The Internet has changed our everyday lives in many ways, and it has changed the programming landscape completely. It is hardly imaginable today to develop any application that is not at least in some way related to the Internet. HTTP, the underlying protocol of the Internet, is a standard protocol for application interoperability and distributed application development.
The Internet provides a wealth of information and functionality available in different forms. Most of this information is structured with a human user in mind; a user who will access a website using a web browser. Sometimes, information is useful as is, and you will see how it is easy to incorporate such information into your applications using the WebBrowser control.
In other situations, you need to access and extract information from unstructured HTML pages. This process is often referred to as HTML screen scraping. The .NET Framework provides all you need to simulate the browser and access such pages without having the servers ever discover that they are not communicating with a web browser but with your Visual Basic program instead. Support for such access comes in the form of the WebClient class and, in situations where you need more low-level control, the HttpWebRequest and HttpWebResponse classes. These classes can be used to access applications that provide structured information meant to be accessed by other applications but use some more lightweight forms of interoperability, like XML over HTTP, as opposed to a dedicated information exchange protocol like SOAP. (You will learn more about SOAP in Chapter 21, "Building and Using Web Services.")
In the Chapter 20, "Building Web Applications," you will learn how to develop web applications — applications made to serve the clients over the Internet. In this chapter, we'll take a look at how you can be on the other side, the consuming side of the wire. You will learn how to access different resources and applications on the Internet through your code and how to integrate browser functionality inside your applications.
In this chapter, you'll learn how to do the following:
Add browser functionality to your Windows Forms applications using the WebBrowser control
Access information and services on the Web from within your code using WebClient or HttpWebRequest and HttpWebResponse classes
The WebBrowser control is the simplest option for adding some browser functionality to a Windows Forms application. It is capable of presenting HTML content with all the usual browser features: hyperlinks, navigation, multimedia content, Favorites, and the like.
There can be a number of reasons you would want to add web browser functionality to your application. The Internet provides a wealth of useful information and ready-to-use functionalities like address validation, weather forecasts, online calendars, and stock quotes, just to name a few. Many times this information is tailored so it can be included like a "widget" or a "gadget" inside some other web page. These make it especially easy to embed Internet content inside your Windows Forms application, as you will see in the section "VB 2010 at Work: The Stock Quotes Project" later in this chapter. Once you see how easy it is to integrate web browser functionality with the WebBrowser control, I am sure you will think of many other useful ways to enrich your applications with Internet content.
With a little bit of work, the WebBrowser control can be used to make a full-fledged custom web browser. This can be useful in situations in which your client needs to restrict the access to intranet-only sites or only to selected Internet sites. Or you might use a WebBrowser control to make a child-friendly browser that can eliminate adult content. Before I show you how to use the WebBrowser control in a plausible application scenario, let's inspect some of its most important properties.
The WebBrowser control is a managed .NET wrapper over the Internet Explorer ActiveX dynamic link library. This is the same library that the Internet Explorer executable uses internally and is available on any Windows machine.
As a consequence, you will not be able to exhort the usual level of control over you application. Since Internet Explorer is essentially part of the Windows operating system, it will be updated through the Windows Automatic Updates service, so you cannot control the version of Internet Explorer that is being used to render the HTML in your application. While most Internet Explorer versions still in circulation work in a similar manner, there are some known differences in how they render the HTML.
The browser operations a user performs on a WebBrowser control will affect the Internet Explorer installation. For example, a Favorite added to the list of Favorites through a WebBrowser control will appear in the Internet Explorer list of Favorites. Pages accessed through a WebBrowser control will appear in the Internet Explorer history. Adding a shortcut using a WebBrowser control will create a new Windows shortcut. And so on.
One important aspect to consider when using a WebBrowser control is security. In this respect, the control behaves in the same manner as Internet Explorer and will run scripts and embedded controls inside web pages. In such situations, the WebBrowser control is, according to MSDN, "no less secure than Internet Explorer would be, but the managed WebBrowser control does not prevent such unmanaged code from running."
Now that you have seen what a WebBrowser control is really made of, let's take a look at its properties.
Like any other visible Windows Forms control, the WebBrowser control has a number of common layout-related properties, including Size, MaximumSize, MinimumSize, Location, Margin, and Anchor. They all work as you would expect from your experience with other Windows Forms controls, so I will not go into more details on any of these. While belonging to this group, a small note is in order for the Dock property.
The Dock property determines how the WebBrowser control is positioned in relation to a container and how it will behave as the container is resized. Anchoring and docking controls are discussed in detail in Chapter 6, "Working with Forms."
When a WebBrowser control is added to an empty form or a container control, the default value for the Dock property is Fill. As a result, the whole form area will be covered by the WebBrowser control. The WebBrowser control drops into your form as a square with no visible clues as to its position. Although the control's white background will stand out, you still might be confused at first as to where it is positioned on the form. Just change the default value of the Dock property to some other value, like None, and the control will become visible as you change the form's size.
The URL property lets you specify the target URL address for the WebBrowser control in the design time. When you display the form, the WebBrowser control will load that URL by default. If you change the property at runtime, the control will navigate to the new URL. In this respect, setting the URL property works the same as calling the WebBrowser control's Navigate method (described in the section "WebBrowser Control Methods" later in this chapter).
The URL property type is the System.Uri class. A URI (Uniform Resource Identifier) can represent a unique identifier or an address (familiar URL) on the Internet. You will typically use instances of this class to represent an Internet address. When doing so, do not forget to specify the protocol part of the address, otherwise you will get an Invalid URI exception. You can instantiate the Uri class by passing a string representation of the URL to its constructor. Here is the correct way to set the WebBrowser URL property in your code:
WebBrowser1.Url = New Uri("http://www.google.com")The AllowNavigation property sets the WebBrowser control behavior in regards to navigation. If you set the AllowNavigation property to False, the WebBrowser control will not react when a user clicks a hyperlink and will not load the page specified in the hyperlink. It will not react to navigation attempts from within your code either. Calling the Navigate method on a WebBrowser control when AllowNavigation is set to False will have no effect. The only page the control will display is the one that was loaded initially.
Bear in mind that AllowNavigation does not alter the visual representation of the page or the cursor. Hyperlinks are still rendered distinctly as hyperlinks (underlined blue text), and the mouse cursor will change to a hand shape when hovering over the hyperlink. Finally, while the AllowNavigation property can prevent users from following a standard HTML hyperlink, it will not prevent the browser from opening a new window as directed by JavaScript code, as, for example, when calling the window.open JavaScript function. Finally, if the user presses F5 (Refresh), the page loaded initially will reload.
Internet Explorer will display the scroll bars when the loaded page is not fully visible. By setting ScrollBarsEnabled to False, you can prevent scroll bars from appearing even if the page loaded into the WebBrowser control is not fully visible.
The AllowBrowserDrop property controls the WebBrowser control's drag-and-drop behavior. When it's set to True, you can open the HTML file in Internet Explorer by dragging the file from Windows Explorer and dropping it on the browser. The WebBrowser control behaves in the same manner by default. To disable drag-and-drop behavior in the WebBrowser control, you can set AllowBrowserDrop to False. You should be aware, however, that this property is superseded by the AllowNavigation property; if AllowNavigation is set to False and AllowBrowserDrop is set to True, the WebBrowser control will not react to a drag-and-drop. This is to be expected because dropping the file on a WebBrowser control is just another way of telling the WebBrowser control to navigate to a certain address — in this case a local HTML file.
In Internet Explorer, you can use a number of key combinations as keyboard shortcuts or accelerators. For example, Alt + the left arrow key combination is a shortcut for clicking the Back button in Internet Explorer and Alt + the right arrow key is a shortcut for clicking Forward. You can disable accelerators in the WebBrowser control by setting the WebBrowserShortcutsEnabled property to False. This property is enabled by default.
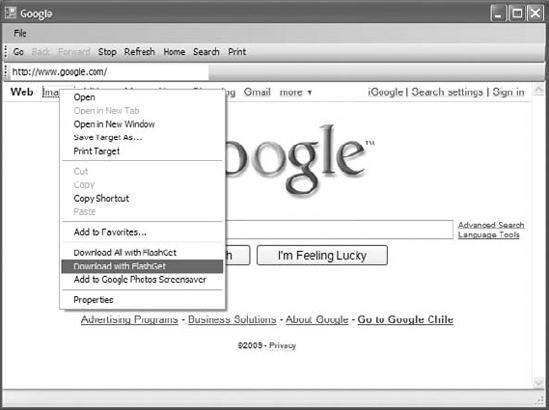
IsWebBrowserContextMenuEnabled controls the display of a context-sensitive, shortcut menu when a user right-clicks the control. The shortcut menu contains some standard browser shortcuts, but it can also contain some shortcuts contributed by various Internet Explorer add-ons and accelerators. You can see a context menu displayed over a WebBrowser control in a custom WebBrowser control-based implementation of a web browser in Figure 19.1.
Modern web pages typically contain large quantities of JavaScript code in addition to the HTML code. As with any other code, bugs in JavaScript code are not rare. The probability of an error in JavaScript code is enhanced by the differences in the way different browsers interpret it. Some JavaScript code can be perfectly legal in one browser but will throw an error in another.
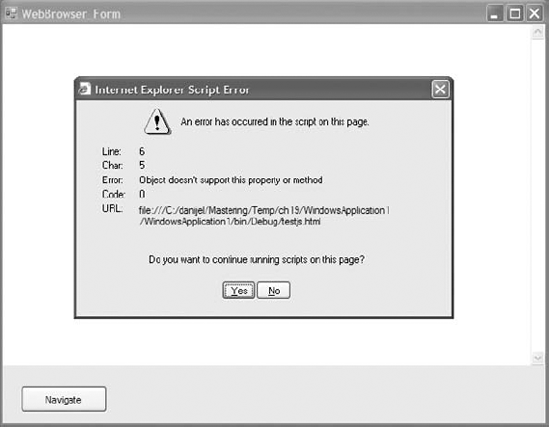
When Internet Explorer encounters an error in JavaScript code (or some other script code), it will by default display a dialog window with detailed error information and prompt the user to decide whether to continue to run the script code. In a WebBrowser control, you can control this behavior through the ScriptErrorsSuppressed property. Set it to False and the WebBrowser control will bear any error in the script code silently.
Script error messages are rarely of any help to the end user, so it is best to set this property to False in the final version of your application. Even if errors in JavaScript code are present, the pages often still display and provide some limited functionality. You can take a look at a Script Error dialog window displayed by the WebBrowser control in Figure 19.2.
You can use this property to obtain a string representation of a currently loaded web page or to load a web page from a string. For example, you can use the code shown in Listing 19.1 to display the page that will submit a search term to the Google search engine.
Example 19.1. Loading a WebBrowser control with HTML content from a string literal
WebBrowser1.DocumentText =
"<html><body>Search in Google:<br/>" &
"<form method='get' action='http://www.google.com/search'>" &
"<input type='text' name='as_q'/><br/>" &
"<input type='submit' value='Search'/>" &
"</form></body></html>"
Just place a WebBrowser control named WebBrowser1 onto a form and write the code in Listing 19.1 into the Form Load event to see the snippet in action.
The DocumentStream property is similar to the DocumentText property. Instead of a string, it uses a System.IO.Stream instance as a property value. Using the stream interface, you can easily load content from a file (and from numerous other sources) into a WebBrowser control.
The Document property is the pivotal property for manipulating a currently loaded HTML page from within your code. The method returns a System.Windows.Forms.HtmlDocument instance representing the current page's Document Object Model (DOM) document — a structured representation of a web page. If you have ever manipulated an HTML page in JavaScript, you will find this object quite familiar.
You can accomplish pretty much anything using a web page's DOM. You can obtain and manipulate values on forms, invoke embedded scripts, manipulate page structure, and so on.
The code in Listing 19.2 adds simple validation to the Google search form code displayed in Listing 19.1.
Example 19.2. Validating an HTML form through the WebBrowser Document property
Private Sub webBrowser1_Navigating(ByVal sender As Object,
    ByVal e As WebBrowserNavigatingEventArgs) Handles
    WebBrowser1.Navigating

    Dim document = WebBrowser1.Document
    If document IsNot Nothing And
        document.All("as_q") IsNot Nothing And
        String.IsNullOrEmpty( _
        document.All("as_q").GetAttribute("value")) Then
        e.Cancel = True
        MsgBox("Please enter a search term.")
    End If
End Sub
The validation implemented in Listing 19.2 is rather simple. It cancels navigation and warns the user that the search string is empty. Being able to access and manipulate web page structure is not limited to such simple operations. Indeed, this feature opens a wealth of implementation possibilities.
The WebBrowser control provides a number of methods that make it possible to emulate standard browser behavior. Let's start with some navigation-related methods.
Essentially, calling the Navigate method has the same effect as writing the URL address in the Internet Explorer address bar and pressing Enter. Similar to using the URL property, calling the Navigate method results in the browser displaying the specified URL. This method will be ignored if the WebBrowser AllowNavigation property is set to False. The method has a number of overloaded variants, but the most typical variants accept a URL parameter in the form of valid URL string:
WebBrowser1.Navigate("http://www.google.com")The WebBrowser control has a number of methods whose names start with the prefix Go. You can use them to invoke typical browser navigation behavior. Table 19.1 lists these methods and the results of their invocation.
You can use this method to cancel the current navigation. Sometimes, a page can take longer than expected to load, or it can even hang. In those situations, you need to be able to cancel the navigation. The Stop method provides this capability.
You can use the Refresh method to reload the current page to the WebBrowser control. This method can be useful when displaying frequently changing information and can be easily automated so it is invoked in certain time intervals in combination with the Timer control.
The WebBrowser control supports a number of methods for displaying different dialog windows with some advanced browser functionality. Table 19.2 lists these methods and explains their purpose.
A WebBrowser control operates in asynchronous mode. Loading a page will not freeze your application; the application will continue to run while the WebBrowser control is downloading and rendering a page. This is why events play an important role in the WebBrowser programmatic model. Let's take a look at a few important ones.
You have already seen the Navigating event at work in Listing 19.2. This event is raised to signal the navigation. You can use this event to cancel the navigation if necessary, by setting the Cancel property of WebBrowserNavigatingEventArgs parameter to True. You can obtain the URL that the navigation is targeting through the TargetFrameName property of the WebBrowserNavigatingEventArgs parameter. If you wish to measure the time a certain web page takes to load, you can use the Navigating event to signal the start of navigation and the DocumentCompleted event to signal the end of the page load process.
The DocumentCompleted event occurs when a web page is completely loaded inside the WebBrowser control. It means that the Document property is available and will return the complete structure of the loaded document.
Table 19.2. WebBrowser Show navigation methods
Method | Effect |
|---|---|
| Displays browser's print dialog used to print the current web page |
| Displays browser's print preview dialog |
| Displays page setup dialog window used to set printing options like Paper Option, Margins, Header, and Footer |
| Displays browser's Save As dialog used to save the current web page to a file |
| Displays current page's Properties window |
A WebBrowser control opens the world of the Internet to your Windows Forms projects in a simple and direct manner. Popular websites often offer a way to embed a part of their functionality inside another website. Such widgets can be easily integrated into your Windows Forms projects.
In the Stock Quotes project, you will use the WebBrowser control to display quotes for selected stocks on a Windows form. Yahoo! Finance offers free Yahoo! badges that display the latest news, stock tickers, charts, and other types of information that are specifically designed to be integrated into your website. You can find out more about Yahoo! badges at the following URL: http://finance.yahoo.com/badges/. If you plan to use this feature in a production environment, please read the terms of service carefully. While the Yahoo! website clearly states that the service is free, I am no expert on legal matters and there might be limitations and conditions on how the service may be used.
You will need a Yahoo.com account to complete the following steps, and you will be prompted to create one if you do not have one. Start by navigating to http://finance.yahoo.com/badges/, click the Start Now button, and follow these steps to obtain the HTML code needed to embed the stock ticker inside the web page:
Choose a module to embed. I chose the most compact module, called Quotes.
Customize the module.
Option 1: Enter MSFT,GOOG,IBM, andORCL. Delete the default entry.Option 2: Select the Medium (200 px) value for the width of the badge. Option 3: Select the first (black) color theme. Option 4: Check the check box signaling that you agree to the terms of service and press the Get Code button. Once the code is displayed, copy and save it in some temporary file. You'll need it soon.
Create a new Windows Forms project and name it StockQuotes. You will display the Yahoo! badge inside a WebBrowser control. To do so, perform the following steps:
Add a WebBrowser control to
Form1. Leave the name of the control as is — WebBrowser1.Disable the scroll bars on the WebBrowser1 control by setting the
ScrollBarsEnabledproperty to False.Change the
Dockproperty to None. Now you can resize and position the WebBrowser control.Position the WebBrowser control somewhere on the right side of the form. That way, the form will take on a look that's similar to the structure of web pages — nonessential information positioned on the right edge of the form.
Add a new
quotes.htmlfile to the project. While I could embed the HTML code for the stock ticker badge inside my Visual Basic code, it will be easier to edit it inside a separate HTML file.
Now that you have created all the items you will need for the StockQuotes project, you need to load the quotes.html file content into the WebBrowser control. You can accomplish this by setting the WebBrowser.Url property with a Uri instance representing the quotes.html file location. Since the quotes.html file is part of your project, you can obtain its location through a My.Application object. Here is the code for the Form_Load event, used to set the WebBrowser.Url property:
Private Sub Form1_Load(ByVal sender As System.Object,
    ByVal e As System.EventArgs) Handles MyBase.Load
    WebBrowser1.Url = New Uri(
        My.Application.Info.DirectoryPath.ToString() &
        "quotes.html")
End Sub
Just to make sure everything works as expected, add some text (for example, "Hello from quotes.html!") to the quotes.html file and run the project. When the form is displayed, the WebBrowser control should show the text contained in the quotes.html file.
As you are already guessing, instead of embedding the stock quotes badge inside HTML page on some website, you will display the badge inside the local HTML file distributed with your Windows Forms application. You can accomplish this by making the quotes.html a properly structured HTML file. (You will learn more about HTML in the next chapter.) For now, you should know that a typical HTML page has html, head, and body elements. Add the following HTML code to the quotes.html file:
<html>
<head>
<title>Stock Quotes</title>
</head>
<body>
<!-- add Yahoo badge code here! -->
</body>
</html>
Remember that HTML code obtained from Yahoo! in the section "Obtaining the HTML Widget"? Take that code and replace the line <!-- add Yahoo badge code here! --> with it.
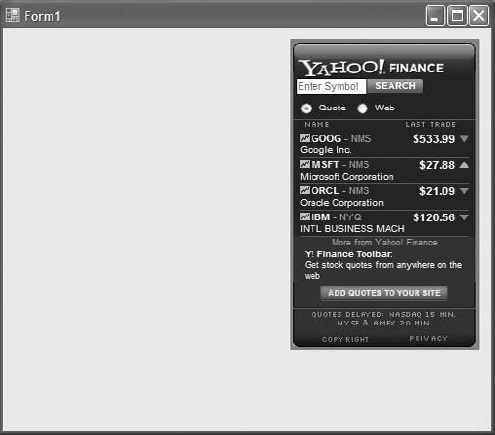
Run the project. The WebBrowser control should now display the stock quotes badge with fresh values obtained from the Yahoo! site.
Although the application is now working, I would like to show you how to tweak the visual appearance of the badge. First, we'll minimize the margins surrounding the badge, and then we'll set the color of the HTML page so it blends better with the badge itself. I guess the gray color will do.
To minimize the margins and change the background color, we will add some CSS code to the quotes.html page. (You will learn more about the CSS in the next chapter.) For now, just modify the quotes.html file so it includes a style tag:
<html>
<head>
<title>Stock Quotes</title>
<style type="text/css">
    body {
     margin-left: 0px;
     margin-top: 0px;
     margin-right: 0px;
     margin-bottom: 0px;
     background-color: Gray;
    }
</style>
</head>
<body>
<!-- add Yahoo badge code here! -->
</body>
</html>
Again, you should replace the line <!-- add Yahoo badge code here! --> with HTML code obtained from the Yahoo! site. Run the project again. Now you can adjust the WebBrowser control size so it displays the complete stock badge widget. When you've finished, the form should look similar to one shown in Figure 19.3.
While you are developing applications that communicate over the network, you often need to take a peek at the traffic going over the wire. Fiddler is one tool that can help you do exactly that, and it's available as a free download from www.fiddler2.com.
Fiddler installs itself between your web browser and web server. It fools the browser into believing it is communicating directly with the web server, while the server is convinced it is communicating with the browser. In the meantime, you will be able to observe and even modify the communication between the two sides.
Fiddler's purpose is not malicious. It can be of great help to web developers. It provides numerous statistics on request/response size, time, performance, and so forth and can help you monitor and debug the conversation.
The Fiddler window consists of two main areas, as shown here.
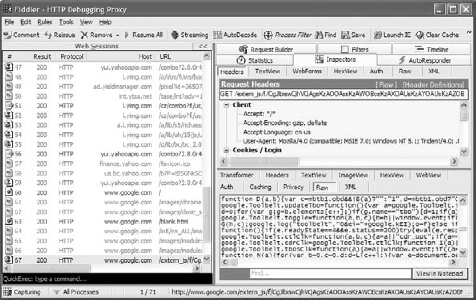
On the left side, you will find a listing of all the HTTP requests and responses. On the right side, you can inspect each request and response. You can visualize HTTP headers and display the body as text, XML, or even as it would appear in the browser by way of a tab called WebView. Further, you can modify and reissue the request from Fiddler itself, automate the whole process through the Fiddler scripting support, or even extend Fiddler with extensions programmed in the .NET Framework.
The simplest way to publish services on the Internet is to make proper use of HTTP. HTTP is the underlying protocol for all kinds of web services, and web services come in different shapes and forms. Some make more direct use of HTTP, while others use it with a lot of overhead.
Lightweight web services typically use HTTP to transport data in XML or JSON format. JavaScript Object Notation (JSON) is a data format similar to XML but more bandwidth efficient. Lightweight web services can be by orders of magnitude more efficient than more ubiquitous SOAP web services. (You will read more about web services and SOAP in Chapter 21.) For lightweight web services, the WebClient class and the HttpWebRequest and HttpWebResponse classes will help you program simple and efficient client applications.
A lot of information and services available on the Internet today are not properly structured for machine consumption. While humans can make use of it, it is difficult to consume such services programmatically. In such situations, the only way to access these services programmatically is to behave in the same way as an Internet browser application. The WebClient class and the HttpWebRequest and HttpWebResponse classes provide an API that can accomplish exactly that. Accessing information contained inside standard HTML pages is generally known as HTML screen scraping.
WebClient is a lightweight, simple alternative for accessing the Web. It represents a higher-level wrapper over the WebRequest and WebResponse classes. You will find that it can handle most of the cases that the HttpWebRequest and HttpWebResponse combination can.
The WebClient class gives you a lot of control over the HTTP communication. You can access request and response headers, configure a proxy, set your credentials, and more.
You can always set query parameters manually by concatenating strings and adding the query as the final part of a URL. A more structured way to accomplish this uses name-value pairs and the QueryString property. The following code snippet illustrates how a q parameter can be added to a query string. The q parameter is often used in search engines to convey the search criteria.
Dim webClient As New WebClient
Dim queryParameters As New System.Collections.Specialized.NameValueCollection()
queryParameters.Add("q", "SearchCriteria")
webClient.QueryString = queryParameters
As you can see, the QueryString property is a NameValueCollection type from the System.Collections.Specialized namespace.
The Headers property represents a collection of request headers. Response headers can be accessed through the ResponseHeaders property. Headers are an important part of HTTP.
For example, a user-agent header is used to convey a lot of client-related information to the server. A user-agent header can include information on the browser version and type, the operating system, even the version of the .NET Framework that has been installed on the machine where the browser is running.
The WebClient class does not set any headers by default. Some servers might expect some standard headers with the request, so if you are experiencing any problems accessing certain servers with the WebClient class, be sure to add some standard headers, like user-agent.
Servers will often use user-agent header information to render the response that best accommodates the reported browser type. For example, the server might exclude JavaScript code from pages if the browser does not support JavaScript, or it might render the page so it fits smaller displays if it detects that the request is coming from a mobile device. A listing of standard request and response headers is available on Wikipedia at following URL: http://en.wikipedia.org/wiki/List_of_HTTP_headers.
ResponseHeaders provides access to headers included in the response by server. These headers can include a lot of information regarding the response, like mime type, encoding, content length, and so forth. The ETag and Cache-Control headers can affect the caching mechanism. Responding with a value of "no-cache" in the Cache-Control header indicates to the browser and to any other HTTP intermediary that the content should not be cached.
Another important response header is Set-Cookie. Although, if you need to manipulate or receive cookies, you are better off using the HttpWebRequest and HttpWebResponse classes because they have better support for this feature.
The WebClient class provides a number of methods for sending a request for a resource under a given URI and receiving the requested data. Most of these methods come in two flavors:
Synchronous
Asynchronous
Asynchronous methods permit the background execution of request-response operations. Since the calling (for example, UI) thread is not blocked, the main line of execution can proceed without waiting for the download to finish. This feature can be used for implementing applications with a more responsive user interface, permitting the user to continue working with the application in the same time that communication is performed or to cancel the request in progress if they wish to do so.
The WebClient class has a number of methods with names that start with Download. These methods essentially perform the same operation — download a resource from a specified URI. The main difference is in the type of the method's return value. Table 19.3 lists the methods and return types.
Download*Async methods have the same function as the standard Download methods. The difference is that employing these methods causes the resource download operation to be performed asynchronously. To receive the data asynchronously, you need to provide an event handling routine for Download*Completed events. Take a look at the code in Listing 19.5 for an example of using the DownloadStringAsync method in an address visualization form project and in Listing 19.3 in the WebClient asynchronous download example for a simple illustration of an asynchronous operation of the WebClient class.
These methods perform similar functions to the Download methods. Each returns a readable stream from a resource specified as the method parameter.
These methods have their counterparts in the Download group of methods. Instead of downloading the data, these methods are used to upload it.
The CancelAsync method aborts the current asynchronous download or upload operation. It bears noting that the corresponding Download*Completed and Upload*Completed events are still raised by the class. It is possible for an operation to complete successfully even after CancelAsync has been called — after all, you can have no control over how the remote call was finalized on the other side of the wire. To check the outcome of asynchronous operation, check the Canceled property of the Download*CompletedEventArgs or Upload*CompletedEventArgs event handler parameter.
A majority of WebClient class events has to do with asynchronous modus-operandi of the download and upload operations.
These events are used to signal the completion of the asynchronous operation. Results of the download operation can be accessed through an event handler's property as well as through the outcome of the asynchronous operation, presented in the Canceled property of the Download*CompletedEventArgs or Upload*CompletedEventArgs parameter.
The code in Listing 19.3 shows the Windows form with a simple example of an asynchronous download operation using the WebClient's asynchronous programming model. The form includes two buttons: bttnDownload, used to initiate the download operation, and bttnCancel, which can be used to cancel the download operation in progress.
Example 19.3. Asynchronous download with WebClient
Imports System.ComponentModel

Public Class Form1

    Dim webClient As New WebClient()

    Private Sub Form1_Load(ByVal sender As System.Object,
            ByVal e As System.EventArgs) Handles MyBase.Load

        AddHandler webClient.DownloadStringCompleted,
            AddressOf webClient_DownloadStringCompleted
    End Sub

    Private Sub webClient_DownloadStringCompleted(ByVal sender As Object,
            ByVal e As DownloadStringCompletedEventArgs)
        Dim asyncCompletedParam As AsyncCompletedEventArgs =
            TryCast(e, AsyncCompletedEventArgs)
        If Not asyncCompletedParam.Cancelled = True Then
            Console.WriteLine(CStr(e.Result))
        Else
            Console.WriteLine("Asynchronous download canceled by user!")
        End If
        MsgBox("Download operation completed. See the Output window.")
    End Sub

    Private Sub bttnDownload_Click(ByVal sender As System.Object,
            ByVal e As System.EventArgs) Handles bttnDownload.Click

        webClient.DownloadStringAsync(New Uri("http://www.google.com"))
    End Sub

    Private Sub bttnCancel_Click(ByVal sender As System.Object,
            ByVal e As System.EventArgs) Handles bttnCancel.Click

        webClient.CancelAsync()
    End Sub
End Class
The DownloadStringCompleted event handler routine is assigned to a WebClient in a form load routine. The event handler first checks the outcome of the download operation through the AsyncCompletedEventArgs parameter's Cancel property and, if the operation was successful, prints the download result from the www.google.com URL to the console output.
Finally, the bttnCancel event handling routine is used to call the WebClient's CancelAsync method. If the asynchronous download is in progress, it is canceled; otherwise, calling the CancelAsync has no effect.
These classes from the System.Net namespace are used internally by the WebClient for download and upload operations over HTTP and HTTPS. While you should prefer the WebClient class because of its simplicity, you can always make use of the HttpWebRequest and HttpWebResponse classes where more granular control over the communication is necessary. The HttpWebRequest and HttpWebResponse classes provide an explicit manner for handling the HTTP cookies.
To manage cookies with HttpWebRequest and HttpWebResponse, you first need to create the instance of the CookieContainer class and attach it to HttpWebRequest. Then you can access the cookies set by the server through the HttpWebRequest Cookies property. The following code illustrates how you can list all of the cookies set by the Hotmail server to the console output:
Dim request As HttpWebRequest = CType(WebRequest.Create(
                "http://www.hotmail.com"), HttpWebRequest)
request.CookieContainer = New CookieContainer()
Using response As HttpWebResponse =
    CType(request.GetResponse(), HttpWebResponse)
    Console.WriteLine("Server set {0} cookies", response.Cookies.Count)
    Dim cookie As Cookie
    For Each cookie In response.Cookies
        Console.WriteLine("Cookie: {0} = {1}", cookie.Name, cookie.Value)
    Next
End UsingIn the following sections, I will show you how to find the map coordinates of a street address and display them on a map. I decided to name the sample project ViewAddressOnAMap. You can download the project from www.sybex.com/go/masteringvb2010.
The business case for such functionality is more than common; many call centers have to record clients' addresses. This can be an error-prone process, so being able to see the address on the map while talking to a client can be a real plus for a call center attendant. Also, some addresses are difficult to find without additional information. ("The street sign blew down in last night's storm, so look for the pink house with purple trim and then turn right at the next street.") Field employees can really benefit from the additional information that goes along with the address. Again, a call center attendant can easily enter these indications while talking to a client and looking at the map. Fortunately, there are services on the Internet today that make such an application possible.
You will learn more about web services and especially SOAP web services in Chapter 21. In a broader sense, a web service is any service that can be consumed by a program (as opposed to a human) over the Internet. So, to implement the address visualization form, we will make use of two web services:
Address coordinates search (geocoding) service
Mapping service
Let's look at the services I chose for the ViewAddressOnAMap sample project in more detail.
A geocoding service returns the exact latitude and longitude for a street address. These coordinates can then be used as parameters for a mapping service, which will return the map for a given coordinate.
Yahoo! provides a geocoding API as a part of its Yahoo! Maps web services. You can find more information about the Geocoding API at http://developer.yahoo.com/maps/rest/V1/geocode.html.
To run the ViewAddressOnAMap sample project, you should follow the Get An App ID link found on the Geocoding API page (at the URL in the preceding paragraph) and replace the YahooAppId in the sample code with the Yahoo! ID you obtained this way.
The Yahoo! Geocoding API is a RESTful web service. REST stands for Representational State Transfer and is actually the simplest way to use HTTP as an application protocol and not just as a transport protocol like SOAP. This means that to obtain the coordinates, you can submit address parameters as a part of a URL query string. It also means that you can make use of this service with a simple browser because it uses HTTP as a native, application-level protocol. To test the service, you can write the following URL into your browser:
http://local.yahooapis.com/MapsService/V1/geocode?
appid= APFGN10xYiHINOslptpcZsrgFbzsTHKr8HgBk7EA81QRe_
&street=701+First+Ave
&city=Sunnyvale
&state=CA
Please note that I have split the actual URL into a five lines to fit the book format; you should enter this address as a single line in the browser's address bar. You should also replace the appid parameter provided in the snippet with the Yahoo! App ID obtained from http://developer.yahoo.com/maps/rest/V1/geocode.html.
At that same URL, you can find another example of the Yahoo! Geocoding URL, and it might be easier to copy and paste that link to use for testing.
The Yahoo! Geocoding Web Service query URL is pretty much self-explanatory. You pass the address information as parameters inside the URL query. You can pass street, city, state and zip together with the Yahoo! App ID as parameters. You should encode the spaces inside the parameter values with a plus sign, so 701 First Ave becomes 701+First+Ave.
Now, you can take a look at the result. The browser should display the following response:
<ResultSet xsi:schemaLocation="urn:yahoo:maps
http://api.local.yahoo.com/MapsService/V1/GeocodeResponse.xsd">
   <Result precision="address">
       <Latitude>37.416397</Latitude>
       <Longitude>-122.025055</Longitude>
       <Address>701 1st Ave</Address>
       <City>Sunnyvale</City>
       <State>CA</State>
       <Zip>94089-1019</Zip>
       <Country>US</Country>
    </Result>
</ResultSet>
As you can see, the service response comes in XML format. This makes the response really easy to parse. If you take a look at the XML, you will note the root element is called ResultSet. The root element contains the Result element. The response is structured this way because the service can return multiple Result elements for the same query in cases where query information was not precise enough. You should keep this in mind when programming the code that interprets the Yahoo! Geocoding service response.
Now let's use Google Maps Service to display the address coordinates on a map. Use this service in a manner similar to the way the Yahoo! badges service was used in the Stock Quotes project earlier in this chapter. Display the service response in a WebBrowser control.
The Google Maps JavaScript API is free, and (as of this writing) there is no limit to the number of page requests you can generate per day. Still, I suggest you register for the Google Maps API and read the related conditions carefully. You can read more about Google Maps JavaScript API at http://code.google.com/apis/maps/documentation/v3/introduction.html.
The Google Maps JavaScript API provides simple scripts that you can embed inside your HTML page to add Google Maps functionality to your website. To use this functionality, you need the HTML code shown on code.google.com in the section "The 'Hello, World' of Google Maps v3" of the Maps V3 tutorial. This code can be used in ViewAddressOnAMap project with minimal modifications. Take a look at the original Hello World code:
<html>
<head>
<meta name="viewport" content="initial-scale=1.0, user-scalable=no" />
<script type="text/javascript" src="http://maps.google.com/maps/api/js?
                                    sensor=set_to_true_or_false">
</script>
<script type="text/javascript">
  function initialize() {
    var latlng = new google.maps.LatLng(−34.397, 150.644);
    var myOptions = {
      zoom: 8,
      center: latlng,
mapTypeId: google.maps.MapTypeId.ROADMAP
};
var map = new google.maps.Map(
document.getElementById("map_canvas"), myOptions);
}
</script>
</head>
<body onload="initialize()">
<div id="map_canvas" style="width:100%; height:100%"></div>
</body>
</html>Even without much JavaScript knowledge, you can see that the LatLng function defines the coordinates where the map will be centered based on two literal numbers. With a little bit of luck, changing these literals will be enough to visualize the map over a specific latitude and longitude. Notice the value of the sensor query parameter in a URL. According to the documentation, this can be set to False for devices that do not use a sensor to determine the location, as in this case.
Now that you have all necessary information for the project, you can create a new Windows Forms project and name it ViewAddresOnAMap. The project will have a single form, and the client's address will be both saved and shown on the map. Since we are interested in only the address visualization functionality for this exercise, you do not have to implement the code to actually save or maintain the address data.
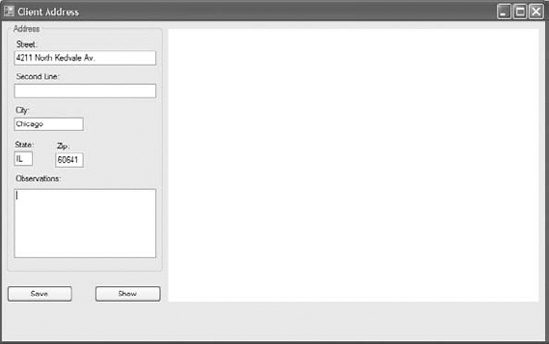
Let's start by adding all the necessary controls to the form. You will need a number of text boxes where users can enter the address information, buttons to save the address and to show the address on the map, and finally, one WebBrowser control to display the map. The form should look like one shown in Figure 19.4.
The large white area on the right side of the form is the WebBrowser control. Text box controls in the Address GroupBox have the following names: txtStreet, txtSecondLine, txtCity, txtState, txtZip, and txtObservations. The buttons are names bttnSave and bttnShow. Now you are ready to add some behavior to the form.
For the txtState control, you should limit the length to 2. A text box with verification of the value entered is a much better option than a states ComboBox control. For txtObservations, you should set the Multiline property to True.
Finally, you can add a label named lblError to the bottom of the form. Here you can display the errors related to address visualization functionality. This functionality should not interfere with the main form functionality consisting of address data entry.
To obtain the address coordinates, you can use the WebClient class to query the Yahoo! geocoding service. To do so, you should first construct the URL. You can declare the Yahoo! service URL as a constant and create the query parameters. Listing 19.4 shows how to construct the NameValueCollection with query parameters for the Yahoo! Geocoding Web Service.
Example 19.4. Form code with constructed Yahoo! geocoding service URL and query parameters
Public Class Form1
Private Shared YahooAppId As String = "BPdn3S7V34GMfMZ5ukBuHAMYuj" &
"APFGN10xYiHINOslptpcZsrgFbzsTHKr8HgBk7EA81QRe_"
Private Shared YahooGeocodeServiceUrl = "http://local.yahooapis.com" &
"/MapsService/V1/geocode"
Dim yahooGeoCodeParameters As NameValueCollection
Private Sub GenerateYahooGeoCodeParameters(ByVal street As String,
ByVal city As String, ByVal state As String,
ByVal zip As String)
yahooGeoCodeParameters = New NameValueCollection
yahooGeoCodeParameters.Add("appid", YahooAppId)
yahooGeoCodeParameters.Add("street", street.Replace(" "c, "+"c))
yahooGeoCodeParameters.Add("city", city.Replace(" "c, "+"c))
yahooGeoCodeParameters.Add("zip", zip)
yahooGeoCodeParameters.Add("state", state)
End Sub
End ClassSince generated URL query parameters should not contain spaces, space characters are replaced with a plus sign using the Replace method of the String class. Now, you are ready to invoke the Yahoo! geocoding service in an asynchronous manner.
Since address visualization is not a principal feature on the form, you should not make users wait for the map to appear before they can save the address. It is quite possible that the user knows the address well; in that case, waiting for the visualization would be more of a hindrance than a help.
If you use the asynchronous capacities of the WebClient class, you will not block the main thread of execution and users will be able to proceed with their work while the map is loaded in the background. Listing 19.5 shows the bttnRefresh button event handling code invoking the FindLocation routine that uses the WebClient class to code the Yahoo! Geocoding Web Service asynchronously.
Example 19.5. Form with constructed Yahoo! Geocoding Web Service URL and query parameters
Imports System.Net
Imports System.IO
Imports System.Collections.Specialized
Public Class Form1
Private Shared YahooAppId As String = "BPdn3S7V34GMfMZ5ukBuHAMYuj" &
"APFGN10xYiHINOslptpcZsrgFbzsTHKr8HgBk7EA81QRe_"
Private Shared YahooGeocodeServiceUrl = "http://local.yahooapis.com" &
"/MapsService/V1/geocode"
Dim yahooGeoCodeParameters As NameValueCollection
Private Sub bttnShow_Click(ByVal sender As System.Object,
ByVal e As System.EventArgs) Handles
bttnShow.Click, txtZip.Leave
lblError.Text = ""
GenerateYahooGeoCodeParameters(txtStreet.Text.Trim(), txtCity.Text.Trim(),
txtState.Text.Trim(), txtZip.Text.Trim())
FindLocation()
End Sub
Private Sub GenerateYahooGeoCodeParameters(ByVal street As String,
ByVal city As String, ByVal state As String,
ByVal zip As String)
yahooGeoCodeParameters = New NameValueCollection
yahooGeoCodeParameters.Add("appid", YahooAppId)yahooGeoCodeParameters.Add("street", street.Replace(" "c,
"+"c))
yahooGeoCodeParameters.Add("city", city.Replace(" "c, "+"c))
yahooGeoCodeParameters.Add("zip", zip)
yahooGeoCodeParameters.Add("state", state)
End Sub
Private Sub FindLocation()
Dim client As New WebClient()
client.QueryString = yahooGeoCodeParameters
AddHandler client.DownloadStringCompleted,
AddressOf webClient_DownloadStringCompleted
client.DownloadStringAsync(New Uri(YahooGeocodeServiceUrl))
End Sub
End ClassIf you look at the code carefully, you will note that bttnShow_Click handles both the bttnShow.Click and the txtZip.Leave events. This way, the address will be shown on the map automatically once the user has filled all the address fields. Since the service invocation code is asynchronous, it will not prevent the user from continuing to operate on the form.
Now you need to take care of the DownloadStringAsync event handler.
Before you can process the geocoding service response, you will need to create a structure that can hold the geocoding information. In this case, a simple structure will do; name the structure Coordinates and set up two String properties: Latitude and Longitude. Add the new class named Coordinates to the project. Listing 19.6 shows the code for the Coordinates structure.
Example 19.6. The Coordinates structure
Public Structure Coordinates
Property Latitude As String
Property Longitude As String
End StructureNow you can code the DownloadStringCompleted event handler. You should bear in mind that the Yahoo! geocoding service responds in XML format. The easiest way to process it is to use LINQ to XML. (I explained how you can work with XML in Visual Basic .NET in detail in Chapter 13, "XML in Modern Programming," and Chapter 14, "An Introduction to LINQ.") To process the Yahoo! geocoding service response with LINQ to XML, you should import the XML namespace for the response using the Imports directive at the top of the form code in the following manner:
Imports <xmlns="urn:yahoo:maps">
When implementing the functionality, be sure to check for errors and handle multiple result responses. In the event of an error or multiple result responses, the best bet is to display the first location encountered while informing the user that the coordinates displayed on a map are not very precise because the service responded with multiple locations. Listing 19.7 shows the code that handles the Yahoo! geocoding service response.
Example 19.7. DownloadStringCompleted event handling code
Sub webClient_DownloadStringCompleted(ByVal sender As Object,
ByVal e As DownloadStringCompletedEventArgs)
If e.Error IsNot Nothing Then
lblError.Text = "Address could not be located on a map"
Return
End If
yahooResponse = XDocument.Parse(CStr(e.Result))
ValidateResponseAndProceede()
End Sub
Private Sub ValidateResponseAndProceede()
If (yahooResponse...<Result>.Count = 0) Then
lblError.Text = "Address could not be located on a map"
Return
End If
If (yahooResponse...<Result>.Count > 1) Then
lblError.Text = "Multiple locations found - showing first." &
" Correct the address and press Refresh"
End If
GenerateLocation()
ShowLocationOnMap()
End Sub
Private Sub GenerateLocation()
addressLocation.Latitude = yahooResponse...<Result>.First.<Latitude>.Value
addressLocation.Longitude = yahooResponse...<Result>.First.<Longitude>.Value
End SubAs you can see, the code handles errors that occur in communication or while querying the Yahoo! geocoding service and displays a message when the results are not very precise and the service responds with multiple results.
To show the location on the map, you need to load the WebBrowser control with the simple HTML page that contains the Google Maps Service code. Since this code contains coordinates, it cannot be loaded from the static HTML file. You can, however, use the static HTML file as a template, load the file, and then replace latitude and longitude tokens with information obtained from the Yahoo! geocoding service before loading it into the WebBrowser control.
Add the new gmapsTemplate.html file to the ViewAddressOnAMap project. Make sure the "Copy to Output Directory file" property is set to "Copy if newer". With this, Visual Studio will make the copy of the file inside the bin/Debug folder and you will be able to access the file while debugging the solution. The code for gmapsTemplate.html is shown in Listing 19.8.
Example 19.8. Google Maps HTML code templates
<html>
<head>
<meta name="viewport" content="initial-scale=1.0, user-scalable=no" />
<script type="text/javascript"
src="http://maps.google.com/maps/api/js?sensor=false">
</script>
<script type="text/javascript">
function initialize() {
var latlng = new google.maps.LatLng(
replace_me_latitude, replace_me_longitude);
var myOptions = {
zoom: 16,
center: latlng,
mapTypeId: google.maps.MapTypeId.ROADMAP
    };
    var map = new google.maps.Map(
        document.getElementById("map_canvas"), myOptions);
  }

</script>
</head>
<body onload="initialize()">
  <div id="map_canvas" style="width:100%; height:100%"></div>
</body>
</html>You will note that the template contains replace_me_longitude and replace_me_latitude strings instead of real coordinates. You will use these strings as tokens and replace them with real coordinate information before loading the HTML inside the WebBrowser control. Token replacement code can be implemented in a GenerateMapsHtml routine:
Private Sub GenerateMapsHtml()
    googleMapsHtml = googleMapsHtmlTemplate.
        Replace("replace_me_latitude", addressLocation.Latitude).
        Replace("replace_me_longitude", addressLocation.Longitude)
End Sub
With this, you have finished implementing the address visualization functionality. You can take a look at the complete code of the form in Listing 19.9.
Example 19.9. Address visualization form code
Imports System.Net
Imports System.IO
Imports System.Linq
Imports System.Xml.Linq
Imports <xmlns="urn:yahoo:maps">
Imports System.Collections.Specialized

Public Class Form1

    Private Shared YahooAppId As String = "BPdn3S7V34GMfMZ5ukBuHAMYuj" &
                        "APFGN10xYiHINOslptpcZsrgFbzsTHKr8HgBk7EA81QRe_"

    Private Shared YahooGeocodeServiceUrl = "http://local.yahooapis.com" &
                                            "/MapsService/V1/geocode"

    Private Shared googleMapsHtmlTemplate As String

    Private Shared applicationDirectory =
                  My.Application.Info.DirectoryPath.ToString()

    Private Shared googleMapsHtmlTemplatePath = applicationDirectory &
                                                "gmapsTemplate.html"

    Private googleMapsHtml As String

    Private addressLocation As Coordinates

    Private yahooResponse As XDocument

    Dim yahooGeoCodeParameters As NameValueCollection

    Public Sub New()

        InitializeComponent()
        googleMapsHtmlTemplate = My.Computer.FileSystem.ReadAllText(
                 googleMapsHtmlTemplatePath)
        Console.WriteLine(googleMapsHtmlTemplate)
    End Sub

    Private Sub bttnShow_Click(ByVal sender As System.Object,
            ByVal e As System.EventArgs) Handles
bttnShow.Click, txtZip.Leave
lblError.Text = ""
GenerateYahooGeoCodeParameters(txtStreet.Text.Trim(), txtCity.Text.Trim(),
txtState.Text.Trim(), txtZip.Text.Trim())
FindLocation()
End Sub
Private Sub GenerateYahooGeoCodeParameters(ByVal street As String,
ByVal city As String, ByVal state As String,
ByVal zip As String)
yahooGeoCodeParameters = New NameValueCollection
yahooGeoCodeParameters.Add("appid", YahooAppId)
yahooGeoCodeParameters.Add("street", street.Replace(" "c, "+"c))
yahooGeoCodeParameters.Add("city", city.Replace(" "c, "+"c))
yahooGeoCodeParameters.Add("zip", zip)
yahooGeoCodeParameters.Add("state", state)
End Sub
Private Sub FindLocation()
Dim client As New WebClient()
client.QueryString = yahooGeoCodeParameters
AddHandler client.DownloadStringCompleted,
AddressOf webClient_DownloadStringCompleted
client.DownloadStringAsync(New Uri(YahooGeocodeServiceUrl))
End Sub
Sub webClient_DownloadStringCompleted(ByVal sender As Object,
ByVal e As DownloadStringCompletedEventArgs)
If e.Error IsNot Nothing Then
lblError.Text = "Address could not be located on a map"
Return
End If
yahooResponse = XDocument.Parse(CStr(e.Result))
ValidateResponseAndProceede()
End Sub
Private Sub ValidateResponseAndProceede()
If (yahooResponse...<Result>.Count = 0) Then
lblError.Text = "Address could not be located on a map"
Return
End If
If (yahooResponse...<Result>.Count > 1) Then
lblError.Text = "Multiple locations found - showing first." &
" Correct the address and press Refresh"
End IfGenerateLocation()
ShowLocationOnMap()
End Sub
Private Sub GenerateLocation()
addressLocation.Latitude = yahooResponse...<Result>.First.<Latitude>.Value
addressLocation.Longitude =
yahooResponse...<Result>.First.<Longitude>.Value
End Sub
Private Sub ShowLocationOnMap()
GenerateMapsHtml()
mapBrowser.DocumentText = googleMapsHtml
End Sub
Private Sub GenerateMapsHtml()
googleMapsHtml = googleMapsHtmlTemplate.
Replace("replace_me_latitude", addressLocation.Latitude).
Replace("replace_me_longitude", addressLocation.Longitude)
End Sub
Private Sub bttnSave_Click(ByVal sender As System.Object,
ByVal e As System.EventArgs) Handles bttnSave.Click
MsgBox("Unimplemented on purpose. " &
"See 'Coding Address Visualization Form'" &
"section in Chapter 20. Try the 'Show' button.")
End Sub
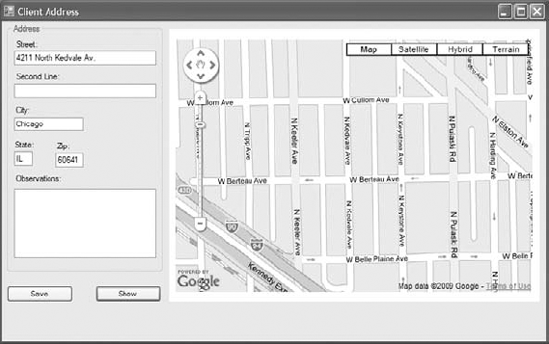
End ClassWhen you run the application, enter the address data on the form, and click the Show button, the form should look like the one shown on Figure 19.5.
- Access a website on the Internet using the WebClient class.
The WebClient class provides an easy and simple way to access resources on the Web programmatically from Visual Basic code. The WebClient class implements many features of HTTP, making it easy to access the sites on the Web in the same way the browser application does. The web server will not distinguish a request coming from a WebClient site from one coming from a user-operated web browser.
The WebClient class can be very useful in HTML screen scraping scenarios, where the data to be extracted from HTML is meant to be read by a human, or in lightweight web service protocols like REST and/or AJAX-styled XML and JSON over HTTP.
- Master It
Use the
Headersproperty of the WebClient class to fine-tune HTTP requests. Trick Google into believing that a request that you are sending from your Visual Basic application is coming from some mobile device.
- Use a WebBrowser control to add web browser functionality to your Windows Forms application.
The WebBrowser control provides all the basic functionality of a browser in a form of Windows Forms control. Visually, it consists only of a main browser window. To provide additional functionality, like an address bar and Back, Forward, Refresh, and other buttons, you will have to add the appropriate controls and program them yourself. The WebBrowser control uses the same browser engine as Internet Explorer.
A WebBrowser control's behavior can be customized to a large degree. You can decide to show or not show the scroll bars, allow or disallow navigation, show or not show the context menu, and so forth. Finally, since the control does not contain the address bar, you can also control which sites a user can access.
- Master It
Create a custom web browser that can navigate to a limited number of URLs.