
I'm assuming that you have installed one of the several versions of Visual Studio 2010. For this book, I used the Professional edition of Visual Studio, but just about everything discussed in this book applies to the Standard edition as well. Some of the Professional edition features that are not supported by the Standard edition include the database tools, which are discussed in Chapter 15 through Chapter 18 of this book.
You may have already explored the new environment on your own, but I'm going to start with an overview of Visual Studio and its basic tools for the benefit of readers who aren't familiar with them. I will not assume any prior knowledge of Visual Basic 6 or Visual Basic .NET, just some familiarity with programming at large.
As you already know, Visual Basic 2010 is just one of the languages you can use to build applications with Visual Studio 2010. I happen to be convinced that it is also the simplest, most convenient language, but this isn't really the issue; I'm assuming you have your reasons to code in VB or you wouldn't be reading this book. What you should keep in mind is that Visual Studio 2010 is an integrated environment for building, testing, debugging, and deploying a variety of applications: Windows applications, web applications, classes and custom controls, and even console applications. It provides numerous tools for automating the development process, visual tools for performing many common design and programming tasks, and more features than any author could hope to cover.
In this chapter, you'll learn how to do the following:
Navigate the integrated development environment of Visual Studio
Understand the basics of a Windows application
Visual Basic 2010 is just one of the languages you can use to program your applications. The language is only one aspect of a Windows application. The visual interface of the application isn't tied to a specific language, and the same tools you'll use to develop your application's interface will also be used by all programmers, regardless of the language they'll use to code the application.
To simplify the process of application development, Visual Studio provides an environment that's common to all languages, known as an integrated development environment (IDE). The purpose of the IDE is to enable the developer to do as much as possible with visual tools before writing code. Even as you write code, the IDE will help you in many ways. For example, it underlines errors, it suggests the keywords that may appear at the current place in your code in a list, and it even provides tools for locating and fixing errors (a process known as debugging).
The IDE provides tools for designing, executing, and debugging your applications. It will be a while before you explore all the elements of the IDE, and I will explain the various items as needed in the course of the book. In the following sections, you'll look at the basic components of the IDE you'll be using to build simple Windows applications. You'll learn how its tools allow you to quickly design the user interface of your application as well as how to program the application.
The IDE is your second desktop, and you'll be spending most of your productive hours in this environment.
When you run Visual Studio 2010 for the first time, you will be prompted to select the type of projects you plan to build so that the environment can be optimized for that specific type of development. I'm assuming that you have initially selected the Visual Basic Development settings, which will optimize your copy of Visual Studio for building Windows and web applications with Visual Basic 2010. You can always change these settings, as explained at the end of this section.
After the initial configuration, you will see a window similar to the one shown in Figure 1.1. The Recent Projects tab will be empty, of course, unless you have already created some test projects. Visual Studio 2010 will detect the settings of a previous installation, so if you're upgrading from an earlier version of Visual Studio, the initial screen will not be identical to the one shown in Figure 1.1.
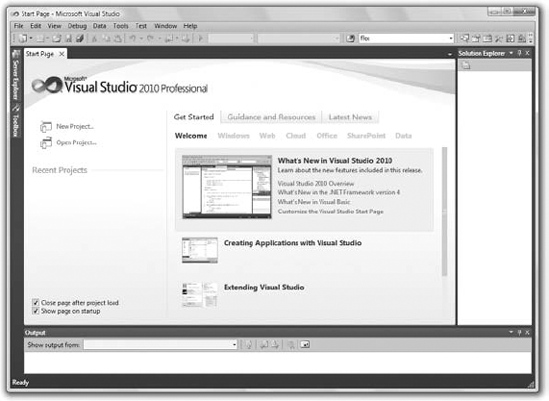
On the Start Page window of Visual Studio, you will see the following panes under the Get Started heading:
- Welcome
Click the Welcome tab to see a series of links that provide developer assistance for using Visual Studio. These links include What's New In Visual Studio 2010, Creating Applications With Visual Studio, and Extending Visual Studio, among others. Other related links may be added as this book goes to the printer.
- Windows
Here you'll find a list of topics related to Windows application development. Windows applications, frequently referred to as desktop applications, are the applications you install on a local computer and execute locally.
- Web
Here you'll find a list of topics related to web application development. Web applications are executed on a remote computer, the web server, and you interact with them through a browser.
- Cloud, Office, SharePoint
In addition to Windows and web applications, Visual Studio can be used to develop applications for Office and SharePoint as well as applications that use a new Microsoft platform for building distributed applications, the Azure platform. These three types of projects aren't discussed in this book.
- Data
Here you'll find a list of topics related to data-driven programming. All applications that interact with a database are data driven; they can be Windows or web applications. The principles of interacting with a database (retrieve, display, and update database data) are the same regardless of whether you use them to build Windows or web applications.
- Recent Projects
Here you see a list of the projects you opened most recently with Visual Studio, and you can select the one you want to open again — chances are you will continue working on the same project as the last time. Each project name is a hyperlink, and you can open a project by clicking its name. Above the list of recent projects there are two hyperlinks — one for creating a new project and another one for opening a new solution. You will find more information on solutions and projects later in this chapter.
Most developers will skip the Start Page. To do so, open the Tools menu and choose the Import And Export Settings command to start a configuration wizard. In the first dialog box of the wizard, select the Reset All Settings check box and then click the Next button. The next screen of the wizard prompts you for a location in which to save the new settings so that Visual Studio can read them every time it starts. Leave the default location as is and click Next again to see the last screen of the wizard, in which you're prompted to select a default collection of settings. This collection depends on the options you've installed on your system. I installed Visual Studio 2010 with Visual Basic only on my system, and I was offered the following options (among others): General Development Settings, Visual Basic Development Settings, and Web Development. For the default configuration of my copy of Visual Studio, and for the purpose of this book, I chose Visual Basic Development Settings so that Visual Studio could optimize the environment for a typical VB developer. Click the Finish button to see a summary of the process and then close the wizard.
At this point, you can create a new project and start working with Visual Studio. To best explain the various items of the IDE, let's build a simple form. The form is the window of your application — it's what users will see on their Desktop when they run your application.
The basic work item with Visual Studio is the solution, which is a container for one or more projects. When you create a set of related projects, they should belong to the same solution. (In this book, you'll learn how to build individual, unrelated projects.) Even when you create an individual new project, though, Visual Studio automatically creates a solution for it. You can add a new or existing project to the solution at any time.
Open the File menu and choose New Project, or click the New Project link on the Start Page. In the New Project dialog box that pops up (see Figure 1.2), you'll see a list of project types you can create with Visual Studio. The most important ones are Windows Forms Applications, which are typical Windows applications with one or more forms (windows); Console Applications, which are simple applications that interact with the user through a text window (the console); Windows Forms Control Libraries, which are collections of custom controls; and Class Libraries, which are collections of classes. These are the project types I'll cover in depth in this book.
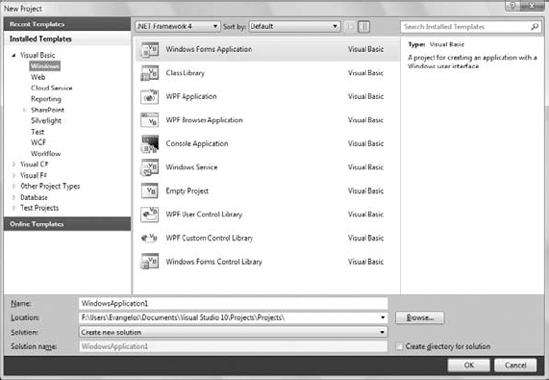
If you have Visual Basic 2010 Express edition installed, you will see fewer project types in the New Project dialog box, but all of the projects discussed in this book are included.
Notice the Create Directory For Solution check box in the dialog box shown in Figure 1.2. If this box is checked, Visual Studio will create a new folder for the solution under the folder you specify in the Location box. You also have the option to create a new solution or add the project to the current solution, if you have one open at the time. While following along with the projects of this book, you should create a new solution for each project and store it in its own folder.
You may discover at some point that you have created too many projects and you don't really need all of them. You can remove unwanted projects from your system by deleting the corresponding folders — no special action is required. You'll know it's time to remove unneeded project folders when Visual Studio suggests project names such as WindowsApplication9 or WindowsApplication49.
For this project, select the Windows Forms Application template; Visual Studio suggests the name WindowsApplication1 as the project name. Change it to MyTestApplication, select the Create Directory For Solution check box, and then click the OK button to create the new project.
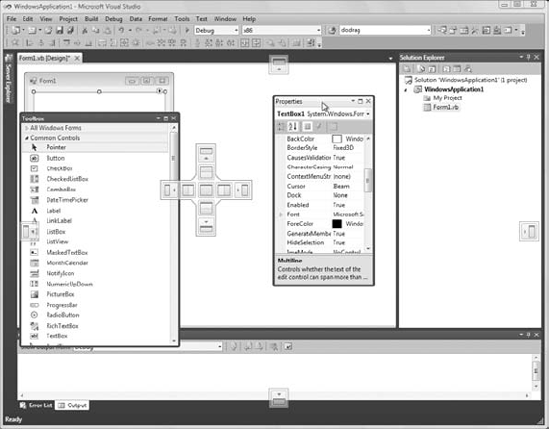
What you see now is the Visual Studio IDE displaying the Form Designer for a new project, as shown in Figure 1.3. The main window of your copy of Visual Studio may be slightly different, but don't worry about it. I'll go through all the components you need to access in the process of designing, coding, and testing a Windows application.
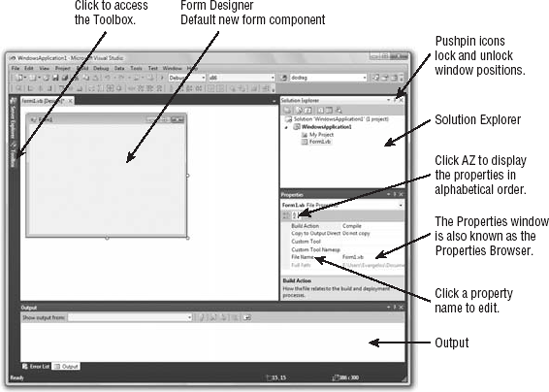
The new project contains a form already: the Form1 component in the Solution Explorer. The main window of the IDE is the Form Designer, and the gray surface on it is the window of your new application in design mode. Using the Form Designer, you'll be able to design the visible interface of the application (place various components of the Windows interface on the form and set their properties) and then program the application.
The default environment is rather crowded, so let's hide a few of the toolbars that we won't use in the projects of the first few chapters. You can always show any of the toolbars at any time. Open the View menu and choose Toolbars. You'll see a submenu with 28 commands that are toggles. Each command corresponds to a toolbar, and you can turn the corresponding toolbar on or off by clicking one of the commands in the Toolbars submenu. For now, turn off all the toolbars except the Layout and Standard toolbars. These are the toolbars shown by default and you shouldn't hide them; if you do (perhaps to make more room for the designer), this is the place where you go to make them visible again.
The last item in the Toolbars submenu is the Customize command; Customize leads to a dialog box in which you can specify which of the toolbars and which of the commands you want to see. After you have established a work pattern, use this menu to customize the environment for the way you work with Visual Studio. You can hide just about any component of the IDE, except for the main menu — after all, you have to be able to undo the changes!
To design the form, you must place on it all the controls you want to display to the user at runtime. The controls are the components of the Windows interface (buttons, text boxes, radio buttons, lists, and so on). Open the Toolbox by moving the pointer over the Toolbox tab at the far left; the Toolbox, shown in Figure 1.4, pulls out. This Toolbox contains an icon for each control you can use on your form.
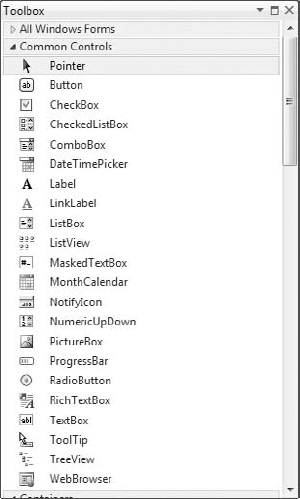
The controls are organized into groups according to function on the interface. In the first part of the book, you'll create simple Windows applications and you'll use the controls on the Common Controls tab. When you develop web applications, you will see a different set of icons in the Toolbox.
To place a control on the form, you can double-click the icon for the control. A new instance with a default size will be placed on the form. Then you can position and resize it with the mouse. Or you can select the control from the Toolbox with the mouse and then click and drag the mouse over the form and draw the outline of the control. A new instance of the control will be placed on the form, and it will fill the rectangle you specified with the mouse. Start by placing a TextBox control on the form.
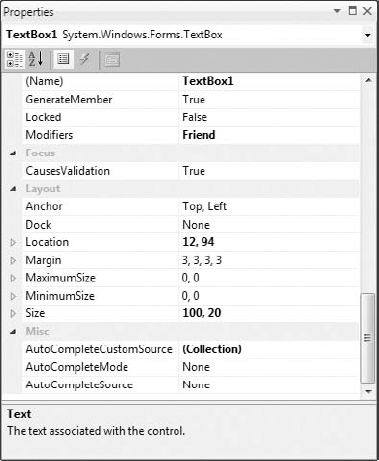
The control properties will be displayed in the Properties window. Figure 1.5 shows the properties of a TextBox control. This window, at the far right edge of the IDE and below the Solution Explorer, displays the properties of the selected control on the form. If the Properties window is not visible, open the View menu and choose Properties Window, or press F4. If no control is selected, the properties of the selected item in the Solution Explorer are displayed.
In the Properties window, also known as the Properties Browser, you see the properties that determine the appearance of the control and (in some cases) its function. The properties are organized in categories according to their role. The properties that determine the appearance of the control are listed alphabetically under the header Appearance, the properties that determine the control's behavior are listed alphabetically under the header Behavior, and so on. You can click the AZ button on the window's title bar to display all properties in alphabetical order. After you familiarize yourself with the basic properties, you will most likely switch to the alphabetical list.
Rearranging the IDE Windows
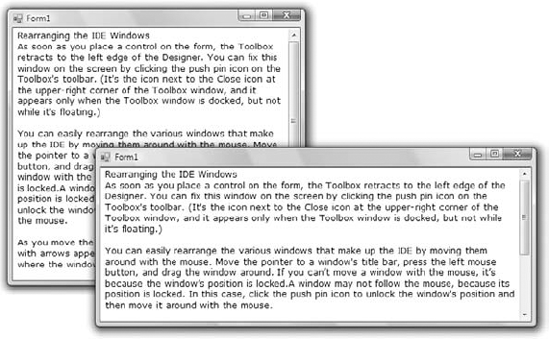
As soon as you place a control on the form, the Toolbox retracts to the left edge of the Designer. You can fix this window on the screen by clicking the pushpin icon on the Toolbox's toolbar. (It's the icon next to the Close icon at the upper-right corner of the Toolbox window, and it appears when the Toolbox window is docked but not while it's floating.)
You can easily rearrange the various windows that make up the IDE by moving them around with the mouse. Move the pointer to a window's title bar, press the left mouse button, and drag the window around. If you can't move a window with the mouse, it's because the window's position is locked. In this case, click the pushpin icon to unlock the window's position and then move it around with the mouse.
As you move the window, eight semitransparent buttons with arrows appear on the screen, indicating the areas where the window can be docked, as shown in the following screen shot. Keep moving the window until the pointer hovers over one of these buttons and the docking area appears in semitransparent blue color. Find a position you like and release the mouse button to dock it. If you release the mouse button while the pointer is not on top of an arrow, the window is not docked. Instead, it remains where you dropped it as a floating window, and you can move it around with your mouse at will.
Most developers would rather work with docked windows, and the default positions of the IDE windows are quite convenient. If you want to open even more windows and arrange them differently on the screen, use the docking feature of the IDE to dock the additional windows.
Locate the TextBox control's Text property and set it to My TextBox Control by entering the string into the box next to the property name. The control's Text property is the string that appears in the control (the caption), and most controls have a Text property.
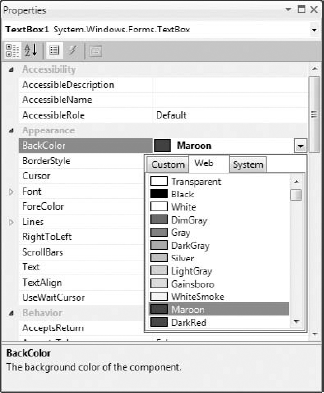
Next locate its BackColor property and select it with the mouse. A button with an arrow appears next to the current setting of the property. Click this button and you'll see a dialog box with three tabs (Custom, Web, and System), as shown in Figure 1.6. In this dialog box, you can select the color that will fill the control's background. Set the control's background color to yellow and notice that the control's appearance changes on the form.
One of the settings you'll want to change is the font of the various controls. While the TextBox control is still selected on the form, locate the Font property in the Properties window. You can click the plus sign in front of the property name and set the individual properties of the font, or you can click the ellipsis button to invoke the Font dialog box. Here you can set the control's font and its attributes and then click OK to close the dialog box. Set the TextBox control's Font property to Verdana, 14 points, bold. As soon as you close the Font dialog box, the control on the form is adjusted to the new setting.
There's a good chance that the string you assigned to the control's Text property won't fit in the control's width when rendered in the new font. Select the control on the form with the mouse and you will see eight handles along its perimeter. Rest the pointer over any of these handles and it will assume a shape indicating the direction in which you can resize the control. Make the control long enough to fit the entire string. If you have to, resize the form as well. Click somewhere on the form, and when the handles appear along its perimeter, resize it with the mouse.
Some controls, such as the Label, Button, and CheckBox controls, support the AutoSize property; AutoSize determines whether the control is resized automatically to accommodate the caption. The TextBox control, as well as many others, doesn't support the AutoSize property. If you attempt to make the control tall enough to accommodate a few lines of text, you'll realize that you can't change the control's height. By default, the TextBox control accepts a single line of text, and you must set its MultiLine property to True before you can resize the TextBox control vertically.
So far, you've manipulated properties that determine the appearance of the control. Now you'll change a property that determines not only the appearance, but also the function of the control. Locate the Multiline property. Its current setting is False. Expand the list of available settings and change it to True. (You can also change it by double-clicking the name of the property. This action toggles the True/False settings.) Switch to the form, select the TextBox control, and make it as tall as you wish.
The Multiline property determines whether the TextBox control can accept one (if Multiline = False) or more (if Multiline = True) lines of text. Set this property to True, go back to the Text property, set it to a long string, and press Enter. The control breaks the long text into multiple lines. If you resize the control, the lines will change, but the entire string will fit in the control because the control's WordWrap property is True. Set it to False to see how the string will be rendered on the control.
Multiline TextBox controls usually have a vertical scroll bar so users can quickly locate the section of text that they're interested in. Locate the control's ScrollBars property and expand the list of possible settings by clicking the button with the arrow. This property's settings are None, Vertical, Horizontal, and Both. Set it to Vertical, assign a very long string to its Text property, and watch how the control handles the text. At design time, you can't scroll the text on the control; if you attempt to move the scroll bar, the entire control will be scrolled. The scroll bar will work as expected at runtime. (It will scroll the text vertically.)
You can also make the control fill the entire form. Start by deleting any other controls you may have placed on the form and then select the multiline TextBox. Locate the Dock property in the Properties window and keep double-clicking the name of the property until its setting changes to Fill. (You'll learn a lot more about docking controls in Chapter 6, "Working with Forms.") The TextBox control fills the form and is resized as you resize the form, both at design time and runtime.
To examine the control's behavior at runtime, press F5. The application will be compiled, and a few moments later, a window filled with a TextBox control (like the one shown in Figure 1.7) will appear on the Desktop. This is what the users of your application would see (if this were an application worth distributing, of course).
Enter some text on the control, select part of the text, and copy it to the Clipboard by pressing Ctrl+C. You can also copy text from any other Windows application and paste it on the TextBox control. Right-click the text on the control and you will see the same context menu you get with Notepad; you can even change the reading order of the text — not that you'd want to do that with a Western language. When you're finished, open the Debug menu and choose Stop Debugging. This will terminate your application's execution, and you'll be returned to the IDE. The Stop Debugging command is also available as a button with a blue square icon on the toolbar. Finally, you can stop the running application by clicking the Close button in the application's window.
The design of a new application starts with the design of the application's form, which is the application's user interface, or UI. The design of the form determines to a large extent the functionality of the application. In effect, the controls on the form determine how the application will interact with the user. The form itself could serve as a prototype, and you could demonstrate it to a customer before even adding a single line of code. By placing controls on the form and setting their properties, you're implementing a lot of functionality before coding the application. The TextBox control with the settings discussed in this section is a functional text editor.
In this section, I will walk you through the development of a simple application to demonstrate not only the design of the interface, but also the code behind the interface. You'll build an application that allows users to enter the name of their favorite programming language, and the application will evaluate the choice. Objectively, VB is a step ahead of all other languages, and it will receive the best evaluation. All other languages get the same grade — good — but not VB.
The project is called WindowsApplication1. You can download the project from www.sybex.com/go/masteringvb2010 and examine it, but I suggest you follow the steps outlined in this section to build the project from scratch. Start a new project, use the default name, WindowsApplication1, and place a TextBox and a Button control on the form. Use the mouse to position and resize the controls on the form, as shown in Figure 1.8.
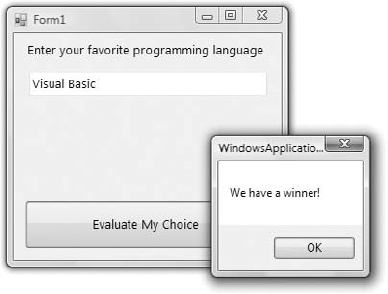
Start by setting the form's Font property to Segoe UI, 9 pt. Arrange and size the controls as shown in Figure 1.8. Then, place a Label control on the form and set its Text property to Enter your favorite programming language. The Label will be resized according to its caption because the control's AutoSize property is True by default. To be sure that a Label control will not grow too long and cover other controls on the form, set its AutoSize property to False and size it manually. As you move the controls around on the form, you'll see some blue lines connecting the edges of the controls when they're aligned. These lines are called snap lines, and they allow you to align controls on the form.
Now you must insert some code to evaluate the user's favorite language. Windows applications are made up of small code segments, called event handlers, which react to specific actions such as the click of a button, the selection of a menu command, the click of a check box, and so on. For this example, you want to program the action of clicking the button. When the user clicks the button, you want to execute some code that will display a message.
The Windows programming model is known as event-driven programming, as it's based on programming events. A Windows form contains controls, such as Buttons, CheckBoxes, TextBoxes, and so on. These controls react to certain events, which are usually initiated by the user. A button click, checking or clearing a check box, a drag and a drop operation — all are examples of user-initiated events. You decide the events to which your application should react and then program the desired actions by inserting some code into the event's handler. Event handlers are independent of one another, and you can focus on one event at a time.
To insert some code behind the Button control, double-click the control. You'll see the form's code window, which is shown in Figure 1.9. You will see only the definition of the procedure, not the code that is shown between the two statements in the figure. The statement beginning with Private... is too long to fit on the printed page, so I had to break it into two lines. When a line is too long, you can break it into two (or more) lines by pressing Enter. In previous versions, you had to insert a space followed by an underscore to indicate that the statement continues on the following line. Alternatively, you can turn on the word wrap feature of the editor (you'll see shortly how to adjust the editor's properties). Notice that I also inserted quite a bit of space before the second half of the first code line. It's customary to indent continued lines so they can be easily distinguished from the other lines.
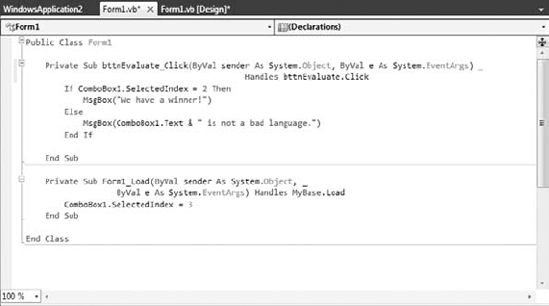
The editor opens a subroutine, which is delimited by the following statements:
Private Sub Button1_Click(ByVal sender As System.Object,
               ByVal e As System.EventArgs) Handles Button1.Click

End Sub
At the top of the main pane of the Designer, you will see two tabs named after the form: the Form1.vb [Design] tab and the Form1.vb tab. The first tab is the Windows Form Designer (in which you build the interface of the application with visual tools), and the second is the code editor (in which you insert the code behind the interface). At the top of the code editor, which is what you see in Figure 1.9, are two ComboBoxes. The one on the left contains the names of the controls on the form. The one on the right contains the names of events each control recognizes. When you select a control (or an object, in general) in the left list, the other list's contents are adjusted accordingly. To program a specific event of a specific control, select the name of the control in the left list (the Objects list) and the name of the event in the right list (the Events list). While Button1 is selected in the Objects list, open the Events list to see the events to which the button can react.
The Click event happens to be the default event of the Button control. To program the Button's Click event, double-click the Button on the form and the editor will open a window with the Button1_Click subroutine. This subroutine is an event handler, which is invoked automatically every time an event takes place. The event of interest in our example is the Click event of the Button1 control. Every time the Button1 control on the form is clicked, the Button1_Click subroutine is activated. To react to the Click event of the button, you must insert the appropriate code in this subroutine.
There are more than two dozen events for the Button control, and it is among the simpler controls. (After all, what can you do to a button besides click it?) Most of the controls recognize a very large number of events, which we rarely code. I've never seen a button that reacts to a double-click, even though you can program this event, or coding for the KeyPress event, which is fired when the user presses a key when the button has the focus. When programming a TextBox control, however, the KeyPress event is one of the most common events to code.
The definition of the event handler can't be modified; this is the event handler's signature (the arguments it passes to the application). All event handlers in VB 2010 pass two arguments to the application: the sender argument, which is an object that represents the control that fired the event, and the e argument, which provides additional information about the event.
The name of the subroutine is made up of the name of the control, followed by an underscore and the name of the event (Button1_Click). This is just the default name, and you can change it to anything you like (such as EvaluateLanguage, for this example, or StartCalculations). What makes this subroutine an event handler is the keyword Handles at the end of the statement. The Handles keyword tells the compiler which event this subroutine is supposed to handle. Button1.Click is the Click event of the Button1 control. If there were another button on the form, the Button2 control, you'd have to write code for a subroutine that would handle the Button2.Click event. Each control recognizes many events, and you can provide a different event handler for each control and event combination. Of course, we never program every possible event for every control.
The controls have a default behavior and handle the basic events on their own. The TextBox control knows how to handle keystrokes. The CheckBox control (a small square with a check mark) changes state by hiding or displaying the check mark every time it's clicked. The ScrollBar control moves its indicator (the button in the middle of the control) every time you click one of the arrows at the two ends. Because of this default behavior of the controls, you need not supply any code for the events of most controls on the form.
If you change the name of the control after you have inserted some code in an event handler, the name of the event handled by the subroutine will be automatically changed. The name of the subroutine, however, won't change. If you change the name of the Button1 control to bttnEvaluate, the subroutine's header will become
Private Sub Button1_Click(ByVal sender As System.Object,
               ByVal e As System.EventArgs) Handles bttnEvaluate.Click

End Sub
Rename the Button1_Click subroutine to EvaluateLanguage. You must edit the code to change the name of the event handler. I try to name the controls before adding any code to the application so that their event handlers will be named correctly. Alternatively, you can use your own name for each event handler. The default names of the controls you place on a form are quite generic, and you should change them to something more meaningful. I usually prefix the control names with a few characters that indicate the control's type (such as txt, lbl, bttn, and so on), followed by a name that reflects the function of the control on the form. Names such as txtLanguage and bttnEvaluate make your code far more readable. It's a good practice to change the default names of the controls as soon as you add the controls to the form. Names such as Button1, Button2, Button3, and so on, don't promote the readability of your code. With the exception of this first sample project, I'm using descriptive names for the controls used in this book's projects.
Let's add some code to the Click event handler of the Button1 control. When this button is clicked, I want to examine the text the user entered in the text box. If it's Visual Basic, I want to display one message; if not, I want to display a different message. Insert the lines of Listing 1.1 between the Private Sub and End Sub statements. (I'm showing the entire listing here, but there's no reason to retype the first and last statements.)
Example 1.1. Processing a user-supplied string
Private Sub EvaluateLanguage(ByVal sender As System.Object,
               ByVal e As System.EventArgs) Handles Button1.Click
   Dim language As String
   language = TextBox1.Text
   If language = "Visual Basic" Then
      MsgBox("We have a winner!")
   Else
      MsgBox(language & " is not a bad language.")
   End If
End Sub
Here's what this code does. First, it assigns the text of the TextBox control to the variable language. A variable is a named location in memory where a value is stored. Variables are where you store the intermediate results of your calculations when you write code. All variables are declared with a Dim statement and have a name and a type. The first statement declares a new variable, the language variable, with the Dim statement and sets its type to String (it's a variable that will store text).
You could also declare and assign a value to the language variable in a single step:
Dim language = TextBox1.Text
The compiler will create a String variable, because the statement assigns a string to the variable. We'll come back to the topic of declaring and initializing variables in Chapter 2, "Handling Data."
Then the program compares the value of the language variable to the string Visual Basic, and depending on the outcome of the comparison, it displays one of two messages. The MsgBox() function displays the message that you passed as an argument by placing it between the parentheses in a small window with an OK button, as shown in Figure 1.8. The argument for a MsgBox() function must be a string. Users can view the message and then click the OK button to close the message box.
Even if you're not familiar with the syntax of the language, you should be able to understand what this code does. Visual Basic is the simplest of the languages supported by Visual Studio 2010, and I will discuss the various aspects of the language in detail in the following chapters. In the meantime, focus on understanding the process of developing a Windows application: how to build the visible interface of the application and how to program the events to which you want your application to react.
The code of this first application isn't very robust. If the user doesn't enter the string with the exact spelling shown in the listing, the comparison will fail. You can convert the string to uppercase and then compare it with VISUAL BASIC to eliminate differences in case. To convert a string to uppercase, use the ToUpper method of the String class. The following expression returns the string stored in the language variable, converted to uppercase:
language.ToUpper
You should also take into consideration the fact that the user might enter VB or VB2010, or something similar. You never know what users may throw at your application, so whenever possible you should try to limit their responses to the number of available choices. In this case, you could display the names of certain languages (the ones you're interested in) and force the user to select one of them.
One way to display a limited number of choices is to use a ComboBox control. In the next section, you'll revise your sample application so that users won't have to enter the name of the language. You'll force them to select their favorite language from a list so that you won't have to validate the string supplied by the user.
Start a new project: the WindowsApplication2 project. Do not select the Create Directory For Solution check box; save the project from within the IDE. As soon as the project is created, open the File menu and choose Save All to save the project. When the Save Project dialog box appears, click the Browse button to select the folder where the project will be saved. In the Project Location dialog box that appears, select an existing folder or create a new folder such as MyProjects or VB.NET Samples.
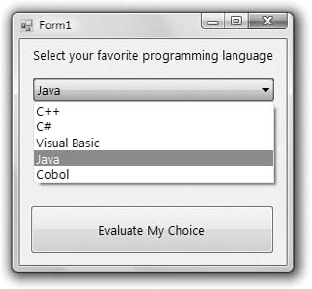
Open the Toolbox and double-click the ComboBox tool icon. A ComboBox control will be placed on your form. Now, place a Button control on the form and position it so that your form looks like the one shown in Figure 1.10. Then set the Text property for the button to Evaluate My Choice.
You must now populate the ComboBox control with the valid choices. Select the ComboBox control on the form by clicking it with the mouse and locate its Items property in the Properties window. The setting of this property is Collection, which means that the Items property doesn't have a single value; it's a collection of items (strings, in this case). Click the ellipsis button and you'll see the String Collection Editor dialog box, as shown in Figure 1.11.
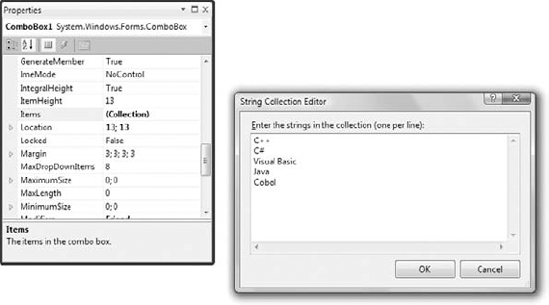
Figure 1.11. Click the ellipsis button next to the Items property of a ComboBox to see the String Collection Editor dialog box.
The main pane in the String Collection Editor dialog box is a TextBox, in which you can enter the items you want to appear in the ComboBox control at runtime. Enter the following strings, one per row and in the order shown here:
| C++ |
| C# |
| Visual Basic |
| Java |
| Cobol |
Click the OK button to close the dialog box. The items you just entered will not appear on the control at design time, but you will see them when you run the project. Before running the project, set one more property. Locate the ComboBox control's Text property and set it to Select your favorite programming language. This is not an item of the list; it's the string that will initially appear on the control.
You can run the project now and see how the ComboBox control behaves. Press F5 and wait a few seconds. The project will be compiled, and you'll see the form displayed on your Desktop, on top of the Visual Studio window. I'm sure you know how the ComboBox control behaves in a typical Windows application, and your sample application is no exception. You can select an item on the control, either with the mouse or with the keyboard. Click the button with the arrow to expand the list and then select an item with the mouse. Or press the down or up arrow keys to scroll through the list of items. The control isn't expanded, but each time you click an arrow button, the next or previous item in the list appears on the control. Press the Tab key to move the focus to the Button control and press the spacebar to emulate a Click event (or simply click the Button control).
You haven't told the application what to do when the button is clicked yet, so let's go back and add some code to the project. Stop the application by clicking the Stop button on the toolbar (the solid black square) or by choosing Debug
Example 1.2. The revised Click event handler
Private Sub Button1_Click(ByVal sender As System.Object,
               ByVal e As System.EventArgs) Handles Button1.Click
   Dim language As String
   language = ComboBox1.Text
   If language = "Visual Basic" Then
      MsgBox("We have a winner!")
   Else
      MsgBox(language & "is not a bad language.")
   End If
End Sub
When the form is first displayed, a string that doesn't correspond to a language is displayed in the ComboBox control. This is the string that prompts the user to select a language; it isn't a valid selection because it's not included in the list of items.
You can also preselect one of the items from within your code when the form is first loaded. When a form is loaded, the Load event of the Form object is raised. Double-click somewhere on the form and the editor will open the form's Load event handler:
Private Sub Form1_Load(ByVal sender As System.Object,
               ByVal e As System.EventArgs) Handles MyBase.Load
End Sub
Enter the following code to select the Visual Basic item when the form is loaded:
Private Sub Form1_Load(ByVal sender As System.Object,
               ByVal e As System.EventArgs) Handles MyBase.Load
   ComboBox1.SelectedIndex = 2
End Sub
SelectedIndex is a property of the ComboBox control that returns the index of the selected item in the Items collection. You can set it to an integer value from within your code to select an item on the control, and you can also use it to retrieve the index of the selected item in the list. Instead of comparing strings, you can compare the SelectedIndex property to the value that corresponds to the index of the item Visual Basic, with a statement such as the following:
If ComboBox1.SelectedIndex = 2 Then
    MsgBox("We have a winner!")
Else
    MsgBox(ComboBox1.Text & " is not a bad language.")
End If
The Text property of the ComboBox control returns the text on the control, and it's used to print the selected language's name. The & symbol is an operator, similar to the arithmetic operators, that concatenates two strings. The first string is the Text property of the ComboBox control and the second string is a literal enclosed in double quotes. To combine the two, use the concatenation operator.
Of course, if you insert or remove items from the list, you must edit the code accordingly. If you run the application and test it thoroughly, you'll realize that there's a problem with the ComboBox control. Users can type in the control a new string, which will be interpreted as a language. By default, the ComboBox control allows users to type in something in addition to selecting an item from the list. To change the control's behavior, select it on the form and locate its DisplayStyle property in the Properties window. Expand the list of possible settings for the control and change the property's value from DropDown to DropDownList. Run the application again and test it; your sample application has become bulletproof. It's a simple application, but you'll see more techniques for building robust applications in Chapter 4, "GUI Design and Event-Driven Programming."
The controls on the Toolbox are more than nice pictures you can place on your forms. They encapsulate a lot of functionality and expose properties that allow you to adjust their appearance and their functionality. Most properties are usually set at design time, but quite frequently you change the properties of various controls from within your code. And it should be obvious by now that the changes take place from within the code that resides in the handlers for the events to which the application should react.
Now that you're somewhat familiar with the process of building Windows applications, and before you look into any additional examples, I will quickly present the components of the Visual Studio IDE.
The IDE of Visual Studio 2010 contains numerous components, and it will take you a while to explore them. It's practically impossible to explain in a single chapter what each tool, window, and menu command does. I'll discuss specific tools as we go along and as the topics become more and more advanced. In the following sections, I will go through the basic items of the IDE — the ones you'll use in the following few chapters to build simple Windows applications.
The IDE menus provide access to a variety of commands; some lead to submenus. Notice that most menus can be displayed as toolbars. Also, not all options are available at all times. The options that cannot possibly apply to the current state of the IDE are either invisible or disabled. The Edit menu is a typical example. It's quite short when you're designing the form and quite lengthy when you edit code. The Data menu disappears altogether when you switch to the code editor — you can't use these menu options while editing code. If you open an XML document in the IDE, the XML item will be added to the menu bar of Visual Studio. Yes, Visual Studio can handle XML files too. Not only that, but Visual Basic provides built-in support for XML files, which I'll help you explore in Chapter 13, "XML in Modern Programming."
The File menu contains commands for opening and saving projects or project items as well as commands for adding new or existing items to the current project. For the time being, use the New
The Edit menu contains the usual editing commands. Among these commands are the Advanced command and the IntelliSense command. Both commands lead to submenus, which are discussed next. Note that these two items are visible only when you're editing your code and are invisible while you're designing a form.
The following options are the more-interesting ones available through the Edit
- View White Space
Space characters (necessary to indent lines of code and make it easy to read) are replaced by periods.
- Word Wrap
When a code line's length exceeds the length of the code window, the line is automatically wrapped.
- Comment Selection/Uncomment Selection
Comments are lines you insert between your code statements to document your application. Every line that begins with a single quote is a comment; it is part of the code, but the compiler ignores it. Sometimes, you want to disable a few lines from your code but not delete them (because you want to be able to restore them later, should you change your mind). A simple technique to disable a line of code is to comment it out (insert the comment symbol in front of the line). The Comment Selection/Uncomment Selection command allows you to comment (or uncomment) large segments of code in a single move.
Edit
- List Members
When this option is on, the editor lists all the members (properties, methods, events, and argument list) in a drop-down list. This list appears when you enter the name of an object or control followed by a period. Then, you can select the desired member from the list using either the mouse or the keyboard. Let's say your form contains a control named
TextBox1and you're writing code for this form. When you enter the name of the control followed by a period (TextBox1.), a list with the members of the TextBox control will appear (as shown in Figure 1.12).
In addition, a description of the selected member is displayed in a ToolTip box, as you can see in the same figure. Select the Text property and then enter the equal sign, followed by a string in quotes, as follows:
TextBox1.Text = "Your User Name"
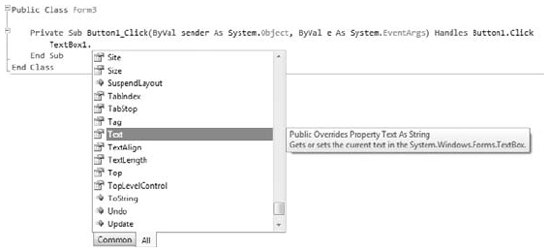
If you select a property that can accept a limited number of settings, you will see the names of the appropriate constants in a drop-down list. If you enter the following statement, you will see the constants you can assign to the property (see Figure 1.13):
TextBox1.TextAlign =

Again, you can use your mouse to select the desired value. The drop-down list with the members of a control or object (the Members list) remains open until you type a terminator key (the Esc or End key) or select a member by pressing the spacebar or the Enter key.
- Parameter Info
While editing code, you can move the pointer over a variable, method, or property and see its declaration in a pop-up box. You can also jump to the variable's definition or the body of a procedure by choosing Go To Definition from the context menu that appears if you right-click the variable or method name in the code window.
- Quick Info
Quick Info is another IntelliSense feature that displays information about commands and functions. When you type an opening parenthesis following the name of a function, for example, the function's arguments will be displayed in a ToolTip box. The first argument appears in bold font; after a value for this argument is entered, the next one is shown in bold. If an argument accepts a fixed number of settings, these values will appear in a drop-down list, as explained previously.
- Complete Word
The Complete Word feature enables you to complete the current word by pressing Ctrl+spacebar. For example, if you type
TextBand then press Ctrl+spacebar, you will see a list of words that you're most likely to type (TextBox, TextBox1, and so on).- Insert Snippet
This command opens the Insert Snippet window at the current location in the code editor window. Code snippets, which are an interesting feature of Visual Studio 2010, are discussed in the section "Using Code Snippets" later in this chapter.
A practical application contains a substantial amount of code in a large number of event handlers and custom procedures (subroutines and functions). To simplify the management of the code window, the Outlining submenu contains commands that collapse and expand the various procedures.
Let's say you're finished editing the Click event handlers of several buttons on the form. You can reduce these event handlers to a single line that shows the names of the procedures with a plus sign in front of them. You can expand a procedure's listing at any time by clicking the plus sign. When you do so, a minus sign appears in front of the procedure's name, and you can click it to collapse the body of the procedure again. The Outlining submenu contains commands to handle the outlining of the various procedures or to turn off outlining and view the complete listings of all procedures. You will use these commands as you write applications with substantial amounts of code:
- Hide Selection
This option lets you hide the selected code segment. You can select part of a routine or multiple routines, which are hidden as a whole with this command. To display the hidden code, click the plus icon on the left margin, or use the Stop Hiding Selection command.
- Toggle Outlining Expansion
This option lets you change the outline mode of the current procedure. If the procedure's definition is collapsed, the code is expanded, and vice versa.
- Toggle All Outlining
This option is similar to the Toggle Outlining Expansion option, but it toggles the outline mode of the current document. A form is reduced to a single statement. A file with multiple classes is reduced to one line per class.
- Stop Outlining
This option turns off outlining and adds a new command to the Outlining submenu, Start Automatic Outlining, which you can select to turn on automatic outlining again.
- Stop Hiding Current
This option stops hiding the currently hidden selection.
- Collapse To Definitions
This option reduces the listing to a list of procedure headers.
This menu contains commands that allow you to display any toolbar or window of the IDE. The Other Windows command leads to a submenu with the names of some standard windows, including the Output and Command windows. The Output window is the console of the application. The compiler's messages, for example, are displayed in the Output window. The Command window allows you to enter and execute statements. When you debug an application, you can stop it and enter VB statements in the Command window. Another related window is the Immediate window, which is very similar to the Command window, and it has the advantage of displaying the IntelliSense box as you type. You'll see how to use these windows later in this book (they're used mostly for debugging).
This menu contains commands for adding items to the current solution (an item can be a form, a file, a component, or another project). The last option in this menu is the Project Properties command, which opens the project's properties pages. The Add Reference and Add Web Reference commands allow you to add references to .NET components and web components, respectively. These two commands are also available in the project's shortcut menu (to open this menu, right-click the name of the project in the Solution Explorer).
The Build menu contains commands for building (compiling) your project. The two basic commands in this menu are Build and Rebuild All. The Build command compiles (builds the executable for) the entire solution, but it doesn't compile any components of the project that haven't changed since the last build. The Rebuild All command clears any existing files and builds the solution from scratch. Every time you start your application, Visual Studio recompiles it as needed so you don't usually have to build your application to execute it. There are situations (when you add custom classes and controls to your application) when you must build the project. These topics are discussed later in this book.
This menu contains commands to start or end an application as well as the basic debugging tools. The basic commands of this menu are discussed briefly in Chapter 4.
This menu contains commands you will use with projects that access data. You'll see how to use this short menu's commands in the discussion of the visual database tools in Chapter 16 through Chapter 18.
The Format menu, which is visible only while you design a Windows or web form, contains commands for aligning the controls on the form. The commands accessible from this menu are discussed in Chapter 4. The Format menu is invisible when you work in the code editor — the commands apply to the visible elements of the interface.
This menu contains a list of useful tools, such as the Macros command, which leads to a submenu with commands for creating macros. Just as you can create macros in a Microsoft Office application to simplify many tasks, you can create macros to automate many of the repetitive tasks you perform in the IDE. The last command in this menu, the Options command, leads to the Options dialog box, in which you can fully customize the environment. The Choose Toolbox Items command opens a dialog box that enables you to add more controls to the Toolbox. In Chapter 9, "Building Custom Windows Controls," you'll learn how to design custom controls and add them to the Toolbox.
This is the typical Window menu of any Windows application. In addition to the list of open windows, it contains the Hide command, which hides all toolboxes, leaving the entire window of the IDE devoted to the code editor or the Form Designer. The toolboxes don't disappear completely; they're all retracted, and you'll be able see the tabs on the left and right edges of the IDE window. To expand a toolbox, just hover the mouse pointer over the corresponding tab.
The Toolbox window contains all the controls you can use to build your application interface. This window is usually retracted, and you must move the pointer over it to view the Toolbox. The controls in the Toolbox are organized in various tabs, so take a look at them to become familiar with their functions.
In the first few chapters, we'll work with the controls in the Common Controls and Menus & Toolbars tabs. The Common Controls tab contains the icons for the most common Windows controls, while the All Windows Controls tab contains all the controls you can place on your form. The Data tab contains the icons for the objects you will use to build data-driven applications (they're explored later in this book). The Menus & Toolbars tab contains the Menu and ContextMenu controls (they're discussed in Chapter 4) among others. On the Printing tab you will find all the controls you'll need to create printouts, and they're discussed briefly in Chapter 11 and in more detail in the tutorial "Printing with Visual Basic." The Dialogs tab contains controls for implementing the common dialog controls, which are so common in Windows interfaces; they're discussed in Chapter 7, "More Windows Controls."
The Solution Explorer window contains a list of the items in the current solution. A solution can contain multiple projects, and each project can contain multiple items. The Solution Explorer displays a hierarchical list of all the components, organized by project. You can right-click any component of the project and choose Properties in the context menu to see the selected component's properties in the Properties window. If you select a project, you will see the Project Properties dialog box. You will find more information on project properties in the following chapter.
If the solution contains multiple projects, you can right-click the project you want to become the startup form and select Set As StartUp Project. (The Startup project is the one that starts executing when you press F5 in the IDE.) You can also add items to a project with the Add Item command from the context menu or remove a component from the project with the Exclude From Project command. This command removes the selected component from the project but doesn't affect the component's file on the disk. The Delete command removes the selected component from the project and also deletes the component's file from the disk.
If a project contains many items, you can organize them into folders. Right-click the project name and select Add from the context menu. From the shortcut menu that appears, select New Folder. To move an existing item into a folder, just drag it and drop it on one of the project folders.
This window (also known as the Properties Browser) displays all the properties of the selected component and their settings. Every time you place a control on a form, you switch to this window to adjust the appearance of the control. You have already seen how to manipulate the basic properties of a control through the Properties window, and you will find many more examples in this and the following chapter.
Many properties are set to a single value, such as a number or a string. If the possible settings of a property are relatively few, they're displayed as meaningful constants in a drop-down list. Other properties are set through a more elaborate interface. Color properties, for example, are set on a Color dialog box that's displayed right in the Properties window. Font properties are set through the usual Font dialog box. Collections are set in a Collection Editor dialog box, in which you can enter one string for each item of the collection, as you did for the items of the ComboBox control earlier in this chapter.
If the Properties window is hidden, or if you have closed it, you can choose View
The Output window is where many of the tools, including the compiler, send their output. Every time you start an application, a series of messages is displayed in the Output window. These messages are generated by the compiler, and you need not understand them at this point. If the Output window is not visible, choose View
While testing a program, you can interrupt its execution by inserting a breakpoint. When the breakpoint is reached, the program's execution is suspended and you can execute a statement in the Immediate window. Any statement that can appear in your VB code can also be executed in the Immediate window. To evaluate an expression, enter a question mark followed by the expression you want to evaluate, as in the following samples, where result is a variable in the program you interrupted:
? Math.Log(35)
? "The answer is " & result.ToString
You can also send output to this window from within your code with the Debug.Write and Debug.WriteLine methods. Actually, this is a widely used debugging technique — to print the values of certain variables before entering a problematic area of the code. There are more elaborate tools to help you debug your application, but printing a few values to the Immediate window is a time-honored practice in programming with VB.
In many of the examples of this book, especially in the first few chapters, I use the Debug.WriteLine statement to print something to the Immediate window. To demonstrate the use of the DateDiff() function, for example, I'll use a statement like the following:
Debug.WriteLine(DateDiff(DateInterval.Day, #3/9/2007#, #5/15/2008#))
When this statement is executed, the value 433 (which is the number of days between the two dates) will appear in the Immediate window. This statement demonstrates the syntax of the DateDiff() function, which returns the difference between the two dates in days. Sending some output to the Immediate window to test a function or display the results of intermediate calculations is a common practice.
To get an idea of the functionality of the Immediate window, switch back to your first sample application and insert the Stop statement after the End If statement in the button's Click event handler. Run the application, select a language, and click the button on the form. After displaying a message box, the application will reach the Stop statement and its execution will be suspended. You'll see the Immediate window at the bottom of the IDE. If it's not visible, open the Debug menu and choose Windows
? ComboBox1.Items.Count
Then, press Enter to execute it. Notice that IntelliSense is present while you're typing in the Immediate window. The expression prints the number of items in the ComboBox control. (Don't worry about the numerous properties of the control and the way I present them here; they're discussed in detail in Chapter 5, "Basic Windows Controls.") As soon as you press Enter, the value 5 will be printed on the following line.
You can also manipulate the controls on the form from within the Immediate window. Enter the following statement and press Enter to execute it:
ComboBox1.SelectedIndex = 4
The fifth item on the control will be selected (the indexing of the items begins with 0). However, you can't see the effects of your changes because the application isn't running. Press F5 to resume the execution of the application and you will see that the item Cobol is now selected in the ComboBox control.
The Immediate window is available only while the application's execution is suspended. To continue experimenting with it, click the button on the form to evaluate your choice. When the Stop statement is executed again, you'll be switched to the Immediate window.
Unlike the Immediate window, the Command window is available at design time. The Command window allows you to access all the commands of Visual Studio by typing their names in this window. If you enter the string Edit followed by a period, you will see a list of all commands of the Edit menu, including the ones that are not visible at the time, and you can invoke any of these commands and pass arguments to them. For example, if you enter Edit.Find "Margin" in the Command window and then press Enter, the first instance of the string Margin will be located in the open code window. To start the application, you can type Debug.Start. You can add a new project to the current solution with the AddProj command, and so on. Most developers hardly ever use this window in designing or debugging applications.
This window is populated by the compiler with error messages if the code can't be successfully compiled. You can double-click an error message in this window and the IDE will take you to the line with the statement in error — which you should fix. Change the MsgBox() function name to MssgBox(). As soon as you leave the line with the error, the name of the function will be underlined with a wiggly red line and the following error description will appear in the Error List window:
Name 'MssgBox' is not declared
Correct the function name (it should be MsgBox with one s) and the error number will disappear from the Error List window. The Error List window has two more tabs, the Warnings tab and the Messages tab, which display various warnings.
The Visual Studio IDE is highly customizable. I will not discuss all the customization options here, but I will show you how to change the default settings of the IDE. Open the Tools menu and select Options (the last item in the menu). The Options dialog box appears, in which you can set all the options regarding the environment. Figure 1.14 shows the options for the fonts of the various items of the IDE. Here you can set the font for the Text Editor, dialog boxes, toolboxes, and so on. Select an item in the tree in the left pane list and then set the font for this item in the box below.
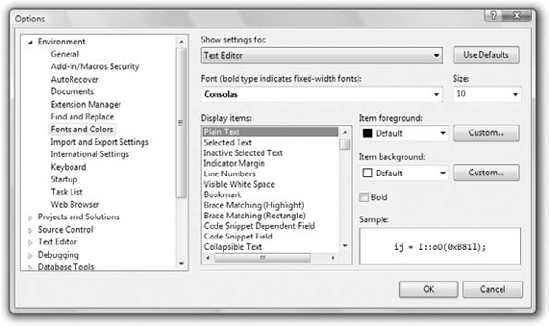
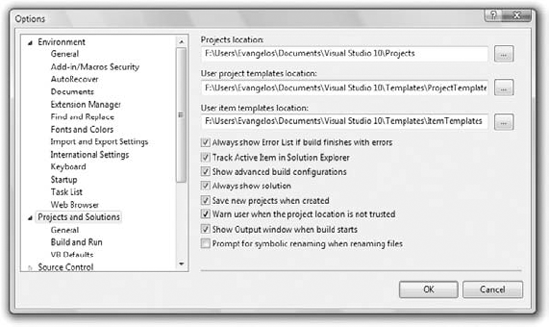
Figure 1.15 shows the Projects And Solutions options. The top box indicates the default location for new projects. The Save New Projects When Created check box determines whether the editor will create a new folder for the project when it's created. If you uncheck this box, then Visual Studio will create a folder in the Temp folder. Projects in the Temp folder will be removed when you run the Disk Cleanup utility to claim more space on your hard drives.
By default, Visual Studio saves the changes to the current project every time you press F5. You can change this behavior by setting the Before Building option in the Build And Run page, under the Project And Solutions branch. If you change this setting, you must save your project from time to time with the File
Most of the tabs in the Options dialog box are straightforward, and you should take a look at them. If you don't like some of the default aspects of the IDE, this is the place to change them. If you switch to the Basic item under the Text Editor branch of the tree in the left pane of the Options dialog box, you will find the Line Numbers option. Select this check box to display numbers in front of each line in the code window. The Options dialog box contains a lot of options for customizing your work environment, and it's worth exploring on your own. Before you make any changes in the Visual Studio options, make sure you save the current settings with the Import And Exporting Settings command accessible from the Tools menu.
Apart from Windows applications, you can use Visual Studio 2010 to build applications that run in a command prompt window. The command prompt window isn't really a DOS window, even though it looks like one. It's a text window, and the only way to interact with an application is to enter lines of text and read the output generated by the application, which is displayed in this text window, one line at a time. This type of application is called a console application, and I'm going to demonstrate console applications with a single example. We will not return to this type of application later in the book because it's not what you're supposed to do as a Windows developer.
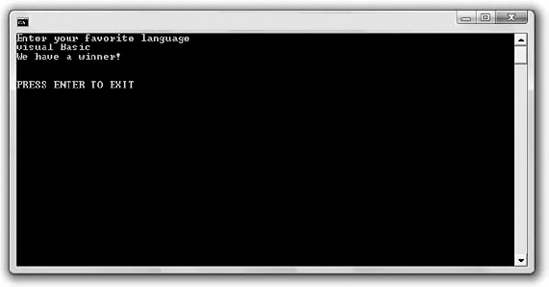
The console application you'll build in this section, ConsoleApplication1, prompts users to enter the name of their favorite language. It then prints the appropriate message on a new line, as shown in Figure 1.16.
Start a new project. In the New Project dialog box, select the template Console Application. You can also change its default name from ConsoleApplication1 to a more descriptive name. For this example, don't change the application's name.
A console application doesn't have a user interface, so the first thing you'll see is the code editor's window with the following statements:
Module Module1

   Sub Main()

   End Sub

End Module
Unlike a Windows application, which is a class, a console application is a module. Main() is the name of a subroutine that's executed automatically when you run a console application. The code you want to execute must be placed between the statements Sub Main() and End Sub. Insert the statements shown in Listing 1.3 in the application's Main() subroutine.
Example 1.3. Console application
Module Module1
   Sub Main()
      Console.WriteLine("Enter your favorite language")
      Dim language As String
      language = Console.ReadLine()
      language = language.ToUpper
      If language = "VISUAL BASIC" Or
              language = "VB" Or
              language = "VB.NET" Or
              language = "VISUAL BASIC 2010" Then
         Console.WriteLine("We have a winner!")
      Else
         Console.WriteLine(language & " is not a bad language.")
      End If
      Console.WriteLine()
      Console.WriteLine("PRESS ENTER TO EXIT")
      Console.ReadLine()
   End Sub
End Module
This code is quite similar to the code of the equivalent Windows applications we developed earlier, except that it uses the Console.WriteLine statement to send its output to the command prompt window instead of a message box.
A console application doesn't react to events because it has no visible interface. However, it's easy to add some basic elements of the Windows interface to a console application. If you change the Console.WriteLine method call into the MsgBox() function, the message will be displayed in a message box.
One reason to build a console application is to test a specific feature of the language without having to build a user interface. Many of the examples in the documentation are console applications; they demonstrate the topic at hand and nothing more. If you want to test the DateDiff() function, for example, you can create a new console application and enter the lines from Listing 1.4 in its Main() subroutine.
Example 1.4. Testing the DateDiff() function with a console application
Sub Main()
   Console.WriteLine(DateDiff(DateInterval.Day, #3/9/2000#, #5/15/2008#))
   Console.WriteLine("PRESS ENTER TO EXIT")
   Console.ReadLine()
End Sub
The last two lines will be the same in every console application you write. Without them, the command prompt window will close as soon as the End Sub statement is reached, and you won't have a chance to see the result. The Console.ReadLine method waits until the user presses the Enter key.
Console applications are convenient for testing short code segments, but Windows programming is synonymous with designing graphical user interfaces, so you won't find any more console applications in this book.
Visual Basic 2010 comes with a lot of predefined code snippets for selected actions, and you can insert these snippets into your code as needed. Let's say you want to insert the statements for writing some text to a file, but you have no idea how to access files. Create an empty line in the listing (press the Enter key a couple of times at the end of a code line). Then open the Edit menu and choose IntelliSense
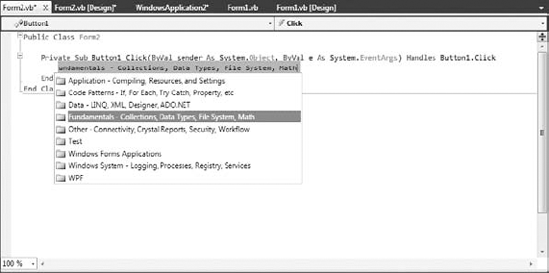
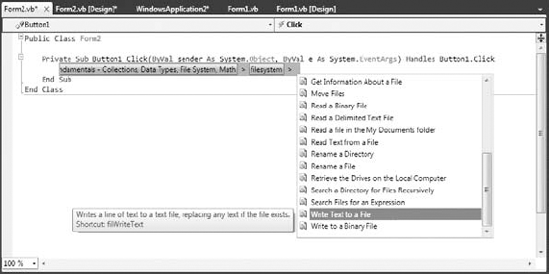
When Insert Snippet opens, you will see a list of the snippets, organized in folders according to their function, as shown in Figure 1.17. Double-click any folder name to see the subfolders or actual snippets available for that function. Try it out. Double-click the Fundamentals folder and take a look at the options available to you: Collections, Data Types, File System, and Math. Double-click the filesystem item to see a list of common file-related tasks, as shown in Figure 1.18. Scroll down and locate the item Write Text To A File in the list. Now, double-click it to insert that snippet at the current location in the code window.
The following snippet will be inserted in your code:
My.Computer.FileSystem.WriteAllText("C: est.txt", "Text", True)To write some text to a file, you need to call the WriteAllText method of the My.Computer.FileSystem object. You can replace the strings shown in the snippet with actual values. The first string is the filename, the second string is the text to be written to the file, and the last argument of the method determines whether the text will be appended to the file (if False) or will overwrite any existing text (if True).
Each snippet shows you the basic statements for performing a common task, and you can edit the code inserted by Visual Studio as needed. A real-world application would probably prompt the user for a filename via the File common dialog box and then use the filename specified by the user in the dialog box instead of a hard-coded filename.
As you program, you should always try to find out whether there's a snippet for the task at hand. Sometimes you can use a snippet without even knowing how it works. Although snippets can simplify your life, they won't help you understand the Framework, which is discussed in detail throughout this book.
You have probably noticed that the code snippets available through Visual Studio use an entity called My — a peculiar object that was introduced with VB 2005 to simplify many program ming tasks. As you saw in the preceding code snippet, the My component allowed you to write some text to a file with a single statement, the WriteAllText method. If you're familiar with earlier versions of Visual Basic, you know that to actually write text to a file you must first open a file, then write some text to it, and finally close the file. The My component allows you to perform all these operations with a single statement.
Another example is the Play method, which you can use to play back a WAV file from within your code:
My.Computer.Audio.Play ("C:SoundsCountDown.wav")Or you can use it to play back a system sound:
My.Computer.Audio.PlaySystemSound(System.Media.SystemSounds.Exclamation)
The method that plays back the sound is the Play method, and the method that writes text to a file is the WriteAllText method. However, you can't call them directly through the My component; they're not methods of the My component. If they were, you'd have to dig hard to find out the method you need. The My component exposes six components, which contain their own components. Here's a description of the basic components of the My component and the functionality you should expect to find in each component:
- My.Application
The Application component provides information about the current application. The
CommandLineArgsproperty of My.Application returns a collection of strings, which are the arguments passed to the application when it was started. Typical Windows applications aren't called with command-line arguments, but it's possible to start an application and pass a filename as an argument to the application (the document to be opened by the application, for example). TheInfoproperty is an object that exposes properties such asDirectoryPath(the application's default folder),ProductName, Version, and so on.- My.Computer
This component exposes a lot of functionality via a number of properties, many of which are objects. The My.Computer.Audio component lets you play back sounds. The My.Computer.Clipboard component lets you access the Clipboard. To find out whether the Clipboard contains a specific type of data, use the
ContainsText, ContainsImage, ContainsData, andContainsAudiomethods. To retrieve the contents of the Clipboard, use theGetText, GetImage, GetData, andGetAudioStreammethods. Assuming that you have a form with a TextBox control and a PictureBox control, you can retrieve text or image data from the Clipboard and display it on the appropriate control with the following statements:If My.Computer.Clipboard.ContainsImage Then PictureBox1.Image = My.Computer.Clipboard.GetImage End If If My.Computer.Clipboard.ContainsText Then TextBox2.Text = My.Computer.Clipboard.GetText End If
You may have noticed that using the My component in your code requires that you write long statements. You can shorten them substantially via the With statement, as shown next:
With My.Computer.Clipboard
    If .ContainsImage Then
        PictureBox1.Image = .GetImage
    End If
    If .ContainsText Then
        TextBox2.Text = .GetText
    End If
End With
When you're executing multiple statements on the same object, you can specify the object in a With statement and call its methods in the block of the With statement by specifying the method name prefixed with a dot. The With statement is followed by the name of the object to which all following methods apply and is terminated with the End With statement.
Another property of the My.Computer component is the FileSystem object that exposes all the methods you need to access files and folders. If you enter the expression My.Computer.FileSystem followed by a dot, you will see all the methods exposed by the FileSystem component. Among them, you will find DeleteFile, DeleteDirectory, RenameFile, RenameDirectory, WriteAllText, ReadAllText, and many more. Select a method and then type the opening parenthesis. You will see the syntax of the method in a ToolTip. The syntax of the CopyFile method is as follows:
My.Computer.FileSystem.CopyFile(
          sourceFileName As String, destinationFileName As String)
Just specify the path of the file you want to copy and the new file's name, and you're finished. This statement will copy the specified file to the specified location.
You will notice that the ToolTip box with the syntax of the CopyFile method has multiple versions, which are listed at the left side of the box along with arrow up and arrow down icons. Click these two buttons to see the next and previous versions of the method. The second version of the CopyFile method is as follows:
My.Computer.FileSystem.CopyFile(
          sourceFileName As String, destinationFileName As String,
          overwrite As Boolean)
The overwrite argument specifies whether the method should overwrite the destination file if it exists.
The third version of the method accepts a different third argument that determines whether the usual copy animation will be displayed as the file is being copied.
The various versions of the same method differ in the number and/or type of their arguments, and they're called overloaded forms of the method. Instead of using multiple method names for the same basic operation, the overloaded forms of a method allow you to call the same method name and adjust its behavior by specifying different arguments.
- My.Forms
This component lets you access the forms of the current application. You can also access the application's forms by name, so the Forms component isn't the most useful one.
- My.Settings
This component lets you access the application settings. These settings apply to the entire application and are stored in an XML configuration file. The settings are created from within Visual Studio, and you use the Settings component to read them.
- My.User
This component returns information about the current user. The most important property of the User component is the
CurrentPrincipalproperty, which is an object that represents the credentials of the current user.- My.WebServices
The WebServices component represents the web services referenced by the current application.
The My component gives beginners unprecedented programming power and allows you to perform tasks that would require substantial code if implemented with earlier versions of the language, not to mention the research it would take to locate the appropriate methods in the Framework. You can explore the My component on your own and use it as needed. My is not a substitute for learning the language and the Framework. It can help you initially, but you can't go far without learning the methods of the Framework for handling files or any other feature.
Let's say you want to locate all the files of a specific type in a folder, including its subfolders. Scanning a folder and its subfolders to any depth is quite a task (you'll find the code in the tutorial "Accessing Folders and Files," which you can download from www.sybex.com/go/masteringvb2010). You can do the same with a single statement by using the My component:
Dim files As ReadOnlyCollection(Of String)
files = My.Computer.FileSystem.GetFiles("D:Data", True, "*.txt")
The GetFiles method populates the files collection with the pathnames of the text files in the folder D:Data and its subfolders. However, it won't help you if you want to process each file in place. Moreover, this GetFiles method is synchronous: If the folder contains many subfolders with many files, it will block the interface until it retrieves all the files. In the tutorial "Accessing Folders and Files," you'll see the code that retrieves filenames and adds them to a control as it goes along.
If you're already familiar with VB, you may think that the My component is an aid for the absolute beginner or the nonprogrammer. This isn't true. VB is about productivity, and the My component can help you be more productive with your daily tasks, regardless of your knowledge of the language or programming skills. If you can use My to save a few (or a few dozen) statements, do it. There's no penalty for using the My component because the compiler replaces the methods of the My component with the equivalent method calls to the Framework.
- Navigate the integrated development environment of Visual Studio.
To simplify the process of application development, Visual Studio provides an environment that's common to all languages, known as an integrated development environment (IDE). The purpose of the IDE is to enable the developer to do as much as possible with visual tools before writing code. The IDE provides tools for designing, executing, and debugging your applications. It's your second desktop, and you'll be spending most of your productive hours in this environment.
- Master It
Describe the basic components of the Visual Studio IDE.
- Understand the basics of a Windows application.
A Windows application consists of a visual interface and code. The visual interface is what users see at runtime: a form with controls with which the user can interact — by entering strings, checking or clearing check boxes, clicking buttons, and so on. The visual interface of the application is designed with visual tools. The visual elements incorporate a lot of functionality, but you need to write some code to react to user actions.
- Master It
Describe the process of building a simple Windows application.