
XML has gained so much in popularity and acceptance that Microsoft has decided to promote XML to a basic data type. Yes, XML is a data type like integers and strings! To understand how far VB has taken XML, type the following in a procedure or event handler:
Dim products = <Books>
<Book ISBN="0000000000001">
  <Title>Book Title 1</Title>
  <Price>11.95</Price>
 </Book>
 <Book ISBN="000000000002">
    <Title>Book Title 2</Title>
    <Price>10.25</Price>
  </Book>
 </Books>
You need not worry too much about getting the document exactly right, because the Visual Studio's editor works just like the XML editor. Every time you type an opening tag, it inserts the matching closing tag and ensures that what you're typing is a valid XML document.
The language has been extended to support XML with features that bridge the gap between VB programming and XML, and XML has become a "first-class citizen" of the Framework. As you will see in this and the following chapter, manipulating XML documents from within your VB application is simpler than ever before. If you haven't used the DOM object in the past to manipulate XML documents, rest assured that the new tools make this task as straightforward as it can be for VB developers. In this chapter, you'll find an introduction to the topic of XML (for readers who are not yet familiar with XML) and the classes that allow you to manipulate XML with VB code.
In this chapter, you'll learn how to do the following:
Create XML documents
Navigate through an XML document and locate the information you need
Convert arbitrary objects into XML documents and back with serialization
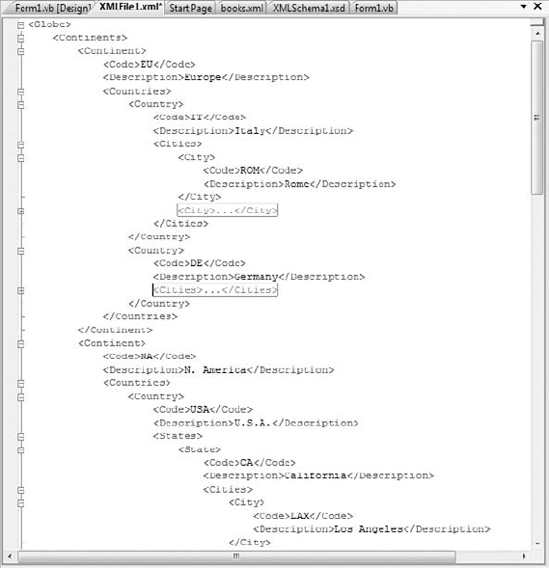
Let's start with a quick overview of XML, which will serve as an introduction to XML for some readers and a quick summary for those familiar with XML at large. To experiment with XML files, you can start a new project in Visual Studio and add a new XML file to the project. When the file is opened in edit mode, you can enter the code samples shown in this chapter. Figure 13.1 shows an XML document open in Visual Studio (it's a file you'll create later in this chapter). Notice that you can collapse segments of the XML tree just as you would collapse parts of VB code.
XML stands for Extensible Markup Language and is as much of a language as HTML is. Neither of them is actually a language, though; they're called declarative languages, and in reality they're formats, or specifications, for storing and transferring structured data. I'm sure you all know by now what XML is and what it looks like, so let's start exploring its structure and the rules for formulating valid XML documents.
XML documents consist of elements, which are the information items you store for a particular entity. Elements are delimited by a keyword embedded in angle brackets. This keyword is called a tag, and tags always appear in pairs: The opening and closing tags delimit an element of the document. Each element has a value, which appears between two tags. The Name element, for example, is delimited by the opening tag <Name> and the closing tag </Name>. The closing tag is identical to the opening tag, except for the backslash in front of the tag's name. The element's value can be a string, a number, or a date, as in the following XML segments. It's also valid for an element to have no value at all. The following XML segment describes salary data for a person whose SSN is not known at the time.
<Name>Richard Manning</Name>
<Rate>39.95</Rate>
<BirthDate>1982-08-14</BirthDate>
<SSN></SSN>
The preceding elements have simple values. It just so happens that Richard's social security number was not known at the time (it has an empty value). An element may also contain a sequence of elements, as in the following:
<Name>
   <First>Richard</First>
   <Last>Manning</Last>
</Name>
<BirthDate>1982-08-14</BirthDate>
<Rate>
   <Type>Hourly</Type>
   <Amount>39.95</Amount>
</Rate>
The Name element here contains two elements, each one with their own value. Here are the first two rules about XML authoring:
| Tags are case sensitive, and they always appear in pairs. It goes without saying that the tags must be properly nested; otherwise, the document wouldn't have a structure. |
VB developers should be especially careful about the first rule, because their favorite language has never had issues with character casing. When you work with XML, you must pay attention to case because <Name> and <name> are two totally different tags.
In addition to values, elements may have attributes, too. Attributes belong to specific elements, and they appear in the element's opening tag, as follows:
<Book ISBN = "978001234567">
The Book element has an ISBN attribute with the value specified with the string following the equals sign. And here's the third rule about XML:
All attribute values must be enclosed in quotes.
You can also insert multiple attributes into an element by placing the elements next to one another:
< Book ISBN = "978001234567" Publisher = "SYBEX">
<Person LastName = "Doe" FirstName = "Joe" SSN = "555-00-1234">
Because elements many contain attributes, which are specified by name, you can't use spaces in an element name. If you do, the compiler will think that the second word is the name of an attribute, not followed by its value. In fact, most XML editors will automatically insert the equals sign followed by two quotes to indicate an attribute without a value.
The value of an element is inserted between its opening and closing tags, and it may (and usually does) contain additional elements. Here's another way to express the preceding Person element:
<Person>
    <Last>Doe</Last>
    <First>Joe</First>
    <SSN>555-00-1234</SSN>
</Person>
There's no clear-cut distinction as to when you should use elements and when you should use attributes, but you usually store information that identifies the element as attributes and the details of the element as its value. Consider the following typical examples of XML segments with attributes:
<Hotel ID = "STR001">
    <HotelName>Hotel of the Stars</HotelName>
    <Rating ID = "3">3 Stars</Rating>
    <Address> address details </Address>
</Hotel>

<Book ISBN="1234567890">
    <Title>Mastering XML Internals</Title>
    <Publisher ID="323">XMLers Int'l.</Publisher>
    <Authors>
        <Author>J. Element</Author>
        <Author>J. Attribute</Author>
    </Authors>
</Book>
<Country Code = "IT" Name = "Italy">
<City Code = "MIL" Name = Milan" />
<City Code = "ROM" Name = "Rome" />
. . . more cities under Italy
</Country>
<Country Code = "FR" Name = "France">
<City Code = "PRS" Name = Paris" />
<City Code = "LYN" Name = "Lyon" />
. . . more cities under France
</Country>
<Employee SSN = "55 22 9999" Sex="M" Status = "Single">
<Name>Peter Evans</Name>
<Position>Finance Director</Position>
<HiredOn>7/15/1989</HiredOn>
</Employee>More often than not, you will see XML documents made up entirely out of elements, without any attributes. You will also see XML documents made up of one element per entity and attributes for all of their properties. Once you understand the nature of XML and you are ready to create your own XML documents, you'll have a good feeling about elements and attributes. It's much more important to properly nest elements to keep relevant information under the same root element than worrying about whether a specific item should be defined as an attribute or an element.
It's also possible for an element to contain one or more attributes, but no value. For these special cases, there's a shorthand notation for avoiding the closing tag: You just insert the backslash character before the opening element's closing angle bracket. The following element
<Product ProductID="39"
         Name="Chartreuse verte" Price="18.50" >
</Product>
can also be written as follows:
<Product ProductID="39"
         Product="Chartreuse verte" Price="18.50" />
The line breaks were introduced to help you read the XML segment, they're not mandatory, and they're not taken into consideration when processing an XML document, just like white space in HTML. If the spaces (tabs, line feeds, and multiple spaces) appear in an element's value, they will be preserved.
As you can see in the few examples so far, XML is just plain text that can be safely exchanged between computers using the HTTP stack. As you probably know, XML is used just about everywhere today, but in its roots it remains a simple data exchange protocol. You can think of the tags as delimiters that separate items of information. It's actually the very fact that the delimiters are specified by the user and that they can be nested that made XML so powerful and suitable for all types of information. XML delimiters are unusual in the sense that they appear before and after each data item, and they occur in pairs: the opening and closing tags. The closing tag is always the same as the opening tag, prefixed with a backslash. The most important aspect of XML, though, is that you can specify the delimiters and their structure: You determine the names of the elements, and you're allowed to nest them so that they reflect the structure, or hierarchy, of the information. The fact that XML tags have meaningful names is a major convenience, but words like book, author, country, and so on, are not especially meaningful to computers. They help you understand the data stored in the file and write code to extract the items of information you're interested in, but no software will process XML documents automatically.
For an XML document to be meaningful and useful to others, you must use element and attribute names consistently. Even though it's possible to use sometimes the <Last> element and other times the <LastName> element, the resulting XML document will be practically unusable. Before you start writing an XML document, you must decide on the names of the elements in it and use them consistently. The structure of the document, along with the names of the elements and attributes, is referred to as the document schema. The schema of the document is another XML document. To get a feel for XML schemas and how they used, start a new VB project in Visual Studio, and add a new XML file to the solution (just right-click the project's name, and select Add
<?xml version="1.0" encoding="utf-8" ?>
Then enter the XML document shown in Listing 13.1 in the file, following the initial tag. The document is a short segment of a report from the Northwind database, and you will find it in the NWProducts.xml file in this chapter's folder.
Example 13.1. An XML document with products, organized by category and supplier
<Categories_Products>
    <Category CategoryID="1" Category="Beverages">
        <Supplier Supplier="Aux joyeux ecclésiastiques">
            <Product ProductID="39"
                     Product="Chartreuse verte" Price="18.0000" />
            <Product ProductID="38"
                     Product="Côte de Blaye" Price="263.5000" />
        </Supplier>
        <Supplier Supplier="Bigfoot Breweries">
            <Product ProductID="34"
                     Product="Sasquatch Ale" Price="14.0000" />
            <Product ProductID="35"
                     Product="Steeleye Stout" Price="18.0000" />
        </Supplier>
    </Category>
        <Category CategoryID="2" Category="Condiments">
<Supplier Supplier="Exotic Liquids">
<Product ProductID="3"
Product="Aniseed Syrup" Price="10.0000" />
</Supplier>
<Supplier Supplier="Forêts d'érables">
<Product ProductID="61"
Product="Sirop d'érable" Price="28.5000" />
</Supplier>
</Category>
</Categories_Products>Now open the XML menu, and select the Create Schema command. Visual Studio will create a schema that matches the XML document and will open it in a new window. Listing 13.2 shows the schema of the preceding XML document.
Example 13.2. The schema of the XML document of Listing 31.1
<?xml version="1.0" encoding="utf-8"?>
<xs:schema attributeFormDefault="unqualified" elementFormDefault="qualified"
xmlns:xs="http://www.w3.org/2001/XMLSchema">
   <xs:element name="Categories_Products">
      <xs:complexType>
         <xs:sequence>
            <xs:element maxOccurs="unbounded" name="Category">
               <xs:complexType>
                  <xs:sequence>
                     <xs:element maxOccurs="unbounded" name="Supplier">
                        <xs:complexType>
                           <xs:sequence>
                              <xs:element maxOccurs="unbounded"
                                          name="Product">
                                 <xs:complexType>
                                     <xs:attribute
                                          name="ProductID"
                                          type="xs:unsignedByte"
                                          use="required" />
                                     <xs:attribute name="Product"
                                          type="xs:string"
                                          use="required" />
                                     <xs:attribute name="Price"
                                          type="xs:decimal"
                                          use="required" />
                                  </xs:complexType>
                               </xs:element>
                            </xs:sequence>
                            <xs:attribute
name="Supplier"
type="xs:string"
use="required" />
</xs:complexType>
</xs:element>
</xs:sequence>
<xs:attribute name="CategoryID"
type="xs:unsignedByte"
use="required" />
<xs:attribute name="Category"
type="xs:string" use="required" />
</xs:complexType>
</xs:element>
</xs:sequence>
</xs:complexType>
</xs:element>
</xs:schema>The automatically generated schema is stored in a file with the same name as the XML document and the extension .xsd. Designing a schema is not a simple task, but there are tools to assist you. The most important aspect of the schema is that it can be applied to an XML document and help you make sure that the document follows its design guidelines. The editor will do its best to decipher the schema of a document based on the data at hand, but the schema may not describe another document with similar data. The use property of the schema, for example, is always required, because all attributes in the XML segment have a value. If one of the elements didn't have a Price attribute, for example, then the use property of the Price attribute would be optional.
Now, switch back to the XML document, and look up its Schemas property in the Properties window. You will see that the file you just created has been applied to the document. If not, click the button next to the Schemas property, and you will see the XML Schemas dialog box, shown in Figure 13.2. Click the Add button, and locate the newly generated XSD file in the project's folder. Open the drop-down list in the Use column, select Use This Schema to apply the newly added schema to the document, and then click OK to close the dialog box. The schema will be applied to the XML document, and any elements or attributes in the document that don't comply with the schema will be highlighted. Of course, because the schema was generated for the specific document, no errors will be found, but this is the purpose of the schema validation: to locate any items that do comply with the specified schema. If you edit the document, the editor will not allow you to deviate from the document's schema.
If you edit the XML document now, the editor will assist you in creating a valid XML document that complies with its schema. The proper elements at each place in the document will appear in the usual IntelliSense drop-down list as you type. When you type the opening angle bracket, the editor will suggest the valid element names (actually it will display only the first element name; the second time it will suggest the second element name, and so on). If you select an element name and then type a space, the editor will suggest the attribute names, as shown in Figure 13.3. In general, the built-in XML editor of Visual Studio will assist you as best as it can in creating XML documents and will make sure they comply with the specified schema.
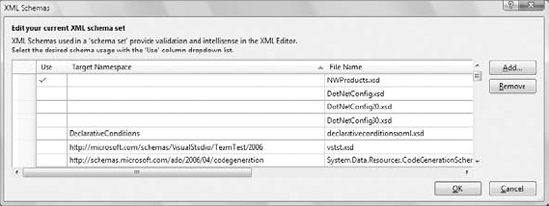
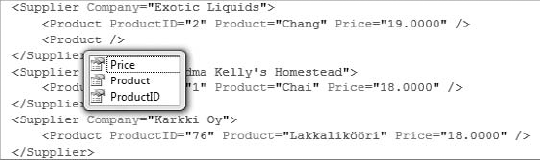
Figure 13.3. Editing an XML document in Visual Studio. The IntelliSense box is populated with the aid of the current schema.
Of course, you don't create a document and then derive its schema as I did here. Normally, when you're asked to produce an XML document, you'll be given a schema. If you're the document designer, you'll have to produce the schema too. One very useful tool for automating schema generation is SQL Server. It's possible to retrieve the results of a SQL query in XML format, and the output may include not only the data, but the schema itself. Actually, this is how I created the sample document NWProducts.xml. If you're curious about schemas and the related keywords, add a new XML Schema item to the project (with the project's Add
Besides strings, element values can be numeric values or dates. The basic numeric data type in XML is the Decimal type, but XML supports all the usual numeric types, including floats, short/long/signed/unsigned integers, and so on. There's also a Boolean data type, whose value is "true" or "false" (not 0/1, not TRUE/FALSE—just the values shown with that exact spelling).
Dates are quite tricky. An XML document can be created anywhere, and dates do not obey a specific locale. That's true of any document that contains dates, but XML addresses this issue elegantly. Consider the following XML segment that has a different meaning in the United States than in the United Kingdom:
<Date>
4/9/2011
</Date>
This segment would present perfectly clear, if different, information to users in the United States and in the United Kingdom; the US reading would be April 9, 2011, while the UK reading would be 4 September 2011. If that cultural understanding of the format causes a user to enter day information in the month position and the value exceeds 12, then the date would be invalid. To address the issue of dates, XML supports the Date, Time, and DateTime data types. The Date data type specifies dates with the unambiguous format YYYY-MM-DD. The Time data type specifies times with the format HH:MM:SS. You can optionally append the time's milliseconds. Here are some examples of Time values:
<start>09:05:32</start>
<start>17:11:45.510</start>
Time values are rather uncommon on their own; you'll usually combine date and time information in a DateTime value. DateTime values are Date and Time values separated by the T character:
<startdate>2011-09-04T09:30:10</startdate>
Another time-related issue is that of the time zone. If you're processing an XML document generated in a different time zone, you should be able to take the time difference into consideration. If you request that a response arrive within four hours, for example, you should be able to convert the time specified in the document into local time. The time zone is specified with the + or – sign followed by a number of hours and, optionally, minutes. The time zones are usually hours apart, but there are a few exceptions (Newfoundland is 3.5 hours behind GMT). Alternatively, you can append a Z character followed by the UTC time. Here are a few DateTime values that include time zone information:
<startdate>2011-09-04T09:30:10-06:00</startdate>
<startdate>2011-09-04T09:30:10Z</startdate>
The first example refers to 9:30:10 in the Central time zone in the United States (six hours behind the GMT time). The second example refers to 9:30:10 GMT time. If you're exchanging XML files that include time information with users in different time zones, you should include the time zone to make them unambiguous.
You have seen the basics of generating XML documents from scratch (and in the second half of this chapter you'll see how to convert your custom objects into XML documents), and you've seen that you can create valid XML documents easily with the help of Visual Studio's XML editor. But what good is an XML document without some tools to extract information from it? You will need some simple tools for creating and manipulating XML documents from within VB code, and these tools are available through the following XML helper classes:
You can use these classes to access the document but also to create it from within your code. Instead of embedding an XML document directly in your code, you can use the XML helper classes and a structural approach to create the same document from within your code. To create a new XElement object, pass the element's name and value to its constructor:
New XElement(element_name, element_value)
The following statement will create a very simple XML document:
Dim XmlDoc = New XElement("Books")
MsgBox(XmlDoc.ToString)
You will see the string <Books /> in a message box. This is a trivial, yet valid, XML document. To create an XML segment with books by using the helper classes, insert the statements from Listing 13.3 in a button Click event handler.
Example 13.3. A simple XElement describing a collection of books
Dim doc = _
     New XElement("Books", _
         New XElement("Book", _
             New XAttribute("ISBN", "0000000000001"), _
             New XElement("Price", 11.95), _
             New XElement("Title", "Book Title 1"), _
             New XElement("Stock", _
                 New XAttribute("InStock", 12), _
                 New XAttribute("OnOrder", 24))), _
             New XElement("Book", _
                 New XAttribute("ISBN", "0000000000002"), _
             New XElement("Price", 10.25), _
             New XElement("Title", "Book Title 2"), _
             New XElement("Stock", _
                 New XAttribute("InStock", 7), _
                 New XAttribute("OnOrder", 10))))
I've added a twist to this new document to demonstrate the use of multiple attributes in the same element. The Stock element contains two attributes, InStock and OnOrder. The Price element is a decimal value, and the Title element is a string. The Book element, however, contains three subelements: the Price, Title, and Stock elements.
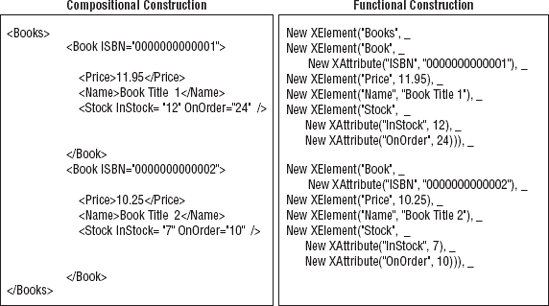
If you look at the code of Listing 13.3 and ignore the XElement and XAttribute items, the code looks a lot like the document we're constructing. This type of construction is called functional construction, because the code is very similar to the XML document we have in mind. If you haven't worked with XML in the past, the functional construction (or functional composition) approach to building XML documents is an enormous improvement over the tools VB programmers had to use until very recently. If you haven't been exposed to XML before, you'll probably think it's typical VB. But wait, it gets even better.
The functional composition of an XML document resembles the actual document you're creating, but the Visual Basic editor can do even better. You can create an XML document and assign it to an XElement variable with a statement like the one shown in Listing 13.4.
Example 13.4. The document of Listing 13.3 created explicitly
Dim xDoc = _
           <Books>
               <Book ISBN="0000000000001">
                   <Price>11.95</Price>
                   <Title>Book Title 1</Title>
                   <Stock InStock="12" OnOrder="24"/>
               </Book>
               <Book ISBN="0000000000002">
                   <Price>10.25</Price>
                   <Title>Book Title 2</Title>
                   <Stock> InStock="7" OnOrder="10"/>
               </Book
           </Books>
As soon as you type the first opening angle bracket, the editor will switch to XML mode and will assist you by inserting the matching closing tags and by indenting the document for you. The two methods of creating XML documents with VB are demonstrated in Figure 13.4.
The XML document you create in-line is not an island, entirely isolated from the rest of the code. You can embed VB expressions right into the XML document, and these expressions will be replaced with their values at runtime. To embed an expression in an XML document, use the special tags <%= and %> (yes, the same tags we used with ASP 1.0 to mix HTML and VBScript code). Here's the same document with the prices replaced by embedded expressions:
Dim price1 As Decimal = 11.95
Dim price2 As Decimal = 10.25
Dim xDoc = _
           <Books>
               <Book ISBN="0000000000001">
                   <Price><%= price1 %></Price>
                   <Title>Book Title 1</Title>
                   <Stock InStock="12" OnOrder="24"/>
               </Book>
               <Book ISBN="0000000000002">
                   <Price><%= price2 %></Price>
                   <Title>Book Title 2</Title>
                   <Stock> InStock="7" OnOrder="10"/>
               </Book>
           </Books>
The prices need not be hard-coded in variables. You can call a function to retrieve them from a database based on the book's ISBN. You can use other simple VB expressions to insert the current date into your document, call built-in functions, and so on. However, you can't embed large segments of code with conditional or looping statements (you'll see how this can be done with LINQ in the next chapter).
The following XML segment generates an XML segment with the parameters of a loan. The loan parameters are specified with the help of variables, but the actual monthly payment is calculated with a call to the Pmt() function right from within the XML code. The tag <%= switches you to VB, and the %> tag switches you back to XML.
Dim loanAmount As Decimal = 135000
Dim loanInterest As Decimal = 8.75
Dim loanDuration = 6
Dim loanXML = <Loan>
                  <Amount><%= loanAmount %></Amount>
                  <Duration><%= loanDuration %>6</Duration>
                  <DurationUnit>Years</DurationUnit>
                  <Interest><%= loanInterest %></Interest>
                  <Payment><%= Financial.Pmt(loanInterest / 10 * 12, _
                                              loanDuration * 12, loanAmount) %>
                  </Payment>
              </Loan>
MsgBox(loanXML)
If you execute the preceding statements, they will print the following XML document on a message box:
<Loan>
     <Amount>135000</Amount>
     <Duration>6</Duration>
     <DurationUnit>Years</DurationUnit>
     <Interest>8.75</Interest>
     <Payment>2,416.73</Payment>
</Loan>
The embedded expression calls a financial function, the Pmt() function, to calculate the loan's payment. The result is even formatted appropriately by calling the ToString method of the Double data type (the Pmt() function returns a Double, as was discussed in Chapter 1, "Getting Started with Visual Basic 2010").
The variable that holds an XML segment is of the XElement type. An XML document is not necessarily based on the XDocument class. The two basic operations you can perform with an XElement (and XDocument) object are saving a file and reloading an XElement object from a file. The operations are performed with the Save and Load methods, which accept the filename as an argument.
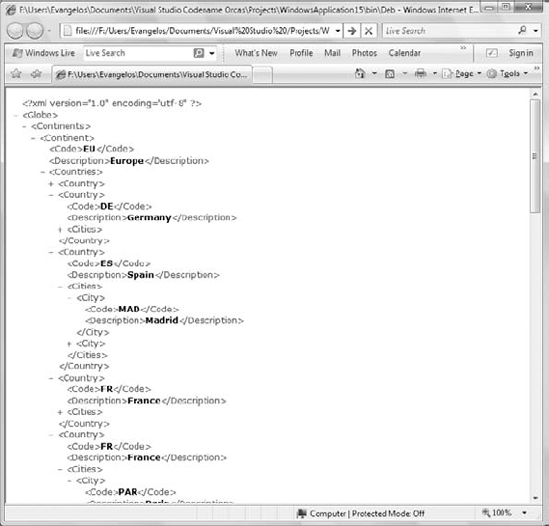
The following statements will save an XML document to a file and then open it with the default application, which on most computers is Internet Explorer, as shown in Figure 13.5. If you have associated XML extensions with another application, then the document will open in that application (it could be Visual Studio or any other XML editor you have installed on your computer).
XElement.Save(file_name)
Process.Start(file_name)
To load the contents of a file to an XElement variable, use the Load method, which accepts as an argument the name of the file:
Dim XDoc = XElement.Load(file_name)
One more related method is the Parse method, which allows you to load an XElement variable from a string. As the code in Listing 13.4 should have convinced you, there's no reason to ever create strings with XML data in your code. You may retrieve an existing XML document as a string. In this case, you can just pass the string to the Parse method to create an XML tree and process it with the techniques discussed in this chapter. The Parse method accepts a string as an argument and returns an XElement object:
Dim XDoc = XElement.Parse(xml_string)
Let's look at how you can process an XML document using XML helper objects. Processing XML consists of navigating to the items of interest in the document, extracting element and attribute values, and editing the contents of an existing XML document.
The basic methods for navigating through an XML document are known as axis methods (they allow you to quickly move to any part of the document, just as you can describe any point in the space with the help of the x-, y-, and z-axes). Let me start the discussion of the axis methods by making it clear that all axis methods are relevant to the current position in the XML tree. If you request the immediate descendant of a continent, for example, you'll get a country element, not a city. If you're currently on a country element, the same method will return a city element.
The Element method allows you to locate an element by name. This method returns the first XElement segment by the name specified as an argument to the method, if such an element exists under the current element. The Elements method is similar, only instead of the first matching element, it returns all matching elements. Note that while the Element method returns an XElement object, the Elements method returns a collection of XElement objects (actually, an IEnumerable of XElement objects).
Each element may have one or more parent elements, which you can access via the Ancestors property, and one or more child elements, which you can access via the Descendants property. Both methods return a collection of XElement objects. To retrieve the desired child or parent elements, you must pass to the method the name of the desired element. The following expression will return all Book elements in the sample document:
xDoc.Descendants("Book")If you call the Descendants method without an argument, it will return all nodes under the current element. I will demonstrate the use of the Elements and Descendants methods and their differences through sample code shortly.
In addition, elements may have attributes, which you can access via the Attribute property. The Attribute method applies to an XElement node in the document and extracts the value of the attribute whose name you pass to the method as an argument.
Let's write a loop to iterate through our simple collection of books which are in the xDoc variable:
For Each book In xDoc.Elements("Book")
    Debug.WriteLine("ISBN " & book.Attribute("ISBN").Value.ToString)
    Debug.WriteLine("   Title: " & book.Element("Name").Value.ToString)
    Debug.WriteLine("   Price: " & book.Element("Price").Value.ToString)
    Dim stock = book.Element("Stock")
    Debug.WriteLine("      Books in stock " & stock.Attribute("InStock").Value)
    Debug.WriteLine("      Books on order " & stock.Attribute("OnOrder").Value)
Next
The loop iterates through the Book elements in the XML file. The expression xDoc.Elements("Book") returns a collection of XElement objects, each one representing a book. We then call the Attribute method of each Book element to access the element's attributes by name. The Descendants method returns a collection of XElement objects, one for each subelement of the element represented by the book XElement. One of the elements, the Stock element, has its own attributes. To read their values, the code creates a variable that represents the Stock element and uses its Attribute method to retrieve an attribute by name. The output of the preceding code segment is shown here:
ISBN 0000000000001
   Title: Book Title 1
   Price: 11.95
      Books in stock 12
      Books on order 24
ISBN 0000000000002
   Title: Book Title 2
   Price: 10.25
      Books in stock 7
Books on order 10There's a shorthand notation for accessing attributes, elements, and descendants in an XML file: The @ symbol is shorthand for the Attribute property, a pair of angle brackets (<>) is shorthand for the Element property, and two dots (..) are shorthand for the Descendants property. The following code segment is identical to the preceding one, only this time I'm using the shorthand notation. The output will be the same as before.
For Each book In doc.Elements("Book")
    Debug.WriteLine("ISBN " & [email protected])
    Debug.WriteLine("   Title: " & book...<Name>.Value.ToString)
    Debug.WriteLine("   Price: " & book...<Price>.Value.ToString)
    Dim stock = book.Element("Stock")
    Debug.WriteLine("      Books in stock " & [email protected])
    Debug.WriteLine("      Books on order " & [email protected])
Next
Notice that attributes are returned as strings and have no Value property.
In addition to traversing XML documents, you can edit them. To add a new element under an existing one, use the Add method, which accepts as an argument the new XElement:
XElement.Add(New XElement (element_name, element_value))
To add a new element that represents a new book to the xDoc variable, call the Add method on the root element, passing the appropriate XElement and XAttribute objects that represent the properties of the new book:
xDoc.Add(New XElement("Book", New XAttribute("ISBN", "0000000003"),
                              New XElement("Price", 19.99),
                              New XElement("Title", "Book Title 3"),
                              New XElement("Stock",
                                  New XAttribute("InStock", 2),
                                  New XAttribute("OnOrder", 5))))
If you execute these statements, the following XML segment will be added to the document:
<Book ISBN="0000000003">
    <Price>19.99</Price>
    <Title>Book Title 3</Title>
    <Stock InStock="2" OnOrder="5" />
</Book>
To change an element's value, call the SetElementValue method, which accepts as an argument the element's new value:
XElement.SetElementValue(new_value)
The SetElementValue method can replace simple content; you can't use it to replace an element's value with a collection of nested elements. If you're at the Price XElement of the first book in the document, you can change the book's price with a statement like the following:
XElement.SetElementValue("9.99")To remove an element from a document, call the Remove method. This method doesn't accept any arguments; it just removes the XElement object to which it's applied. You navigate to the element you want to remove as discussed earlier in this section and call the Remove method. You can also apply this method to an XElements collection to quickly remove a larger section of the document.
Two methods to edit attributes are available to you from within VB. The Add method of the XElement class can accept as an argument an XAttribute object. When applied to an XElement object, it will add the XAttribute to the XElement object. To change the value of an attribute, call the XElement class SetAttributeValue, and pass the attribute value as an argument.
Both the SetElementValue and SetAttributeValue methods can be called with a Nothing value in the place of the second argument (the value argument) to remove a specified element or attribute. An empty string will change the value of the element or attribute but not remove it.
Now is a good time to look at some VB code that exercises all the methods and properties discussed so far. Instead of dwelling on the descriptions of the various axis methods, I designed an XML document that will demonstrate the use of the axis methods and will allow you to experiment with them, as well as with the methods discussed in the following section of this chapter. The XML fragment we'll use for our samples describes a hierarchy of countries and cities and is shown in Listing 13.5.
Example 13.5. AN XML fragment of geographical data
Dim countries = <Countries>
                    <Country>
                        <Code>IT</Code>
                        <Description>Italy</Description>
                        <Cities>
                            <City>
                                <Code>ROM</Code>
                                <Description>Rome</Description>
                            </City>
                            <City>
                                <Code>FLR</Code>
                                <Description>Florence</Description>
                            </City>
                        </Cities>
                    </Country>
                    <Country>
                        <Code>DE</Code>
                        <Description>Germany</Description>
                        <Cities>
                            <City>
                                <Code>BRL</Code>
                                <Description>Berlin</Description>
</City>
<City>
<Code>MUN</Code>
<Description>Munich</Description>
</City>
<City>
<Code>FRN</Code>
<Description>Frankfurt</Description>
</City>
</Cities>
</Country>
</Countries>It's a very short segment with two countries and a couple of cities in each country, but we'll extend it shortly. Notice that each item, whether it's a country or a city, is described by two elements by the same name: the Code and Description elements. Each country is identified by a code and a description, and the same is true for each city; their tags are Code and Description in both cases. This is not uncommon in XML, as long as no two identical tags appear under the same element. Personally, I recommend that you differentiate the element names in all cases (using names like countryName and cityName in our examples), but it's not always up to you. Sometimes you may also have to use identical element names, so just be sure that they do not belong to the same parent element.
The following loop retrieves the values of all Description elements in the document (they're all the elements by that name under the root element, Country):
For Each destination In countries.Descendants("Description")
    TextBox1.AppendText(destination.Value & vbCrLf)
Next
The output generated by the preceding loop is shown next:
Italy
Rome
Florence
Germany
Berlin
Munich
Frankfurt
As you can see, the expression countries.Descendants("Description") retrieves all Description elements, regardless of whether they represent countries or cities. Had you used different tag names for countries and cities, it would have simplified things, but this contrived example will better demonstrate the use of the various axis methods. The reason I chose this structure is because I ran into documents with tag names like Price or Code, which might appear more than once under different parents. When this happens, your code will appear to work as expected, but sometimes it will return the wrong price or code.
To retrieve all the country names, you must select all descendants (or all elements) with the Country name. The following expression is a collection with all countries:
countries.Descendants("Country")To retrieve the country names, write a loop that iterates through the items of this collection and prints the value of their Description element:
For Each destination In countries.Descendants("Country")
    TextBox1.AppendText(destination.Descendants("Description").Value & vbCrLf)
 Next
If you replace the call to the Descendants property with a call to the Elements property, the result will be the same, because you're retrieving elements under a country node.
To retrieve all city names, regardless of the country to which they belong, start with the following expression:
countries.Elements("Country").Elements("Cities").Elements("City")which retrieves all City elements under each Cities element under each Country element. This expression retrieves all Country nodes and then retrieves the Cities element under each node and finally all the City elements under the Cities node. The following loop iterates through all cities:
For Each destination In countries.Elements("Country").
                                   Elements("Cities").Elements("City")
    TextBox1.AppendText(destination.Element("Description").Value & vbCrLf)
Next
And here's the output produced by the preceding statements:
Rome
Florence
Berlin
Munich
Frankfurt
You can also move to a specific element in the hierarchy by indexing the appropriate Elements collection. To access the second country in the document, Germany, use this expression:
countries.Elements("Country")(1)If you call the ToString method of this expression, you will get the XML of the second country, which is shown here:
<Country>
  <Code>DE</Code>
<Description>Germany</Description>
  <Cities>
    <City>
      <Code>BRL</Code>
      <Description>Berlin</Description>
    </City>
    <City>
      <Code>MUN</Code>
      <Description>Munich</Description>
    </City>
    <City>
      <Code>FRN</Code>
      <Description>Frankfurt</Description>
    </City>
  </Cities>
</Country>
Usually, to simplify our code, we assign the segment of the document we're interested in to an XElement variable and work with it by applying the same methods to the XElement with the document's segment. To access the cities of Germany, retrieve the Cities element and then the elements under it. Here's the loop that iterates through the German cities:
For Each city In countries.Elements("Country")(1).Element("Cities").Elements
    Debug.WriteLine(city.Element("Description").Value)
Next
While you're at a German city, you can call the Ancestors property to retrieve the entire Cities element under the Germany node with the following expression:
city.Ancestors.ElementAt(0)
To retrieve the element that represents the entire Germany node, call the second element of the city's Ancestors collection:
city.Ancestors.ElementAt (1)
Both properties return a collection of XElement objects, and you can iterate through them as usual.
To add a new country to the countries document, call the Add method as follows:
countries.Add(New XElement ("Country", "Spain"))The new XElement can contain multiple nested elements, as in Listing 13.6, which adds an entire new country (including its code and the cities under it) to the countries document with a single statement.
Example 13.6. Adding a new country with a single statement
countries.Add(New XElement("Country",
                  New XElement("Code", "FR"),
                  New XElement("Description", "France"),
                  New XElement("Cities",
                      New XElement("City",
                          New XElement("Code", "PAR"),
                          New XElement("Description", "Paris")),
                      New XElement("City",
                          New XElement("Code", "NIC"),
                          New XElement("Description", "Nice")))))
I've nested this statement to make it easier to visualize. The idea is rather simple: To add multiple elements at the same level, you just supply their values and separate them with commas. To add nested elements, you insert a New XElement declaration in place of the parent element's value. Of course, you can always create intermediate variable to store individual elements and then add them one after the other. Just remember that the constructor of the XElement object accepts the element's name as its first argument and the element's value as the second argument. The element's value can be another XElement (as in the case of the Cities and City elements) or an array of XElement objects (as in the case of the Code and Description elements).
The alternative approach is to create city nodes, then add them to a country node, and finally add the country to the countries document. The statements in Listing 13.7 create a new country (Spain), then two new cities (Madrid and Barcelona), and then add the two cities to the Cities element of Spain. Finally, they add the new country, the countrySpain element, to the countries document.
Example 13.7. Adding a new country by building all intermediate elements
' Create an XElement to represent Spain
Dim countrySpain = New XElement("Country",
                                New XElement("Code", "ES"),
                                New XElement("Description", "Spain"))
' Create XElement to represent Madrid
Dim cityMadrid = New XElement("City",
                            New XElement("Code", "MAD"),
                            New XElement("Description", "Madrid"))
' Create XElement to represent Barcelona
Dim cityBarcelona = New XElement("City",
                            New XElement("Code", "BAR"),
                            New Element("Description", "Barcelona"))
' Create XElement to represent the cities of the Spain
Dim citiesSpain = New XElement("Cities")
' and add Madrid and Barcelona elements to it
citiesSpain.Add(cityMadrid)
citiesSpain.Add(cityBarcelona) ' add the spanish cities under Spain element countrySpain.Add(citiesSpain) ' and finally add the complete Spain element to the countries document countries.Add(countrySpain) MsgBox(countries.ToString)
The last statement displays the entire countries document, from which I've extracted the segment that corresponds to Spain:
<Country>
  <Code>ES</Code>
  <Description>Spain</Description>
  <Cities>
    <City>
      <Code>MAD</Code>
      <Description>Madrid</Description>
    </City>
    <City>
      <Code>BAR</Code>
      <Description>Barcelona</Description>
    </City>
  </Cities>
</Country>
Compare the statements in Listing 13.6 and Listing 13.7 to see the differences between the two approaches. They're functionally equivalent, but when you're building a complex XElement in a single statement, you have to make sure that the parenthesized expressions end properly.
Now we'll edit our XML document by adding a few more countries and embedding our initial countries collection into a larger collection with continents. We want to create a new document with the following structure:
Globe
  Continents
      Continent
          Countries
              Country
                  States
                      State
                          Cities
                             City
                             City
                             ...
                      State
...
Country
...
Continent
...It's a straightforward document that you can easily create with the functional composition approach. Since you already have a segment of the document, you should be able to reuse the countries document, right? Indeed, this is the case. Start typing a new XElement with the new structure, and when you get to Europe, just embed the existing document, as shown in Listing 13.8 (the bold statement inserts the contents of the XElement that represents European countries into the document).
Example 13.8. Functional composition of an XML document
Dim Globe =
<Globe>
   <Continents>
      <Continent>
         <Code>EU</Code>
         <Description>Europe</Description>
         <%= countries %>
      </Continent>
      <Continent>
         <Code>NA</Code>
         <Description>N. America</Description>
         <Countries>
            <Country>
               <Code>USA</Code>
               <Description>U.S.A.</Description>
               <States>
                  <State>
                     <Code>CA</Code>
                     <Description>California</Description>
                     <Cities>
                        <City>
                        <Code>LAX</Code>
                        <Description>Los Angeles</Description>
                     </City>
                     <City>
                        <Code>SD</Code>
                        <Description>San Diego</Description>
                     </City>
                     <City>
                        <Code>SF</Code>
                        <Description>San Francisco</Description>
                     </City>
                  </Cities>
</State>
<State>
<Code>NY</Code>
<Description>New York</Description>
<Cities>
<City>
<Code>NYC</Code>
<Description>New York City</Description>
</City>
<City>
<Code>ALB</Code>
<Description>Albany</Description>
</City>
</Cities>
</State>
</States>
</Country>
<Country>
<Code>MX</Code>
<Description>Mexico</Description>
<Cities>
<City>
<Code>MXC</Code>
<Description>Mexico City</Description>
</City>
<City>
<Code>TIJ</Code>
<Description>Tijuana</Description>
</City>
<City>
<Code>GDJ</Code>
<Description>Guadalajara</Description>
</City>
</Cities>
</Country>
</Countries>
</Continent>
</Continents>
</Globe>Figure 13.6 shows how you can mix VB and XML in the code editor and switch from one to the other by opening and closing the <% and %> tags.
Note that I included state information in the USA country to add a twist to the document. When you process it, you must take into consideration that some countries are separated into states, while others aren't. You'll start with a loop that iterates through the continents and their subordinate elements and prints out continents, countries, and cities. For the time being, you'll ignore the states; you just want to print the cities under each country. The code shown in Listing 13.9 consists of three nested loops: The outer one goes through the continents, the next inner one countries under each continent, and the innermost loop goes through the cities under each country.
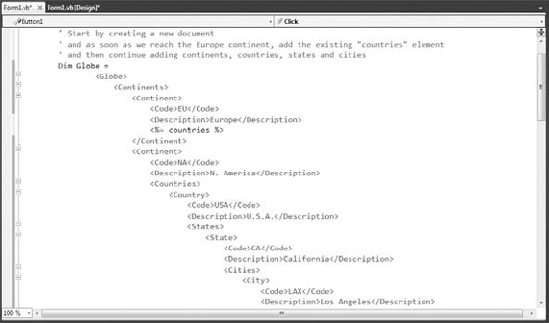
Figure 13.6. The gap between traditional programming and XML has suddenly narrowed with VB's support of XML.
Example 13.9. Iterating through the globe document's continents, countries, and cities
For Each continent In Globe.Elements("Continents").Elements("Continent")
    TextBox1.AppendText(continent.Element("Description").Value & vbCrLf)
    For Each country In continent.Elements("Countries").Elements("Country")
        TextBox1.AppendText(vbTab & country.Element("Description").Value & vbCrLf)
        For Each city In country.Descendants("Cities").Elements("City")
            TextBox1.AppendText(vbTab & vbTab &
                                 city.Elements("Description").Value & vbCrLf)
        Next
    Next
Next
The expression Globe.Elements("Continents").Elements("Continent") returns a collection of all continents in the globe document. The continent control variable is an XElement itself that represents the current continent in the outer loop. To extract the current continent's countries, the code uses the expression continent.Elements("Country"), which returns a collection of countries. The country control variable is also an XElement that represents the current continent's states and cities. Although all expressions use the Elements axis to locate the corresponding elements, the innermost loop uses the Descendants axis to retrieve the cities, whether they belong to a country or a state. The code of Listing 13.9 will produce the following output:
Europe
     Italy
          Rome
          Florence
Germany
Berlin
Munich
Frankfurt
France
Paris
Spain
Madrid
N. America
U.S.A.
Los Angeles
San Diego
San Francisco
New York City
Albany
Mexico
Mexico City
Tijuana
GuadalajaraIf you replace the line
For Each city In country.Descendants("Cities").Elements("City")with the following:
For Each city In country.Elements("Cities").Elements("City")you will get the same results for all countries, except the United States, where the cities are nested under their states (there will be no cities under the US node).
If the preceding code segment is not clear to you or if you'd prefer a more verbose version of the same code segment, here's an alternate method of producing the same output. This time I create two intermediate variables to store countries and cities: the continentCountries and countryCities variables. These variables are collections that hold the appropriate elements at each iteration of the corresponding loop:
For Each continent In Globe.Elements("Continents").Elements("Continent")
    TextBox1.AppendText(continent.Element("Description").Value & vbCrLf)
    Dim continentCountries = continent.Elements("Countries")
    For Each country In continentCountries.Elements("Country")
        TextBox1.AppendText(
                  vbTab & country.Element("Description").Value & vbCrLf)
        Dim countryCities = country.Descendants("Cities")
        For Each city In countryCities.Elements("City")
            TextBox1.AppendText(vbTab & vbTab & _
                  city.Elements("Description").Value & vbCrLf)
        Next
    Next
Next
If you want to include the states (and this is obviously the proper method of iterating through this document), you must differentiate the countries with states from the countries without states. To do so, you must retrieve the States descendants of each country node and examine their count. If the count is zero, which means there are no states under the current country, the code should proceed with the cities of the country. If the count is positive, the code must first iterate through the States descendants and then through the cities in each state. Listing 13.10 shows the final loop that iterates through the globe document, taking into consideration the different organization schema of certain countries.
Example 13.10. Iterating through the globe document's continents, countries, states, and cities
For Each continent In Globe.Descendants("Continents").Descendants("Continent")
    TextBox1.AppendText(continent.Element("Description").Value & vbCrLf)
    For Each country In continent.Descendants("Country")
        TextBox1.AppendText(vbTab & country.Element("Description").Value & vbCrLf)
        If country.Descendants("States").Count = 0 Then
            Dim CountryCities = country.Descendants("Cities")
            For Each city In CountryCities.Descendants("City")
                TextBox1.AppendText(vbTab & vbTab &
                                city.Elements("Description").Value & vbCrLf)
            Next
        Else
            For Each state In country.Descendants("State")
                TextBox1.AppendText(vbTab & vbTab & _
                                     state.Element("Description").Value & vbCrLf)
                Dim CountryCities = state.Descendants("Cities")
                For Each city In CountryCities.Descendants("City")
                    TextBox1.AppendText(vbTab & vbTab & vbTab &
                                   city.Elements("Description").Value & vbCrLf)
                Next
            Next
        End If
    Next
Next
The output produced by the preceding code segment is shown next (I'm showing only a single country in Europe in the interest of saving some space on the printed page):
Europe
    Italy
        Rome
        Florence
N. America
    U.S.A.
        California
            Los Angeles
San Diego
San Francisco
New York
New York City
Albany
Mexico
Mexico City
Tijuana
GuadalajaraTo make the most of the XElement class, you must familiarize yourself with the concept of lambda expressions. Lambda expressions are inline functions you can embed in some of the methods, most notably in the Where method. This method selects certain elements from an XElements collection based on criteria you specify.
The syntax of the Where method requires that you pass as an argument a function that determines whether an element will be selected by the Where method. This function will be called once for each element in the collection, and it must return a True/False value to indicate whether the current element passed the selection criteria. Now, how do you pass a function to a method? Lambda expressions to the rescue. To specify a lambda function, you declare a function without a name but with an argument list and a statement. Here's a lambda function that evaluates to a True/False value and can be used with the Where extension method:
Function(Bk As Book) Book.Price >= 30
This lambda function accepts as an argument an object of the Book type and returns True if the price of the book represented by the Bk variable is $30 or more. To use this function in a Where method, just pass the entire statement as an argument:
Books.Elements("Book").Where(Function(Bk As Book) Bk.Price >= 30)The preceding expression will extract from the Books collection all books with a value of $30 or more.
Let's return to the countries example and write a lambda function that will be used with the Where method to retrieve the cities in Germany:
Dim germanCities =
       countries.Elements("Country").
       Where(Function(ctry) ctry.Element("Code").Value = "DE").
       Descendants("Cities").Descendants("City")
The germanCities variable is a collection that contains all cities in Germany, and you can iterate through them with a loop as usual. To find out the number of cities under the Germany node, call the Count property of the germanCities collection.
In the next chapter, you'll learn an even better method of selecting elements in an XML document, namely, the LINQ syntax. LINQ, however, is based on the methods exposed by the XElements and Descendants classes, which is why I've chosen to show you the hard method first.
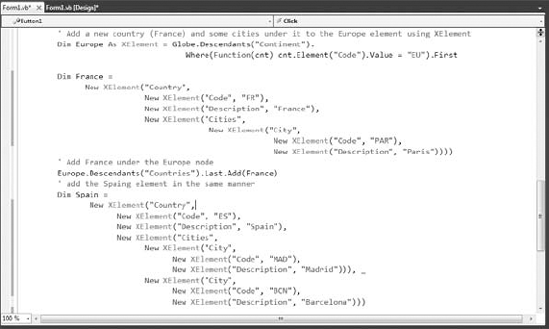
Let's apply the Where method of the IEnumerable type to this chapter's main sample document, the globe document. The following statement uses a lambda expression to locate the XElement that represents the entire node of Europe:
Dim Europe As XElement =
        Globe.Descendants("Continent").
        Where(Function(cnt) cnt.Element("Code").Value = "EU").First
Now, this statement contains a method you haven't seen before, the First method. The First method returns the first element in a collection of XElement objects. The Where clause in our sample code will always return a single XElement, but this is just a special case. In general, the Where method may (and it usually does) return multiple elements as an IEnumerable (basically, a collection you can enumerate over). To make sure that you retrieve a single element (and not a collection by mistake), we call the First method. The Europe variable is an XML segment that represents Europe.
To add new countries to Europe, you can use the Add method of the XElement as discussed earlier in this chapter. Let's prepare a couple of XElement objects that represent countries in Europe:
Dim France =
      New XElement("Country",
                   New XElement("Code", "FR"),
                   New XElement("Description", "France"),
                   New XElement("Cities",
                            New XElement("City",
                                     New XElement("Code", "PAR"),
                                     New XElement("Description", "Paris"))))
Dim Spain =
       New XElement("Country",
             New XElement("Code", "ES"),
             New XElement("Description", "Spain"),
             New XElement("Cities",
                   New XElement("City",
                         New XElement("Code", "MAD"),
                         New XElement("Description", "Madrid"))),
                   New XElement("City",
                         New XElement("Code", "BCN"),
                         New XElement("Description", "Barcelona")))
To add the two countries to the Europe element, just call the Add method once for each country, as shown in Figure 13.7.
Here ends the introduction to XML and the VB methods for manipulating XML. In the next chapter, you'll learn an even better method of working with XML documents, namely, LINQ. LINQ is a querying language you can apply not only to XML but to collections of objects, simple arrays, and even databases. It's the new method of querying data, and it's an exciting topic. Before moving on to LINQ, however, I must present a very special topic in the Framework—serialization.
In Chapter 12, "Storing Data in Collections," you learned how to use collections to store items, how to access their elements, and even how to sort and search the collections. To make the most of collections and to use them to store large sets of data, you should also learn how to persist collections to disk files or databases.
Persisting data means storing them on disk at the end of one session and reloading them into the same application in a later session. The persisted data can also be shared among different applications and even different computers, as long as there's an application that knows what to do with the data. What good is it to create a large collection if your application can't save it and retrieve it from session to session?
Since time immemorial, programmers had to write code to save their data to disk. The most challenging aspect of the data persisting was the format used to store the data. With XML being a universal format, what better method of persisting data than converting them to XML documents? Indeed, it's possible to convert any object or collection to an XML document and save it to a file or exchange it with any other system. By the way, the XML format is quite verbose and wouldn't have caught up earlier, when storage was expensive.
In this chapter, you'll see how to convert objects to streams with a technique known as serialization, which is the process of converting arbitrary objects to streams of bytes. After you obtain the serialized stream for a specific object, you can persist the object to disk, as well as read it back. The process of reconstructing an object from its serialized form is called deserialization. It makes so much sense to convert objects to XML and back; that the process is supported natively by the Framework. The System.Xml.Serialization class can convert arbitrary objects to XML and back, and you'll see shortly how easy it is to use this class—no, you won't have to use any of the techniques discussed so far to create your own XML. You just call the Serialize and Deserialize methods of this class to do the work for you.
To use XML serialization, you must create an instance of the XmlSerializer class and then call its Serialize method (or the Deserialize method to extract data from an XML stream and populate an instance of a custom class). The XmlSerializer class belongs to the XmlSerialization namespace, which is not imported by default in a new project. To use it, import the Serialization class by inserting the following statement at the beginning of the module that needs the serialization services:
Imports System.Xml.Serialization
To set up a new instance of the class, you must call the XmlSerializer class constructor, passing as an argument the type of objects it will serialize or deserialize. You can't use the same instance of the XmlSerializer class to serialize arbitrary objects; instead, you must tell the compiler the type of object you need to serialize in the XmlSerializer constructor. Here's how to set up a new instance of the XmlSerializer class:
Dim serializer As New XmlSerializer(custom_type)
The custom_type argument represents a custom (or built-in for that matter) type, whose instances are intended to be serialized through the XmlSerializer class. You can also pass the name of the class itself to the constructor by using a statement such as the following:
Dim serializer As New XmlSerializer(GetType(CustomClass))
The serializer object can be used to serialize only instances of the specific class, and it will throw an exception if you attempt to serialize a different class with it. Note also that all classes are XML-serializable by default. I'm mentioning this here because with the other serialization types, you must prefix the classes with the <Serializable> attribute to make them serializable.
In the background, CLR will create a temporary assembly, a process that will take a few moments. The temporary assembly, however, will remain in memory as long as the application is running. After the initial delay, XML serialization will be quite fast.
Once the serializer variable has been set up, you can call the Serialize method, passing two arguments: a stream that will accept the serialized data and the object to be serialized:
serializer.Serialize(stream, object)
That's all it takes to convert an object or collection of objects to an XML document. To reconstruct the original object, call the Deserialize method, and pass the stream with the serialized data as an argument. This stream points to the file to which the serialization data has been stored:
object = serializer.Deserialize(stream)
The Deserialize method returns an Object data type, which you must cast to the appropriate type, as with the following statement:
object = CType(serializer.Deserialize(stream), object_type)
As for setting up the Stream object that will accept the serialization data (or provide the serialized data to the Deserialize method), that's also straightforward. If you're not familiar with the concept of streams, please read the tutorial "Accessing Files and Folders" (available for download from http://www.sybex.com/go/masteringvb2010). Start by importing the System.IO namespace, and then create a new FileStream object that points to the file that will accept the serialization data:
Dim saveFile As New FileStream("Objects.xml", FileMode.Create)The saveFile variable represents a stream and must be passed to the Serialize method along with the object to be serialized. To create a stream for reading data, use a statement like the following:
Dim Strm As New FileStream("Objects.xml", FileMode.Open)Let's serialize a few simple objects to get a feel of the functionality of the XmlSerialization namespace and how to use it to move objects to their XML equivalents and back.
Let's serialize a single Rectangle object using the following statements:
Dim saveFile As FileStream
saveFile = File.OpenWrite("Rectangles.xml")
Dim serializer As New XmlSerializer(GetType(Rectangle))
Dim R As New Rectangle(10, 10, 100, 160)
serializer.Serialize(saveFile, R)
saveFile.Close()
If you execute the preceding statements, the following data will be stored in the Rectangles.xml file:
<?xml version="1.0" encoding="utf-8"?>
<Rectangle xmlns:xsi="http://www.w3.org/2001/XMLSchema-instance"
 xmlns:xsd="http://www.w3.org/2001/XMLSchema">
  <Location>
    <X>10</X>
    <Y>10</Y>
  </Location>
  <Size>
    <Width>100</Width>
    <Height>160</Height>
  </Size>
  <X>10</X>
  <Y>10</Y>
  <Width>100</Width>
  <Height>160</Height>
</Rectangle>
This is a well-formed XML document. As you can see, the XmlSerializer extracted the basic properties of the Rectangle object and used them to create an XML document with the basic properties of the Rectangle as elements. Note that all relevant information has been stored in elements, and there are no attributes in the XML generated by the XmlSerializer class's Serialize method.
There's some redundancy in this file because the values of the properties appear twice. This isn't part of the XML specification; the document contains the values of the following properties: Location, Size, X, Y, Width, and Height. The Rectangle object exposes additional properties, such as the Top, Bottom, and so on, but these values aren't serialized. The Location property is an object, which in turn exposes the X and Y properties. The values of these properties appear within the Location segment of the document and as separate values near the end of the file. The same happens with the Size property.
To deserialize the data and create a new Rectangle object with the same properties as the original one, set up a Stream object and an XMLSerializer object, and then call the XmlSerializer object's Deserialize method:
Imports System.Xml.Serialization
Dim serializer As New XmlSerializer(GetType(Rectangle))
Dim FS As FileStream
FS = New FileStream("Rectangles.xml", FileMode.Open)
Dim R As Rectangle
R = serializer.Deserialize(FS)
FS.Close()
Not surprisingly, if you examine the properties of the R object that was created by the deserialization process, you'll see that it's identical to the Rectangle object you serialized earlier to disk.
Let's move on to a more interesting example. This time we'll serialize a more elaborate custom object. Listing 13.11 shows a class that describes books. The Book class is quite trivial, except that each book can have any number of authors. The authors are stored in an array of Author objects, where Author is a nested class (Book.Author).
Example 13.11. The Book class definition
Public Class Book
    Private _title As String
    Private _pages As Integer
    Private _price As Decimal
    Private _authors() As Author

    Public Sub New()

    End Sub

    Public Property Title() As String
        Get
            Return _title
        End Get
        Set(ByVal Value As String)
            If Value.Length > 100 Then
_title = Value.Substring(0, 99)
Else
_title = Value
End If
End Set
End Property
Public Property Pages() As Integer
Get
Return _pages
End Get
Set(ByVal Value As Integer)
_pages = Value
End Set
End Property
Public Property Price() As Decimal
Get
Return _price
End Get
Set(ByVal Value As Decimal)
_price = Value
End Set
End Property
Public Property Authors() As Author()
Get
Return (_authors)
End Get
Set(ByVal Value As Author())
_authors = Value
End Set
End Property
Public Class Author
Private _firstname As String
Private _lastname As String
Public Property FirstName() As String
Get
Return _firstname
End Get
Set(ByVal Value As String)
If Value.Length > 50 Then
_firstname = Value.Substring(0, 49)
Else
_firstname = ValueEnd If
End Set
End Property
Public Property LastName() As String
Get
Return _lastname
End Get
Set(ByVal Value As String)
If Value.Length > 50 Then
_lastname = Value.Substring(0, 49)
Else
_lastname = Value
End If
End Set
End Property
End Class
End ClassThe following statements create a new Book object, which includes three authors:
Dim BK0 As New Book
Dim authors(2) As Book.Author
authors(0) = New Book.Author
authors(0).FirstName = "Author1 First"
authors(0).LastName = "Author1 Last"
authors(1) = New Book.Author
authors(1).FirstName = "Author2 First"
authors(1).LastName = "Author2 Last"
authors(2) = New Book.Author
authors(2).FirstName = "Author3 First"
authors(2).LastName = "Author3 Last"
BK0.Title = "Book Title"
BK0.Pages = 234
BK0.Price = 29.95
BK0.Authors = authors
To exercise some of the new "convenience" features of VB 2010, we'll add another book using object initializers, this time with more meaningful data:
Dim authors() = {New Author With
                      {.FirstName = "Evangelos", .LastName = "Petroutsos"}, _
                 New Author With {.FirstName = "Richard", .LastName = "Manning"}}
Dim BK1 = New Book1 With { _
            .ISBN = "0-470-53287-4",
                      .Title = "Mastering Visual Basic 2010", .Authors = authors}
To serialize the BK0 and BK1 variables, create a new XmlSerializer object, and call its Serialize method as usual:
Dim serializer As New XmlSerializer(BK1.GetType)
Dim strm As New FileStream("books.xml", FileMode.Create)
serializer.Serialize(strm, BK0)
strm.Close()
To serialize two objects in the same file, call the Serialize method twice, passing as an argument the appropriate instance of the Book object, as shown here:
serializer.Serialize(strm, BK0)
serializer.Serialize(strm, BK1)
As you can understand, serialization would be severely limited without the ability to serialize arrays and collections, and this is the topic we'll explore in the next section. However, it's worth taking a look at the contents of the books.xml file generated by the XmlSerializer class. If you open the books.xml file, shown in Listing 13.12, you'll see that it contains two XML documents (the <?xml> tag appears twice in the file). This certainly isn't a valid XML document because it doesn't contain a unique root element. However, you can see the equivalence between the structure of the class and the XML document. The serializer takes all the public properties and converts them to elements. Nested classes, like the Authors under the Book class, are converted to nested elements. Moreover, there are no attributes to the resulting XML; all properties are translated into elements.
Example 13.12. Typical XML-serialized data
<?xml version="1.0"?>
<Book xmlns:xsi=http://www.w3.org/2001/XMLSchema-instance
 xmlns:xsd="http://www.w3.org/2001/XMLSchema">
  <Title>Book Title</Title>
  <ISBN>1234567890</ISBN>
  <Price>29.95</Price>
  <Pages>0</Pages>
  <Authors>
    <Author>
      <FirstName>Author1 First</FirstName>
      <LastName>Author1 Last</LastName>
    </Author>
    <Author>
      <FirstName>Author2 First</FirstName>
      <LastName>Author2 Last</LastName>
    </Author>
    <Author>
      <FirstName>Author3 First</FirstName>
      <LastName>Author3 Last</LastName>
    </Author>
</Authors>
</Book>
<?xml version="1.0"?>
<Book xmlns:xsi="http://www.w3.org/2001/XMLSchema-instance"
xmlns:xsd="http://www.w3.org/2001/XMLSchema">
<Title>Mastering Visual Basic 2010</Title>
<ISBN>0-470-53287-4</ISBN>
<Price>0</Price>
<Pages>0</Pages>
<Authors>
<Author>
<FirstName>Evangelos</FirstName>
<LastName>Petroutsos</LastName>
</Author>
<Author>
<FirstName>Richard</FirstName>
<LastName>Manning</LastName>
</Author>
</Authors>
</Book>Each book has been serialized as a separate entity; the serialization process did not create a new root element that encloses the serialized objects. Even though this isn't a well-formed XML document, you can deserialize the two objects by calling the Deserialize method twice, as shown in the following code segment:
Dim serializer As New XmlSerializer(GetType(Book))
Dim strm As New FileStream("books.xml", FileMode.Open)
Dim book1 = CTpe(serializer.Deserialize(strm), Book)
Dim book2 = CTpe(serializer.Deserialize(strm), Book)
strm.Close()Let's see how to serialize collections of objects in XML format, starting with a hard rule:
| The collection to be serialized must be strongly typed. |
You can use XML serialization with typed arrays, Lists and Dictionaries, but you can't serialize ArrayLists or arrays of arbitrary objects. All the elements of the collection should have the same type, which must match the type you pass to the constructor of the XmlSerializer class. If you pass to the serializer an array of objects of different types, no warning will be issued at design time, but a runtime exception will be thrown as soon as your code reaches the Serialize method. The XmlSerializer instance is constructed by the compiler on the fly for a specific type of object, and any given instance of this class can handle objects of the specific type and nothing else.
Let's start by creating an array of Book objects and then serialize it. First, we'll create an array of the Book type and store a few properly initialized instances of the Book class to its elements. In Listing 13.13, I'm using the variables BK0, BK1, BK2, and BK3, but I'm not showing the code for their initialization. Then, we'll pass this array to the Serialize method of the XmlSerializer class, also as shown in Listing 13.13.
Example 13.13. XML serialization of an array of objects
Private Sub bttnSaveArrayXML_Click(...)Handles bttnSaveArrayXML.Click
      Dim AllBooks(3) As Book
      ' initialize the BK0, BK1, BK2 and BK3 variables
      AllBooks(0) = BK0
      AllBooks(1) = BK1
      AllBooks(2) = BK2
      AllBooks(3) = BK3

      Dim serializer As New XmlSerializer(AllBooks.GetType)

      Dim FS As FileStream
      Try
          FS = New FileStream("SerializedXMLArray.xml", FileMode.Create)
          serializer.Serialize(FS, AllBooks)
      Catch exc As Exception
          MsgBox(exc.InnerException.ToString)
          Exit Sub
      Finally
          FS.Close()
      End Try
      MsgBox("Array of Book objects saved in file SerializedXMLArray.xml"
End Sub
The XmlSerializer class constructor accepts as an argument the array type. Because the array is typed, it can figure out the type of custom objects it will serialize.
There's a substantial overhead the first time you create an instance of the XmlSerializer class, but this happens only once during the course of the application. The overhead is caused by the CLR, which creates a temporary assembly for serializing and deserializing the specific type. This assembly, however, remains in memory for the course of the application, and the initial overhead won't recur. Even though there will be an additional delay of a couple of seconds when the application starts (or whenever you load the settings), you can persist the class with the application's configuration every time the user changes one of the settings without any performance penalty.
To serialize a List collection, you must pass the same type of argument as you used in the list declaration to the XmlSerializer class constructor. The constructor doesn't need to know that you're planning to serialize a List collection; all it cares about is the type of objects it's going to serialize. The following two statements declare a List of Person objects and an instance of the XMLSerializer for serializing this collection:
Dim Persons As New List(Of Person)
Dim XMLSRLZR As New XmlSerializer(Persons.GetType)
The statements for serializing and deserializing the collection are identical to the ones you'd use to serialize any other object. To serialize a collection, create a StreamWriter for a new file, and then call the Serialize method, passing the stream as an argument:
' To serialize a typed collection:
Dim WStrm As New IO.StreamWriter(file_path)
XMLSRLZR.Serialize(WStrm, Persons)
(In the preceding sample code I used the StreamWriter class, which is equivalent to a Stream object opened for writing to a file). To deserialize the same collection, create a FileStream for the file where the serialization data has been stored, and call its Deserialize method. This method returns an object, which you must cast to the appropriate type as usual (in our case to a List of Book objects):
Dim RStrm As New IO.FileStream(file_path, IO.FileMode.Open)
newPersons = CType(XMLSRLZR.Deserialize(Rstrm), List(Of Person))
As I mentioned earlier, XML serialization is the most common form of serialization, but it's not the only one. You can use two more types of serialization, namely, binary and SOAP serialization.
Binary serialization is performed with the BinaryFormatter class, and it converts the values of the object's properties into a binary stream. The result of the binary serialization is compact and efficient. However, the output it produces is not human readable, and you can't do much with a file that contains a binary serialized object without access to the original application code. Because binary serialization is very compact and very efficient, it's used almost exclusively to persist objects between sessions of an application or between applications that share the same classes.
The other serialization type, SOAP serialization, is very similar to XML serialization, but the resulting document is more structured and contains information about the properties that have been serialized. Each book's authors, for example, are marked as an array. The Authors property will be serialized as follows:
<_authors href="#ref-5"/>
This is a reference to another element with the generic name ref-5 in the same document, and here's the definition of this element:
<SOAP-ENC:Array id="ref-5" SOAP-ENC:arrayType="a1:Author[2]">
<item href="#ref-6"/>
<item href="#ref-7"/>
</SOAP-ENC:Array>
The array contains two elements, which are also referenced in the array. Finally, here are the definitions of the two elements of the Authors array in the same file:
<a1:Author id="ref-6" >
<_firstname id="ref-8">Evangelos</_firstname>
<_lastname id="ref-9">Petroutsos</_lastname>
</a1:Author>
<a1:Author id="ref-7">
<_firstname id="ref-10">Richard</_firstname>
<_lastname id="ref-11">Manning</_lastname>
</a1:Author>
Let's start with binary serialization, which is implemented in the following namespace (you must import it into your application):
Imports System.Runtime.Serialization.Formatters.Binary
This namespace isn't loaded by default, and you must add a reference to the corresponding namespace. Right-click the project's name in the Solution Explorer, and choose Add Reference from the context menu. In the Add Reference dialog box that appears, select the same namespace as in the Imports statement shown earlier.
To use a SOAP serializer in your application, reference the assembly System.Runtime.Serialization.Formatters.Soap.dll and import the following namespace:
Imports System.Runtime.Serialization.Formatters.Soap
You can serialize individual objects as well as collections of objects. To serialize an object, you must call the Serialize method of the System.Runtime.Serialization.Formatters.Binary object. First declare an object of this type with a statement like the following:
Dim BFormatter As New BinaryFormatter()
The BinaryFormatter class persists objects in binary format. You can also persist objects in text format by using the SoapFormatter class. SoapFormatter persists the objects in XML format, which is quite verbose, and the corresponding files are considerably lengthier. To use the SoapFormatter class, declare a SoapFormatter variable with the following statement:
Dim SFormatter As Soap.SoapFormatter
SOAP is a protocol for accessing objects over HTTP; in other words, it's a protocol that allows the encoding of objects in text format. SOAP was designed to enable distributed computing over the Internet. SOAP uses text to transfer all kinds of objects, including images and audio, and it's not rejected by firewalls.
The BinaryFormatter and SoapFormatter methods are equivalent, so I will use BinaryFormatter for the examples in this section. To serialize an object, call the Serialize method of the appropriate formatter, where stream is a variable that represents a stream and object is the object you want to serialize. Here's the syntax:
BFormatter.Serialize(stream, object)
Because we want to persist our objects to disk, the stream argument represents a stream to a file where the serialized data will be stored. It can be created with statements like the following:
Dim saveFile As FileStream
saveFile = File.Create("Shapes.bin", IO.FileMode.Create)
The saveFile variable represents the stream to a specific file on the disk, and the Create method of the same variable creates a stream to this file.
After you have set up the Stream and BinaryFormatter objects, you can call the Serialize method to serialize any object. To serialize a Rectangle object, for example, use the following statements:
Dim R As New Rectangle(0, 0, 100, 100)
BFormatter.Serialize(saveFile, R)
Listing 13.14 serializes two Rectangle objects to the Shapes.bin file. The file's extension can be anything. Because the file is binary, I used the .bin extension.
Example 13.14. Serializing distinct objects
Dim R1 As New Rectangle()
R1.X = 1
R1.Y = 1
R1.Size.Width = 10
R1.Size.Height = 20
Dim R2 As New Rectangle()
R2.X = 10
R2.Y = 10
R2.Size.Width = 100
R2.Size.Height = 200
Dim saveFile As FileStream
saveFile = File.Create("Shapes.bin")
Dim formatter As BinaryFormatter
formatter = New BinaryFormatter()
formatter.Serialize(saveFile, R1)
formatter.Serialize(saveFile, R2)
saveFile.Close()
Notice that the Serialize method serializes a single object at a time. To save the two rectangles, the code calls the Serialize method once for each rectangle. To serialize multiple objects with a single statement, you must create a collection, append all the objects to the collection, and then serialize the collection itself, as explained in the following section. If you serialize multiple objects of different types into the same stream, you can't deserialize them unless you know the order in which the objects were serialized and then deserialize them in the same order.
To deserialize a serialized object, you must create a new binary or SOAP formatter object and call its Deserialize method. Because the serialized data doesn't contain any information about the original object, you can't reconstruct the original object from the serialized data, unless you know the type of object that was serialized. Deserialization is always more difficult than serialization. Whereas the Serialize method will serialize any object you pass as an argument, the Deserialize method won't reconstruct the original object unless you know the type of the object you're deserializing. The Shapes.bin file of Listing 13.14 contains the serialized versions of two Rectangle objects. The Deserialize method needs to know that it will deserialize two Rectangle objects. If you attempt to extract the information of this file into any other type of object, a runtime exception will occur.
To deserialize the contents of a file, create a formatter object as you did for the serialization process, by using one of the following statements (depending on the type of serialization):
Dim SFormatter As Soap.SoapFormatter
Dim BFormatter As BinaryFormatter
Then establish a stream to the source of the serialized data, which in our case is the Shapes.bin file:
Dim Strm As New FileStream("Shales.Bin", FileMode.Open)Finally, deserialize the stream's data by calling the Deserialize method. Since the Deserialize method returns an object, you must also cast its value appropriately:
Dim R1, R2 As Rectangle
R1 = CType(SFormatter.Deserialize(Strm), Rectangle)
R2 = CType(SFormatter.Deserialize(Strm), Rectangle)
You can serialize as many objects as you like into the same stream, one after the other, and read them back in the same order. With binary and SOAP serialization, you're limited to a single type, as long as you deserialize the data in the proper order.
You can open the files with the serialized data and view their data. The contents of the file with two serialized Rectangle objects is shown next:
<SOAP-ENV:Envelope xmlns:xsi="http://www.w3.org/2001/XMLSchema-instance"
   xmlns:xsd="http://www.w3.org/2001/XMLSchema"
   xmlns:SOAP-ENC="http://schemas.xmlsoap.org/soap/encoding/"
   xmlns:SOAP-ENV="http://schemas.xmlsoap.org/soap/envelope/"
   xmlns:clr="http://schemas.microsoft.com/soap/encoding/clr/1.0"
   SOAP-ENV:encodingStyle="http://schemas.xmlsoap.org/soap/encoding/">
<SOAP-ENV:Body>
<a1:Rectangle id="ref-1" xmlns:a1="http://schemas.microsoft.com/clr/nsassem
         /System.Drawing/System.Drawing%
   2C%20Version%3D2.0.3600.0%2C%20Culture%3Dneutral%2C%20PublicKeyToken%
   3Db03f5f7f11d50a3a">
<x>0</x>
<y>0</y>
<width>100</width>
<height>100</height>
</a1:Rectangle>
</SOAP-ENV:Body>
</SOAP-ENV:Envelope>
<SOAP-ENV:Envelope xmlns:xsi="http://www.w3.org/2001/XMLSchema-instance"
xmlns:xsd="http://www.w3.org/2001/XMLSchema"
xmlns:SOAP-ENC="http://schemas.xmlsoap.org/soap/encoding/"
xmlns:SOAP-ENV="http://schemas.xmlsoap.org/soap/envelope/"
xmlns:clr="http://schemas.microsoft.com/soap/encoding/clr/1.0"
SOAP-ENV:encodingStyle="http://schemas.xmlsoap.org/soap/encoding/">
<SOAP-ENV:Body>
<a1:Rectangle id="ref-1" xmlns:a1="http://schemas.microsoft.com/clr/nsassem
/System.Drawing/System.Drawing%
2C%20Version%3D2.0.3600.0%2C%20Culture%3D
neutral%2C%20PublicKeyToken%3Db03f5f7f11d50a3a">
<x>65</x>
<y>30</y>
<width>19</width>
<height>199</height>
</a1:Rectangle>
</SOAP-ENV:Body>
</SOAP-ENV:Envelope>You'll never have to create your own SOAP files, so don't panic if they look complicated. There are, however, a few points of interest. First, you see a reference to the System.Drawing class, which indicates that the serialized data can't be used outside the context of the Framework; this file contains serialized data describing an instance of a specific class. The section of the file with the data contains the values of the two basic properties of the Rectangle object. Second, the SOAP format uses an XML notation to delimit its fields, but it's not an XML file. If you attempt to open the same file with Internet Explorer, you'll see a message indicating that it's not a valid XML document.
Serializing a collection is quite similar to serializing any single object, because collections are objects themselves. The second argument to the Serialize method is the object you want to serialize, and this object can be anything, including a collection. To demonstrate the serialization of an ArrayList, modify the previous code a little so that instead of persisting individual items, it will persist an entire collection. Declare the two Rectangle objects as before, but append them to an ArrayList collection. Then add a few Color values to the collection, as shown in Listing 13.15, which serializes an ArrayList collection to the file C:ShapesColors.bin.
Example 13.15. Serializing a collection
Private Sub Button2_Click(...) Handles Button2.Click
   Dim R1 As New Rectangle()
   R1.X = 1
   R1.Y = 1
   R1.Width = 10
R1.Height = 20
   Dim R2 As New Rectangle()
   R2.X = 10
   R2.Y = 10
   R2.Width = 100
   R2.Height = 200
   Dim shapes As New ArrayList()
   shapes.Add(R1)
   shapes.Add(R2)
   shapes.Add(Color.Chartreuse)
   shapes.Add(Color.DarkKhaki.GetBrightness)
   shapes.Add(Color.DarkKhaki.GetHue)
   shapes.Add(Color.DarkKhaki.GetSaturation)
   Dim saveFile As FileStream
   saveFile = File.OpenWrite("C:ShapesColors.bin")
   saveFile.Seek(0, SeekOrigin.End)
   Dim formatter As BinaryFormatter = New BinaryFormatter()
   formatter.Serialize(saveFile, shapes)
   saveFile.Close()
   MsgBox("ArrayList serialized successfully")
End Sub
The last three calls to the Add method add the components of another color to the collection. Instead of adding the color as is, I'll add three color components, from which we can reconstruct the color Color.DarkKhaki. Then I proceed to save the entire collection to a file by using the same statements as before. The difference is that I don't call the Serialize method for each object. I call it once and pass the entire ArrayList as an argument.
To read a file with the description of an object that has been persisted with the Serialize method, simply call the formatter object's Deserialize method, and assign the result to an appropriately declared variable. In the preceding example, the value returned by the Deserialize method must be assigned to an ArrayList variable. The syntax of the Deserialize method is the following, where str is a Stream object pointing to the file with the data:
object = Bformatter.Deserialize(str)
Because the Deserialize method returns an Object variable, you must cast it to the ArrayList type with the CType() function. To use the Deserialize method, declare a variable that can hold the value returned by the method. If the data to be deserialized is a Rectangle, declare a Rectangle variable. If it's a collection, declare a variable of the same collection type. Then call the Deserialize method, and cast the value returned to the appropriate type. The following statements outline the process:
Dim object As <type>
{ code to set up a Stream variable (str) and BinaryFormatter}
object = CType(Bformatter.Serialize(str), <type>)
Listing 13.16 is the code that retrieves the items from the ShapesColors.bin file and stores them into an ArrayList. I added a few statements to print all the items of the ArrayList.
Example 13.16. Deserializing a collection
Private Sub Button1_Click(...) Handles Button1.Click
    Dim readFile As FileStream
    readFile = File.OpenRead("C:ShapesColors.bin")
    Dim BFormatter As BinaryFormatter
    BFormatter = New BinaryFormatter()
    Dim Shapes As New ArrayList()
    Dim R1 As Rectangle
    Shapes = CType(BFormatter.Deserialize(readFile), ArrayList)
    Dim i As Integer
    TextBox1.AppendText("The ArrayList contains " & Shapes.Count & _
                        " objects " & vbCrLf & vbCrLf)
    For i = 0 To Shapes.Count - 1
       TextBox1.AppendText(Shapes(i).ToString & vbCrLf)
    Next
End Sub- Create XML documents.
XML documents can be built easily with the XElement and XAttribute classes. XElement represents an element, and its constructor accepts as arguments the element's name and either the element's value or a series of attributes and nested elements. XAttribute represents an attribute, and its constructor accepts as arguments the attribute's name and its value. You can also assign an XML document directly to an XElement.
- Master It
Create the XML segment that describes an object of the Item type, defined by the following class:
Class Item
     Property ID As String
     Property Name As String
     Property Prices As Price
     Property Name As String
Class Price
          Property Retail As PriceDetails
          Property WholeSale As PriceDetails
          Class PriceDetails
               Property Price As Decimal
               Property VolumeDiscount As Decimal
End Class
Class Dimension
     Property Width As Decimal
     Property Height As Decimal
     Property Depth As Decimal
End Class
- Navigate through an XML document and locate the information you need.
The XElement class provides a number of methods for accessing the contents of an XML document. The
Elementsmethod returns the child elements of the current element by the name specified with the argument you pass to the method as a string. TheElementmethod is quite similar, but it returns the first child element by the specified name. TheDescendantsmethod returns all the elements by the specified name under the current element, regardless of whether they're direct children of the current element. Finally, theAttributemethod returns the value of the attribute by the specified name of the current element.- Master It
Assuming an XML document with the following structure, write the expressions to retrieve all cities in the document and all cities under the third country in the document.
<Countries> <Country> <City> ... </City> </Country> <Country> ... </Country> ... </Countries>- Master It
Assuming that both country and city names are specified in the document with the
Nameelement, explain the difference between the queries:Dim q1 = countries.Elements("Country").Elements("Name") Dim q2 = countries.Descendants("Name")
- Convert arbitrary objects into XML documents and back with serialization.
Serialization is the process of converting an object into a stream of bytes. This process (affectionately known as dehydration) generates a stream of bytes or characters, which can be stored or transported. To serialize an object, you can use the BinaryFormatter or SoapFormatter class. You can also use the XmlSerializer class to convert objects into XML documents. All three classes expose a Serialize class that accepts as arguments the object to be serialized and a stream object and writes the serialized version of the object to the specified stream. The opposite of serialization is called deserialization. To reconstruct the original object, you use the
Deserializemethod of the same class you used to serialize the object.- Master It
Describe the process of serializing an object with the XmlSerializer class.