
The webcams that we have worked with until now can only provide 2D visual information of the surroundings. For getting 3D information about the surroundings, we have to use 3D vision sensors or range finders, such as laser finders. Some of the 3D vision sensors that we are discussing in this chapter are Kinect, Asus Xtion Pro, Intel Real sense, and Hokuyo laser scanner:

The first two sensors we are going to discuss are Kinect and Asus Xtion Pro. Both of these devices need the OpenNI (Open source Natural Interaction) driver library for operating in the Linux system. OpenNI acts as a middleware between the 3D vision devices and the application software. The OpenNI driver is integrated to ROS and we can install these drivers by using the following commands. These packages help to interface the OpenNI supported devices, such as Kinect and Asus Xtion Pro:
$ sudo apt-get install ros-kinetic-openni-launch ros-kinetic-openni2-launch
The preceding command will install OpenNI drivers and launch files for starting the RGB/depth streams. After successful installation of these packages, we can launch the driver by using the following command:
$ roslaunch openni2_launch openni2.launch
This launch file will convert the raw data from the devices into useful data, such as 3D point clouds, disparity images, and depth, and the RGB images using ROS nodelets.
Other than the OpenNI drivers, there is another driver available called lib-freenect. The common launch files of the drivers are organized into a package called rgbd_launch. This package consists of common launch files that are used for the freenect and openni drivers.
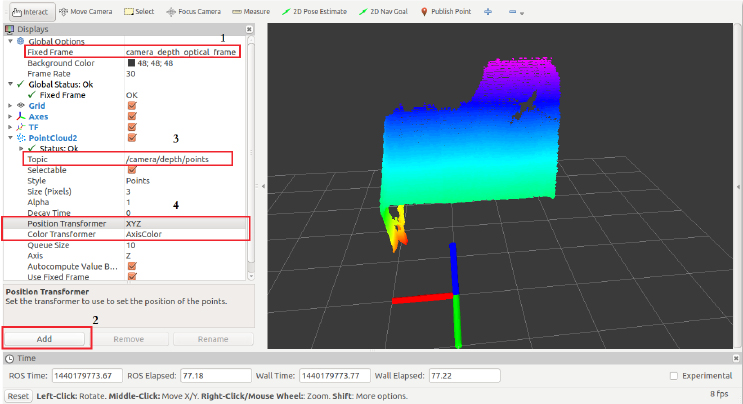
We can visualize the point cloud generated by the OpenNI ROS driver by using RViz.
Run RViz, using the following command:
$ rosrun rviz rviz
Set the fixed frame to /camera_depth_optical_frame, add a PointCloud2 display, and set the topic as /camera/depth/points. This is the unregistered point cloud from the IR camera, that is, it may have a complete match with the RGB camera and it only uses the depth camera for generating the point cloud:
We can enable the registered point cloud by using the Dynamic Reconfigure GUI, by using the following command:
$ rosrun rqt_reconfigure rqt_reconfigure
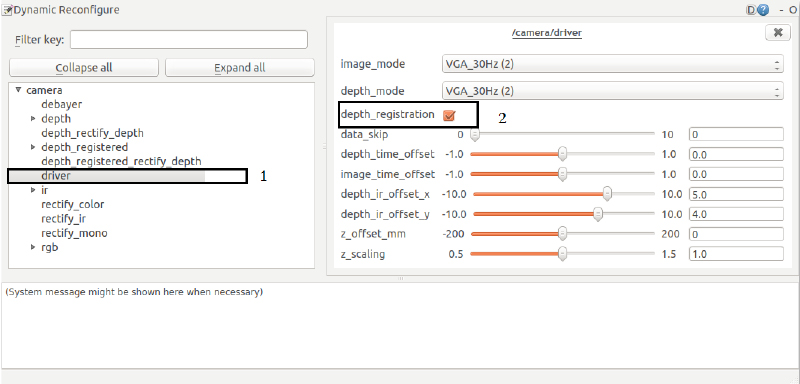
Click on camera | driver and tick depth_registration. Change the point cloud to /camera/depth_registered/points and Color Transformer to RGB8 in RViz. We will see the registered point cloud in RViz as it appears in the following image. The registered point cloud takes information from the depth and the RGB camera to generate the point cloud:
