
After confirming the serial values from the board, we can install the Chefbot ROS package. The Chefbot package contains the following files and folders:
- chefbot_bringup: This package contains Python scripts, C++ nodes, and launch files to start publishing robot odometry and tf, and performing gmapping and AMCL. It contains the Python/C++ nodes to read/write values from the LaunchPad, convert the encoder ticks to tf, and twist messages to motor commands. It also has the PID node for handling velocity commands from the motor commands.
- chefbot_description: This package contains the Chefbot URDF model.
- chefbot_simulator: This package contains launch files to simulate the robot in Gazebo.
- chefbot_navig_cpp: This package contains the C++ implementation of a few nodes that are already implemented in chefbot_bringup as the Python node.
After cloning the Chefbot main directory from the previous GitHub repository, we could compile the workspace. To successfully compile the packages of the repository, some dependencies must be installed using the following command:
$ sudo apt-get install ros-kinetic-depthimage-to-laserscan ros-kinetic-kobuki-gazebo-plugins ros-kinetic-robot-pose-ekf ros-kinetic-yocs-cmd-vel-mux ros-kinetic-move-base-msgs ros-kinetic-openni-launch ros-kinetic-kobuki-description ros-kinetic-gmapping ros-kinetic-amcl ros-kinetic-map-server
The following launch file will start the robot odometry and the tf publishing nodes:
$ roslaunch chefbot_bringup robot_standalone.launch
In the next figure, the nodes started by this launch file and how they are interconnected are shown:
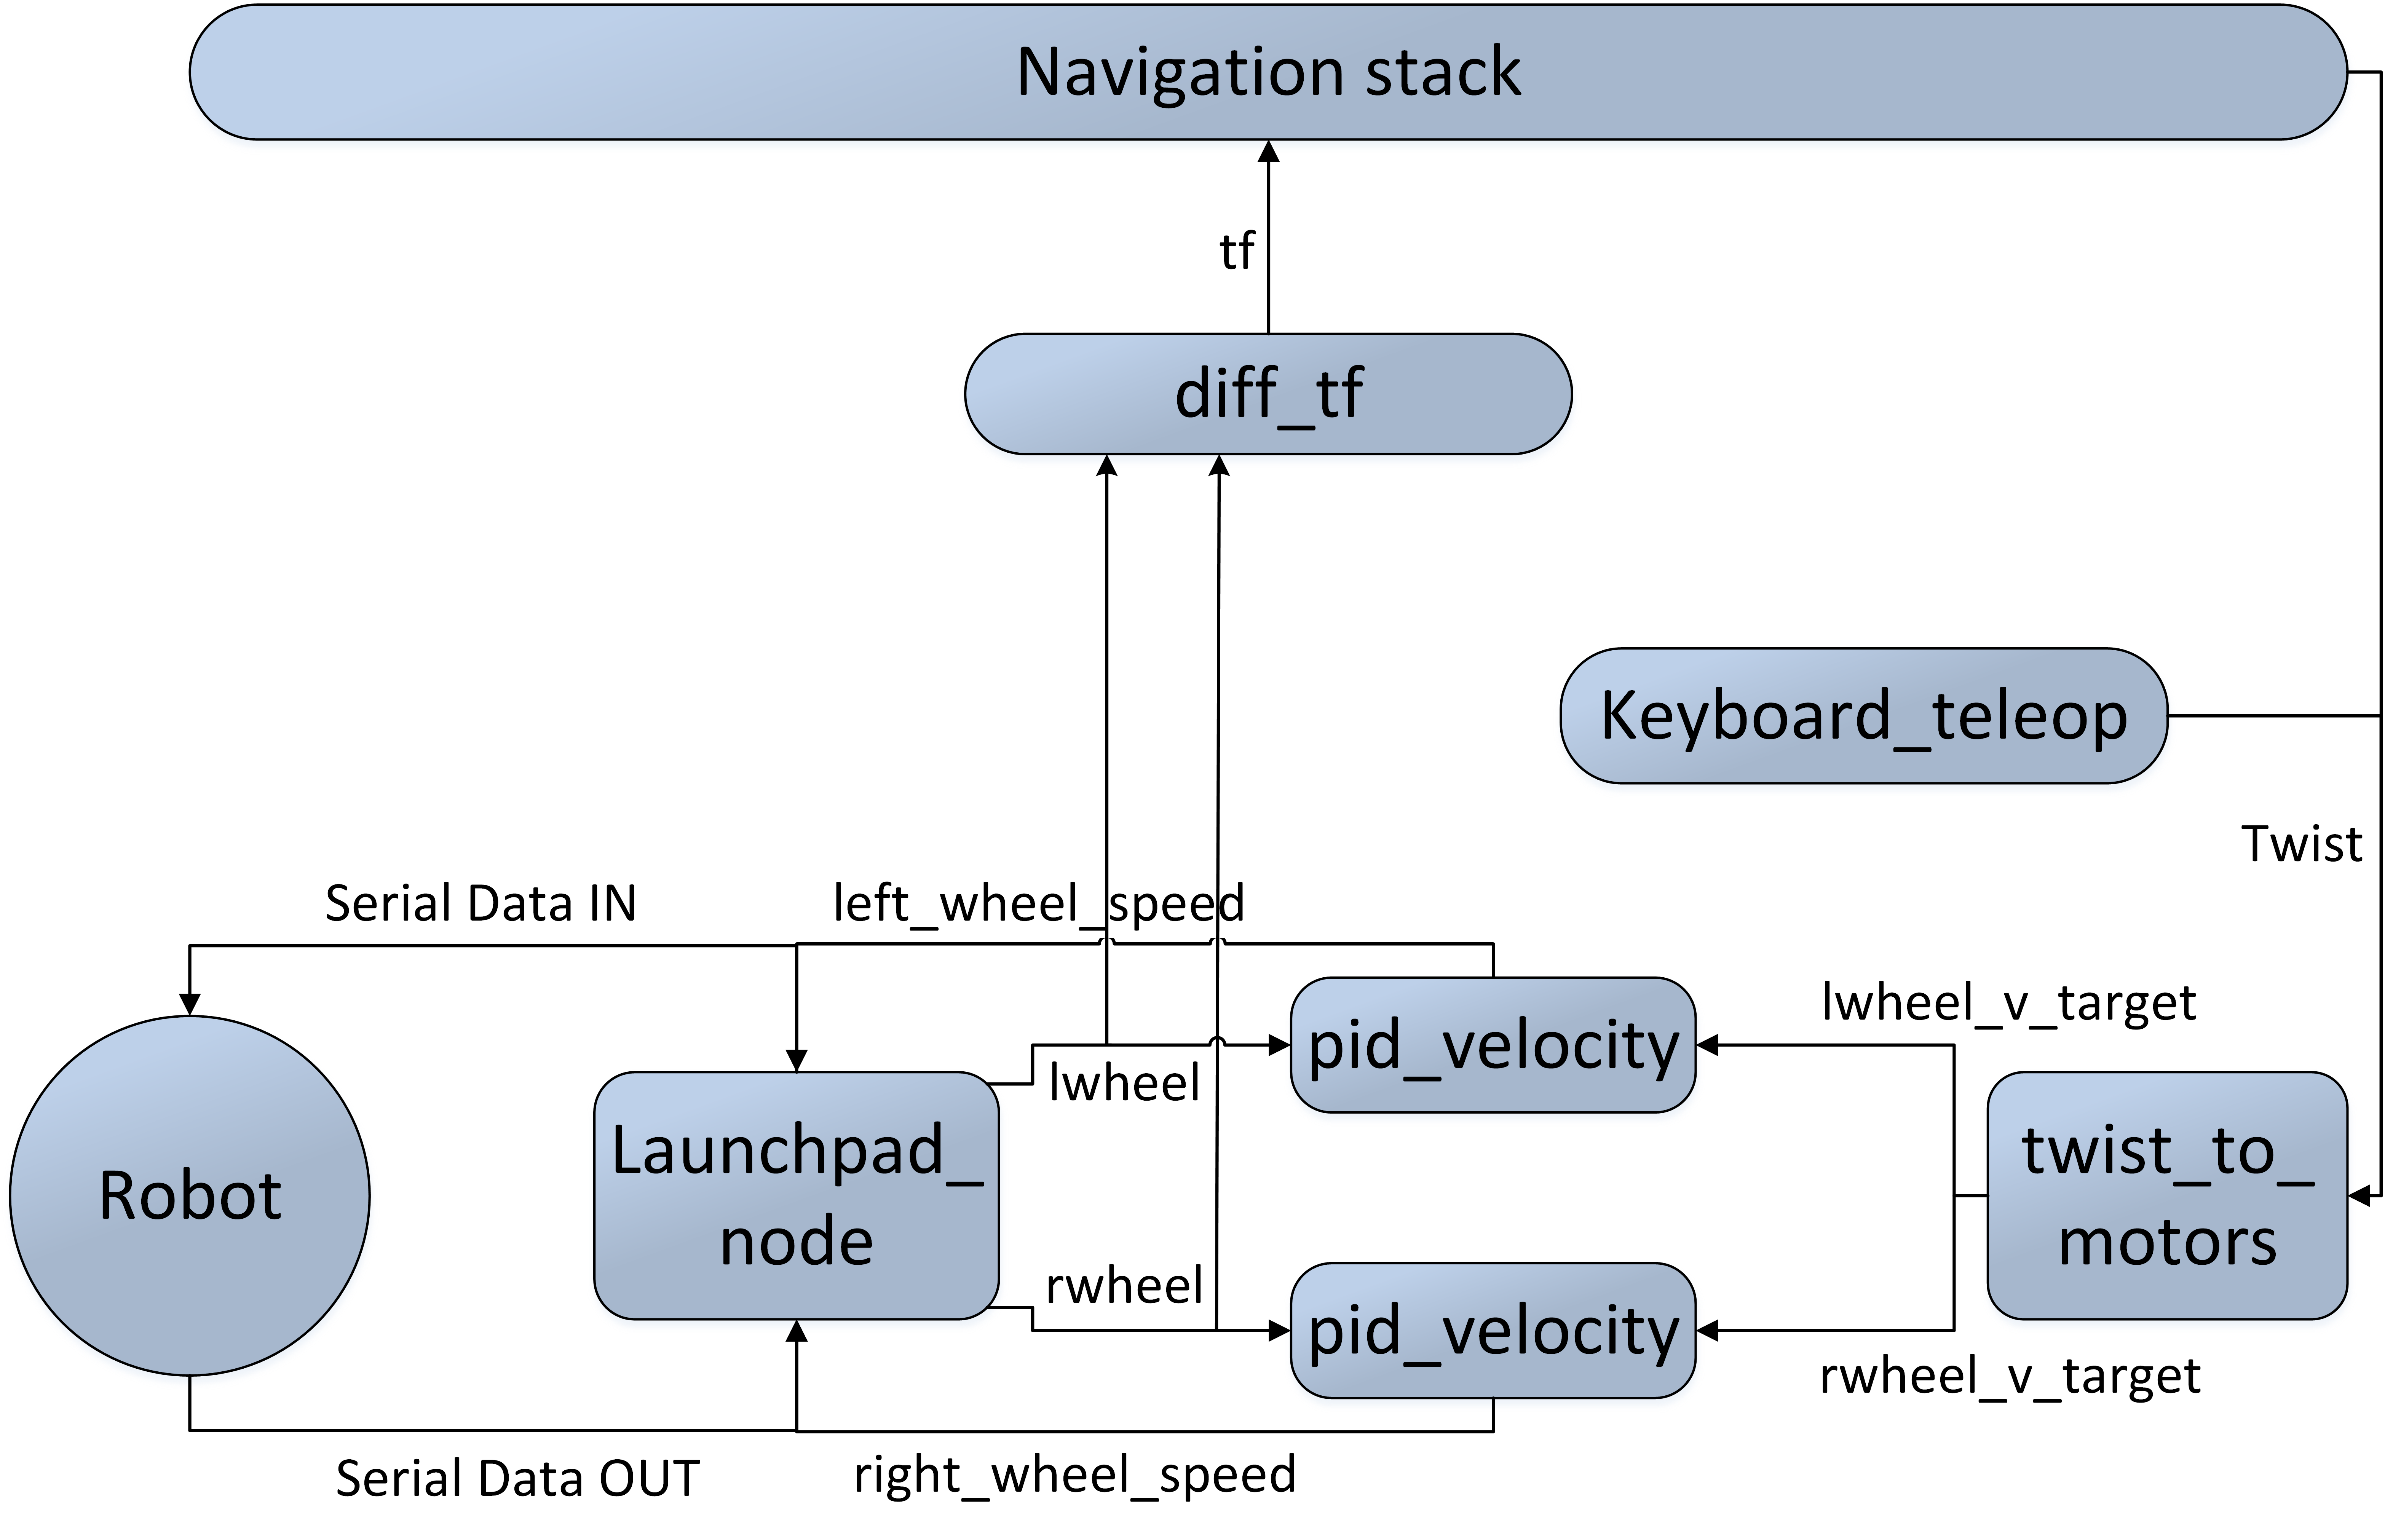
The nodes run by this launch file and their workings are described next:
- launchpad_node.py: We know that this robot uses the Tiva C LaunchPad board as its controller. This node acts as a bridge between the robot controller and the ROS. The basic functionality of this node is to receive serial values from the LaunchPad and convert each sensor data into ROS topics. This acts as the ROS driver for the LaunchPad board.
- twist_to_motors.py: This node converts the geometry_msgs/Twist message to motor velocity targets. It subscribes the command velocity, which is either from a teleop node or from an ROS Navigation stack, and publishes lwheel_vtarget and rwheel_vtarget.
- pid_velocity.py: This node subscribes wheel_vtarget from the twist_to_motors node and the wheel topic, which is the encoder tick from the launchpad_node. We have to start two PID nodes for each wheel of the robot, as shown in the previous figure. This node finally generates the motor speed commands for each motor.
- diff_tf.py: This node subscribes the encoder ticks from the two motors, and computes odometry, and publishes tf for the Navigation stack.
- The list of topics generated after running robot_standalone.launch are shown in the following image:

The following is the content of the robot_standalone.launch file:
<launch>
 <arg name="simulation" default="$(optenv TURTLEBOT_SIMULATION false)"/>
 <param name="/use_sim_time" value="$(arg simulation)"/>

<!-- URDF robot model -->
  <arg name="urdf_file" default="$(find xacro)/xacro.py '$(find chefbot_description)/urdf/chefbot_base.xacro'" />
  <param name="robot_description" command="$(arg urdf_file)" />

  <!-- important generally, but specifically utilised by the current app manager -->
  <param name="robot/name" value="$(optenv ROBOT turtlebot)"/>
  <param name="robot/type" value="turtlebot"/>

<!-- Starting robot state publisher -->
  <node pkg="robot_state_publisher" type="robot_state_publisher" name="robot_state_publisher">
    <param name="publish_frequency" type="double" value="5.0" />
  </node>

<!-- Robot parameters -->
  <rosparam param="base_width">0.3</rosparam>
  <rosparam param="ticks_meter">14865</rosparam>

<!-- Starting launchpad_node -->
  <node name="launchpad_node" pkg="chefbot_bringup" type="launchpad_node.py">
    <rosparam file="$(find chefbot_bringup)/param/serial.yaml" command="load" />
  </node>

<!-- PID node for left motor , setting PID parameters -->
  <node name="lpid_velocity" pkg="chefbot_bringup" type="pid_velocity.py" output="screen">
      <remap from="wheel" to="lwheel"/>
      <remap from="motor_cmd" to="left_wheel_speed"/>
      <remap from="wheel_vtarget" to="lwheel_vtarget"/>
      <remap from="wheel_vel" to="lwheel_vel"/>

      <rosparam param="Kp">400</rosparam>
      <rosparam param="Ki">100</rosparam>
      <rosparam param="Kd">0</rosparam>
      <rosparam param="out_min">-1023</rosparam>
      <rosparam param="out_max">1023</rosparam>
      <rosparam param="rate">30</rosparam>
      <rosparam param="timeout_ticks">4</rosparam>
      <rosparam param="rolling_pts">5</rosparam>
  </node>

<!-- PID node for right motor, setting PID parameters -->
  <node name="rpid_velocity" pkg="chefbot_bringup" type="pid_velocity.py" output="screen">
      <remap from="wheel" to="rwheel"/>
      <remap from="motor_cmd" to="right_wheel_speed"/>
      <remap from="wheel_vtarget" to="rwheel_vtarget"/>
      <remap from="wheel_vel" to="rwheel_vel"/>
      <rosparam param="Kp">400</rosparam>
      <rosparam param="Ki">100</rosparam>
      <rosparam param="Kd">0</rosparam>
      <rosparam param="out_min">-1023</rosparam>
      <rosparam param="out_max">1023</rosparam>
      <rosparam param="rate">30</rosparam>
      <rosparam param="timeout_ticks">4</rosparam>
      <rosparam param="rolling_pts">5</rosparam>
 </node>

<!-- Starting twist to motor and diff_tf nodes -->

  <node pkg="chefbot_bringup" type="twist_to_motors.py" name="twist_to_motors" output="screen"/>
  <node pkg="chefbot_bringup" type="diff_tf.py" name="diff_tf" output="screen"/>

</launch>
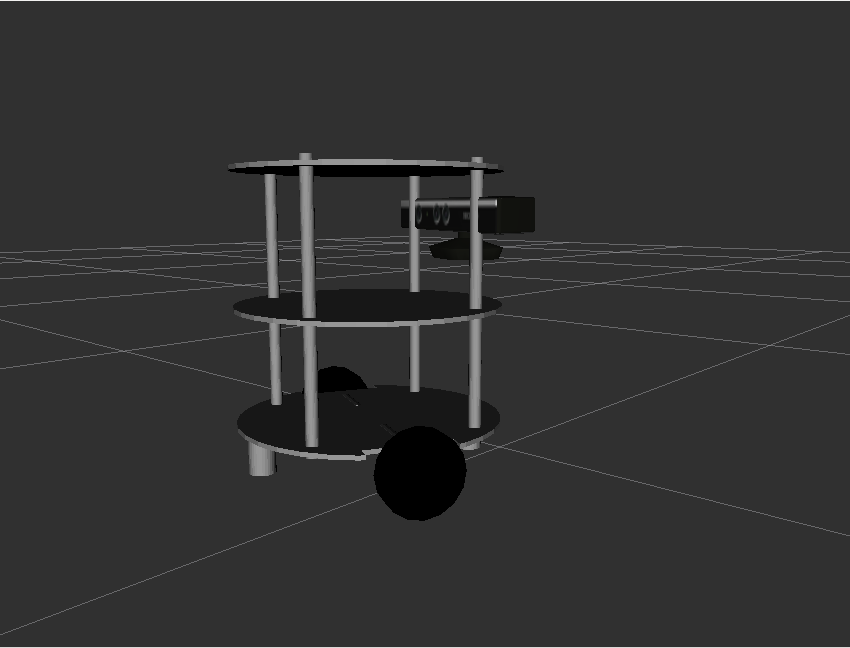
After running robot_standalone.launch, we can visualize the robot in RViz, using the following command:
$ roslaunch chefbot_bringup view_robot.launch
We will see the robot model, as shown in this next screenshot:
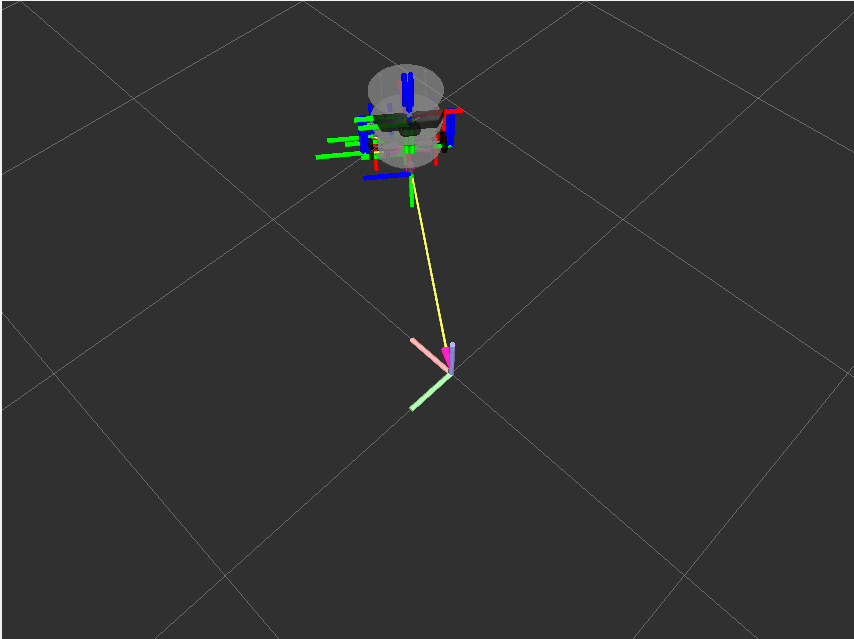
Launch the keyboard teleop node and we can start moving the robot:
$ roslaunch chefbot_bringup keyboard_teleop.launch
Move the robot using the keys and we will see that the robot is moving around. If we enable tf of the robot in RViz, we can view the odometry, as shown in the following screenshot:
The graph of the connections between each node can be viewed, using the rqt_graph tool:
$ rqt_graph
Until now we have discussed the Chefbot interfacing on ROS. The coding of Chefbot is completely done in Python. There are some nodes implemented in C++ for computing odometry from the encoder ticks and generating motor speed commands from the twist messages.