
Till now, we have learned about Polyglot Persistence and why RethinkDB is best suited for it. It's time to get to work and prove that this kind of system can be implemented with RethinkDB. In this section, we are going to develop an application that will use three databases, RethinkDB, MySQL, and MongoDB, where RethinkDB will act as an entry database.
We will develop an application where you can perform the CRUD operation in RethinkDB and all changed data will be synchronized automatically to MySQL and MongoDB.
Consider the following diagram:

As you can see in the preceding diagram, the server will first perform the data manipulation in RethinkDB and by using the changefeed we will notify and update MongoDB and MySQL.
Before moving ahead to the code part, let's do some quick data modeling for all three databases. We are going to store personal data related to the users. Here is the simple data model schema for RethinkDB:
{
    "id": "string",
    "name":  "string",
    "gender": "string"
    "dob" : "Date",
    "location" : "string"
}
Here is the sample schema for MongoDB:
{
    "_id": "string",
    "rethinkId": "string"
    "name":  "string",
    "gender": "string"
    "dob" : "Date",
    "location" : "string"
}
As you may notice, we have added one more ID field named rethinkId, which will eventually store the ID of the RethinkDB document. This is good way to have distributed indexing.
Now for MongoDB; you may not need to create a database and collection beforehand because we are going to use mongoose ORM, which takes care of definition-level queries for MongoDB. However, for MySQL, we need to manually create the database and table definition before writing the code.
So let's do that.
Install MySQL or, I would say, the complete package of XAMPP to access the phpMyAdmin screen for data access.
Installation of XAMPP depends upon different operation systems. You can visit their official site at https://www.apachefriends.org/index.html to download the stable version of XAMPP.
Once done, open up phpMyAdmin by visiting http://localhost/phpmyadmin from your browser. Type in the name of the database you require and hit the Create button, as shown in the screenshot:

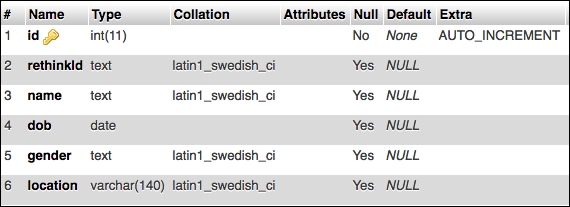
Once the database is created, create a new table named users inside it with the properties shown in the screenshot:
So we have the database and tables in place. Let's begin the implementation. The first step is to set up the project environment.
I am going to use Node.js to develop this POC. The best practice to begin the Node.js project is by creating a package.json file using npm command.
Here is the command to generate a basic package.json file:
npm init --y
This will generate the package.json file with default values. Refer to the following screenshot:

The next step is to install all of our dependencies needed for the project. We are going to need drivers for all three databases and the Express module for web server handling.
Here is the command to install all the dependencies:
sudo npm i --S rethinkdb mysql mongodb mongoose async express body-parser
This will take a moment depending upon the Internet speed at your end. Once the installation is complete, we are good to go to the development phase. In development, the first thing we need is a server.
To develop a server using the Express module, we need to first load the module, configure the routes, and then listen on specific ports for requests.
This is how we load the Express module:
const express = require('express');
We need to create a new instance of the class. Here is how we do it in Node.js:
const app = express();
The next step is to configure the routes. We are going to put our routes code in a separate file, say users.js. This is how to configure it in our server.
First require the router file:
const routes = require('./users');
Then configure Express to use these routes:
app.use(routes);
Once done, we can now start our server using the following code:
app.listen(4000,() => {
  console.log("Listening to port 4000");
});
So, eventually, the complete code base will look something like this:
const express = require('express');
const bodyParser = require('body-parser');
const app = express();
const routes = require('./users');
app.use(bodyParser.json());
app.use(routes);
app.listen(4000,() => {
  console.log("Listening to port 4000");
});
We did develop our server but it won't work without a route. Let's develop sample routes for CRUD operations. You can find these codes in the users.js file.
We are going to use our Model function, the getAllUsers() function, to retrieve all data from RethinkDB and return it to the client:
const express = require('express');
const router = express.Router();
const userModel = require('./userModel');
router.route('/')
  .get((req,res) => {
    let userObject = new userModel();
    userObject.getAllUsers(function(err,userResponse) {
      if(err) {
        return res.json({"responseCode" : 1, "responseDesc" : userResponse});
      }
      res.json({"responseCode" : 0, "responseDesc" : "Success", "data" : userResponse});
    });
  });
module.exports = router;
Here is the getAllUsers() function in the userModel.js file:
const rethinkdb = require('rethinkdb');
const db = require('./db');
const async = require('async');
class Users {
  getAllUsers(callback) {
    async.waterfall([
      function(callback) {
        var userObject = new db();
        userObject.connectToDb(function(err,connection) {
          if(err) {
            return callback(true,"Error connecting to database");
          }
          callback(null,connection);
        });
      },
      function(connection,callback) {
        rethinkdb.table('users').run(connection,function(err,cursor) {
          connection.close();
          if(err) {
            return callback(true,"Error fetching users from database");
          }
          cursor.toArray(function(err, result) {
            if(err) {
              return callback(true,"Error reading cursor");
            }
            callback(null,result)
          });
        });
      }
    ],function(err,data) {
      callback(err === null ? false : true,data);
    });
  }
}
In the last chapter, we used a similar Model function to perform CRUD operations on the RethinkDB database. Here, we have first made a connection to the database using the predefined function in our db.js file, which we used in the last chapter as well, and then we ran the ReQL query to retrieve all documents related to the user.
RethinkDB returns the stream so we need to iterate and collect all the documents before returning it to the user. We do this using the toArray() function of RethinkDB.
Since the db.js code is similar to the one used in the last chapter with a different database name, I don't think there is a need to explain it again here.
We are going to use our Model function addNewUser to create a new user in a RethinkDB table and return the response to the client:
const express = require('express');
const router = express.Router();
const userModel = require('./userModel');
router.route('/')
  .post((req,res) => {
    let userObject = new userModel();
    userObject.addNewUser(req.body,function(err,userResponse) {
      if(err) {
        return res.json({"responseCode" : 1, "responseDesc" : userResponse});
      }
      res.json({"responseCode" : 0, "responseDesc" : "Success","data" : userResponse});
    });
  });
module.exports = router;
Here is our Model function to add the new user in the RethinkDB table:
const rethinkdb = require('rethinkdb');
const db = require('./db');
const async = require('async');
class Users {
  addNewUser(userData,callback) {
    async.waterfall([
      function(callback) {
        var userObject = new db();
        userObject.connectToDb(function(err,connection) {
          if(err) {
            return callback(true,"Error connecting to database");
          }
          callback(null,connection);
        });
      },
      function(connection,callback) {
        rethinkdb.table('users').insert(userData).run(connection,function(err,result) {
          connection.close();
          if(err) {
            return callback(true,"Error happens while adding new user");
          }
          callback(null,result);
        });
      }
    ],function(err,data) {
      callback(err === null ? false : true,data);
    });
  }
}
module.exports = Users;
In this function, we are first connecting to our database and then running the insert() query of ReQL to perform the creation of a new document in the RethinkDB table. The userData variable contains the incoming data from the client passed by the router to this function.
This is for the creation of the new user. Let's move to a use case where we need to update the existing document.
In this use case, we are going to use our Model function updateUser to update the information of the user in the RethinkDB table and return the response to the client:
const express = require('express');
const router = express.Router();
const userModel = require('./userModel');
router.route('/')
  .put((req,res) => {
    let userObject = new userModel();
    userObject.updateUser(req.body,function(err,userResponse) {
      if(err) {
        return res.json({"responseCode" : 1, "responseDesc" : userResponse});
      }
      res.json({"responseCode" : 0, "responseDesc" : "Success","data" : userResponse});
    });
  });
module.exports = router;
Here is our Model function to update the user information in the RethinkDB table:
const rethinkdb = require('rethinkdb');
const db = require('./db');
const async = require('async');
class Users {
  updateUser(userData,callback) {
    async.waterfall([
      function(callback) {
        var userObject = new db();
        userObject.connectToDb(function(err,connection) {
          if(err) {
            return callback(true,"Error connecting to database");
          }
          callback(null,connection);
        });
      },
      function(connection,callback) {
        rethinkdb.table('users').get(userData.id).run(connection,function(err,result) {
          if(err) {
            return callback(true,"Error fetching users from database");
          }
          // update users
          result = userData;
          rethinkdb.table('users').get(userData.id).update(result).run(connection,function(err,result) {
            connection.close();
            if(err) {
              return callback(true,"Error updating the user");
            }
            callback(null,result);
          });
        });
      }
    ],function(err,data) {
      callback(err === null ? false : true,data);
    });
  }
}
module.exports = Users;
In this function, we are first making a connection to the database and then running two queries in the pipe. First, we will find whether any user exists using the ID and if it exists, we will update it with the incoming payload and run the update ReQL query to make the effect in the database.
With this, we are left with our final use case, deleting the user.
In this use case, we are going to use our Model function deleteUser to delete the information of the user in the RethinkDB table and return the response to the client:
const express = require('express');
const router = express.Router();
const userModel = require('./userModel');
router.route('/')
  .delete((req,res) => {
    let userObject = new userModel();
    userObject.deleteUser(req.body,function(err,userResponse) {
      if(err) {
        return res.json({"responseCode" : 1, "responseDesc" : userResponse});
      }
      res.json({"responseCode" : 0, "responseDesc" : "Success","data" : userResponse});
    });
  });
module.exports = router;
Here is our Model function to delete the user information from RethinkDB:
const rethinkdb = require('rethinkdb');
const db = require('./db');
const async = require('async');
class Users {
  deleteUser(userData,callback) {
    async.waterfall([
      function(callback) {
        var userObject = new db();
        userObject.connectToDb(function(err,connection) {
          if(err) {
            return callback(true,"Error connecting to database");
          }
          callback(null,connection);
        });
      },
      function(connection,callback) {
        // find and delete user
        rethinkdb.table('users').get(userData.id).delete().run(connection,function(err,result) {
          connection.close();
          if(err) {
            return callback(true,"Error deleting the user");
          }
          callback(null,result);
        });
      }
    ],function(err,data) {
      callback(err === null ? false : true,data);
    });
  }
}
module.exports = Users;
In this function, we are first making a connection to the database and then running two queries in the pipe. First, we are finding out whether any user exists using the ID and if it exists, we are deleting the user using the delete ReQL command.
So now we are done with all the required CRUD use cases, let's move ahead with integrating RethinkDB in Node.js, that is, initializing the database class during the start of the server.
To do so, we need to add the following three lines in the server code before configuring the routes:
const db = require('./db');
const dbSetup = new db();
dbSetup.setupDb();
This will make sure that RethinkDB is connected and the required database and table is in place before accepting the request from the client.
Before moving ahead, let's check whether our code base is correct. Start the server using the following command:
node app.js
This will start the server and configure the RethinkDB database as shown in the following screenshot:

So we have a server ready to perform CRUD operations in the entry database. Next we need the Polyglot agent.