
Mathematical Imaging is a very broad field that is concerned with the treatment of images by representing them as mathematical objects. Depending on the goals, we have four subfields:
- Image acquisition: The concern here is the effective representation of an object as an image. Clear examples are the digitalization of a photograph (that could be coded as a set of numerical arrays), or super-imposed information of the highest daily temperatures on a map (that could be coded as a discretization of a multivariate function). The processes of acquisition differ depending on what needs to be measured and the hardware that performs the measures. This topic is beyond the scope of this book but, if interested, some previous background can be obtained by studying the Python interface to OpenCV and any of the background libraries, such as Python Imaging Library (PIL) and the friendly PIL fork Pillow.
Tip
A nice documentation for PIL can be accessed through the http://effbot.org/ pages at http://effbot.org/imagingbook/pil-index.htm. Installing the SciPy stack immediately places a copy of the latest version of PIL in our system. If needed, downloads of this library alone are available from http://pythonware.com/products/pil/. For information about Pillow, a good source is http://pillow.readthedocs.org/.
A good source of information for OpenCV can be found at http://opencv.org/. For a closer look at the interface to Python, I have found the tutorials at http://docs.opencv.org/3.0-beta/doc/py_tutorials/py_tutorials.html very useful.
Note that the installation of OpenCV for Python is not easy. My recommendation is to perform such an installation from Anaconda or any other scientific Python distribution.
- Image compression: This is the most technical of these subfields and requires mostly high-level libraries from NumPy, SciPy, and some extra packages. The goal is the representation of images using the minimum possible data, in a way that most (ideally all) of the relevant information is kept.
- Image editing: This, together with the following image analysis, is what we refer to as Image processing. Examples of the goals of image editing range from the restoration of damaged photographs, to the deblurring of a video sequence, or the removal of an object in an image, so that the removed area gets inpainted with coherent information. To deal with these operations, in the SciPy stack, we have the library
scipy.ndimage, and the image processing toolkitscikit-image.Tip
A good set of references and documentation for the multidimensional image-processing library
scipy.ndimagecan be found at http://docs.scipy.org/doc/scipy/reference/tutorial/ndimage.html, including an enlightening introduction to filters.To explore the image processing toolkit
scikit-image, a good initial resource is the documentation of the official page at http://scikit-image.org/docs/stable/. This includes a crash course on using NumPy for images. - Image analysis: This is an interesting field, where we aim to obtain different pieces of information from an object represented as an image. Think of a code that can track the face of an individual in the video rendering of a large crowd, or count the number of gold atoms on a micrograph of a catalyst. For these tasks, we usually mix functions from the previous two libraries, with the ever-useful toolkit
scikit-learnthat we discussed in the previous chapter.
In our exposition, we will start with a small section on how to represent digital images within the SciPy stack. We continue with a second section on the nature of basic operations over images. The rest of the sections continue with the presentation of techniques for compression, editing, and analysis, in that order.
Most of the operations we introduce conclude with a visualization of the examples. The corresponding code is usually a trivial application of commands from matplotlib. These codes are usually not included, and left to the reader as exercise. Only when a specific complex layout or novel idea is introduced, we will include those codes in our presentation.
The dictionary defines a pixel (an abbreviation of picture element) as a minute area of illumination on a display screen, one of many from which an image is composed. We therefore consider a digital image as a set of pixels, each of them defined by its location (irrespective of the kind of coordinates chosen) and the intensity of light of the corresponding image at that location.
Depending on the way we measure intensity, a digital image belongs to one of three possible types:
- Binary
- Gray-scale
- Color (with or without an alpha channel)
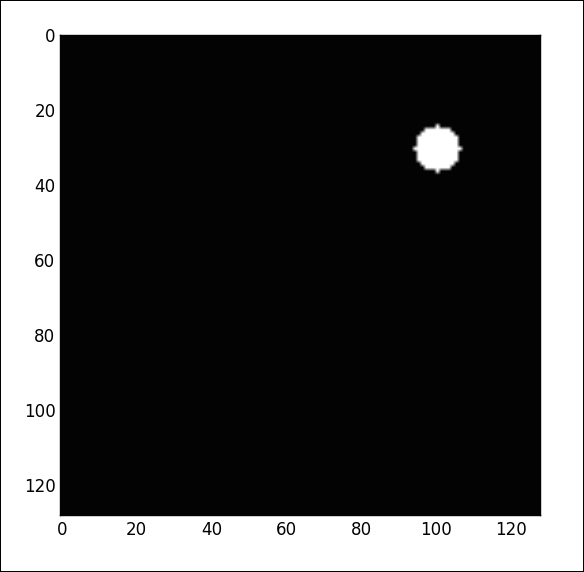
In a binary image there are only two possible intensities—light or dark. Such images are traditionally best implemented as simple two-dimensional Boolean arrays. True indicates a bright spot, while False measures a dark spot.
For instance, to create a binary image of size 128 x 128, with a single disk of radius 6 centered at the location (30, 100), we could issue the following:
In [1]: import numpy as np, matplotlib.pyplot as plt
In [2]: disk = lambda x,y: (x-30)**2 + (y-100)**2 <= 36
In [3]: image = np.fromfunction(disk, (128, 128))
In [4]: image.dtype
Out[4]: dtype('bool')
Tip
Another method to generate geometric shapes on a binary image is the set of utilities in the modules skimage.draw or skimage.morphology. For instance, the previous could have been generated as follows:
>>> from skimage.draw import circle
>>> image = np.zeros((128, 128)).astype('bool')
>>> image[circle(30, 100, 6)] = True
The module skimage.draw has routines to create other two-dimensional geometric shapes:
A gray-scale image is the traditional method of representing black and white photographs. In these images, the intensity of the light is represented as different scales of gray. White indicates the brightest, and black signifies no light. The number of different scales is predetermined, and usually a dyadic number (we could choose as little as 16 scales, or as many as 256, for example). In any case, the highest value is always reserved for the brightest color (white), and the lowest for the darkest (black). A simple two-dimensional array is a good way to store this information.
The scipy.misc library has a test image conforming to this category. In the toolkit skimage, we also have a few test images with the same characteristics:
In [6]: from scipy.misc import lena;
   ...: from skimage.data import coins
In [7]: lena().shape
Out[7]: (512, 512)
In [8]: lena()
Out[8]:
array([[162, 162, 162, ..., 170, 155, 128],
       [162, 162, 162, ..., 170, 155, 128],
       [162, 162, 162, ..., 170, 155, 128],
       ...,
       [ 43,  43,  50, ..., 104, 100,  98],
       [ 44,  44,  55, ..., 104, 105, 108],
       [ 44,  44,  55, ..., 104, 105, 108]])
In [9]: coins().shape
Out[9]: (303, 384)
In [10]: coins()
Out[10]:
array([[ 47, 123, 133, ...,  14,   3,  12],
       [ 93, 144, 145, ...,  12,   7,   7],
       [126, 147, 143, ...,   2,  13,   3],
       ...,
       [ 81,  79,  74, ...,   6,   4,   7],
       [ 88,  82,  74, ...,   5,   7,   8],
       [ 91,  79,  68, ...,   4,  10,   7]], dtype=uint8)
