Chapter 3
Installing and Configuring vCenter Server
In the majority of today's information systems, the client-server architecture is king. This standing is because the client-server architecture can centralize resource management and give end users and client systems simplified access to those resources. Information systems used to exist in a flat, peer-to-peer model, when user accounts were required on every system where resource access was needed and when significant administrative overhead was needed simply to make things work. That's how managing a large infrastructure with many ESXi hosts feels without vCenter Server. vCenter Server brings the advantages of the client-server architecture to the ESXi host and to virtual machine (VM) management.
Introducing vCenter Server
As the size of a virtual infrastructure grows, managing the infrastructure from a central location becomes significantly more important. vCenter Server is an application that serves as a centralized management tool for ESXi hosts and their respective VMs. vCenter Server acts as a proxy that performs tasks on the individual ESXi hosts that have been added as members of a vCenter Server installation. As discussed in Chapter 1, “Introducing VMware vSphere 6.7,” VMware includes vCenter Server licensing in every kit and every edition of vSphere, underscoring the importance of vCenter Server. Although VMware does offer a few different editions of vCenter Server (vCenter Server Essentials, vCenter Server Foundation, and vCenter Server Standard), we'll focus only on vCenter Server Standard in this book.
VMware has a number of other products, but vCenter Server is considered the central integration point tying them all together. Software such as vRealize Automation, Site Recovery Manager, and its often-paired vSphere Replication, as well as vRealize Operations Manager all depend on an instance of vCenter Server to integrate into the VMware environment. Not only this, but as you will see, much of the advanced functionality that vSphere offers comes only when vCenter Server is present. Specifically, vCenter Server offers core services in the following areas:
- Resource management for ESXi hosts and VMs
- Template management
- VM deployment
- VM management
- Scheduled tasks
- Statistics and logging
- Alarms and event management
- ESXi host management
Figure 3.1 illustrates the core services available through vCenter Server.

FIGURE 3.1 vCenter Server provides a full spectrum of virtualization management functions.
vCenter Server can be installed in two ways. The historic approach is an application installed on a Windows Server, but as of vSphere 6.7, this will be the last release of this deployment type; the other format is as a Linux-based virtual appliance. You'll learn more about virtual appliances in Chapter 10, “Using Templates and vApps,” but for now, suffice it to say that the vCenter Server virtual appliance (which you may see referred to as VCVA or VCSA) offers an option to quickly and easily deploy a full installation of vCenter Server and Platform Services on VMware's open source Photon OS.
Because of the breadth of features included in vCenter Server, most of these core services are discussed in later chapters. For example, Chapter 9, “Creating and Managing Virtual Machines,” discusses VM deployment, VM management, and template management. Chapter 11, “Managing Resource Allocation,” and Chapter 12, “Balancing Resource Utilization,” deal with resource management for ESXi hosts and VMs. Chapter 13, “Monitoring VMware vSphere Performance,” discusses alarms. In this chapter, we'll focus primarily on ESXi host management, but we'll also discuss scheduled tasks, statistics and logging, event management, and appliance management.
There are other key items about vCenter Server that you can't really consider core services. Instead, these underlying features support core services. To help you more fully understand the value of vCenter Server in a vSphere deployment, let's take a closer look at the following:
- Centralized user authentication
- Web Client server
- Extensible framework
Centralizing User Authentication Using vCenter Single Sign-On
Centralized user authentication is not listed as a core service of vCenter Server, but it is essential to how vCenter Server and many other VMware products operate. In Chapter 2, “Planning and Installing VMware ESXi,” we discussed a user's authentication to an ESXi host under the context of a user account created and stored locally on that host. Generally speaking, without vCenter Server, you would need a separate user account on each ESXi host for each administrator who needed access to the server. As the number of ESXi hosts and required administrators grows, the number of accounts to manage grows exponentially. There are workarounds for this overhead; one such workaround is integrating your ESXi hosts into Active Directory, a topic we'll discuss in more detail in Chapter 8, “Securing VMware vSphere.” In this chapter, we'll assume the use of local accounts, but be aware that using Active Directory integration with your ESXi hosts does change the picture somewhat. In general, though, the centralized user authentication that vCenter Server offers is easier to manage than other available methods.
In a virtualized infrastructure with only one or two ESXi hosts, administrative effort is not a major concern. Administering one or two servers would not incur incredible effort on the part of the administrator, and creating user accounts for administrators would not be too much of a burden.
In situations like this, you may not miss vCenter Server from a management perspective, but you may certainly miss its feature set. In addition to its management capabilities, vCenter Server can perform vMotion, configure vSphere Distributed Resource Scheduler (DRS), establish vSphere High Availability (HA), and use vSphere Fault Tolerance (FT). These features are not accessible using ESXi hosts without vCenter Server. You also lose key functionality such as vSphere Distributed Switches, host profiles, policy-driven storage, VM encryption, and vSphere Update Manager. vCenter Server is a requirement for any enterprise-level virtualization project.
But what happens when the environment grows? What happens when there are 10 ESXi hosts and 5 administrators? Now the administrative effort of maintaining all these local accounts on the ESXi hosts becomes a significant burden. If a new account is needed to manage the ESXi hosts, you must create the account on 10 different hosts. If an account password needs to change, you must change it on 10 different hosts. Then add into this equation other VMware components such as vRealize Automation or vRealize Orchestrator, with their own possible accounts and passwords.
The Platform Services Controller (PSC)—or more accurately, the medley of components that comprise the service of vCenter Single Sign-On (SSO), including the Secure Token Service (STS) and Identity Management Service (IDM)—addresses this problem. It is a prerequisite for installing vCenter Server—that is, vCenter Server cannot be installed without SSO being available first. We'll explain briefly how SSO works and what other software it interacts with (both VMware and non-VMware).
Prior to vSphere 5.1, when you logged onto vCenter your authentication request was forwarded to either the local security authority on vCenter Server's OS or Active Directory. In versions up through vSphere 6.7, with SSO the request can still end up going to Active Directory, but it can also go to a list of locally defined users within SSO itself or to another Security Assertion Markup Language (SAML) 2.0–based authority. Generally speaking, SSO is a more secure way of authenticating to VMware products. Notice we said products and not vSphere? That's because SSO has hooks into other VMware products, not just vCenter Server. vRealize Orchestrator, vRealize Operations Manager, and vCloud Director are just a few. Why is this important? It means that SSO can take a single user and provide them with access to everything they need through the virtual infrastructure with a single username and password, and it can do so securely.
The following steps outline what happens when a user logs on using the vSphere Web Client or any other VMware product that is integrated with SSO (see Figure 3.2):
- The vSphere Web Client presents a secure web page to log into.
- The username and password are issued to the SSO server (in the form of a SAML 2.0 token).
- The SSO server sends a request to the relevant authentication mechanism (local, AD, or another SAML 2.0–based authority).
- Once authentication succeeds, SSO passes a token to the vSphere Web Client.
- This token can now be used to authenticate directly with vCenter, or any other SSO integrated VMware products.

FIGURE 3.2 The steps taken to issue an authenticated session with the SSO component.
As you can see, the authentication procedure can sound more complicated than other traditional methods; however, the process is seamless to the end administrators who get access as they always have.
Before we talk about some of the more visible components of vCenter Server, let's discuss some of the unseen aspects inside the Platform Services Controller of vCenter.
Understanding the Platform Services Controller
vSphere 6.0 introduced a new component called the Platform Services Controller (PSC). This component has remained in the vSphere architecture up through vSphere 6.5, and now vSphere 6.7. It is used to run common components for VMware products in a central or in distributed location(s). The PSC offers multiple services; let's step through them so you can understand why the PSC is vital to your vSphere environment:
- Single Sign-On (SSO)
- Licensing
- Certificate Authority
- Certificate Store
- Service Registry
As you read over the paragraph preceding this list, you may have noticed that we said “for VMware products.” The PSC is not solely for vCenter Server, or vSphere for that matter. These services can be located externally or internally to the vCenter Server and provide a common service across your entire VMware environment.
As we mentioned in the previous section, SSO is a service offered via the PSC for authentication brokering and secure token exchange, and can be shared to multiple vCenter instances or other VMware products.
The Licensing Service holds all licensing information for the vSphere environment and potentially other products, too, when they ship with PSC support. It removes the dependency where vCenter must be available for licensing operations to occur. This is especially important when you're installing multiple vCenter Servers in a geographically wide environment—older vCenter versions didn't replicate licensing information between them unless they were in a linked mode group.
The Certificate Authority and Store is the SSL certificate mint and wallet for your vSphere Environment. These services will allow you to create your own or store and assign third-party certificates for both vCenter and ESXi hosts. You'll find more details on how this service is used in Chapter 8.
The Service Registry works as the name suggests: it is a registration index of all VMware services available in this environment. This index will be particularly powerful when all VMware products also register their existence with the PSC, or more specifically, the Service Registry. No longer will you need to provide the details of each component to every other component; the Service Registry will do this automatically on your behalf.
During the installation of the PSC, which we'll detail later in this chapter, you see options for the installation type. Depending on the availability requirements of your vCenter Server installation, you may wish to make the PSC embedded on the vCenter Server; alternately, you may choose to make the PSC externally available from multiple sites, highly available in a single cluster, or even highly available across multiple sites. When you're installing a PSC for the first time, the first instance will always be a single node. Installing additional PSCs then allows you to join nodes to suit your environment. They can be external to the vCenter Server or embedded, as you can see in Figure 3.3. We'll discuss the pros and cons of the different PSC models in the section “Protecting the Platform Services Controller,” later in this chapter We will also go through configuring the more complex installation model, a vCenter Server using an external Platform Services Controller, later in this chapter. After you've wrapped your head around each configuration, the simpler, embedded Platform Services Controller model will be quite intuitive.
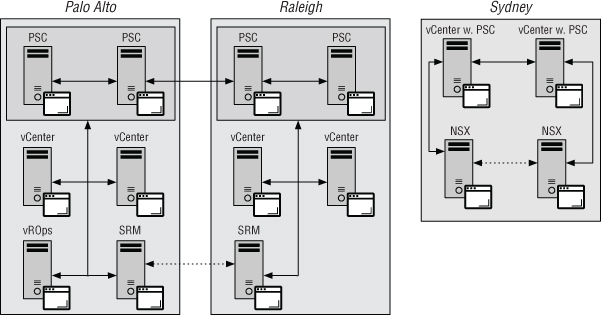
FIGURE 3.3 The Platform Services Controller can be installed as an embedded or external component of vCenter Server, just like a database.
Using the vSphere Web Client for Administration
In the months that preceded and followed the release of vSphere 6.5, VMware made deprecation announcements to both their Flash-based vSphere Web Client and vSphere Client, the latter often referred to as C# Client or Thick Client, ushering in a new HTML5-based vSphere Client. The new HTML5 Client, like its Flash-based predecessor, is a server-side service for administering vSphere from a web browser. The following browsers are certified and supported with the vSphere Web Client and the HTML5 Client:
- Microsoft Internet Explorer—versions 10 and later (Windows only)
- Microsoft Edge—versions 39 and later (Windows only)
- Mozilla Firefox—versions 39 and later
- Google Chrome—versions 34 and later
Additionally, to use the vSphere Web Client, you must have Adobe Flash Player version 16 or later, up to and including version 23 installed.
As stated in Chapter 2, the HTML5-based vSphere Client is not as feature-rich as the Flash-based vSphere Web Client. As you read through the rest of this book, you can assume that unless we specify the HTML5 Client, the Flash-based vSphere Web Client is the default choice and the one you should be using.
Providing an Extensible Framework
Just as centralized authentication is not a core vCenter Server service, we don't include vCenter Server's extensible framework as a core service. Rather, this extensible framework provides the foundation for vCenter Server's core services and enables third-party developers to create applications built around vCenter Server. Figure 3.4 shows some of the components that revolve around the core services of vCenter Server.
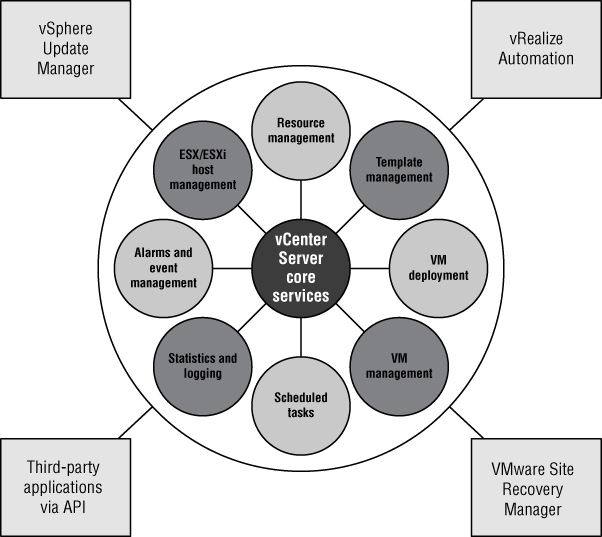
FIGURE 3.4 Other applications can extend vCenter Server's core services to provide additional management functionality.
A key aspect for successful virtualization is the ability to allow third-party companies to provide products that add value, ease, and functionality to existing products. By building vCenter Server in an extensible fashion and providing an application programming interface (API) to it, VMware has shown its interest in allowing third-party software developers to play an integral part in virtualization. The vCenter Server API allows companies to develop custom applications that can take advantage of the virtual infrastructure created in vCenter Server. For example, numerous companies have created backup utilities that work off the exact inventory created inside vCenter Server to allow for advanced backup options of VMs. Storage vendors use the vCenter API to create plug-ins that expose storage details, and other third-party applications use the vCenter Server APIs to provide management, monitoring, life-cycle management, or automation functionality.
You can find more information on vCenter Server functionality in Chapter 10, which provides a detailed look at templates along with VM deployment and management, and in Chapter 8, which goes deeper into vCenter Server's access controls. Chapter 11 discusses resource management, and Chapter 13 offers an in-depth look at ESXi host and VM monitoring as well as alarms.
You're almost ready to take a closer look at installing, configuring, and managing vCenter Server. First, however, we'll discuss how to choose which version of vCenter Server you should deploy in your environment.
Choosing the Version of vCenter Server
As mentioned in the previous section, vSphere 6.7 marks the last release in which vCenter Server comes available as an installable Windows-based application, and all future releases will be the Photon OS Linux–based virtual appliance. As a result, while appearing straightforward on the surface, a critical decision you must make as you prepare to deploy vCenter Server is which version you will use. Will you use the Windows Server–based version, and later use the vCenter Server Appliance Migration utility, or go with the virtual appliance from the get-go?
There are advantages and disadvantages to each approach:
- If your experience is primarily with Windows Server, you may not be familiar with the Linux underpinnings of the vCenter virtual appliance. This introduces a learning curve that you should consider.
- If you need support for Microsoft SQL Server or Oracle RDBMS, the Linux-based vCenter Server virtual appliance won't work; you'll have to deploy the Windows Server–based version of vCenter Server. The vCenter Server virtual appliance supports only an embedded Postgres database, which, if you and/or your staff are only familiar with the aforementioned databases, may also introduce a learning curve that you should consider.
- If your experience is primarily with Linux or you manage a “Linux only by policy” datacenter, then deploying a Windows Server–based application will require some learning and acclimation for you and/or your staff.
- Because the vCenter Server virtual appliance naturally runs only as a VM, you are constrained to that particular design decision. If you want or are required to run vCenter Server on a physical system, you cannot use the vCenter Server virtual appliance.
As you can see, a number of considerations will affect your decision to deploy vCenter Server as a Windows Server–based installation or as a Linux-based virtual appliance.
In the next section, we'll discuss some of the planning and design considerations that have to be addressed if you plan to deploy the Linux–based version of vCenter Server. Most of these issues apply to the Linux–based version of vCenter Server, but some may also apply to the Windows Server-based installation; we'll point those out where applicable.
Planning and Designing a vCenter Server Deployment
vCenter Server is a critical application for managing your virtual infrastructure. Its implementation should be carefully designed and executed to ensure availability and data protection. When discussing the deployment of vCenter Server and its components, the following questions are among the most common questions to ask:
- How much hardware do I need to power vCenter Server?
- How do I provide high availability for vCenter Server?
- How do I prepare vCenter Server for disaster recovery?
- If I run vCenter Server in a VM, do I need a separate management cluster?
- Should I use a vCenter Server with an embedded Platform Services Controller or with an external Platform Services Controller?
Many of the answers to these questions are dependent on each other, but we have to start somewhere, so let's start with the first topic: figuring out how much hardware you need for vCenter Server.
Sizing Hardware for vCenter Server
The amount of hardware that vCenter Server requires is directly related to the number of hosts and VMs it will be managing. This planning and design consideration applies not only to the appliance–based version of vCenter Server but also the Windows Server–based version. Because it is a prepackaged virtual appliance, the virtual hardware of the vCenter Server virtual appliance is predefined and established before it is deployed.
As a starting point, the minimum hardware requirements for the Linux–based version of vCenter Server are as follows:
- Two vCPUs
- 10 GB of RAM
- 300 GB of disk space
- A network adapter (Gigabit Ethernet is strongly recommended)
Keep in mind these are minimum system requirements that an appliance can be deployed with, only allowing you to run up to approximately 10 hosts and 100 VMs. Large enterprise environments with many ESXi hosts and VMs must scale the vCenter Server system accordingly.
Unlike the prepackaged Linux-based vCenter Server virtual appliance, the minimum requirements for the Windows Server–based edition of vCenter Server do not account for running a database server, which vCenter Server requires. Although vCenter Server is the application that manages your ESXi hosts and VMs, vCenter Server uses a database for storing all of its configuration, permissions, statistics, and other data. Figure 3.5 shows the relationship between vCenter Server and the separate database server.
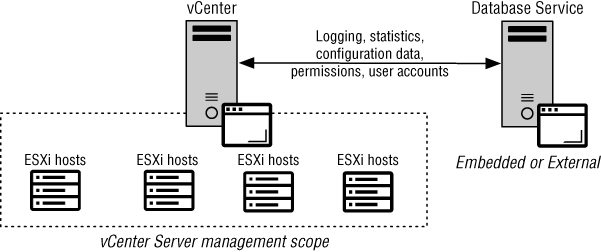
FIGURE 3.5 vCenter Server acts as a proxy for managing ESXi hosts, but all of the data for vCenter Server is stored in a database.
Although you can run vCenter Server and its dependencies on the same machine, it's usually not recommended, because it creates a single point of failure for key aspects of your virtual infrastructure. However, sometimes you don't have a choice, especially in smaller environments where capacity is at a premium. Keep in mind that VMware recommends 10 GB of RAM if vCenter Server is installed with an embedded Platform Services Controller, but only for environments with up to 10 ESXi hosts or 100 VMs. This would be the case if you use the Embedded option when installing vCenter Server.
VMware suggests vCenter hardware requirements depending on the size of the environment that vCenter will be managing. Table 3.1 shows these recommendations.
TABLE 3.1: vCenter sizing
| ESXI HOSTS | POWERED-ON VMs | CPU CORES | RAM GB | STORAGE GB |
| 10 | 100 | 2 | 10 | 300 |
| 100 | 1,000 | 4 | 16 | 340 |
| 400 | 4,000 | 8 | 24 | 525 |
| 1,000 | 10,000 | 16 | 32 | 740 |
| 2,000 | 35,000 | 24 | 48 | 1180 |
Should you choose to run the separate database server on the same physical or virtual computer as vCenter Server, if you're opting for a Windows-based deployment, you'll need to consult the documentation for your chosen database server. Without a doubt, the database server requires additional CPU capacity, RAM, and disk storage just like other co-located services, so you will need to plan accordingly. With the vCenter Server virtual appliance, this has been taken care of for you with the embedded Postgres database and the removal of external databases available in previous versions, so you just need to account for inventory size and other integrating components that you plan on deploying to the environment. That brings us to the next topic: planning for availability.
Planning for vCenter Server Availability
Planning for a vCenter Server deployment is more than just accounting for CPU and memory resources. You must also create a plan for business continuity and disaster recovery. Remember, features such as vSphere vMotion, vSphere Storage vMotion, vSphere DRS, and, to a certain extent, vSphere HA stop functioning or are significantly impacted when vCenter Server is unavailable. While vCenter Server or any component it depends on is down, you won't be able to clone VMs or deploy new VMs from templates. You also lose centralized authentication and role-based administration of the ESXi hosts. Clearly, there are reasons why you might want vCenter Server to be highly available.
Keep in mind, too, that the heart of the vCenter Server and its components are stored in backend databases. Although the Linux-based vCenter Server virtual appliance obfuscates this from you with the use of an embedded database, with a Windows-based deployment, this needs to be high on the list of considerations. Any good disaster-recovery or business-continuity plan must also include instructions on how to handle data loss or corruption, especially so in the backend databases, and if you're running external backend databases on separate physical computers or VMs, they must be designed and deployed to be resilient and highly available. This is especially true in larger or mission-critical environments.
There are a few different ways to approach this concern. First, we'll discuss how to protect the vCenter Server components, then the vCenter Server itself, and finally, we'll talk about protecting the separate database server.
PROTECTING THE PLATFORM SERVICES CONTROLLER
The Platform Services Controller (PSC) is an integral part of vCenter Server. Without it there is no ability to log in and administer vCenter. Therefore, it is imperative that your protection strategy encompass the whole of vCenter Server and its components. There are three methods for ensuring you have a PSC node available to you with little or no downtime: deploying in an HA-enabled cluster, deploying multiple nodes, and having a solid backup plan.
During the PSC installation, you can join an existing deployment—specifically, the same site as a pre-existing PSC—and configure an HA cluster—often dubbed PSC HA. With this configuration, all PSC instances must sit behind a load balancer. Deploying PSC in this way protects you from an outage of the SSO application or server. Keep in mind, however, that just because you have deployed multiple PSCs into the same site, you do not have to configure a load balancer; being in the same site is purely a prerequisite for high availability.
If the complexity of configuring a highly available PSC configuration is too much for you or your organization, consider the secondary model of high redundancy. Instead of using a load balancer for near-seamless failover between nodes, by using a site with multiple PSCs, you are able to repoint the vCenter Server to a secondary PSC. This process does require downtime for the vCenter Server, unlike PSC HA, so if your environment must abide to a strict service level agreement (SLA) with any of your customers, this needs to be taken into account.
The last installation option for PSCs is called Multisite. This mode lets you install PSCs with multiple physical locations. This is usually deployed when you need to be able to sign in from multiple locations, but, like having multiple PSCs in the same site, it can also be used to facilitate a protection mechanism, allowing for an administrator to repoint vCenter to a separate site. Multisite can be used in conjunction with PSC HA to provide per-site high availability; however, we consider multisite PSC HA to be the most complex and intricate of the methods available, which should really only be considered when you are faced with the strictest of uptime requirements.
However, with all of these models in mind, there is no substitute for a properly configured, companywide backup solution that covers the PSC deployment. Having a solid backup plan that covers all of your nodes is critical to the integrity of your vSphere environment.
PROTECTING VCENTER SERVERS
If the vCenter Server computer is a physical server, one way to provide availability is to create a standby vCenter Server system that you can turn on in the event of a failure of the online vCenter Server computer. After failure, you bring the standby server online and attach it to the existing SQL Server database, and then the hosts can be added to the new vCenter Server computer. In this approach, you'll need to find mechanisms to keep the primary and secondary/standby vCenter Server systems synchronized with regard to file system content and configuration settings. The use of the Linux-based virtual appliance might make this approach easier because it is a VM; it therefore can be cloned (a process you'll see in more detail in Chapter 10).
A variation on that approach, which is applicable to both a physical deployment and a virtual deployment (Windows-based or Linux-based), is to keep the standby vCenter Server system as a VM. You can use physical-to-virtual (P2V) conversion tools to regularly “back up” the physical vCenter Server instance to a standby VM. This method reduces the amount of physical hardware required and leverages the P2V process as a way of keeping the two vCenter Servers synchronized. Obviously, this sort of approach is viable for a Windows Server–based installation on a physical system but is not applicable to the virtual appliance version of vCenter Server.
Finally, if you are using the Linux-based vCenter Server virtual appliance, vSphere 6.5 introduced a native solution called vCenter High Availability (vCHA). This solution uses a cluster of three vCenter Server nodes—an Active, a Passive, and a Witness node—to provide an automated process of synchronization and failover between the Active and Passive nodes. The Witness node provides a quorum—the tie-breaking entity—in the event of network isolation between the Active and Passive nodes, often referred to as a split-brain event. Setting up this solution gives you the most consistent experience with documented performance overhead and recovery time objective (RTO), unlike the previously mentioned solutions that require their own bit of creativity to provide synchronization, failover initiation, and maintenance. However, like vCenter Server Heartbeat, vCHA comes at the expense of utilizing much more active resources. As mentioned previously, in environments where resources come at a premium, justifying this solution may be a struggle.
Ultimately, the most important part of the vCenter Server recovery plan is to ensure that the application server and its associated database server, be it embedded or external, is redundant and protected. Although this will get you up and running from a vCenter perspective, remember that other products (SRM, Horizon View, vRealize Operations Manager, etc.) also rely on vCenter Server and need to be accounted for. Recovery can get complicated, so test your recovery plan often.
PROTECTING THE VCENTER DATABASE
For high availability of the database server supporting the Windows-based vCenter Server, you can configure the backend database on a cluster. Figure 3.6 illustrates using a SQL Server cluster for the backend database. This figure also shows a standby vCenter Server system. Methods used to provide high availability for the database server are in addition to whatever steps you might take to protect vCenter Server itself. Other options might include using SQL log shipping or database mirroring to create a database replica on a separate system. If clustering or log shipping/database replication is not available or is not within fiscal reach, you should strengthen your database backup strategy to support easy recovery in the event of data loss or corruption. Using the native SQL Server tools, you can create a backup strategy that combines full, differential, and transaction log backups. This strategy allows you to restore data up to the minute when the loss or corruption occurred.
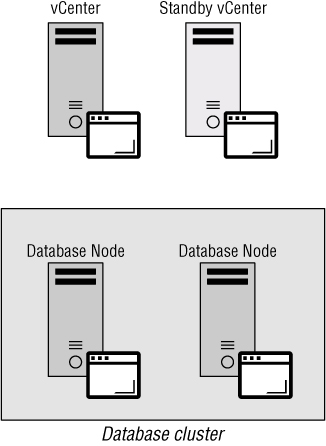
FIGURE 3.6 A good disaster-recovery plan for vCenter Server should include a quick means of regaining the user interface as well as ensuring that the data is highly available and protected against damage.
The suggestion of using a VM as a standby system for a physical computer running vCenter Server naturally brings us to the last topic surrounding architecture: Should you run vCenter Server in a VM? That's quite a question, and it's what we'll answer next.
Running vCenter Server and Its Components as VMs
As touched on earlier, you certainly have the option of skipping a physical server entirely and running vCenter Server and its components as a VM or even multiple VMs. This is actually the VMware recommendation. Running vCenter on a VM gives you several advantages, including snapshots, clones, vMotion, vSphere HA, Fault Tolerance, and vSphere DRS.
Running vCenter Server and the PSC as VMs on an HA-enabled cluster makes perfect sense. In fact, even with regular backups, clones, or snapshots, running vCenter Server on an HA-enabled cluster should be your default platform. Remember, the VMs running on your ESXi hosts, the storage, and the networking all continue to operate normally even with vCenter down. There are no dependencies on vCenter for these VMs to keep running. If the ESXi host that's running these VMs becomes unavailable, HA will kick in and restart the vCenter VM(s) on another available host. You might not even know it's happened unless your monitoring systems tell you!
Another feature that's available with vSphere 6 is Fault Tolerance (FT). Previously FT could only support one vCPU on a protected Virtual Machine. This meant that vCenter was not a possible candidate as it requires a minimum of two vCPUs to operate. As of vSphere 6.7 and later, FT supports eight vCPUs, vCenter and the PSC can be protected to avoid downtime altogether if an individual host goes down. You can read more about both HA and FT in Chapter 7, “Ensuring High Availability and Business Continuity.”
Snapshots are a feature we'll discuss in detail in Chapter 9. At a high level, snapshot functionality lets you return to a specific point in time for your VM—in this case, your vCenter Server VM. vMotion gives you the portability to move the server from host to host without experiencing server downtime. But what happens when a snapshot is corrupted or the VM is damaged to the point it will not run? With vCenter Server as your VM, you can make regular copies of the virtual disk file and keep a “clone” of the server ready to go in the event of server failure. The clone will have the same system configuration used the last time the virtual disks were copied. Given that the bulk of the data processing by vCenter Server ends up in a backend database running on a different server, this should not be very different. Additionally, if you are using the vCenter Server virtual appliance with the embedded database, you could run into issues with snapshots and reverting to snapshots. This might or might not be an issue, but be sure to plan accordingly. Figure 3.7 illustrates the setup of a manual cloning of a vCenter Server VM.

FIGURE 3.7 If vCenter Server is a VM, its virtual disk file can be copied regularly and used as the hard drive for a new VM, effectively providing a point-in-time restore in the event of complete server failure or loss.
Some organizations may have a “virtualize first” or a “100 percent virtual” policy; although this may give all the advantages of virtualization, you need to consider other issues in the design of the infrastructure. Having a separate management cluster to host all the vCenter Server components, along with any dependencies such as database servers and Active Directory, is fast becoming commonplace. This separate management cluster will ensure that a production workload incident would not negatively impact the manageability of the environment.
Delving into design best practices is outside the scope of this book, just as with physical infrastructure design, but there are certain things you must consider to ensure that your virtual infrastructure is designed to meet business requirements. Like any “best practice,” it's a recommendation when there are no requirements that would point you in a different direction. For more information on vSphere design, we recommend you read VMware vSphere Design (Sybex, 2013).
By now, you have a good understanding of the importance of vCenter Server in a large enterprise environment and some of the considerations that go into planning for a vCenter Server deployment. You also have a good idea of the components, features, functions, and role of vCenter Server. With this information in mind, let's deploy vCenter Server. The next section mainly focuses on the installation of the vCenter Server and Platform Services Controller virtual appliances; for information on the Windows-based vCenter Server, refer to older versions of this book.
Installing vCenter Server and Its Components
Depending on the size of the environment to be managed, installing vCenter Server can be simple. In small environments, the vCenter Server Installer can install and configure all the necessary components. For larger environments, installing vCenter Server in a scalable and resilient fashion is a bit more involved and requires a few different steps. For example, supporting more than 2,000 ESXi hosts or more than 25,000 VMs requires installing multiple vCenter Server instances in a linked mode group, a scenario that we'll discuss later in this chapter in the section “Installing vCenter Server in an Enhanced Linked Mode Group.”
Most of this discussion applies only to installing vCenter Server and its components as a Linux–based virtual appliance. However, some tasks—such as those required for configuring the SSO portion of the PSC—apply to the use of the Windows-based vCenter Server (physical or virtual) as well.
INSTALLING THE VCENTER SERVER COMPONENTS
The vCenter Server virtual appliance is a Photon OS–based VM that comes prepackaged and preinstalled with vCenter Server. It is commonly referred to as the vCSA, vCVA, or sometimes just the vCenter appliance. Rather than creating a new VM, installing a guest OS, and then installing vCenter Server, you only need to deploy the virtual appliance using a special deployment application. We discussed the vCenter Server virtual appliance earlier in this chapter in the section “Choosing the Version of vCenter Server.”
The vCenter Server virtual appliance comes as a packaged VM that requires its own deployment tool, both of which are packed together on the installation media. We'll discuss OVF templates in great detail in Chapter 10, but for now we'll simply explain them as an easy way to distribute “prepackaged VMs.”
The vCenter Server virtual appliance deployment and configuration takes only a few minutes and is not too administratively intensive, assuming you've completed all the pre-installation tasks. Once mounted, you can start the vCenter Server installation by double-clicking the OS-specific installer inside the vCenter Server installation directory.
The vCenter Server Appliance Installer, shown in Figure 3.8, is the central point for freshly deploying, upgrading, migrating, and even restoring your vSphere environment. But before we get too carried away, let's focus on getting your first environment deployed and take you through what the Install option provides. Once the Install tile is clicked, this option enables you to deploy the following:
- vCenter Server with an embedded Platform Services Controller
- vCenter Server that uses an External Platform Services Controller
- External Platform Services Controller

FIGURE 3.8 The VMware vCenter Server Appliance Installer has become one of the central places for install, upgrade, migration, and restore operations within your environment.
Unlike the a la carte style of installation that came with vSphere 5.x, with vSphere 6.0 and later, nearly all of the auxiliary components shipped with vCenter Server are now bundled together, and you will have full access to them once the system has been setup. These auxiliary components include the following:
- vCenter Authentication Proxy
- vSphere Web Clients (Flash-based and HTML5-based)
- vSphere Update Manager
- vSphere Auto Deploy
- vSphere Syslog Collector
- vSphere ESXi Dump Collector
In addition, the ISO that packages the vCenter Server Appliance Installer contains the binaries necessary to set up Update Manager Download Service (UMD). Chapter 4, “vSphere Update Manager and the vCenter Support Tools,” provides more detail on vSphere Update Manager. For now, we'll focus just on vCenter Server and its components.
INSTALLING A PLATFORM SERVICES CONTROLLER
Earlier in this chapter, we explained that vCenter Single Sign-On (SSO) is a prerequisite for vCenter and is part of the Platform Services Controller. Not only must it be installed for vCenter to run, it must also be running before the vCenter Server itself is installed.
We'll assume that you've already downloaded the files for the vCenter Server virtual appliance from VMware's website at my.vmware.com. You'll need these files before you can proceed with deploying either the Platform Services Controller virtual appliance or vCenter Server virtual appliance.
Use the following steps to install a PSC running SSO:
- Mount the ISO (or burn it to a CD).
- Once mounted, launch the vCenter Server Appliance Installer. To begin, navigate to
x:vcsa-ui-installer, wherexis the drive or mount point, depending on your operating system. There will be three directories available to you, allowing you to runinstalleron Mac OS X(/mac/installer.app), Microsoft Windows (win32installer.exe), or Linux (/lin64/installer). - The vCenter Server Appliance Installer should appear. Click Install, review the Introduction screen, which explains the two-stage appliance deployment operation, and then click Next.
- On the End User License Agreement (EULA) page, select the check box to accept and click Next.
- On the Select Deployment Type page, as shown in Figure 3.9, we'll choose the second option, Platform Services Controller, and click Next.

FIGURE 3.9 The Platform Services controller can be installed either embedded with or separately from vCenter Server.
The list of options available allow you to craft your environment's architecture given the set of requirements we covered previously.
- The first option, vCenter Server With An Embedded Platform Services Controller, allows you to install a combined vCenter Server installation with a PSC on the same system.
- The second option, which we've used for this walkthrough, installs a stand-alone/external PSC. The Platform Services Controller option installs only the components required for the PSC and will not install vCenter Server itself. This is a precursor to PSC HA, if needed.
- Finally, the third option, vCenter Server (Requires External Platform Services Controller), will install just vCenter Server and, as the option details, not the PSC components. This option should only be used if you already have a stand-alone, external PSC installed that you wish to join a new vCenter installation to.
- You'll need a running ESXi host to deploy the vCSA to. At a minimum, the host needs to be running version 6.0 to work for this installation. Provide the ESXi hostname or IP address, a username (in this case, root), and the appropriate password. Click Next.
- A pop-up box will prompt you with an SSL certificate warning, which will be the certificate thumbprint of the ESXi host. Click Yes to proceed to the next screen.
- Supply a VM (or display) name for the Platform Services Controller virtual appliance. You will also need to provide a password for the root account of this VM. Click Next to continue.
- Select the datastore that you want the Platform Services Controller to reside on, and then click Next.
Chapter 6 and Chapter 9 provide more details on the different disk provisioning types. In all likelihood, you'll want to use Thin Provision to help you conserve disk space.
- The final steps of Stage 1 are to provide the network information for the VM deployment. Working from top to bottom of the screen, first you must choose a network. On the ESXi host, this could also be called a port group, which you can read more about in Chapter 5, “Creating and Configuring a vSphere Network.”
- Second, select between IPv4 or IPv6 as the protocol. You'll most likely want to use a static IP address for Platform Services Controller—so on the third field, IP Address, select Static. However, if DHCP is available on the selected network, you can use that option. You'll need to provide a hostname, the associated IP address, a subnet mask, a gateway, and at least one DNS server. The hostname established in this step will be used to sign the SSL certificate generated upon deployment.
- Finally, new in vSphere 6.7 for appliance deployments, you have the option to provide unique ports that the Platform Services ontroller will use. Leave these as default, and click Next.
Unless there is a conflict in your environment, we recommend not changing the default port numbers. It can make configuration and troubleshooting more difficult later on.
- On the last page of Stage 1, review all the configuration details, as shown in Figure 3.10, to make sure there are no errors. Click Finish to deploy the virtual appliance.
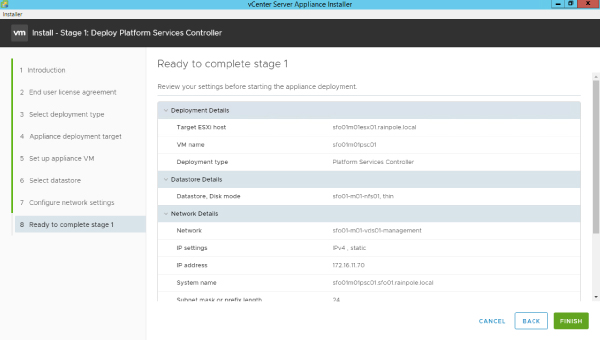
FIGURE 3.10 Ensure that everything has been configured before clicking Finish. Once committed, you can't make any grandiose changes like changing the Fully Qualified Domain Name.
A progress window like the one shown in Figure 3.11 will appear while the Platform Services Controller virtual appliance is being deployed to the ESXi host.
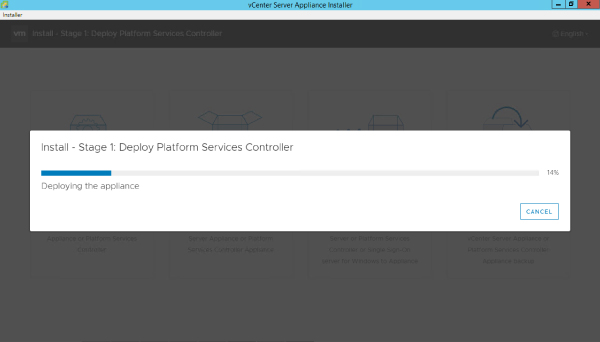
FIGURE 3.11 You can monitor each component being deployed and installed via the installation progress bar.
- After the appliance has been successfully deployed, you'll begin Stage 2 to finalize the Platform Services Controller's configuration. Review the Introduction page, which explains the two-stage appliance deployment operation, and then click Next.
- In the Appliance Configuration section, provide an NTP source. Unless necessary, due to a lack of NTP server availability in your environment, avoid using the VMware time sync tool because a time-drift can occur unless it's set up in a specific way.
For troubleshooting purposes, enable SSH access, and then click Next.
- On the following screen, shown in Figure 3.12, you're asked if you would like to configure a new Single Sign-On instance or join an existing one. Again, choose to configure a new SSO instance. You'll need to create a domain name, an SSO administrator password, and a site name. Click Next to continue.

FIGURE 3.12 To instantiate your first SSO domain, use the top radio button. For subsequent PSCs you want to join to the SSO domain, use the bottom radio button.
It is worth noting that these domain and site names have nothing to do with Active Directory domain or site names. In fact, we suggest that you use different names to avoid namespace conflicts in the future.
- The PSC installer will now ask you to join the Customer Experience Improvement Program that enabled VMware to collect telemetry data from your environment. Depending on your security requirements, either check the box to join or uncheck it to opt-out. Then click Next.
- Finally, review all configuration details for errors, as shown in Figure 3.13. Click Finish to proceed with configuring the Platform Services Controller virtual appliance. You'll receive one last warning that you will be unable to pause the installation after you proceed—essentially, there is no turning back from this point—so double-check those final configuration details, and then click OK.

FIGURE 3.13 Reviewing configuration details for errors.
- When installation is complete, click Close to close the installer.
After you complete the installation of Platform Services Controller, a link to the Platform Services Controller Getting Started page is displayed (https://<server name>:443 or https://<server ip address>:443). Unlike the previous version of vSphere, the administrator no longer has access to the Platform Services Controller UI, where the Login Banners, Smart Card Authentication, and certificate management were handled. All of these items have been relocated into vCenter Server HTML5-based Web Client.
INSTALLING VCENTER SERVER
After you've completed deploying the Platform Services Controller, you are now in a position to install the vCenter Server virtual appliance. If you have installed vCenter any number of times with a previous release, be it on Windows or using the appliance, this process should feel very familiar. Further, due to the nature of the two-stage operation for deploying the appliances, Stage 1 is largely a repeat of the same process you followed to deploy the Platform Services Controller.
Perform the following steps to install vCenter Server virtual appliance:
- Mount the ISO (or burn it to a CD).
- Once mounted, launch the vCenter Server Appliance Installer. To begin, navigate to
x:vcsa-ui-installer, wherexis the drive or mount point, depending on your operating system. There will be three directories available for you, allowing you to runinstalleron Mac OS X (/mac/installer.app), Microsoft Windows (win32installer.exe), or Linux (/lin64/installer). - The vCenter Server Appliance Installer should appear. Click Install, review the Introduction screen, which explains the two-stage appliance deployment operation, and then click Next.
- On the End User License Agreement (EULA) page, select the check box to accept and click Next.
- For Select Deployment Type, you have the same options outlined in the previous section. Since we showed you how to do a stand-alone/external Platform Services Controller, we'll now step you through a stand-alone vCenter Server and join them together. The result will functionally be the same as the Embedded Platform Services Controller option, but you'll have seen both sides of the installation process. This is important because if you want to add new vCenter Servers (or PSCs) in the future, the chances are you'll separate them. Select the third option, vCenter Server (Requires External Platform Services Controller), and click Next.
- Identical to the Platform Services Controller process, you'll need a running ESXi host to deploy the vCSA to. At a minimum, the host needs to be running version 6.0 to work for this installation. Provide the ESXi hostname or IP address, a username (in this case, root), and the appropriate password. Click Next.
- A pop-up box will prompt you with an SSL certificate warning, which will be the certificate thumbprint of the ESXi host. Click Yes to proceed to the next screen.
- Supply a VM (or display) name for the vCenter Server virtual appliance. You will also need to provide a password for the root account of this VM. Click Next to continue.
- Select the datastore that you want the vCenter Server to reside on, and then click Next.
- The following screen, shown in Figure 3.14, is where we see the first big divergence from the Platform Services Controller installation: you'll be asked to define the appliance's size. Select Tiny vCenter Server from the Deployment Size drop-down and Default from the Storage Size drop-down, and then click Next to continue.

FIGURE 3.14 Depending on the initial number of hosts and VMs in your environment, choose the appropriate size. You can increase the vCenter Server's resources as your environment grows.
Though we selected Tiny, the drop-down menus for Deployment Size and Storage Size allow you to configure the number of vCPUs and Memory along with Storage Space, respectively. The former drop-down defines the number of hosts and virtual machines the appliance can handle, while the latter drop-down defines the retention time of non-persistent items stored on disk, such as logs. These choices will dictate what the appliance will receive upon deployment.
- The final steps of Stage 1 are to provide the network information for the VM deployment. Working from top to bottom of the page, first you must choose a network. On the ESXi host, this could also be called a port group. Since you've already performed this activity for your PSC deployment, select the port group you previously used.
- Second, select between IPv4 or IPv6 as the protocol. You'll most likely want to use a static IP address for vCenter Server so in the third field, IP Address, select Static; however, you have the option to use DHCP if it is available on the selected Network. You'll need to provide a hostname, the associated IP address, a subnet mask, a gateway, and at least one DNS server. The hostname established in this step will be used to sign the SSL certificate generated upon deployment.
- Finally, new in vSphere 6.7 for appliance deployments, you have the option to provide unique ports that the vCenter Server will use. Leave these as default values. Click Next.
Unless there is a conflict in your environment, we recommend not changing the default port numbers. It can make configuration and troubleshooting more difficult later on.
- On the last page of Stage 1, review all the configuration details to make sure there are no errors. Click Finish to deploy the virtual appliance.
A progress window like the one shown earlier in Figure 3.11 will appear while the vCenter Server virtual appliance is being deployed to the ESXi host.
You can use the VM console from the Host Client to watch the virtual appliance boot up. Eventually, it will display a virtual appliance management screen, as shown in Figure 3.15. The vCenter Virtual Appliance console looks very similar to an ESXi host console. You can perform some limited configuration and troubleshooting from here, but the vast majority of vCenter configuration will be performed using the vSphere Web Client. The next section will show you what that looks like.

FIGURE 3.15 Until your first vCenter Server has been instantiated, using the ESXi Host Client's virtual machine consoles gives you visibility into their boot activities.
- When the appliance has been successfully deployed, you'll be greeted with a Success screen. This screen displays a web address you can use in the event that you need to continue the installation of this vCenter at a later time. That is, from the web address, you can continue the Stage 2 operation. For the sake of continuity, let's keep using the Installer; click Continue to move to Stage 2.
- Begin Stage 2 of the deployment that finalized the vCenter Server's configuration by reviewing the Introduction page, which again explains the two-stage appliance deployment operation, and then click Next.
- In the Appliance Configuration section, you'll also need to provide an NTP source. Like with the PSC install, unless necessary, such as a lack of NTP server in your environment, avoid using the VMware time sync tool because it can cause time-drift unless it's set up in a specific way.
For troubleshooting purposes, enable SSH access, and then click Next
- The following screen, shown in Figure 3.16, is where we see the second noticeable divergence from the Platform Services Controller installation. Enter the Platform Services Controller name you previously installed, along with the SSO domain name and the password to the Administrator account. Note that there is no mention of the Site as that is defined at the Platform Services Controller level; the vCenter Server simply inherits the site that is associated with the Platform Services Controller you join it to. Click Next to continue.

FIGURE 3.16 Joining multiple PSCs to the same SSO domain enables redundancy and scale out of your environment.
- On the last page of Stage 2, review the configuration details for errors, as shown in Figure 3.17. Click Finish to proceed with configuring the vCenter Server virtual appliance. You'll receive one last warning that you will be unable to pause the installation once you proceed, so double-check those final configuration details, and then click Finish.
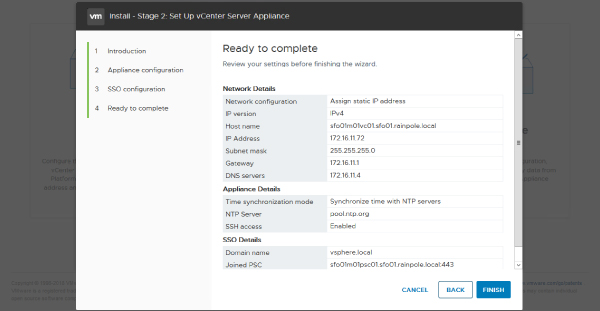
FIGURE 3.17 The vCenter Server installation program will ask for all the configuration options up front, before installing the software.
- When the installation is complete, click Close to close the installer.
After you complete the installation of vCenter Server, a link to the vCenter Server Getting Started page is displayed (https://<vcenter.domain.name>: 443 or https://<vcenter ip address>:443). Unlike the Platform Services Controller, on the Getting Started for vCenter Server, you'll have the option to launch either the HTML5-based Web Client (https://<vcenter.domain.name>/ui) or the Flash-based Web Client (https://<vcenter.domain.name>/vsphere-client). If you click the latter link, your default web browser will launch to this page. Before we dive into this area, we want to cover a few details regarding user interfaces and services.
The Flash-based vSphere Web Client connected to vCenter Server should be the primary management tool for managing vCenter. However, in the event that vCenter Server becomes unavailable, the HTML5-based Host Client will allow you to connect to each of the managed ESXi hosts, and give you visibility into their respective VMs. As we've mentioned, the Host Client can connect directly to ESXi hosts only under the context of a local user account defined on each ESXi host. That's not to say you cannot log in with an Active Directory account, but ESXi does not have any integration with the Platform Services Controller, so while you can authenticate to each host independently, once the vCenter Server services have been restored, your token won't allow you to seamlessly log in.
After you install vCenter Server, a number of new services will be installed to facilitate the operation of vCenter Server. Depending on whether you have installed both the PSC and vCenter on the same server, the services you may see will differ. Here are some of the most important ones:
- VMware vCenter Server, the core of vCenter Server that provides centralized management of ESX/ESXi hosts and VMs
- VMware Services Lifecycle Manager API, the interface to the VMware Lifecycle Manager (vMon) that provides the watchdog service to the Platform Services Controllers and vCenter Server, ensuring each node has healthy services and proper start order
- VMware Postgres, the embedded database on vCenter Server where configuration and historical data from the environment is preserved
- VMware vSphere Web Client, the web server that runs the user interface
As a vSphere administrator, you should be familiar with the default states of these services. In times of troubleshooting, check the status of the services to see whether they've changed. Later in this chapter, we'll show you where to monitor the services within the VMware Appliance Management Interface, but that's only useful if your vCenter is working enough to see that user interface. Keep in mind the dependencies that exist between vCenter Server and other services on the network. For example, if the vCenter Server service is failing to start, be sure to check that the system has access to the Platform Services Controller. If vCenter Server cannot access the PSC because of a lack of connectivity or the PSC services are not running, it will not start.
As additional features and extensions are installed, additional services will also be installed to support those features. For example, installing vSphere Update Manager will install an additional service called VMware Update Manager Service. You'll learn more about vSphere Update Manager in Chapter 4.
In Chapter 2, you learned that there are two clients that can be used to administer a vCenter Server installation: the old vSphere Desktop Client and the newer vSphere Web Client. We guided you through installing the older client. In previous versions of vSphere, the Web Client required a separate install, but with vSphere 6, the vSphere Web Client is installed with every vCenter Server installation.
Now that you've successfully installed vCenter Server, you'll probably want to log in and get started. Unless you also wish to know how to deploy for enhanced linked mode, feel free to skip to the section “Exploring vCenter Server.”
Installing vCenter Server in an Enhanced Linked Mode Group
What is an enhanced linked mode (ELM) group, and why might you want to install multiple instances of vCenter Server into such a group? If you need more ESXi hosts or more VMs than a single vCenter Server instance can handle, or if you need more than one instance of vCenter Server, you can install multiple instances of vCenter Server to scale outward or sideways and have those instances share licensing and permission information. The multiple instances of vCenter Server that share information among them are referred to as an enhanced linked mode group, or simply enhanced linked mode. In an enhanced linked mode environment, there are multiple vCenter Server instances, and each of the instances has its own set of hosts, clusters, and VMs. They are all registered back to the same PSC and SSO instance.
Prior to vSphere 6, vCenter Server linked mode, as it was previously called, used Microsoft Active Directory Application Mode (ADAM) to replicate the information between vCenter instances. Because of this architecture, it was limited to only the Windows version of vCenter. Now, with the re-architecting that was introduced in vSphere 6, the PSC is used to replicate the following information between the instances:
- Connection information (IP addresses and ports)
- Certificates and thumbprints
- Licensing information
- User roles and permissions
- Policies and tags
There are a few reasons you might need multiple vCenter Server instances running in an enhanced linked mode group. With vCenter Server 4.0, one common reason was the size of the environment. With the dramatic increases in capacity incorporated into vCenter Server 4.1 and later, and with vSphere 6.7 nearly doubling capacity maximums, the need for multiple vCenter Server instances due to size is reduced. However, you might still use multiple vCenter Server instances. You might prefer to deploy multiple vCenter Server instances in enhanced linked mode to accommodate organizational or geographic constraints, or you might want to manage multiple vCenter Servers from a single user interface. You can have up to 15 vCenter Servers participating in a linked mode group.
Before you install additional vCenter Server instances, you must verify the following prerequisites:
- All computers that you wish to run vCenter Server in an enhanced linked mode group must be registered to the same SSO domain, sometimes referred to as a vSphere domain. The servers can exist in different Active Directory domains only if a two-way trust relationship exists between the domains.
- DNS must be operational. Also, the DNS name of the servers must match the server name.
- You must use the same version of vSphere when deploying additional Platform Services Controllers and vCenter Servers; you cannot combine vCenter Server 6 instances in an enhanced linked mode group with earlier versions of vCenter Server via fresh installation.
- Enhanced Linked Mode is supported between the Linux-based vCenter virtual appliance and the installable Windows version of vCenter.
- Each vCenter Server instance must have its own backend (Windows) or embedded (Appliance) database.
After you've met the prerequisites, installing vCenter Server in an enhanced linked mode group is straightforward, though you have two choices to achieve this: deploying an additional Platform Services Controller for your new vCenter Server to use or connecting the new vCenter Server to the already-deployed Platform Services Controller. As previously discussed, depending on your availability requirements, the former operation provides higher redundancy within your vSphere environment at the cost of an increase in resources and administrative overhead, while the latter raises the risk of availability by introducing a single point of failure for multiple vCenters while reducing your resources and additional administrative overhead.
For the former operation, in which you deploy a new Platform Services Controller, you follow the steps outlined previously in “Installing a Platform Services Controller” until you get to step 14. In the previous instructions, you installed the Platform Services Controller as a new instance in step 14. This time, however, you simply select the option Join An Existing SSO Domain.
When you select to install into an existing SSO domain, you will be prompted for the name and port number of the existing SSO instance on a Platform Services Controller. The new Platform Services Controller instance uses this information to replicate data from the PSC server's repository. After you've provided the information to connect to a remote Platform Services Controller instance, the rest of the installation follows the same steps.
Next, you follow the steps outlined previously in “Installing vCenter Server” until you reach step 16. Instead of providing the first Platform Services Controller you deployed in this step, you'll provide the newest Platform Services Controller deployed.
This operation also applies to using vCenter Servers with Embedded Platform Services Controllers. However, rather than configuring the vCenter Server and Platform Services Controller separately, these operations have been joined together. So as you want to scale out and add more vCenter Servers to your ELM group, you simply use the option Join an existing SSO domain as you would for an External Platform Services Controller.
For the latter operation in which you want to re-use your original Platform Services Controller, nothing in the installation process changes for the vCenter Server installation outlined previously in “Installing vCenter Server.”
If, however, you are nervous about only having a single PSC servicing multiple vCenter Servers, don't fret. You can install PSCs later using the process mentioned previously and manually redistribute the vCenter Servers via repoint scripts covered in VMware Knowledge Base article 2113917.
When the additional vCenter Server is up and running in the enhanced linked mode group, logging in via the vSphere Client displays all the linked vCenter Server instances in the inventory view, as you can see in Figure 3.18.
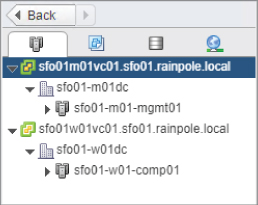
FIGURE 3.18 In an enhanced linked mode environment, the vSphere Client shows all the vCenter Server instances for which a user has permission.
One quick note about enhanced linked mode: although the licensing and permissions are shared among all the enhanced linked mode group members, each vCenter Server instance is managed separately. Prior to vSphere 6, each vCenter Server instance represented a vMotion domain. This meant that you couldn't perform a vMotion migration between vCenter Server instances, even in a linked mode group. In vSphere 6 and later, this is no longer a limitation—you can now migrate vMotion VMs between vCenters joined in enhanced linked mode. This certainly blurs the line between managing vCenter Servers as single entities and managing your vCenter Servers together. We'll discuss vMotion in detail in Chapter 12. As you'll see, joining vCenter instances together by specifying an existing SSO domain is quite straightforward. Most vSphere administrators will likely now install their vCenters in enhanced linked mode by default.
Exploring vCenter Server
As explained, you can access vCenter Server through either of the vSphere Web Clients, be it the Flash-based or HTML-based version. Previously, the HTML5-based Web Client was not as feature-rich compared with the Flash-based Web Client, but starting with vSphere 5.5, and through the vSphere 6.0 and vSphere 6.5 releases, the Flash-based Web Client has become quite feature-rich by comparison. Therefore, this is the client we'll use to demonstrate the majority of features throughout this book. There's a lot to cover, so let's start out at the beginning: logging in.
To run the vSphere Web Client, all you need is a compatible web browser with Adobe Flash installed. While the legacy Windows vCenter Server has a shortcut in the Start ⇒ All Programs ⇒ VMware ⇒ VMware vSphere Web Client folder, since we're focusing on the vCenter Server Appliance, accessing the vCenter Web Client can only be done via another computer. Go to https://<vcenter.domain.name>/vsphere-client. For our vSphere Web Client, this address is https://sfo01m01vc01.rainpole.local/vsphere-client.
When you connect to a vCenter Server instance with the vSphere Web Client, you may receive a security warning message that differs slightly depending on your web browser. This security warning appears because the vSphere Web Client uses HTTP over Secure Sockets Layer (HTTPS) to connect to vCenter Server but the vCenter Server is using a Secure Sockets Layer (SSL) certificate from an “untrusted” source.
To correct this error, you have the following two options:
- You can choose the Do Not Prompt For Security Warnings option (again, the option depends on your browser). This option tells your browser to ignore that there's an untrusted certificate.
- You can install your own SSL certificate from a trusted certification authority on the vCenter Server. We recommend this, and we'll step you through this process in Chapter 8 when we discuss security in greater detail.
If you simply browse to HTTPS on the vCenter Server's hostname or IP address, you'll be prompted with a splash screen with a link to the /vsphere-client URL. After the vSphere Web Client connects and authenticates to the vSphere Web Client, you'll notice a Getting Started tab that explains the various sections of the user interface. Closing this tab reveals the home screen, which is the starting point for the vSphere Web Client.
The vSphere Web Client Home Screen
So far, you've seen only the Hosts And Clusters inventory view within the traditional vSphere Client, but it's very similar in the Web Client. The Hosts And Clusters view is where you manage ESXi hosts, clusters, and VMs. You already understand hosts and VMs; and we'll discuss clusters in the section “Creating and Managing a vCenter Server Inventory,” later in this chapter. To see the rest of what vCenter Server has to offer, click the house icon on the top of the browser next to the VMware vSphere Web Client name.
As shown in Figure 3.19, the interface is divided into five main areas and a search bar appears in the upper-right corner.
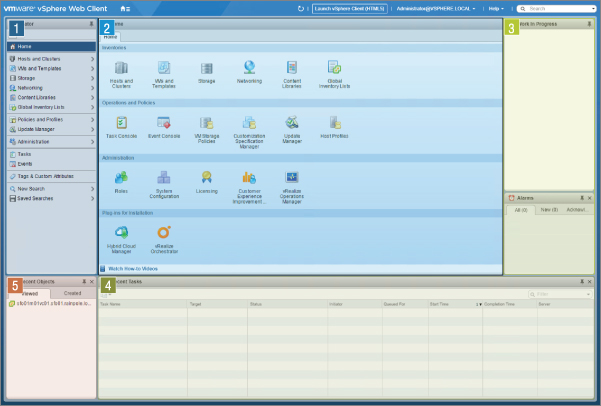
FIGURE 3.19 The vSphere Web Client home screen shows the full selection of features within vCenter Server as well as both services that hook into the vSphere Web Client.
- Navigator (1) The leftmost column is used for showing inventory and for navigation. It is the primary item selection tool.
- Content Area (2) Once an item is selected, the larger middle column shows the content or configuration options for that item.
- Alarms and Work In Progress (3) On the right is a column that brings potential problems to your attention and also shows any current wizards that are in progress but put to the side for completion at a later time.
- Recent Tasks (4) The Recent Tasks bar shows anything that is currently or has recently occurred within vCenter. Recent Tasks can be swapped between My Tasks and All Users.
- Recent Objects (5) The Recent Objects bar shows the last 10 objects that you have recently viewed or created within vCenter. The Recent Viewed Objects can be swapped with Recent Created Objects by clicking on the opposite tab.
The home screen lists all the various features that the vSphere Web Client has to offer within the content area in managing ESXi hosts and VMs:
- Under Inventories, the Web Client offers several views, including Hosts And Clusters, VMs And Templates, Storage, Networking, Content Library, and Global Inventory Lists.
- Under Operations And Policies, the Web Client has screens for viewing tasks, events, host profiles, storage service classes, and customization specifications.
- Under Administration are areas for managing roles, configuring the system, and licensing.
- Under Plug-ins For Installation, the Web Client has screens to access Hybrid Cloud and vRealize Orchestrator.
Many of these features are explored in other areas of the book. For example, networking is discussed in Chapter 5, and storage is discussed in Chapter 6. Chapter 10 discusses templates and customization specifications, and Chapter 8 discusses roles and permissions. Under Administration, you'll also see a link to vCenter Operations Manager, which is outlined in Chapter 13. A large portion of the rest of this chapter is spent just on vCenter Server's inventory views.
From the home screen, you can click any of the icons to navigate to the corresponding area. There may or may not be additional icons here, depending on the plug-ins you have installed. The vSphere Web Client also has another way to navigate quickly and easily, and that's called the navigator.
Using the Navigator
The left-hand column of the vSphere Web Client is the navigator. As stated on the Getting Started tab, the navigator is an “aggregated view of all objects in the inventory.” The top of the navigator shows you exactly where you are in the various screens that vCenter Server provides and also displays a chronological history so you can jump back to a prior screen.
If you click any item in the navigation bar with an arrow next to it, the menu changes and displays just the subitems of the selected item. When you click an item without the arrow, the Navigator menu doesn't change, but it does change the content area. A key point about the vSphere Web Client and vCenter Server is that many of the menu options and tabs that appear within the application are context sensitive, meaning they change depending on what object is selected or active. You'll learn more about this topic throughout the chapter.
Now that you understand how to navigate using the vSphere Web Client, you're ready to start creating and managing the vCenter Server inventory.
Creating and Managing a vCenter Server Inventory
As a vSphere administrator, you'll spend a significant amount of time using the vSphere Web Client. You will spend a great deal of that time working with the various inventory views available in vCenter Server, so it's quite useful to first explain them.
Understanding Inventory Views and Objects
Every vCenter Server has one or more root objects; these are datacenter objects, which serve as a container for all other objects. Prior to adding an object to the vCenter Server inventory, you must create at least one datacenter object (you can have multiple datacenter objects in a single vCenter Server instance). The objects found within the datacenter object depend on which inventory view is active. The navigator provides a quick and easy reminder of which inventory view is currently active by displaying the four main inventory trees as tabs at the top. In the Hosts And Clusters view, you'll work with ESXi hosts, clusters, resource pools, and VMs. In the VMs And Templates view, you'll work with folders, VMs, and templates. In the Storage view, you'll work with datastores and datastore clusters; in the Networking view, you'll work with vSphere Standard Switches and vSphere Distributed Switches.
You organize the vCenter Server inventory differently in different views. The Hosts And Clusters view is primarily used to determine or control where a VM is executing or how resources are allocated to a VM or group of VMs. You would not, typically, create your logical administrative structure in the Hosts And Clusters inventory view. This would be a good place, though, to provide structure for resource allocation or to group hosts into clusters according to business rules or other guidelines.
In VMs And Templates view, though, you can place VMs and templates within folders irrespective of the specific host on which that VM is running. Thus you can create a logical structure for VM administration that remains, for the most part, independent of the physical infrastructure on which those VMs are running. There is one very important tie between the VMs And Templates view and the Hosts And Clusters view: datacenter objects are shared between them. Datacenter objects span both the Hosts And Clusters view and the VMs And Templates view.
The naming strategy you provide for the objects in vCenter Server should complement existing datacenter design and management. For example, if you have qualified IT staff at each of your three datacenters across the country, you would most likely create a hierarchical inventory that mirrors that management style. If your IT management was set by the various departments in your company, the datacenter objects might be named after each respective department. In most enterprise environments, the vCenter Server inventory will be a hybrid that involves management by geography, department, server type, and even project title.
The vCenter Server inventory can be structured as needed to support a company's IT management needs. Folders can be created above and below the datacenter object to provide higher or more granular levels of control that can propagate to lower-level child objects. In Chapter 8, we'll discuss the details of vCenter Server permissions and how you can use them in a vCenter Server hierarchy. Figure 3.20 shows a Hosts And Clusters view of a vCenter Server inventory that is based on a geographical management style.
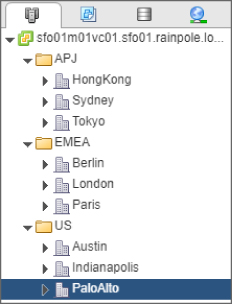
FIGURE 3.20 Users can create folders above the datacenter object to grant permission at a level that can propagate to multiple datacenter objects or to create folders beneath a datacenter to manage the objects within the datacenter object.
If a company uses more of a departmental approach to IT resource management, the vCenter Server inventory can be shifted to match that management style. Figure 3.21 reflects a Hosts And Clusters inventory view based on a departmental management style.
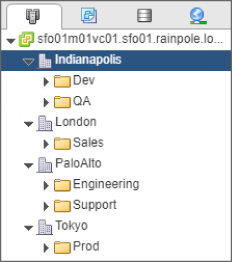
FIGURE 3.21 A departmental vCenter Server inventory allows the IT administrator to implement controls within each organizational department.
In most enterprise environments, the vCenter Server inventory will be a hybrid of the different topologies. Perhaps one topology might be a geographical top level, followed by departmental management, followed by project-based resource configuration.
Folders can be used to organize all different object types within vCenter Server. Figure 3.22 shows how you can create folders designated for the various objects, such as hosts and clusters or VMs and templates.
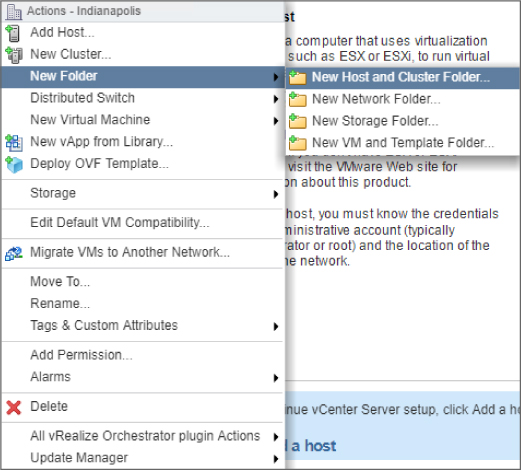
FIGURE 3.22 Create folders to organize objects and delegate permissions within the vCenter Web Client.
These inventory views are mostly separate and independent, although as we pointed out earlier, they do share datacenter objects. For example, the Hosts And Clusters view may reflect a physical or geographical focus, whereas the VMs And Templates view may reflect a departmental or functional focus. Because permissions are granted based on these structures, organizations can build inventory structures that properly support their administrative structures. Chapter 8 will describe the security model of vCenter Server that will work hand in hand with the management-driven inventory design.
With that basic understanding of vCenter Server inventory views and the hierarchy of inventory objects behind you, it's time for you to build your inventory structure and start creating and adding objects in vCenter Server.
Creating and Adding Inventory Objects
Before you can build your inventory—in either Hosts And Clusters view or VMs And Templates view—you must get your ESXi hosts into vCenter Server. And before you can get your ESXi hosts into vCenter Server, you need to have a datacenter object.
CREATING A DATACENTER OBJECT
You might have created the datacenter object as part of the Getting Started Wizard, but if you didn't, you must create one now. Don't forget that you can have multiple datacenter objects within a single vCenter Server instance.
Perform the following steps to create a datacenter object:
- Launch the vSphere Web Client, if it is not already running, and connect to a vCenter Server instance.
- On the home screen, select Hosts And Clusters.
- In the navigator, right-click the vCenter Server object and select New Datacenter.
- Type a name for the new datacenter object and click OK.
Once you create at least one datacenter object, you're ready to add your ESXi hosts to the vCenter Server inventory, as described in the next section.
ADDING ESXI HOSTS
In order for vCenter Server to manage an ESXi host, you must first add the ESXi host to vCenter Server. The process of adding an ESXi host to vCenter Server automatically installs a vCenter agent on the ESXi host through which vCenter Server communicates and manages the host.
Note that vCenter Server 6.7 supports adding and managing only ESXi 6.x hosts to the inventory; vCenter Server 6.7 no longer supports managing ESXi 5.x hosts. We'll only describe adding ESXi 6.7 hosts to vCenter Server, but the process is nearly identical for other versions.
Perform the following steps to add an ESXi host to vCenter Server:
- Launch the vSphere Web Client, if it is not already running, and connect to a vCenter Server instance.
- From the navigator, select vCenter Hosts And Clusters, or simply click the Hosts And Clusters icon on the home screen.
- In the navigator, right-click the datacenter object and select Add Host.
- In the Add Host Wizard, supply the IP address or fully qualified hostname and user account information for the host being added to vCenter Server. This will typically be the root account.
Although you supply the root password when adding the host to the vCenter Server inventory, vCenter Server uses the root credentials only long enough to establish a different set of credentials for its own use moving forward. This means that you can change the root password without worrying about breaking the communication and authentication between vCenter Server and your ESXi hosts. In fact, regularly changing the root password is considered a security best practice.
- When you're prompted to decide whether to trust the host, and an SHA1 fingerprint is displayed, click Yes.
Strictly speaking, security best practices dictate that you should verify the SHA1 fingerprint before accepting it as valid. ESXi provides the SHA1 fingerprint in the View Support Information screen at the console.
- The next screen displays a summary of the ESXi host being added, along with information on any VMs currently hosted on that server. Click Next.
- On the next screen, you need to assign a license to the host being added (see Figure 3.23). The option to add the host in evaluation mode is also available.

FIGURE 3.23 Licenses can be assigned to an ESXi host as they are added to vCenter Server or at a later time.
Choose evaluation mode, or assign a license; then click Next.
- The next screen offers the option to enable lockdown mode. There are two lockdown mode options. Normal lockdown mode ensures that the management of the host occurs via vCenter Server, not through the vSphere Client connected directly to the ESXi host. Strict lockdown mode takes normal mode one step further and disables the Direct Console User Interface (DCUI). For now, leave this disabled and click Next.
- On the VM location screen, you will be asked where you want to move any existing VMs running on this host. If you have folders set up within the VMs And Templates view, these folders will be displayed under the datacenter object here. For now, simply select the datacenter you already have created and click Next.
- Review your host details and click Finish at the summary screen.
- Repeat this process for all the ESXi hosts you want to manage using this instance of vCenter Server.
Now compare the tabs in the content area in the middle of the vSphere Web Client for the vCenter Server, datacenter, and host objects. You can see that the tabs presented to you look the same, but if you select them, their subsections change depending on the object selected in the inventory tree. This is yet another example of how vCenter Server's user interface is context sensitive and changes the options available to the user depending on what is selected.
You can add hosts to vCenter Server and manage them as separate, individual entities, but you might prefer to group these hosts together into a cluster, another key object in the vCenter Server inventory. We'll describe clusters in the next section.
CREATING A CLUSTER
We've made a few references to clusters here and there, and now it's time to take a closer look at them. Clusters are not just administrative groupings of ESXi hosts but a way to pool resources. After you group hosts into a cluster, you can enable some of vSphere's most useful features. vSphere High Availability (HA), vSphere Distributed Resource Scheduler (DRS), and vSphere Fault Tolerance (FT) all work only with clusters. We'll describe these features in later chapters; Chapter 7 discusses vSphere HA and vSphere FT, and Chapter 12 discusses vSphere DRS.
Perform the following steps to create a cluster:
- Launch the vSphere Web Client, if it is not already running, and connect to a vCenter Server instance.
- Right-click a datacenter object in the Hosts And Clusters view.
- Select New Cluster to open the New Cluster Wizard.
- Supply a name for the cluster.
Don't select Turn ON vSphere DRS, Turn ON vSphere HA, or Turn ON Virtual SAN. We'll explore those options later in the book (Chapter 12, Chapter 7, and Chapter 6, respectively).
Also, leave EVC set to Disable (the default), and click OK.
When the cluster is created, adding hosts to it is a matter of simply dragging the ESXi host object onto the cluster object within the navigator; vCenter Server will add the host to the cluster. There are other avenues—using the right-click menu or scripting—but dragging host objects is the simplest, provided you don't have a large number of hosts to add. You may be prompted about resource pools; refer to Chapter 11 for more information on what resource pools are and how they work.
Adding ESXi hosts to vCenter Server enables you to manage them with vCenter Server. You'll explore some of vCenter Server's management features in the next section.
Exploring vCenter Server's Management Features
After your ESXi hosts are managed by vCenter Server, you can take advantage of some of vCenter Server's management features:
- Basic host management tasks in Hosts And Clusters view
- Basic host configuration
- Scheduled tasks
- Events
- Host profiles
- Tags
In the next few sections, you'll examine each of these areas in a bit more detail.
Understanding Basic Host Management
A great deal of the day-to-day management tasks for ESXi hosts in vCenter Server occur in the Hosts And Clusters view. From this area, the context (right-click) menu for an ESXi host shows some of the options available. This menu has changed from the previous versions of the vSphere Web Client; it is now more closely aligned to the menus that exist within the deprecated vSphere Desktop Client and Host Client, as shown in Figure 3.24.

FIGURE 3.24 The right-click menu in the vSphere Web Client is now very similar to the vSphere Desktop Client.
The majority of these options are described in later chapters. Chapter 9 describes creating VMs, and Chapter 11 discusses resource pools. Chapter 8 covers permissions, and Chapter 13 discusses alarms and reports. The remaining actions—shutting down, rebooting, powering on, standing by, disconnecting, and removing from vCenter Server—are self-explanatory.
Additional commands may appear on this context menu as extensions or are installed into vCenter Server depending on the ESXi host's configuration. For example, after you install vSphere Update Manager, several new commands appear on the context menu for an ESXi host. ESXi hosts in a cluster enabled for vSphere HA would have additional options. You'll learn more about vSphere HA in Chapter 7.
In addition to the context menu, the tabs across the middle content area of the vSphere Web Client also provide some host-management features. Figure 3.25 shows some of the tabs.
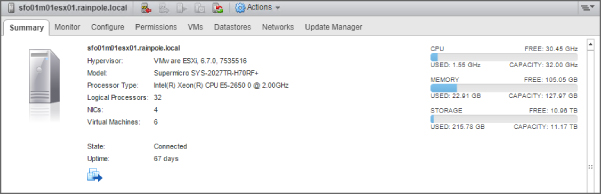
FIGURE 3.25 When a host is selected in the inventory view, the tabs across the top also provide host-management features.
Within each of these tabs are subsections that further divide the settings into appropriate areas. For the most part, these tabs correspond closely to the commands on the context menu. Here are the tabs and subsections that are displayed when a host is selected in the inventory view, along with a brief description of what each does:
- Summary The Summary tab gathers and displays information about the underlying physical hardware, the storage devices that are configured and accessible, the networks that are configured and accessible, and the status of certain features such as vMotion, vSphere FT, and Host Profiles. The content within this tab is somewhat configurable. You can drag the different boxes around, change their size, and expand categories to reveal more information. There are no subsections of the Summary tab, but it does provide links to commonly performed host- management tasks.
- Monitor The Monitor tab displays all the monitoring information available about the selected host and breaks it down into a number of subsections.
- Issues The Issues subsection lists any current configuration problems with the selected host; this could be any number of things, from a cluster configuration to a network issue. The triggered alarms area relates to alarms on this host that have not been acknowledged or reset.
- Performance The Performance subsection displays performance information for the host, such as overall CPU utilization, memory utilization, disk I/O, and network throughput. We'll discuss this area in more detail in Chapter 13.
- Tasks All tasks related to the selected host are displayed here. The Tasks subsection shows all tasks, the target object, which account initiated the task, which vCenter Server was involved, and the result of the task.
- Events Similar to the Tasks subsection, the Events subsection lists all events related to the selected host, such as a triggered alarm. If a host is using almost its entire RAM or if a host's CPU utilization is very high, you may see some triggered alarms.
- Scheduled Tasks The scheduled tasks subsection lists any pending tasks that you may have scheduled, while also letting you set up a scheduled job of creating a new virtual machine.
- Hardware Status The Hardware Status subsection displays sensor information on hardware components such as fans, CPU temperature, power supplies, network interface cards (NICs) and NIC firmware, and more.
- Configure The Configure tab is where you will make configuration changes to the host. Tasks such as configuring storage, configuring the network, changing security settings, configuring hardware, and so forth are all performed here.
- Permissions The Permissions tab displays all of the permissions that may have been established above the ESXi host—at the cluster, datacenter, or vCenter level—and allows you to add permissions directly on the ESXi host. Keep in mind that any permissions added to the ESXi from vCenter Server do not propagate to the ESXi host's local permissions store.
- VMs The VMs tab displays all of the virtual machines and templates that currently reside on the ESXi host, giving you quick insight into the specifications of the virtual machines such as their power state, their resource allocation, and their vSphere HA status. You can add additional columns that can provide more details across the VMs and templates.
- Datastores The Datastores tab displays all the mounted datastores available on the selected host and information about each, such as the type—NFS, VMFS 5, VMFS 6, Virtual SAN (vSAN), or Virtual Volume (VVOL)—overall capacity, free space, and whether or not the datastore is in a datastore cluster. As with other sections, you can add columns that provide more details across the different datastores.
- Networks The Networks tab displays all the networking information available about the selected host and breaks it down into two subsections: Networks and Distributed Switches. The Networks subsection lists all of the port groups associated with the selected host, displaying information such as the port group types, how many virtual machines reside on which port group, and how many hosts have access to the port group. The other subsection, Distributed Switches, gives you a cursory look at any Distributed Virtual Switches that are associated with the selected host; this will give you information such as the DVS's version, the version of Net IO Control, and what vCenter Server owns the DVS.
- Update Manager The Update Manager tab, often referred to as the Update Manager Compliance view, is where you will coordinate updates and patches to the selected host, which includes managing the baselines, managing the compliance against said baselines along with staging patches, and scheduling remediation operations. We'll discuss this area in more detail in Chapter 4.
Before showing you some of vCenter Server's other management features, we want to walk you through the Manage tab in detail. This is where you'll perform almost all of the ESXi host-configuration tasks and where you're likely to spend a fair amount of time, at least in the beginning.
Examining Basic Host Configuration
You've already seen the Configuration tab of an ESXi host, when in Chapter 2 you learned how to configure Network Time Protocol (NTP) time synchronization. We'll spend a bit more time on it; however, in the Web Client, the System subsection is under the Configure tab, along with others. You'll be visiting this area quite often throughout this book. In Chapter 5, you'll use the Configure tab for networking configuration, and in Chapter 6, you'll use the Configure tab for storage configuration.
CONFIGURE TAB
Figure 3.26 shows the commands available on the Configure tab for an ESXi host that has just been added to vCenter Server.
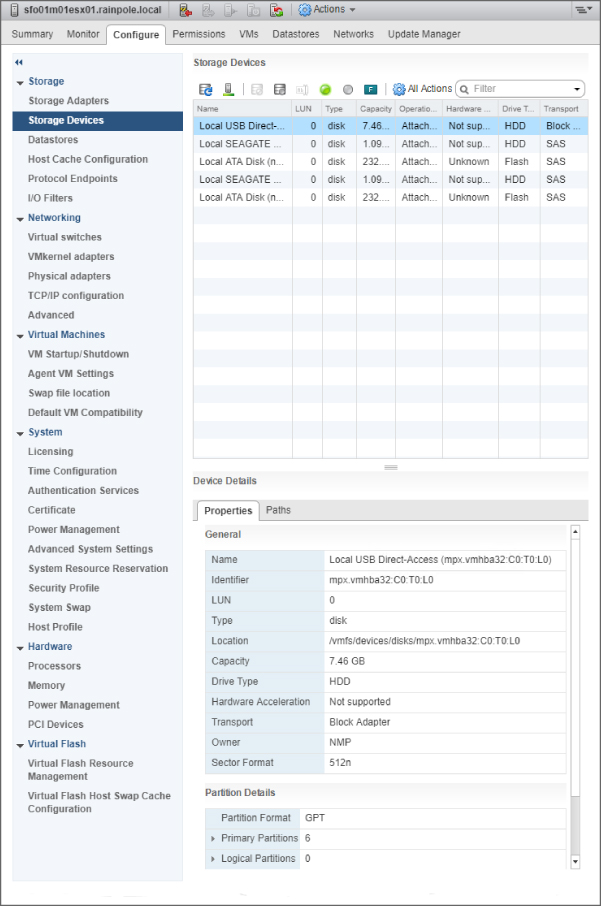
FIGURE 3.26 The Configure tab of an ESXi host offers a number of commands to view or modify the host's configuration.
There are a lot of options here, so let's quickly run through them and provide a brief explanation of each. Let's start by going from top to bottom.
- Storage Subsection The following areas are available in the Storage subsection of the Configure tab:
- Storage Adapters This area provides information on the various storage adapters installed in the ESXi host as well as information on storage resources connected to those adapters.
- Storage Devices The Storage Devices area shows storage LUN and device mapping along with their relative paths to the host. Devices in here generally have a datastore on top of them that can be viewed in the Storage view. This is more of a logical view of storage, whereas the Storage Adapters area described earlier is more physical in nature.
- Host Cache Configuration The Host Cache Configuration area displays how the host's Flash-based datastores are configured. You are able to see what space is reserved for Host Cache and how much space is available on a per-host level.
- Protocol Endpoints The Protocol Endpoints area directly relates to the endpoints that this host can see with the Virtual Volume (VVOL) storage configuration. VVOLs are explained in detail in Chapter 6.
- I/O Filters The I/O Filters area directly relates to the storage filters that this host has been configured with. By default, you should see spm and vmwarevmcrypt, which are for VMware's default Storage Policies and VM Encryption, respectively. We'll talk more about VM Encryption in Chapter 8, and talk about Storage Policies and I/O Filters are explained in detail in Chapter 6.
- Networking Subsection The following areas are available in the Networking subsection of the Configure tab:
- Virtual Switches In Chapter 5, we'll explore the functionality found in this area. You'll configure network connectivity to both standard and distributed virtual switches here and in the Network view.
- Virtual Adapters The Virtual Adapters area is where you can configure different VMkernel network interfaces to the ESXi host to use for Management, vMotion, and Fault Tolerance, for example.
- Physical Adapters The Network Adapters area provides read-only information on the network adapters that are installed in the selected ESXi host. It also allows you to add networking to the ESXi host along with changing the network speed of any network adapter. We'll talk more about the Physical Adapters section in Chapter 5.
- TCP/IP Configuration In this area, you can view and change the DNS and routing configuration for the selected ESXi host.
- Advanced In this area, you can view advanced options such as IPv6 configuration.
- Virtual Machines Subsection The following areas are available in the Virtual Machines subsection of the Configure tab:
- VM Startup/Shutdown If you want VMs to start up or shut down automatically with the ESXi host, you configure those settings in this area. You can also define the startup order of VMs that are set to power on with the host.
- Agent VM Settings Agent VMs add specific supporting functionality to the virtual environment. Although they are VMs, they are considered part of the infrastructure and should be started before all others. For example, NSX Edge Gateway uses agent VMs to help supply its functionality.
- Swap File Location This area is where you'll configure the location of the swap files for running VMs on the host. By default, the swap file is stored in the same directory as the VM itself. When an ESXi host is in a cluster, the cluster setting overrides the per-host configuration.
- Default VM Compatibility When a VM is created, it is created with a specific VM hardware version. Each VM hardware version has a certain level of features available to it based on the version of the vSphere host, and with each new revision of vSphere, new VM hardware versions are introduced and new features are added. This may cause backward-compatibility issues when you want to migrate VMs with newer VM hardware versions from a newer environment to an older one. You'll learn more about VM compatibility in Chapter 9; for now, just know that this is the area where you can set the default level when a VM is created.
- System Subsection The following areas are available in the System subsection of the Configure tab:
- Licensing This area allows you to view the currently licensed features as well as assign or change the license for the selected ESXi host.
- Time Configuration From here, you can configure time synchronization via NTP for the selected ESXi host. You saw this area within the vSphere Client in Chapter 2.
- Authentication Services This area allows you to configure how ESXi hosts authenticate users; we'll discuss it in more detail in Chapter 8.
- Certificate SSL certificates are managed by the PSC but can be updated on a per-host basis from this area. More details about the PSC Certificate Authority can be found in Chapter 8.
- Power Management If you want to use Distributed Power Management (DPM), you'll need to configure the ESXi hosts appropriately. This area is where that configuration occurs.
- Advanced System Settings The Advanced System Settings area provides direct access to detailed configuration settings on the selected ESXi host. In the majority of instances, this is not an area you'll visit on a regular basis, but it is helpful to know where it is in the event you need to change a setting.
- System Resource Allocation The System Resource Allocation area allows you to fine-tune the resource allocation for the selected ESXi host.
- Security Profile This area allows you to configure which daemons (services) should run on the host.
- System Swap In this area, you can disable or specify which datastore should be used for host swap files. We'll explain host swapping and how it differs from VM swapping in Chapter 11.
- Host Profile Although there is a Host Profiles area accessible from the home screen, this area lets you attach a host profile as well. See the section “Working with Host Profiles,” later in this chapter.
-
Hardware and Virtual Flash Subsections The following areas are available in the Hardware and Virtual Flash subsections of the Configure tab:
- Processors In this area, vCenter Server provides details about the processors in the selected ESXi host as well as the ability to enable or disable hyperthreading on that ESXi host.
- Memory This area shows you the amount of memory installed in an ESXi. It only provides information about the memory in the host, how much is allocated to the system (ESXi), and how much is allocated to VMs—there are no options to configure.
- Graphics Within the Graphics area, you can see what type of GPU is in the system and how much memory it has. In Chapter 9, you'll read about use cases for sharing the GPU of an ESXi host to the guest VMs in certain circumstances.
- PCI Devices The PCI Devices area allows you to mark available devices on the ESXi host that can then be allocated to one of the virtual machines in the host's inventory. This allows for the virtual machines to directly access the physical device on the host.
- Power Management The Power Management area in the Hardware subsection differs from the area under the System subsection above it. This area allows you to set various power-management policies on the selected ESXi host.
- Virtual Flash Resource Management Solid State Drive (SSD)–backed datastores can be allocated to the flash resource type in this area. You can then further allocate this resource in the Cache Configuration described next.
- Virtual Flash Host Swap Cache Configuration This area allows you to specify or view the amount of space on Solid State Drive (SSD)–backed datastores (or flash) that can be used for swapping. Swapping to SSD as opposed to traditional disks is much faster, and this area allows you to control which SSD-backed datastores may be used for swapping.
As you can see, vCenter Server provides all the tools that most administrators will need to manage ESXi hosts. Although these host-management tools are visible in the Hosts And Clusters view, several of vCenter Server's other management features are found in the multiple views.
Using Scheduled Tasks
Earlier in this chapter, you learned how the vSphere Web Client often displayed the UI depending on the context of the item selected. Scheduled Tasks is a feature that's available from many areas, including vCenter.
From the Navigator, select Manage Scheduled Tasks to display the Scheduled Tasks area of vCenter Server.
Here, you can create jobs to run based on a defined logic. You can schedule the following list of tasks:
- Change the power state of a VM.
- Clone a VM.
- Deploy a VM from a template.
- Move a VM with vMotion.
- Move a VM's virtual disks with Storage vMotion.
- Create a VM.
- Make a snapshot of a VM.
- Add a host.
- Change the power settings for a cluster.
- Change resource settings for a resource pool or VM.
- Check compliance for a profile.
As you can see, vCenter Server supports quite a list of tasks you can schedule to run automatically. Because the information required for each scheduled task varies, the wizards are different for each of the tasks. Let's take a look at one task that you might find quite useful to schedule: adding a host.
Why might you want to schedule a task to add a host? Perhaps you know that you'll be adding a host to vCenter Server but you want to add it after hours. You can schedule a task to add the host to vCenter Server at a later time, although keep in mind that the host must be reachable and responding when the task is created.
Follow these steps to create a scheduled task to add a host to vCenter Server:
- Launch the vSphere Web Client, if it is not already running, and connect to a vCenter Server instance.
- After you connect to vCenter Server, navigate to the Scheduled Tasks area of the Hosts And Clusters view by selecting a cluster and then choosing Manage Scheduled Tasks. This example will also work by selecting a datacenter instead of a cluster.
- Select Schedule A New Task from within the content area.
- From the list of tasks to schedule, select Add Host.
The Add Host Wizard starts.
- Supply the hostname, username, and password to connect to the host, just as if you were adding the host manually.
- When prompted to accept the host's SHA1 fingerprint, click Yes.
- The next four steps in the wizard are the same as adding the host manually. Click Next after each step until you come to the point of scheduling the task.
- Supply a task name and task description, and click the Change button. The Configure Scheduler pop-up is fairly self-explanatory, but you can run the task now, after startup, or at a later time of your choosing. There's also an option for setting a recurring schedule, but for adding a host, the recurring option doesn't make sense. Click OK once your scheduler is configured.
- Specify that you want to receive email notification of the scheduled task when it completes by supplying an email address. Note that vCenter Server must be configured with the name of an SMTP server it can use.
Scheduling the addition of an ESXi host is of fairly limited value. However, the ability to schedule tasks such as powering off a group of VMs, moving their virtual disks to a new datastore, and then powering them back on again is quite useful.
Using the Events and Events Consoles in vCenter Server
The consoles for Tasks and Events in vCenter Server bring together all the events and tasks that have been logged by vCenter Server. Figure 3.27 shows the Events console with an event selected.

FIGURE 3.27 The Events console lets you view event details, search events, and export events (highlighted).
You can view the details of an event by simply clicking it in the list. Any text highlighted in blue is a link; clicking that text will take you to that object in vCenter Server. You can search through the events using the search box in the upper-right corner of the vSphere Web Client content window. Right below the event list is a button that you can click to export the events to a text file. Figure 3.28 shows the dialog box for exporting events.

FIGURE 3.28 Users have a number of options when exporting events out of vCenter Server to a CSV file.
Working with Host Profiles
Host profiles are a powerful feature of vCenter Server. As you'll see in upcoming chapters, a bit of configuration is involved in setting up an ESXi host. Although vCenter Server and the vSphere Web Client make it easy to perform these configuration tasks, it's easy to overlook something. Additionally, making all these changes manually for multiple hosts can be time consuming and even more error prone. That's where host profiles can help.
A host profile is essentially a collection of all the various configuration settings for an ESXi host. This includes settings such as NIC assignments, virtual switches, storage configuration, date and time, and more. By attaching a host profile to an ESXi host, you can compare the compliance of that host with the settings outlined in the host profile. If the host is compliant, you know its settings are the same as the settings in the host profile. If the host is not compliant, you can enforce the settings in the host profile to make it compliant. This provides you with a way not only to verify consistent settings across ESXi hosts but also to quickly and easily apply settings to new ESXi hosts.
To work with host profiles, click the Home button and then click Host Profiles. Figure 3.29 shows the Host Profiles view in vCenter Server, where a host profile has been created but not yet attached to any hosts.

FIGURE 3.29 Host profiles provide a mechanism for checking and enforcing compliance with a specific configuration.
As you can see in Figure 3.29, the toolbar contains a number of buttons. These buttons allow you to perform the following tasks:
- Extract a profile from a host.
- Import a host profile.
- Duplicate a host profile.
- Copy settings from a host.
- Check the host profile compliance.
- Attach/detach host profiles from hosts or clusters.
- Remediate a host based on its host profile.
To create a new profile, you must either create one from an existing host or import a profile that was already created somewhere else. Creating a new profile from an existing host requires only that you select the reference host for the new profile. vCenter Server will then compile the host profile based on that host's configuration.
After you create a profile, you can edit the profile to fine-tune the settings contained in it. For example, you might need to change the IP addresses of the DNS servers found in the profile because they've changed since the profile was created.
Follow these steps to edit the DNS server settings in a host profile:
- If the vSphere Web Client isn't already running, launch it and connect to a vCenter Server instance.
- On the home screen, select Host Profiles.
- Right-click the host profile to be edited, and select Edit Settings.
- Click Next to move past the Name And Description page onto Edit Host Profile.
- From the tree menu on the left side of the Edit Host Profile window, navigate to Networking Configuration ⇒ Netstack Instance ⇒ defaultTcpipStack ⇒ DNS Configuration.
Figure 3.30 shows this area.
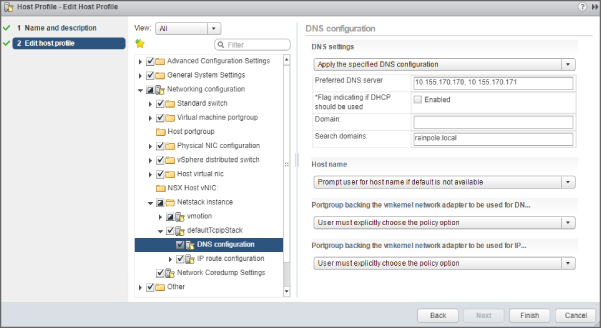
FIGURE 3.30 To make changes to a number of ESXi hosts at the same time, put the settings into a host profile, and attach the profile to the hosts.
- Change the values shown in the host profile.
- Click Next and then click Finish to save the changes to the host profile.
Although this procedure describes only how to change DNS settings, the steps for changing other settings within a host profile are similar. This allows you to quickly create a host profile based on a reference host and then customize the host profile until it represents the correct “golden configuration” for your hosts.
Host profiles don't do anything until they are attached to ESXi hosts. Click the Attach/Detach A Host Profile To Hosts And Clusters button just below the Objects tab in the vSphere Web Client to open a dialog box that allows you to select one or more ESXi hosts to which the host profile should be attached.
After a host profile has been attached to an ESXi host, checking for compliance is as easy as right-clicking that host on the Hosts And Clusters tab and selecting Host Profile Check Compliance from the context menu.
If an ESXi host is found noncompliant with the settings in a host profile, you can then place the host in Maintenance mode and apply the host profile. When you apply the host profile, the settings found in the host profile are enforced on that ESXi host to bring it into compliance. Note that some settings require a reboot to take effect.
To truly understand the power of host profiles, consider a group of ESXi hosts in a cluster. We haven't discussed clusters yet, but as you'll see elsewhere in the book—especially in Chapter 5 and Chapter 6—ESXi hosts in a cluster need to have consistent settings. Without a host profile, you would have to manually review and configure these settings on each host in the cluster. With a host profile that captures the settings, adding a new host to the cluster is a simple two-step process:
- Add the host to vCenter Server and to the cluster.
- Attach the host profile and apply it.
That's it. The host profile will enforce all the settings on this new host that are required to bring it into compliance with the settings on the rest of the servers in the cluster. This approach is a great timesaver for larger organizations that need to quickly deploy new ESXi hosts.
Host profiles are also hugely important when you're using vSphere Auto Deploy to create a stateless environment. In stateless environments using Auto Deploy, configuration settings aren't persistent between reboots. To keep your stateless ESXi hosts properly configured, you'll want to use host profiles to apply the proper settings so that the host retains a consistent configuration over time, even when it's rebooted.
As explained previously, host profiles start to become beneficial when your environment has a large number of ESXi hosts to keep things consistent and manageable. However, host profiles are not the only feature included with vSphere that assists with management; tags are a relatively recent addition to help with these tasks.
Tags and Custom Attributes
Nearly every item within a vCenter inventory can have a label and metadata added to it by way of tags or custom attributes. Tags let you group related items together using categories, and they help sort and manage your vCenter objects. Tags can be both exclusive and inclusive, which gives you great flexibility when you design your metadata structure. They also can extend outside the confines of a single vCenter Server; if multiple vCenter Servers are configured in enhanced linked mode the tags and categories you create will be accessible and searchable across all of their inventories. We'll explain how this might be useful with an example. Say that you want to know which VMs belong to the engineering team, as well as which VMs are production, test, or development. In the section “Understanding Inventory Views and Objects,” earlier in this chapter, you saw how to use folders to organize objects for management and security. The problem with folders is that a VM can reside in only one folder, and a folder can only exist within a single vCenter Server; taking this example, you cannot put a VM in both the Engineering folder and the Production folder. With tags, this problem is solved. Although you can specify that only a single tag can be applied to a certain object at any one time, you can also specify multiple tags against a single object.
Using tags to build metadata around your ESXi hosts, VMs, and other objects is quite powerful, and the integration with the vSphere Web Client's search functionality makes large inventories much more manageable. As your environment grows, and your engineering team begins deploying more virtual machines across multiple vCenter Servers, object tracking can quickly become a tedious task. With the potential of VMs, Templates, hosts of varying hardware, and a myriad of other items spread across multiple clusters and multiple vCenter Servers, leveraging the shared tags and categories quickly enables you to search out logical relationships, allowing you to quantify and locate specific objects.
Custom Attributes provide a similar role within your vCenter inventory.
We'll now show you how to create some tags and how they can be used. Each tag must belong to a category (and only a single category), and because of this requirement, you must create a category before or at the same time you create any tags. Here are the steps:
- If the vSphere Web Client isn't already running, launch it and connect to a vCenter Server instance.
- From the home screen within the navigator, select Tags & Custom Attributes.
- From the Tags tab, click the New Tag icon to open the New Tag dialog box.
- Enter the name of the tag and a description.
- Change the category to New Category, and the window will expand to show more fields.
- Give the Category a name and a description.
- Decide whether this category should allow a single tag or multiple tags per object, and then select what object type(s) are associated with this category, as shown in Figure 3.31.

FIGURE 3.31 You are able to create both tags and tag categories in the New Tag dialog box.
- Click OK to save the new tag and category.
Tags let you define custom identification or information options for nearly every object type within vCenter, including the following:
- Clusters
- Datacenters
- Datastores
- Distributed switches
- Folders
- Hosts
- Networks
- Resource pools
- vApps
- Virtual machines
After you create this tag, you can attach the tag to an object. After the tag is added, it appears in the Tags section of the content area Summary tab. You can use the Assign Tag option in the right-click menu to add tags to various objects, as shown in Figure 3.32.

FIGURE 3.32 You can add metadata to objects by creating and assigning tags.
With the tags clearly defined for various objects, you can then search based on that data. Figure 3.33 shows a custom search for all objects whose tag contains the text Production, Engineering, and Windows.
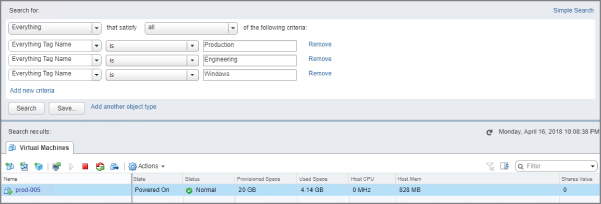
FIGURE 3.33 After you've defined a category and a tag, you can use it as search criteria for quickly finding objects with similar tags.
At this point, you have installed vCenter Server, added at least one ESXi host, and explored some of vCenter Server's features for managing settings on ESXi hosts. Now we'll cover how to manage some of the settings for vCenter Server itself.
Managing vCenter Server Settings
To make it easier for vSphere administrators to find and change the settings that affect the behavior or operation of a vCenter Server instance, VMware centralized these settings into a single area within the vSphere Web Client user interface. You'll see this Settings area on the Manage tab when you have a vCenter Server selected in the vSphere Web Client navigator. Here you can configure vCenter Server after installation with options that are not provided during installation. The Administration menu contains these items:
- General
- Licensing
- Message Of The Day
- Advanced Settings
The vCenter Server Settings area lets you change the settings that control how vCenter Server operates, as you'll see in the next section.
General vCenter Server Settings
The General vCenter Server Settings area contains 10 vCenter Server settings:
- Statistics
- Database
- Runtime Settings
- User Directory
- SNMP Receivers
- Ports
- Timeout Settings
- Logging Settings
- SSL Settings
When you have vCenter Server instances running in a linked mode group, be sure to select the correct vCenter Server instance within the navigator.
Each of these settings controls a specific area of interaction or operation for vCenter Server, which we briefly discuss next:
- Statistics On the Statistics page, shown in Figure 3.34, you can configure the collection intervals and the system resources for accumulating statistical performance data in vCenter Server. In addition, it provides a database-sizing calculator that can estimate the size of a vCenter Server database based on the configuration of statistics intervals. By default, the following four collection intervals are available.
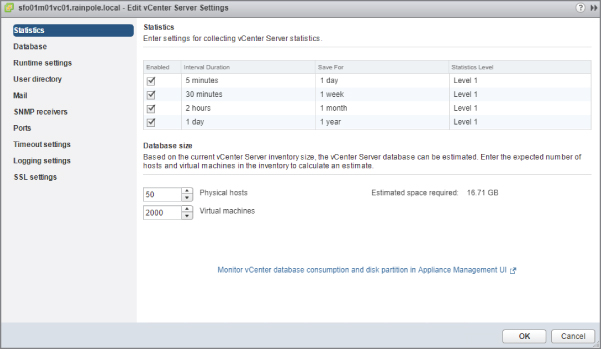
FIGURE 3.34 You can customize statistics collection intervals to support broad or detailed logging.
- Past day: 5 minutes per sample at statistics level 1
- Past week: 30 minutes per sample at statistics level 1
- Past month: 2 hours per sample at statistics level 1
- Past year: 1 day per sample at statistics level 1
By selecting an interval and clicking the drop-down list, you can customize the interval configuration. You can set the interval, how long to keep the sample, and what statistics level (level 1 through level 4) vCenter Server will use.
Four Statistics Collection levels are defined in the user interface:
- Level 1 Has the basic metrics for average usage of CPU, memory, disk, and network. It also includes data about system uptime, system heartbeat, and DRS metrics. Statistics for devices are not included.
- Level 2 Includes all the average, summation, and rollup metrics for CPU, memory, disk, and network. It also includes system uptime, system heartbeat, and DRS metrics. Maximum and minimum rollup types as well as statistics for devices are not included.
- Level 3 Includes all metrics for all counter groups, including devices, except for minimum and maximum rollups.
- Level 4 Includes all metrics that vCenter Server supports.
- Runtime Settings The Runtime Settings area lets you configure the vCenter Server unique ID, the IP address used by vCenter Server, and the server name of the computer running vCenter Server. The unique ID will be populated by default, and changing it requires a restart of the vCenter Server service. These settings would normally require changing only when running multiple vCenter Server instances in the same environment.
- Database The Database page lets you configure the maximum number of connections to the backend database. To limit the growth of the vCenter Server database, you can configure a retention policy. vCenter Server offers options for limiting the length of time that both tasks and events are retained in the backend database.
- User Directory On this page you can set the user directory (usually Active Directory) time-out value, a limit for the number of users and groups returned in a query against the user directory database, and the validation period (in minutes) for synchronizing users and groups used by vCenter Server.
- Mail The Mail page might be the most commonly customized page because its configuration is crucial to the sending of alarm results, as you'll see in Chapter 13. The mail SMTP server name or IP address and the sender account will determine the server and the account from which alarm results will be sent.
- SNMP Receivers The SNMP Receivers configuration page is where you would configure vCenter Server for integration with a Systems Network Management Protocol (SNMP) management system. The receiver URL should be the name or IP address of the server with the appropriate SNMP trap receiver. The SNMP port, if not configured away from the default, should be set at 162, and the community string should be configured appropriately (Public is the default). vCenter Server supports up to four receiver URLs.
- Ports The Ports page is used to configure the HTTP and HTTPS ports used by vCenter Server.
- Timeout Settings This area, the Timeout Settings area, is where you configure client connection time-outs. The settings by default allow for a 30-second time-out for normal operations or 120 seconds for long operations.
- Logging Settings
The Logging Settings area customizes the level of detail accumulated in vCenter Server logs. The logging options include the following:
- None (Disable Logging)
- Errors (Errors Only)
- Warning (Errors And Warnings)
- Information (Normal Logging)
- Verbose (Verbose)
- Trivia (Trivia)
By default, the Windows-based vCenter Server stores its logs at
C:ProgramDataVMwareVMware VirtualCenterLogs(on Windows Server 2008 R2, Windows Server 2012 and later) while the Linux-based vCenter Server virtual appliance stores its logs at/var/log/vmware. - SSL Settings On this page, you can configure a certificate validity check between vCenter Server and the vSphere Client. If enabled, both systems will check the trust of the SSL certificate presented by the remote host when performing tasks such as adding a host to inventory or establishing a remote console to a VM. You'll learn more about SSL certificates in Chapter 8.
Licensing
The Licensing configuration area of the vCenter Server Settings dialog box, shown in Figure 3.35, provides the parameters for how this specific vCenter Server instance is licensed. The options include using an evaluation mode or assigning a license key to this instance of vCenter Server.
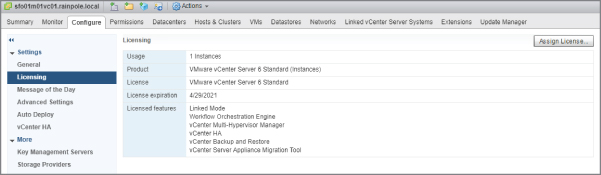
FIGURE 3.35 Licensing vCenter Server is managed through the vCenter Server Settings dialog box.
When an evaluation of vSphere and vCenter Server is no longer required and the appropriate licenses have been purchased, you must deselect the evaluation option and add a license key. Evaluation licenses are only valid for 60 days after installation.
Message of the Day
As the name suggests, you can edit the message of the day (MOTD) from this area. The MOTD is displayed to users each time they log into vCenter Server. This provides an excellent means of distributing information regarding maintenance schedules or other important information.
Advanced Settings
The Advanced Settings area provides for an extensible configuration interface. These settings should be changed only under specific circumstances, usually at VMware's direction.
Auto Deploy
We'll take you through Auto Deploy as another method of rapidly deploying and configuring ESXi hosts in Chapter 4, but for now, just know that this area provides access to some of the underlying components necessary for configuring this service, including iPXE boot loader, a keystone to the image streaming process.
vCenter HA
Touched on earlier in the chapter, the vCenter HA configuration area is where you'll setup and maintain a highly available configuration of your Linux-based vCenter Server virtual appliance. In its out-of-the-box form, you'll simply see a splash page, but we'll take you through vCenter HA more in-depth in Chapter 7.
Key Management Servers
We'll touch on this more in in Chapter 8, but for now, just know that the Key Management Servers area allows you to establish a trust between the vCenter Server and the local key management server (KMS). This is a prerequisite if you ever plan on enabling encryption in your virtual infrastructure in order to provide an extra level of security within the environment.
Storage Providers
The Storage Providers area provides insight into the existing storage entities and their capabilities within your environment, including external physical storage and abstracted storage, such as VMware Virtual SAN (vSAN) or Virtual Volumes (VVols), leveraging the vSphere APIs for Storage Awareness (VASA). This can be a powerful component within your environment, allowing vCenter Server and its ESXi hosts to obtain information about your storage configuration, its status, and storage data services offered, which enables you to make more informed decisions about workload placement.
We'll talk more about Storage Providers and Storage Policy-Based Management (SPBM) in Chapter 6.
vSphere Web Client Administration
As we explained when outlining the home screen of the vSphere Web Client, there are three distinct areas: Inventories, Monitoring, and Administration. So far, we've explained a number of features of the Inventories and Monitoring areas, but let's also briefly touch on the third category of features, Administration.
There are three areas under the Administration banner: Roles, Licensing, and vCenter Solutions Manager. There is some overlap between these areas and those that come under Inventories.
Roles
The Roles option from the Administration menu is available only when the view is set to Administration and the Roles tab is selected. This menu works like a context menu where you can add, edit, rename, or remove roles based on what object is selected. Although you set up the roles and accounts within this area, you apply those roles for permissions against vCenter objects within the various inventory views. Chapter 8 describes vCenter Server's roles in detail.
Licensing
In the previous section, you saw how to go about setting a license for a specific vCenter Server through the inventories vCenter view. There are also licensing options when you select individual hosts in the Hosts And Clusters view. However, the Licensing area of the vSphere Web Client home screen gives you a broad view of all your licenses within the environment and indicates to which component those licenses are allocated.
Within Licensing, you can also report on your license usage over time and export this data. Depending on how complex your environment and license agreement is with VMware, you will seldom use this area, or only dedicated licensing staff will look at this section. Standard (Perpetual) licenses or VMware Service Provider Program (VSPP) licensing agreements are all managed through the overall licensing area.
vCenter Solutions Manager
As extensions—such as vSphere Update Manager or vSphere Auto Deploy—are added to vCenter Server, additional icons, tabs, and features may appear throughout the vSphere Web Client. The extensions themselves that enable these new features are managed through this vCenter Solutions Manager area.
Chapter 4 discusses one such extension to vCenter Server: vSphere Update Manager.
System Configuration
The System Configuration feature falls under the Administration banner on the vSphere Web Client home screen, and just like the Licensing section, this feature gives you an aerial view of all vCenter Servers and Platform Services Controller within your environment. In the earlier sections “Understanding Basic Host Management” and “Understanding Inventory Views and Objects,” you learned to interact with and address the different objects' services and settings within the management domain of vCenter Server, such as ESXi hosts, clusters, or data centers; however, although we touched upon some of the Advanced Settings you can configure on vCenter, you may have noticed we are missing actual visibility into the vCenter Server's and Platform Services Controller's services, health, and domain. While there is some overlap with what is available in the VMware Appliance Management Interface (VAMI), System Configuration allows for you to see all vCenter Servers and Platform Services Controllers deployed in the same vSphere domain in one place. This area allows you to do the following:
- View and browse all nodes in a vSphere domain, quickly observing their aggregate health at either the Node or Services level.
- Monitor the networking, storage, and performance (memory and CPU usages) of each node.
- Manage settings such as SSH or DCUI access, change networking settings, and add Firewall rules.
- Check the health of individual services that belong to a specific node.
- Manage the startup type as well as the start, stop, and restart of individual services.
- Manage service-specific settings of individual services, such as Content Library, vSphere Authentication Proxy, or vSphere Update Manager.
- Export the logs from vCenter Server or Platform Services Controller.
When you select System Configuration from the Administration section on the home screen, you can observe the overall health for all nodes and services within your vSphere domain, as shown in Figure 3.36.
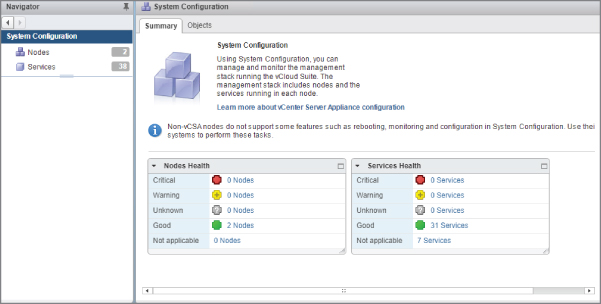
FIGURE 3.36 You can view the health of vCenter Server or Platform Services Controller easily from the System Configuration.
Perform the following tasks to export system logs out of vCenter Server and Platform Services Controller:
- With the vSphere Web Client running and connected to a vCenter Server instance, on the home screen, select System Configuration.
- In the Navigator pane, select Nodes, and let the pane load your Platform Services Controller and vCenter Server.
- Right-click on your Platform Services Controller, and select Export Support Bundles.
- Select the log(s) you want to export. By default, neither of the bundles is selected, so go ahead and select both. Use the drop-down menu to select a specific, desired log if needed.
- Click the Export Support Bundle button.
- A new browser window will appear where you can specify a local path in which to save the logs. Allow for the export to finish.
In the location you selected, the Platform Services Controller will download VMware-vCenter-Support-<Date>@<Time>.zip, which contains another compressed file: <Hostname>-supportbundle<date>@<time>.tgz. If you decompress both files, you'll find the system logs for the Platform Services Controller system. Figure 3.37 shows some log files exported from the Platform Services Controller.
FIGURE 3.37 These logs are for the Platform Services Controller.
We'll continue to explore vCenter Server's functionality in the coming chapters. Chapter 4 explores the functionality added to vCenter Server by the vSphere Update Manager extension.
VMware Appliance Management Administration
If you've ever taken any of the other VMware appliance-based products for a spin, you may have had some hands-on time with the Virtual Appliance Management Interface (VAMI). 'The VAMI is your view into the host operating system—often referred to as the Host OS—that runs the VMware application services. In this case, the VAMI on the vCenter Server virtual appliance gives you visibility into the underpinnings of Photon OS and provides you with administrative features that don't necessarily fit into the vSphere Web Client's virtual infrastructure management-oriented user interface. Unlike the vSphere Web Client, which can only be accessed from the vCenter Server, VAMI is available for both vCenter Servers and External Platform Services Controllers, and can be accessed from https://
<server.domain.com>
:5480.
These underpinnings and administrative features are broken down into the following 10 areas within the VAMI, as shown in Figure 3.38:
- Summary
- Monitor
- Access
- Networking
- Time
- Services
- Update
- Administration
- Syslog
- Backup

FIGURE 3.38 The VAMI, similar to Explorer and Task Manager on a Windows OS, allows for insight into the Host OS and application state of the vCenter Server or Platform Services Controller virtual appliances.
There is some overlap between these areas and those that come under the vSphere Web Client's System Configuration. Let's jump in and have a look around.
Summary
The Summary screen is the first part of the VAMI you'll see. It contains two main areas for the vCenter Server with External Platform Services Controller, and three main areas for vCenter Servers with Embedded Platform Services Controllers and External Platform Services Controllers.
For a vCenter Server with External Platform Services Controllers, the two main areas are
- An upper section detailing the Host OS's Hostname, Type (in Figure 3.38, ‘it's vCenter Server with an external Platform Services Controller), the Version, and the Build Number of the system.
- A lower section that provides a high-level overview of the health status of the Host OS's virtual hardware, which includes CPU, Memory, Database (only available on your vCenter Server with an external or embedded Platform Services Controller), Storage, and Swap, which all bubble up into Overall Health.
For a vCenter Server with Embedded Platform Services Controllers or External Platform Services Controllers, you'll see a new section that covers the Single Sign-On Status for the node, giving you the domain name and whether the SSO-related services discussed earlier in this chapter are running. The other two sections, as shown in Figure 3.39, are nearly identical with the following exceptions in the upper section:
- The Node Type will reflect whether it's an External Platform Services Controller or a vCenter Server with an Embedded Platform Services Controller.
- The bottom health section lacks a Database monitor for External PSCs as they do not come with a database.

FIGURE 3.39 The Summary screen, along with some of the subsections, will be contextualized around what deployment architecture you chose for your vCenter Server.
We'll discuss accessing more of the health monitoring details in the next couple of sections.
Monitor
In the previous section, you were given a high-level view of the vCenter Server virtual appliance's Host OS health, but with the Monitor area, you can drill down into these individual components' health. In the middle pane, you'll see four distinct items: CPU & Memory, Disks, Network, and Database. Again, the Database monitor is only available on a vCenter Server with an external or embedded Platform Services Controller.
- CPU & Memory The CPU & Memory page allows you to report on your CPU and Memory usage over time. The drop-down menus include the following options for increasing windows of time:
- Last Hour
- Last Day
- Last Week
- Last Month
- Last Quarter
- Last Year
As with other performance charts available within the different vSphere UIs, due to the use of rollup jobs, you lose granularity with the metrics displayed as you go further back in time. For example, the Last Hour option gives you extreme granularity into the CPU and memory activities of the appliance—you can look at the statistics in 5-minute increments. By contrast, the Last Year option provides the least amount of granularity and can only report on the aggregated statistics of the appliance by the day.
- Disks On the Disks page, you can look at the usage across all 13 disks within the appliance. Hovering over the bar graphs under the Utilization column will give you more details on the Used Space and Available Space that aren't readily perceivable from the graph itself.
- Network In the Network area, you can review the inbound and outbound traffic utilization on the appliance over time. In the bottom section, you can choose from a medley of options on the virtual NIC (vNIC) interfaces, which will dictate what's shown in the graph. The options include the following generalized vNIC statistics:
- Receive Bytes
- Received Packets
- Received Errors Detected
- Received Packets Dropped
- Transmitted Bytes
- Transmitted Packets
- Transmitted Errors Detected
- Transmitted Packets Dropped
As previously mentioned, the time period drop-down menu enables you to select a time increment, from last hour up to the last year, with decreased granularity as you increase your time period being monitored.
- Database And finally, on the Monitor page, you are provided visibility into the capacity of the database, split into two graphs:
- One graph depicts the SEAT (Stats, Events, Alarms, and Tasks) data generated from activities from your virtual infrastructure, which is often referred to as historical data.
- One graph depicts the overall space of the database, with individual lines for SEAT, Database Logging. and Core statistics.
As with the CPU & Memory and Network areas, these statistics are graphed over time, and you have the ability to use the drop-down menu to select a time interval between the last hour up to the last year, with decreased granularity as you increase your time period.
Access
In the unlikely event that you need to log into the Appliance—either to view something or when working with your support group to perform troubleshooting—the Access area allows you to manipulate the different methods to logging in. This includes enabling or disabling SSH, the Direct Console User Interface (DCUI), the Console CLI, and Bash Shell.
We'll discuss these different access methods in more detail in Chapter 4.
Networking
On this page, you can set and view the DNS server settings (usually defined during install), the virtual NIC settings (such as MAC address, IP address, subnet mast, default gateway, and whether the NIC is enabled), and Proxy settings used by vCenter Server.
Time
The Time area, as the name implies, allows you to manipulate the time configuration of the appliance. The top section in this area allows you to change the Time Zone on the appliance from its default Coordinated Universal Time (UTC), though we recommend against changing this unless your company policy requires you to do so. The bottom section allows you to update the Time settings, including setting the appliance's time mode to either use NTP or rely on the underlying host's time, as well as managing the Time Servers. The current Time Server will be identical to what was used during the appliance's deployment (covered earlier in this chapter).
Services
The services area is your one-stop shop for reviewing service health as well as which services are started or stopped within your appliances, with the caveat that the service has been integrated with VMware Service Lifecycle Manager—referred to as vMon. vMon serves as the watchdog engine for both the vCenter Server and Platform Services Controller, and monitors the services under its domain. If the service is found to be in a defunct state, vMon will attempt to cycle the service and bring it back into a health state. The Services section plugs directly into vMon, and therefore gives you visibility into the state of these services. What this means is that while all of the vCenter Server's services have been integrated, and thus you can monitor and cycle them within the VAMI, some of the services from the Platform Services Controller—such as the VMware Identity Management Service, Security Token Service, and VMware Directory Service—are not integrated and must be cycled from command line.
You'll notice that most of the services have been configured with the Startup Type of automatic, while some have been set to Manual or Disabled. This indicates the behavior of the services under the domain of vMon:
- Automatic This enables the service to start up on successful boot of the OS, following vMon's instantiation. If the service has been configured with a startup dependency—such as the vCenter Server Service (VPXD) starting after vPostgres or the vSphere Update Manager service (VUM) starting after VPXD—this will be orchestrated by vMon.
- Manual This marks the service as eligible for manual startup from the UI or CLI, but it does not start after boot of the OS and vMon.
- Disabled This marks the service as ineligible for manual startup from the UI and CLI, or after the bootup of the OS or vMon.
It's best not to toggle any of these settings unless explicitly told to do so by product documentation or support as incorrectly modifying one of the services in a chain of dependencies could result in multiple services not starting—often referred to as a catastrophic event. If a service is configured for Disabled or Manual, all dependent items will not automatically start. Oftentimes, the services marked as Manual or Disabled are auxiliary to the core management components of vCenter Server—such as Image Builder or vCenter High Availability—which will be toggled on and off when enabled elsewhere, such as in the vSphere Web Client.
Update
As patches and updates are released for vCenter Server, and, due to their conjoined nature, the Platform Services Controller, the Update page is the area in which you'll stage and install the bundles into the appliance. You are providing two means of updating your appliances:
- Manually downloading the upgrade ISO from MyVMware's Product Patches microsite and mounting them to the individual appliances as a virtual CD-ROM.
- Via a repository that's hosted either by VMware or your own internal web server. By default, the Upgrade framework is set to query the VMware's public repository.
In environments where vCenter Server does not have direct access to the Internet, you'll need to configure the system to either use a proxy or set up an Internet web server to host the upgrade bundles. In an environment where bandwidth is limited, such as a remote or branch office, downloading the upgrade ISO manually and attaching it to each of the components may prove to be the most reliable form of transport.
Administration
The Administration area allows you to change the password for your Root account on the appliance, or any other local account that may have been created. It also lets you set the password requirements for the local account as well as an expiry period.
Remember, the VAMI, like the HTML5 Host Client, does not hook into SSO, so the password policies configured within the vSphere Web Client do not propagate to the VAMI or to the local accounts.
Syslog
Having visibility into the state of your environment both immediately and over time is key, but it just may not be possible based on the number of vCenter Servers and Platform Services Controllers that have been deployed. Further, if you are in an industry where auditing is required for compliance purposes, streaming logs from your environment is key. In the Syslog area, you have the ability to configure log streaming to a remote syslog server to preserve logs as well as vCenter Server events that the environment has generated. While this feature was available in previous versions, with vSphere 6.7, you can now configure up to three forwarders to remote syslog servers. This may prove to be extremely useful if you have discreet syslog servers in your environment that provide different functions, such as a long-term auditing archive for auditors, a security response system monitoring for questionable activity, or a site reliability system keeping a watchful eye on service health. As with the previous version of vSphere, you can configure the log-forwarding protocol using UDP, TCP, TLS (encrypted over TCP), or RELP—depending on what your syslog server can support.
Chapter 8 discusses the use of Syslog in more depth and under the context of Security.
Backup
As touched upon in the “Planning for vCenter Server Availability” section, having solid backups for your vCenter Server and Platform Services Controllers is key to an enterprise ready environment. In the Backup area, you can configure the vCenter Server or Platform Services Controller to create file-based backups to an external location, using FTP, FTPS, HTTP, HTTPS, or SCP. While this functionality is not new in vSphere 6.7, the ability to schedule is! Gone are the days of using customized scripts to manually run a backup of the vCenter Server or PSC., You can now pick the schedule and retention of file-based backups of your systems.
Chapter 7 discusses how to configure and use the file-based backup functionality to preserve your environment in the event of a corruption or disaster.
The Bottom Line
- Understand the components and role of vCenter Server. vCenter Server plays a central role in the management of ESXi hosts and VMs. Key features such as vMotion, Storage vMotion, vSphere DRS, vSphere HA, and vSphere FT are all enabled and made possible by vCenter Server. vCenter Server provides scalable authentication and role-based administration based on integration with Active Directory.
- Master It Specifically with regard to authentication, what are three key advantages of using vCenter Server?
- Plan a vCenter Server deployment. Planning a vCenter Server deployment includes selecting a backend database engine, choosing an authentication method, sizing the hardware appropriately, and providing a sufficient level of high availability and business continuity. You must also decide whether you will run vCenter Server as a VM or on a physical system. Finally, you must decide whether you will use the Windows Server–based version of vCenter Server or deploy the vCenter Server virtual appliance.
- Master It What are some of the advantages and disadvantages of running vCenter Server as a VM?
- Master It What are some of the advantages of using the vCenter Server virtual appliance?
- Install and configure a vCenter Server database. vCenter Server supports several enterprise-grade database engines, including Oracle and Microsoft SQL Server. Depending on the database in use, there are specific configuration steps and specific permissions that must be applied in order for vCenter Server to work properly.
- Master It Why is it important to protect the database engine used to support vCenter Server?
- Install and configure the Platform Services Controller. The Platform Services Controller is an architectural change in vCenter Server 6. Along with SSO, it allows the vSphere Client to present multiple solutions interfaces within a single console provided the authenticated user has access.
- Master It After installing vCenter 6.7 and all the appropriate components, you cannot log into the vCenter Server Web Client with your local credentials and gain access to vCenter. What could be missing from the configuration of SSO?
-
Install and configure vCenter Server. vCenter Server is installed using the VMware vCenter Server Appliance Installer. You can install vCenter Server as a stand-alone instance or join a linked mode group for greater scalability.
- Master It When preparing to install multiple vCenter Servers, are there any concerns about using a single Platform Services Controller versus multiple? Can this be handled later?
- Use vCenter Server's management features. vCenter Server provides a wide range of management features for ESXi hosts and VMs. These features include scheduled tasks, host profiles for consistent configurations, tags for metadata, and event logging.
- Master It Your department just merged vSphere environments with another department, and your manager has asked for you to find a way of easily tracking both departments' virtual machines. How would you go about accomplishing that task?
- Provide Visibility into vCenter Server's settings. vCenter Server's Appliance Management Interface provides insight into its health, configuration, and settings.
- Master It Your manager has asked you why the vCenter Server recently came back on an audit report saying that SSH is enabled. What section in vCenter Server's VAMI will help you in this task?
- Master It You recently added a few more Active Directory domain controllers within your environment after a recent refresh and configured them to replace your older time server. How can you update the NTP servers on your vCenter Servers and Platform Services Controllers?