Chapter 14
Automating VMware vSphere
The role of a VMware vSphere administrator has become more demanding as the features and capabilities of the platform are enhanced and integrated with adjacent solutions. VMware continues to ensure that these features are quickly consumable for an administrator, as you have seen throughout this book. However, new features often lead to additional responsibilities, more opportunities for errors or inconsistencies, and lower tolerances for outages of critical and complex workloads.
As a vSphere administrator, you will often need to perform repetitive tasks with increasingly more touch points. Examples include creating multiple virtual machines (VMs) from a template, changing the network configuration on a group of VMs or hosts, migrating VMs to new datastores with Storage vMotion, and gathering information about an environment for internal and external audits. Automation can help you complete these tasks much more quickly, provide greater consistency, and ultimately save your organization money by reducing the risk of errors and unplanned outages. Automation can benefit every administrator and every organization that adopts vSphere in their environment and the benefits can be realized regardless of scale or previous experience.
Why Use Automation?
You may ask yourself, “Why should I use automation?” The simple, but obvious, answer is that you are only one person. An individual can perform only a finite amount of work manually in any given hour, day, or week. With automation, modern datacenter administrators can increase their efficiency, accuracy, and capacity.
- Efficiency Automation enables you to complete repeated tasks with less effort. Scripts and workflows do not get distracted by a colleague or a meeting, causing it to miss a step or not complete its work in a timely manner.
- Accuracy Automation delivers consistency across repetitive and mundane tasks. Configuration changes, reports, and process workflows can be automated with high confidence that errors will not occur.
- Capacity: Automation can often increase productivity. Tasks that would often take hours manually can now be completed in minutes or seconds with automation.
These benefits apply to any modern data center environment. The increase of business requirements and expectations means that we must find ways to extend our finite abilities and ensure we consistently deliver outcomes. In this chapter, you will learn how to continue to invest and innovate to deliver vSphere automation capabilities to administrators of various needs and backgrounds.
vSphere Automation Options
VMware continues to make significant improvements in the automation capabilities and options it offers. These advancements provide vSphere administrators with options from which to choose to accomplish their automation goals, regardless of skill level or requirements. This section briefly outlines the various vSphere automation tools and the existing experience that best aligns with them.
In our experience, the most widely adopted automation tool to manage and automate vSphere is PowerCLI. Built on PowerShell, PowerCLI is a multi-platform, command-line and scripting tool that appeals to Windows and Linux users alike. Providing more than 600 cmdlets for not only vSphere, but also adjacent solutions such as, vSAN, NSX-T, vRealize Operations Manager, vCloud Director, VMware Cloud on AWS, and VMware Horizon, it is often the vSphere automation tool of choice.
VMware PowerCLI is covered in this chapter based on common usage in the virtualization industry and the relative learning curve. Our intention is to demonstrate how you can begin to automate tasks within your environments, regardless of little or no automation experience.
What are some additional vSphere automation tools provided by VMware?
The vSphere Automation SDKs include the libraries for programmatically accessing features available via the API, such as virtual machine (VM) and vCenter Server appliance management. In addition, the SDKs contain samples for interoperating with vSphere APIs.
vRealize Orchestrator is an orchestration engine that is included with vSphere licensing entitlements. It provides the ability to use the out-of-the-box workflows or design and deploy custom, scalable workflows to automate vSphere processes. The adoption of vRealize Orchestrator is increasingly more common as it has become tightly integrated in the vRealize Automation where it can automate management and operational tasks across both VMware and third-party solutions, such as NSX and service management systems.
Automating with PowerCLI
Generally considered the tool of choice for automating vSphere, PowerCLI provides the ability to easily manage nearly all components in a vSphere environment.
People with Windows administration backgrounds generally have some familiarity with PowerShell and find adopting PowerCLI more natural than adopting the other tools. Individuals who are comfortable with console administration will find PowerCLI easy to pick up and use.
In the following sections, we will introduce you to PowerShell, walk you through the initial configuration of PowerCLI on multiple platforms, examine essential PowerCLI cmdlets, demonstrate how to build more scripts that use the functionality of PowerCLI, and discuss the new features found in PowerCLI 10.
PowerShell and PowerCLI
PowerCLI would not be possible were it not for PowerShell. Based on the .NET Framework, PowerShell is a command-line and scripting language developed by Microsoft. As a standard Microsoft automation platform, PowerShell has shipped natively with Microsoft Windows since Windows 7 and Server 2008, although it has been available for much longer. PowerShell has tremendous capabilities for managing a wide range of Windows systems and applications. Microsoft Exchange and SQL Server administrators have been using PowerShell for years because those products were among the earliest solutions in which Microsoft made PowerShell the management tool of choice. A growing percentage of vendors and partners have developed modules and snap-ins for PowerShell to help manage their applications and hardware.
In 2018, Microsoft expanded the platform and enabled administrators to automate the administration of multiple operating systems with PowerShell Core 6.0. Adding support for Windows, macOS, and Linux, these operating systems and application processes running on each can now be managed and rapidly automated.
In this section, we will briefly discuss some key PowerShell concepts that will help you get started with PowerCLI.
CMDLETS
The first PowerShell term that needs defining is cmdlets (pronounced “command-lets”), which are compiled .NET classes that perform a single action on an object. PowerShell cmdlets follow a <verb>-<singular noun> syntax followed by a set of parameters. For the most part, cmdlets are simple to use because they do not attempt to do too much all at once. With an established naming convention, you can often find the cmdlet you need by simple intuition. For example, to get today's date, you would execute Get-Date in PowerShell, or to get all VMs in a vCenter Server instance, you would simply execute Get-VM in PowerCLI. This is intuitive by design.
OBJECTS
PowerShell is built on the Microsoft .NET Framework, and as such, objects are a critical component to understand and be successful with PowerCLI. Simply put, an object is a container of properties and methods. When you execute the PowerCLI cmdlet Get-VM while connected to a vCenter Server instance, the information that is returned is a collection of VM objects. Each VM can be treated as its own object that contains unique information for that VM. The information for VM-1 and VM-2 will be different, but they will be the same type of object or container. This means you can filter or compare properties of each object because they share the same format. To do this, it helps to understand what properties are available. We will discuss the various ways you can quickly retrieve general and detailed information from an object.
General information can be gained by simply entering the cmdlet and reviewing the output. The default output has been programmed into PowerCLI to return the most-common properties sought for the given object. For instance, running the Get-VM cmdlet will return all of the VMs in the vCenter Server inventory with the attributes for the VM name, power state, number of CPUs, and memory (MB). You can specify which information you want to return using the Select-Object cmdlet in the pipeline as follows:
Get-VM | Select-Object Name, PowerState To return all information associated with all of the VMs, you execute the following command, with the second option demonstrating the very common Select-Object alias Select:
Get-VM | Select-Object * Or:
Get-VM | Select * You will notice that the output is likely to fill up and scroll the console rather quickly. In such a situation, you can export the result set to a .CSV file by piping to the Export-CSV cmdlet:
Get-VM | Select * | Export-CSV -Path C:Mastering vSphere 6.7AllVMs.csv -NoTypeInformation As we discussed earlier, you can get more detailed information about objects. Using Select * gives you a full output of all property values, but there is an easier way to identify what properties are available. Using the Get-Member cmdlet, you can return a list of the available properties and methods of an object type. Try both of the following examples, where the second example uses GM, an alias for Get-Member:
Get-VM | Get-Member And then:
Get-VM | GM Before we discuss additional PowerShell terms, we have one more tip. If you have a large inventory and want things to run faster while you learn, you can use the Select-Object cmdlet to select only the first few returned objects. In the following example, the command will return only the first three VM objects in your inventory:
Get-VM | Select -First 3 We will discuss additional functionality in this chapter, but for now, this should give you an idea of how simple it is to select properties that you are interested in and a better understanding of the structure of objects in PowerShell/PowerCLI.
VARIABLES
Variables are not unique to PowerShell; they are used in many programming and scripting languages. In PowerShell, variables begin with a $ followed by alphanumeric characters. There are both global and user-defined variables, and we will touch on examples of each.
Think of a variable as an empty container where you can store objects within PowerShell. The most common use cases for variables are to collect results of a script or to store information that will be used later in a script. Building on the example in the Objects section, imagine that you want to store a list of all VM objects in a variable for later use:
$vm = Get-VM | Select-Object Name, PowerState The variable $vm now contains the same data produced when you ran the longer command earlier. Now, you can simply type $vm into the PowerCLI console for the current session and you will see the same results. This means you can do a variety of things with the variable later in the console or script:
$vm | Export-CSV -Path C:TestVMs.csv -NoTypeInformation$vm | Where-Object{$_.PowerState -eq "PoweredOn"}
Keep in mind that there are also global variables already in use with PowerShell and PowerCLI. You can return a full listing of them with the Get-Variable cmdlet. However, keep in mind that $host variable is already in use by the system and cannot be set within your scripts. It is common to use $vm and $vmhost instead. You will learn about $DefaultVIserver later in this chapter, in the “Connecting to vCenter Server and ESXi Hosts” section.
PIPELINE
Fundamental to PowerShell's capability is the pipeline. Those administrators with a Linux or Unix background are well versed in the concept of a pipeline. However, PowerShell took the traditional pipeline and kicked it up a notch. In the past, pipelines were a means to pass text from one command to another, simplifying the syntax of a given operation. In PowerShell, pipelines are a means to pass entire objects from one cmdlet to another. This ability increased the power of the pipeline while simplifying its capacity to accomplish almost any administrative action. In short, this means that as you use PowerCLI cmdlets, you will be able to pass a Cluster object through the pipeline and retrieve all the hosts within a cluster. In the following example, we will do this and then check each Get-VMHost object so that you return only those that are in maintenance mode:
Get-Cluster <cluster name> | Get-VMHost |ˋWhere-Object{$_.ConnectionState -eq "Maintenance"}
In the next example, return only the hosts in the cluster that are running ESXi 6.7.0:
Get-Cluster <cluster name> | Get-VMHost |ˋWhere-Object{$_.Version -eq "6.7.0"}
Alternatively, you could check each of your clusters for hosts in maintenance mode. Doing so means that you pass a collection of all Cluster objects in inventory through the pipeline and then gather the Get-VMHosts that are in maintenance mode:
Get-Cluster | Get-VMHost | ´Where{$_.ConnectionState -eq "Maintenance"}
Notice that the Where-Object cmdlet is now using the Where alias, and is collecting the Get-VMHosts objects to check for the ConnectionState property value. This is just a touch of what the pipeline can provide as you pass objects through. You will see many more examples of the pipeline throughout this chapter, and hopefully the concepts of objects and the pipeline will become second nature to you.
What's New in PowerCLI 10
Each version of PowerCLI has included new cmdlets to take advantage of the many new features provided in vSphere—and other VMware products. As such, the product name has transformed from the vSphere PowerCLI naming to VMware PowerCLI.
In 2017, PowerCLI removed the need for a Windows .MSI installer package. The management of the PowerCLI modules transitioned the PowerShell Gallery. Now, by using the PowerShell default cmdlets for working with modules in the PowerShell Gallery, PowerCLI can be installed and updated with ease. We will explore these steps in the next section.
In early 2018, PowerCLI hit a milestone and celebrated its tenth anniversary and was aptly iterated to VMware PowerCLI 10. But there is a bigger story. With the name change, support for more than vSphere, and the transition to the PowerShell Gallery, PowerCLI was removed from the lockstep versioning with vSphere—allowing it to integrate faster to deliver new features and capabilities across not only vSphere but also across the VMware stack.
Following the Microsoft PowerShell Team open-sourcing of the PowerShell base code and the release of PowerShell 6.0, PowerCLI 10 introduced multi-platform support by adding macOS and Linux support with PowerShell Core. This is huge—you can now use PowerShell and PowerCLI on Windows, macOS, or Linux!
PowerCLI 10.1.0, which was released shortly after the general availability of vSphere 6.7, added support for this vSphere release.
Installing and Configuring PowerCLI on Windows
To install PowerCLI 10 on Windows, you must have a compatible Microsoft Windows operating system (OS) (Table 14.1) along with compatible .NET and PowerShell engine versions (Table 14.2).
TABLE 14.1: Supported Windows operating systems and versions for PowerCLI 10
| OS TYPE | VERSIONS |
| Server |
Windows Server 2016 Windows Server 2012 R2 Windows Server 2008 R2 Service Pack 1 |
| Workstation |
Windows 10 Windows 8.1 Windows 7 Service Pack 1 |
TABLE 14.2: Required components and compatible versions for PowerCLI 10 on Windows
| COMPONENT | VERSIONS |
| .NET Framework |
4.5 4.5.x 4.6 4.6.x 4.7.x |
| PowerShell |
3.0 4.0 5.0 5.1 |
For the best experience and support for the latest features, consider upgrading to PowerShell 5.1.
Installing PowerCLI involves installing two different components:
- PowerShell Powershell has been a core component of Microsoft Windows since Windows 7. As previously suggested, for the best experience and support for the latest Windows Management Framework features, consider upgrading to PowerShell 5.1. Windows Management Framework 5.1 is available for download from the Microsoft website at
microsoft.com/download. - PowerCLI PowerCLI is available from the PowerShell Gallery.
Before installing PowerCLI, you need to do the following:
- Uninstall PowerCLI 6.5 R1 or earlier.
- Verify access to the Internet.
- Register PowerShell Gallery as a local repository.
- NOTE In this example, a fresh install of Microsoft Windows 10, April 2018 (1803) Update is used.
Perform the following steps to install PowerCLI on a system with PowerShell 5.1;
- Launch the PowerShell console with Run-As Administrator.
- Run the following command to install all official PowerCLI modules:
Install-Module VMware.PowerCLI –Scope CurrentUserThe modules are installed to
$homeDocumentsWindowsPowerShellModules. - If prompted that the “NuGet Provider is required to continue,” type
Yand press Enter to continue. PowerShellGet will download and import the NuGet provider. - If prompted with “Untrusted Repository,” type
Yand press Enter to continue with the repository. The PowerCLI modules will be downloaded and installed from the PowerShell Gallery.To avoid this prompt, prior to installing PowerCLI, run the following command to change the installation policy for the PowerShell Gallery:
Set-Repository -Name PSGallery´-InstallationPolicy Trusted´-SourceLocation https://www.powershellgallery.com/api/v2 - PowerShell will download and install the PowerCLI modules for the current user. Once that process is completed, verify the status of the modules by running the following command:
Get-Module VMware* –ListAvailableThe command will return a list of the modules.
At any time, run the following command to update to the latest version of PowerCLI from the PowerShell Gallery.
Update-Module -Name VMware.PowerCLI That's it! You have now successfully installed PowerCLI on Microsoft Windows. However, you still need to modify the script execution policy of PowerShell. As of PowerShell v4, the default execution policy is Remote Signed on Windows Server 2012 R2 and later.
Follow these steps to set the PowerShell script execution policy on operating systems other than Windows Server 2012 R2 and later:
- Launch the PowerShell console with Run-As Administrator.
- Run the following command to set the execution policy:
Set-ExecutionPolicy RemoteSigned - Type
Yand press Enter to continue. The PowerShell script execution policy will be set toRemoteSigned. - To verify the script execution policy setting, run the following cmdlet:
Get-ExecutionPolicyThe cmdlet should return
RemoteSigned. - Type
Exitand press Enter to close the PowerShell session.
Now when you relaunch PowerShell, you can begin to use PowerCLI modules. Unlike older versions of PowerCLI, there is no need to load these new modules into a PowerShell session. Once the modules are loaded into the module folder, PowerShell will automatically register the cmdlets with the PowerShell session.
However, unlike prior versions of PowerCLI, a shortcut to PowerCLI will not be created. Although it is not required in order for you to use the PowerCLI modules, you may wish to create a shortcut. To do this, perform the following steps:
- Right-click the Desktop and select New ⇒ Shortcut.
- In the Create Shortcut Wizard, enter the following for the location, and then click Next.
C:WindowsSystem32WindowsPowerShellv1.0powershell.exe -noe -c "Import-Module VMware.PowerCLI" - Type PowerCLI for the Name and click Finish.
- Right-click on the new PowerCLI shortcut and select Properties. In the Start In field, type C: as shown in Figure 14.1. Then click OK.
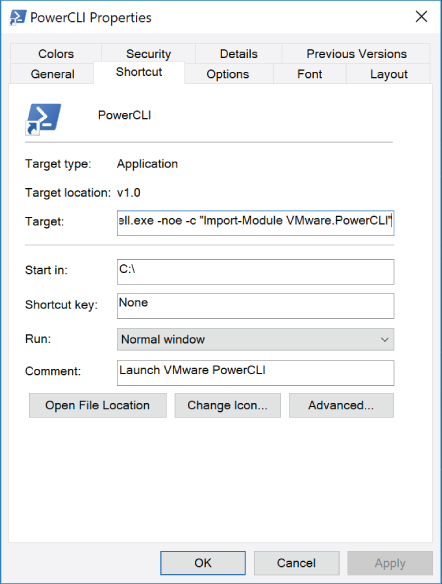
FIGURE 14.1 A custom shortcut for PowerCLI 10
- Right-click on the shortcut (Figure 14.2) and select Run As Administrator. When prompted by User Account Control to allow the program to make changes to the device, click Yes.

FIGURE 14.2 Launch PowerCLI 10 as an Administrator.
You are greeted with several excellent starting cmdlets, such as
Connect-VIServer,Get-VIcommand,Get-PowerCLIHelp, andGet-PowerCLICommunity(Figure 14.3). These suggestions are important, especially sinceConnect-VIServeris a required first cmdlet for connecting to your virtual infrastructure. You are now ready to get started with PowerCLI on Windows.

FIGURE 14.3 The PowerCLI startup screen provides quick tips on a few useful commands.
Installing and Configuring PowerCLI on macOS
To install PowerCLI 10 on macOS, you must have a compatible macOS OS (Table 14.3) along with compatible PowerShell Core engine version (Table 14.4).
TABLE 14.3: Supported macOS OS and version for PowerCLI 10
| OS TYPE | VERSION |
| Workstation | macOS 10.12+ |
TABLE 14.4: Required component and compatible version for PowerCLI 10 on macOS
| COMPONENT | VERSION |
| PowerShell Core | 6.0.2 |
Installing PowerCLI on macOS involves installing two different components:
- PowerShell Core Powershell Core can be installed using the Homebrew package manager, or by downloading the installation
PKGpackage from the releases page on Github atgithub.com/powershell/powershell/releases. - PowerCLI PowerCLI is available from the PowerShell Gallery after invoking PowerShell Core.
Before you begin the process of installing PowerCLI on macOS, verify that you have access to the Internet.
- NOTE In this walkthrough, a fresh install of macOS 10.13.3 High Sierra is used. Homebrew is the preferred method for installing PowerShell Core and is described here.
Perform the following steps to install PowerShell Core on macOS:
- Open
Terminal.appand typebrew. If a “command not found” message is returned, run the following command to install the Homebrew package manager for macOS:/usr/bin/ruby -e "$(curl -fsSL https://raw.githubusercontent.com/Homebrew/install/master/install)". - Once Homebrew is installed, install Homebrew-Cask, so you can install more packages:
brew tap caskroom/cask - Once Homebrew-Cask is installed, PowerShell Core can be installed. To begin installing PowerShell Core 6, run the following command:
brew cask install powershell - Once the PowerShell Core package is installed, launch PowerShell by running the following command:
pwsh
When a new version of PowerShell Core is released, simply update Homebrew and install the PowerShell Core update by running the following commands:
brew updatebrew cask upgrade powershell
Once PowerShell Core is installed, you can perform the following steps to install PowerCLI on macOS:
- Open
Terminal.appand invoke PowerShell Core with the following command:pwsh - Run the following command to install all official PowerCLI modules:
Install-Module VMware.PowerCLI –Scope CurrentUserThe modules are installed to
/Users/<username>/.local/share/powershell/Modules. - If prompted with “Untrusted Repository,” type
Yand press Enter to continue with the repository. The PowerCLI modules will be downloaded and installed from the PowerShell Gallery. - Once the download and installation process is completed, verify the status of the modules by running the following command:
Get-Module VMware* –ListAvailableThe command will return a list of the PowerCLI modules.
At any time, run the following command to update to the latest version of PowerCLI from the PowerShell Gallery.
Update-Module -Name VMware.PowerCLI You are now ready to get started with PowerCLI on macOS (Figure 14.4.)

FIGURE 14.4 PowerCLI on macOS
Installing and Configuring PowerCLI on Linux
To install PowerCLI 10 on Linux, you must have a compatible Linux OS (Table 14.5) along with compatible PowerShell Core engine version (Table 14.6).
TABLE 14.5: Supported Linux OS and version for PowerCLI 10
| OS TYPE | VERSION |
| Workstation | Ubuntu Linux 16.04 |
TABLE 14.6: Required component and compatible version for PowerCLI 10 on Linux
| COMPONENT | VERSION |
| PowerShell Core | 6.0.2 |
Installing PowerCLI on Linux involves installing two different components:
- PowerShell Core PowerShell Core is published to a package repository for simple installation and updates. This is the preferred method. It can also be downloaded from the releases page on Github at
github.com/powershell/powershell/releases. - PowerCLI PowerCLI is available from the PowerShell Gallery after invoking PowerShell Core.
Before you begin the process of installing PowerCLI on Ubuntu, verify that you have access to the Internet.
- NOTE In this walkthrough, a fresh install of Ubuntu Desktop 16.04 LTS is used. The package repository is the preferred method for installing PowerShell Core and is described here.
Perform the following steps to install PowerShell Core on Ubuntu:
- On the Desktop, open the Terminal application.
- Run the following command to import the repository GPG keys:
curl https://packages.microsoft.com/keys/microsoft.asc | sudo apt-key add - - Run the following command to register the Microsoft Repository for Ubuntu 16.04:
sudo curl -o /etc/apt/sources.list.d/microsoft.list https://packages.microsoft.com/config/ubuntu/16.04/prod.list - Run the following command to update the product list on Ubuntu Linux:
sudo apt-get update - Run the following command to install PowerShell Core on Ubuntu Linux:
sudo apt-get install -y powershell - Once the PowerShell Core package is installed, launch PowerShell by running the following command:
pwsh
Perform the following steps to install PowerCLI on Ubuntu:
- Open a Terminal and invoke PowerShell Core with the following command:
pwsh - Run the following command to install all official PowerCLI modules:
Install-Module VMware.PowerCLI –Scope CurrentUserThe modules are installed to
/home/<username>/.local/share/powershell/Modules. - If prompted with “Untrusted Repository,” type
Yand press Enter to continue with the repository. The PowerCLI modules will be downloaded and installed from the PowerShell Gallery for the current user. - Once completed, verify the status of the modules by running the following command:
Get-Module VMware* –ListAvailableThe command will return a list of the PowerCLI modules.
At any time, run the following command to update to the latest version of PowerCLI from the PowerShell Gallery:
Update-Module -Name VMware.PowerCLI
You are now ready to get started with PowerCLI on Ubuntu (Figure 14.5).

FIGURE 14.5 PowerCLI on Ubuntu
Additional PowerCLI Capabilities
VMware PowerCLI provides over 600 cmdlets for managing and automating more than just vSphere. It also supports vCloud Director, vRealize Operations, vSAN, NSX-T, VMware Cloud on AWS, and VMware Horizon.
Additionally, PowerNSX—a community developed PowerCLI module for NSX for vSphere (NSX-v)—is also available to manage and automate NSX-v implementations. Learn more at powernsx.github.io.
Getting Started with PowerCLI
The first and most important thing to remember about PowerCLI is that the PowerShell's <verb>-<noun> nomenclature for cmdlets makes it easy to read and easy to find the right cmdlets for the job. In the following sections, we will discuss the basic starting points of PowerCLI. By the end of this discussion, you will be able to connect PowerCLI to your vSphere resources, locate the cmdlet you need, get information about how to use any cmdlet, and start creating one-liner scripts. These are the first steps to automating vSphere with PowerCLI.
FINDING CMDLETS
VMware PowerCLI provides a special cmdlet, Get-VICommand, that helps you find the cmdlet you need. Get-VICommand is similar to PowerShell's Get-Command, but it is specific to the PowerCLI-provided cmdlets. Imagine that you are looking for available cmdlets to manage your logs. Using the following command in PowerCLI will return a list of all available log cmdlets:
Get-VICommand *log* Alternatively, you could use the Get-Command cmdlet and narrow your search criteria to only the <noun> portion of the cmdlet name:
Get-Command -Noun *log* You will notice that the Get-Command cmdlet returns more results than Get-VICommand. Why is this? The Get-Command cmdlet will return all PowerShell cmdlets that contain log in the
<noun> position of cmdlet name, whereas Get-VICommand will return only PowerCLI cmdlets that contain log in the <noun> position of the cmdlet name.
If you are using PowerShell version 3 or later on Windows, you can use the Show-Command cmdlet to launch a visual of the cmdlet and its parameters. You can also input values into the parameters and then run or copy the PowerCLI syntax.
PowerShell, and therefore PowerCLI, provides tab completion for all cmdlets. This means that if you type Get-VM and press Tab, PowerCLI will cycle through all available cmdlets that begin with Get-VM, starting with Get-VM and then Get-VMGuest. Usually, this is not the fastest method to find the cmdlet you are looking for, but it certainly works when you are in a pinch. Tab completion also works within the cmdlet. Pressing the spacebar after a cmdlet and then pressing Tab repeatedly will cycle you through the list of parameters for which you can specify values. For example, if you type Get-VM -D and press Tab, PowerCLI will cycle through all available parameters for the cmdlet that begin with D, starting with Datastore and then DistributedSwitch. However, tab completion only cycles through each cmdlet name or parameter in PowerShell/PowerCLI on Windows with each press of Tab. For macOS and Linux, the first press of Tab will return a complete list of the available options and retain your previous commands.
GETTING HELP
Regardless of how long you have been working with PowerShell or PowerCLI, there will always be times when you need help. PowerShell provides a useful cmdlet for just this occasion: Get-Help. The Get-Help cmdlet can provide helpful information about cmdlets or topics within PowerShell. Simply type the cmdlet in your console and press Enter for a breakdown of its capabilities. In the context of PowerCLI, we will show you how to get more information from the cmdlets you located earlier using Get-VIcommand.
Once you identify the cmdlet you need, you can use Get-Help to find out more about it, like the parameters or parameter sets, a description of how it is used, and examples of how to use it. For example, try the following:
Get-Help Get-Log The command will return a brief synopsis of Get-Log cmdlet capabilities, the syntax for usage, a more detailed description, and links associated with the cmdlet. If you are looking for examples to get you started with the cmdlet, use the -examples parameter as follows:
Get-Help Get-Log -examples There are several other parameters to choose from under the Remarks section, such as -full and -online. The -full parameter will return a full text-based reference for the cmdlet to the session, whereas, using the -online parameter will open the default browser to the PowerCLI Reference on VMware {code} at https://code.vmware.com. For example:
Get-Help Get-Log -online CONNECTING TO VCENTER SERVER AND ESXI HOSTS
The first cmdlet that any PowerCLI user must know is Connect-VIServer. This cmdlet has many features that make connecting to your vCenter Server or ESXi hosts easy. We will discuss a few of those features in this section. If you would like to see the full capabilities of Connect-VIServer, you can check the PowerCLI help by entering the following:
Get-Help Connect-VIServer -full
Connecting to a vCenter Server is the most common use of Connect-VIServer. To connect, you must provide, at a minimum, the vCenter Server name, a username, and a password:
Connect-VIServer -Server <vCenter Server FQDN or IP>´-User <username> -password <password>
This works well, but it is certainly not something you would want to do with someone peering over your shoulder or as part of a script. Including a password in plaintext is simply asking for trouble. On Windows, PowerCLI can natively use the user's domain credentials for the system login. If the account you are logged into has vCenter access, no credentials are required. Many organizations follow the practice of separate administrative accounts and, as such, it is important to demonstrate ways to protect credentials. To solve this problem, you can securely prompt for credentials in your scripts and store them encrypted in a variable using the Get-Credential cmdlet. When you call Get-Credential in a script, it will prompt for a username and password. It stores them in the PSCredential object, which can then be used by Connect-VIServer as follows:
$credential = Get-CredentialConnect-VIServer -Server <vCenter Server FQDN or IP>´-Credential $credential
Aside from the security benefits, the best part of this method is that the $credential variable information remains for the duration of the PowerCLI session or until you update the variable with new information. This means you can have the same variable set to different credentials in different PowerCLI sessions. This is ideal for running multiple scripts simultaneously on the same system and protects your credentials from prying eyes.
You can also connect to multiple vCenter Server instances or ESXi hosts in the same session by separating them with a comma.
In the following example, we're connecting to two vCenter Server instances:
Connect-VIServer -Server´sfo01m01vc01.rainpole.local,sfo01m01vc02.rainpole.local ´-Credential $credential
In the next example, we're connecting directly to two ESXi hosts:
Connect-VIServer -Server´sfo01m01esx01.rainpole.local,sfo01m01esx02.rainpole.local ´-Credential $credential
If you are running multiple vCenter Server instances with Enhanced Linked Mode or Embedded Linked Mode, here is one final, and handy, tip for the Connect-VIServer cmdlet. If your account has common permissions across vCenter Server instances in linked mode, you can connect to all instances with PowerCLI using the -AllLinked parameter like this:
Connect-VIServer -Server sfo01m01vc01.rainpole.local´-Credential $credential -AllLinked:$true
Before we leave the Connect-VIServer cmdlet, it is important for you to know about its counterpart: Disconnect-VIServer. If you run Disconnect-VIServer by itself in the PowerCLI console, you will be prompted for verification that you want to disconnect from the vCenter Server instance. You can press Enter, and it will disconnect from the active server (identified by
$VIServer). If you are connected to multiple systems, by default this command will not disconnect from all of them. You can accomplish this by specifying the name of the systems you wish to disconnect from or by using a wildcard *. Use the -Confirm parameter to prevent being prompted to disconnect.
In the following example, we specify the vCenter Server instances that will be disconnected in the session:
Disconnect-VIServer -Server´sfo01m01vc01.rainpole.local,sfo01m01vc02.rainpole.local´-Confirm:$false
And in the next example, we use a wildcard (*) to disconnect all vCenter Server instances in the session:
Disconnect-VIServer * -Confirm:$false At times, you may wish to verify any vCenter Server instances or ESXi hosts you are connected to. To do this, simply type the variable $DefaultVIServers in PowerCLI. You can also identify the current default system by typing $DefaultVIServer. The default server will be disconnected if no server is specified when using the Disconnect-VIServer cmdlet.
YOUR FIRST ONE-LINER: REPORTING
One of the most common uses of PowerCLI is reporting. You can gather tremendous amounts of data about an environment in a short period of time. Previously, in the discussion about the pipeline, we mentioned how you can quickly identify the hosts in your environment that are in maintenance mode. That small script is often called a “one-liner”. One-liners are scripts that can be written out and executed in a single line using the pipeline to pass information. Let's combine a few things we have discussed and see how you can quickly generate reports for your environment.
Since ESXi does not store logs for an extended period, your hosts should redirect their syslog data to an external location. Failure to do so results in logs being lost at reboot. How can you quickly determine which hosts are configured and which are not? Using PowerCLI, you can return the information in moments:
Get-VMHost | Get-VMHostSyslogServer |´Export-CSV C:Mastering vSphereReportsSyslog.csv´-NoTypeInformation
This one-liner gathers a collection of all ESXi hosts in inventory and then collects the syslog server settings for each. The final pipeline takes that syslog server information and exports it to a CSV file. You may note that this script does not tell you which host has what configuration!
You can fix this by creating a parameter for the Get-VMHost object in the pipeline. This is an intermediate PowerShell technique, but one that we want to show you because it is helpful with cmdlets like Get-VMHostSyslogServer and Get-VMHostNTPServer:
Get-VMHost |´Select Name, @{N="SyslogServer";E={$_ |Get-VMHostSyslogServer}} |´Export-CSV C:Mastering vSphereReportsSyslog.csv´-NoTypeInformation
Now that you have this information, what do you do if you have multiple ESXi hosts with the incorrect syslog settings? Write a one-liner to update them, of course!
YOUR FIRST ONE-LINER: CONFIGURATION CHANGE
PowerCLI is not just for reporting. You can also modify the environment, assuming you have the appropriate privileges. In the previous section, you identified systems that did not have the correct syslog settings. To update these hosts, you need to identify the supporting cmdlet. In situations like this, where a Get- verb is used in a cmdlet, it is common that a Set- verb is also available. In this instance, you will want to use the Set-VMHostSyslogServer cmdlet. Running Get-Help Set-VMHostSyslogServer -full returns the syntax and tells you that you will need to specify the -SysLogServer parameter, and perhaps the -SysLogServerPort parameter if the syslog collector endpoint is listening on a specific port. Assume in this scenario that you are sending your logs to a vRealize Log Insight cluster with hostname sfo01vrli01.rainpole.local. Go ahead and specify port 514:
Get-VMHost | Set-VMHostSyslogServer -SysLogServer´sfo01vrli01.rainpole.local -SysLogServerPort 514
You may have noticed that this one-liner does more than set the correct syslog server settings on the systems that had the incorrect settings. It sets the settings on all the VMHosts collected with Get-VMHost. Although this is not necessarily a problem, it could take quite some time to run in large environments. Let's assume that you want to change only those that are not correct.
If you have a small environment, we recommend just running the previous one-liner to update all systems with each pass. If, however, you have a large environment or a strong desire to update only the incorrect settings, let's move forward. We are going to build on what we have discussed earlier and use some additional PowerShell techniques. Let's identify the hosts with the incorrect setting and update them with a single one-liner:
Get-VMHost | Select Name, @{N="SyslogServer";E={$_ |Get-VMHostSyslogServer}} |´Where{$_.SyslogServer -notlike "sfo01vrli01.rainpole.local:514"} |´Set-VMHostSyslogServer -SysLogServer sfo01vrli01.rainpole.local SysLogServerPort 514
If you are following along, you will notice that this one-liner throws an error. We wanted to show you how this method has changed the VMHost object type, which Set-VMHostSyslogServer cannot accept through the pipeline. One way to fix this is by using a ForEach loop (using the % alias) so that you process each VMHost, and changing its object type back to something that Set-VMHostSyslogServer can use.
Get-VMHost | Select Name, @{N="SyslogServer"; E={$_ |Get-VMHostSyslogServer}} |´Where{$_.SyslogServer -notlike "sfo01vrli01.rainpole.local:514"} |´%{Set-VMHostSyslogServer -VMhost (Get-VMHost -Name $_.Name)´-SysLogServer sfo01vrli01.rainpole.local -SysLogServerPort 514}
Thanks for following along. You had to do a few new things there to accomplish something relatively simple. We wanted to go through this exercise to demonstrate the value of the pipeline, the importance of understanding objects, and how much can be done with a single line of PowerCLI scripting.
You should now have enough exposure to start branching beyond one-liners into multiline PowerCLI scripts.
Building PowerCLI Scripts
You have seen that one-liners are nothing more than a series of PowerCLI cmdlets strung into a series of PowerShell pipelines. Scripts can often be as straightforward as a one-liner saved to a text file with a .ps1 filename extension for future reuse. Often, as you have seen, multiple steps are necessary to accomplish your automation goal. This is where you begin to tie together all the topics discussed. With that in mind, we will discuss a few more examples of how PowerCLI can make your work easier.
MIGRATING ALL VIRTUAL MACHINES ON A HOST
In the first example, you will build a simple pipeline using multiple PowerCLI cmdlets. By combining cmdlets in a pipeline, you can build more complex commands, such as the following:
Get-VMHost <FirstHost> | Get-VM | Move-VM´–Destination (Get-VMHost <SecondHost>)
This command relocates all VMs on the ESXi host specified by <FirstHost> to the ESXi host represented by <SecondHost>. This includes both running VMs, which are moved with vMotion, as well as powered-off VMs. Notice that we use parentheses when defining the destination VMHost. PowerShell will run the content within the parentheses first and use the result for the -Destination parameter. This is like a mathematical order of operations.
You could also perform this action by storing the source and destination VMHost in a variable:
$SourceHost = Get-VMHost <FirstHost>$DestinationHost = Get-VMHost <SecondHost>Get-VMHost $SourceHost | Get-VM | Move-VM -Destination $DestinationHostSet-VMHost $SourceHost -State Maintenance
Suffice it to say, there are always many ways to accomplish the same outcome.
MANIPULATING VIRTUAL MACHINE SNAPSHOTS
Let's look at a second scenario, where you will use PowerCLI to work with VM snapshots.
In this example, imagine you need to perform an application upgrade for a workload that consists of multiple VMs. It may be useful to create a snapshot for all the VMs associated with the application, which you have organized in a VM folder within the inventory. This one-liner would quickly accomplish the task for you:
Get-Folder <Folder Name> | Get-VM | New-Snapshot´-Name "Pre-Upgrade"
Once the application upgrade is completed and operationally verified, you can use the Remove-Snapshot cmdlet to delete the snapshot created on each VM:
Get-Folder <Folder Name> | Get-VM | Get-Snapshot´-Name "Pre-Upgrade" | Remove-Snapshot
Finally, you can use the Get-Snapshot cmdlet to list all snapshots so that you could be sure you had created or deleted them:
Get-Folder <Folder Name> | Get-VM | Get-Snapshot (Remember, snapshots are not backups!)
This command would return a list of any snapshot objects for all the VMs in the specified VM folder.
RECONFIGURING VIRTUAL MACHINE NETWORKING
In this third example, imagine that you want to move all the VMs currently connected to one port group to a different port group. This is possible with a one-line command in PowerCLI:
Get-VM | Get-NetworkAdapter | Where-Object {$_.NetworkName´-like "OldPortGroupName"} |´Set-NetworkAdapter –NetworkName "NewPortGroupName"´–Confirm:$false
A few new concepts are introduced here in this script, so we will break it down a little bit:
- The
Get-VMcmdlet returns the VM objects. - The VM objects are passed to the
Get-NetworkAdaptercmdlet, which returns virtual NIC objects for all VMs. - The virtual NIC objects are parsed using the
Where-Objectcmdlet to include only those virtual NICs where theNetworkNameproperty is like the"OldPortGroupName"string. - The parsed list of virtual NICs is passed to the
Set-NetworkAdaptercmdlet, which sets theNetworkNameproperty to the"NewPortGroupName"value. - The
Confirmparameter instructs PowerShell not to ask the user for confirmation of each operation.
MOVING VIRTUAL MACHINES BETWEEN RESOURCE POOLS
In this example, we will use PowerCLI to move a group of VMs from one resource pool to another. However, we want to move only a subset of the VMs from the source resource pool. Only the VMs that are running a Microsoft Windows guest OS should be moved.
We will build this example in steps. First, as you have probably guessed, we can use the Get-ResourcePool, Get-VM, and Get-VMGuest cmdlets to create a list of VM guest OS objects in the resource pool:
Get-ResourcePool <ResourcePoolName> | Get-VM | Get-VMGuest Next, we need to filter the output to return only those objects identified as Microsoft Windows guest OSs. As you saw in a previous example, we can use the Where-Object cmdlet to filter the output list in a pipeline:
Get-ResourcePool <ResourcePoolName> | Get-VM | Get-VMGuest |´ Where-Object { $_.OSFullName -Match "^Microsoft Windows*"} This should do it, right? To finish the command, you should be able to add the Move-VM cmdlet and move the VMs to the destination resource pool. Unfortunately, that will not work. You are working with objects with PowerShell, and a VM guest OS object—which is what is being returned by the Get-VMGuest cmdlet—is not an object that the Move-VM cmdlet will accept as input.
Instead, you will have to use a multiline script for this, as shown in Listing 14.1.
Again, we will break down the script so that it is easier to understand:
- Line 1 uses the
Get-VMandGet-ResourcePoolcmdlets to retrieve a list of VM objects in the specified resource pool. That list of VM objects is stored in the$VMsvariable. - Line 2 creates a loop that operates for each of the objects in the
$VMsvariable. Each individual VM object is stored as$vm. - Line 3 uses the
Get-VMGuestcmdlet with the$vmvariable to retrieve the guest OS object for that VM object and store the result in the$vmguestvariable. - Line 4 tests to see whether the
OSFullNameproperty of the$vmguestobject matches a string starting with "Microsoft Windows". - Line 5 executes only if the test on the fourth line was successful; if it executes, it uses the
Move-VMandGet-ResourcePoolcmdlets to move the VM object represented by the$vmvariable to the resource pool named Production.
If you were to save the script in Listing 14.1 as MoveWindowsVMs.ps1, then you could run it in PowerCLI like this:
PS C:>.<Path to Script>MoveWindowsVMs.ps1 SETTING A BASELINE HOST CONFIGURATION WITH POWERCLI AND JSON
In this example, we will kick things up a notch and use PowerCLI in conjunction with a JSON configuration to automate the baseline configuration of several freshly installed ESXi hosts.
Imagine that you are establishing—or resetting—the infrastructure for a lab environment. In this scenario, eight hosts have been installed with the ESXi hypervisor and have their hostname, management IP address, netmask, and gateway configured—four hosts for a management cluster and four hosts for a workload cluster. A vCenter Server instance will be deployed on a management host; then the datacenter and cluster objects for management and workload will be created, and the hosts will be added and prepared for use.
Instead of manually configuring each host with some baseline settings so that the vCenter Server instance can be deployed, the hosts can be added quickly, and avoid manual misconfigurations, you have decided to script a portion of the setup process (although you could certainly automate more than just this).
You have decided to automate the configuration of the following settings on each host based on its use—management or workload.
- NTP Servers
- DNS Servers
- DNS suffix
- VMkernel for NFS storage traffic with jumbo frames
- Port groups for management, storage, and VM traffic
- Mount 2 NFS datastores
- Enable SSH
In Listing 14.2, we have created a JSON configuration with the host, network, and datastore objects for the hosts based on a management or workload classification. JSON is a minimal and readable format to structure data in simple key/value pairs.
Now that we have populated a JSON configuration file with the hosts, networks, and datastore objects that represent what we want to configure in the environment, we can now write a PowerCLI script to ingest the key/value pairs and configure the hosts to the specification.
In Listing 14.3, we have created a PowerCLI script that will consume the JSON specification and begin to iterate through each object and take action. Unlike our previous scripts, this one includes additional helpful, onscreen outputs as it runs to provide an update for each step of the procedure using the Write-Host cmdlet along with a -ForegroundColor option. For example, look at the following line:
Write-Host "Successfully created $NetworksStoragePortgroupName Portgroup with VLAN $NetworksStorageVlanId on vSwitch0 for $HostFQDN" -ForegroundColor Green It could result in the following being displayed onscreen in green:
Successfully created Storage Portgroup with VLAN 3104 on vSwitch0 for sfo01m01esx01.rainpole.local
Next, let's look at what is happening through the script execution.
If you were to save the configuration file in Listing 14.2 as Lab.json and the script in Listing 14.3 as Configure-Hosts.ps1 into C:Mastering vSphere, then you could run it in PowerCLI like this:
PS C:>.Mastering vSphereConfigure-Hosts.ps1 Lab.json First, notice that we are passing the JSON configuration file as a parameter for the script so that we can select the JSON file we want to use for this run. The script and the specification are separate entities. so that we can update the configuration without changing the script. If the JSON file is not provided, the script will present a message that the parameter must be provided.
Next, the Get-Content and the ConvertFrom-JSON cmdlets read the specifications into PowerCLI and begin a loop through each host, setting the variables that need to be defined and called during the execution, such as the networking and datastore settings based on a "management" or "workload" tag. Once the variables are set for the first host in the loop, PowerCLI will initiate a connection to the hosts with the Connect-VIServer cmdlet using the username and password from the configuration file. It then loops through to configure and report its progress as follows:
- Step 1: Creates the storage port group on the host with the name and VLAN from the specification.
- Step 2: Creates the VMkernel for NFS storage traffic on the host with the IP, netmask, and MTU from the specification.
- Step 3: Mounts the first NFS datastore on the host with the datastore in the specification.
- Step 4: Mounts the second NFS datastore on the host with the datastore in the specification.
- Step 5: Creates the VM Network port group on the host with the name and VLAN from the specification.
- Step 6: Enables SSH and configures the auto-start policy.
- Step 7: Configures the NTP settings on each host using the NTP servers in the specification.
- Step 8: Configures the DNS settings on each host using the DNS servers in the specification.
Once the first host is completed, the script disconnects from the current host with the Disconnect-VIServer cmdlet and continues the loop for the remaining hosts in the JSON specification example.
There is so much more that you can do with PowerShell and PowerCLI—these examples just scratch the surface. In the next section, we will discuss some of the advanced capabilities available to automate vSphere with PowerCLI.
PowerCLI Advanced Capabilities
You should now have a good understanding of the many possibilities for automating a vSphere environment with PowerCLI. Next, we will demonstrate some advanced functionality that directly leverage the vSphere vCenter API.
PowerCLI users are not limited to just the cmdlets included in PowerCLI. VMware extends the capabilities of PowerCLI by allowing users to access various methods and information within the vSphere API. The Get-View cmdlet gives PowerCLI users the ability to call these methods as part of their PowerCLI scripts or directly from the PowerShell console.
Listing 14.4 shows a situation where an administrator recognized functionality in the vCenter Server that was not natively available in the PowerCLI cmdlets. Specifically, when attempting to vMotion a VM, vCenter Server would perform checks to verify that the prerequisites for vMotion to that host were met. If something was found to be incorrect, vCenter Server would notify the administrator that vMotion could not be performed and generally identify the root cause. The purpose was to check every VM in a cluster prior to a scheduled maintenance window, allowing the administrator to identify any issues prior to the scheduled maintenance and address them to minimize delays or the need for rollback.
To accomplish this, the administrator must identify the method used in the vSphere API. VMware publishes the API documentation at www.vmware.com/support/pubs/sdk_pubs.html. You can also use the API documentation by using the VMware {code} API Explorer at code.vmware.com/apis to browse, search, and inspect the APIs.
In the API documentation, you can locate the CheckMigrate method. The documentation outlines the required information to invoke the method. In the script (Listing 14.4) we collect the components, the VM, the destination host, and the resource pool as variables in the script prior to calling the CheckMigrate method. The entirety of the script revolves around the small amount of code seen below. Most of the script works on setting the required variables to use the CheckMigrate method and then handling the output of that method as follows:
# Set Variables needed for CheckMigrate Method$pool = ($v.ResourcePool).ExtensionData.MoRef$vmMoRef = $v.ExtensionData.MoRef$hsMoRef = $DestHost.ExtensionData.MoRef$si = Get-View ServiceInstance -Server $global:DefaultVIServer$VmProvCheck = get-view $si.Content.VmProvisioningChecker$result = $VmProvCheck.CheckMigrate($vmMoRef,$hsMoRef,$pool,$null,$null)
You should note that this script is built as a PowerShell function. This means it is designed to be loaded into a PowerShell console session and used like a cmdlet. For example, once you have loaded the function, you can call this command as follows:
Get-Cluster "ClusterName" | Test-vMotion You should now have a solid understanding of the vast capabilities of PowerCLI and how to get started. We have provided you with the essential information to help you start the journey towards automating vSphere.
Additional Resources
As you get started with PowerCLI, and even as you dive into more advanced scripting, remember that there are many resources to help enable and support you in your journey. Let's look at some of these.
First and foremost are the VMware PowerCLI product pages on VMware {code} and the PowerShell Gallery. You can get the latest documentation and reference material for the most recent versions of PowerCLI from the following sources:
- VMware PowerCLI on VMware {code}:
code.vmware.com/web/dp/tool/vmware-powercli/ - VMware PowerCLI in the PowerShell Gallery:
powershellgallery.com/packages/VMware.PowerCLI/
You can also make use of the vibrant VMware community to get help. The VMware Community forums, the VMware PowerCLI blog, and the VMware {code} Sample Exchange are excellent resources to browse and download code samples directly from VMware as well as code samples contributed by the VMware community. You can also submit requests for new samples or contribute your own scripts to the community. Use the VMware {code} API Explorer to start learning, modeling, and using the vSphere API though PowerCLI.
- VMware Communities:
vmware.com/go/powercli - VMware PowerCLI blog:
blogs.vmware.com/powercli - VMware {code} Sample Exchange:
code.vmware.com/samples - VMware {code} API Explorer:
code.vmware.com/apis - VMware PowerCLI posters:
vmware.com/go/posters
We also highly recommend the book VMware vSphere PowerCLI Reference: Automating vSphere Administration, 2nd Edition (Sybex, 2016). It contains a wealth of information and detailed explanations of PowerCLI capabilities. And remember to always look to the community forums and bloggers for assistance as you navigate PowerCLI.
Happy automating!
The Bottom Line
- Identify automation solutions for VMware vSphere. With over 600 cmdlets, the most widely adopted automation tool to manage and automate vSphere is PowerCLI. Some additional vSphere automation tools provided by VMware include the vSphere Automation SDKs with libraries for programmatically accessing features available via the API. vRealize Orchestrator provides the ability to use the out-of-the-box workflows or design and deploy custom, scalable workflows to automate vSphere processes.
- Master It Explore these and additional options for vSphere automation tools by VMware and third-party providers that leverage the vSphere Automation SDKs.
- Use PowerCLI on multiple platforms. PowerCLI 10 introduced multi-platform support by adding macOS and Linux support with PowerShell Core after the Microsoft PowerShell Team open-sourced the PowerShell base code with the release of PowerShell 6.0. PowerShell and PowerCLI can now run on Windows, macOS, and Linux.
- Master It Practice installing PowerShell and VMware PowerCLI on each platform. From each OS, grow your scripting to more complex scenarios to make common, repetitive, and often error-prone tasks a breeze. Use Microsoft Visual Code with an integrated shell and plug-ins for a common development interface.
- Create PowerCLI scripts to automate common tasks. VMware PowerCLI builds on the Power of the PowerShell scripting language to provide you with a simple yet powerful way to automate tasks within the vSphere environment and the ability to do so from your platform of choice. It is easy to get started with your first one-liner and grow your scripting to more complex scenarios to make common, repetitive, and often error-prone tasks a breeze.
- Master It If you are familiar with other scripting languages, what would be the biggest hurdle in learning to use PowerShell and PowerCLI, other than syntax?