The navigation panel contains the following elements:
- The logo
- The server list ( if
$cfg['LeftDisplayServers']is set toTRUE) - The Home link or icon (takes you back to the phpMyAdmin home page)
- A Log out link or icon (if logging out is possible)
- A link or icon leading to the Query window
- Icons to display phpMyAdmin and MySQL documentation
- A Reload link or icon (to refresh just this panel)
- A table name filter (under certain conditions, see later in the Table name filter section)
- The names of databases and tables
If $cfg['MainPageIconic'] is set to TRUE (the default), we see the icons. However, if it is set to FALSE, we see the links.
The navigation panel can be resized by clicking and moving the vertical separation line in the preferred direction to reveal more data, in case the database or table names are too long for the default navigation panel size.
We can customize the appearance of this panel. Many appearance-related parameters are located in themes/<themename>/layout.inc.php. The $cfg['NaviWidth'] parameter contains the default width of the navigation panel in pixels. The background color is defined in $cfg['NaviBackground']. The $cfg['NaviPointerColor'] parameter defines the pointer color. To activate the navigation pointer for any theme being used, a master setting, $cfg['LeftPointerEnable'], exists in config.inc.php. Its default value is TRUE.
The logo display behavior is controlled by a number of parameters. First, $cfg['LeftDisplayLogo'] has to be set to TRUE, to enable any displaying of the logo. It is true by default. A click on this logo brings the interface to the page listed in the $cfg['LeftLogoLink'] parameter, which is usually the main phpMyAdmin page (default value main.php), but can be changed to any URL. Finally, the $cfg['LeftLogoLinkWindow'] parameter indicates in which window the new page appears after a click on the logo. By default, it's on the main page (value main). However, it could be on a brand new window by using the value new.
The logo image itself comes from the logo_left.png file, which is located in each specific theme directory structure.
The following example shows that no database has been chosen yet:
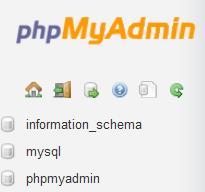
It is also possible to see a No databases message instead of the list of databases. This means that our current MySQL rights do not allow us to see any existing databases.
Note
A MySQL server always has at least one database (named mysql), but it may be the case that we do not have the rights to see it. Moreover, as MySQL 5.0.2, a special database called information_schema appears at all times in the database list—unless it is hidden via the $cfg['Servers'][$i]['only_db'] or the $cfg['Servers'][$i]['hide_db'] mechanisms. It contains a set of views describing the metadata visible for the logged-in users.
We may have the right to create one, as explained in Chapter 4.
The navigation panel can be shown in two ways—the Light mode and the Full mode. The Light mode is used by default, defined by a TRUE value in $cfg['LeftFrameLight']. This mode shows a drop-down list of the available databases, and only tables of the currently chosen database are displayed. It is more efficient than Full Mode; the reason is explained in the Full Mode section appearing later in the chapter. In the following screenshot, we have chosen the mysql database:
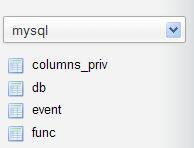
Clicking on a database name or selecting it opens the main panel in the Database view, and clicking on a table name opens the main panel in the Table view to browse this table. (Refer to the Main panel section for details.)
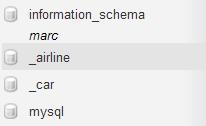
A user might be allowed to work on a single database, for example marc. Some system administrators offer a more flexible scheme by allowing user marc to create many databases, provided all have their names starting with marc, such as marc_airline and marc_car. In this situation, the navigation panel can be set to display a tree of these database names, as shown in the following screenshot:
This feature is controlled by the following parameters:
$cfg['LeftFrameDBTree'] = TRUE;
$cfg['LeftFrameDBSeparator'] = '_';
The default value of TRUE in $cfg['LeftFrameDBTree'] ensures that this feature is activated. A popular value for the separator is'_'. Should we need more than one set of characters to act as a separator, we just have to use an array:
$cfg['LeftFrameDBSeparator'] = array('_', '+'),
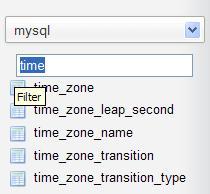
If a database has too many tables, we might want to display just a subset of these, based on a filter text string. In Light mode only, if a database is currently selected, a table name filter is displayed just under the current database name, provided that the number of tables exceeds the value of $cfg['LeftDisplayTableFilterMinimum'], which is set to 30 by default. As we input a subset of the table names in this filter, the list of tables is reduced to match this subset. To try this feature, we set the directive's value to 15 and we input time in the filter field:
The previous examples were shown in Light mode, but setting the $cfg['LeftFrameLight'] parameter to FALSE produces a complete layout of our databases and tables using collapsible menus (if supported by the browser) as shown in the following screenshot:
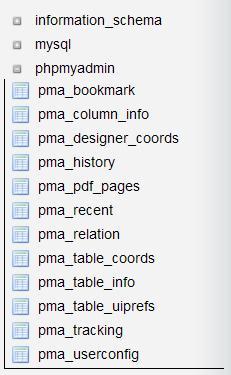
The Full mode is not selected by default; it can increase network traffic and server load if our current rights give us access to a large number of databases and tables. Links must be generated in the navigation panel to enable table access and quick access to every table.
Moving the cursor over a table name displays comments about the table (if any), and the number of rows currently within it as shown in the following screenshot:
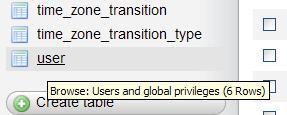
It was established that the most common action on a table must be to browse it. Therefore, a click on the table name itself opens it in browse mode. The icon beside each table name is a quick way to do another action on each table, and by default, it brings us to Structure view.

The $cfg['LeftDefaultTabTable'] parameter controls this action. It has a default value of'tbl_structure.php', which is the script that shows the table's structure. Other possible values for this parameter are listed in Documentation.html. If we prefer a setting in which a click on the table name opens it in the Structure page and a click on the quick-access icon leads to the Browse page, we have to set these directives:
$cfg['LeftDefaultTabTable'] = 'sql.php';
$cfg['DefaultTabTable'] = 'tbl_structure.php';
MySQL's data structure is based on two levels—databases and tables. This does not allow subdivisions of tables per project. To work by project, users must rely on having multiple databases, but this is not always allowed by their provider. To help them with this regard, phpMyAdmin supports a nested-levels feature based on the naming of the table.
Let us say we have access to the db1 database, and we want to represent two projects, marketing and payroll. Using a special separator (by default a double underscore) between the project name and the table name, we create the marketing, payroll__employees and payroll__jobs tables, achieving a visually interesting effect as shown in the following screenshot:
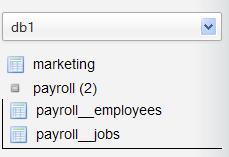
This feature is parameterized with $cfg['LeftFrameTableSeparator'] (set here to'__') to choose the characters that will mark each level change, and $cfg['LeftFrameTableLevel'] (set here to'1') for the number of sub-levels.
Note
The nested-level feature is intended only for improving the navigation panel's look. The proper way to reference the tables in MySQL statements stays the same, for example, db1.payroll__jobs.
A click on the navigation panel on the project name (here payroll) opens this project in the main panel, showing only those tables associated with that project.
If we have to manage multiple servers from the same phpMyAdmin window and often need to switch between servers, it is useful to always have the list of servers in the navigation panel.
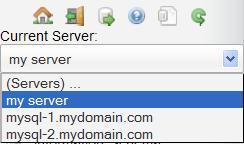
For this, the $cfg['LeftDisplayServers'] parameter must be set to TRUE. The list of servers can have two forms—a drop-down list or links. Which form appears depends on $cfg['DisplayServersList']. By default, this parameter is set to FALSE, so we see a drop-down list of servers. Setting $cfg['DisplayServersList'] to TRUE produces a list of links to all defined servers.
This section describes some techniques to cope with a server holding a huge number of databases and tables.
It would be difficult to work with the interface if we had access to hundreds or even thousands of databases, or hundreds of tables in the same database. Two parameters, shown here with their default values, establish a limit on the number of databases and tables displayed, by adding a page selector and navigation links:
$cfg['MaxDbList'] = 100;
$cfg['MaxTableList'] = 250;
The effect of setting $cfg['MaxTableList'] to a value of 5 can be seen on the navigation panel, shown here for a database having more than five tables:
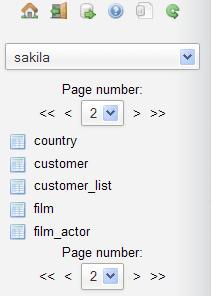
The page selector and navigation links also appear in the main panel.
Three configuration parameters have an effect on the speed of database name retrieval and table counting. The first one is:
$cfg['Servers'][$i]['ShowDatabasesCommand'] = 'SHOW DATABASES';
Every time phpMyAdmin needs to obtain the list of databases from the server, it uses the command listed in this parameter. The default command SHOW DATABASES is fine in ordinary situations. However, on servers with many databases, speed improvements can be observed by trying other commands such as one of the following:
SHOW DATABASES LIKE '#user#\_%'
SELECT DISTINCT TABLE_SCHEMA FROM information_schema.SCHEMA_PRIVILEGES'
SELECT SCHEMA_NAME FROM information_schema.SCHEMATA
In the first example, #user# is replaced by the current username.
In extreme situations (thousands of databases), a user who installs his own copy of phpMyAdmin should put false in this parameter. This would block any database names' fetching, and would require to populate the $cfg['Servers'][$i]['only_db'] parameter with this user's database list.
Finally, some users experience speed issues (at least under MySQL 5.1) with information retrieval from INFORMATION_SCHEMA. Therefore, the $cfg['Servers'][$i]['DisableIS'] directive, with its default value of TRUE, disables the usage of INFORMATION_SCHEMA from a major portion of the phpMyAdmin code. For your server, it may be worth setting this to FALSE to see if response time improves.
