The main panel is the principal working area, and all the possible views for it are explained in the following sections. Its appearance can be customized. The background color is defined in $cfg['MainBackground'].
The home page may contain a varying number of links depending on the login mode and the user's rights. The Home link from the navigation panel is used to display this page. It shows the phpMyAdmin and MySQL versions, the MySQL server name, and the logged-in user. In order to reveal less information about our web server and MySQL server, we could set $cfg['ShowServerInfo'] to FALSE. Another setting, $cfg['ShowPhpInfo'], can be set to TRUE if we want to see the Show PHP Information link on the home page—by default its value is FALSE. In some cases, a No privileges message may appear here; the reason for this and how to fix this condition is covered in Chapter 4.
In this example, a normal user is allowed to change his/her password from the interface by using the Change password link which brings the following dialog:

We can either choose our new password by typing it twice, or use the Generate button (only available in JavaScript-enabled browsers); in this case, the new password is shown in a clear field for us to take good note of it, and is automatically filled into the dialog for changing the password. It is highly recommended to generate passwords in this way, as they are most likely more secure than a human-chosen password. To disallow the Change password link from the home page, we set $cfg['ShowChgPassword'] to FALSE. Privileged users have more options on the home page. They have more links to manage the server as a whole, for example, the Privileges link (more on this in Chapter 19).
phpMyAdmin goes into Database view (shown in the following screenshot) every time we click on a database name from the navigation panel.
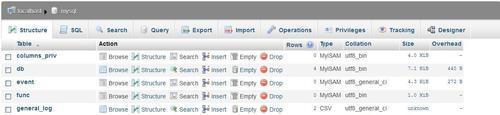
This is where we can see an overview of the database—the existing tables, a dialog to create a table, the tabs to the Database view pages, and some special operations we might do on this database to generate documentation and statistics. There is a checkbox beside each table to make global operations on that table (covered in Chapter 9). The table is chosen by using the checkbox or by clicking anywhere on the row's background. We can also see each table's size, provided $cfg['ShowStats'] is set to TRUE. This parameter also controls the display of table-specific statistics in the Table view.
The initial screen that appears here is the database Structure page. We note here that almost every column header—such as Table, Records, and Size —is a link which can be used to sort the corresponding column (Chapter Chapter 4 covers sorting). While sorting by descending table name might not be that useful, sorting by descending size is definitely something we should do from time to time.
We might want a different initial page to appear while entering the Database view. This is controlled by the $cfg['DefaultTabDatabase'] parameter, and the available choices are given in the configuration file as comments.
The number of rows is obtained using a quick method, the SHOW TABLE STATUS statement, and not by using a SELECT COUNT(*) FROM TABLENAME. This quick method is usually accurate, except for InnoDB tables, which returns an approximate number of records. To help get the correct number of records, even for InnoDB, the $cfg['MaxExactCount'] parameter is available. If the approximate number of records is lower than this parameter's value—by default, 20000—the slower SELECT COUNT(*) method will be used.
Do not put a value too high for the MaxExactCount parameter. You would get correct results but only after waiting for a few minutes, if there are many thousands of rows in your InnoDB table. To examine the number of rows as displayed for InnoDB, please refer to Chapter 10, where we actually have an InnoDB table to play with.
A user might be surprised when seeing the term KiB in the Size and Overhead columns. phpMyAdmin has adopted the International Electrotechnical Commission (IEC) binary prefixes (see http://en.wikipedia.org/wiki/Binary_prefix). The displayed values are defined in each language file.
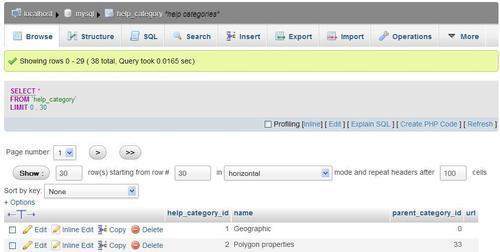
This is a commonly used view, giving access to all table-specific pages. By default, the initial screen is the table's Browse screen, which shows the first page of this table's data. Note that the header for this screen always shows the current database and table names. We also see the comments set for the table, next to the table name:
The $cfg['DefaultTabTable'] parameter defines the initial page on the Table view. Some users prefer to avoid seeing the first page's data because in production they routinely run saved queries or enter the Search page (explained in Chapter 8).
This view is entered each time we go back to the home page. A privileged user will, of course, see more choices in the Server view. The Server view panel was created to group together related server management pages, and enable easy navigation between them.
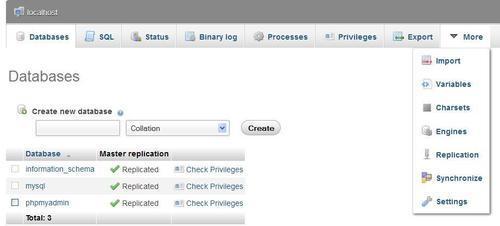
The default Server page is controlled by the $cfg['DefaultTabServer'] parameter. This parameter defines the initial starting page as well. For multi-user installations, it is recommended to keep the default value (main.php)
, which displays the traditional home page. We could choose to display server statistics instead by changing this parameter to server_status.php, or to see the user's list with server_privileges.php. Other possible choices are explained in the configuration file, and the server administration pages are covered in Chapter 19.
A configuration parameter, $cfg['MainPageIconic'], controls the appearance of icons at various places of the main panel:
- On the home page
- At top of page when listing the Server, Database, and Table information
- On the menu tabs in
Database, Table, andServerviews
When the parameter is set to TRUE, which is by default, you will see the following screenshot:
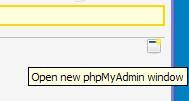
Sometimes we want to compare data from two tables at once or have other needs for more than one phpMyAdmin window. At the bottom of almost every page, a small icon is available to open another window in phpMyAdmin with the current panel's content. Moreover, this icon can be used to create a browser bookmark that points to the current phpMyAdmin page (but we should log in to access the data).