(User’s Manual: D300S page 189; D300 page 191)
Interval timer shooting allows you to set your camera up to shoot a series of images over time. Make sure you have a full battery or are connected to a full-time power source for images taken over long periods of time.
The first step in using Interval timer shooting is to make sure that your Time zone and date (D300S) or World time (D300) are set correctly in the Setup Menu of your camera (see the heading Time Zone and Date or World Time in the chapter titled Chapter 5). If you don’t have the camera’s time and date information set, the Interval timer shooting menu selection will be grayed out, and you won’t be able to use it. (see Figure 3-61).

The screens in Figure 3-61 look a little daunting, but it might help you to realize that the bottom half of screens 2-6 is informational in nature. It shows the settings you create with the top half of each screen.
There are four steps involved in configuring Interval timer shooting:
Choose a Start Time.
Choose an Interval.
Choose the number of intervals (Select intvls).
Choose the number of shots per interval (no. of shots).
So, if I wanted to take a series of images starting Now (Start time), and shoot every 10 seconds (Interval), over a period of 30 seconds, or 3 intervals (number of intervals), making 2 images per interval (number of shots), I would set the following (get your camera and try these steps yourself so that it’ll make sense to you):
Under Choose start time (see Figure 3-61, image 2), you could select Now, and the timer will start 3 seconds after you’ve complete steps 3–5 (skipping step 2). If you select Now, the camera will skip step 2 since it selects a start time. If you’d rather start at a future time—instead of now—simply select Start time from screen 2 and scroll right, then move on to step 2.
You will now see a Start time menu (see Figure 3-61, image 3) with the time in 24-hour (military) format:
00:00
Enter the time at which you want the intervals to begin. If I wanted to start at 3:30 p.m., I would insert the following:
15:30
Once you’ve entered the time, scroll to the right.
You will now see the Interval screen with hours : minutes’ seconds″; in the following format (see Figure 3-61, image 4):
00 : 00′ 00″
The first two zeros represent the hour, the second set represents minutes, and the third set seconds. Since we want to start out with an Interval of 10 seconds, let’s set the screen to look like this:
00 : 00′ 10″
Scroll to the right to get to the next screen.
Now we’ll select the number of intervals (see Figure 3-61, image 5). This screen will say Select intvls X no. of shots in the format below. Number of intervals × number of shots = total shots.
000 × 0 = 0000
Set your camera so that it looks like this instead (see Figure 3-61, image 5):
003 × 2 = 0006
This means that there will be 003 intervals of 10 seconds each (set in step 3 above) and that the camera will take 2 pictures in each interval, for a total of 0006 pictures. In other words, 2 pictures will be taken every 10 seconds over a period of 30 seconds for a total of 6 images. Now scroll to the right to get to the next screen.
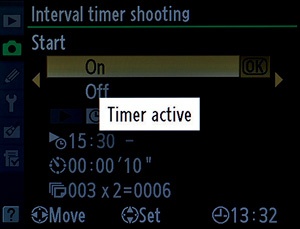
Select On from the final screen (Figure 3-61, image 6) and press the OK button. A Timer Active message will appear on your camera’s Monitor (see Figure 3-62). If you look at the top Control panel you will see the word INTVL on the D300S, or INTERVAL on the D300, flashing. This will keep flashing as long as the Interval timer is in operation.
If you’re shooting a timed interval during daylight hours, be sure to use the little black eyepiece cap (DK-5) supplied with your camera. Otherwise, changes in the light from behind the camera could cause the exposure to be inaccurate.
To pause or stop an interval and cease timer operations, simply select Interval timer shooting from the Shooting Menu and scroll to the right (see Figure 3-63). This won’t work if your intervals are very close together.
Notice how Figure 3-63, image 1, shows that Interval timer shooting is, proving that an interval is in progress.
After scrolling to the right, you can select Pause or Off from the screen with the bright green In progress bar (see Figure 3-63, image 2). At the bottom of the screen, you will also see the starting time (Now will show a series of dashes, as shown), current interval delay, and number of intervals and shots remaining, in case you don’t want to pause or stop it but just want to see how things are going.

The number of intervals remaining will be displayed on the Control panel, in the same spot the shutter speed is normally displayed. The place that normally displays the aperture will instead display the number of shots remaining in the current interval setup.
Note: Be sure to adjust any bracketing for the exposure or flash (AE & flash or Flash only), or Active D-Lighting (ADL bracketing) before you start Interval timer shooting. Bracketing overrides Number of shots, so you may not get what you expected if any kind of bracketing is active.
My Recommendation: Please learn to use this function! It is complicated, but if you read this section carefully and practice using Interval timer shooting as you read, you’ll learn it quickly. This type of photography allows you to shoot things like flowers gradually opening or the sun moving across the sky. Have some fun with it!