(User’s Manual – D300S page 308; D300 page 324)
Image authentication is a method used in conjunction with Nikon software to guarantee that an image has not been modified in any way.
With film, one can easily detect whether a printed image has been modified from the original. All one must do is look at the original transparency or negative. However, with digital photography and programs like Photoshop, one can modify an image in amazing ways.
Many law enforcement agencies would like to use digital imaging to save lots of money on film and processing costs but have been hampered by this ability to modify digital images so easily. Some courts have refused digital images as evidence for this reason.
Some major editorial houses, like large newspapers and magazines, have been embarrassed when one of their photographers modified a news image and was later caught.
Clearly there is a need to prove that a digital image has not been modified from its original form. Nikon has answered that need with the Image authentication feature of the Nikon D300(S) and other DSLR cameras. Working in conjunction with Nikon’s Image Authentication software, the D300(S) can stamp images with an electronic “seal” that allows an agency to prove that an image printed from the camera has not been modified, or if so, where.
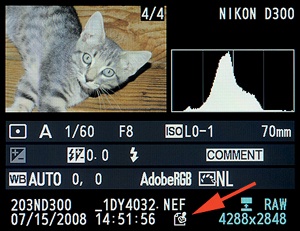
Figure 5-27 shows a D300 Playback screen with the Image authentication stamp icon. This merely shows that an image has been shot with Image authentication enabled. It takes the Nikon software to prove whether or not it has been modified.
There are two settings in the Image authentication function, as shown in Figure 5-28:
On – Image authentication information, which can be used by Nikon’s Image Authentication software, is imbedded in the image. With this feature turned on, and with the used of Nikon software, you can prove that a certain image has not been modified.
Off – No Image authentication embedding takes place. This is the default setting.
Here are the steps and screens used to configure Image authentication (see Figure 5-28):
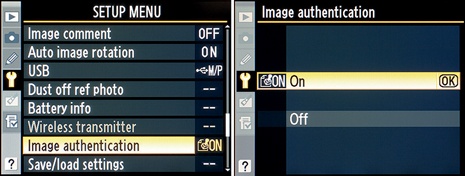
Select Image authentication from the Setup Menu and scroll to the right.
Select On or Off from the Image authentication screen (Figure 5-28, image 2).
Press the OK button to lock in your choice.
Take a picture and check the Playback screen to see if the authentication seal is showing (see Figure 5-27).
My Recommendation: After a little thought, I decided to set my camera’s Image authentication to On. I figure that one day I’ll be sitting in the car waiting for the wife at the local superstore, and a very important news event will occur right next to my car. I won’t even have to get out of the car! In order to get my Pulitzer Prize, I’ll want to be able to prove later that the images I took have not been modified in any way. I’ll have to buy the Nikon Image Authentication software to prove it, but with the money I’ll make from these images, it’ll be worth it. If you work for a law-enforcement agency or cover wars and presidential elections—or news of various sorts—turn this on immediately. Later you can prove that you have not modified the image.