
(User’s Manual – Page 117)
Sometimes you might want to control the WB in a totally manual way. This method and the next method are basically the same thing, except this method configures the WB using a button and dial and the other uses the camera’s menu system.
Each of these methods will allow you to set a particular WB temperature. If you want your image to appear cool, medium, or warm, you can set the appropriate color temperature, take the picture, and then look at the image on the Monitor.
Figure 9-2 shows the external camera controls used to adjust WB. Later figures in this chapter will refer to Figure 9-2 as a means to select a white balance type. Usually, they will only show the Control panel screen (Figure 9-2, image 3), assuming that you will remember the controls shown in Figure 9-2, images 1 and 2 (WB button and Main command dial). Examine Figure 9-2 and the following steps carefully until it makes sense to you.

Here is how to manually choose a WB type using the WB button, Main command dial, and Control panel:
Press and hold the WB button (WB/protect/help) near the top left of your D7000’s Monitor, just below the MENU button (Figure 9-2, image 1, red arrow).
Rotate the Main command dial (Figure 9-2, image 2, red arrow).
The symbols in the following list will appear one at a time on the Control panel (Figure 9-2, image 3, red arrow). Each click of the dial will change the display to the next WB setting. These symbols, options, and their Kelvin values are as follows:
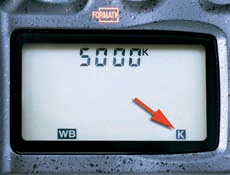
The K selection on the Control panel is flexible and allows you to manually select a WB value between 2500K and 10,000K. Here are the steps to select a specific Kelvin (K) white balance value:
Select the K symbol on the Control panel by holding down the WB button and rotating the rear Main command dial (Figure 9-2 and Figure 9-3).
While still holding down the WB button, rotate the front Sub-command dial to select the actual WB Kelvin temperature you desire (2500K to 10,000K). In Figure 9-3, I used the front Sub-command dial to select 5000K.
When you have selected an exact white balance temperature, all images you shoot from that point forward—until you change to another WB—will have that setting. You can have very consistent white balance from image to image by using this method. For in-studio product shoots, or in any circumstance where you need a constant white balance, this is a desirable function.
This method allows you to measure ambient light values and set the camera’s WB. It’s not hard to learn and is very accurate since it’s an actual through-the-lens measurement of the source light’s Kelvin temperature.

You’ll need a white or gray card to accomplish this measurement. Figure 9-4 shows the popular WhiBal white balance reference cards, which are available for purchase at http://mtapesdesign.com/whibal. The WhiBal cards come in various sizes, several that will easily fit in your pocket or camera bag—and even one for your keyring.
Here’s how to select the PRE white balance measurement method:
Press and hold the WB button (Figure 9-2).
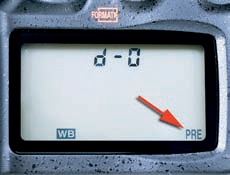
Rotate the Main command dial until PRE shows in the lower-right of the Control panel (Figure 9-2 and Figure 9-5). You’ll also see d-0 in the top of the Control panel in Figure 9-5.
Release the WB button.
Press and hold the WB button again until PrE (with a lowercase r) starts flashing on the Control panel.
Point the camera at a white or neutral gray card in the light source under which you will be taking pictures. It does not have to focus on the card; it can just be pointed at the card so it fills the frame.
Press the Shutter-release button fully, as if you were photographing the card. The shutter will fire, but nothing will appear on the Monitor.
Check the Control panel to see if Good is flashing. If you see no Gd flashing (instead of Good), the operation was not successful. Your available light may not be bright enough to take an accurate reading. If Good is flashing, the PRE white balance measurement was successful.
The PRE measurement is very sensitive because it uses the light coming through the lens to set the WB. Unless you are measuring in an extremely low-light level, it will virtually always be successful.
In step 2, I mentioned that d-0 appears in the top-left corner of the Control panel during a WB measurement (Figure 9-5). This d-0 is where the current WB value is stored. There are four other memory locations, d-1 to d-4, which you can use to store WB values you regularly use. Later, you can copy a value stored in d-1 to d-4 back into d-0.
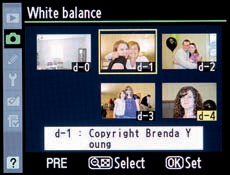
If you have previously used the manual measured PRE method to set the WB, you will already have a value in WB memory location d-0. You can keep up to five WB values stored in your D7000. In location d-0 you’ll find the current PRE WB, and in d-1 through d-4 you’ll find any stored WB values. They appear as tiny images, as shown in Figure 9-6. If there is nothing stored in d-0 to d-4, there will be a blank spot above the number.
If you shoot under a certain light source on a frequent basis, such as in a studio, you may want to store one or more of your PRE white balance values in one of the four permanent storage areas in your camera (d-1 to d-4).
I tried to enter a white balance PRE measurement directly into one of the d-1 to d-4 memory locations by selecting the location before doing the light measurement. However, my values did not show up in d-1 to d-4 but instead overwrote the value in d-0 each time. You may only copy a value from d-0 into one of the four storage locations. I suppose Nikon was concerned that people might accidentally overwrite a carefully prepared white balance setting, so it added a copy step between the measurement and long-term storage.
In effect, you may have up to five white balance values stored in your camera. One is the current temporary setting, and the other four are in memory for long-term use.
Figure 9-7 shows the steps used to copy the current white balance value from a PRE reading to one of the four memory locations. As you progress through the steps, you’ll see a visual representation of the stored WB values, where d-0 is a PRE measurement and d-1 to d-4 are WB values from previously taken images.
Here’s how to save the current WB reading (d-0) to one of the memory locations from d-1 to d-4:
Use method 1 to obtain a PRE white balance reading. It will automatically be placed in memory location d-0.
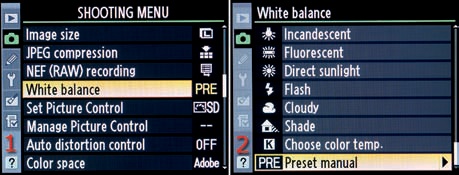
Use the screens shown in Figure 9-7 to start the WB maintenance process. Select White balance from the Shooting Menu screen and scroll to the right (Figure 9-7, image 1).
Select Preset manual and scroll to the right (Figure 9-7, image 2). Figure 9-8 begins where Figure 9-7 leaves off.
Scroll to one of the memory locations d-1 to d-4 (I selected d-1 in Figure 9-8, image 1).
Press the checkered Thumbnail/playback zoom out button to open the selection screen shown in Figure 9-8, image 2.
Scroll down to Copy d-0 and press the OK button. The camera will then write a copy of d-0 into the memory location you selected (Figure 9-8, image 3).
The display will show that the PRE reading you took in step 1 has now been copied to d-1, overwriting the value that was previously in that location (Figure 9-8, image 3). It is a solid white value because I took the reading from a white card.
Press the OK button to Set the value. Figure 9-9 begins where Figure 9-8 leaves off.
The camera will now display the fine-tuning screen (Figure 9-9) where you can modify the WB value. Simply move the little square toward a particular color in the color box. You can add tints (amber, blue, green, or magenta) to the WB setting you just stored in memory location d-1. This is entirely optional. When you are done, press the OK button.


We’ll talk more about fine-tuning a white balance with the Shooting Menu in an upcoming section.
When you’ve written a WB value to one of the memory locations from d-1 to d-4, it will remain there for future use as needed. You can access any of the saved WB values by selecting PRE with the WB button and then rotating the Sub-command dial until you find the one you want (d-0 to d-4). Or you can use the Shooting Menu > White balance > Preset manual menu to directly select the numbered memory location.
As shown in Figure 9-10, you can edit (rename) the comment field of the memory location in which you just stored a White balance setting. Change the comment to something that will remind you of this WB setting’s use.
The initial comment is a copy of the Setup Menu > Image comment field. If you edit the name and save it, you will have a better reminder of what type of WB setting this memory location offers. It will not overwrite the original picture’s Image comment field.

Here are the steps to edit the WB setting’s comment field:
Select White balance from the Shooting Menu and scroll to the right (Figure 9-10, image 1).
Choose Preset manual from the menu and scroll to the right (Figure 9-10, image 2).
Select the memory location for which you want to edit the comment (Figure 9-10, image 3) and press the Thumbnail/playback zoom out button. This will open the Preset manual menu.
Choose Edit comment from the menu and scroll to the right (Figure 9-10, image 4).
The character-selection panel will now display (Figure 9-10, image 5). Use the Multi Selector to navigate among the letters and numbers. Press the OK button to add a character to the name. To scroll through characters already in the new name, hold down the Thumbnail/playback zoom out button while navigating to the left or right with the Multi Selector. Press the Delete button to delete the current character. Press the Playback zoom in button to save the memory location comment.
The White balance memory location screen will now display, with the newly named memory location comment displayed (Figure 9-10, image 6). I renamed memory location d-3 to Party Direct Flash to signify that this white balance choice is useful for shooting with direct flash at a party.
You can also select a white balance setting from an image you have already successfully taken. The value from this image can be applied to the picture you are about to take, or it can be copied to memory locations d-1 to d-4 (using the function described previously) for later use.

Here are the steps to recover the White balance setting from an image stored on your camera’s memory card:
Select White balance from the Shooting Menu and scroll to the right (Figure 9-11, image 1).
Choose Preset manual from the menu and scroll to the right (Figure 9-11, image 2).
Choose a memory location to save the WB from an existing picture. I chose d-1 (Figure 9-11, image 3). You must select d-1 to d-4. You cannot use d-0 for this operation.
Choose Select image from the Preset manual menu and scroll to the right (Figure 9-11, image 4). Select image will be grayed out if there are no images on your current memory card.
You will now see the Select image screen (Figure 9-11, image 5). Navigate through the available images until you find the one you want to use for white balance information. Press the OK button to select the image.
A small picture of the image will appear in your selected white balance memory location and is saved there for future use (Figure 9-11, image 6). The white balance from that picture is now the white balance setting for the camera, until you change it.
If you want to fine-tune a certain white balance to have more amber or blue, you can use the camera’s external WB controls to do it in mired steps. Using the Shooting Menu allows you to fine-tune not only amber and blue, but you can add green and magenta.
Basically, you select one of the white balance values provided by the camera and add amber or blue in 5-mired steps. You can add or subtract amber or blue in up to six steps—A1 to A6, or b1 to b6. That means you can change the color from a minimum of 5 mired to a maximum of 30 mired. Remember, a 1-mired step is equivalent to a barely perceptable change in color.
Here is how to add or subtract amber or blue from a Nikon-provided white balance value, using external camera controls:

Press and hold the WB button and turn the rear Main command dial until you select a white balance value you would like to fine-tune (refer to Figure 9-2 for the location of the controls). In Figure 9-12 you can see the results of selecting a WB value; I selected auto (A) white balance.
While still holding down the WB button, turn the front Sub-command dial to the left for amber values (A1–A6) or to the right for blue values (b1–b6). Remember that each Sub-command dial click is a 5-mired value. In Figure 9-12 there are two Control panel screens showing the two color types that I selected (A2 and b2). Image 1 is two 5-mired steps additional amber, and image 2 is two 5-mired steps extra blue in the WB value.
Release the WB button, and you’re ready to take pictures with your fine-tuned WB value. It stays fine-tuned until you change it back. You’ll see a small asterisk next to the WB symbol on the Control panel (WB*) when you are using a fine-tuned WB value. You can see the asterisk in both images in Figure 9-12.
Unfortunately, fine-tuning is not an in-camera visual process. You’ll need to examine the results of images taken with your new WB* value to determine if you like the results of your fine-tuning effort.
In addition to fine-tuning with the camera’s external controls, you can use the Shooting Menu to fine-tune even more effectively. Instead of two colors (amber and blue), you can adjust four colors (amber, blue, green, and magenta).
If you want to fine-tune a previously saved White balance value, you can do it with the Set function. The value in any of the d-0 to d-4 memory locations can be manually changed. The color balance can be moved toward G-Green, A-Amber, M-Magenta, or B-Blue, or it can be moved toward intermediate combinations of those colors.
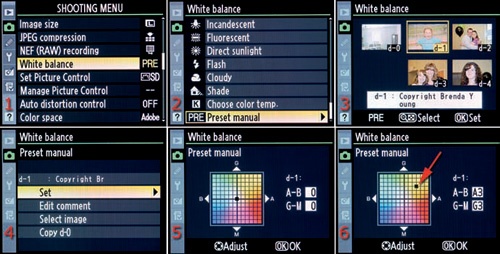
Here are the steps to Set a new color balance. Here are the steps used to fine-tune a white balance setting using Shooting Menu screens:
Select White balance from the Shooting Menu and scroll to the right (Figure 9-13, image 1).
Choose Preset manual from the menu and scroll to the right (Figure 9-13, image 2).
Use the Multi Selector to scroll to the d-1 to d-4 memory location you want to fine-tune (Figure 9-13, image 3). Press the Thumbnail/playback zoom out button to select it.
Choose Set from the Preset manual menu and scroll to the right (Figure 9-13, image 4).
Use the Multi Selector to Adjust the color balance (Figure 9-13, images 5 and 6). Scroll around in the color box toward whatever color you want to add to the currently stored White balance (Figure 9-13, image 6, red arrow). If you change your mind, return the little black square to the center of the color box. You’ll see the color-mired values change on the right side of the screen in the fields next to A–B and G–M. Each increment (click) of the Multi Selector is equal to about 5-mired steps.
Press the OK button to save your adjustments to the stored White balance (Figure 9-13, image 6).