
(User’s Manual – Pages 275–279)
CLS is an advanced wireless lighting technology that allows you to use your imagination in designing creative lighting arrangements. No wires are used since the CLS-compatible remote flash units are controlled by a commander device, or what Nikon refers to as a “master flash unit.” You can use the Commander mode built into the D7000; an Accessory shoe–mounted commander, such as the SB-900, SB-800, and SB-700 Speedlights; or the SU-800 Wireless Speedlight Commander unit. The SB-600 has only a remote mode, so it cannot be used as a commander unit.
We’ll consider only the camera’s built-in Commander mode in this chapter. I suggest buying a copy of The Nikon Creative Lighting System by Mike Hagen (published by Rocky Nook and Nikonians Press). It goes into excellent detail on how to use CLS with multiple banks of various external Nikon Speedlight flash units.
Using CLS, you can easily experiment with setups and flash output. You can obtain a visual preview of how things will look by pressing the Depth-of-field preview button, which will fire the pulsed modeling capability within Nikon Speedlights.
There is no need to calculate complex lighting ratios when you can control your flash banks right from the camera and see the results immediately. CLS simplifies the use of multiple flash-unit setups for portraiture, interiors, nature, or any situation where several Speedlights need to work in unison.
You can simply position the flash units where you’d like them to be and let CLS automatically calculate the correct exposure, or you can change the lighting ratios directly from the Custom Setting Menu > e3 Flash cntrl for built-in flash > Commander mode menu of your D7000.
Nikon’s CLS is world-class in power and not too difficult to use. The Nikon D7000 camera contains everything you need to control a simple or complex CLS setup. Let’s learn how to use it!
In Commander mode, the camera functions as a controller for multiple Nikon Speedlight flash units. Although the professional-level Nikon D3/D3S/D3X requires the separate purchase of an Accessory shoe–mounted commander device, the D7000 body has full Nikon CLS technology built right into the camera.
You can use normal i-TTL flash technology with the camera’s built-in flash or use Commander mode and the built-in flash to control up to two groups of an unlimited number of external Nikon Speedlight flash units. Nikon currently makes the powerful SB-900 flash unit, along with its slightly less powerful SB-700 and SB-600 brothers, and other smaller Speedlight units, such as the SB-400 or SB-R200.
Many people who use the D7000 have an external flash unit or two—usually the SB-900, SB-800 (now discontinued), SB-700, SB-600, or SB-400. The SB-R200 flash is designed to be used on various brackets available from Nikon and will work in conjunction with the bigger Speedlight flash units. The Nikon D7000 is happy to let you arrange professional lighting setups using these relatively inexpensive and very portable Speedlights. The cool thing about the D7000 is that it can serve as a CLS flash commander device or use Nikon’s other CLS flash commander devices at will. You have great control with this fine camera!
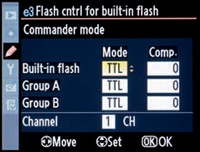
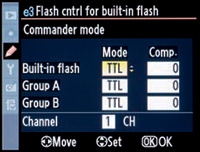
Commander mode is controlled through a menu on your D7000. If you examine the Commander mode screen shown in Figure 12-10, you’ll note that you have controls for the built-in flash and two groups (A and B), or banks, of external flash units. You’ll also see that you can set exposure compensation for either of these groups.
If the main flash is too bright, you can either move it farther away or dial its power down by setting compensation (Comp.) to underexpose a little. You can set Comp. in 1/3-stop increments, so you have very fine control of each group’s flash output. You can experiment until you get the image just the way you want it. Sure, you can do things the old way and use a flash meter or get your calculator and figure out complex fill ratios. Or you can simply use CLS to vary your settings visually until the image is just right (Figure 12-11).
Isn’t it more fun to simply enter some initial settings into your Commander mode screen and then take a test shot? If it doesn’t look right, change the settings and do it again. Within two or three tries you’ll probably get it right, and you will have learned something about the performance of your CLS. In a short time you’ll have a feel for how to set the camera and flash units and will use your flash/camera combo with authority.

Figure 12-11. J. Ramón Palacios used a Commander device and two SB-800 Speedlights to take this CLS photo
Note: If you leave Custom setting e4 Modeling flash set to the factory default of On, you can test fire the built-in modeling light of your single Speedlights—or all speedlights in Groups A and B—by pressing and holding the camera’s Depth-of-field preview button.
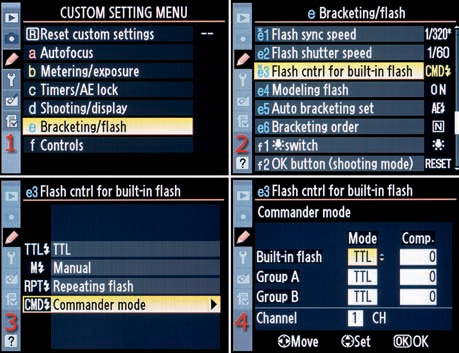
Let’s start by putting your camera into Commander mode. We’ll do that by changing Custom Setting Menu > Custom setting e3 to Commander mode (CMD). Look at Figure 12-12 for the steps to set this option.
Since this section is about controlling multiple flash units, we’ll have to change the settings in Commander mode, as shown in Figure 12-12, image 4. We’ll examine each of the settings available in Commander mode.
First, we’ll consider TTL. It’s the easiest to use since it allows you to set exposure compensation for the built-in flash as well as each of your flash groups. Second, we’ll briefly look at AA mode, which is an old-fashioned mode not often used by new photographers. Third, we’ll look at M mode, since that gives you fine control of your flash from full power (1/1) to 1/128 power. Finally, we’ll consider the – – (double-dash) mode, which prevents the camera’s built-in flash from firing the main flash output but does not stop the necessary monitor preflashes or the firing of the external flash units.
When your camera is controlling external Speedlights using its built-in Commander mode, you must always raise the built-in flash on your D7000. The camera communicates with the external flash units during the monitor preflash cycle.
Always position the sensor windows on the external Speedlights where they will pick up the monitor preflashes from the built-in flash. Take particular care when you are not using a tripod.
Basically, the Mode fields on the Commander mode screen will display the selections in the following list. Use the Multi Selector to change the values, as shown in Figure 12-13. Here are the four Commander mode settings:
TTL, or i-TTL mode
AA, or Auto Aperture mode
M, or Manual mode
– –, or double-dash mode
You’ll find each mode in the Mode box shown in yellow in Figure 12-13. Use the Multi Selector to scroll up or down and select a mode. AA mode is not available for the Built-in flash, so you will see AA only in the Mode boxes following Groups A and B. Now, let’s examine each mode in more detail:
TTL mode – The TTL setting allows you to use the full power of i-TTL technology. By leaving Mode set to TTL (as shown in Figure 12-13) for the Builtin flash or Group A or B, you derive maximum flexibility and accuracy from all your flash units. In this mode, the Comp. setting will display exposure values from -3.0 EV to +3.0 EV, a full six-stop range of exposure compensation for each group of Speedlights. You can set the Comp. in 1/3 EV steps for very fine control.
AA mode – The AA mode is an older non-i-TTL technology included for people who are accustomed to using it. It is not available for the built-in Speedlight on the D7000 or for the SB-600. You can safely ignore the AA mode, unless you want to experiment with it. It may not provide as accurate a flash exposure as TTL mode since it is not based on the amazing i-TTL technology. Otherwise, it works pretty much the same as TTL mode.
M mode – This allows you to set different levels of flash output in 1/3 EV steps for the Built-in flash or the Speedlights in Group A or B. The settings you can put in the Comp. field are between 1/1 (full) and 1/128. The intermediate 1/3-stop settings are presented as decimals within the fractions. For example, 1/1.3 and 1/1.7 are 1/3 and 2/3 stops below 1/1 (full). Many people are used to working with flash units this way, so it seems more familiar to them. CLS is willing to oblige people who have experience with working manually.
- - mode (double-dash mode) – The built-in Speedlight will not fire the main flash burst in this mode. It will fire the monitor preflashes, since it uses them to determine exposure and communicate with the external flash groups. Be sure you always raise the camera’s built-in flash in any of the Commander modes; otherwise, the external flash groups will not receive a signal and won’t fire their flashes. When you set the Mode for Group A or B to double-dash (– –) mode, that entire group of flashes will not fire any flash output. You can use this mode to temporarily turn off one of the flash groups for testing purposes.
Since the preflashes of the built-in flash always fire, be careful that they do not influence the lighting of your image. Use a smaller aperture, or move the camera farther away from your subject if the preflashes add unwanted light.
Look at Figure 12-14, or your camera’s Commander mode screen, and you’ll notice that just below Group B there is a Channel (CH) selection. The number 3 that I selected in the yellow box is the communication channel your D7000 will use to talk to the external flash groups (the factory default is 1). There are four channels available (1–4), just in case you happen to be working in the vicinity of another Nikon photographer who is also using Commander mode. By using separate channels, you won’t interfere with each other.

Note: It is important to realize that all external flashes in all groups must be on the same channel. This involves setting up your individual flash units to respond on a particular channel. They might be in separate groups, but they must be on the same channel. Each external Speedlight flash will have its own method for selecting a Group and Channel. You’ll need to read the user’s manual for your flash unit.
There is a downloadable PDF document accompanying this chapter called Selecting a Nikon Speedlight Flash Unit at http://rockynook.com/NikonD7000. It discusses today’s available Nikon Speedlights.