This chapter will examine scanners, the benefits they offer, and the threats they pose.
A scanner is a security tool that detects system vulnerabilities. Here's a primitive example:
#!/usr/bin/perl
$count==0;

    open(MAIL, "|/usr/lib/sendmail mikal") || die "Cannot open mail
";
    print MAIL "To: Administration
";
    print MAIL "Subject: Password Report
";
    print MAIL "Reply-To: Password-scanner
";
    open(PASSWORDS, "cat /etc/passwd|");
    while(<PASSWORDS>) {
      $linenumber=$.;
       @fields=split(/:/, $_);
        if($fields[1] eq "") {
             $count++;
             print MAIL "
***WARNING***
";
             print MAIL "Line $linenumber has a blank password.
";
             print MAIL "Here's the record: @fields
";
             }
         }
    close(PASSWORDS);
        if($count < 1)  {
            print MAIL "I found no blank password fields
";
            }
    print MAIL ".
";
     close(MAIL);
This program scans /etc/passwd, looking for empty password fields. For each empty field it finds, it warns the user via email. Although this is rudimentary, it concisely demonstrates the scanner concept: automatically detecting possible security weaknesses.
Different scanners scan for different weaknesses, but all fit into one of two categories:
System scanners
Network scanners
Let's look at the theory behind each.
System scanners scan your local host, looking for obvious (and not-so-obvious) security vulnerabilities that arise from oversights, peccadilloes, and configuration problems that even seasoned users sometimes miss. Some examples:
Lax or erroneous file permissions
Default accounts
Erroneous or duplicate UID entries
To better understand how system scanners operate, please run through this next example using the Computer Oracle and Password System, or COPS.
Application: COPS by Dan Farmer (Also see SATAN)
Required: C, Perl (version 3.44+), and cracklib
Config Files: is_able.lst (for specifying files and directories that should be checked for writeability) and crc_lst (for specifying files and directories for which you'd like to maintain CRC values).
Location: http://metalab.unc.edu/pub/Linux/system/security/cops_104_linux.tgz
Security History: COPS has no significant security history.
Notes: COPS is an older but still useful tool.
COPS analyzes your system for common configuration problems, weaknesses, and warning signs that still persist (or can crop up) in UNIX systems, including
COPS also compares existing file dates against known dates of CERT security advisories. (This is useful because COPS can identify files that should have been patched but weren't.)
After downloading COPS, unzip the archive, like this:
$ guznip cops_104_linux.tgz
Next, un-tar the COPS tar archive, like this:
$ tar -xvf cops_104_linux.tar
COPS will expand to cops_104/. Change your working directory to cops_104/ (cd cops_104) and run the reconfig script, like this:
$ ./reconfig
$ make
Note
You shouldn't encounter problems with make. However, you must have cracklib installed. If you don't, COPS will die during compilation, exiting on error at src/pass.c. (You'll find cracklib on your Linux CD-ROM.)
Now you're ready to test the program. The quickest way is to issue this command:
$ ./cops -v -s . -b cops.err
(Note that the period is required.)
What happens next depends on your host's configuration. The analysis could take just a few seconds or several minutes. When COPS completes its analysis, it writes results to a directory named after your hostname, in a dated file. For example, on the following sample scans, COPS wrote results to GNSS/1999_May_24 and linux2/1999_May_24.
Here are the results of a COPS scan on the SGI running IRIX 6.2 (an older operating system likely to have several holes):
ATTENTION:
Security Report for Mon May 24 07:05:22 PDT 1999
from host GNSS

****root.chk****
****dev.chk****
Warning!  NFS file system  exported with no restrictions!
Warning!  NFS file system  exported with no restrictions!
Warning!  NFS file system / exported with no restrictions!
Warning!  NFS file system /home/jsf131 exported with no restrictions!
Warning!  NFS file system /CD-ROM exported with no restrictions!
Warning!  NFS file system /usr/local exported with no restrictions!
****is_able.chk****
Warning!  /.ebtpriv is _World_ writeable!
Warning!  /usr/local/bin/objects.res is _World_ writeable!
Warning!  /usr/local/bin/objectserver_reset is _World_ writeable!
Warning!  /usr/local/bin/xp4 is _World_ writeable!
****rc.chk****
Warning!  File /usr/local/ileaf6/bin/lmgrd (in /etc/rc2.d/S990lm) is _World_ writeable!
Warning!  File /usr/local/ileaf6/data/license/license.dat (in /etc/rc2.d/S990lm) is _World_ writeable!
****cron.chk****
****group.chk****
****home.chk****
Warning!  User nuucp's home directory /var/spool/uucppublic is mode 0777!
Warning!  User nobody's home directory /dev/null is not a directory! (mode 020666)
Warning!  User noaccess's home directory /dev/null is not a directory! (mode 020666)
Warning!  User nobody's home directory /dev/null is not a directory! (mode 020666)
****passwd.chk****
Warning!  Duplicate uid(s) found in /etc/passwd:
nobody
Warning!  Password file, line 2, user shutdown has uid = 0 and is not root
    shutdown:*:0:0:shutdown,,,,,,:/shutdown:/bin/csh
Warning!  Password file, line 3, user sysadm has uid = 0 and is not root
    sysadm:*:0:0:System V Administration:/usr/admin:/bin/sh
Warning!  Password file, line 4, user diag has uid = 0 and is not root
    diag:*:0:996:Hardware Diagnostics:/usr/diags:/bin/csh
Warning!  Password file, line 22, negative user id:
    nobody:*:-2:-2:original nobody uid:/dev/null:/dev/null
****user.chk****
****misc.chk****
****ftp.chk****
Warning!  /etc/ftpusers should exist!
****pass.chk****
Warning!  Password Problem: null passwd:    +    shell:
****kuang****
****bug.chk****
Warning!  /usr/lib/sendmail could have a hole/bug!  (CA-88:01)
Warning!  /bin/login could have a hole/bug!  (CA-89:01)
Warning!  /usr/etc/ftpd could have a hole/bug!  (CA-89:01)
Warning!  /usr/etc/fingerd could have a hole/bug!  (CA-89:01)
Note the last few lines:
Warning!  /usr/lib/sendmail could have a hole/bug!  (CA-88:01)
Warning!  /bin/login could have a hole/bug!  (CA-89:01)
Warning!  /usr/etc/ftpd could have a hole/bug!  (CA-89:01)
Warning!  /usr/etc/fingerd could have a hole/bug!  (CA-89:01)
Here, COPS suggested that several programs had holes or bugs and that I should check corresponding CERT advisories. They were
CA-88:01—A December 1988sendmaildebugoption hole. The advisory describes ways of verifying that the hole exists and remedying it. Find it at http://www.cs.uu.nl/pub/SECURITY/cert-advisories/CA-88:01.ftpd.hole.CA-89:01—A January 1989passwdhole in all BSD-ish systems. The advisory offers a patch forpasswd.cat http://www.mit.edu/afs/athena/astaff/reference/ cert/Advisories/CA-89:01.passwd.hole.
Now let's look at a COPS scan on linux2, running a fresh install of Caldera OpenLinux 1.3:
ATTENTION:
Security Report for Mon May 24 04:41:40 PDT 1999
from host linux2.samshacker.net

****root.chk****
****dev.chk****
Warning!  /dev/fd0 is _World_ writeable!
Warning!  /proc is _World_ readable!
Warning!  /dev/fd0 is _World_ readable!
****is_able.chk****
Warning!  /usr/spool/uucp is _World_ writeable!
Warning!  /etc/security is _World_ readable!
Warning!  /etc/securetty is _World_ readable!
****rc.chk****
****cron.chk****
****group.chk****
****home.chk****
Warning!  User uucp's home directory /var/spool/uucp is mode 01777!
****passwd.chk****
****user.chk****
****misc.chk****
****ftp.chk****
ftp-Warning! Incorrect permissions on "ls" in /home/ftp/bin!
****pass.chk****
****kuang****
****bug.chk****
Clearly there were permission problems. Also, in both cases, COPS identified configuration issues and, in at least four programs on the SGI, possible holes. These are staple functions of a system security scanner.
In contrast, network scanners test hosts over network connections, much like a cracker would. They probe available services and ports, looking for well-known weaknesses that remote attackers can exploit.
To better understand how network scanners operate, please run through this next example using an early version of ISS, a.k.a. Internet Security Scanner.
Application: ISS by Christopher Klaus
Required: C and IP header files
Config Files: None.
Location: http://www.atomicfrog.com/archives/exploits/crack-scan/iss.tar.gz
Security History: ISS version 2 has no significant security history.
Notes: Don't confuse this release of ISS with later, commercial versions that have restrictive licenses.
Old ISS (circa 1993 for version 2) is significant because it was the first of its kind. In the original ISS documentation, Klaus discusses his early security research:
ISS is a project that I started as I became interested in security. As I heard about (cr/h)ackers breaking into NASA and universities around the world, I wanted to find out the deep secrets of security and how these people were able to gain access to expensive machines that I would think were secure. I searched the Internet for relative information, such as Phrack and CERT advisories… Having talked with security experts and read CERT advisories, I started trying to look for various security holes within my domain. To my surprise, I noticed that many of the machines were adequately secured, but within a domain there remained enough machines with obvious holes that anyone who wanted to get into any machine could attack the weak "trusted" machine and from there could gain access to the rest of the domain.
Klaus contemplated creating a tool that could automatically detect (and in some cases, exploit) such obvious holes over a network connection. ISS was the result of his research.
After downloading ISS, decompress the iss_tar.gz archive, like this:
$gunzip iss_tar.gz
Next, un-tar the ISS tar archive (iss_tar), like this:
$tar -xvf iss_tar
Here, ISS will extract to iss/, which should contain the following files:
-rw-------    1 102      50           157 Apr  6  1995 Bugs
-rw-------    1 102      50          2028 Apr  6  1995 Changes
-rw-r--r--    1 root     sys         1220 May 23 23:30 ISS.log
-rw-------    1 102      50            64 Apr  6  1995 Makefile
-rwxr-xr-x    1 root     sys        34976 May 23 23:30 iss
-rw-------    1 102      50          9446 Apr  6  1995 iss.1
-rwxrwxr-x    1 102      50         20292 Apr  6  1995 iss.c
-rw-r--r--    1 root     sys        30880 May 23 23:30 iss.o
-rw-------    1 102      50          8971 Apr  6  1995 readme.iss
-rw-------    1 102      50         10035 Apr  6  1995 telnet.h
-rw-------    1 102      50           676 Apr  6  1995 todo
Change your working directory to iss/ (cd iss) and make the package:
Now you're ready to test ISS. For instructions on how to use it, issue the ISS command without arguments. In response, ISS will print a usage summary:
$ iss
ISS v1.21  (Internet Security Scanner)
Usage: iss -msrdyvpqefo #1 #2
 -m Ignores checking for mail port.
 -s xx number of seconds max to wait
 -r Ignores Checking for RPC calls
 -d Ignores Checking Default Logins such as sync
 -y Try to get pw via Ypx
 -v Ignores finding Mail Aliases for decode, guest, bbs, lp
 -p Scans one Host for all open TCP ports (disables all other options)
 -q Turns off Quick Scan so it finds hosts even with no name.
 -e Only logs directories that can be mounted by everyone
 -f Ignores Checking FTP port for logging in as anonymous
 -o <file> send output to non ISS.log file, "-" is stdout
#1 is the inetnet network to start searching on
#2 is the inetnet network to end searching on
(ie. 128.128.128.1 128.128.128.25 will scan all hosts from
 128.128.128.1 to 128.128.128.25).
Written By Christopher Klaus ([email protected])
Send me suggestions, bugs, fixes, and ideas.    Send flames > /dev/null
For this example, I compiled ISS on GNSS (IRIX) and ran a generic port scan against 172.16.0.2 (Linux) like this:
$ iss -p 172.16.0.2
Here's the output:
-->    Inet Sec Scanner Log By Christopher Klaus (C) 1993    <--
              Email: [email protected] [email protected]
       ================================================================
Host 172.16.0.2, Port 7  ("echo" service) opened.
Host 172.16.0.2, Port 9  ("discard" service) opened.
Host 172.16.0.2, Port 13  ("daytime" service) opened.
Host 172.16.0.2, Port 19  ("chargen" service) opened.
Host 172.16.0.2, Port 21  ("ftp" service) opened.
Host 172.16.0.2, Port 23  ("telnet" service) opened.
Host 172.16.0.2, Port 25  ("smtp" service) opened.
Host 172.16.0.2, Port 70 opened.
Host 172.16.0.2, Port 79  ("finger" service) opened.
Host 172.16.0.2, Port 80  ("http" service) opened.
Host 172.16.0.2, Port 109  ("pop-2" service) opened.
Host 172.16.0.2, Port 110  ("pop-3" service) opened.
Host 172.16.0.2, Port 111  ("sunrpc" service) opened.
Host 172.16.0.2, Port 113  ("auth" service) opened.
Host 172.16.0.2, Port 143  ("imap2" service) opened.
Host 172.16.0.2, Port 512  ("exec" service) opened.
Host 172.16.0.2, Port 513  ("login" service) opened.
Host 172.16.0.2, Port 514  ("shell" service) opened.
Host 172.16.0.2, Port 540  ("uucp" service) opened.
Host 172.16.0.2, Port 624 opened.
ISS identified available services on various ports, ranging from 7 to 624. Meanwhile, on the victim side, Linux logged some of this activity (ISS network connections) in /var/log/ messages:
MMay 23 16:53:16 linux2 syslog: error: cannot execute /usr/sbin/gn: No such file or directory

May 23 16:53:16 linux2 telnetd[683]: ttloop:  peer died: Success
May 23 16:53:16 linux2 syslog: error: cannot execute /usr/sbin/ipop3d: No such file or directory

May 23 16:53:16 linux2 syslog: error: cannot execute /usr/sbin/ipop2d: No such file or directory
May 23 16:53:16 linux2 syslog: error: cannot execute /usr/sbin/imapd: No such file or directory
May 23 16:53:17 linux2 ftpd[682]: FTP session closed
May 23 16:53:17 linux2 in.rexecd[691]: connect from gnss
May 23 16:53:17 linux2 syslog: error: cannot execute /usr/sbin/uucico: No such file or directory
From this, you can see that ISS made several connections and performed diagnostic tests, but to really grasp the process, you need to look closer.
In the source, Klaus describes each function's purpose. Some examples:
do_log(s)—Here, ISS records the telnet session between the scanning and target host and tries a login with the usernamesync. Here's why:syncis a default login on legacy SunOS and other UNIX systems.syncwon't get you inside via telnet, but often, servers that support thesyncuser will allow FTP logins under that name. From there, an attacker might be able to steal password files.domainguess()—Here, ISS tries to guess the target's NIS domain name. This is an attack on the yellow pages (yp) system.ypservwill provide network maps to anyone who can guess the NIS domain name. With this information, crackers can penetrate your system. For comprehensive coverage of how these attacks are performed, see Improving the Security of Your Site by Breaking Into It, by Dan Farmer and Wietse Venema. Find it at http://www.securit.net/breakin.html.checksmtp()—Here, ISS engagessendmail(port 25) and tries various options. At one point, it sends the stringsdebugandwiz, trying to exploit oldsendmailvulnerabilities. (Thedebughole reaches back to the Internet Worm incident. Earlier you saw COPS detect this as a possible problem on the IRIX system.) Check out those holes at http://www.nai.com/products/security/ballista/interface/modules/modules5000.html.checkftp()—Here, ISS tries FTP to see if it can make or remove directories. (Writeable anonymous FTP directories are generally a no-no. See Chapter 11, "FTP Security," for more information.)
So, ISS identifies running services and tests them for known security vulnerabilities that can be exploited remotely. These are staple functions of a network security scanner.
Now, let's expand our view and look at the scanner process in more generic terms. This will help you understand scanner development over the years and how scanners are constructed so you can use them effectively and perhaps write your own.
Although system and network scanners differ from a technical standpoint, they share some common characteristics. Of these, the most fundamental is their logical process. Most follow this pattern:
For example, many system scanners follow a flow pattern like the one depicted in Figure 8.1.

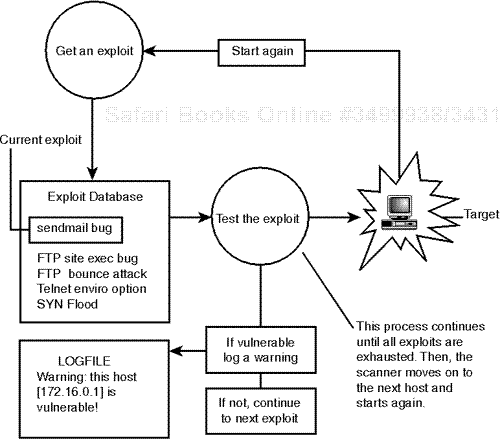
Likewise, many network scanners follow a flow pattern like the one depicted in Figure 8.2.
Rules or exploits can be just about anything. Examples that you've already seen (with COPS and ISS) include tests for valid permissions, password file structure, programs known to have various bugs, open services, default logins, and so on.
COPS and ISS merely marked the beginning of a new era in security assessments, though. Today, many scanners are more complex, more flexible, and, in certain cases, more extensible. As new exploits emerge, some scanner developers incorporate them into their tools. This evolving process has produced scanners that test for hundreds of security vulnerabilities.
In recent years, scanner development patterns have followed market and usage trends. Whereas early scanners addressed UNIX hosts almost exclusively, modern scanners can assess heterogeneous environments. It's common to find tools (like Nessus, discussed later) that evaluate Windows 95, Windows NT, and UNIX hosts in a single pass. (Some include Novell NetWare in their assessment regimen as well.)
Finally, because system and network vulnerabilities vary, and because different users are concerned with different aspects of security, many different kinds of scanners exist. Some are specialized and test only certain services, while others test well-known services but add new reporting functionality. For example, one scanner may find open services, while another might find the UIDs that own these processes.
This transition from simple scanners to advanced host assessment tools can be traced to a specific date: April 5, 1995, the day that SATAN was unleashed on the Internet. Let's briefly look at SATAN now.
Application: SATAN by Dan Farmer (April 1995)
Required: C, IP header files, BSD 4.4-compatible netinfo include files, and the tcp_scan.c diff patch for Linux (see below)
Config Files: config/satan.cf, paths.pl
Location: http://www.fish.com/satan/
Security History: SATAN had two significant security incidents: one in 1995, the other in 1998. In 1995, a Temple University student trojaned precompiled SATAN 1.0 binaries. (The student altered fping.c to place a backdoor in host systems.) In 1998, Marc Heuse found a race condition in bin/rex.satan. Go here for details on patching that hole: http://geek-girl.com/bugtraq/1998_2/0608.html.
Notes: Although SATAN is now old news, presented here to demonstrate scanner evolution, it remains an interesting and useful learning tool.
SATAN marked a turning point in scanner development. By 1995, the various available network scanners still performed relatively simple tasks. Security folks wanted more, and with SATAN, they got it. SATAN was the first point-and-click scanner that integrated several system probes.
SATAN's release was attended by substantial publicity. I remember a local evening news broadcast featuring Dan Farmer at his workstation, running the new tool. This struck me because in those days, the Internet received meager media coverage.
News of SATAN's impending arrival generated a lively public response. Many security organizations expressed concerns that SATAN's release would result in widespread network attacks. This prompted the Defense Data Network (at DISA) to issue the following advisory:
SATAN is a tool for remotely probing and identifying the vulnerabilities of systems on IP networks. Each IP address for a given subdomain is systematically scanned for security weaknesses, which if found are then identified and logged for each system. SATAN has been widely publicized in the national media and on various Internet forums. The software is scheduled to be released 5 April 95, 14:00 GMT, and will be freely available to anyone on the Internet… It will be extremely important for DoD [Department of Defense] system administrators and network security personnel to make sure the vulnerabilities SATAN scans for have been eliminated from their systems.
(From Security Administrator Tool for Analyzing Networks, (SATAN), DDN Security Bulletin 9514, April 5, 1995. Find it at http://www.tao.ca/thunder/Zines/Sec/sec-9514.txt.)
The hype soon fizzled, though. In the end, SATAN didn't destabilize Internet security worldwide, as many journalists insisted it would. Instead, despite a respectable showing of SATAN-driven crack attacks, SATAN strengthened Internet security by heightening awareness.
SATAN consists of numerous scanning modules that probe remote hosts for weaknesses in the following areas:
File Transfer Protocol (FTP)
Network File System (NFS) exported file systems
Network Information Service (NIS) passwords
Remote shell (rsh) access
Rexd access
sendmailvulnerabilitiesTrivial File Transfer Protocol (TFTP) vulnerabilities
X server security and access control
These scanning modules (written in C) assess the target and report results to a centralized database. From there, Perl scripts capture this information and display it in your Web browser.
Note
You can also run SATAN from a command line. (See SATAN's documentation.) However, SATAN's extensive reporting is not available from a shell prompt.
Farmer wrote SATAN for long-established UNIX flavors (SunOS, Solaris, BSD, and IRIX), but made no specific provisions for Linux. Therefore, SATAN does not run on Linux out of the box. Let's quickly cover how to get SATAN running on Linux.
To run SATAN on Linux, you'll need two additional components:
A Linux patch for
satan-1.1.1./src/port_scan/tcp_scan.c. Get it at http://recycle.jlab.org/~doolitt/satan/tcp_scan.diff2.BSD 4.4 include files for
satan-1.1.1/include/netinet. Get them at http://recycle.jlab.org:80/~doolitt/satan/BSD-4.4-includes.tar.gz.
After downloading these files, you're ready to begin. First, unpack and un-tar the SATAN archive to satan-1.1.1/, like this:
$ gunzip satan-1.1.1.tar.gz
$ tar -xvf satan-1.1.1.tar
Next, you'll need to update tcp_scan.c. (This will add important, Linux-specific changes without which SATAN will not run.) To do so, copy tcp_scan.diff2 to satan-1.1.1/ src/port_scan and issue the following command:
$ patch src/port_scan/tcp_scan.c src/port_scan/tcp_scan.diff2
Next, you'll need to install the BSD-style include files in satan-1.1.1/include/netinet. To do so, unpack the libraries:
$ guznip BSD-4.4-includes.tar.gz
$ tar -xvf BSD-4.4-includes.tar
Note
Note that for the BSD-style include files to automatically unpack into the correct directory, you must un-tar them from satan-1.1.1/. If you don't, you'll need to create that directory (mkdir satan-1.1.1/include; mkdir satan-1.1.1/include/netinet) and copy the files over manually (cp /some-directory/include/netinet/* satan-1.1.1/include/netinet).
If you're not running DNS, you'll need to edit config/satan.cf and change line 125 from this:
$dont_use_nslookup=0;
to this:
$dont_use_nslookup=1;
Next, open satan-1.1.1/config/paths.pl and change the $MOSAIC variable to reflect your Web browser's correct location. (If you don't, SATAN will be unable to find your browser and exit on error at startup.) To specify your browser, edit line 10, which by default is
$MOSAIC="/usr/exp/bin/netscape";
Finally, run the perl script reconfig in satan-1.1.1/:
$ perl reconfig
Now you're ready to make and run SATAN.
To make the SATAN package, issue the following command:
$ make linux
Several messages will scroll by during the make (which should take only a minute or so). After verifying that the make went smoothly, start X, open an xterm, and, while still in satan-1.1.1/, issue the following command:
$ satan
In response, SATAN will display this message:
SATAN is starting up.
After a few moments, your Web browser will appear with the SATAN Control Panel as its home page. Please see Figure 8.3.

Note
If you run SATAN with Netscape Navigator or Communicator, you may find that SATAN's links don't lead anywhere. (That is, when you click on them, Communicator prompts you with a Save File As dialog box.) To remedy this, place your mouse over the menu bar and click Edit, Preferences, Navigator, Applications. Once there, scroll the Helper Applications list down to Perl. You'll see that Perl applications are assigned a *.PL extension. Delete this entry, shut down the browser, and restart SATAN. Afterward, links will work just fine.
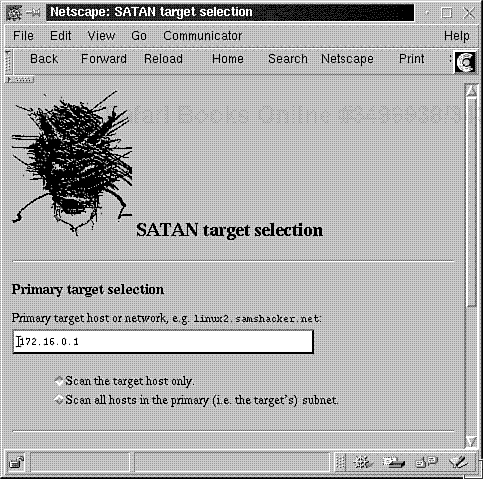
To scan your host, choose SATAN Target Selection. In response, SATAN will load the Target Selection screen (and probably fill in the target field with your current host's IP or hostname). Please see Figure 8.4.
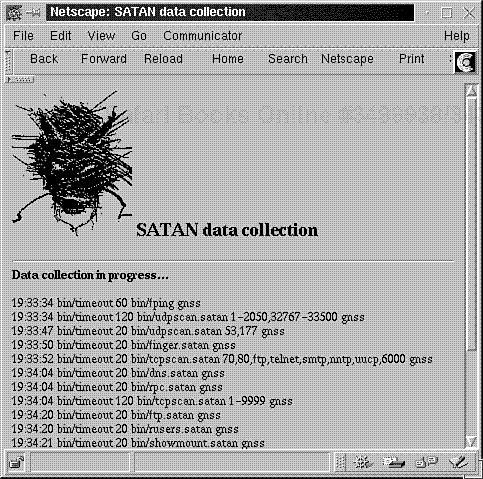
If SATAN did not automatically fill in your host's address, do so now. Choose Scan the target host only, specify a heavy scan, and choose Start the Scan. SATAN will launch the scan with the parameters you've chosen and drop into data collection mode. Please see Figure 8.5.
This phase may take several minutes as SATAN scans UDP, TCP, finger, FTP, DNS, and other services. After the scan completes, scroll to the bottom of the page and choose Continue with report and analysis. This will bring you to SATAN's Reporting and Analysis page. Please see Figure 8.6.

On the Reporting and Analysis page, SATAN offers several reports that can be sorted in various ways. For example:
On your first scan, you should view vulnerabilities by severity. To do so, choose By Approximate Danger Level. In response, SATAN will load the Vulnerabilities – Danger Levels screen. Here, under Table of Contents, SATAN lists vulnerabilities it has found. Please see Figure 8.7.
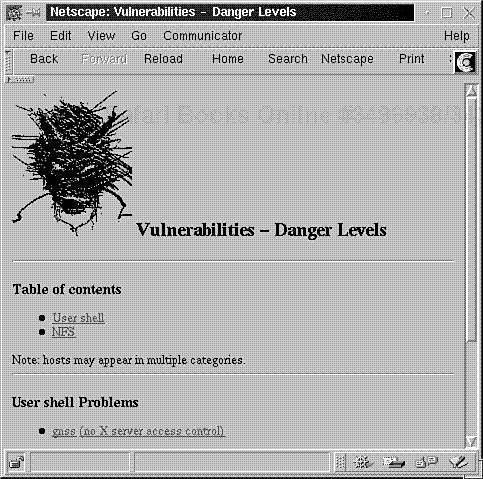
In the sample scan, SATAN found two vulnerabilities:
No X server access control.
A possible NFS hole.
This next bit is where SATAN truly differs from its predecessors. When you click on a vulnerability, SATAN loads a tutorial that describes the weakness, its impact, and how to fix it. Please see Figure 8.8.

This new functionality made SATAN exceedingly popular. And, because SATAN's reporting output could be easily manipulated, for the first time it was possible to evaluate exceptionally large networks and still keep data manageable.
To see a good example of this, see Flirting with SATAN by Nancy Cook and Marie Corbin. Cook and Corbin used SATAN to assess some 14,000 hosts in 11 Class B networks, reporting an average assessment time of four days per 2,000 hosts. By performing periodic SATAN scans, they reduced vulnerabilities in their host base until only 4% of all machines had SATAN-detectable weaknesses. (Those remaining hosts harbored low-risk weaknesses arising from necessary evils like exported write-only file systems.) Check out Flirting with SATAN at http://www.fish.com/security/auditing_course/nancy_cook.ps.
SATAN raised the bar and inspired many later scanners, some commercial, some not. In a moment, we'll unpack, install, and use a few of these and interpret their output. For now, let's quickly address how scanners fit into your security regimen.
Scanners are essential security tools that can save you many hours of work. Network scanners, in particular, cover substantial ground in short time periods, as evidenced by the Cook and Corbin paper. However, scanners are not end-all security solutions. Instead, they offer a shotgun-blast approach, suitable as a first step in evaluating your host or network. For example, in the COPS documentation, Farmer wrote that whenever he was on a new machine, he'd download COPS and run it.
Use scanners to get a system baseline, and be sure to compare that baseline to later scan results. In this way, you can automate your security assessment's first layer and ensure that new hosts you add also meet your baseline requirements.
On a Linux network, try running scans every 30 days. You'd be surprised how much can change in a multiuser environment even in that short time.
Also, you may see some benefit in using several different scanners. Even though scanners are now exceptionally advanced, no single scanner offers absolutely every test.
The following section focuses on various scanners.
Application: SAINT by World Wide Digital Security, Inc.
Required: C, IP header files, BSD 4.4-compatible netinfo include files, and the tcp_scan.c diff patch for Linux (see below)
Config Files: config/saint.cf, paths.pl
Location: http://www.wwdsi.com/saint/
Security History: SAINT has not had any security issues.
Notes: Compilation problems (related to glibc2.1) plagued SAINT on Red Hat 6.0 and OpenLinux 2.2, but the authors have since corrected this. If you obtain a recent release, you shouldn't have a problem. If you experience other problems when building SAINT, contact the authors or visit the SAINT Bulletin Board at http://www.wwdsi.com/cgi-bin/ubb/Ultimate.cgi.
SAINT is WDDSI's updated, much-enhanced version of SATAN and includes support for many recent vulnerabilities, including
CGI-based Web attacks
Denial-of-service attacks
POP server attacks
SSH vulnerabilities
Remote buffer overflows
To install SAINT, perform all the tasks enumerated for SATAN. The chief difference is that files and directories that previously included satan in their names now include saint instead:
Note
WDDSI also offers WebSAINT, a more user-friendly Web-enabled scanner that generates graphical Java-based network statistics. It's intended for less technically oriented users who don't have the time or inclination to fiddle with SAINT configuration. WebSAINT uses SSL to encrypt your data transmissions and is reportedly quite safe.
SAINT is a good free alternative to commercial-grade scanners like xiss (discussed later in this chapter).
Application: ISS 5.3.1 from Internet Security Systems, Inc.
Required: C and IP header files
Config Files: None.
Location: http://iss.net
Security History: ISS has no significant security history.
Notes: Although ISS provides a scan-localhost-only version for evaluation, this is a commercial product.
ISS 5.3.1 is the latest incarnation of Christopher Klaus' original tool. This modern version sports an intuitive X interface and many new attack modules, including support for DoS attacks like log floods, SYN floods, time bombs, packet storms, and so forth. All in all, ISS 5.3.1 is a very complete scanner solution.
After downloading ISS, extract the iss-Linux.tar archive like this:
$tar -xvf iss-Linux.tar
ISS will unpack into iss/, which should contain the following files and directories:
dr-xr-xr-x   4 root     daemon       1024 Mar 11 11:30 X11/
dr-xr-xr-x   2 root     daemon       1024 May 25 12:03 bin/
dr-xr-xr-x   2 root     daemon       1024 May 25 12:03 config/
dr-xr-xr-x   4 root     daemon       1024 May 25 12:03 doc/
-rw-r--r--   1 root     root          459 May 25 12:03 env.csh.ex
-rw-r--r--   1 root     root          491 May 25 12:03 env.sh.ex
-rwxr-xr-x   1 root     root        17421 Feb 22 13:53 install.iss*
dr-xr-xr-x  28 root     daemon       2048 Mar 11 11:29 lib/
drwxr-xr-x   2 root     root         1024 May 25 12:03 reports/
drwxr-xr-x   2 root     root         1024 May 25 12:03 scans/
-rw-r--r--   1 root     root           12 Mar  9 09:33 version
Before using ISS, first specify your browser. (Help is in HTML format.) To do so, change your working directory to iss/config and edit default.cfg. You'll find the browser setting on line 26:
Output:               iss.log
Keyfile:              iss.key
WebBrowser:           /usr/local/bin/netscape
UDPEchoTest:          off
CheckFingerBomb:      off
Next, start X, open an xterm, and launch ISS like this:
$ iss/bin/xiss
xiss will briefly display a splash screen and load the xiss main console. Please see Figure 8.9.

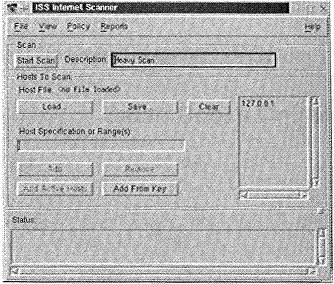
xiss offers several different scan levels—light, medium, and heavy. To test your own host, I recommend a heavy scan. To load the heavy scan policy, choose Policy, Load from the main menu. In response, xiss will display a dialog box containing various policy files. Please see Figure 8.10.

Choose the file issheavy.config. If you made the correct choice, the main console will now reflect that xiss is set for a heavy scan. Please see Figure 8.11.
From here, choose Start Scan. In response, xiss will prompt you with a directory suffix. Please see Figure 8.12.
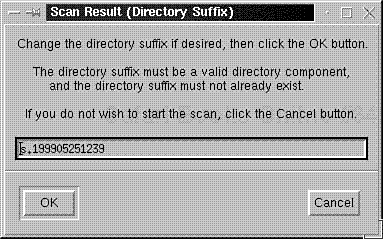
If you want to change the directory suffix, do so now. Otherwise, click OK and wait. xiss will now scan your system.
The first thing you may notice is that xiss will seize a vulnerability in X and use it to change your desktop background image. Please see Figure 8.13.

When xiss finishes, change to the scans directory. There, you'll find the directory housing your scan results. Here are the contents of my iss/scans directory:
drwxr-xr-x 3 root root 1024 May 25 12:52 s.199905251241
The directory s.199905251241/ holds the following files:
drwxr-xr-x   2 root     root         1024 May 25 12:43 files
-rw-r--r--   1 root     root          730 May 25 12:52 iss.ban.csv
-rw-r--r--   1 root     root         7449 May 25 12:41 iss.cfg.csv
-rw-r--r--   1 root     root          703 May 25 12:52 iss.dmp.csv
-rw-------   1 root     root         4052 May 25 12:52 iss.err
-rw-r--r--   1 root     root           39 May 25 12:52 iss.hst.csv
-rw-r--r--   1 root     root          205 May 25 12:52 iss.job.csv
-rw-r--r--   1 root     root        30306 May 25 12:52 iss.log
-rw-r--r--   1 root     root          959 May 25 12:52 iss.srv.csv
-rw-r--r--   1 root     root         1617 May 25 12:52 iss.stat
-rw-r--r--   1 root     root          170 May 25 12:52 iss.usr.csv
-rw-r--r--   1 root     root          991 May 25 12:52 iss.vul.csv
From these, xiss will generate a report (although you can also manipulate their data manually). To generate a report, choose Reports, Generate Reports from the main menu. In response, xiss will display the Report Settings window. Please see Figure 8.14.

Valid output options are text, HTML, and export, and xiss allows you to sort results in several ways. I recommend sorting by severity. To view the xiss report, choose Reports, View Existing Reports. In response, xiss will display the scan's result. Please see Figure 8.15.

Here, xiss reports and explains each vulnerability and describes a fix. The tutorial text isn't quite as comprehensive as SATAN's, but xiss is quick, accurate, and suitable for wide, utilitarian assessments.
xiss also checks for many things that other scanners don't. For example, in the sample scan, xiss determined that linux2 had mail relaying enabled. While this is not a critical issue, relaying should be disabled.
Note
Mail relaying is where your mail server provides third-party mail transport. Hence, [email protected] can use yourmailserver.com to send messages to [email protected]. This is highly undesirable because bozos can use your host to spam or forge mail. Unless you're running an ISP where customers absolutely need relay support (a rarity), you should always disable this feature.
xiss is an excellent choice if you have a budget for it and need industrial-strength scanning.
Application: Nessus by Renaud Deraison
Required: C, IP header files, GTK
Config Files: See documentation.
Location: http://www.nessus.org/
Security History: Nessus has had no security issues.
Notes: None.
Nessus is an extremely versatile and up-to-date free scanner. Written by Renaud Deraison (who was just 18 at Nessus' first release), Nessus is constantly evolving. So much so that Deraison established a CVS server that distributes daily or even hourly changes.
Note
CVS stands for Concurrent Versions System, a project-development tool that allows programmers to share source code at various stages of development. Each programmer can store his changes in a separate directory, but CVS also provides a common repository from which stable versions can be retrieved by all. CVS therefore makes it possible for participants to grab the latest changes just moments after they've been committed.
Nessus currently runs on Linux, Windows NT, and various flavors of UNIX, and is, like SATAN, very much a toolkit scanner.
Nessus support for various attacks comes through plug-ins. These are small modules that define rules and reporting procedures for various attacks. Currently, Nessus has some 209 attack plug-ins. To manage these plug-ins, Deraison created a special Application Programming Interface (API). Using this system, it's possible to take any new attack or exploit and plug it into Nessus.
Note
To see an up-to-the-minute list of all vulnerabilities Nessus checks for, go to http:// cvs.nessus.org/plugins_list.html.
Nessus also shares other characteristics with SATAN, SAINT, and ISS. One is the luxury of an attractive, intuitive graphical user interface (GUI). More importantly, though, Nessus provides tutorials and explanations for each vulnerability it finds.
Application: nmap by Fyodor
Required: C/IP header files, lex, and yacc
Config Files: N/A
Location: http://www.insecure.org/nmap/
Security History: nmap has no significant security history.
Notes: Fyodor includes a comprehensive document (doc/nmap_doc.html) that describes various port scanning techniques in detail.
After downloading nmap, unzip and un-tar the archive. nmap will expand to nmap-2.12/, which should contain the following files:
-rw-------    1 500      500         5554 Apr  4 13:04 CHANGELOG
-rw-r--r--    1 500      500        18485 Aug 23  1998 COPYING
-rw-r--r--    1 500      500          476 Dec  5 10:16 INSTALL
-rw-------    1 500      500         4166 Apr  3 18:31 Makefile.in
-rw-------    1 500      500         1787 Mar 31 01:06 charpool.c
-rw-------    1 500      500          143 Feb  7 08:41 charpool.h
-rwxr-xr-x    1 500      500        20370 Aug 23  1998 config.guess
-rw-------    1 500      500          807 Feb  5 18:46 config.h.in
-rwxr-xr-x    1 500      500        19236 Aug 23  1998 config.sub
-rwx------    1 500      500        73404 Apr  4 13:04 configure
-rw-------    1 500      500         9453 Feb  7 16:52 configure.in
drwx------    2 500      500         4096 Jun  1 00:01 docs
-rw-r--r--    1 500      500          412 Sep 27  1998 error.c
-rw-r--r--    1 500      500          194 Oct  7  1998 error.h
-rw-------    1 500      500         4418 Mar 21 16:09 global_structures.h
-rw-r--r--    1 500      500         2404 Aug 23  1998 inet_aton.c
-rwxr-xr-x    1 500      500         5585 Aug 23  1998 install-sh
drwxr-xr-x    6 500      500         4096 Jun  1 00:01 libpcap-possiblymodified
-rw-------    1 500      500         2788 Apr  4 13:05 nmap-2.12-1.spec
-rw-------    1 500      500       120702 Apr  3 00:24 nmap-os-fingerprints
-rw-------    1 500      500        90073 Mar 21 16:31 nmap-services
-rw-------    1 500      500       110834 Apr  3 23:33 nmap.c
-rw-r--r--    1 500      500         9756 Feb  7 16:54 nmap.h
-rw-r--r--    1 root     sys            0 Jun  1 00:01 nmapdir.txt
-rw-------    1 500      500        37050 Apr  3 23:45 osscan.c
-rw-r--r--    1 500      500         1301 Apr  3 21:32 osscan.h
-rw-------    1 500      500         5207 Feb  7 19:28 services.c
-rw-------    1 500      500          472 Feb  7 10:48 services.h
-rw-------    1 500      500          934 Apr  3 23:21 snprintf.c
-rw-------    1 500      500        35814 Apr  3 23:45 targets.c
-rw-------    1 500      500         1807 Nov 22  1998 targets.h
-rw-------    1 500      500        32395 Mar 21 16:58 tcpip.c
-rw-r--r--    1 500      500         9429 Mar 20 19:09 tcpip.h
-rw-------    1 500      500         5355 Apr  3 23:11 utils.c
-rw-------    1 500      500         1538 Apr  3 21:43 utils.h
To install nmap, first run the configure script:
$./configure
Then run make (and optionally make install):
$ make
From here, you're ready to run nmap.
nmap has many, many features, including sequence number prediction, remote host operating system identification, stealth scanning, and so forth. Here's output from a simple scan:
Starting nmap V. 2.12 by Fyodor ([email protected], www.insecure.org/nmap/)
Host  (172.16.0.1) appears to be up … good.
Initiating TCP connect() scan against  (172.16.0.1)
Adding TCP port 5232 (state Open).
Adding TCP port 21 (state Open).
Adding TCP port 23 (state Open).
Adding TCP port 1 (state Open).
Adding TCP port 9 (state Open).
Adding TCP port 37 (state Open).
Adding TCP port 13 (state Open).
Adding TCP port 6000 (state Open).
Adding TCP port 79 (state Open).
Adding TCP port 789 (state Open).
Adding TCP port 139 (state Open).
Adding TCP port 805 (state Open).
Adding TCP port 1032 (state Open).
Adding TCP port 969 (state Open).
Adding TCP port 514 (state Open).
Adding TCP port 88 (state Open).
Adding TCP port 1024 (state Open).
Adding TCP port 80 (state Open).
Adding TCP port 25 (state Open).
Adding TCP port 19 (state Open).
Adding TCP port 512 (state Open).
Adding TCP port 513 (state Open).
Adding TCP port 515 (state Open).
Adding TCP port 111 (state Open).
Adding TCP port 7 (state Open).
The TCP connect scan took 1 seconds to scan 1483 ports.
For OSScan assuming that port 1 is open and port 43832 is closed and neither are firewalled
Interesting ports on  (172.16.0.1):
Port    State       Protocol  Service
1       open        tcp        tcpmux
7       open        tcp        echo
9       open        tcp        discard
13      open        tcp        daytime
19      open        tcp        chargen
21      open        tcp        ftp
23      open        tcp        telnet
25      open        tcp        smtp
37      open        tcp        time
79      open        tcp        finger
80      open        tcp        http
88      open        tcp        kerberos-sec
111     open        tcp        sunrpc
139     open        tcp        netbios-ssn
512     open        tcp        exec
513     open        tcp        login
514     open        tcp        shell
515     open        tcp        printer
789     open        tcp        unknown
805     open        tcp        unknown
969     open        tcp        unknown
1024    open        tcp        unknown
1032    open        tcp        iad3
5232    open        tcp        sgi-dgl
6000    open        tcp        X11

TCP Sequence Prediction: Class=64K rule
                         Difficulty=1 (Trivial joke)

Sequence numbers: 10CEBC00 10CFB600 10D2A400 10D39E00 10D49800 10D59200
Remote operating system guess: IRIX 6.2 - 6.5
OS Fingerprint:
TSeq(Class=64K)
T1(Resp=Y%DF=N%W=EF2A%ACK=S++%Flags=AS%Ops=MNWNNT)
T2(Resp=Y%DF=N%W=0%ACK=S%Flags=AR%Ops=)
T3(Resp=Y%DF=N%W=EF2A%ACK=O%Flags=A%Ops=NNT)
T4(Resp=Y%DF=N%W=0%ACK=O%Flags=R%Ops=)
T5(Resp=Y%DF=N%W=0%ACK=S++%Flags=AR%Ops=)
T6(Resp=Y%DF=N%W=0%ACK=O%Flags=R%Ops=)
T7(Resp=Y%DF=N%W=0%ACK=S%Flags=AR%Ops=)
PU(Resp=Y%DF=N%TOS=0%IPLEN=38%RIPTL=148%RID=E%RIPCK= E%UCK=E%ULEN=134%DAT=E)
Nmap run completed -- 1 IP address (1 host up) scanned in 1 second
nmap identified open services and ports and accurately guessed the operating system release. This remote OS detection feature is extensible, too. You can add new operating system fingerprints for future scans. (Check the documentation for more information.)
Table 8.1 lists some important nmap command-line options.
Table 8.1. Various nmap Command-Line Options
| Option | Purpose |
|---|---|
-b | Use this option to add FTP bounce attack capability to the scan. |
-e [interface] | Use this option to specify a specific interface. |
-f | Use this option to send tiny fragmented packets during the scan. |
-F | Use this option to specify a quick scan that checks for standard services (those in /etc/services). |
-g | Use this option to set the scan's source port. |
-i [file] | Use this option to have nmap read IP addresses from a file. |
-I | Use this option to pull identd data from targets (if such information is available). |
-n | Use this option to disable DNS lookups. |
-o [outfile] | Use this option to specify your outfile. |
-p [ports] | Use this option to specify ports. You can express this either by range ([21-1024]) or in delimited format ([21,23,25]). |
-P0 | Use this option to turn off host pings. |
-PB | Use this option to force both TCP and ICMP scans simultaneously. |
-PI | Use this option to specify ICMP pinging. |
-PT[port] | Use this option to specify TCP pinging. |
-sF | Use this option to run a stealth FIN scan. This is for scanning hosts behind a firewall and will elude scan detectors like courtney and synlogger. |
-sS | Use this option to run a stealth port scan. |
-sT | Use this option to specify a TCP connect()port scan. |
-sU | Use this option to specify a UDP port scan. |
-v | Use this option to enable verbose mode. |
Application: CGI scanner v1.0 by CKS, Fdisk, m0dify, su1d sh3ll
Required: C/IP header files
Config Files: N/A
Location: http://www.hackersclub.com/km/files/c_scripts/cgichk-11b.c
Security History: CGI scanner v1.0 has no significant security history.
Notes: None.
CGI scanner v1.0 is a quick-and-dirty way to scan remote Web hosts (UNIX and NT) for well-known CGI-related files that harbor security vulnerabilities. Some examples:
/_vti_pvt/authors.pwd
/_vti_pvt/service.pwd
/_vti_pvt/users.pwd
/cgi-bin/aglimpse
/cgi-bin/AT-admin.cgi
/cgi-bin/campas
/cgi-bin/Count.cgi
/cgi-bin/faxsurvey
/cgi-bin/filemail.pl
/cgi-bin/handler
/cgi-bin/htmlscript
/cgi-bin/info2www
/cgi-bin/jj
/cgi-bin/maillist.pl
/cgi-bin/man.sh
/cgi-bin/nph-test-cgi
/cgi-bin/perl.exe
/cgi-bin/pfdispaly.cgi
/cgi-bin/phf
/cgi-bin/php.cgi
/cgi-bin/test-cgi
/cgi-bin/UnlG1.1
/cgi-bin/view-source
/cgi-bin/webdist.cgi
/cgi-bin/webgais
/cgi-bin/websendmail
/cgi-bin/wwwboard.pl
/cgi-bin/www-sql
/cgi-dos/args.bat
/cgi-win/uploader.exe
After downloading CGI scanner v1.0, compile it:
$ cc cgichk-11b.c -o cgichk
And run it:
$ cgichk
Here's a sample scan from linux2 to GNSS:
[CKS & Fdisk]'s CGI Checker - modify by su1d sh3ll 11.03.99
[ Press any key to check out the httpd version…… ]
HTTP/1.0 200 Document follows
Date: Tue, 01 Jun 1999 09:44:14 GMT
Server: NCSA/1.4.1
Content-type: text/html
[ Press any key to search 4 CGI stuff…… ]
Searching for UnlG - backd00r : Not Found
Searching for phf             : Not Found
Searching for Count.cgi       : Not Found
Searching for test-cgi        : Not Found
Searching for nph-test-cgi    : Not Found
Searching for php.cgi         : Not Found
Searching for handler         : Found !! ;)
Searching for webgais         : Not Found
Searching for websendmail     : Not Found
Searching for webdist.cgi     : Found !! ;)
Searching for faxsurvey       : Not Found
Searching for htmlscript      : Not Found
Searching for pfdisplay       : Not Found
Searching for perl.exe        : Not Found
Searching for wwwboard.pl     : Not Found
Searching for www-sql         : Not Found
Searching for view-source     : Not Found
Searching for campas          : Not Found
Searching for aglimpse        : Not Found
Searching for man.sh          : Not Found
Searching for AT-admin.cgi    : Not Found
Searching for filemail.pl     : Not Found
Searching for maillist.pl     : Not Found
Searching for jj              : Not Found
Searching for info2www        : Not Found
Searching for service.pwd     : Not Found
Searching for users.pwd       : Not Found
Searching for authors.pwd     : Not Found
Searching for args.bat        : Not Found
Searching for uploader.exe    : Not Found
…have a nice hack… ;-)
Here, CGI scanner found two vulnerabilities common to IRIX:
The
cgi-bin/handlerscript allows local and remote users to execute arbitrary commands with the privileges of thehttpddaemon.The
webdist.cgicgi-binprogram allows local and remote users to execute arbitrary commands with the privileges of thehttpddaemon.
CGI scanner is suitable for checking new Web server installations for obvious default holes that often get missed.
You can quickly add new test procedures to CGI Scanner by adding the offending files. For example, suppose there was a new vulnerable test script called /cgi-bin/variables.cgi. Add this to the CGI Scanner source in both the buff and cginame arrays, like this:
buff[27] = "GET /_vti_pvt/users.pwd HTTP/1.0

";
buff[28] = "GET /_vti_pvt/authors.pwd HTTP/1.0

";
buff[29] = "GET /cgi-dos/args.bat HTTP/1.0

";
buff[30] = "GET /cgi-win/uploader.exe HTTP/1.0

";
buff[31] = "GET /cgi-bin/variables.cgi HTTP/1.0

";
and this:
cginame[26] = "service.pwd";
cginame[27] = "users.pwd";
cginame[28] = "authors.pwd";
cginame[29] = "args.bat";
cginame[30] = "uploader.exe";
cginame[31] = "variables.cgi";
Then recompile CGI Scanner. It will now scan for (and report on) the new file (variables.cgi).
Beyond these tools, there are other, more specialized scanners with varying purposes and functionality. Table 8.2 lists a few.
Table 8.2. Other Interesting Scanners
| Scanner | Description and Location |
|---|---|
checkXusers | Checks for users currently logged from insecure X servers. It needs netstat in the path, and you should run it from an ordinary account. Location: ftp://coast.cs.purdue.edu/pub/tools/unix/checkXusers.Z. |
Connect | Recursively checks machines for a tftp server. This tool is useful for ascertaining whether your network harbors any vulnerabilities via tftp. Location: http://www.giga.or.at/pub/hacker/unix/connect.tar.gz. |
dnswalk | A DNS debugger that scans DNS records for suspicious or inconsistent entries. It's a good way to keep your DNS clean and up-to-date, and is similar in some respects to dns_lint. To use it, you need Perl 5.003 or better and the Net::DNS and IO::Socket modules from CPAN at http://www.cpan.org. Location: http://www.cis.ohio-state.edu/~barr/dnswalk/. |
DOC | Domain Obscenity Control, a DNS debugging tool. It diagnoses misconfigured domains and attempts to reconcile errant records by querying the appropriate nameservers. Requires awk (gawk). Location: ftp://coast.cs.purdue.edu/pub/tools/unix/doc.2.0.tar.Z. |
exscan | A port scanner that offers remote operating system detection, banner capture, and a small compliment of intelligence-gathering functions for HTTP, telnet, FTP, etc. Location: http://exscan.netpedia.net/exscan.html. |
getethers | Scans the LAN, pings each workstation, and records its Ethernet address. Location: http://ftp.unicamp.br/pub/unix-c/networks/getethers.tar.gz. |
IdentTCPscan | Will attempt to get the UID of running processes. This is useful when you have a large network and want to assess whether any workstations are running httpd root or, if NCSA, nobody. Location: http://www.giga.or.at/pub/hacker/unix/identTCPscan.c.gz. |
jakal | A stealth scanner that leaves little or no footprint behind in logs. It scans hosts behind firewalls by using half-open, not fully negotiated connections. Location: http://bob.urs2.net/computer_security/152cscripts/jakal.c. |
mdmrst.c | An annoying little tool that can reset a target's modem over the Internet. It works by sending special modem control characters (+++AZH0) via ICMP_ECHO_REQUEST transmissions. The result is that the target's modem will break the connection. (This tool is generally used in conjunction with intelligence gathered from war dialers, where the attack knows the target has an available modem.) Location: http://www.sekurity-net.com/newfiles/mdmrst.c. |
portscan | A quick-and-dirty port scanner that catches all open TCP ports (and UDP, too, with a little tweaking). Location: http://www.giga.or.at/pub/hacker/unix/portscan.c. |
| Proxy Port Scanner | Provides anonymous scanning via proxies. While not quite clean (the proxy's address is recorded in logs on the target), this tool will complicate a system administrator's investigation. Useful, perhaps, when you're conducting some security audits. Location: http://www.sekurity-net.com/newfiles/ppscan.c. |
QueSo | A remote operating system detection scanner. The developers routinely add new operating system fingerprints. Check it out at http://www.apostols.org. |
rhosts.dodgy | Checks rhosts files system-wide for possible configuration problems. The tool is more complex than you'd think, going far beyond simple lexical analysis. It also makes forward/reverse lookups on hosts and identifies unknown or suspicious hosts, anomalies in usernames, and all the standard checks for + and * in rhosts. Requires Perl. Location: http://gopher.metronet.com:70/0/perlinfo/scripts/admin/rhosts.dodgy.pl. |
sl0scan | A Perl-based scanner that offers source spoofing and forging (used by crackers to obscure their location). There are various forging options, including those in which you explicitly specify the address or use random generation. sl0scan also allows you to specify where in the random sequence the real scan will occur. Location: http://www2.merton.ox.ac.uk/~security/bugtraq-199902/0173.html. |
spoofscan | spoofscan offers an interesting twist: It spoofs the scan's source address. (spoofscan is also mentioned in Chapter 9, "Spoofing.") Find it at http://24.92.91.91/Members/pROcon/exploits/spoofscan.txt. |
strobe | A quick-and-dirty port scanner of yore that runs quite fast. Gets standard /etc/services-style services. Location: http://ugweb.cs.ualberta.ca/~beck/hack/strobe.tar.gz. |
trojan.pl | Scans search paths, looking for situations and permissions that could possibly invite trojan authors to attack. trojan.pl tells you which users are capable of installing a trojan and how they might do so. Requires Perl. Location: ftp://coast.cs.purdue.edu/pub/tools/unix/trojan/. |
xscan | Scans hosts for unsecured X displays and logs keystrokes of those displays. This tool is useful for quick-and-dirty assessments of X security. Location: http://www.jabukie.com/Unix_Sourcez/xscan.tar.gz. |
Note
Use port scanners cautiously, and don't scan other hosts without permission. Even if you do so without malice, you may unwittingly cause denial of service. As discussed in Chapter 17, "Denial-of-Service Attacks," certain network hardware (unpatched Osicom RouterMate models, for example) will crash when scanned. Also vulnerable are Cisco routers running IOS 12.0 (unpatched) when UDP-scanned on Port 514 (especially with NMAP).
The legality of scanners is a subject of debate. Some folks liken this activity to criminal trespassing, arguing that scanning a target is like going to somebody's house and using a crowbar to pry open the doors and windows. Others insist that by maintaining an Internet site, you've given at least implied consent to be scanned. After all, your network address is much like a telephone number; anyone has a legal right to dial it.
Neither view is supported by criminal law. To date, no law has been written specifically to address scanners, (although some statutes could conceivably apply.) So for now, the answer is yes, scanners are legal.
However, if you scan a host without authorization, that fact may not help you. I've seen the classic case many times: A student at a university scans the local network. A system administrator discovers this and brings in the school's administration. The offending student is taken before the board and penalized. Does the student have any recourse? Sure, if he has money to hire a lawyer. But is it really worth thousands of dollars and months of litigation just to scan a few hosts? Of course not.
Then, there's the ethical issue. You might argue that in scanning the target network, you sought to improve its security. However, it's more likely that you intended to exploit holes that you found. Most system administrators believe that the only reason to scan a network is to reveal vulnerabilities. Therefore, they contend that scanning a network is prima facie evidence of ill intent.
Either way, if you scan networks without authorization, be prepared for trouble—not just from the target, but from your provider. The better solution, if you want to learn about and perhaps develop scanners, is to establish an intranet in your home. This will give you a decent testing ground without ruffling anyone's feathers.
Scanners are highly beneficial when they're in the right hands—your own. However, anyone can obtain them, including crackers. And, while scanners won't give attackers immediate access to your server (unless you fail to cover your bases), their existence warrants concern.
Scanners cull important intelligence on your server. For this reason alone, you should become familiar with scanner detection. This way, even if you can't stop attackers from scanning your system, you'll at least be aware that they're doing so.
The following tools can help in this regard.
Application: courtney by Marvin J. Christensen
Required: Perl 5+, tcpdump, libpcap-0.0
Config Files: None.
Location: ftp://ciac.llnl.gov/pub/ciac/sectools/unix/courtney/courtney.tar.Z
Security History: courtney has no significant security history.
Notes: Recent Linux distributions generally carry tcpdump and libpcap-0.0. (Check your CD-ROM.)
courtney is a Perl script that, in conjunction with tcpdump, detects SATAN and SAINT scans. It logs the warnings in standard syslog ALERT format, and notification is visible in /var/log/messages.
To install courtney, unzip and un-tar the archive. courtney will unpack into courtney-1.3/, which should contain the following files:
-rw-r--r--   1 1565     bin          1802 Apr  7  1995 DISCLAIMER
-rw-r--r--   1 1565     bin          1735 Apr  7  1995 INSTALL
-rw-r--r--   1 1565     bin          3164 Apr  7  1995 README
-rwxr-xr-x   1 1565     bin         11832 Apr  7  1995 courtney.pl
To run courtney, issue the following command:
$ courtney.pl &
You will see this message:
tcpdump: listening on eth0
For this example, I ran courtney on linux2 and initiated a SAINT scan from gnss. As the scan progressed, courtney recorded the activity. Here's a snippet of /var/log/messages on linux2 (the victim machine):
May 30 23:51:57 linux2 syslog: error: cannot execute /usr/sbin/ipop3d: No such file or directory
May 30 23:51:57 linux2 root: courtney[6197]: NORMAL_ATTACK from gnss -target linux2.samshacker.net
May 30 23:51:57 linux2 syslog: error: cannot execute /usr/sbin/ipop2d: No such file or directory
May 30 23:51:57 linux2 syslog: error: cannot execute /usr/sbin/gn: No such file or directory
May 30 23:51:57 linux2 syslog: error: cannot execute /usr/sbin/imapd: No such file or directory
May 30 23:51:57 linux2 in.rexecd[6247]: connect from gnss
May 30 23:51:57 linux2 root: courtney[6197]: HEAVY_ATTACK from gnss target linux2.samshacker.net
May 30 23:51:57 linux2 ftpd[6234]: FTP session closed
May 30 23:51:57 linux2 syslog: error: cannot execute /usr/sbin/uucico: No such file or directory
May 30 23:52:10 linux2 fingerd[6260]: rejected @
May 30 23:52:11 linux2 syslog: error: cannot execute /usr/sbin/imapd: No such file or directory
As you can see, courtney's approach is straightforward. However, it does offer several command-line options for marginal customization. Please see Table 8.3.
Table 8.3. Various courtney Command-Line Options
Note
Another SATAN-specific alternative is Gabriel, which was originally designed for Solaris and therefore requires considerable tweaking for Linux. If that strikes your interest, check out Gabriel at http://www.lat.com/.
Application: IcmpInfo by Laurent Demailly
Required: C, networking, net includes (/usr/include/netinet/)
Config Files: None.
Location: ftp://hplyot.obspm.fr/net/icmpinfo-1.11.tar.gz
Security History: IcmpInfo has no significant security history.
Notes: None.
IcmpInfo detects suspicious ICMP activity, such as bombs and scans. To use it, unzip and un-tar the package. icmpinfo will unpack into icmpinfo-1.11, which should contain the following files:
-rw-r--r--    1 root     sys         1769 Aug 28  1995 CHANGES
-r--r--r--    1 root     sys          930 Aug 28  1995 CHECKSUMS.asc
-rw-r--r--    2 root     sys         4363 Aug 28  1995 DOC
-rw-r--r--    1 root     sys         4690 Aug 28  1995 LICENSE
-rw-r--r--    1 root     sys          837 Aug 17  1995 Makefile
-rw-r--r--    1 root     sys         1416 Aug 17  1995 NocTools.Infos
-rw-r--r--    2 root     sys         4363 Aug 28  1995 README
-rw-r--r--    1 root     sys           45 Aug 17  1995 TODO
-rw-r--r--    1 root     sys         1613 May 26  1994 defs.h
-rw-r--r--    1 root     sys          311 Apr 22  1994 err.c
-rw-r--r--    1 root     sys         4190 Aug 28  1995 icmpinfo.c
-rw-r--r--    1 root     sys         1657 Aug 28  1995 icmpinfo.man
-rw-r--r--    1 root     sys         3791 May 11  1994 linux_ip_icmp.h
-rw-r--r--    1 root     sys         6561 Aug 28  1995 print.c
-rw-r--r--    1 root     sys          552 Jan  7  1994 recvping.c
From here, make the package:
$ make
Now you're ready to run the program. For this example, I ran icmpinfo with the -vv option to catch ping and traceroute traffic:
linux2 36# icmpinfo -vvv
Next, in another window, I issued a traceroute request. Here's what icmpinfo recorded:
May 31 23:45:27 ICMP_Dest_Unreachable[Port] < 172.16.0.2 [linux2.samshacker.net]
> 172.16.0.2 [linux2.samshacker.net] sp=34304 dp=33435 seq=0x00140000 sz=36(+20)
May 31 23:45:27 ICMP_Dest_Unreachable[Port] < 172.16.0.2 [linux2.samshacker.net]
> 172.16.0.2 [linux2.samshacker.net] sp=34304 dp=33436 seq=0x00140000 sz=36(+20)
May 31 23:45:27 ICMP_Dest_Unreachable[Port] < 172.16.0.2 [linux2.samshacker.net]
> 172.16.0.2 [linux2.samshacker.net] sp=34304 dp=33437 seq=0x00140000 sz=36(+20)
icmpinfo watches both inbound and outbound traffic and is quite configurable. Table 8.4 lists the important command-line options.
Table 8.4. Various IcmpInfo Command-Line Options
Application: scan-detector by Christoph Schuba/Gene Spafford
Required: Perl 5+, tcpdump, libpcap-0.0
Config Files: None.
Location: ftp://coast.cs.purdue.edu/pub/COAST/tools/scan-detector.tar.Z
Security History: scan-detector has no significant security history.
Notes: You should also retrieve scan-detector's SATAN extensions. Obtain those at ftp://coast.cs.purdue.edu/pub/COAST/tools/SATAN_Extensions.tar.Z.
scan-detector is a generic, Perl-based TCP/UPD scan detector. It should run out of the box without problems, providing you have Perl correctly installed. Table 8.5 lists scan-detector's more important command-line options.
Table 8.5. Various scan-detector Command-Line Options
Application: klaxon by Doug Hughes
Required: C and netinet includes
Config Files: None.
Location: ftp://ftp.eng.auburn.edu/pub/doug/klaxon.tar.gz
Security History: klaxon has no significant security history.
Notes: The author warns that applying klaxon to too many ports could open you to denial-of-service attacks.
klaxon is a sophisticated tool that detects port scans by service. It was built from modified rexec code and replaces TCP and UDP services in inetd.conf, so your inetd.conf looks like this:
rexec   stream  tcp     nowait  root    /etc/local/klaxon klaxon rexec
link    stream  tcp     nowait  root    /etc/local/klaxon klaxon link
supdup  stream  tcp     nowait  root    /etc/local/klaxon klaxon supdup
tcpmux  stream  tcp     nowait  root    /etc/local/klaxon klaxon tcpmux
klaxon then detects scans and logs activity (the first 128 bytes of each probe). Although klaxon will not detect stealth-style scans, it's more than sufficient for monitoring garden- variety scans on specific services.
Application: PortSentry by Craig H. Rowland/Psionic
Required: C/IP include files
Config Files: portsentry_config.h, portsentry.conf (for setting paths, identifying ports you'd like to listen on, and setting blocking rules).
Location: http://www.psionic.com/tools/portsentry-0.90.tar.gz
Security History: PortSentry has no significant security history.
Notes: PortSentry's author meticulously commented his source code, thereby offering users an inside view of how the tool is constructed. For this reason, beyond its general utility, PortSentry is great for anyone studying socket programming.
PortSentry is an advanced tool that reaches beyond simple port scanning detection: It actually attempts to identify and block the attacker in real-time.
PortSentry's features include:
Extensive stealth-scan detection support for FIN, half-open, NULL, "oddball packet," SYN, and X-MAS-style attacks.
Simultaneous TCP and UDP monitoring of multiple sockets, even when running just a single instance of
PortSentry.State maintenance (remembering hosts that previously connected) for automagically assigning offending hosts a
denyentry in the TCP Wrappers configuration.
PortSentry compiles cleanly for Linux out of the box, and the documentation is so extensive that I'll pass over installation and configuration here and simply tell you this: PortSentry is quite complete, and I recommend it highly.
Note
PortSentry is part of the Abacus Project, which sports several well-designed security tools, including LogCheck, a log analysis tool (see Chapter 19, "Logs and Audit Trails") and HostSentry, an intrusion detection tool (see Chapter 20, "Intrusion Detection"). To learn more about the Abacus Project, go to http://www.psionic.com/abacus/.
Finally, the following documents and resources focus on scanners, their utilities, and the impact they have on network security.
An E-Interview with Dr. Gary McGraw, Marie Alm. In this interview, the author of Java Security: Hostile Applets, Holes, & Antidotes discusses Java security and how crackers have used the cache in the past to use Java to port scan(http://www.bayarea.net/~aalm/mb/97jun/eintvu.htm).
"Daemons Defy Hackers," Michael Surkan, PC Week. In this article, Surkan compares Internet Security Scanner, PingWare, SATAN, and NetProbe(http://www.zdnet.com/pcweek/netweek/0205/tdaem.html).
Chapter 8 of the Firewall Testing, 3rd Annual Firewall Industry Guide, International Computer Security Association. This chapter discusses integrating scanners into firewall testing (http://www.icsa.net/fwbg/chap_8.html).
"Is Your Browser a Blabbermouth? Are Your Ports Being Scanned?", Gary McGraw, JavaWorld. This article takes a different view, delving into what can happen when your Web client is a scan target. The author addresses older holes in Java (http://www.javaworld.com/javaworld/jw-03-1997/jw-03-securityholes.html).
"Network Security Scanners: Sniffing Out Network Holes," Leslie O'Neill and Joel Scambray, Editors, InfoWorld. This document chronicles an in-house comparison of two big-name scanners, ISS and CyberCop, describing their features, effectiveness, and total cost of ownership. Check it out at http://archive.infoworld.com/cgi-bin/displayTC.pl?/990208comp.htm.
Network Security Anything But Bulletproof, Christopher W. Klaus, Internet Security Systems, Inc. In this article, Klaus discusses attacks and scans against firewalls(http://data.com/tutorials/bulletproff.html).
Page of World Wide Port Scans, Institute of Physiology, Technical University in Aachen, Germany. This site is a great reference tool for folks who are studying port scanners. The University set up the page (which is updated every ten minutes) to display port scan attacks against their network. Included are firewall logs (again, updated every 10 minutes) and a graphed-out analysis of activity (http://www.physiology.rwth-aachen.de/user/jens/wwp.html).
SATAN-ism: Computer Security Probes Over the Internet - Shrink Wrapped for Your Safety?, David G. Hesprich and Dr. Paul Clark. This article, although dated, offers a nice look at various services that SATAN scans for (http://gue-tech.asee.org/darkgrue/ classwork/cs329/SATAN-ism.html).
Stealth Scanning—Bypassing Firewalls/SATAN Detectors, Christopher Klaus (ISS). Here, Klaus discusses technical aspects of scanning through a firewall without raising alarms (http://www.netsys.com/firewalls/firewalls-9512/0085.html).
Tracking Their Moves: Know Your Enemy II, Lance Spitzner. Here, Spitzner takes you through log analysis and addresses how to discover or identify stealth scanning. The document targets Solaris system administrators but still offers valuable advice for Linux users (http://www.enteract.com/~lspitz/enemy2.html).
There are two sides to every coin, and many swords are double-edged. These rules aptly apply to scanners. Although scanners are valuable host assessment tools, they harbor two dangers: One is that attackers can use them to quickly ascertain weaknesses in your security system, and the other is that you may rely on scanners too much. Guard against both of these contingencies and you'll reap a world of benefit from scanners. (And as always, be sure to obtain the very latest releases. Scanners evolve rapidly.)