
Now that we have a good grasp on how to write our code in Python and MicroPython, it is time to look at the supporting libraries that make up the firmware. As you will see, the libraries available in MicroPython mirror those in Python. In fact, the libraries in the firmware (sometimes called the application programming interface or API or firmware API) comprise a great deal of the same libraries in Python.
There are some notable exceptions for standard libraries where there is an equivalent library in MicroPython, but it has been renamed to distinguish it from the Python library. In this case, the library has either been reduced in scope by removing the less-frequently used features or modified in some ways to fit the MicroPython platform - all to save space (memory).
There are also libraries that are specific to MicroPython, and the hardware that provides functionality that may or may not be in some general Python releases. These libraries are designed to make working with the microcontroller and hardware easier.
Thus, there are three types of libraries in the firmware: those that are standard and mostly the same as those in Python, those that are specific to MicroPython, and those that are specific to the hardware. There is another type of library sometimes called user-supplied or simply custom libraries . These are libraries (APIs) we create ourselves that we can deploy to our board and thereby make functionality available to all our projects. We will see an overview of all types of libraries in this chapter.
Note
The word module, or code module, is sometimes used to refer to a library; however, module is commonly a single code file while a library may consist of many code files. Thus, it is ok to interchange the names if the library is a single file (code module). Another word sometimes used for library is package, which implies multiple files. You may encounter that term too.
Rather than simply paraphrase or (gasp) copy the existing documentation, we will see overviews of the libraries in the form of quick reference tables you can use to become familiar with what is available. Simply knowing what is available can often speed up development and make your programs stronger by not having to reinvent something or spend lots of time trying to find a library that you may (or may not) need. However, there are several libraries that are crucial to learning how to develop MicroPython IOT projects. We will discover those in more detail with code snippets to help you learn them. So, while this chapter is intended to teach you about the more common libraries, it is also a reference guide to a deeper understanding of the MicroPython firmware with links to the official documentation.
Let’s begin with a look at those libraries in MicroPython that are “standard” Python libraries.
Built-In and Standard Libraries
As you know, MicroPython is built on Python. Much work was done to trim things down so that most the Python libraries can fit on a chip. The resulting MicroPython firmware is considerably smaller than Python on your PC but in no way crippled. That is, MicroPython is Python, and as such MicroPython has many of the same libraries as Python.
Some may call these libraries “built-in ,” but it is more correct to name them “standard” libraries since these libraries are the same as those in Python. More specifically, they have the same classes with the same functions as those in Python. So, you can write a script on your PC and execute it there and then execute the same script unaltered on your MicroPython board. Nice! As you can surmise, this helps greatly when developing a complex project.
Recall we saw this technique demonstrated in the last chapter. There we saw it is possible to develop part of your script - those parts using standard libraries - and debug them on your PC. That is, once you have them working correctly, you can move on to the next part that requires MicroPython libraries or the hardware libraries. This is because developing on our PC is so much easier. We don’t need to power the board on, connect it to our WiFi, etc., to get it to work. Plus, the PC is a lot faster. It’s just easier all around. By exercising this practice, we can potentially save ourselves some frustration by ensuring the “standard” parts of our project are working correctly.
In this section, we will explore the standard Python libraries beginning with a short overview of what is available, followed by details on how to use some of the more common libraries.
Tip
See http://docs.micropython.org/en/latest/pyboard/library/index.html#python-standard-libraries-and-micro-libraries for more details about any of the standard libraries.
Overview
The standard libraries in MicroPython contain objects that you can use to perform mathematical functions, operate on programming structures, work with transportable documents (a document store) through JSON, interact with the operating system and other system functions, and even perform calculations on time. Table 5-1 contains a list of the current standard MicroPython libraries. The first column is the name we use in our import statement, the second is a short description, and the third contains a link to the online documentation.
Table 5-1. Standard Python Libraries in MicroPython
Notice the links are for the Pyboard documentation and most of these apply to the other boards too. If in doubt, always visit the MicroPython documentation for your board.
Tip
Most of the libraries presented here are common to the Pyboard and WiPy. We will also see some of the differences in the next chapter.
As you can see, there are many libraries that begin with a u to signify they are special versions of the Python equivalent libraries. What is interesting is some platforms may include the original Python library. That is, if you need access to the original Python version - if it exists - you can still access it by using the original name (without the u prefix). In this case, MicroPython will attempt to find the module by the original name and if not there, default to the MicroPython version. For example, if we wanted to use the original io library, we could use import io. However, if there is no module named io on the platform, MicroPython will use the MicroPython version named uio.
Caution
The format of the import statement allows us to specify directories. So, if we use import mylibs.io, MicroPython will attempt to find the library (code module) named io.py in the mylibs folder. This can affect how one uses modules without the u prefix. If we used import io and io.py is not a code module, it will use io as the name of a folder and if it exits, look modules in that folder. Thus, you can get yourself in trouble if you use folder names that are the same as the Python library names. Don’t do that.
Next, we will look at some of the more commonly used standard libraries and see some code examples for each. But first, there are two categories of standard functions we should discuss.
Common Standard Libraries
Now let’s look at examples of some of the more commonly used standard libraries. What follows is just a sampling of what you can do with each of the libraries. See the online documentation for a full description of all the capabilities. Like most MicroPython libraries, the common standard libraries may be subsets of the full Python3 (CPython) implementation.
Note
The examples in this chapter are intended to be run on the MicroPython board. You may need to make some changes to run it on your PC.
sys
The sys library provides access to the execution system such as constants, variables, command-line options, streams (stdout, stdin, stderr), and more. Most of the features of the library are constants or lists. The streams can be accessed directly but typically we use the print() function, which sends data to the stdout stream by default.
The most commonly used functions in this library include the following. Listing 5-1 demonstrates these variables and the exit() function.
sys.argv: list of arguments passed to the script from the command line
sys.exit(r): exit the program returning the value r to the caller
sys.modules: list of modules loaded (imported)
sys.path: list of paths to search for modules – can be modified
sys.platform: display the platform information such as Linux, MicroPython, etc.
sys.stderr: standard error stream
sys.stdin: standard input stream
sys.stdout: standard output stream
sys.version: the version of Python currently executing
Listing 5-1. Demonstration of the sys library features
# MicroPython for the IOT - Chapter 5# Example use of the sys libraryimport sysprint("Modules loaded: " , sys.modules)sys.path.append("/sd")print("Path: ", sys.path)sys.stdout.write("Platform: ")sys.stdout.write(sys.platform)sys.stdout.write(" ")sys.stdout.write("Version: ")sys.stdout.write(sys.version)sys.stdout.write(" ")sys.exit(1)
Notice we start with the import statement and after that, we can print the constants and variables in the sys library using the print() function. We also see how to append a path to our search path with the sys.path.append() function. This is very helpful if we create our own directories on the boot drive (SD drive) to place our code. Without this addition, the import statement will fail unless the code module is in the lib directory.
At the end of the example, we see how to use the stdout stream to write things to the screen. Note that you must provide the carriage return (newline) command to advance the output to a new line ( ). The print() function takes care of that for us. The following shows the output of running this script on a MicroPython board.
>>> import examples.sys_exampleModules loaded: {'examples': <module 'examples'>, 'examples.sys_example': <module 'examples.sys_example' from 'examples/sys_example.py'>}Path: ['', '/flash', '/flash/lib', '/sd']Platform: WiPyVersion: 3.4.0
Notice we see the data as we expect and that this example is running on a WiPy module. Do you see something strange in the import statement? Here, the code is placed in a new directory named examples and then copied the code module to that directory on my boot drive. Thus, we can use the directory name in the statement to find the code module and import it (examples/sys_examples.py). If you want to run this code on your own MicroPython board, you can write the code to a file such as sys_example.py, then copy the file to your boot drive or use ftp to copy the file. This allows you to keep your boot (flash) drive tidy and place you code in a common location.
Finally, notice that there are no command-line arguments. This is because we used an import statement. However, if we were to run the code on our PC providing command-line arguments, we would see them. The following shows the output of running this script on a PC.
$ python ./sys_example.pyModules loaded: {'builtins': <module 'builtins' (built-in)>, 'sys': <module 'sys' (built-in)>, ... '/sd']darwinVersion: 3.6.0 (v3.6.0:41df79263a11, Dec 22 2016, 17:23:13)[GCC 4.2.1 (Apple Inc. build 5666) (dot 3)]
uio
The uio library contains additional functions to work with streams and stream-like objects. There is a single function named uio.open() that you can use to open files (but most people use the built-in function named open()) as well as classes for byte and string streams. In fact, the classes have similar file functions such as read(), write(), seek(), flush(), close(), as well as a getvalue() function, which returns the contents of the stream buffer that contains the data. Let’s look at an example.
In this example, we first open a new file for writing and write an array of bytes to the file. The technique used is passing the hex values for each bye to the write() function. When you read data from sensors, they are typically in binary for (a byte or string of bytes). You signify a byte with the escape, x as shown.
After writing the data to the file, we then read the file one byte at a time by passing 1 to the read() function. We then print the values read in their raw for (the value returned from the read(1) call), decimal value, and hex value. Listing 5-2 shows how to read a file in binary mode using the uio.FileIo() class. The bytes written contain a secret word (one obscured by using hex values) – can you see it?
Listing 5-2. Demonstration of the uio library features
# MicroPython for the IOT - Chapter 5# Example use of the uio library# Note: change uio to io to run this on your PC!import uio# Create the binary filefio_out = uio.FileIO('data.bin', 'wb')fio_out.write("x5Fx9ExAEx09x3Ex96x68x65x6Cx6Cx6F")fio_out.write("x00")fio_out.close()# Read the binary file and print out the results in hex and char.fio_in = uio.FileIO('data.bin', 'rb')print("Raw,Dec,Hex from file:")byte_val = fio_in.read(1) # read a bytewhile byte_val:print(byte_val, ",", ord(byte_val), hex(ord(byte_val)))byte_val = fio_in.read(1) # read a bytefio_in.close()
This is like how you would use the normal built-in functions, which we saw in the last chapter. Listing 5-3 shows the output when run on the WiPy.
Listing 5-3. Demonstration of the uio library features (Pyboard)
>>> import examples.uio_exampleRaw,Dec,Hex from file:b'_' , 95 0x5fb'xc2' , 194 0xc2b'x9e' , 158 0x9eb'xc2' , 194 0xc2b'xae' , 174 0xaeb' ' , 9 0x9b'>' , 62 0x3eb'xc2' , 194 0xc2b'x96' , 150 0x96b'h' , 104 0x68b'e' , 101 0x65b'l' , 108 0x6cb'l' , 108 0x6cb'o' , 111 0x6fb'x00' , 0 0x0
If you’re curious what the file looks like, you can use a utility like hexdump to print the contents as shown below. Can you see the hidden message?
$ hexdump -C data.bin00000000 5f 9e ae 09 3e 96 68 65 6c 6c 6f 00 |_...>.hello.|0000000c
ujson
The ujson library is one of those libraries you are likely to use frequently when working with data in an IOT project. It provides encoding and decoding of JavaScript Object Notation (JSON) documents. This is because many of the IOT services available either require or can process JSON documents. Thus, you should consider getting into the habit of formatting your data in JSON to make it easier to integrate with other systems. The library implements the following functions that you can use to work with JSON documents.
ujson.dumps(obj): return a string decoded from a JSON object.
ujson.loads(str): parses the JSON string and returns a JSON object. Will raise an error if not formatted correctly.
ujson.load(fp): parse the contents of a file pointer (a file string containing a JSON document). Will raise an error if not formatted correctly.
Recall we saw a brief example of JSON documents in the last chapter. That example was written exclusively for the PC but a small change makes it possible to run it on a MicroPython board. Let’s look at a similar example. Listing 5-4 shows an example of using the ujson library.
Listing 5-4. Demonstration of the ujson library features
# MicroPython for the IOT - Chapter 5# Example use of the ujson library# Note: change ujson to json to run it on your PC!import ujson# Prepare a list of JSON documents for pets by converting JSON to a dictionaryvehicles = []vehicles.append(ujson.loads('{"make":"Chevrolet", "year":2015, "model":"Silverado", "color":"Pull me over red", "type":"pickup"}'))vehicles.append(ujson.loads('{"make":"Yamaha", "year":2009, "model":"R1", "color":"Blue/Silver", "type":"motorcycle"}'))vehicles.append(ujson.loads('{"make":"SeaDoo", "year":1997, "model":"Speedster", "color":"White", "type":"boat"}'))vehicles.append(ujson.loads('{"make":"TaoJen", "year":2013, "model":"Sicily", "color":"Black", "type":"Scooter"}'))# Now, write these entries to a file. Note: overwrites the filejson_file = open("my_vehicles.json", "w")for vehicle in vehicles:json_file.write(ujson.dumps(vehicle))json_file.write(" ")json_file.close()# Now, let's read the list of vehicles and print out their datamy_vehicles = []json_file = open("my_vehicles.json", "r")for vehicle in json_file.readlines():parsed_json = ujson.loads(vehicle)my_vehicles.append(parsed_json)json_file.close()# Finally, print a summary of the vehiclesprint("Year Make Model Color")for vehicle in my_vehicles:print(vehicle['year'],vehicle['make'],vehicle['model'],vehicle['color'])
The following shows the output of the script running on the WiPy.
>>> import examples.ujson_exampleYear Make Model Color2015 Chevrolet Silverado Pull me over red2009 Yamaha R1 Blue/Silver1997 SeaDoo Speedster White2013 TaoJen Sicily Black
uos
The uos library implements a set of functions for working with the base operating system. Some of the functions may be familiar if you have written programs for your PC. Most functions allow you to work with file and directory operations. The following lists several of the more commonly used functions.
uos.chdir(path): change the current directory
uos.getcwd(): return the current working directory
uos.listdir([dir]): list the current directory if dir is missing or list the directory specified
uos.mkdir(path): create a new directory
uos.remove(path): delete a file
uos.rmdir(path): delete a directory
uos.rename(old_path, new_path): rename a file
uos.stat(path): get status of a file or directory
In this example, we see how to change the working directory so that we can simplify our import statements. We also see how to create a new directory, rename it, create a file in the new directory, list the directory, and finally clean up (delete) the changes. Listing 5-5 shows the example for working with the uos library functions.
Listing 5-5. Demonstration of the uos library features
# MicroPython for the IOT - Chapter 5# Example use of the uos library# Note: change uos to os to run it on your PC!import sysimport uos# Create a function to display files in directorydef show_files():files = uos.listdir()sys.stdout.write(" Show Files Output: ")sys.stdout.write(" name size ")for file in files:stats = uos.stat(file)# Print a directory with a "d" prefix and the sizeis_dir = Trueif stats[0] > 16384:is_dir = Falseif is_dir:sys.stdout.write("d ")else:sys.stdout.write(" ")sys.stdout.write(file)if not is_dir:sys.stdout.write(" ")sys.stdout.write(str(stats[6]))sys.stdout.write(" ")# List the current directoryshow_files()# Change to the examples directoryuos.chdir('examples')show_files()# Show how you can now use the import statement with the current dirprint(" Run the ujson_example with import ujson_example after chdir()")import ujson_example# Create a directoryuos.mkdir("test")show_files()
While this example is a little long, it shows some interesting tricks. Notice we created a function to print out the directory list rather than printing out the list of files returned. We also checked the status of the file to determine if the file was a directory or not and if it was, we printed a d to signal the name refers to a directory. We also used the stdout stream to control formatting with tabs ( ) and newline ( ) characters.
You will also see how to use change directory to improve how we use the import statement. Since we changed the directory to examples, the import ujson_example will attempt to find that module (library) in the current directory first. This is a nice trick you can use in your own projects to deploy your code to your board in a separate directory, which means you can use this to deploy multiple projects to your board placing each in its own directory.
Now let’s see the output. Listing 5-6 shows the output when run on the WiPy. Take a few moments and look through the output to see how the functions worked. Also, note the output from the JSON example is shown since we imported that code in the middle of the script. Nice.
Listing 5-6. Demonstration of the uos library features (output)
>>> import examples.uos_exampleShow Files Output:name sizemain.py 34d sysd libd certboot.py 336d examplesdata.bin 15my_vehicles.json 377Show Files Output:name sizesys_example.py 395uio_example.py 609ujson_example.py 1370uos_example.py 1163data.bin 15Run the ujson_example with import ujson_example after chdir()Year Make Model Color2015 Chevrolet Silverado Pull me over red2009 Yamaha R1 Blue/Silver1997 SeaDoo Speedster White2013 TaoJen Sicily BlackShow Files Output:name sizesys_example.py 395uio_example.py 609ujson_example.py 1370uos_example.py 1163data.bin 15my_vehicles.json 377d test
utime
The utime library is another popular library used in many projects. The library is used to get the current time, date, and working with time data such as calculating time differentials. Note that some of the functions only work with a real-time clock (RTC) installed either as a hardware extension or through a network time server. See Chapter 6 for more details. The following lists several of the more commonly used functions related to inserting delays in our scripts. Delays are helpful when we need to pause processing to allow a sensor to read or to wait for data from/to other sources. Another common use of this library is recording the date and time of an event or sensor data read.
utime.sleep(seconds): put the board in a sleep mode for the number of seconds specified
utime.sleep_ms(ms): put the board in a sleep mode for the number of milliseconds specified
utime.sleep_us(us): put the board in a sleep mode for the number of microseconds specified
Let’s see a short example of how to use time delays. Here, we use a random function to sleep for a random period and to provide random values. Don’t worry about the RTC code; we will see more about that in Chapter 6.
Listing 5-7. Demonstration of the utime library sleep features
# MicroPython for the IOT - Chapter 5# Example use of the utime library# Note: This example only works on the WiPy# Note: This example will not on your PC.import machineimport sysimport utime# Since we don't have a RTC, we have to set the current time# initialized the RTC in the WiPy machine libraryfrom machine import RTC# Init with default time and datertc = RTC()# Init with a specific time and date. We use a specific# datetime, but we could get this from a network time# service.rtc = RTC(datetime=(2017, 7, 15, 21, 32, 11, 0, None))# Get a random number from 0-1 from a 2^24 bit random valuedef get_rand():return machine.rng() / (2 ** 24 - 1)# Format the time (epoch) for a better viewdef format_time(tm_data):# Use a special shortcut to unpack tuple: *tm_datareturn "{0}-{1:0>2}-{2:0>2} {3:0>2}:{4:0>2}:{5:0>2}".format(*tm_data)# Generate a random number of rows from 0-25num_rows = get_rand() * 25# Print a row using random seconds, milleseconds, or microseconds# to simulate time.print("Datetime Value")print("------------------- --------")for i in range(0,num_rows):# Generate random value for our sensorvalue = get_rand() * 100# Wait a random number of seconds for timeutime.sleep(int(get_rand() * 15)) # sleep up to 15 secondsprint("{0} {1:0>{width}.4f}".format(format_time(rtc.now()), value, width=8))
Note
This example also demonstrates how the firmware can differ among the boards available. This example only works on the WiPy and similar Pycom boards.
Notice there is a lot going on in this example than simply waiting a random number of seconds. This example shows you how to do that but also how to work with time data and formatting data. You typically must do this when logging data. Let’s walk through this a bit.
Aside from the RTC code, we create two functions: one to generate a random number using the machine library of the WiPy (this function is not available in the Pyboard firmware), and another to format the datetime in a user-friendly format.
Since the function creates a random number of 24 bits, we divide by the max value for 24 bits to give a value between 0 and 1. We can then multiply that by an integer to get a value for a range. For example, if we wanted a value between 0 and 6, we can use get_rand() * 6.
The format_time() function returns a string representing the datetime. Here we see some advanced formatting options to format the date with the correct digits per part. Specifically, 4 digits for year and 2 for month, day, hour, minute, and second. The :0>2 option tells the format() function to space the value over 2 positions (digits) with leading zeros. Cool, eh? Notice the last print() statement. Notice we use another trick to pass the width with a named parameter (width).
Finally, we get to the example code where we generate a random number of lines from 0 to 25, then loop for those iterations generating a random value (0-100) and then wait (sleep) for a random number of seconds (0-15) then print the new datetime and the value. This simulates a typical loop we would use to read data from sensors. As most sensors need time to read the value, the sleep function allows us to wait for that period.1
Now that we know more about what this code is doing, let’s see an example of how it works. The following shows the output from running this code on the WiPy.
>>> import examples.utime_exampleDatetime Value------------------- --------2017-07-15 21:32:12 014.15202017-07-15 21:32:25 003.53802017-07-15 21:32:28 044.82982017-07-15 21:32:35 099.09812017-07-15 21:32:41 086.88392017-07-15 21:32:47 083.83042017-07-15 21:32:55 083.06702017-07-15 21:32:59 064.3214
Note
As mentioned in earlier chapters, there are some elements of MicroPython that are specific to a single MicroPython board or hardware. We will discuss those in the next chapter.
There are also built-in functions that are not part of any specific library and there are exceptions that allow us to capture error conditions. Let’s look at those before we dive into some of the more commonly used standard libraries.
Built-In Functions and Classes
Python comes with many built-in functions: functions you can call directly from your script without importing them. There are many classes that you can use to define variables, work with data, and more. They’re objects so you can use them to contain data and perform operations (functions) on the data. We’ve seen a few of these in the examples so far.
Let us see some of the major built-in functions and classes. Table 5-2 includes a short description of each. You can find more information about each at https://docs.python.org/3/library/functions.html . While this is the Python documentation, it applies to MicroPython too. Classes are designated with “class”; the remainder are functions.
You should look through this list and explore the links for those you find interesting and refer to the list when developing your projects so that you can use the most appropriate function or class. You may be surprised how much is “built-in.” However, once again, always check the documentation for your chosen MicroPython board for the latest functions and classes available in your firmware.
Table 5-2. MicroPython Built-in Functions and Classes
Name | Description |
|---|---|
abs(x) | Return the absolute value of a number. |
all(iterable) | Return True if all elements of the iterable are true (or if the iterable is empty). |
any(iterable) | Return True if any element of the iterable is true. |
bin(x) | Convert an integer number to a binary string. |
class bool([x]) | Return a Boolean value, that is, one of True or False. |
class bytearray([source[, encoding[, errors]]]) | Return a new array of bytes. |
class bytes([source[, encoding[, errors]]]) | Return a new “bytes” object, which is an immutable sequence of integers in the range 0 <= x < 256 |
callable(object) | Return True if the object argument appears callable, False if not. |
chr(i) | Return the string representing a character whose Unicode code point is the integer i. |
classmethod(function) | Return a class method for function. |
class complex([real[, imag]]) | Return a complex number with the value real + imag*1j or convert a string or number to a complex number. |
delattr(obj, name) | This is a relative of setattr(). The arguments are an object and a string. The string must be the name of one of the object’s attributes. |
class dict() | Create a new dictionary. |
dir([object]) | Without arguments, return the list of names in the current local scope. With an argument, attempt to return a list of valid attributes for that object. |
divmod(a,b) | Take two (non-complex) numbers as arguments and return a pair of numbers consisting of their quotient and remainder when using integer division. |
enumerate(iterable, start=0) | Return an enumerate object. Iterable must be a sequence, an iterator, or some other object that supports iteration. |
eval(expression, globals=None, locals=None) | Evaluate and expression using globals and locals as dictionaries in a local namespace. |
exec(object[, globals[, locals]]) | Execute a set of Python statements or object using globals and locals as dictionaries in a local namespace. |
filter(function, iterable) | Construct an iterator from those elements of iterable for which function returns true. |
class float([x]) | Return a floating-point number constructed from a number or string. |
class frozenset([iterable]) | Return a new frozenset object, optionally with elements taken from iterable. |
getattr(object, name[, default]) | Return the value of the named attribute of object. Name must be a string. |
globals() | Return a dictionary representing the current global symbol table. |
hasattr(object, name) | The arguments are an object and a string. The result is True if the string is the name of one of the object’s attributes, False if not. |
hash(object) | Return the hash value of the object (if it has one). Hash values are integers. |
hex(x) | Convert an integer number to a lowercase hexadecimal string prefixed with “0x”. |
id(object) | Return the “identity” of an object. |
input([prompt]) | If the prompt argument is present, it is written to standard output without a trailing newline. The function then reads a line from input, converts it to a string (stripping a trailing newline), and returns that. |
class int(x) | Return an integer object constructed from a number or string x, or return 0 if no arguments are given. |
isinstance(object, classinfo) | Return true if the object argument is an instance of the classinfo argument, or of a (direct, indirect, or virtual) subclass thereof. |
issubclass(class, classinfo) | Return true if class is a subclass (direct, indirect, or virtual) of classinfo. |
iter(object[, sentinel]) | Return an iterator object. |
len(s) | Return the length (the number of items) of an object. |
class list([iterable]) | List sequence. |
locals() | Update and return a dictionary representing the current local symbol table. |
map(function, iterable, …) | Return an iterator that applies function to every item of iterable, yielding the results. |
max([iterable|arg*]) | Return the largest item in an iterable or the largest of two or more arguments. |
class memoryview(obj) | Return a “memory view” object created from the given argument. |
min([iterable|arg*]) | Return the smallest item in an iterable or the smallest of two or more arguments. |
next(iterator[, default]) | Retrieve the next item from the iterator by calling its __next__() method. |
class objectO | Return a new featureless object. Object is a base for all classes. |
oct(x) | Convert an integer number to an octal string. |
open(file, mode='r', buffering=-1, encoding=None, errors=None, newline=None, closefd=True, opener=None) | Open file and return a corresponding file object. Use close() to close the file. |
ord(c) | Given a string representing one Unicode character, return an integer representing the Unicode code point of that character. |
pow(x, y[, z]) | Return x to the power y; if z is present, return x to the power y, modulo z (computed more efficiently than pow(x, y) % z). |
print(*objects, sep=' ', end=' ', file=sys.stdout, flush=False) | Print objects to the text stream file, separated by sep and followed by end. sep, end, file and flush; if present, must be given as keyword arguments. |
class property(fget=None, fset=None, fdel=None, doc=None) | Return a property attribute. |
range([stop|[start, stop[, step]]]) | Range sequence. |
repr(object) | Return a string containing a printable representation of an object. |
reversed(seq) | Return a reverse iterator. |
round(number[, ndigits]) | Return number rounded to ndigits precision after the decimal point. |
class set([iterable]) | Return a new set object, optionally with elements taken from iterable. |
setattr(object, name, value) | This is the counterpart of getattr(). The arguments are an object, a string, and an arbitrary value. |
class slice(start, stop[, step]) | Return a slice object representing the set of indices specified by range(start, stop, step). |
sorted(iterable[, key][, reverse]) | Return a new sorted list from the items in iterable. |
staticmethod(function) | Return a static method for function. |
class str(object) | Return a str version of object. |
sum(terable[, start]) | Sums start and the items of an iterable from left to right and returns the total. |
super([type[, object-or-type]]) | Return a proxy object that delegates function calls to a parent or sibling class of type. |
class tuple([iterable]) | Tuple sequence. |
type(object) | Return the type of an object. |
zip(*iterables) | Make an iterator that aggregates elements from each of the iterables. |
Tip
See https://docs.python.org/3/library/functions.html for more information about the built-in functions and classes. See http://docs.micropython.org/en/latest/pyboard/library/builtins.html for the latest list of built-in functions and classes in MicroPython.
Let’s see an example of using one of the classes - the dictionary. The following shows how we can use the built-in class to create a variable of type dict() and later use it. Since the class is part of the built-in functionality, it will work on both Python and MicroPython.
>>> my_addr = dict()>>> print(my_addr){}>>> my_addr['street'] = '123 Main St'>>> my_addr['city'] = 'Anywhere'>>> my_addr['zip'] = 90125>>> print(my_addr){'city': 'Anywhere', 'street': '123 Main St', 'zip': 90125}>>> my_addr = {'street':'201 Cherry Tree Road', 'city':'Gobye', 'zip':12345}>>> print(my_addr){'city': 'Gobye', 'street': '201 Cherry Tree Road', 'zip': 12345}
Here we see we can use the dictionary class to create a variable of that type. We can see this in the first print() call. Recall that the syntax for defining a dictionary is a set of curly braces. Next, we add values to the dictionary using the special syntax for accessing elements. Finally, we reassign the variable a new set of data using the more familiar dictionary syntax.
Now let’s talk about a topic we haven’t talked a lot about - exceptions. Exceptions are part of the built-in module for Python and can be a very important programming technique you will want to use. Perhaps not right away, but eventually you will appreciate the power and convenience of using exceptions in your code.
Exceptions
There is also a powerful mechanism we can use in Python (and MicroPython) to help manage or capture events when errors occur and execute code for a specific error. This construct is called exceptions and the exceptions (errors) we can capture are called exception classes. It uses a special syntax called the try statement (also called a clause since it requires at least one other clause to form a valid statement) to help us capture errors as they are generated. Exceptions can be generated anywhere in code with the raise() function . That is, if something goes wrong, a programmer can “raise” a specific, named exception and the try statement can be used to capture it via an except clause. Table 5-3 shows the list of exception classes available in MicroPython along with a short description of when (how) the exception could be raised.
Table 5-3. MicroPython Exception Classes
Exception Class | Description of Use |
|---|---|
AssertionError | an assert() statement fails |
AttributeError | an attribute reference fails |
Exception | base exception class |
ImportError | one or more modules failed to import |
IndexError | subscript is out of range |
KeyboardInterrupt | keyboard CTRL-C was issued or simulated |
KeyError | key mapping in dictionary is not present in the list of keys |
MemoryError | out of memory condition |
NameError | a local or global name (variable, function, etc.) is not found |
NotImplementedError | an abstract function has been encountered (it is incomplete) |
OSError | any system-related error from the operating system |
RuntimeError | possibly fatal error encountered on execution |
StopIteration | an iterator’s next function signaled no more values in iterable object |
SyntaxError | code syntax error encountered |
SystemExit | the sys.exit() function was called or simulated |
TypeError | a function or operation is applied to an inappropriate type (like type mismatch) |
ValueError | the right type but wrong value found (like out of bounds) |
ZeroDivisionError | mathematical function results in a / 0 |
The syntax for the try statement is shown below. Each part of the construct is called a clause.
try_stmt ::= try1_stmt | try2_stmttry1_stmt ::= "try" ":" code block("except" [expression ["as" identifier]] ":" code block)+["else" ":" code block]["finally" ":" code block]try2_stmt ::= "try" ":" code block"finally" ":" code block
Notice there are four clauses: try, except, else, and finally. The try clause is where we put our code (code block) - one or more lines of code that will be included in the exception capture. There can be only one try, else, and finally but you can have any number of except clauses naming an exception class. In fact, the except and else go together such that if an exception is detected running any of the lines of code in the try clause, it will search the except clauses and if and only if no except clause is met, it will execute the else clause. The finally clause is used to execute after all exceptions are processed and executed. Notice also that there are two versions of the statement: one that contains one or more except and optionally an else and finally, and another that has only the try and finally clauses.
Let’s look at one of the ways we can use the statement to capture errors in our code. Suppose you are reading data from a batch of sensors and the libraries (modules) for those sensors raise ValueError if the value read is out of range or invalid. It may also be the case that you don’t want the data from any other sensors if one or more fail. So, we can use code like the following to “try” to read each of the sensors and if there is a ValueError, issue a warning and keep going or if some other error is encountered, flag it as an error during the read. Note that typically we would not stop the program at that point; rather, we would normally log it and keep going. Study the following until you’re convinced exceptions are cool.
values = []print("Start sensor read.")try:values.append(read_sensor(pin11))values.append(read_sensor(pin12))values.append(read_sensor(pin13))values.append(read_sensor(pin17))values.append(read_sensor(pin18))except ValueError as err:print("WARNING: One or more sensors valued to read a correct value.", err)except:print("ERROR: fatal error reading sensors.")finally:print("Sensor read complete.")
Another way we can use exceptions is when we want to import a module (library) but we’re not sure if it is present. For example, suppose there was a module named piano.py that has a function named keys() that you want to import but the module may or may not be on the system. In this case, we may have other code we can use instead creating our own version of keys(). To test if the module can be imported, we can place our import inside a try block as shown below. We can then detect if the import fails and take appropriate steps.
# Try to import the keys() function from piano. If not present,# use a simulated version of the keys() function.try:from piano import keysexcept ImportError as err:print("WARNING:", err)def keys():return(['A','B','C','D','E','F','G'])print("Keys:", keys())
If we added code like this and the module were not present, not only can we respond with a warning message, but we can also define our own function to use if the module isn’t present.
Finally, you can raise any exception you want including creating your own exceptions. Creating custom exceptions is an advanced topic, but let’s see how we can raise exceptions since we may want to do that if we write our own custom libraries. Suppose you have a block of code that is reading values but it is possible that a value may be out of range. That is, too large for an integer, too small for the valid range of values expected, etc. You can simply raise the ValueError passing in your custom error message as follows with the raise statement and a valid exception class declaration.
raise ValueError("ERROR: the value read from the sensor ({0}) is not in range.".format(val_read))You can then use the try statement to capture this condition since you know it is possible and work your code around it. For example, if you were reading data, you could elect to skip the read and move on - continue the loop. However, if this exception was to be encountered when running your code and there were no try statements, you could get an error like the following, which even though is fatal, is still informative.
Traceback (most recent call last):File "<stdin>", line 1, in <module>ValueError: ERROR: the value read from the sensor (-12) is not in range.
You can use similar techniques as shown here to make your MicroPython code more robust and tolerant of errors. Better still, you can write you code to anticipate errors and react to them in a graceful, controlled manner.
Tip
For a more in-depth look at Python exceptions, see https://docs.python.org/3/tutorial/errors.html .
MicroPython Libraries
There are also libraries that are built expressly for the MicroPython system. These are libraries designed to help facilitate using MicroPython on the hardware. Like the built-in libraries, there are some MicroPython libraries that apply to one board or another and those that differ from one board to another. That is, there are subtle differences in the libraries that prevent them from working on more than one board. Always consult the documentation for the firmware for your board for a complete list of the MicroPython libraries available.
Overview
The MicroPython libraries provide functionality that is specific to the MicroPython implementation of Python. There are libraries with functions for working with the hardware directly, the MicroPython system, and networking. We will see examples of some of the features of each of these libraries in the following sections. Table 5-4 contains a list of the current MicroPython libraries that are common to most boards. The first column is the name we use in our import statement, the second is a short description, and the third contains a link to the online documentation.
Tip
See http://docs.micropython.org/en/latest/pyboard/library/index.html#micropython-specific-libraries for more details about any of the MicroPython libraries.
Table 5-4. MicroPython-Specific Libraries
Name | Description | Documentation |
|---|---|---|
framebuf | Frame buffer | http://docs.micropython.org/en/latest/pyboard/library/framebuf.html |
machine | Hardware-related functions | http://docs.micropython.org/en/latest/pyboard/library/machine.html |
micropython | MicroPython internals | http://docs.micropython.org/en/latest/pyboard/library/micropython.html |
network | Networking | http://docs.micropython.org/en/latest/pyboard/library/network.html |
uctypes | Access binary data | http://docs.micropython.org/en/latest/pyboard/library/uctypes.html |
Next, we will look at a few of the more common MicroPython libraries and see some code examples for each.
Common MicroPython Libraries
Now let’s look at examples of some of the more commonly used MicroPython libraries. What follows is just a sampling of what you can do with each of the libraries. See the online documentation for a full description of all the capabilities. Once again, the MicroPython libraries may vary slightly from one board (firmware) to another. In fact, the Pycom documentation states this quite clearly ( https://docs.pycom.io/chapter/firmwareapi/pycom/ ).
These modules are specific to the Pycom devices and may have slightly different implementations to other variations of MicroPython (i.e. for Non-Pycom devices). Modules include those which support access to underlying hardware, e.g. I2C, SPI, WLAN, Bluetooth, etc.
machine
The machine library contains functions related to the hardware, providing an abstraction layer that you can write code to interact with the hardware. Thus, this library is the main library you will use to access features like timers, communication protocols, CPU, and more. Since this functionality is communicating directly with the hardware, you should take care when experimenting to avoid changing or even potentially damaging the performance or configuration of your board. For example, using the library incorrectly could lead to lockups, reboots, or crashes.
Caution
Take care when working with the low-level machine library to avoid changing or even potentially damaging the performance or configuration of your board.
Since the machine library is a low-level hardware abstraction, we will not cover it in-depth in this chapter. Rather, we will see more of the hardware features in the next chapter. In the meantime, let’s explore another interesting gem of MicroPython knowledge by showing you how to discover what a library contains through the help function. For example, Listing 5-8 shows an excerpt of what is reported through the REPL console when we issue the statement help(machine) on the WiPy when connected to the Expansion Board. The help() function will display all the functions and constants that are available for use in the library. While it doesn’t replace a detailed explanation or even a complete example, it can be useful when encountering a library for the first time.
Listing 5-8. The machine Library Help
>>> import machine>>> help(machine)<module 'umachine'>object is of type module__name__ -- umachinemem8 -- <8-bit memory>mem16 -- <16-bit memory>mem32 -- <32-bit memory>reset -- <function>...Pin -- <class 'Pin'>UART -- <class 'UART'>SPI -- <class 'SPI'>I2C -- <class 'I2C'>PWM -- <class 'PWM'>ADC -- <class 'ADC'>DAC -- <class 'DAC'>SD -- <class 'SD'>Timer -- <class 'Timer'>RTC -- <class 'RTC'>WDT -- <class 'WDT'>PWRON_RESET -- 0HARD_RESET -- 1WDT_RESET -- 2...
Notice there is a lot of information there! What this gives us most is the list of classes we can use to interact with the hardware. Here we see there are classes for UART, SPI, I2C, PWM, and more. Let’s contrast that to the same output from the Pyboard. The following shows the same excerpt of classes for the Pyboard.
Pin -- <class 'Pin'>Signal -- <class 'Signal'>I2C -- <class 'I2C'>SPI -- <class 'SPI'>UART -- <class 'UART'>WDT -- <class 'WDT'>
Notice there are a few missing. We will explore some of these differences in the next chapter. It is always a good idea to check the output of help(machine) on a board you’re using for the first time. It may save you a lot of headaches trying to find support for hardware that doesn’t exist!
network
The network library on the Pyboard is used to install network drivers (classes for interacting with the networking abstraction) and configuring the settings. While the other libraries discussed are a little different from one board to another, this library is one that is quite different among the Pyboard and WiPy (and other) boards. In fact, the WiPy has the same library but contains different classes.
This is largely since the WiPy has built-in WiFi, it has its own mechanisms for working with networks. Recall we saw the network library for the Pyboard demonstrated briefly in Chapter 3 and we will see it used again later in the example chapters. That is, we learned there are only two network drivers for the Pyboard (and similar) boards: CC3K and WINNET5K. The WiPy network library contains three classes: WLAN, Bluetooth, and Server. Recall also we saw an example of the WLAN class in Chapter 3.
We will see more about the networking classes and the intriguing Bluetooth class in the next chapter.
Custom Libraries
Building your own custom libraries may seem like a daunting task, but it isn’t. What is possibly a bit of a challenge is figuring out what you want the library to do and making the library abstract (enough) to be used by any script. The rules and best practices for programming come to play here such as data abstraction, API immutability, etc.
We discussed creating your own modules in the last chapter. In this section, we will look at how to organize our code modules into a library (package) that we can deploy (copy) to our MicroPython board and use in all our programs. This example, though trivial, is a complete example that you can use as a template should you decide to make your own custom libraries.
For this example, we will create a library with two modules: one that contains code to perform value conversions for a sensor, and another that contains helper functions for our projects - general functions that we want to reuse. We will name the library my_helper. It will contain two code modules: sensor_convert.py and helper_functions.py. Recall we will also need a __init__.py file to help MicroPython import the functions correctly but we will get back to that in a moment. Let’s look at the first code module.
We will place the files in a directory named my_helper (same as the library name). This is typical convention and you can put whatever name you want, but you must remember it since we will use that name when importing the library in our code. Figure 5-1 shows an example layout of the files. This image was taken of my Pyboard flash drive.
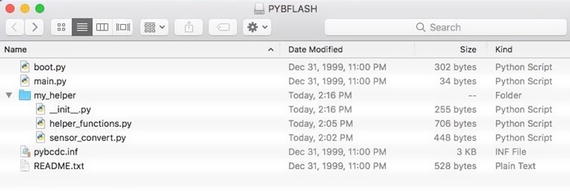
Figure 5-1. Directory/File Layout for the my_helper Sample Library on Pyboard
Notice we moved (copied) the directory containing the three files to my Pyboard. If you are copying the files to the WiPy, you will need to use ftp using the commands in Listing 5-9. Notice also we created the directory while connected to the WiPy and that we are in the directory containing the files we want to copy.
Note
If you use Linux, you may need to add the -p option (passive) for the ftp command.
Listing 5-9. Using ftp to copy files to the WiPy
$ ftp 192.168.4.1Connected to 192.168.4.1.220 Micropython FTP ServerName (192.168.4.1:cbell): microPassword:Remote system type is UNIX.Using binary mode to transfer files.ftp> cd flash250ftp> ls227 (192,168,4,1,7,232)150-rw-rw-r-- 1 root root 34 Jan 1 1980 main.pydrw-rw-r-- 1 root root 0 Jan 1 1980 sysdrw-rw-r-- 1 root root 0 Jan 1 1980 libdrw-rw-r-- 1 root root 0 Jan 1 1980 cert-rw-rw-r-- 1 root root 336 Jan 1 2098 boot.pydrw-rw-r-- 1 root root 0 Jan 1 2098 examples-rw-rw-r-- 1 root root 15 Jan 1 2098 data.bin-rw-rw-r-- 1 root root 377 Jan 1 2098 my_vehicles.json226ftp> mkdir my_helper250ftp> cd my_helper250ftp> put __init__.pylocal: __init__.py remote: __init__.py227 (192,168,4,1,7,232)150100% |***********************************| 255 1.24 MiB/s 00:00 ETA226255 bytes sent in 00:00 (0.61 KiB/s)ftp> put helper_functions.pylocal: helper_functions.py remote: helper_functions.py227 (192,168,4,1,7,232)150100% |***********************************| 703 5.49 MiB/s 00:00 ETA226703 bytes sent in 00:00 (1.34 KiB/s)ftp> put sensor_convert.pylocal: sensor_convert.py remote: sensor_convert.py227 (192,168,4,1,7,232)150100% |***********************************| 448 4.10 MiB/s 00:00 ETA226448 bytes sent in 00:00 (1.27 KiB/s)
Now let’s look at the code. The first module is named helper_functions.py and contains the two helper functions from a previous example. Since these are generic, we placed them in this code module. However, we want to use this code on all my boards. The problem is, the machine.rng() function returns a different size for the random number. On the Pyboard, it’s 30 bits but on the WiPy it’s only 24 bits. So, we use a try statement to detect if that library function is available setting a global variable that can be used in the get_rand() to return the correct value. Listing 5-10 shows the complete code for the module.
Listing 5-10. The helper_functions.py module
# MicroPython for the IOT - Chapter 5# Example module for the my_helper library# This module contains helper functions for general use.try:import pyb_PYBOARD = Trueexcept ImportError:import machine_PYBOARD = False# Get a random number from 0-1 from a 2^24 bit random value# if run on the WiPy, return 0-1 from a 2^30 bit random# value if the Pyboard is used.def get_rand():if _PYBOARD:return pyb.rng() / (2 ** 30 - 1)return machine.rng() / (2 ** 24 - 1)# Format the time (epoch) for a better viewdef format_time(tm_data):# Use a special shortcut to unpack tuple: *tm_datareturn "{0}-{1:0>2}-{2:0>2} {3:0>2}:{4:0>2}:{5:0>2}".format(*tm_data)
The second code module is named sensor_convert.py and contains functions that are helpful in converting sensor raw values into a string for qualitative comparisons. For example, the function get_moisture_level() returns a string based on the threshold of the raw value. The datasheet for the sensor will define such values and you should use those in your code until and unless you can calibrate the sensor. In this case, if the value is less than the lower bound, the soil is dry; if greater than the upper bound, the soil is wet. Listing 5-11 shows the complete code for the module.
Listing 5-11. The sensor_convert.py module
# MicroPython for the IOT - Chapter 5# Example module for the my_helper library# This function converts values read from the sensor to a# string for use in qualifying the moisture level read.# Constants - adjust to "tune" your sensor_UPPER_BOUND = 400_LOWER_BOUND = 250def get_moisture_level(raw_value):if raw_value <= _LOWER_BOUND:return("dry")elif raw_value >= _UPPER_BOUND:return("wet")return("ok")
Now let’s go over the __init__.py file. This is a very mysterious file that developers often get very confused about. If you do not include one in your library directory, you should import what you want to use manually. That is, with something like import.my_helper.helper_functions. But with the file, you can do your imports at one time allowing a simple import my_helper statement, which will import all the files. Let’s look at the __init__.py file. The following shows the contents of the file.
# Metadata__name__ = "Chuck's Python Helper Library"__all__ = ['format_time', 'get_rand', 'get_moisture_level']# Library-level importsfrom my_helper.helper_functions import format_time, get_randfrom my_helper.sensor_convert import get_moisture_level
Notice on the first line we use a special constant to set the name of the library. The next constant limits what will be imported by the * (all) option for the import statement. Since it lists all the methods, it’s just an exercise but a good habit to use especially if your library and modules contain many internal functions that you do not want to make usable to others. The last two lines show the import statements used to import the functions from the modules making them available to anyone who imports the library. The following shows a short example of how to do that along with how to use an alias. Here, we use myh as the alias for my_ helper.
>>> import my_helper as myh>>> myh.get_rand()0.2830396
We can now access (use) all three functions by that alias as shown below.
r_int = myh.get_rand() * 10print(myh.format_time(value))print(myh.get_moisture_level(sensor_raw))
In case you’re wondering, the help function works on this custom library too!
>>> import my_helper>>> help(my_helper)object <module 'Chuck's Python Helper Library' from 'my_helper/__init__.py'> is of type module__path__ -- my_helperhelper_functions -- <module 'my_helper.helper_functions' from 'my_helper/helper_functions.py'>__name__ -- Chuck's Python Helper Librarysensor_convert -- <module 'my_helper.sensor_convert' from 'my_helper/sensor_convert.py'>get_rand -- <function get_rand at 0x20004270>format_time -- <function format_time at 0x20004300>__file__ -- my_helper/__init__.py__all__ -- ['format_time', 'get_rand', 'get_moisture_level']get_moisture_level -- <function get_moisture_level at 0x20004920>
Once you have started experimenting with MicroPython and have completed several projects, you may start to build up a set of functions that you reuse from time to time. These are perfect candidates to place into a library. It is perfectly fine if the functions are not part of a larger class or object. So long as you organize them into modules of like functionality, you may not need to worry about making them classes. On the other hand, if data is involved or the set of functions works on a set of data, you should consider making that set of functions a class for easier use and better quality code.
Summary
The MicroPython firmware has a lot of capability for IOT projects. Indeed, there are a lot of different classes we can use to write robust and complex MicroPython programs from built-in functions that give the language a breadth of capability to working with data, performing calculations, and even working with time values to interfacing directly with the hardware.
Working with the hardware is one area that differs the most about MicroPython from one board to another. This is because the boards are quite different. Some have networking, some do not. Some have more on-board features than others, and some have less memory and even fewer GPIO pins. It is no surprise then that the firmware differs from one board to the next when it comes to the hardware abstraction layers.
In this chapter, we explored some of the more commonly used built-in and MicroPython libraries that generally apply to all boards. In the next chapter, we will dive a bit deeper into the lower-level libraries and hardware support in MicroPython including those board-specific libraries we can use such as those for the Pyboard, WiPy, and more.
Footnotes
1 Also, keep in mind this interval - called a sampling rate - must also make sense for the project. Sampling the ambient temperature in a controlled climate 30 times a second may generate a considerable amount of data that is useless because it rarely changes.