Chapter 8. Aggregating Data from Different Data Sources
In This Chapter
• Connecting to SQL Server Databases
• Database in the Cloud: Connecting to SQL Azure
• Collaboration: Working with Lists from SharePoint 2010
The business of a company involves a lot of tasks, processes, documents, huge amounts of data, and so on. Talking in terms of software, different platforms help to solve specific problems, meaning that databases and data-centric applications are not the only solution. For example, a company can use Microsoft SharePoint 2010 to share documents, calendars, team decisions, and tasks through internal web portals. In addition, cloud computing is becoming day by day an important business solution for storing data because it reduces the costs of maintaining servers in house by also offering an infrastructure that automatically keeps all the information secure. So, a company could upload information to databases hosted on Microsoft SQL Azure.
Finally, a company could have business applications that consume data coming from external data sources, created by other developers. In fact, it is not uncommon that an application elaborates data from other sources such as web services. So, the first challenge is to build modern business applications that enable organizations to interact with all these data sources other than databases, with the minimum effort for both the company and the developer, all in one place and possibly with the same approach. But there is also another challenge: upgrading to more modern applications. Usually, this is not easy, because migration is certainly a huge investment in terms of money (although necessary). Because of this, moving to a modern application cannot absolutely imply migrating or losing existing data storages.
Visual Studio LightSwitch offers great solutions to face the challenges described here. In fact, in LightSwitch, you are not limited to creating a new database for each application (that is what you saw so far). Instead, you can make a LightSwitch application interact with existing SQL Server databases, making migration easier without the risk of losing data stored within existing databases (assuming that your company already uses SQL Server as the database engine).
In addition, you can connect LightSwitch to other external data sources, including databases in the cloud, collaboration platforms, and services. Data sources available for LightSwitch are therefore SQL Server, SQL Azure, SharePoint 2010, and WCF RIA Services. The good news is that one application can federate multiple data sources, relate them, and present them together on screens.
In addition, the development experience is dramatically simplified because you use the same techniques independently from the data source the application is connecting to. Therefore, you do not need to learn how the aforementioned technologies work behind the scenes and how to write code against them, because in LightSwitch you simply reuse the same skills acquired so far. Last but not least, all these possibilities can be accomplished both without writing a single line of code and by customizing actions in managed code.
This chapter explains how to handle data connections to all the aforementioned data platforms in one place, by extending the Invoice Management application example, except for WCF RIA Services, which are discussed in Chapter 19, “LightSwitch Extensibility: Data and Extension Deployment.” In fact, these allow creating custom data sources and require more advanced skills, so talking about them in a chapter devoted to extensibility is more appropriate.
Connecting to SQL Server Databases
In the Invoice Management application built so far, you created the data source from zero, starting with the design of entities. Then LightSwitch generated a SQL Server database for you (the intrinsic database) and was responsible for defining tables and columns in the database, mapping entity properties to columns, and assigning the appropriate SQL data types according to the LightSwitch types you specified at design time.
In some scenarios, you need to continue some previous work upon an existing SQL Server database. For example, your company might ask you to update clients with LightSwitch but a lot of information is inside an existing database, so you must use this when building the new application. There is also another common scenario that you might need to accomplish: Your company works on different databases, but some of them need to share some information. For example, the list of the employees in your company is stored in a different database, and you need to grab it to use it in the application.
Visual Studio LightSwitch enables you to satisfy both objectives with simple instruments and steps. You can both create applications built upon existing databases and you can aggregate tables from another database into the LightSwitch application. The application’s infrastructure is then responsible for managing data connections for you, and so you do not need to write code. This section explains both scenarios, by creating a brand-new application and by extending the Invoice Management example.
Visual Studio LightSwitch supports Microsoft SQL Server Express Edition. This is a free edition of the database engine and can be used with no limitations in your company. Of course, some advanced features (such as backup automation) are not available, and each database has limited capacity. (This can be up to 4 GB in SQL Express 2005 and 2008 and 10 GB in version 2008 R2.) Versions allowed are 2005, 2008, and 2008 R2. On one side, this is important because if you have existing data upon SQL Server 2005 Express, you are not obliged to migrate to 2008 R2 (but remember that it is free). On the other side, LightSwitch requires SQL Server 2008 R2 Express Edition on the development machine. If you have another edition of SQL Server installed, such as the Developer Edition, this will not be recognized on the development machine.
Because SQL Server 2008 R2 Express Edition is also installed when you install LightSwitch, you can create your business applications with no problem. You can use different editions and instances once the application is deployed to end users. In addition, notice that each time we refer to SQL Server in this chapter, we are referring to SQL Server Express Edition. You can find further information, including differences with other editions, at the official page: www.microsoft.com/express/database.
Installing the Sample Northwind Database
This chapter explains how to create a brand-new application that uses an existing SQL Server database and how to extend the Invoice Management application with data grabbed from an external database. To accomplish both the proposed objectives, the sample Northwind database from Microsoft is used. This is probably the most used database example in books and articles about programming, because it represents a typical order information system. Northwind has the goal of reproducing the business life of a fictitious company called Northwind Traders. You need to download the database from the MSDN Code Gallery: http://code.msdn.microsoft.com/northwind. This is available via a zipped archive. Once downloaded, unzip the package to any folder you like, and then follow the instructions in the appropriate subsection (depending on whether you have installed SQL Server Management Studio).
Installing Northwind with SQL Server Management Studio
Installing Northwind (and any other SQL Server database) with Microsoft SQL Server Management Studio is an easy task. Once you open this application, follow these steps:
1. Select File, Open, and then locate the InstNwnd.sql file in the folder where you extracted the content of the zip archive. When you click OK, Management Studio loads the content of this file, which is visible in the SQL code editor, as shown in Figure 8.1. This file contains a number of T-SQL instructions that create the Northwind database and make it available on the instance of SQL Server to which you are connected.
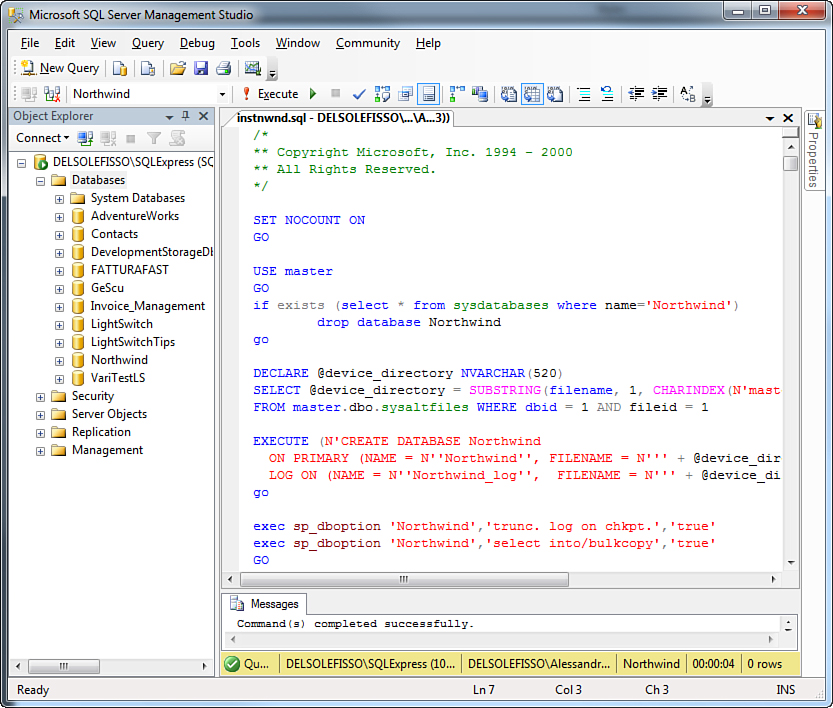
Figure 8.1. SQL Server Management Studio is ready to install the Northwind database.
2. Press F5 so the instructions are executed. After a few seconds, the message Commands Completed Successfully appears in the Message box at the bottom of the query execution panel.
At this point, the database is available in the selected instance of SQL Server, as you can verify by examining the Databases node in the Object Explorer window (see Figure 8.1).
Installing Northwind Without SQL Server Management Studio
To install the Northwind database, as well as any other SQL Server database based on a SQL script, you can also use a command prompt. This is useful if you do not have SQL Server Management Studio installed. To accomplish this, follow these steps:
1. In Windows, select Start, All Programs, Accessories.
2. Right-click Command Prompt and select Run as Administrator from the pop-up menu.
3. Type the following command line, which opens the specified script and installs the database to the specified SQL Server instance:
SQLCmd -S .SQLEXPRESS -i c:pathinstnwnd.sql
C:Path is the folder where you previously unzipped the Northwind archive. SQLCmd is the command-line tool that enables you to interact with SQL Server manually.
Creating New Applications on Existing SQL Server Databases
One great benefit that Visual Studio LightSwitch offers is connecting applications to existing SQL Server databases other than the intrinsic database. This includes connecting to a whole database or just the selected objects.
Avoid Connecting to Production Databases in Development
If you are new to programming, remember that it is a best practice to not connect to an existing production database in development. The appropriate approach is to create a copy of the database and work against the copy. You do not need to copy all the data from the source database to the target one; you might only need to re-create it starting from its schema (which includes tables, views, and so on). To create a copy of the database, you can use SQL Server Management Studio, Visual Studio, or the Import/Export Data tool that ships with SQL Server.
In this subsection, you first learn how to create a new application that is built upon the Northwind database. So, run Visual Studio LightSwitch. When the environment is ready, create a new project called NorthwindTraders. (You are free to choose the programming language.) When the new project is created, in the LightSwitch designer you can see the first choice for creating a data source, as shown in Figure 8.2.
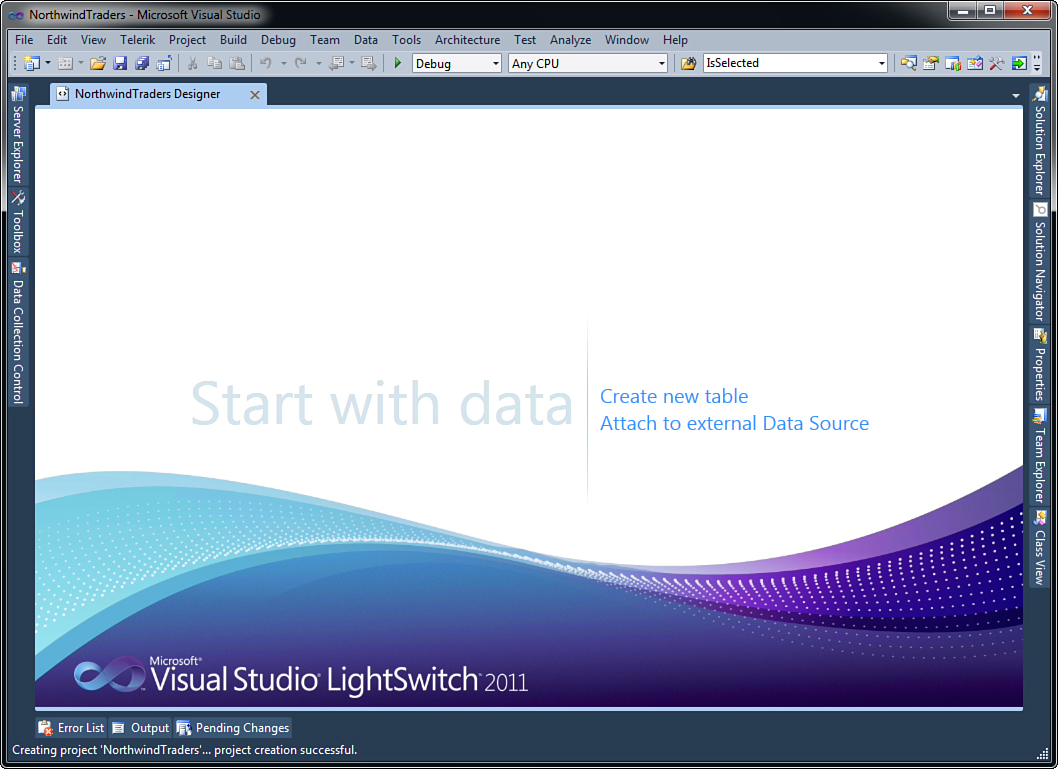
Figure 8.2. Selecting an external database as the new source.
Click Attach to External Database. At this point, you are asked to specify the external data source you want the application to connect to. As you can see, the Attach Data Source Wizard dialog displays, as the first choice, the external data sources available to LightSwitch applications (see Figure 8.3).
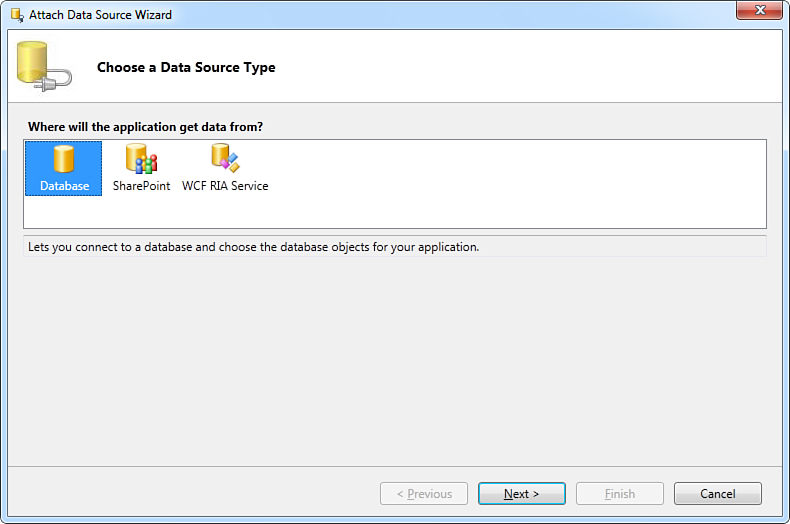
Figure 8.3. The list of available external data sources.
As you probably suppose, you use this dialog several times in this chapter because it enables you to select all the data sources discussed here. Select Database and click Next. When the Connection Properties dialog appears, in the Server Name box specify the instance of SQL Server Express where you installed the Northwind database, which is .SQLEXPRESS by default. Then, in the Select or Enter a Database Name box (in the Connect to a Database group at the bottom), select Northwind. Figure 8.4 shows an example of connection properties.
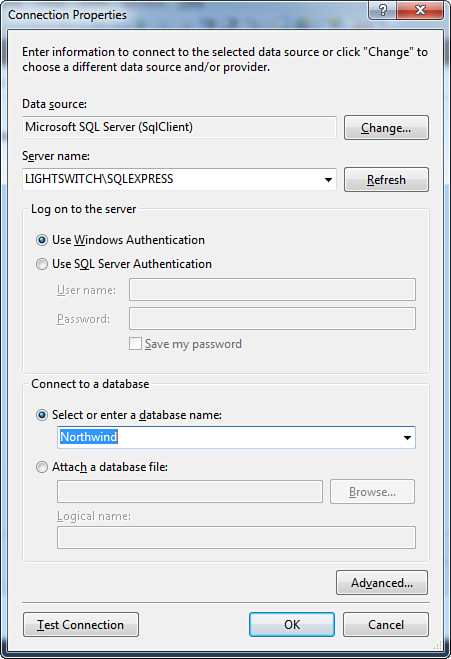
Figure 8.4. Specifying the connection properties to the Northwind database.
If you have some experience in Visual Studio 2010 and earlier, this dialog is not new to you. Just notice that LightSwitch supports .NET data providers for Entity Framework 4. This implies that by default, you can connect to SQL Server, which is the built-in data provider, and to any other installed Entity Framework 4 provider. If no other providers for Entity Framework 4 are installed, you can connect only to a SQL Server database.
When you click OK, the data source dialog asks you to select the objects in the database that you want to make available to the application.
With regard to SQL Server databases, LightSwitch can cache both tables and views. A view is basically a virtual, read-only table made of rows and columns that derives its data from one or more physical tables and that can be considered as a query stored in the database. Views are really useful because they expose to the user only the specified data set, so that all the other data that is not part of the view cannot be modified.
Both tables and views are wrapped by LightSwitch into entity collections. For example, expand the Tables node and then select the Categories and Products tables. Figure 8.5 shows this selection.
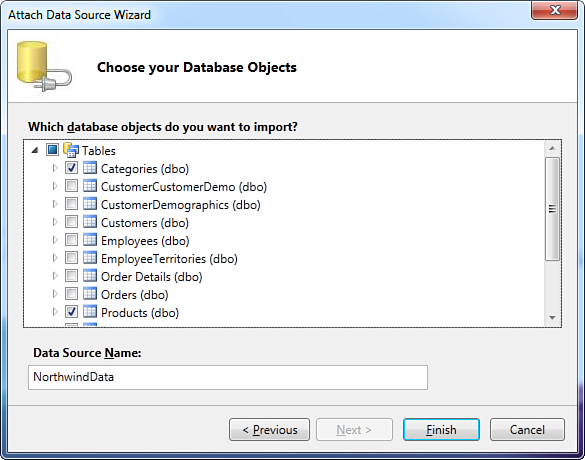
Figure 8.5. Selecting database objects.
Next, expand the Views node and select the Product Sales for 1997 view. Notice that the Data Source Name field provides a default name for the new data source. This name is displayed in Solution Explorer once you complete importing objects. You can replace this identifier with a different one, but for now leave the default selection unchanged and click Finish. At this point, Visual Studio LightSwitch informs you that no primary key has been found in the selected view, so it will generate a virtual primary key to mark each item in the resulting entity collection as unique. Figure 8.6 shows what the warning message looks like.

Figure 8.6. LightSwitch infers the primary key if not found in the imported object.
When you click Continue, LightSwitch generates entities and entity collections the usual way; so, it generates a new Product entity and a new Category entity. Figure 8.7 shows how the Category entity is defined in the designer, including the master-details relationship with the Product entity.
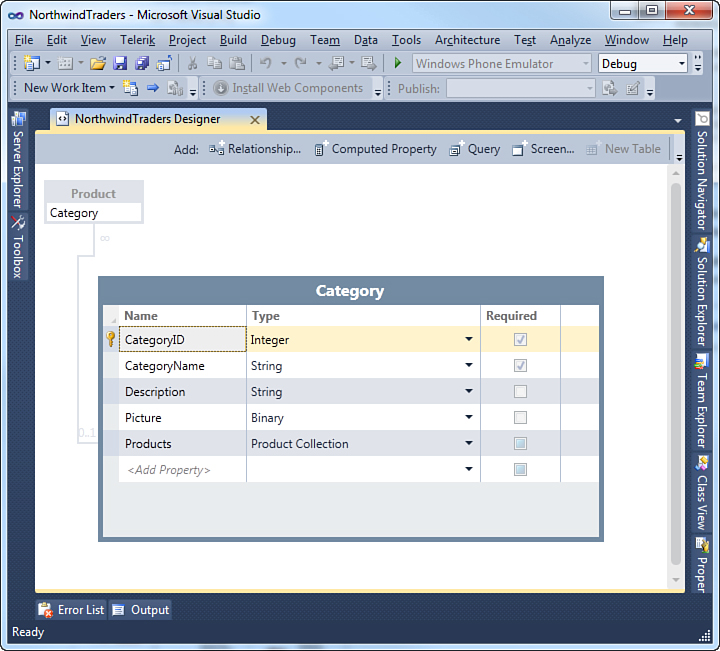
Figure 8.7. The new entity generated from the Categories table in Northwind.
You can immediately notice a couple of things at this point:
• LightSwitch recognizes that the imported table has a primary key named CategoryID, so it uses this instead of generating a default Id property of type Integer (as instead happens when creating new entities from scratch).
• LightSwitch ensures that columns marked as required in the database are also marked as required properties in the newly generated entities, and this setting cannot be changed.
• LightSwitch imports data from the external database and automatically maps such data into the appropriate type; also, to ensure that the database will receive back valid information, it does not allow changing the nature of the storage type. For instance, CategoryName is a property of type String, and you cannot change it to a numeric type. Instead, you are allowed to replace it with another business type that inherits from String, such as EmailAddress or PhoneNumber.
• When the IDE understands that a type in the database has no corresponding type in LightSwitch, it keeps the original type. This is the case of pictures stored as Binary; although LightSwitch offers an Image type, pictures stored in the database as binary data cannot be automatically converted into the Image type. This is why LightSwitch left the Binary selection unchanged, but it also allows changing the selection to the Image type. This is because in some cases, the conversion could succeed but also because you might want to build a custom control that converts from the original format to the Image type.
What You Can Do and What You Can’t in Lightswitch
LightSwitch does not allow you to make schema changes on external data sources; you are only allowed to enhance the model on the LightSwitch side. In other words, you can extend imported entities with new properties or map entity types with business types, add relationships across federated data sources, but you cannot delete a column from a table or make any other change that would affect the database schema.
Now open the Product entity, whose definition is shown in Figure 8.8.
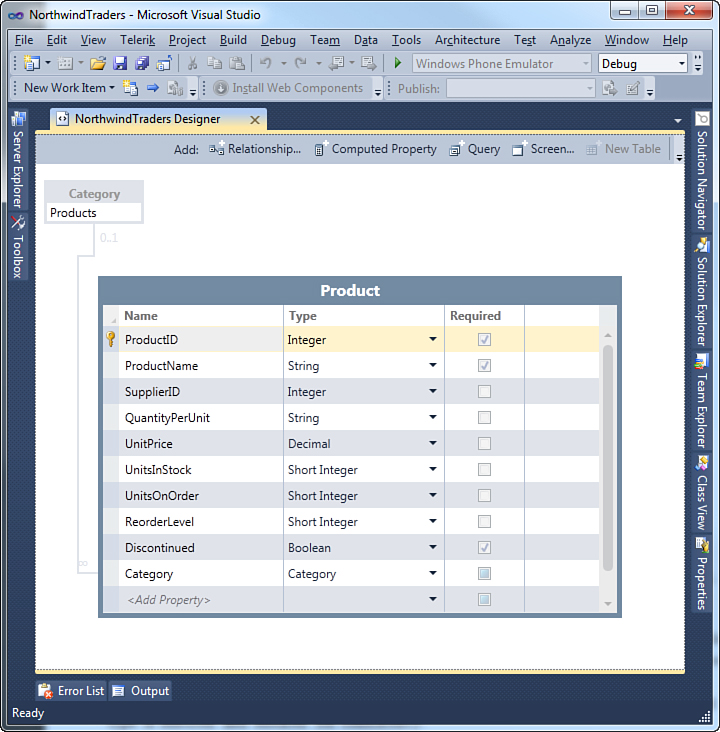
Figure 8.8. The Product entity definition as it comes from the database.
By continuing the previous considerations, you can observe the autogenerated ProductID primary key. Next, notice that the property UnitPrice is of type Decimal; the reason is that this is the default when importing data of type Money from a SQL Server database, but you can now replace Decimal with Money. (For this and next replacements with Money, also remember to provide the appropriate culture information useful for the currency symbol.) Finally, notice how some properties are of type Short and cannot be changed. The reason is that they are exposed by the database as smallint objects and therefore no other type is accepted, so the .NET corresponding type is selected and blocked for consistency.
Investigating the Original Data Types in the Database
If you want to understand how LightSwitch actually represents SQL data types, you can expand the structure of the database inside SQL Server Management Studio Express or expand the database structure in the LightSwitch Server Explorer window. Each column can be extended so that members and member types can be discovered easily. Figure 8.9 shows the Object Explorer window listing columns within the Products table and their SQL types.
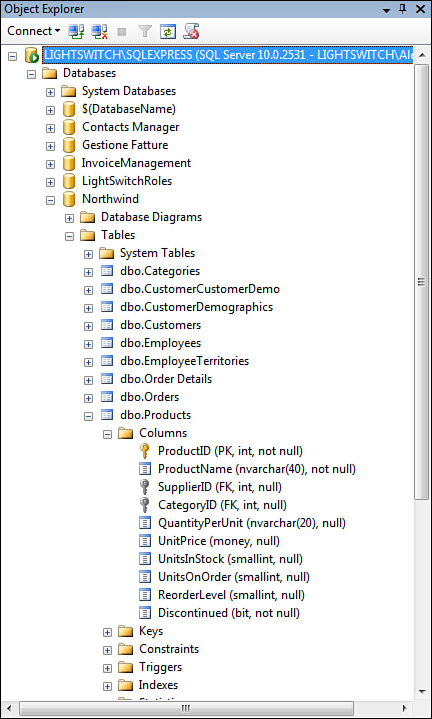
Figure 8.9. Checking column types for the Northwind database.
LightSwitch also imports relationships from the external database. If you take a look at the Entity Designer, you can see how a one-to-many relationship exists between the Category and Product entities. If you right-click the relationship and select Edit Relationship, the same-named dialog shows relationship details, as shown in Figure 8.10.
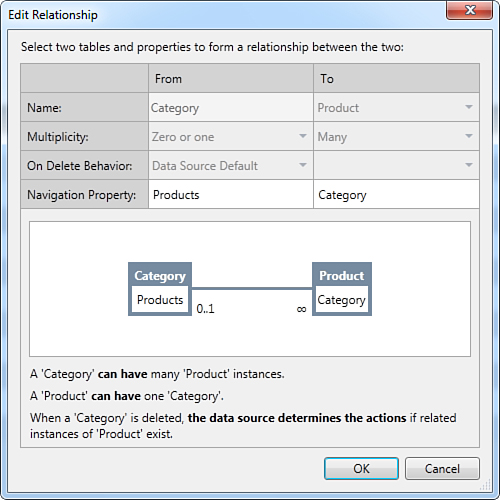
Figure 8.10. Displaying information about existing relationships.
Querying, Filtering and Sorting
You can apply all the notions you learned in Chapter 6, “Querying, Filtering, and Sorting Data,” to entities built over tables from an external database. There is actually no difference, because you apply filters over the entity collection that models the table from the external database. So, what you learned before can be used in this new scenario, as well.
Notice that relationships imported from existing data sources cannot be edited, so that the original data structure is kept safe. If you now open Solution Explorer, you can also see that LightSwitch generated a new entity and an entity collection for the Product_Sales_for_1997 view that was selected when importing the database objects. The entity is called Product_Sales_for_1997Item and looks like Figure 8.11.

Figure 8.11. Views in the database are represented as entities in LightSwitch.
The entity generation for the view makes sense because a view is a virtual table made of columns and rows, so it is natural for LightSwitch to translate such an object into an entity.
Views from the Lightswitch Perspective
As explained previously, views are virtual tables that aggregate data from other tables and that eventually filter such data according to a given criterion. So, a view defines filters and queries directly in the SQL Server database. This means that you do not need to provide custom filters in the LightSwitch Query Designer: data comes filtered from the database. This is demonstrated shortly when adding screens to the application.
As you did previously for the Product entity, replace the Decimal type in the ProductSales property with Money. Now take advantage of what you learned throughout this book and add the following screens:
• A New Data Screen for the Product entity
• A List and Details Screen for the Categories collection, including Category Details and Category Products
• A Search Data Screen for the Products_Sales_for_1997 collection
If you did not replace the type for the Picture property in the Category entity from Binary to Image, you will notice in the Screen Designer that this property is listed but no user control is assigned for data binding. The reason is that built-in controls in LightSwitch for displaying and setting images are only bound to work with supported image file formats, not with binary data. If you want to show pictures correctly from the Northwind database, you should create a custom Silverlight control that displays and sets images via the Image control, whose Source property should invoke a converter class that converts from binary to supported images and vice versa. Converter classes are objects that implement the IValueConverter interface. The MSDN Library provides both explanations and examples on the usage of such an interface: http://bit.ly/dWTr5f.
You can also make the user interface more friendly by changing values to the Display Name property for each element to provide more descriptive contents. After you complete the design of the user interface, you can start the application. For example, you can add a new product to the list by running the CreateNewProduct screen. Figure 8.12 shows how to add a new product.
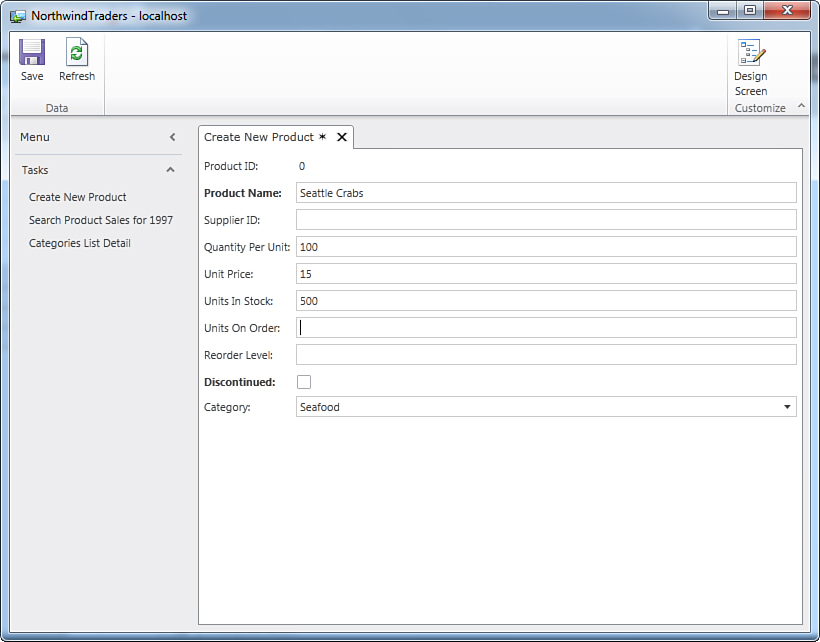
Figure 8.12. Creating a new product for the Northwind database.
Similarly, you could show the list of categories and the product details by running the appropriate screen. This will display data items exactly as you would expect, as shown in Figure 8.13.
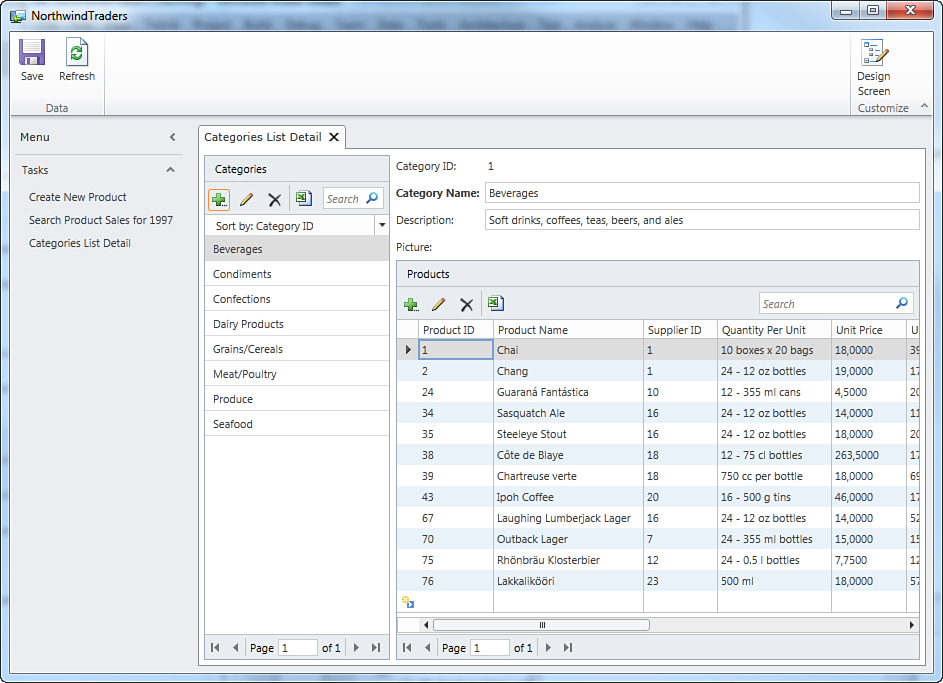
Figure 8.13. Showing a list/details representation of data items.
In particular, the screen shows the list of categories on the left, and category details and the list of products belonging to each category on the right. Notice how all the usual functionalities are still available, such as buttons for data editing and reporting. Also notice how prices are formatted with the currency symbol. This results because we replaced the Decimal type with Money for the UnitPrice property.
All these aspects demonstrate how the LightSwitch infrastructure is independent from the data source that the application relies on. Just for completeness, take a closer look at Figure 8.13 and notice that the product added before is visible in the list of products, and this is correct once you save the product to the database.
Finally, you can display product sales for the year 1997 by running the appropriate screen, which is based on the view wrapped from the database. When you run the screen, products are sorted by category, but you can decide to sort items by price just clicking the ProductsSales column. Again, prices are formatted with the currency symbol and the appropriate punctuation (because we replaced Decimal with Money), as shown in Figure 8.14.
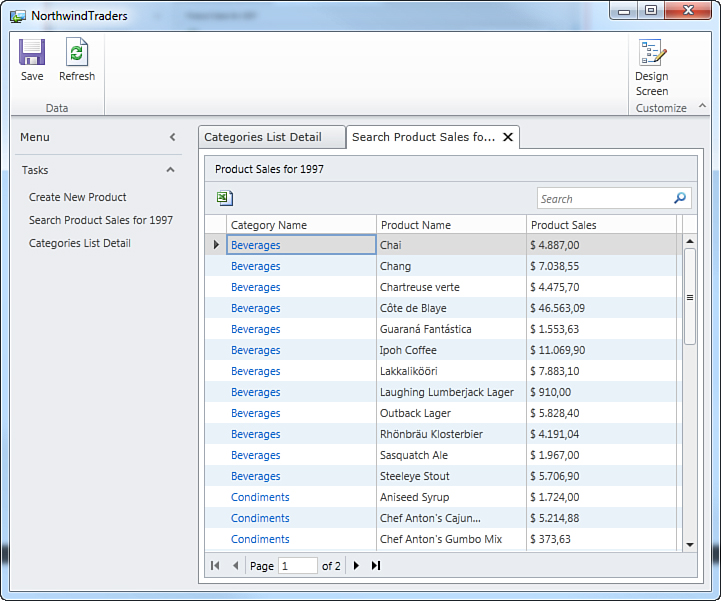
Figure 8.14. Showing data from a view in the SQL Server database within a LightSwitch screen.
You can easily click each item to see a screen showing details. You cannot edit the data, however, because a view is read-only. So, although the Northwind Traders application did not include all the database objects from Northwind, it was good enough to understand how LightSwitch applications can be built upon existing SQL Server databases, instead of creating your own data sources from scratch. By the way, LightSwitch offers another great opportunity: combining multiple data sources, such as data coming from an existing external database and data within entities designed from zero. This is discussed in the next section.
Aggregating Data from Existing Databases into LightSwitch Applications
With Visual Studio LightSwitch, you can federate data from multiple sources. For example, you might be working on an application that exposes its own data set that you need to extend with tables from an external database. Consider the Invoice Management application: You defined entities and entity collections related to customers, orders, products, and invoices. Now imagine that the list of employees in your company is stored inside a different database and that you want to add such a list to the current application without recreating the entity from zero and with the ability to load the existing employee information from the second database. The Northwind sample database exposes a table called Employees that comes with a built-in list of employees. Therefore, it is really useful to understand how to extend the Invoice Management application with an entity representing the list of employees in the company, grabbing this from the Northwind database. For the sake of consistency, we will extend the sample application as it was updated in Chapter 6. By so doing, you can follow the same steps regardless of which edition of LightSwitch you are running. This will make things easier and will let you focus on data connections instead of focusing on other features.
Adding Entities to the Intrinsic Database from External Tables
Open the Invoice Management project created in Chapter 6 and repeat the steps (explained before) required to establish a connection to the Northwind database until you see the Attach Data Source Wizard dialog. When such a dialog appears, expand the Tables node and select the Employees table, as shown in Figure 8.15.
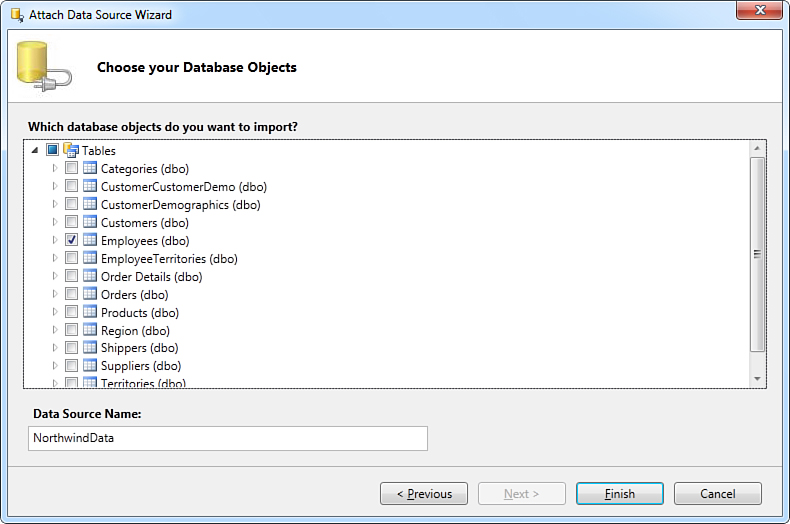
Figure 8.15. Adding the Employees table to the Invoice Management application.
You can leave unchanged the NorthwindData name for the new data source and click Finish. In Solution Explorer, you can now see that there are two different data sources: the ApplicationData, which includes entities that you designed at the beginning of the application development; and the NorthwindData source, which includes the imported table. LightSwitch generated a new entity called Employee from the Employees table, which exposes all the expected properties, as shown in Figure 8.16.
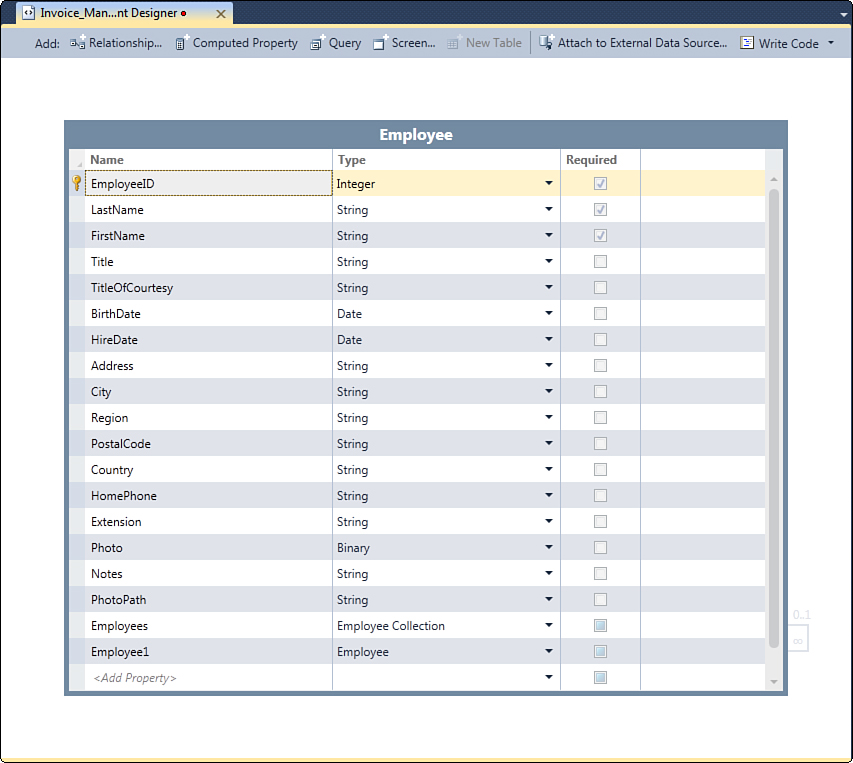
Figure 8.16. The Employee entity from a LightSwitch perspective.
The same considerations about data types made in the previous subsection also apply to the current example. For better compatibility, it is convenient to replace DateTime with Date in the BirthDate and HireDate properties. In addition, LightSwitch imported a relationship with the entity itself, which looks recursive and that is actually a supported scenario. (For example, you could rename the Employee1 relationship to Manager.)
The goal now is to specify a relationship between the Employee and OrderHeader entities, meaning that the application will allow keeping track of what orders have been processed by each employee. The steps required are basically the same described back in Chapter 4, “Building More-Complex Applications with Relationships and Details Screens.” Click the Add Relationship button to display the Add New Relationship dialog. Define the relationship by setting Zero or One in the From part, under Employee, and then by setting OrderHeader in the To element as the Many part of the relationship. Figure 8.17 shows what the dialog should look like at this point.
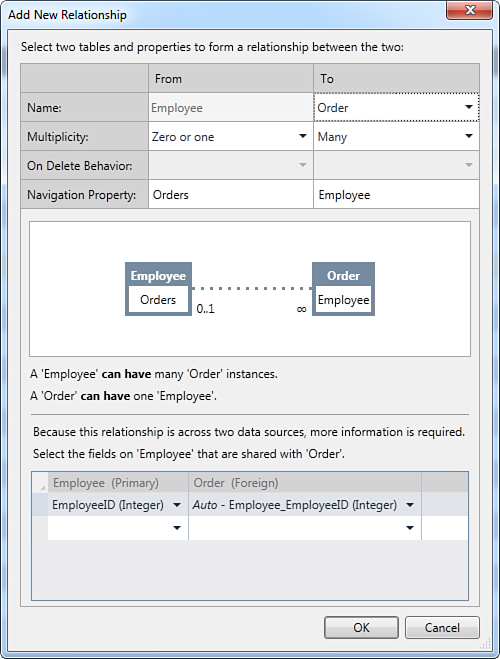
Figure 8.17. Adding a relationship between entities.
An important point to make now is that a relationship can be established between an entity defined in the application and a table defined inside an external database. At this point, it is worth emphasizing how LightSwitch creates entities: As explained in Chapter 4, the object model in LightSwitch maps foreign keys in a different way if compared to SQL Server. This is why you now get a new box (Which Properties on ‘Employee’ Are Shared with ‘OrderHeader’?) in the dialog. In this particular scenario, you have to explicitly specify which properties in both entities can be related to one another. Because the previously mentioned different mapping model, LightSwitch is unable to automatically find a foreign key to which to establish a relationship.
By the way, LightSwitch is smart enough to provide an alternative solution: creating a new property of type Integer (which accepts null values) that will act as a foreign key to handle the new relationship. In the current example, the IDE proposes a new Employee_EmployeeID property for the OrderHeader entity so that this can be easily associated with the Employee one. Notice that this choice is marked as Auto, meaning that this solution is proposed automatically. As an alternative, you can choose a different property that is suitable for solving the problem. Just remember that if you want to choose a property on your own, this must be of type Integer and accept null values (that in the .NET terminology means a Nullable(Of Integer)). Leave unchanged the proposed selection and click OK, so that after a few seconds you will be able to see the relationship in the Entity Designer, exactly as you would expect. After you have imported objects from the external database and established some relationships, you also need make some edits to the user interface.
How are Entities Mapped and Where is Data Saved?
When you import an external data source, Visual Studio LightSwitch defines an entity that models the table exposed from the external database under the form of a .NET class. This is something common to the entity generation in applications in which you use only the intrinsic database. In this new scenario, the modeling happens on the LightSwitch side, but the actual data source is still on the external database. Therefore, LightSwitch does not generate a new table in the intrinsic database: It just allows exchanging data with the external database, passing through the .NET entity mapping. Then changes that you make to entities that map external data sources are reflected to the external database and not to the intrinsic database. Technically speaking, this means that referential integrity cannot be enforced across federated data sources, but LightSwitch can relate them together for you, displaying them on screens, and allow editing of them.
This can be easily demonstrated by investigating the database with SQL Server Management Studio Express. There is another consideration: This discussion is true when you work singularly on the imported source. For example, if you create a new employee, this will be saved to the Northwind database. But if you update an instance of the OrderHeader entity, which is in the intrinsic database, by adding the employee name (as shown in next subsection), this particular information is saved to the application data because of the Employee_EmployeeID property that the OrderHeader entity was extended with. Such a new property represents the relationship between entities. As a consequence, when you deploy your application, you also need to deploy all the external data sources or update the connection string to point to the production database. With regard to the current example, the setup process for the Invoice Management example will deploy both the intrinsic database and the Northwind database.
Binding Screens to Imported Tables
At this point, you need to update screens in which you edit orders with employees’ information, so that the one-to-many relationship established before gets satisfied. First, in Solution Explorer, double-click the CreateNewOrderHeader screen. When the Screen Designer is available, notice on the left how the OrderProperty element has been updated with the Employee and Employee_EmployeeID properties. The first is a reference to the associated employee, and the second one is the property added for the specific purpose of performing the association. Drag Employee onto the designer (for example, between the Date Picker, ShippedDate, and Rows Layout, Right elements). An Auto Complete Box control will be added and will make it easier to select the employee on the screen. Figure 8.18 shows what the screen now looks like and how you select a different control.
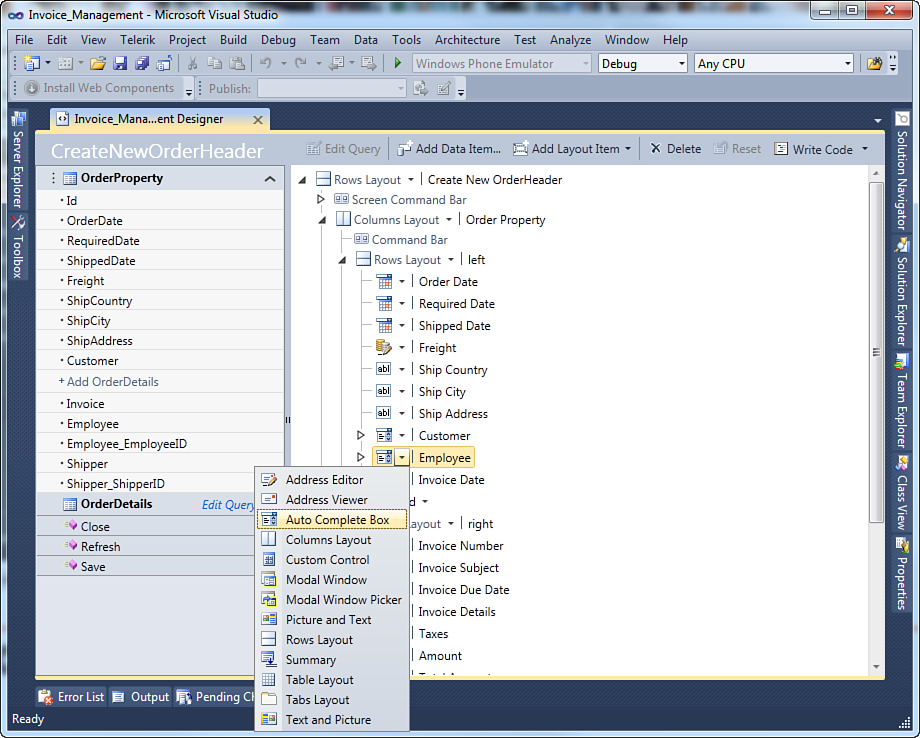
Figure 8.18. Adding the Employee property to the screen.
Now you can edit another screen, such as a Search Screen or List and Details Screen related to order management. Just as an example, open the OrderHeaderListDetails screen and repeat the same steps to add the Employee property, this time placing the property between the auto complete box called Customer and Date Picker, Order Date elements. Now run the application and open the CreateNewOrderHeader screen for first. You can specify the new order properties as usual, but you can also select the employee who is responsible for handling that order by picking up the name from the appropriate auto complete box, as shown in Figure 8.19.
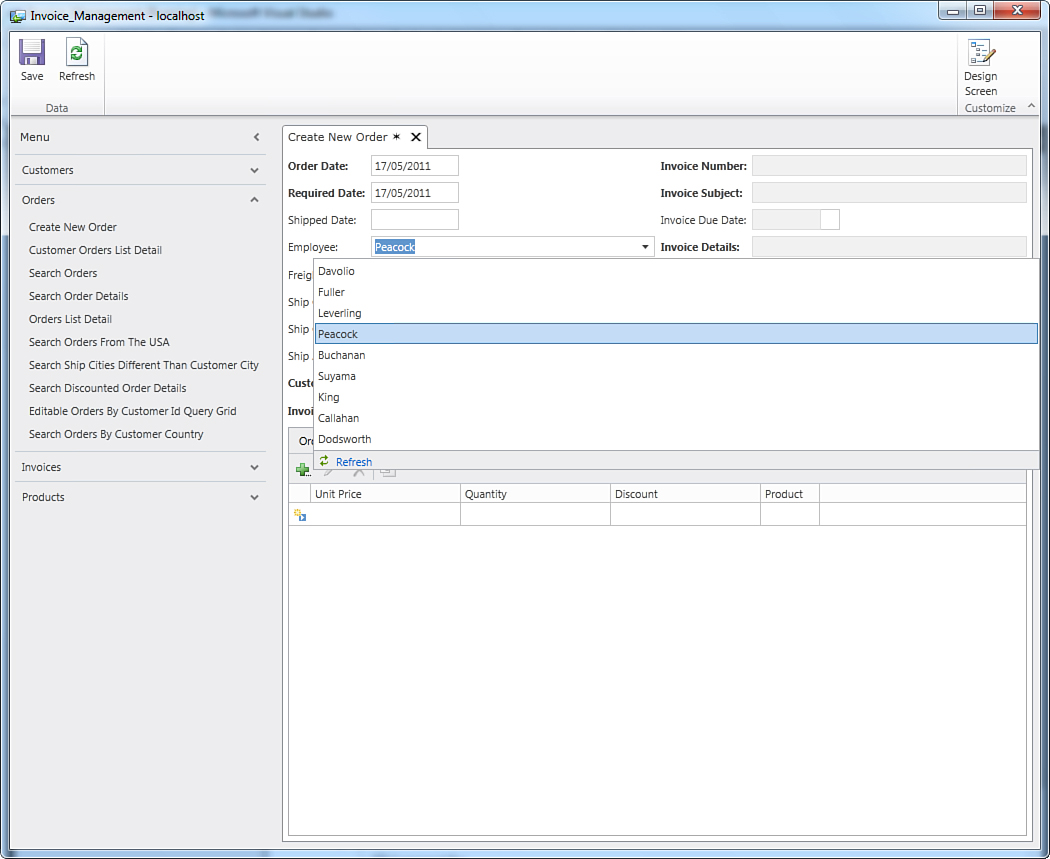
Figure 8.19. Selecting an employee for the newly created order.
When you save changes, the new order contains the name of the employee. This can be checked by showing the OrderHeaderListDetails screen, which reports the employee name, as shown in Figure 8.20.

Figure 8.20. The updated list of orders now displays the employee’s name.
As explained before, the employee’s reference is stored into the application database. Now close the application and create a new data entry screen for adding new employees; this is useful if your company decides to hire someone.
Finally, create a new screen of type List and Details for the Employee entity, called EmployeeListDetails, which will be integrated later with data coming from SharePoint 2010. When you show the data entry screen in the application, you can easily add information for a new employee, as shown in Figure 8.21.
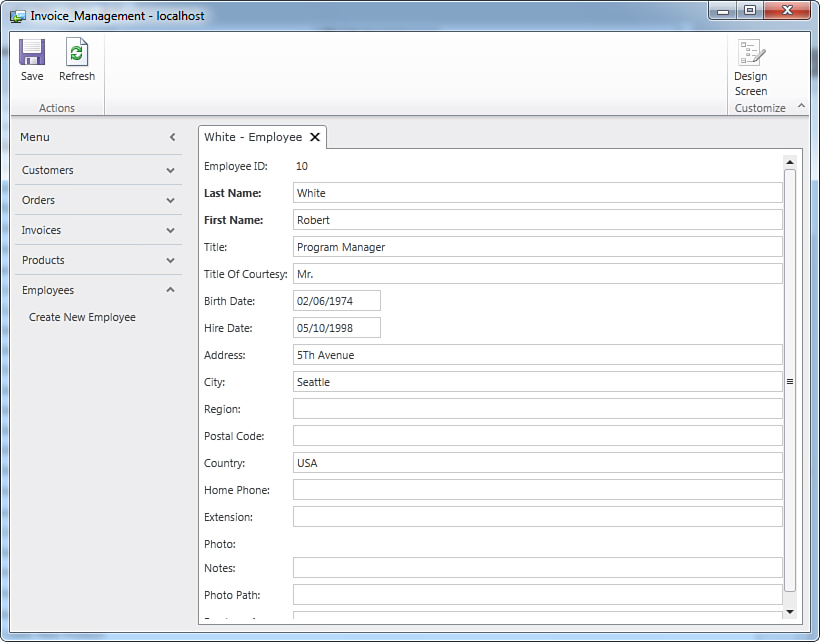
Figure 8.21. Adding a new employee.
When you save your edits, employee information is sent to the Northwind database. This sentence can be easily demonstrated by investigating the database within SQL Server Management Studio or within Server Explorer in LightSwitch (see Figure 8.22).
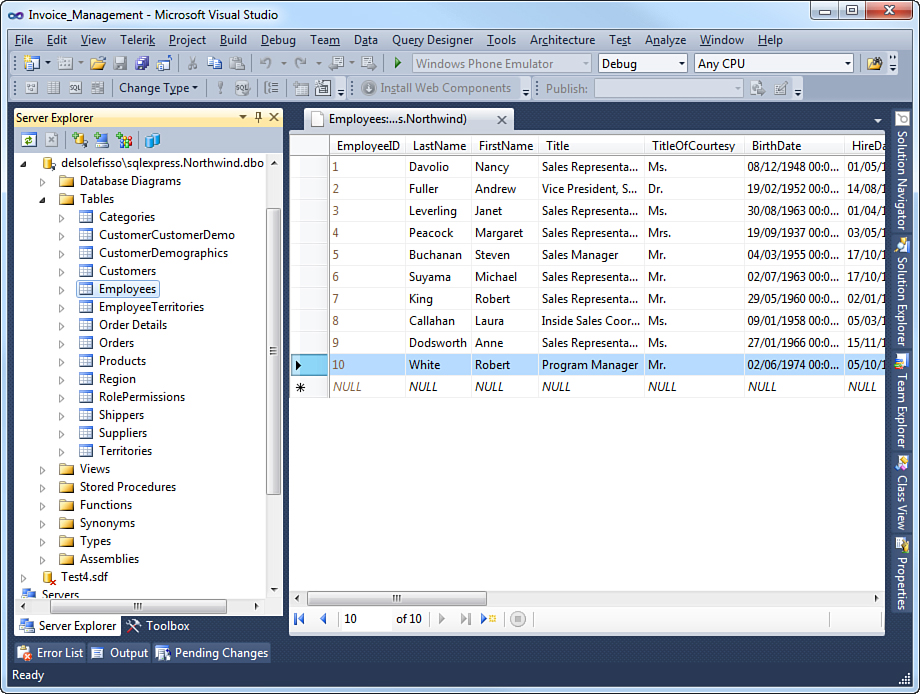
Figure 8.22. Changes to the Employee entity are sent to Northwind.
In addition, as noted previously, all the external data sources (in this case, Northwind) are deployed together with the application (see Chapter 10, “Deploying LightSwitch Applications”) to ensure that all the required data sources are available to the application itself.
Database in the Cloud: Connecting to SQL Azure
Assumptions in This Section and Scenario Explanations
This section describes how to integrate LightSwitch applications with the Microsoft SQL Azure platform, which is a paid service. Therefore, we assume that you have already purchased an account for the SQL Azure platform. This is required to complete all the steps described here. If you have not, there are several ways to subscribe to SQL Azure. For example, if you have an MSDN Ultimate subscription, you can use the Windows Azure Services Platform (including SQL Azure) for no additional cost. Read more here: http://msdn.microsoft.com/en-us/subscriptions/ee461076.aspx.
There is also an introductory offer known as SQL Azure Trial that allows you to try SQL Azure for 30 days (valid at the time of this writing); read more at www.microsoft.com/en-us/sqlazure/purchase.aspx. This page also describes general ways to obtain a subscription. You can also easily host your entire LightSwitch application in Windows Azure, as covered later in this book when talking about deployment. However, a business might already have data stored in the cloud, and so you might want to use SQL Azure databases in LightSwitch as external data sources. The last scenario is explained in this chapter.
It is common today to hear discussions about cloud computing. The “cloud” is something that is growing steadily as companies and people discover the benefits of such an approach to the world of the information technology. Microsoft has invested heavily in the cloud with the release of the Windows Azure Services Platform. This platform enables you to publish web applications to the cloud, where applications themselves run on a specialized, 64-bit version of the Windows operating system (Windows Azure) that provides the infrastructure for great levels of performance and scalability.
Details About the Windows Azure Services Platform
The Windows Azure Services Platform includes several services and infrastructures. The information in this chapter relates solely to the use of the platform as required for the examples. You can find complete information about the platform at the official Azure’s portal: www.microsoft.com/windowsazure/windowsazure/.
The Windows Azure Services Platform is not just the operating system and the infrastructure for executing web applications in the cloud. Instead, it is a complete environment for building and executing applications, offering files and data storage (blobs, tables, and queues), connectable services (AppFabric), and including databases stored in the cloud. As part of the Windows Azure Services Platform, Microsoft released the SQL Azure Database platform. This is a relational database service built upon the SQL Server technology and allows companies and developers to store their data in the cloud, hosted in Microsoft data centers. Databases in SQL Azure work in a similar way to SQL Server. In fact, they still support the T-SQL language, and a lot of tools that you use to manage SQL Server databases can be used to manage databases on SQL Azure in the same way. The list of tools includes Microsoft SQL Server Management Studio, Microsoft Visual Studio 2010, and the new Developer Portal for Windows Azure. SQL Azure’s main benefits can be summarized as follows:
• No physical administration is required.
• High scalability.
• Programmability via Transact SQL.
• Integration with existing tools from Microsoft.
• All the features offered by the SQL Server relational database management system infrastructure (RDBMS) are still available, such as tables, views, stored procedures, indexes, constraints, transactions, and reporting.
Diffidence: Why Should I Move My Data Onto SQL Azure?
It is a common opinion that data hosted in the cloud does not offer the same security levels as if you host it in your own data center. Basically, the greatest difference is that when hosting databases in the cloud, you do not have the physical files and you do need an Internet connection. But Microsoft takes care of your data: Each SQL Azure database is replicated onto three different data centers so that if one is down, you neither lose your data nor find your data inaccessible when you need it. In addition, you use the same security policies available in a physical SQL Server instance, because you use the SQL authentication, which requires a username and a password.
If this is not enough to convince you that SQL Azure can be good for you, just remember that you already work with the cloud, although this might not be readily evident. Email, IM contacts, files on Windows Live SkyDrive—these all live in the cloud, and you never lose them (unless you do not have an Internet connection available). If you have ever wondered why you can reinstall Windows Live Messenger on a clean machine without losing your contacts, the reason is that they are stored in the cloud. So, the cloud is not so bad. It can also reduce the costs of maintaining a data center in your company, and this is probably the biggest benefit.
The SQL Azure platform also offers two services other than the Database service: Sync and Reporting. Sync (which is available as a Community Technology Preview at the time of this writing) enables you to synchronize data in the cloud with local platforms and is based on the Microsoft Sync Framework. Reporting is the cloud-based implementation of the famous SQL Server Reporting Services feature. Examples in the current chapter use neither Sync nor Reporting, instead focusing on the Database service. The really good news is that you can use SQL Azure databases in your LightSwitch applications, and the way you accomplish this is incredibly easy.
Now you will learn how to establish connections to SQL Azure, and then you will create a database in the cloud that will be used by a LightSwitch application. Usually, you connect LightSwitch to databases already available in the cloud; however, if you are new to the Azure platform, this is an opportunity to learn how to create new databases. This is just for learning purposes; after all, when you publish the application, the Publish Wizard creates the Azure database for you.
SQL Azure offers a secure privacy policy, and this might be enough. Before using SQL Azure in your business, however, ensure that SQL Azure policies and your company’s policies adhere to your country’s laws about privacy. This is something that you must take care of before moving your application into production.
Establishing Connections to SQL Azure
The first step you have to take to work with SQL Azure is to access the Developer Portal, which you reach at http://windows.azure.com. Assuming you already accessed the portal and completed the server setup (see the official documentation at http://goo.gl/Bdp4A), the first way you can connect to SQL Azure databases is right through the Developer Portal. Figure 8.23 shows what this looks like. (Sensitive information has been marked out for privacy reasons.)

Figure 8.23. The SQL Azure Developer Portal.
This is actually the perfect management tool, because you can manage your SQL Azure server and also create databases and database objects, manage firewall rules and permissions (not supported by other client tools), manage the security, and definitely manage your subscription. In the next section, you learn how to create a SQL Azure database via the Developer Portal. However, this is not the only way to connect to SQL Azure. For example, you can use both SQL Server Management Studio Express and Visual Studio 2010. Although both tools have some limitations with regard to connecting to Azure, especially on the administration side, they are very useful when you want to work with SQL Azure data in a more familiar way.
Connecting via SSMSE
SQL Server Management Studio Express (SSMSE) 2008 R2 is another great tool for connecting to SQL Azure databases (although earlier versions are not supported). It has some limitations with regard to administration tasks (such as firewall rules), but generally it enables you to create and manage SQL Azure databases the same way you do with SQL Server. Basically, you just need to enter the server address and your SQL Azure credentials, and then you browse and manage databases the usual way. Figure 8.24 shows how to enter SQL Azure credentials and how databases are listed in SSMSE.
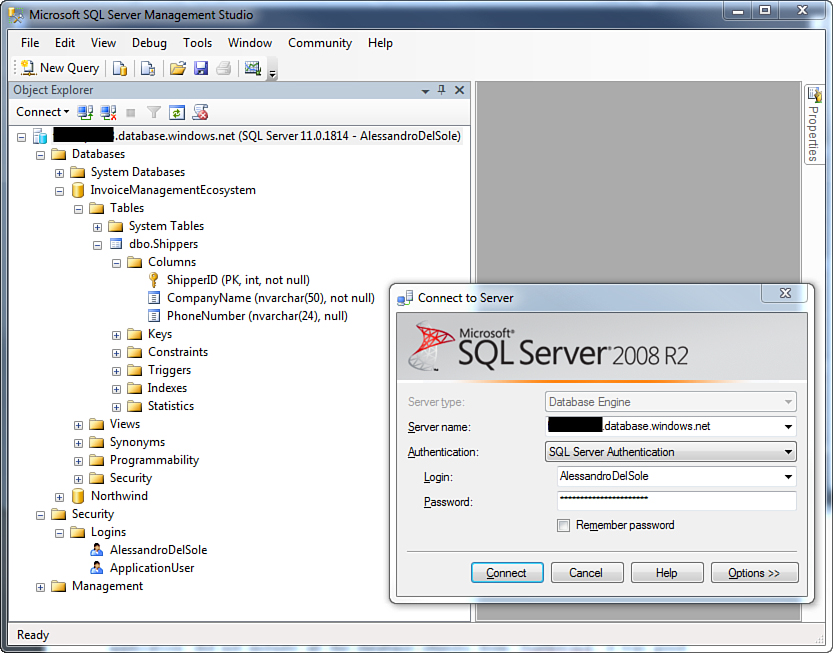
Figure 8.24. Accessing SQL Azure databases from SQL Server Management Studio.
Accessing SQL Azure from SQL Server Management Studio 2008 R2 requires firewall rules to be already configured on the server. If your machine has a static IP address or if you work within a local network, you (or your network administrator) probably just need to configure the firewall rules one time in the Developer Portal. Also, do not get confused with logins. Although they appear as in SQL Server databases, with SQL Azure, the Management Studio tool creates a SQL script for creating a new login on the server, but the number of permitted logins depends on your subscription. So, before creating new logins, read the subscription’s documentation carefully.
Connecting via Visual Studio 2010
Microsoft Visual Studio 2010, including LightSwitch, allows data connections to SQL Azure via the Server Explorer window. Typically, you establish a connection to a SQL Azure database in the same way you do for a SQL Server database, which involves clicking the Connect to Database button in Server Explorer and then specifying server and database information in the Connection Properties dialog (refer to Figure 8.4 for an example) and then displaying the desired information. Figure 8.25 shows what Visual Studio 2010 (including the LightSwitch Edition) looks like when you access a SQL Azure database by displaying data from a table.
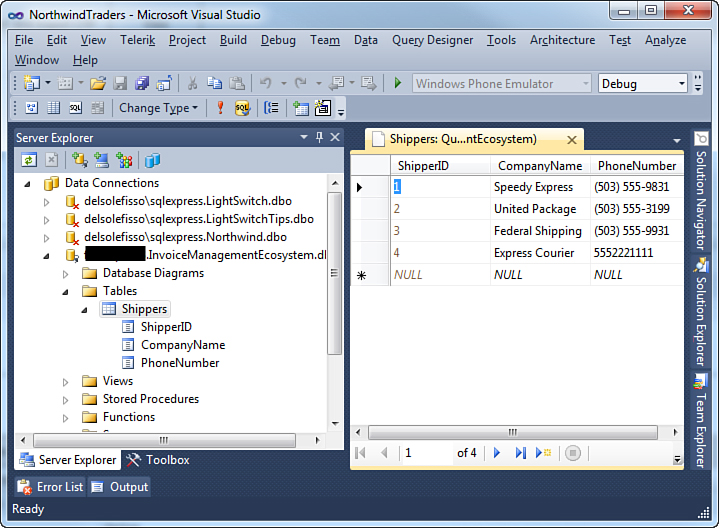
Figure 8.25. Accessing SQL Azure databases from Visual Studio 2010.
Further explanations are provided in the next section as you populate a SQL Azure database.
Designing SQL Azure Databases With Visual Studio 2010
Another benefit of using Visual Studio 2010 Professional or higher (not the LightSwitch Edition) against SQL Azure is that within the development environment, you can also design databases and write the data structure to the cloud. This is possible by using the ADO.NET Entity Framework and the integrated designer in Visual Studio. In fact, such a designer now supports the so-called model-first approach, which allows designing the data structure by creating and modeling entities in a .NET fashion. When ready, Visual Studio 2010 generates a SQL script that is sent to SQL Azure and that adds to the database the specified objects. This approach works exactly in the same way with SQL Server databases, too, but it has one limitation in both scenarios: It requires that the database be already available on the server; so, you need to create it manually via the Developer Portal or SQL Server Management Studio, or via Visual Studio 2010 itself.
Creating a SQL Azure Database
Similar to what you saw previously with regard to SQL Server databases, you can create a LightSwitch application that uses a SQL Azure database as the data store or just grab one or more tables from a database in the cloud. In this chapter, you learn how to create a list of shippers within a SQL Azure database and then connect such information to the Invoice Management application example. It is left to you as an exercise to create an application that uses a SQL Azure database as the only data store. (You could just install Northwind in the cloud by using SQL Server Management Studio.)
Setting Up the Database Server
This section assumes you have already set up your server on SQL Azure. If you haven’t, follow the easy steps described in the official documentation at http://bit.ly/otY4tu.
So, first you must create a new database in the cloud. After logging in to the Windows Azure Developer Portal, focus on the left part of the web page, and then do the following:
1. Click Database.
2. Click Subscriptions.
3. Expand the node and select the server name. Figure 8.26 shows what the Developer Portal now looks like. (The server name and other sensitive information have been marked out for privacy reasons.)
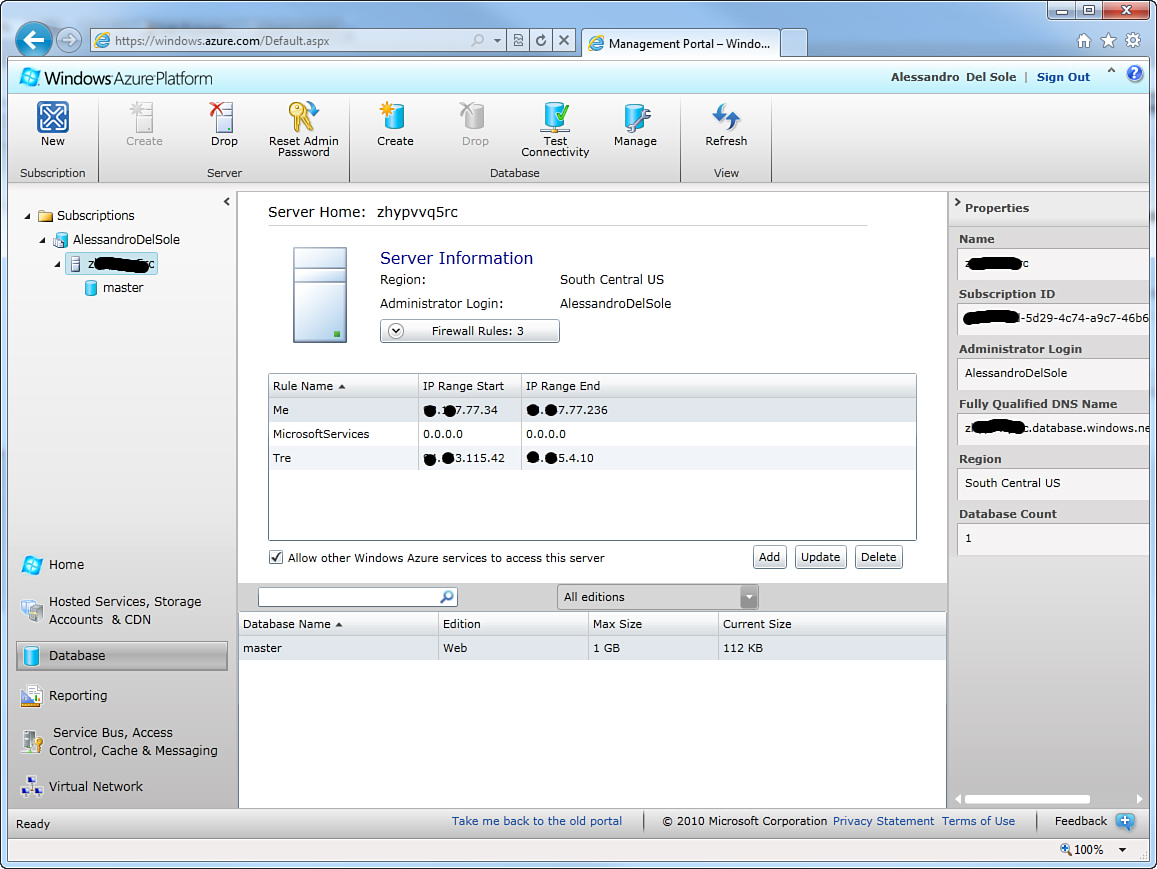
Figure 8.26. The SQL Azure server management instrumentation.
To allow connections to your SQL Azure server, you must add new or edit existing firewall rules. This prevents unwanted access, but it requires you to specify your IP address (or a range of IP addresses in which your current IP falls). To add a new firewall rule, click Add. When the Add Firewall Rule dialog appears, enter an IP range that includes your current address. Figure 8.27 shows an example.
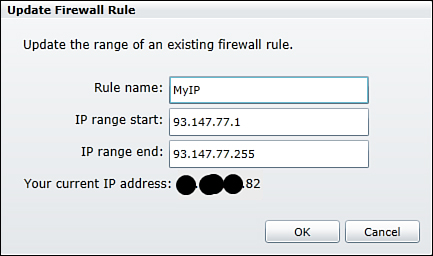
Figure 8.27. Allowing data connections by specifying firewall rules.
At this point, you are ready to create a new cloud-based database. So, on the main toolbar, click Create (in the Database group). When the Create Database dialog appears, specify a name for the new database (for example, InvoiceManagementEcosystem). For the current example, leave unchanged the Web choice for the Edition option and 1 GB as the database maximum size. Notice that if you are using SQL Azure as part of your MSDN subscription benefits, leaving these settings unchanged ensures that you incur no additional cost charged to your credit card. So, now the Create Database dialog looks like Figure 8.28.
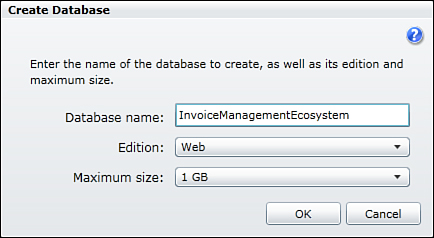
Figure 8.28. Setting options for the new database.
After you click OK, the new database is created and appears in the list of databases for the current server, as visible on the left of the page. Select the new database and click Manage on the toolbar. Doing so launches the Database Manager tool, in which you can design the data structure, such as tables. When the Database Manager is launched, you must first provide your password. After you do so, the tool becomes available in your web browser and shows summary information about the selected database, as shown in Figure 8.29.
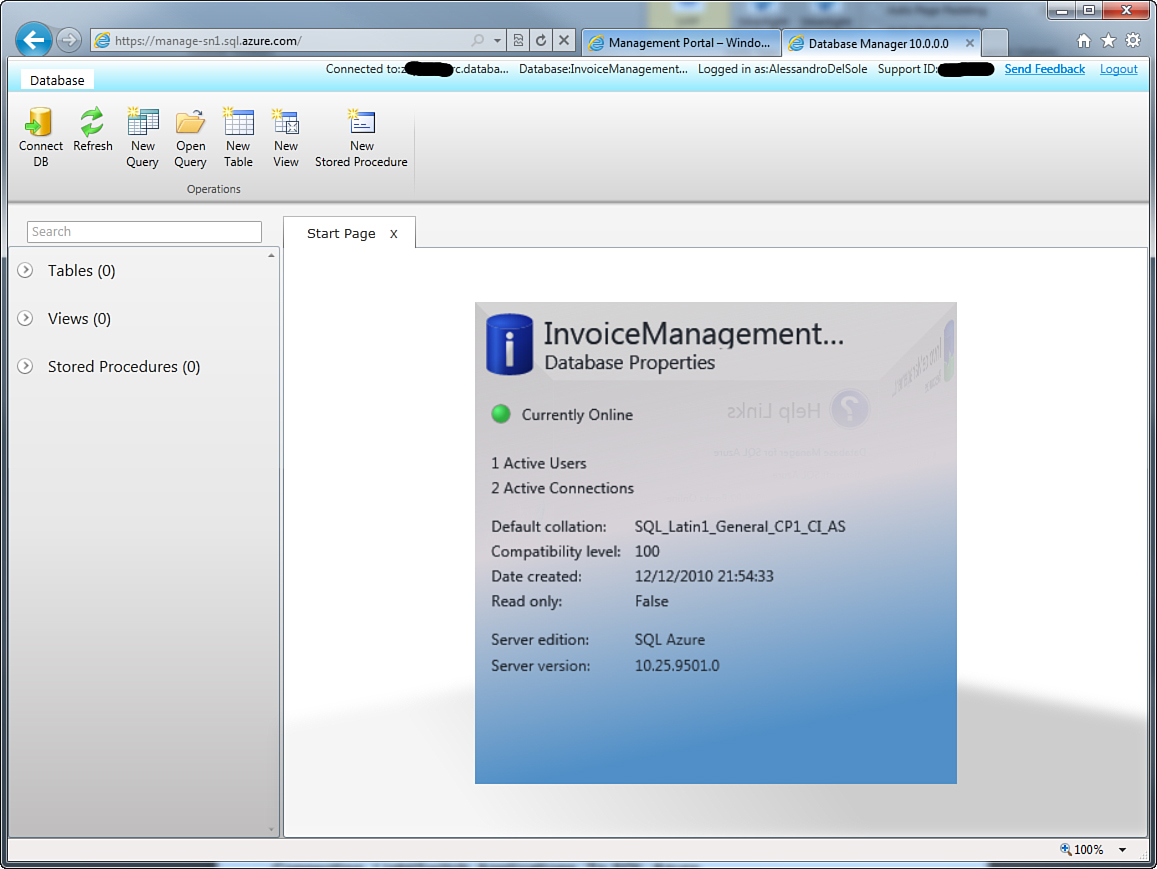
Figure 8.29. The Database Manager show summary information about the new database.
As you can see in the toolbar, you can create new objects such as queries, tables, views, and stored procedures, exactly as you would do in a normal SQL Server database. The next step is to add a new table to store shipper information. To do so, click New Table. The Table Designer at this point appears in the web browser and shows three columns by default. The first column is named ID, and is of type int and marked as a non-nullable, primary key. The goal here is to replicate the Shippers table in the Northwind database in the cloud. Check the Is Identity check box, and then rename the column to ShipperID (just click inside the Column field). Now replace the other two columns with the following:
• CompanyName, of type NVarChar 50, required
• PhoneNumber, of type NVarChar 24, not required
Figure 8.30 shows what the designer looks like at this point.
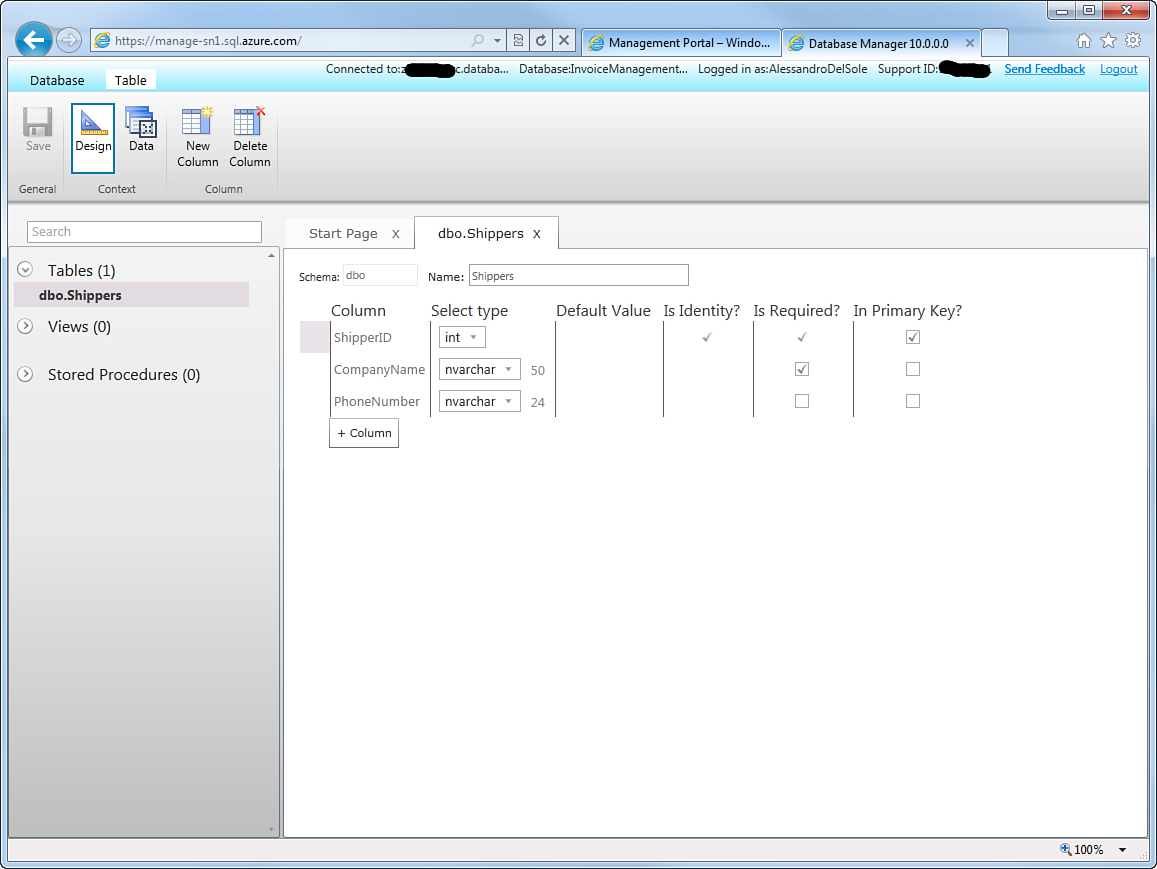
Figure 8.30. The new Shippers table showing edits.
You could add any other tables you want, but for the sake of simplicity, the example is based on a single table so that demonstrating LightSwitch integration capabilities with SQL Azure is clearer. Now you have the database and you have the Shippers table, but this is empty, and you should put some information inside it. You now learn how to populate a table within a SQL Azure database from Visual Studio LightSwitch.
Populating SQL Azure Databases from Visual Studio LightSwitch
The Server Explorer window in Visual Studio LightSwitch, as well as in Visual Studio 2010, supports data connections to SQL Azure. So, you can use this tool to connect to the database, show the Shippers table data, and populate it. In Visual Studio LightSwitch, open Server Explorer by pressing Ctrl+Alt+S. When the tool window is available, click the Connect to Database button to display the Add Connection dialog (which you already know about). In the Server Name box, enter the SQL Azure server name that is displayed in the portal, and then select the SQL Server authentication and provide your credentials. Then select the InvoiceManagementEcosystem database from the list of available databases, as shown in Figure 8.31.
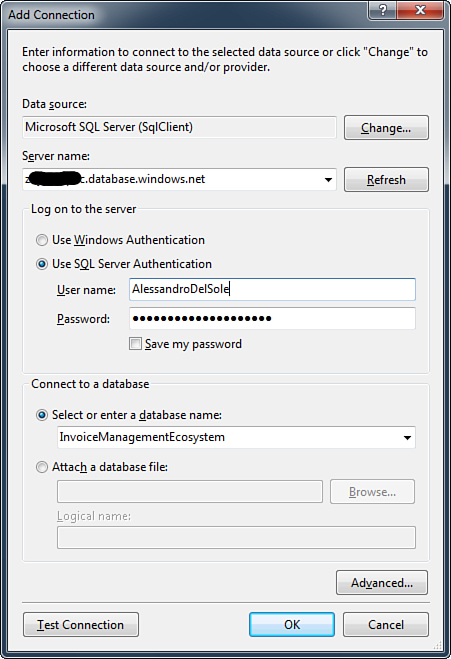
Figure 8.31. Specifying connection settings to SQL Azure.
When you click OK, the database becomes available in Server Explorer, and you can navigate its structure the same way you would do with classic SQL Server databases (see Figure 8.32).
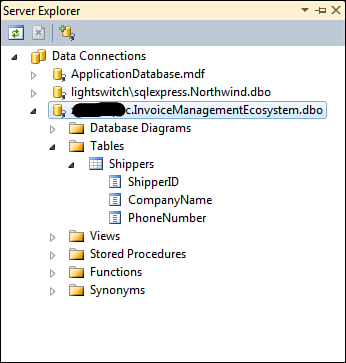
Figure 8.32. Navigating the SQL Azure database from within LightSwitch.
At this point, right-click the Shippers table and select Show Table Data. When the IDE displays the table structure, you can fill in the table with some fictitious data. If you need an example, you can just copy shippers’ names from the Northwind database. Figure 8.33 shows how the table has been populated with this information.
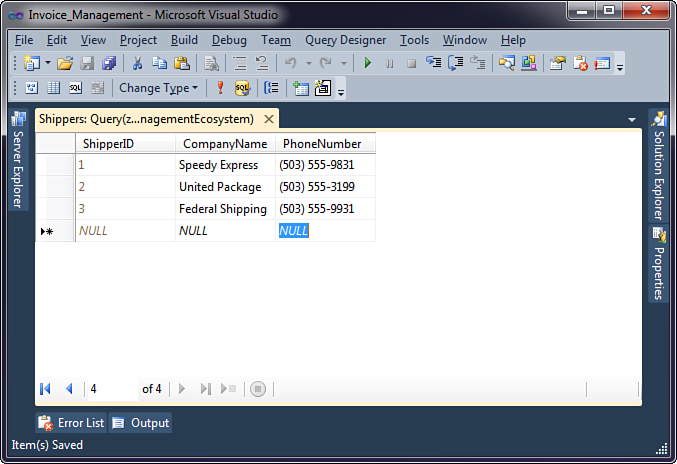
Figure 8.33. Populating the Shippers table with custom data.
At this point, you have successfully populated a table within a SQL Azure database from Visual Studio LightSwitch. The next step is to extend the Invoice Management application to connect to the cloud-based database.
Connecting LightSwitch Applications to SQL Azure
LightSwitch applications can take advantage of SQL Azure databases in a way that looks similar to what was described previously with regard to SQL Server databases. Ensure that the Invoice Management solution is open in Visual Studio LightSwitch, and then in Solution Explorer, right-click Data Sources and select Add Data Source. The Attach Data Source Wizard appears, displaying a number of choices, as previously shown in Figure 8.3. Select Database and click Next. When the Add Connection dialog appears, enter your connection information to the SQL Azure instance, as you did previously (see Figure 8.31). Once you are connected, LightSwitch shows a list of available objects in the database, as shown in Figure 8.34. Select Shippers and click Finish.
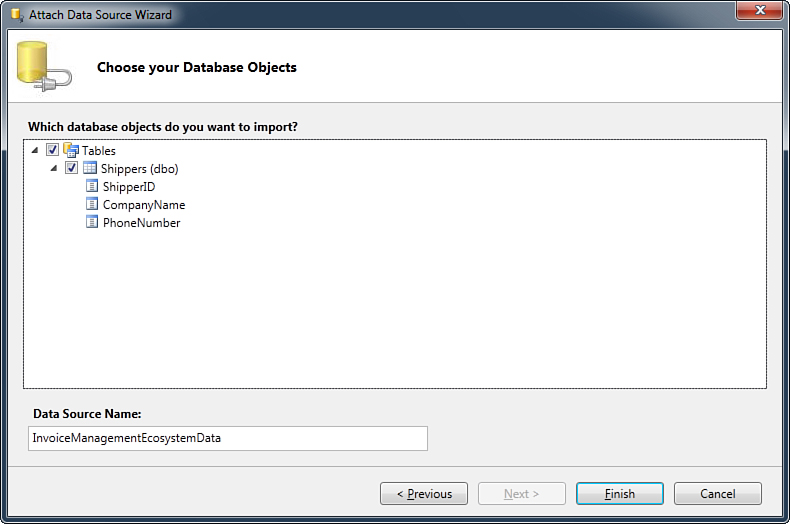
Figure 8.34. Selecting database objects from the cloud.
One point must be made now: You connect LightSwitch to SQL Azure the same way you connect it to SQL Server. The only real difference is that you enter a server name for pointing to the cloud instead of a physical instance of a database engine, but the rest is exactly identical. At this point, LightSwitch generates a new Shipper entity based on the Shippers table, which is shown in Figure 8.35. In addition, a Shippers entity collection is generated behind the scenes.
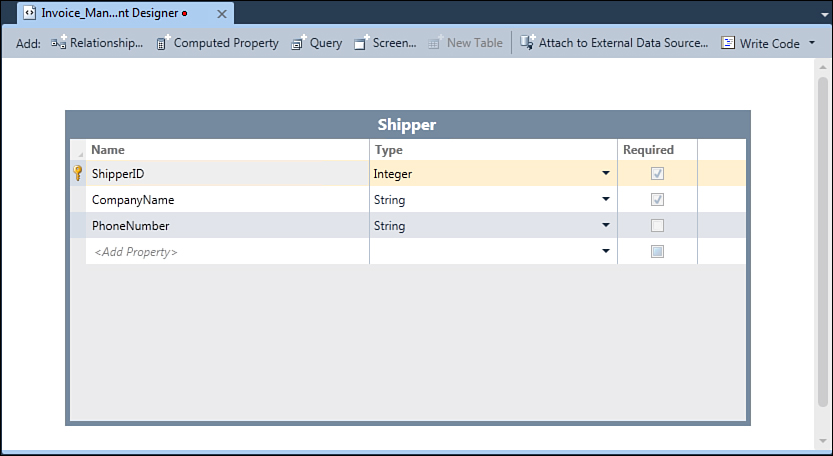
Figure 8.35. LightSwitch generates a new entity based on the table coming from the cloud.
To provide the best experience possible, replace the String type with PhoneNumber for the PhoneNumber property. In reality, shippers are responsible for delivering products purchased via orders to your customers. So, the new Shipper entity must have a relationship with the Order one. In the Entity Designer, click Add Relationship, and in the Add New Relationship dialog specify the Zero or One multiplicity for the Shipper entity and the Many multiplicity for the OrderHeader entity. Exactly as it was with the Northwind database, based on SQL Server, LightSwitch does not know how to handle the relationship because the entity in the intrinsic database and the entity generated from a table in the cloud have no foreign keys in common, so you need to specify a property that is shared between the two entities. As with SQL Server, the IDE proposes a default option that will autogenerate a shared property, so you can leave this setting unchanged. Figure 8.36 shows what the dialog looks like after you set all the required options.
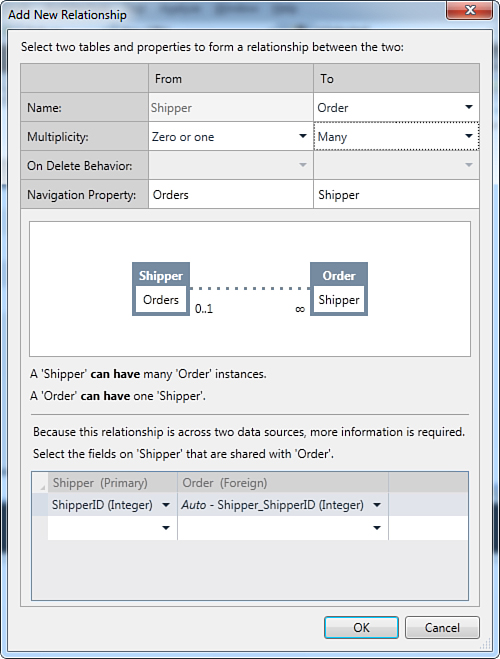
Figure 8.36. Setting a relationship between entities.
When you click OK, you will see the new relationship in the Entity Designer.
Binding Data to Screens
Now that all the data has been designed and associated, you just need some screens to display them. You are now an expert in creating screens, so the next steps will be fast to execute:
1. Create a new data entry screen for the Shipper entity.
2. Create a new search screen for displaying items from the Shippers entity collection.
3. Edit the screen navigation to add a new group called Shippers, which will include the screens created earlier.
As a final step before testing the application, we can extend the OrderHeadersListDetails screen by adding the possibility of selecting a shipper for the selected order. So, open the Screen Designer pointing to this screen. Then, from the Orders element on the left, drag the Shipper property onto the designer surface and release it between the Customer and Employee UI elements.
Figure 8.37 shows what the designer should look like.

Figure 8.37. Extending the OrderHeadersDetailsScreen with the Shipper property.
Now run the application and run the shipper data entry screen. Enter information for a new shipper so that you can test whether new data is correctly saved in the cloud. Figure 8.38 shows an example.
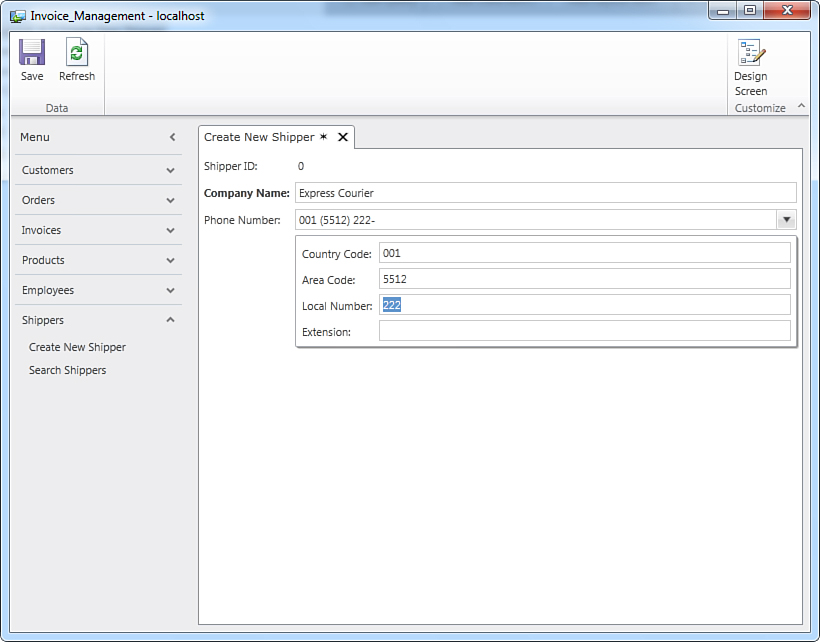
Figure 8.38. Entering information for a new shipper.
Notice how you can format phone numbers. You can do it this way because the String default type was replaced with PhoneNumber in the Shipper entity definition. With regard to this, it is important to mention that the phone number is stored as a string, without any formatting, but it is correctly displayed in the application because of the usage of PhoneNumber. Now launch the Search Shippers screen. As shown in Figure 8.39, the screen displays the full list of shippers, including the new item added before. This also demonstrates that the new item has been correctly saved to the InvoiceManagementEcosystem database in the cloud.
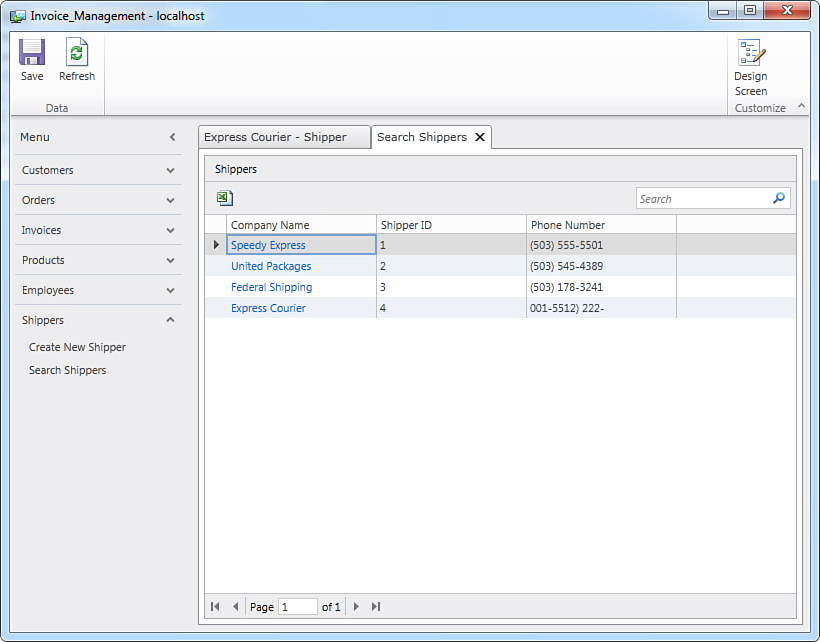
Figure 8.39. Displaying the full list of shippers.
As it was for SQL Server, you can still export data coming from the cloud to Microsoft Excel. Now open the OrderHeadersListDetails screen. You can see the availability of the new Shipper field, which you can easily fill by selecting a shipper from the appropriate auto complete box, as shown in Figure 8.40. After you save your data, the association between the selected order and the selected shipper is successfully finalized.
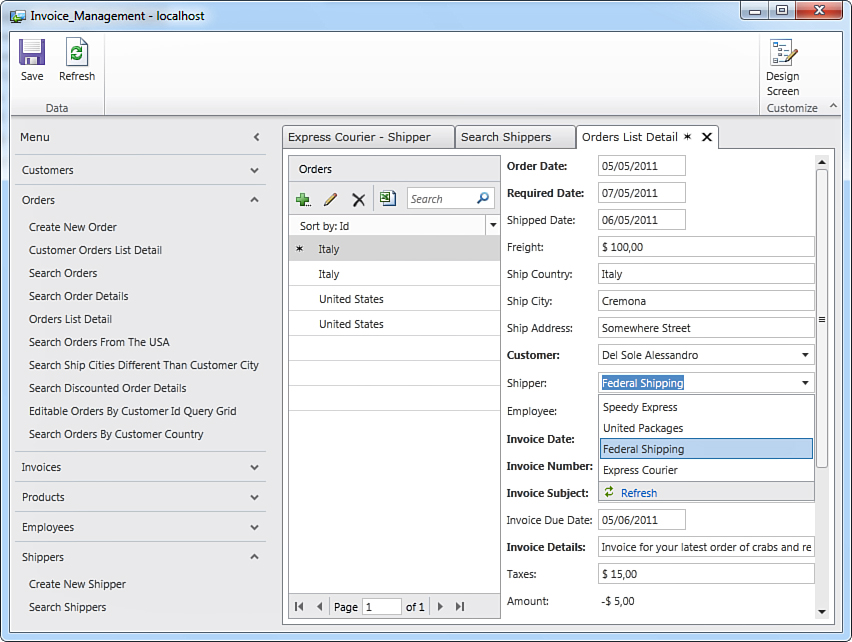
Figure 8.40. Associating a shipper with the selected order.
The current example demonstrates how a LightSwitch application can interact with SQL Azure databases and store data in the cloud. As it was for SQL Server, when you deploy a LightSwitch application that connects to SQL Azure, connection information to the cloud is also included in the deployment package.
In Chapter 10, “Deploying LightSwitch Applications,” you learn how to publish the application database to SQL Azure to take full advantage of the cloud as the data store. Here you learned how to combine SQL Server and SQL Azure in one LightSwitch application. Unsurprisingly, however, LightSwitch still has much more to offer. In the next section, you learn how to work with lists of items exposed by Microsoft SharePoint 2010.
Collaboration: Working with Lists from SharePoint 2010
This section assumes that you have installed Microsoft SharePoint 2010 on your development machine (the Foundation Edition is good enough), as pointed out back in Chapter 1, “Introducing Visual Studio LightSwitch,” or that you can access a remote SharePoint server. In addition, this section assumes that you have fully configured the default website for the SharePoint server that you are using to complete this chapter. This task is usually accomplished by the SharePoint setup at the end of the installation process.
Because business tasks and processes change quickly, technology must offer the best support possible for companies and enterprises. This also affects the internal life of a company, in which there is a plethora of different situations to handle, such as producing documents, scheduling meetings and employee vacations, making team decisions, and keeping track of various tasks. To manage all these scenarios in one place, Microsoft offers the SharePoint 2010 product, which ships in different editions.
In this chapter, SharePoint 2010 Foundation is used on the development machine. SharePoint is a collaboration platform that enables users to create websites typically for an intranet, but also for the Internet. With SharePoint, you can build collaboration portals and content-sharing websites, and you can take advantage of a number of built-in templates that help you build portals in which you have support for document sharing, event scheduling, issue tracking, contacts management, and team decisions.
In addition, SharePoint portals enable you to manage users via Windows and Forms authentication systems and by assigning permissions for certain site categories to the specified groups of users only. You have a lot of possibilities for developing SharePoint portals or single parts for an existing portal. The most common tools in SharePoint development are Microsoft Visual Studio 2010 and the Microsoft SharePoint Designer. The latter is a free tool that offers a pretty good design-time experience, with tools for creating any kind of supported content (either starting from existing templates or by creating content from scratch).
If you are a member of the Administrators group of the web portal, you edit directly from within the web page. SharePoint provides the necessary tools edit existing (or add new) material to enrich the user experience and otherwise satisfy company needs. So, instead of using an external tool, such as the SharePoint Designer, you learn here how to edit from within the web page.
Because of SharePoint’s importance in the business world, Visual Studio LightSwitch can connect to a SharePoint portal and import data from so-called lists. A list in SharePoint is a collection of similar items and is organized in columns, where each column has a name and is of a specific type, such as text, a Boolean value, a date/time group, and so on. In addition, lists can contain attached files. Because of this particular composition, lists from SharePoint can be easily imported into LightSwitch, which is then responsible for generating new entities based on the list structure. LightSwitch can also import information from SharePoint’s libraries, which are a sort of specialized lists for document management. An important benefit of SharePoint objects is the deep integration with Microsoft Office. You can, in fact, elaborate items with Excel and Access, and you can also perfectly integrate tasks with Outlook (for example, send alerts via email every time a person changes an item).
Before learning how to interact with SharePoint 2010 from LightSwitch, you need to set up a SharePoint site. If you already have a SharePoint site, you can test the example on the existing site or create a new site anyway. In SharePoint, you have a default website that is configured with basic information when you install the product. You can then add subsites if you need a more complex web architecture. In this section, you just take advantage of the default website, in which you add into the Invoice Management application a vacation plan for employees. So, let’s start by examining the default website before adding content that can be used from LightSwitch applications.
Running the Default Website
When you install SharePoint 2010, the installation process creates a default SharePoint portal for you, which you can reach by typing the network name of your machine in the address bar of your web browser. For example, the network name of my machine is DELSOLENOTEBOOK, so to reach the default portal the network address is http://delsolenotebook. Typically, you should be able to reach your portal by just writing the more generic address http://localhost. Specifying the actual name is a better approach because it is shared across all computers in your network. When you open the default portal, you are first prompted to enter your network credentials. You usually enter your Windows logon credentials or your domain credentials. After you enter those, the default portal runs inside your web browser, as shown in Figure 8.41.
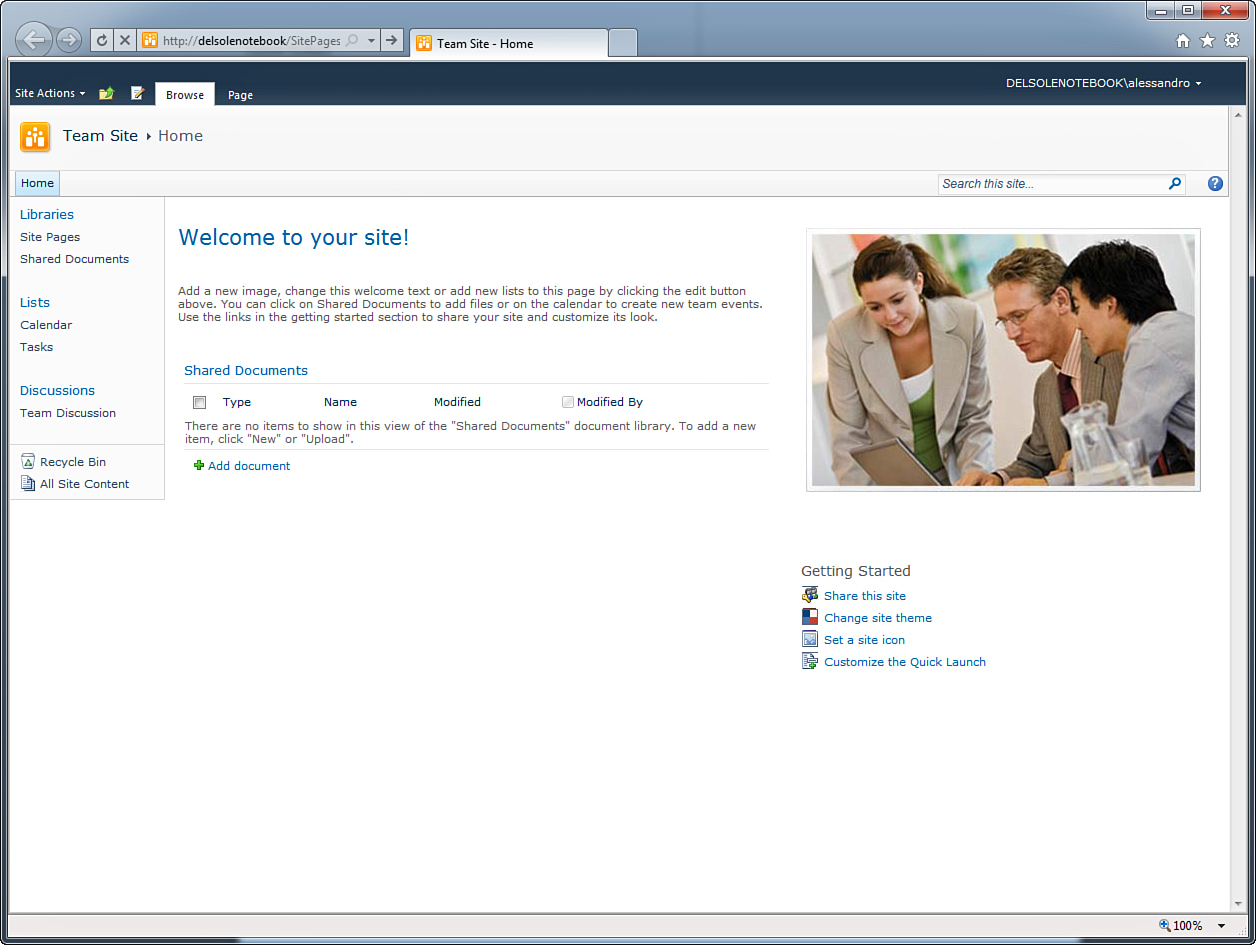
Figure 8.41. The default SharePoint web portal on the development machine.
The default web portal is based on a built-in SharePoint template that is dedicated to team collaboration. It contains a number of ready-to-use features, such as a place for team discussions, a document library, a calendar for meetings/events, and a list of tasks. The interesting thing is that the SharePoint infrastructure also offers users management based on the network, so you can easily assign tasks, share documents, and schedule events with users in your domain by simply selecting the username from a list.
The goal here is to set up an appropriate environment for our needs in the quickest way possible. So, for now, we will not create a new list. Instead, the default Calendar, which is actually a full-feature list, is used to organize vacations plans for employees.
Configuring a Vacation Plan Calendar on SharePoint 2010
Suppose you want to plan vacations for the employees in the Invoice Management application. You can set up a vacation plan in your SharePoint portal for a better integration with other management tasks, but you also want to interact with this information within your LightSwitch application. So, first click Calendar on the left side of the master page, under the Lists element. Then, when the Calendar page is open, click Calendar under the Calendar Tools tab at the top of the page (see Figure 8.42).
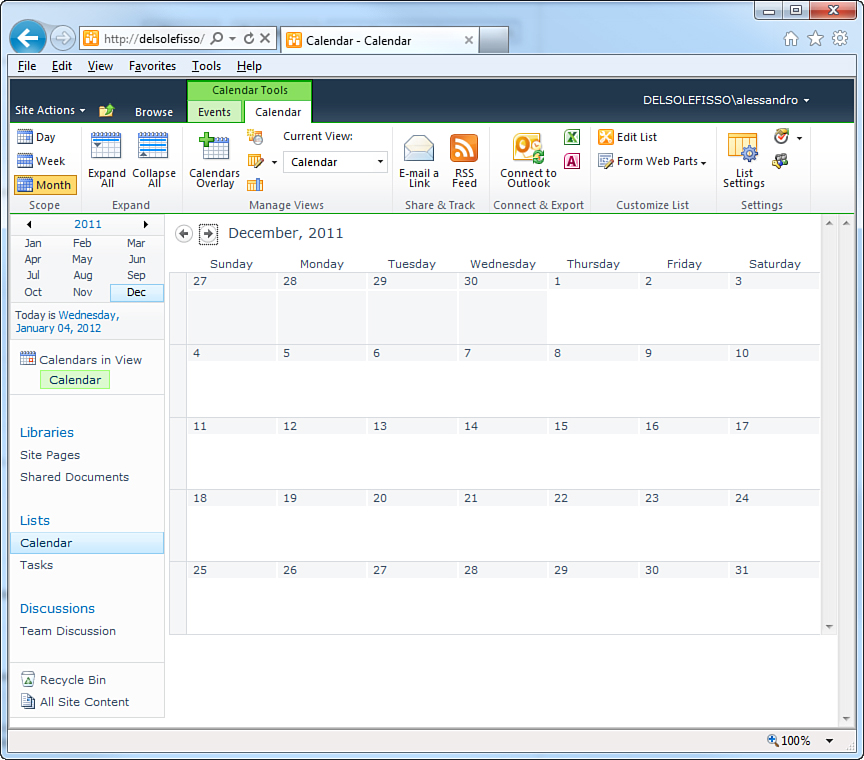
Figure 8.42. The default Calendar page.
As you can see, you have different options for displaying the calendar (such as per day, week, or month), and you have a lot of features available, such as integration with Office. How the calendar is currently implemented would be enough, but we want to make some more edits. For example, it is important to ensure that a vacation plan is approved by an administrator. It is also important to provide a basic validation rule that ensures that the starting date is earlier than the ending date. And, it is important to analyze and eventually change how columns in the list are composed. To edit the current calendar list, click List Settings on the toolbar. At this point, you enter the List Settings page, where you find lots of customizable settings for the current list (see Figure 8.43).
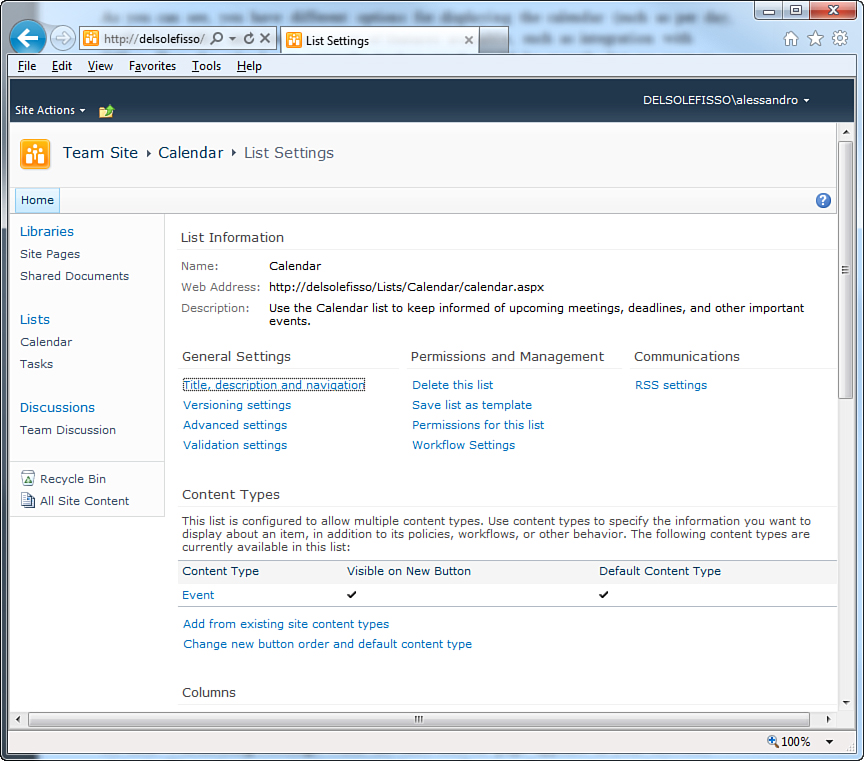
Figure 8.43. The List Settings page for the current list.
You might first want to specify that an approval is required for a calendar item. To do so, click Versioning Settings. When the same-named page appears in your browser, click the Yes radio button in the upper-right box (Require Content Approval for Submitted Items?), and then click OK. Next, you provide a basic form of data validation, such as ensuring that the end date of the vacation period is not greater than (later than) the start date. At this point, click Validation Settings and supply a validation formula. The web page provides a validation formula example that shows exactly what you need here. So, the validation formula becomes =[Start Time]<[End Time]. Figure 8.44 shows how the formula must be entered on the page.
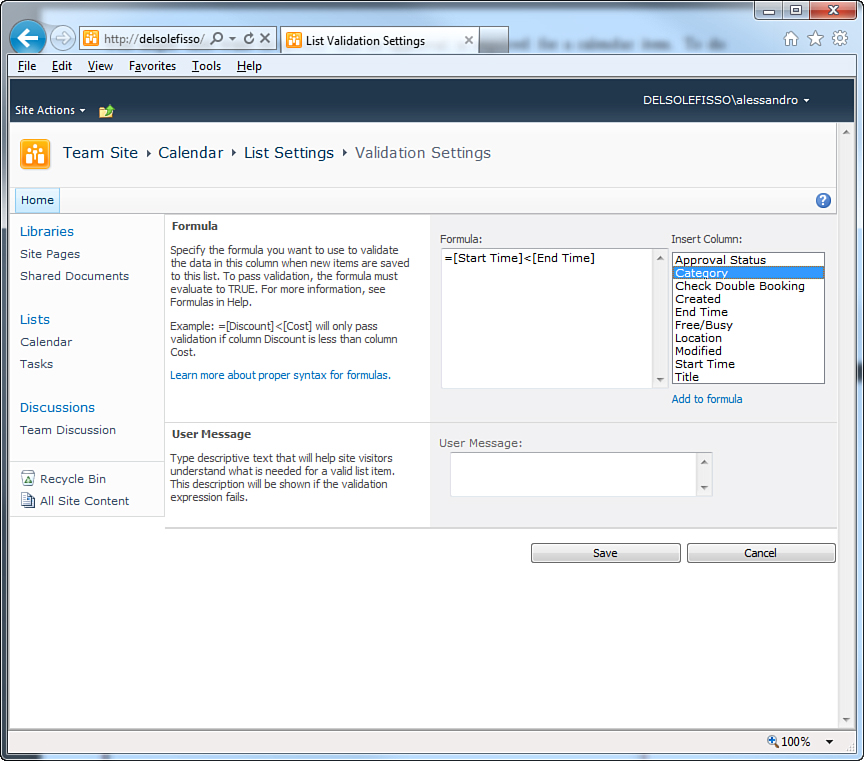
Figure 8.44. Validation formulas in SharePoint lists.
Click Save so that the designer points you to the General Settings page.
You then add a new column to the list, in this case called Last Name, which represents the employee’s last name. The reason is simple: As you will discover in a few moments, you can establish relationships between SharePoint lists and any other data source in LightSwitch based on columns, so it is best practice to add, if not already available, a column that corresponds specifically with the one that it will be related to (in this case, the LastName column from the Employees table in the Northwind database). To accomplish this, follow these steps:
1. In the General Settings page, click the Create Column link at the bottom of the page to open the Create Column page.
2. In the Column Name field, type Last Name and specify the column type as a Single line of text, as shown in Figure 8.45.
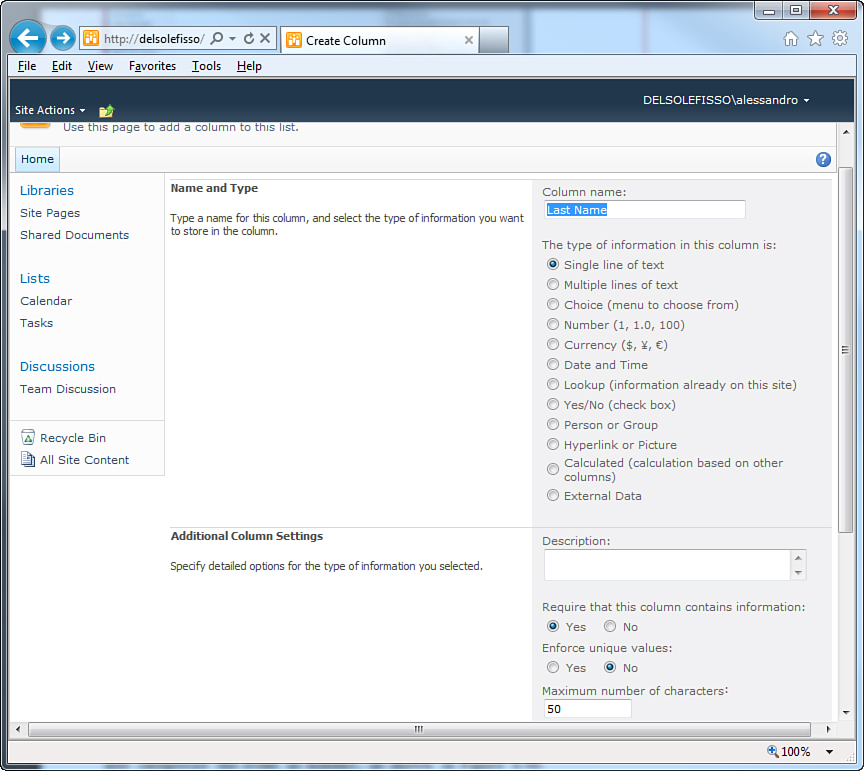
Figure 8.45. Creating a new column.
3. Select Yes for the Require That This Column Contains Information option, and set the maximum number of characters to 50.
Now it is time to add some elements to the calendar to represent employees’ vacations. Click Calendar, and then click the day you know a vacation starts for an employee. When the Add hyperlink becomes visible, click it to activate the New Item dialog. This requires you to enter the information about a new calendar event. To grab data from this list in the LightSwitch application, you need a comparison value. So, in the Last Name field, enter the employee’s last name (which will be compared to the Employee.LastName property). In addition, the Title field is required, so fill it in with custom, descriptive information.
Retrieving the Username from Windows
SharePoint has a special list called UserInformationList, which is useful to retrieve the list of users if you are under a Windows domain. If this is your case, you might consider using this list instead of manually setting a column for the employee’s name. Beth Massi from the LightSwitch team wrote a blog post about using the UserInformationList list from SharePoint 2010 in LightSwitch, which you can find at http://bit.ly/j2wwnt.
Then specify the start and end dates and check the All Day Event check box. You can also categorize the event as holiday, as shown in Figure 8.46.
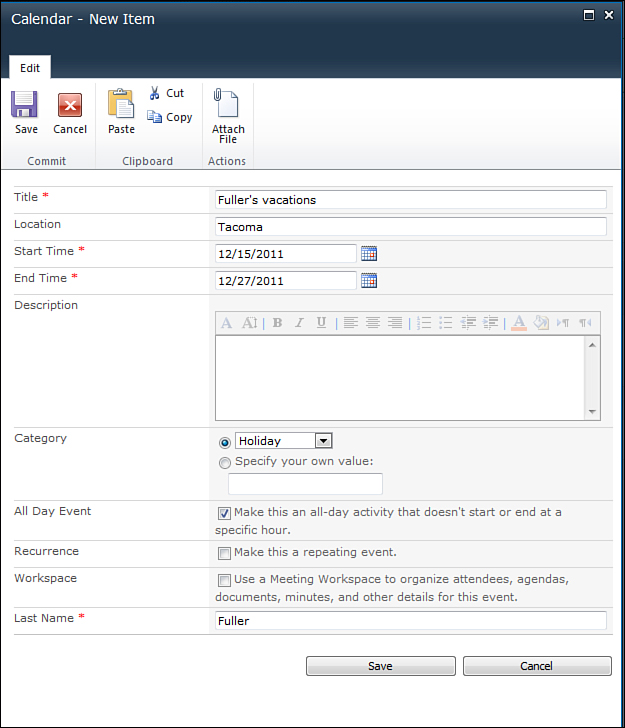
Figure 8.46. Adding a new calendar item.
When you are done, just click Save. Repeat the same steps for other employees found in the Employees table in the Northwind database so that you have a number of items that can be associated with the Invoice Management application. Figure 8.47 shows a vacation calendar example.
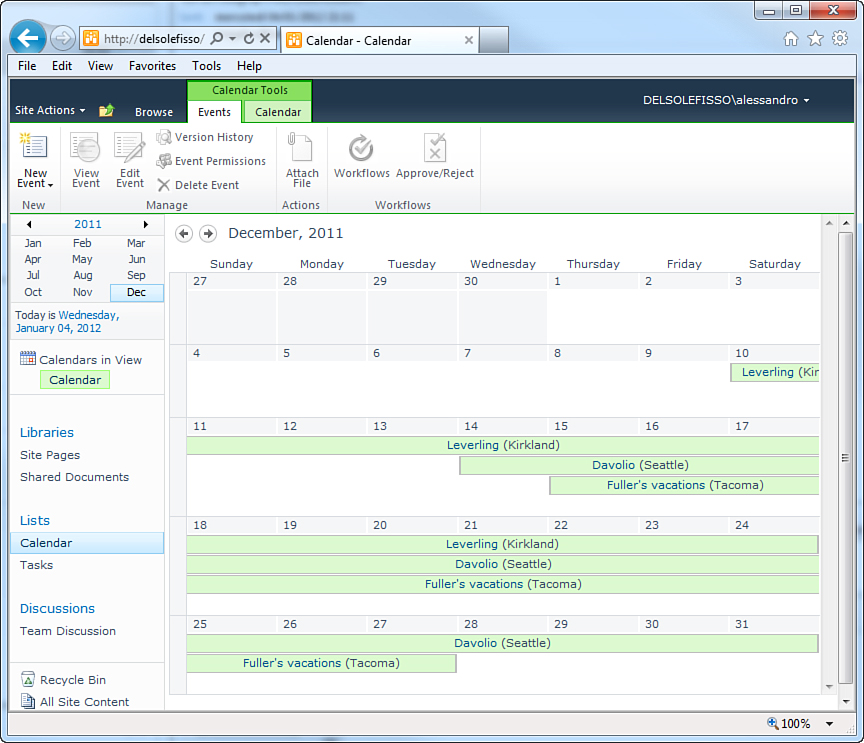
Figure 8.47. A vacation plan calendar example in the SharePoint web portal.
Now that you have some data in SharePoint, it is time to see how LightSwitch applications can retrieve and display data in custom clients.
Extending LightSwitch Applications with SharePoint Data
Visual Studio LightSwitch can access SharePoint 2010 (not earlier versions) portals and connect to lists that can be imported into your projects. You connect to SharePoint in LightSwitch in the exact same way you access SQL Server and SQL Azure.
You will now extend the Invoice Management application so that it can display vacation plans for the company’s employees. Before connecting to SharePoint, you need a more appropriate place to display employee vacation schedules. So, use the EmployeeDetails screen created earlier, of type List and Details, created previously. When the screen is available in the designer, remove the Photo and Employee1 properties.
Reorganize Your Screen Navigation
Now that you have two screens for the employees list, it is easy to reorganize the screen navigation by creating a new group named Employees that contains both screens.
In Solution Explorer, right-click the Data Sources folder and then Add Data Source. Doing so launches the Attach Data Source Wizard dialog that you already know, having used it in the previous connections. Now select the SharePoint data source, as shown in Figure 8.48.
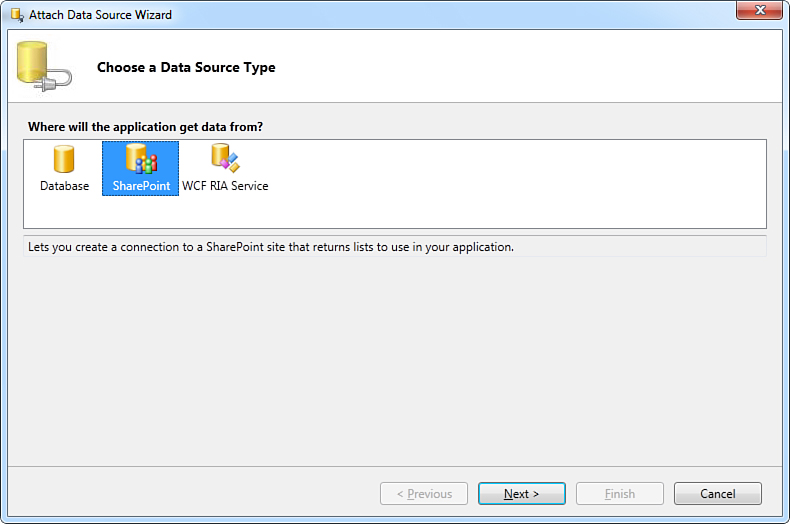
Figure 8.48. Selecting SharePoint as a data source.
When you click Next, you are asked to specify the SharePoint site address, which is the web address of your portal. On my machine, it is http://delsolenotebook. Just replace this with your address. If you are using a subsite, add the full address (in the form of http://localhost/subsite). You can also specify the login information, (either Windows credentials or a user name/password group). Leave the Windows Credentials radio button selected (as long as the application connects to SharePoint using your Windows logon credentials or your domain username), as shown in Figure 8.49.
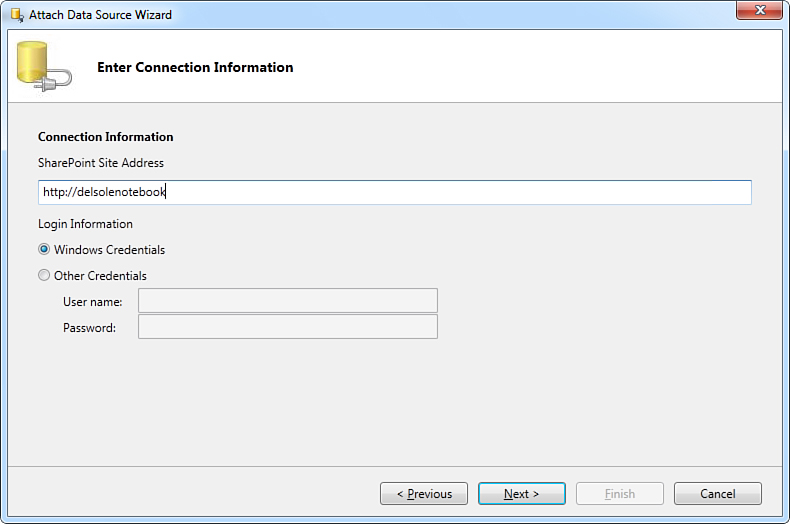
Figure 8.49. Specifying the SharePoint site address and login information.
Although deploying applications is covered later, this is a good opportunity to point out that if the application is deployed using Windows authentication, the credentials used by the middle tier in LightSwitch need to be added to SharePoint. This is probably something that the SharePoint administrator will do.
At this point, Visual Studio LightSwitch asks you to select one or more items to import from the SharePoint site. As you can see in Figure 8.50, there are several items. The reason is that the default web portal is based on a team site template that includes several lists by default. Here you just need to select Calendar and replace the data source name with a more intuitive one, like EmployeesVacationData, and then click Finish.

Figure 8.50. Selecting SharePoint lists.
When LightSwitch imports lists from SharePoint, it also checks for existing relationships between lists and other SharePoint objects. Relationships between SharePoint objects are not uncommon because each list usually references another item. In the case of the Calendar list, this has two relationships. The first relationship is with an object named Attendees; the reason is that a Calendar object can be used for scheduling meetings, as well. The second relationship is with a list called UserInformationList and is used within SharePoint to designate users that create/modify items in the calendar. Such users are picked up by SharePoint from the built-in user groups.
Because the first relationship is of type many-to-many, LightSwitch cannot handle it, and so it cannot import the Attendees object. In addition, the relationship between Calendar and UserInformationList, although not necessary for our purposes, cannot be broken. Therefore, LightSwitch needs to import both Calendar and UserInformationList. So, LightSwitch generates a new entity called Calendar, based on the list imported from SharePoint. The new entity behaves exactly like any other entity that you have seen so far and allows some changes. Such changes include visibility onscreen, name and display name, and entity type for properties of type String, where you can specify EmailAddress and PhoneNumber other than String. Changes to properties of other types are not allowed.
Entities built upon SharePoint lists can also be effectively associated with other entities in the project. To associate the new entity with the Employee entity, it is not necessary to display on the user interface all the information provided by the list. For instance, if a manager in your company wants to display vacation dates per employee, the only important properties could be the following: Location, StartTime, EndTime, and Description. All the other information is not useful in this context, but this does not mean that you need to remove it. Instead, it is just convenient to mark that information as not visible onscreen. So, click all the other properties in the entity, and in the Properties window uncheck Is Visible on Screen. Figure 8.51 shows an example, also demonstrating how the new entity appears in the Entity Designer, including the relationship that it holds with the auto-imported UserInformationList entity.
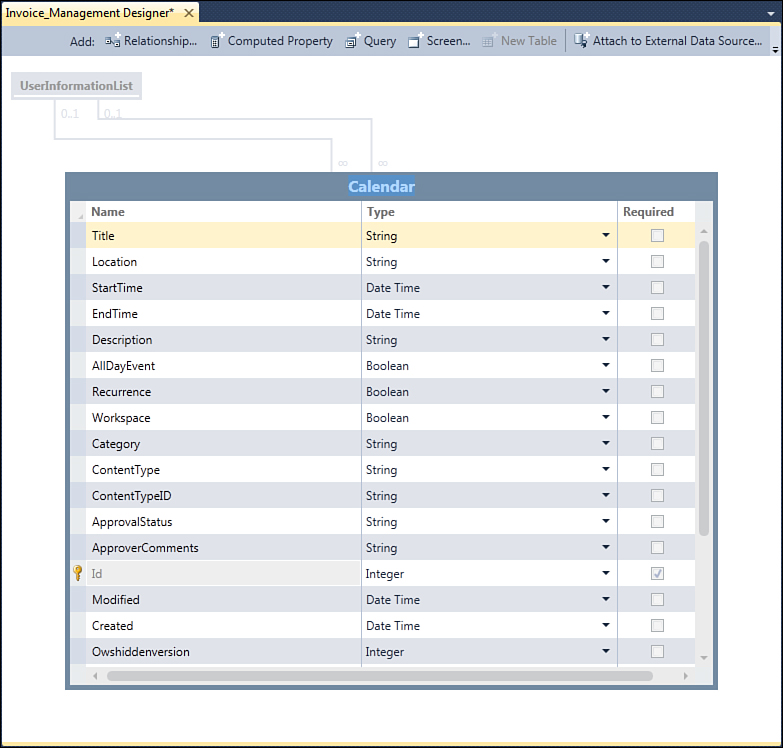
Figure 8.51. The new entity featured in the Entity Designer.
Now it is time to add a relationship between Calendar and Employee. Click Add Relationship in the Entity Designer. When the Add New Relationship dialog appears, select Many as the multiplicity for Calendar and Zero or One as the multiplicity for Employee. One employee can have multiple vacation plans, so this is the reason for the relationship implementation. The association between entities can be effectively finalized by comparing the LastName property from Employee to the Title property from Calendar. This clarifies why the employee’s last name was specified in the Title field for each calendar item. In the end, the relationship dialog looks like Figure 8.52.
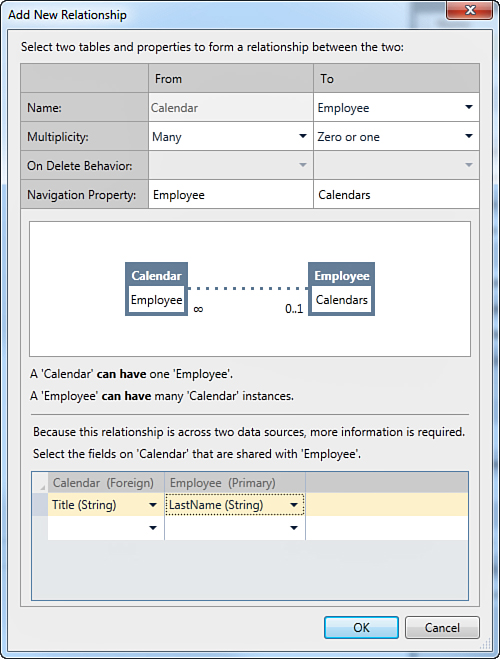
Figure 8.52. Setting a new relationship between Calendar and Employee.
When you click OK, LightSwitch completes defining the relationship between entities, and you are then ready to show the result of this association in the user interface. To accomplish this, open the EmployeeListDetail screen created earlier so that vacations can be data-bound to employees. When the Screen Designer is available, locate click the +Add Calendars hyperlink at the bottom of the Employee element. At this point, LightSwitch generates a collection of Calendar elements, named Calendars, specific to the current employee, based on the last name. Drag this new collection onto the designer and release it under the element named Rows Layout, EmployeeDetails, and then remove the Employee subelement. Figure 8.53 shows what the designer looks like at this point.
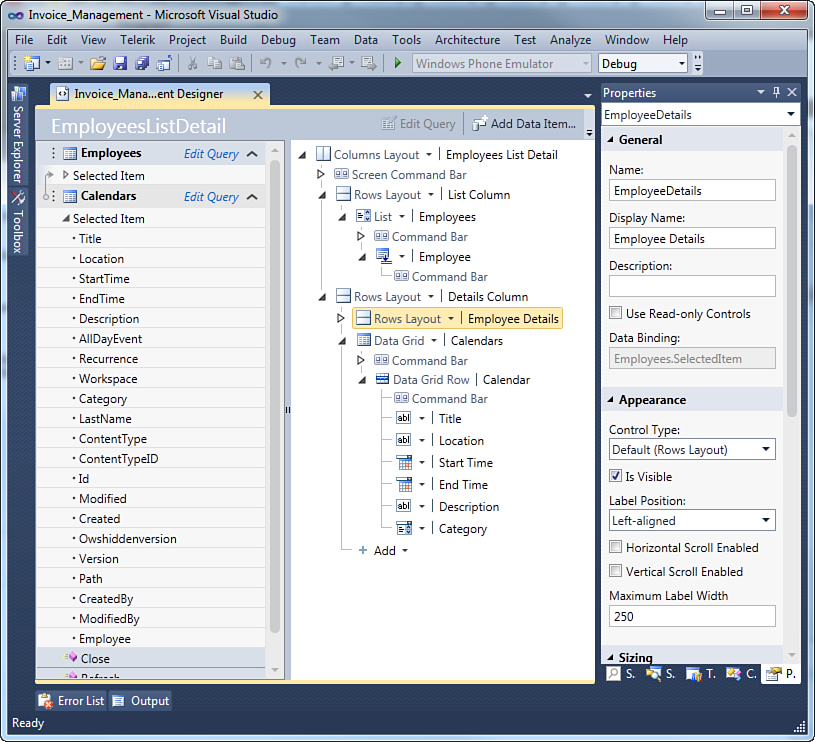
Figure 8.53. Binding the calendar items collection per employee.
Notice that as in other contexts, LightSwitch uses the appropriate user controls depending on the data type. For better display purposes, replace the content of the Display Name property in the Properties window (as it relates to the Calendars element) with Employee Vacations.
You need to make an important adjustment before running the application because the application needs to send changes to two different data sources. Unless specified, LightSwitch sends changes back only to the data source that was originally associated with the screen. So, you need to write a few lines of code to tell the runtime that changes have to be saved to all data sources that the application is working with (in this case, the Northwind database and the SharePoint site). You learn about this in more detail in Chapter 12, “Dissecting a LightSwitch Application.” For now, though, what you need to know is that saving changes to different data sources concurrently is something that must be explicitly set in code. This involves two changes at the screen level:
• Writing code for the InitializeDataWorkSpace method. You must populate the list of data sources that will be involved in the save pipeline.
• Calling the Saving method explicitly in code. You must manually save changes to the desired data sources.
So, open the Screen Designer for the EmployeeListDetails screen. In the Write Code drop-down list, select EmployeeListDetails_InitializeWorkSpace. By doing so, you open the code editor pointing to the selected method. You must write the following code:
Private Sub EmployeesListDetail_InitializeDataWorkspace _
(saveChangesTo As System.Collections.
Generic.List(Of Microsoft.LightSwitch.IDataService))
saveChangesTo.Add(Me.DataWorkspace.EmployeeVacationsData)
saveChangesTo.Add(Me.DataWorkspace.NorthwindData)
End Sub
The saveChangesTo method parameter represents a collection of data sources, via a List(Of IDataService) object. Each object (called data service) in the list implements the IDataService interface and allows data interaction with a particular data source. In this scenario, the code tells the runtime that the data sources involved in the data processing are both the SharePoint list (EmployeeVacationsData) and the Northwind database (NorthwindData). The application handles references to data services via the DataWorkspace object. You may think of DataWorkspace as a container of references to data services. By invoking the collection’s Add method, the specified data services are added to the data-processing pipeline, and editing is enabled on the screen.
You then need to manually save changes to the specified data sources. You can do so by writing the Saving method as follows:
Private Sub EmployeesListDetail_Saving(ByRef handled As Boolean)
Me.DataWorkspace.NorthwindData.SaveChanges()
Me.DataWorkspace.EmployeeVacationsData.SaveChanges()
handled = True
End Sub
Saving is invoked right before the save process begins. As you can see, manually saving changes is an easy task; you just need to invoke the SaveChanges method on the specified data service in a specific order.
It is really important to emphasize that the code that you have just seen is not specific to SharePoint. Any other data sources for which you want to enable saving on the same screen need this code. You just refer to the data source via its data service class.
Notice that the code also assigns the handled variable with True. This is required to tell the runtime that the task completed. If it is not set, the application runtime keeps the Saving method alive, and this leads to errors. At this point, all the requirements have been satisfied. Therefore, you can run the application and open the EmployeeListDetails screen. You will see that it correctly displays the list of vacations associated with the selected employee, as shown in Figure 8.54.
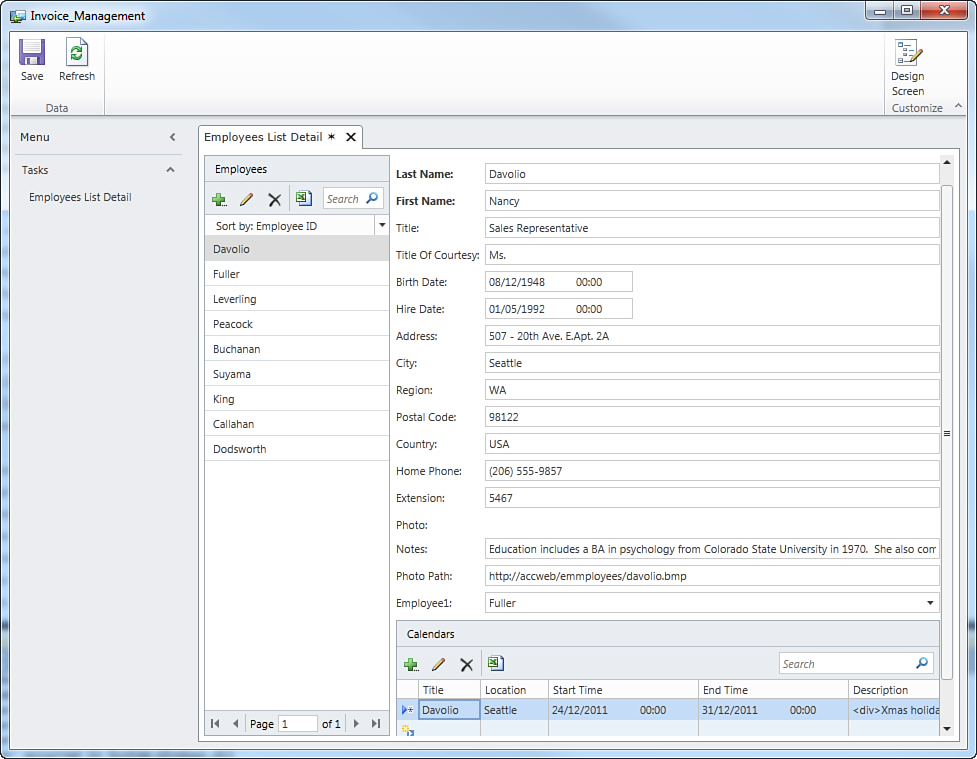
Figure 8.54. Displaying the list of vacations associated with the selected employee.
Notice that in this particular scenario, the content of the Description column is mapped as a String in LightSwitch but that it is actually content of type HTML in SharePoint. This is why you see the <div> tags. Data entered via LightSwitch does not show such tags.
Also notice that an Export to Excel button is available in this scenario. Of course, you can also send back changes to SharePoint (as you are used to doing with databases). For example, you could edit the selected vacation or create a new calendar item from within the LightSwitch application. For example, click Add in the vacations grid. At this point, the application shows a pop-up dialog called Add New Calendar, in which you can fill in the fields with the required information. Notice that you can select the calendar category via a convenient combo box, as shown in Figure 8.55.
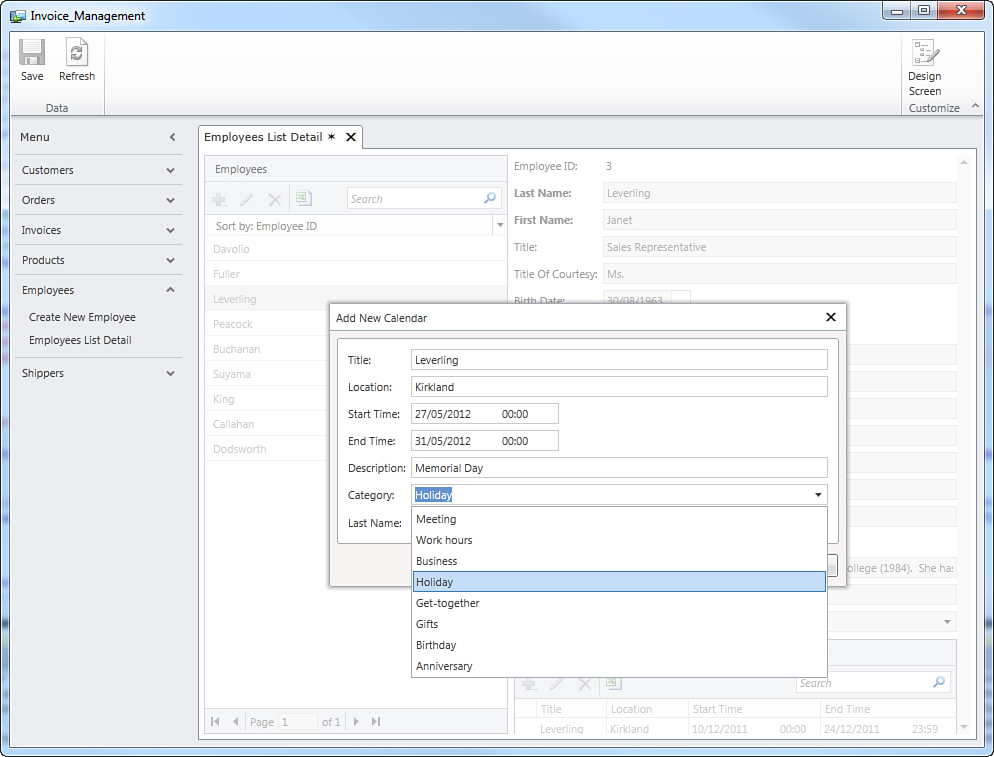
Figure 8.55. Entering a new calendar item via a LightSwitch application.
Just remember to leave unchanged the value for Title, because this is important to associate the new item with the current instance of Employee. When you close the dialog and save your changes, these are sent to the SharePoint web portal. To view these changes, just open the portal itself (see Figure 8.56).
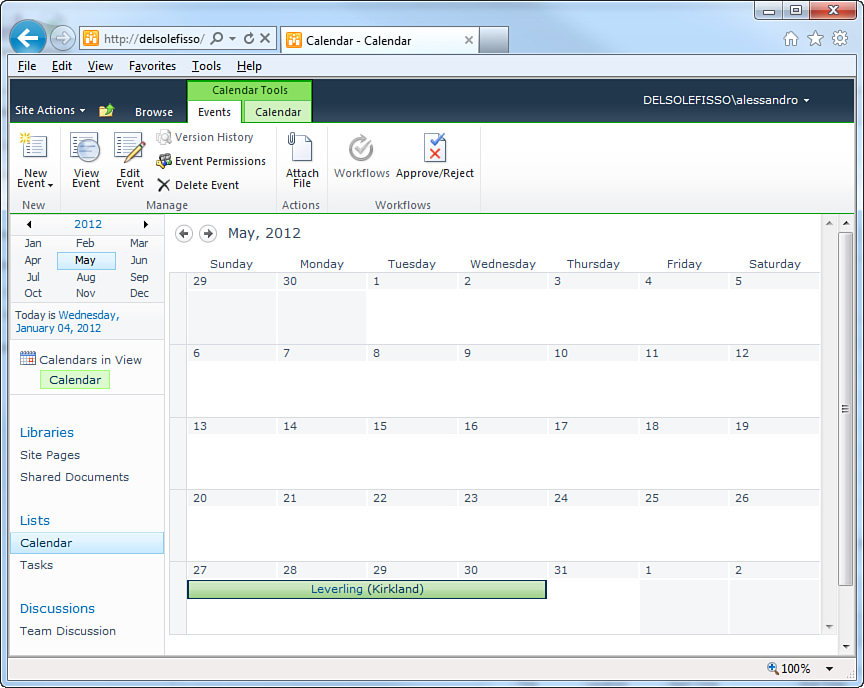
Figure 8.56. The SharePoint portal has been updated with changes sent from a LightSwitch application.
Interaction with SharePoint lists from LightSwitch is possible in many other ways, too. For example, you could import a list of documents and bind such a list to the employee who produced the document. You could also import a list of invoices per customer. The steps required to do so are basically the same as described in this section. The major point to emphasize is that Visual Studio LightSwitch makes it really easy to interact with SharePoint data sources via the same tools available for other data sources. Another important point to remember is that all the work described so far has been performed with only the minimal code needed to save multiple data source. The LightSwitch application’s architecture is, in fact, responsible for performing all the required work on your behalf.
Custom Queries, Data Validation, and Writing Code
Because the LightSwitch approach to SharePoint lists is exactly the same as that used for the intrinsic database, and more generally for SQL Server databases (that is, mapping the data source with new entities), you can apply the concepts you learned in Chapters 4, 5, and 6 to the current scenario. Therefore, you can apply filters, queries, custom data validation, and other custom code to entities built upon SharePoint lists in the same way you would do in other contexts. Being able to use the same model to perform such operations regardless of the underlying data source is a huge advantage.
Summary
As you learned in this chapter, Visual Studio LightSwitch enables you to leverage existing data from a wide variety of data sources. Therefore, you can upgrade to more-recent applications but still access existing databases. You also can easily connect to different data platforms that your company (or you as the developer) might use to provide the best support for business activities. By using the same steps and approach, your LightSwitch applications can connect to the following data sources:
• External SQL Server databases
• Databases in the cloud hosted by SQL Azure
• Lists from SharePoint 2010 web portals
• WCF RIA Services (explained in Chapter 18, with regard to extensibility)
Whatever data source you choose, Visual Studio LightSwitch generates entities that you can manipulate exactly as you’ve always done (that is, before reading this chapter). In addition, a LightSwitch application’s infrastructure is responsible for handling operations like queries, insert, update, delete, and data submission. So, you can manipulate and consume data without writing a single line of code. In addition, even if data sources are different, the way you create the user interface remains unchanged. Because the approach is always based on entities, even when connecting to external data sources, you can write custom code or add filters, custom data validation, and controls exactly as you learned earlier (no difference at all).
You have now received a full introduction to LightSwitch and can create great business applications. However, you also want to show the world how good you are with LightSwitch by securing your applications and deploying them to the public. So, read on.