Chapter 7. Customizing Applications with Buttons, COM Automation, and Extensions
Visual Studio LightSwitch is a general-purpose development tool released to aid the largest number of developers at every skill level.
The development environment handles most common business scenarios for you, but you might sometimes need to extend the capabilities you get out of the box. Fortunately, LightSwitch provides a rich extensibility model that allows professional developers to write these enhancements and package them up into extensions, and developers of all skill levels can easily install these extensions and use them in their applications.
You can usually extend a LightSwitch application by adding buttons to the various toolbars on screens and by using the aforementioned extensions. This chapter explains how to extend applications with both buttons and extensions. In Chapter 17, “Implementing Printing and Reporting,” and Chapter 18, “LightSwitch Extensibility: Themes, Shells, Controls, and Screens,” professional developers learn how to leverage the power of the extensibility model in LightSwitch by creating custom controls and other kinds of extensions.
Customizing the Command Bars
Visual Studio Lightswitch 2011 Edition
In this section, you do not need Visual Studio 2010 Professional or later. You can just use Visual Studio LightSwitch 2011 Edition, which runs as a standalone environment.
Visual Studio LightSwitch enables you to customize screens by adding buttons to the Command Bars, which is the place where you find buttons holding shortcuts to common tasks, such as Save or Refresh. Screens in LightSwitch commonly expose a Screen Command Bar, which mimics the Ribbon Bar from Microsoft Office and that is available in every screen, and a Command Bar that is typically available in Search Screens and List and Details screens, offering buttons for most common tasks, such as adding, editing, removing, or exporting items to Excel. In Visual Studio LightSwitch, the IDE generally provides a built-in set of buttons where appropriate, according to the type of the screen. This built-in set includes the following buttons:
• Save
• Close
• Add
• Edit
• Delete
• Remove
• Refresh
According to the screen template you are using, Visual Studio LightSwitch adds the appropriate built-in buttons to the Command Bar, but you can provide additional buttons that are not available by default, or you can add custom buttons if you want to invoke a particular task. Buttons in the Screen Command Bar are also named shell buttons, regardless of their nature (built in or custom). Notice that Add, Remove, and Delete are available only within nested Command Bars in the List and Details Screen template. In this section, you learn how to customize the Screen Command Bar and the Command Bar by adding both built-in buttons and custom buttons.
Command Bars on Layout Controls
It is worth mentioning that you can also add buttons to container controls such as Rows Layout, Columns Layout, Auto-complete Box, and so on. Therefore, you can place buttons next to other controls on the screen.
Adding Built-In Buttons to the Screen Command Bar
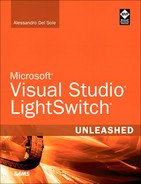
When you create a data entry screen, LightSwitch adds two default shell buttons to the Screen Command Bar: Save and Refresh. In contrast, when you create a search screen, LightSwitch adds one shell button, which is Refresh. You might want to make the user interface of screens more friendly by adding a Close button. For example, consider the SearchCustomer screen and open it in the Screen Designer. The Screen Command Bar element of the screen contains buttons. If you expand such an element, you can see how it contains the Refresh button by default, but you also see an Add shortcut, which you use to add other buttons, as shown in Figure 7.1.
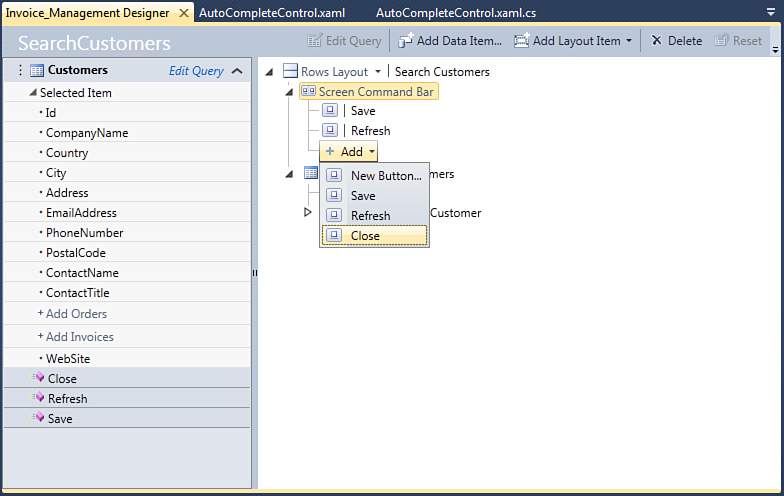
Figure 7.1. The Ribbon Bar can be extended with an additional button.
The New Button item is covered in the next subsection. For now, focus on the other shell buttons. Suppose you want to add the Close button for a better interface. Click it and run the application, and then launch the SearchCustomer screen. The Close button now appears in the Screen Command Bar, as shown in Figure 7.2.
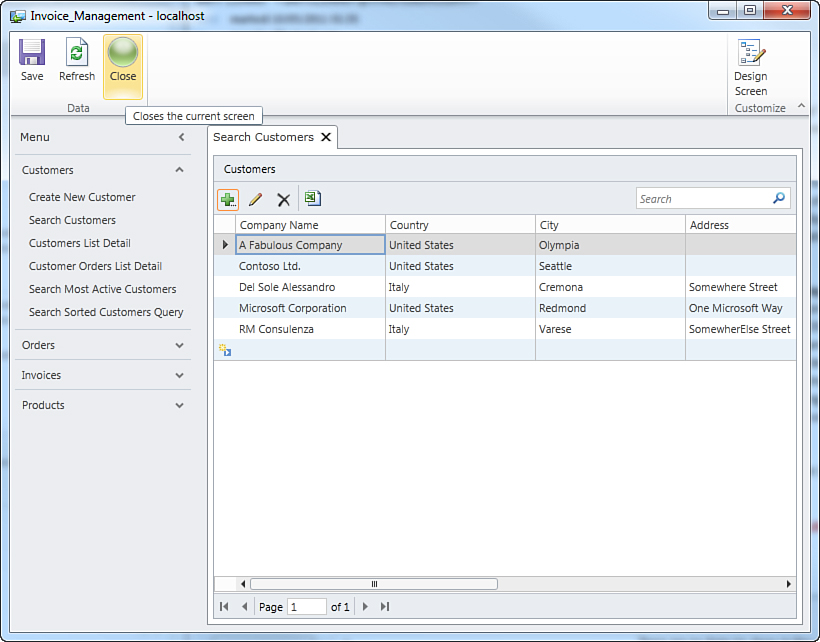
Figure 7.2. The shell Close button is available in the Ribbon Bar.
It is really interesting to notice that shell buttons have a predefined behavior, so you do not need to write code to manage their actions. In current example, the Close button’s default behavior is to close the current screen, which is exactly what happens when you click it. The Save and Close buttons also give you the possibility of customizing in code the execution of their action. If you close the application and go back to the Screen Designer, you can right-click the Close button in the Ribbon Bar and see the Edit Closing Code method. This basically allows overriding the default behavior for the Closing events exposed by the screen. The following code snippets demonstrate how to show a simple text message when the user requests to close the screen and how to cancel the closing in case any validation errors exist:
Private Sub SearchCustomer_Closing(ByRef cancel As Boolean)
'Prevents from closing the screen
'by setting cancel = True
ShowMessageBox("You decided to close the screen.",
"", MessageBoxOption.Ok)
cancel = False
End Sub
Generally, you will not need to override the default code for shell buttons, but it is important to understand how they work under the hood.
Replacing the Default Icon
As you can see in Figure 7.2, LightSwitch assigns a not-so-cool default icon to new buttons. If you select the button and then open the Properties window, at the very bottom of it you can find a shortcut named Choose Image that allows you to replace the default icon with a custom one. When you click such a hyperlink, the Select Image dialog opens, in which you can import and assign a new image (see Figure 7.3).
Figure 7.3. Importing custom images for buttons.
You just click Import and then select your favorite image. Once selected, you click OK; the image will be assigned to the button as the new icon, as you can easily verify by rerunning the application.
Adding and Managing Custom Buttons
So far, you have seen how to customize screens by adding a built-in button to the Screen Command Bar, but you are not limited to this scenario. In Visual Studio LightSwitch, you can add custom buttons other than built-in buttons to accomplish your specific tasks. You can extend with custom buttons both the Screen Command Bar and the Command Bar. In the previous section, you saw how to add a built-in button to the Screen Command Bar. In this section, you learn how to add a custom button to the Command Bar on the SearchInvoices screen, whose role is exporting the list of orders to an XML file. Open the Screen Designer for SearchInvoices and expand its definition, to locate the Command Bar element. When this is expanded, you will see that only the Refresh button is visible. At this point, click Add, so that you will be prompted with a list of button choices, as shown in Figure 7.4.
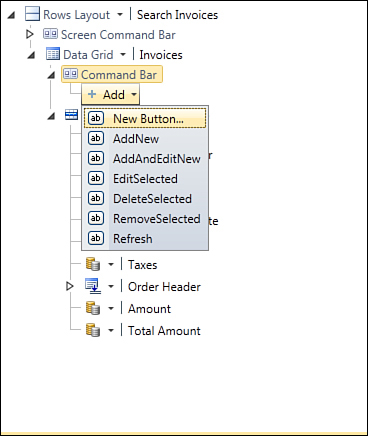
Figure 7.4. Adding a new custom button.
Click New Button, and at this point you are prompted to specify a name for the button. Replace the default suggestion with ExportAsXml, as shown in Figure 7.5.
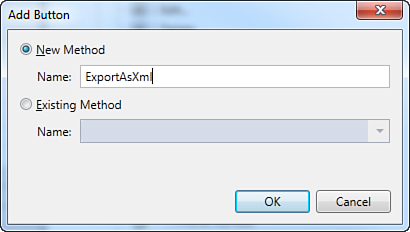
Figure 7.5. Specifying the name for a new button.
When you click OK, the new button control is added to the Command Bar. The default value in the Display Name field is the same as the button name. If you use normal English words, though, Visual Studio LightSwitch can split those words into a convenient description (in this case, Export as Xml). You can open the Properties window pointing to the new button and provide a more meaningful description if required. Now right-click the new button. A pop-up menu will display a number of choices, but two of them are the most important: Edit CanExecute Code and Edit Execute Code. Both CanExecute and Execute are methods that actually handle the same-named events. The first one establishes the Boolean condition that allows the command associated with the button to be executed when the condition is True. Execute represents the action that needs to be executed when the button is pressed. Click Edit CanExecute Code to activate the code editor. Visual Studio LightSwitch generates the following method stub:
Private Sub ExportAsXml_CanExecute(ByRef result As Boolean)
End Sub
You need to assign the result variable with the condition that must be evaluated as True. Notice that until the condition is False, the button associated with the code is disabled. For example, consider the following method implementation:
Private Sub ExportAsXml_CanExecute(ByRef result As Boolean)
' Write your code here.
result = System.Runtime.InteropServices.Automation.
AutomationFactory.IsAvailable And Me.Invoices.Count > 0
End Sub
This code enables the command only if the application is running as a desktop client (AutomationFactory.IsAvailable) and only if the data-bound Invoices collection contains at least one item. The reason this button is available only when the application is running as a desktop client is that these types of applications have more permissions over the local system, and this is required, for example, when you need to write a file to disk. The following is the code that instead handles Execute and that generates an XML document that contains a simplified list of orders:
Private Sub ExportAsXml_Execute()
Try
'Builds a default document pathname
Dim pathname = Environment.
GetFolderPath(Environment.SpecialFolder.
MyDocuments) + "OrdersReport.xml"
'Using LINQ and XML Literals makes easy
'to create XML documents
Dim doc As XDocument = <?xml version="1.0"?>
<Orders>
<%= From ord In Me.
Invoices
Select
<Order Id=<%= ord.Id %>
OrderDate=<%= ord.
OrderDate.ToString %>/>
%>
</Orders>
Using xStream As New StreamWriter(pathname)
doc.Save(xStream)
End Using
Catch ex As Exception
ShowMessageBox(ex.Message)
End Try
End Sub
The preceding code uses XML literals to dynamically generate an XML document. Basically, XML literals provide you an opportunity to write XML markup inside your Visual Basic code. For further information about XML literals, visit the following page in the MSDN documentation: http://msdn.microsoft.com/en-us/library/bb384563.aspx. XML literals are not available in Visual C#, so if you use this programming language you need to use the XDocument and XElement classes, including their properties in their standard flavor.
If you now run the application and open the SearchOrder screen, you can see the Export as Xml button created previously, available and enabled, unless the application is running as a desktop client and there is at least one order in the collection. Figure 7.6 demonstrates this.
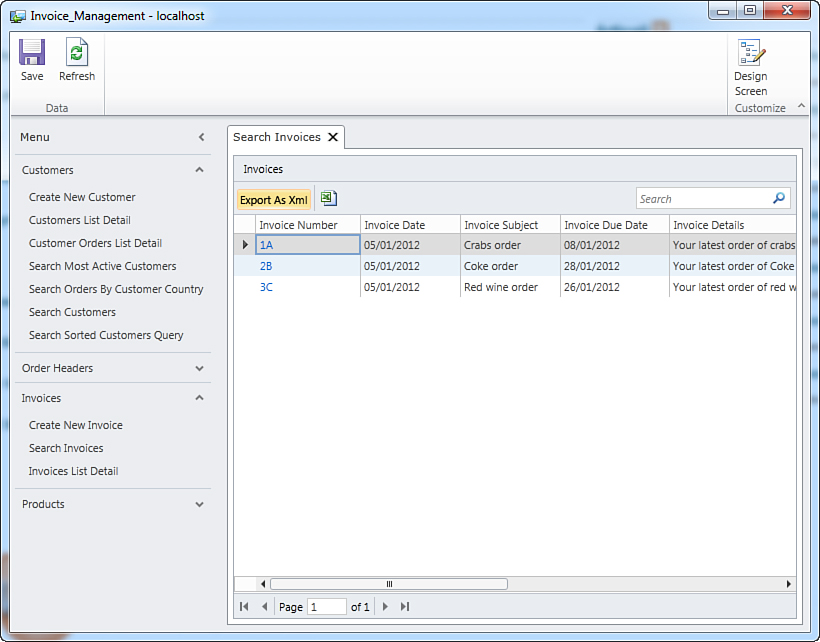
Figure 7.6. The new custom button is available in the Command Bar.
If you click the new button, a new XML document containing a simplified list of orders is generated in the Documents folder at the user level.
Adding Buttons to the Screen Command Bar
You use exactly the same technique described in this subsection to add a custom button to the Screen Command Bar to start particular activities.
Other common scenarios in which you might want to implement custom buttons are populating a data-bound custom control at runtime with a particular query result or data source and starting a custom activity. In the next chapter, you will see a custom button that starts a printing activity.
Handling More-Complex Scenarios with COM Interoperability
Silverlight 4 introduced a number of new APIs that can be successfully used in LightSwitch applications. Among these new features, Silverlight 4 introduced support for interoperability with the COM architecture only for out-of-browser applications with full trust, which in LightSwitch is translated as desktop client applications. This is really important if you think of the so-called Office automation: By using COM interoperability, you can automate tasks by running applications of the Microsoft Office suite. Because LightSwitch applications are built upon Silverlight 4, this means that you can interact with Microsoft Office by using COM interoperability (although this should be limited to specific scenarios).
This requires some more steps, some more lines of code, and some experience with Visual Studio 2010. For example, suppose you want to send an email using the local Microsoft Outlook to customers to remind them of their next order shipments. Technically speaking, you need to implement a class that checks for elevated permissions (full trust) and that exposes a method that sends an email message. This class cannot be implemented on the data layer because it would be out of place, and it cannot be implemented on the UI layer because it would require objects that are not allowed at that point. Under the hood, LightSwitch applications are made of several projects (as you learn in more detail in Chapter 14, “Debugging LightSwitch Applications”). Among the available projects is one named Client that provides interaction between screens and data. This is the perfect place to position a custom class for sending an email, but you might wonder why you do not see it in Solution Explorer. What you see instead in Solution Explorer is a button representing some folders. If you click the down arrow near the button, you see two choices: Logical View (which is the default setting) and File View. By switching to File View, you will be able to see all the projects that compose your LightSwitch applications in a completely familiar fashion, as shown in Figure 7.7.
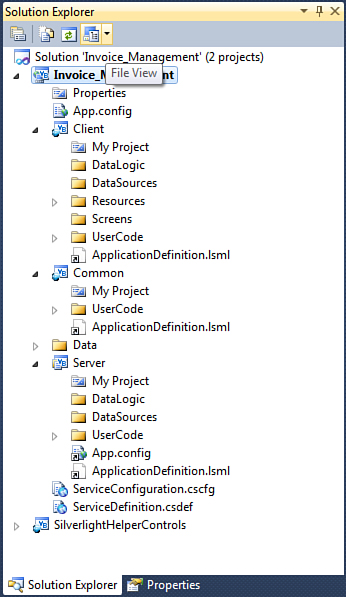
Figure 7.7. Switching to the File View and seeing all the available projects.
Later in this book, the complete solution infrastructure is explained in detail. For now, focus on the Client project. This contains code that acts as a bridge between data sources and screens. Do not change the default code for any reason, because any edit could potentially make the application inoperable. Because you need to write a class that is actually in the middle, because it receives a command from the user interface and makes invocations to data, this is the appropriate place for it. As you know from your previous experience in Visual Studio, right-click the Client project name and then select Add, Class. When the Add New Item dialog appears, rename the Class1.vb code file to MailSender.vb. Double-click the new file to access the code editor.
Before writing code, consider these points. First, COM automation is possible in Visual Basic code via late binding. This requires an Option Strict Off directive as the first line in the class. Second, before sending an email, you need to ensure that the application has elevated permissions. This is accomplished by checking the value of the AutomationFactory.IsAvailable property. Because COM automation is available only in desktop clients, if your application runs inside a web browser, the value for this property will always be False.
AutomationFactory is a class exposed by the System.Runtime.InteropServices.Automation namespace, so you need the following Imports directive:
Imports System.Runtime.InteropServices.Automation
After you are sure that the application has elevated permissions, you invoke the AutomationFactory.CreateObject method to create an instance of the desired Office application, which is Outlook in the current context. All the tasks required for sending an email can be grouped inside one method that receives an instance of the Customer class, as the mail recipient, and a collection of orders related to that customer. Basically, the method will
1. Get an instance of Microsoft Outlook.
2. Create a new mail message.
3. Populate the message with the mail recipient, subject, and body.
4. Display the mail message in Outlook.
In this particular case, the application will allow sending an email to inform the customer about next shipments; this implies a LINQ query that retrieves only orders for the specified customer in which the ShippedDate is greater than (later than) today. Listing 7.1 shows the code for the MailSender class and the SendMail method.
Listing 7.1. Sending Email via Outlook Automation
Option Strict Off
Imports System.Runtime.InteropServices.Automation
Public Class MailSender
Public Shared Sub SendMail(ByVal customer As LightSwitchApplication.Customer,
ByVal orders As EntityCollection(Of LightSwitchApplication.OrderHeader))
If AutomationFactory.IsAvailable = True Then
Dim outlook = AutomationFactory.
CreateObject("Outlook.Application")
Dim mail = outlook.CreateItem(0)
mail.To = customer.EmailAddress
mail.Subject = "Your orders"
Dim body As New Text.StringBuilder
With body
.AppendLine("Dear " + customer.ContactName)
.AppendLine("Following is the list of Your orders that we are going to _ ship soon:")
Dim query = From ord In customer.OrderHeader
Where ord.ShippedDate > Date.Today
Select ord
For Each ord In query
.AppendLine(String.Format("Order Id: {0}, Order Date: {1}",
ord.Id, ord.OrderDate.ToShortDateString))
Next
.AppendLine()
.AppendLine("Sincerely")
End With
mail.Body = body.ToString
mail.Display()
Else
Throw New InvalidOperationException _
("This feature is available only in desktop client applications")
End If
End Sub
End Class
Once the application has permissions (AutomationFactory.IsAvailable), an instance of Outlook is created (AutomationFactory.CreateObject("Outlook.Application")), and so a new mail message is generated (outlook.CreateItem(0)). Next, each fundamental field of a mail message is populated. Notice how the mail body is constructed by using the StringBuilder class, for better efficiency. A LINQ query gets only the related orders where the ShippedDate property is greater than (later than) today, and then a For..Each loop adds the list of orders to the mail message. Instead of automatically sending the message (which would require a mail.Send invocation), the new message is displayed as a draft in Outlook before sending. When the user is satisfied with the mail draft, this can be sent by pressing the appropriate button in Outlook. Now that you have this method, you need to bind it to a button. In Solution Explorer, switch back to the Logical View, and then enable the Screen Designer for the SearchCustomer screen. By following the lesson learned in the previous section, locate the Command Bar nested into the Data Grid, Customers element. Finally, add a new button called SendEmail to the Command Bar. Implementing CanExecute and Execute methods for the new button is an easy task and is accomplished with the following snippets:
Private Sub SendEmail_CanExecute(ByRef result As Boolean)
'Enabled only when one customer is selected
result = Me.Customers.SelectedItem IsNot Nothing
End Sub
Private Sub SendEmail_Execute()
'If no email address was specified for the selected customer...
If String.IsNullOrEmpty(Me.Customers.
SelectedItem.EmailAddress) Then
'...shows an error message and go back.
ShowMessageBox _
("Unable to serve your request.
It appears that you did not provide
an email address for the selected customer.")
Exit Sub
End If
'invokes the SendMail method
'by passing the selected customer instance
'and its orders
MailSender.SendMail(Me.Customers.SelectedItem,
Me.Customers.SelectedItem.OrderHeader)
End Sub
End Class
At this point, you can run the application and show the SearchCustomers screen. As you can see in Figure 7.8, the screen now offers a new button for sending email to the selected customer.
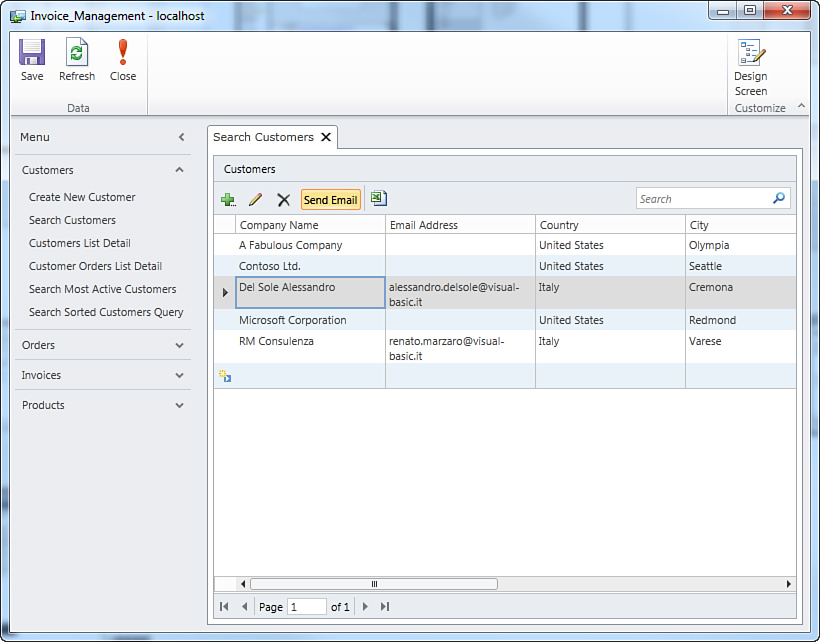
Figure 7.8. The Send Email button is available on the screen.
When you click such a button, a new Outlook window opens and shows a mail message draft in which the body contains the list of orders for the selected customer as it was filtered in code, as shown in Figure 7.9.
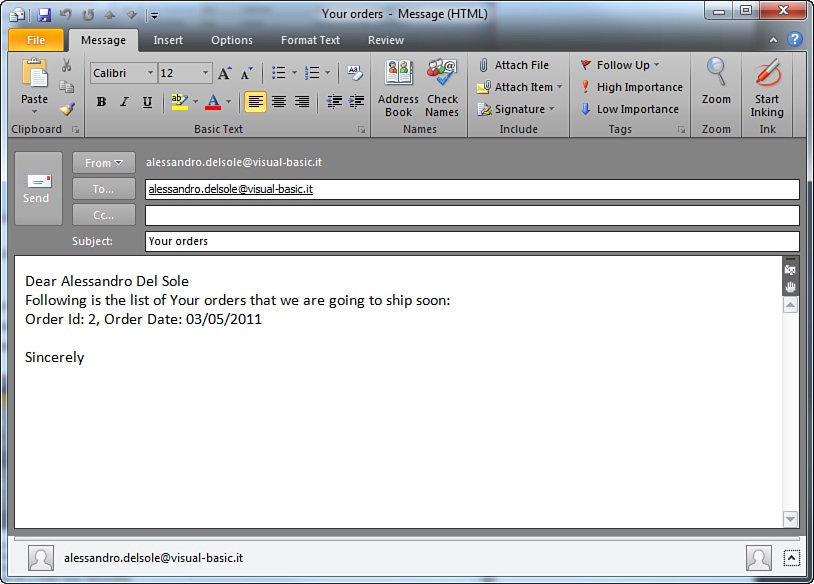
Figure 7.9. The new email message generated from within the LightSwitch application.
Now the user just needs to check whether everything in the message is okay and send it. So, with COM interoperability, some lines of code, and a custom button, you were able to dramatically improve your screen by allowing users to interact with Microsoft Outlook, which is very common and important in business applications.
In Chapter 17, “Implementing Printing and Reporting,” you discover the Office Integration Pack extension, which enables you to leverage Outlook and other applications from the Microsoft Office suite without using COM Automation explicitly and with a very limited effort. The example in this chapter has been provided to demonstrate how you can add powerful features to a LightSwitch application with more advanced programming techniques, including interaction with Microsoft Office.
Downloading, Installing, and Using Extensions
As you have read throughout this book so far, one of the main goals of Visual Studio LightSwitch is to make the development experience as easy as possible. To accomplish this, the integrated development environment (IDE) offers all the necessary tools, including built-in controls that the designer applies to the user interface, based on the data that they are intended to map.
In some situations, however, standard features are not enough. Although LightSwitch offers a really complete environment, Microsoft is aware that developers often need custom functionalities. This is why Visual Studio LightSwitch is an extensible environment, meaning that you can plug new functionalities into the IDE to enrich your applications. LightSwitch supports a variety of extensions, as you learn later in this chapter. In addition, you can build and share (or sell) custom extensions by using Visual Studio 2010 (as explained in Chapters 18 and 19). This current chapter has two goals: giving you the basics of extensibility in Visual Studio LightSwitch and demonstrating how to enhance your toolbox by downloading and installing extensions produced by other developers (including Microsoft). You will need this knowledge in Chapter 18, where you learn to extend the IDE with custom extensions.
Extensions Types in Visual Studio LightSwitch
Visual Studio LightSwitch applications can be extended to support new functionalities out of the box. Six types of extensions are allowed in the LightSwitch extensibility model:
• Custom controls: These allow extending the user interface with Silverlight-based custom controls. Because of their importance, custom controls are discussed in two other chapters in this book (Chapters 16, “Customizing Applications with Custom Controls,” and 18, “LightSwitch Extensibility: Themes, Shells, Controls, and Screens”).
• Screen templates: You can create a custom screen layout that will be available on the Screen Designer, so that you can define a customized user experience.
• Business types: As mentioned several times, LightSwitch introduces the concept of business type, which is a business flavor for .NET data types bound to show, format, validate, and store data (such as EmailAddress or PhoneNumber). You can create your custom business types to represent your specific business scenarios.
• Shells: This provides the common parts of the user interface in an application, such as the navigation pane, the command bar, and the active screen pane. By creating a shell extension, you can override the default layout, providing a custom one that better fits specific needs (for example, an application running on devices with multi-touch screens needs a different layout than the default one).
• Themes: You can create your own set of colors, fonts, and palettes to override the default aesthetic behavior in the application.
• Data sources: You can gain connectivity to data sources other than SQL Server (or Azure) databases via custom WCF RIA Services. Because of their importance, these are discussed in Chapter 19, “LightSwitch Extensibility: Data and Extension Deployment,” to demonstrate how you build a reusable, custom data source.
Now that you know the kinds of extensions that LightSwitch supports, you also know what you to expect when searching for additional functionalities for the IDE. So, in this chapter, you learn how to search, download, and install extensions built by other developers. In Chapters 18 and 19, professional developers with .NET and Silverlight skills learn how to build extensions that both serve your needs and that you can share with (or sell to) other developers.
Downloading and Installing Extensions
In Visual Studio LightSwitch, and more generally in Visual Studio 2010, you have two basic ways to download and install extensions. The first alternative is to visit the Visual Studio Gallery (http://visualstudiogallery.msdn.microsoft.com), a web portal where you can find any kind of extensions for Visual Studio and download them via a web browser. This implies installing extensions manually, but the advantage is that you are not limited to VSIX packages. From the Visual Studio Gallery, you can download extensions that are distributed as MSI (Windows Installer) packages or as self-extracting, executable (.exe) archives. This is not unusual, especially for extensions that require interaction with the operating system (such as storing information to the Windows Registry). Figure 7.10 shows a preview of the Visual Studio Gallery.
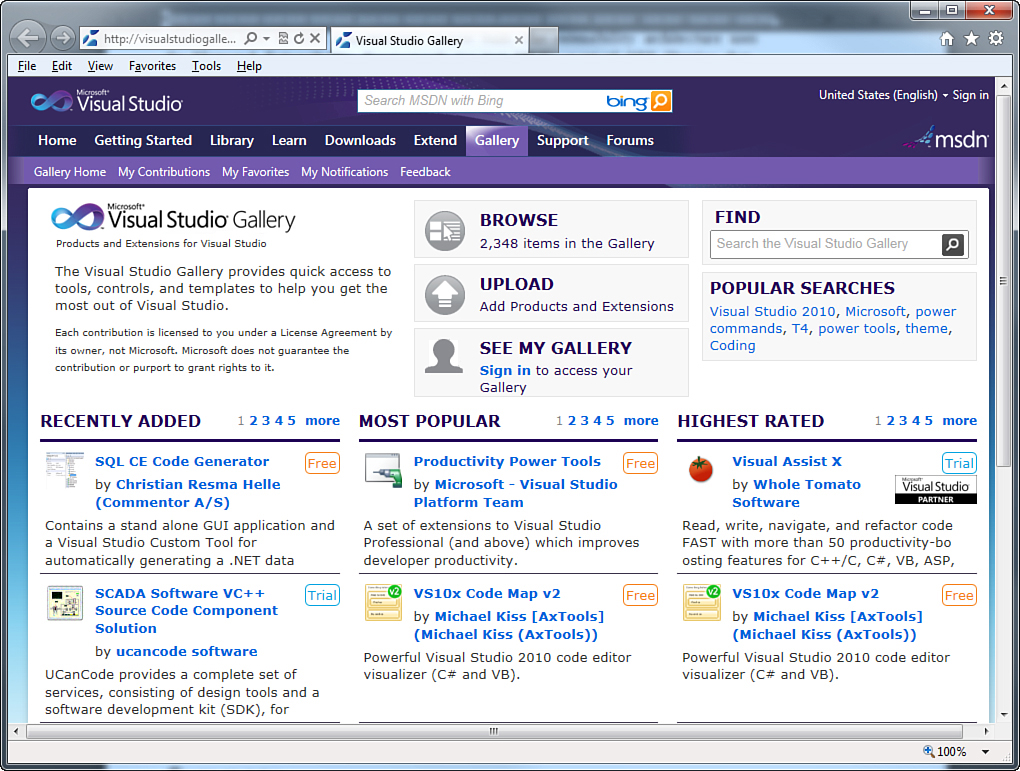
Figure 7.10. Visiting the Visual Studio Gallery from Microsoft.
You can browse the gallery by taking advantage of built-in search criteria or by entering your own keys. You can also search by the extensibility area (for example, user controls) or by cost. With regard to the current development environment, “LightSwitch” is the search key to use to find a list of available extensions. After you open the page of a particular extension, you can see detailed information (as provided by the producer), screenshots, ratings, reviews, and lots of other information.
You can download an extension by clicking the Download button. Figure 7.11 shows the web page of an extension called Web Address Business Type, where the Download button is also visible. This extension is a custom business type created (by your author) to provide a specific data type to represent and validate web addresses. The full process followed to create the Web Address extension is explained in Chapter 19. For now, you just need a ready-to-use example to download so that you can easily understand how extensions can be used.
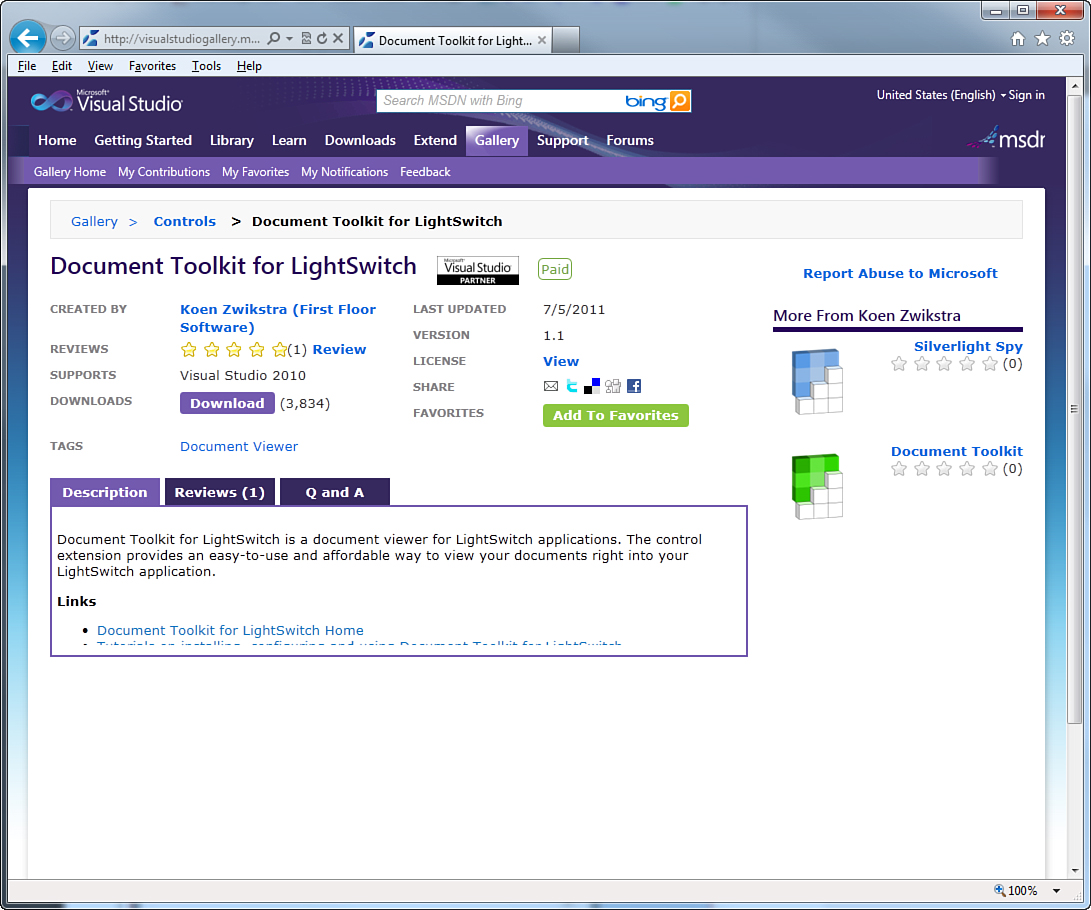
Figure 7.11. Visiting an extension’s page.
If the extension is available under the form of a VSIX package, when you launch it, the Visual Studio Extension Installer dialog appears, requesting your agreement to install the extension, as shown in Figure 7.12.
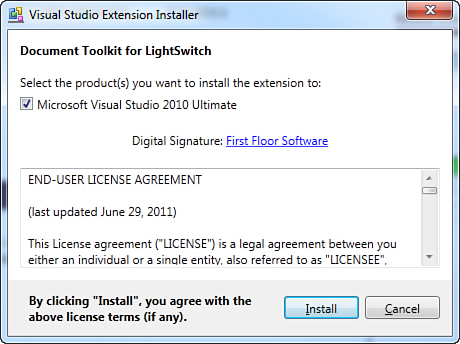
Figure 7.12. Installing the downloaded extension.
In most cases, you also need to accept a license agreement before installing the extension. Of course, if the extension that you download is available as an MSI or .exe package, you must follow the steps required by the setup procedure. The second option for downloading and installing extension is a tool called Extension Manager, which is integrated in Visual Studio LightSwitch and that you can find in the Tools menu. Extension Manager not only allows downloading and installing extensions from the Web, but it also allows managing currently installed extensions. For example, you might want to temporarily disable or completely uninstall an extensions; Extension Manager provides these capabilities. When you launch Extension Manager, you can browse the online gallery by clicking the Online Gallery element on the left side of the dialog (see Figure 7.13).
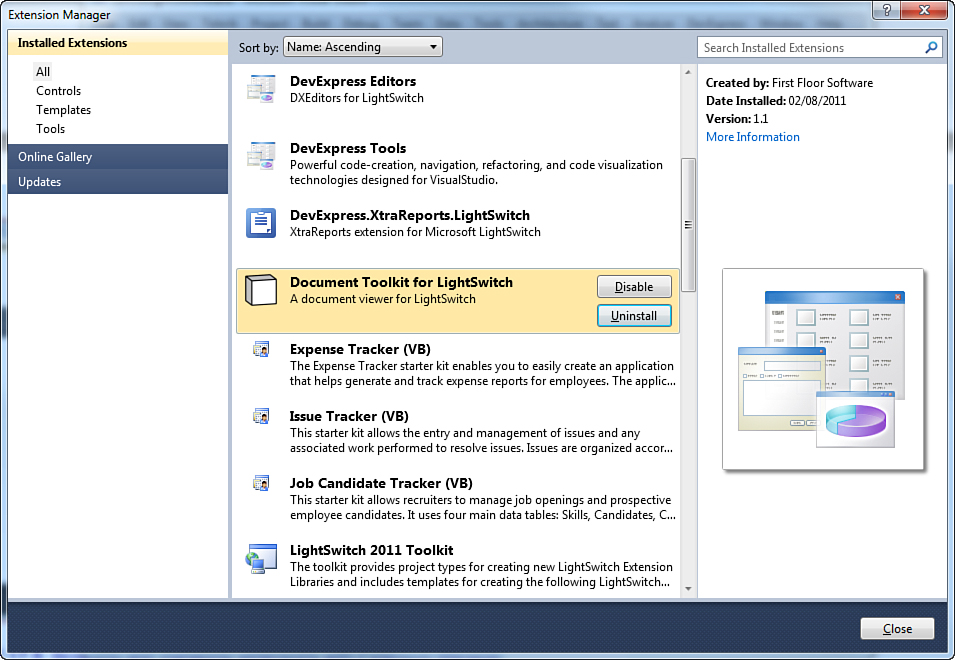
Figure 7.13. Browsing and managing extensions with Extension Manager.
If you installed LightSwitch over Visual Studio 2010, Extension Manager will show the list of all available extensions for Visual Studio 2010, not only LightSwitch, both from the installed extensions and from the Online Gallery.
When you select an extension from the Online Gallery, you will see a Download button and some information about the extension. Note that Extension Manager can download VSIX, MSI (Windows Installer), and executable files, but only VSIX packages are installed automatically for you.
After the extension has been downloaded, the Visual Studio Extension Installer asks for your confirmation before going on (refer to Figure 7.12). If you instead want to manage installed extensions, just click the Installed Extensions element on the left side of the dialog to see the full list of available extensions, or click one of the nested elements to see extensions belonging only to the selected area. For each installed extension, you get two buttons, Disable and Uninstall, which are self-explanatory and which enable you to manage installed extensions.
Using Extensions
After an extension has been installed, the new component appears as available in Visual Studio LightSwitch, depending on the extension type. The documentation for the downloaded extension should provide information about how to use it, but here are some general rules:
• Screen templates extensions are available in the Add Screen dialog.
• Custom shells and themes are selectable from the General Properties tab in the Application Designer.
• Custom data sources are available when attaching to an external source.
• Custom controls are available in the Screen Designer.
• Custom business types are available in the Table Designer.
For example, if the extension that you download is a business type, you can use it within the Table Designer. Figure 7.14 shows how to enable the Web Address extension in the Application Designer, together with the list of all available extensions.
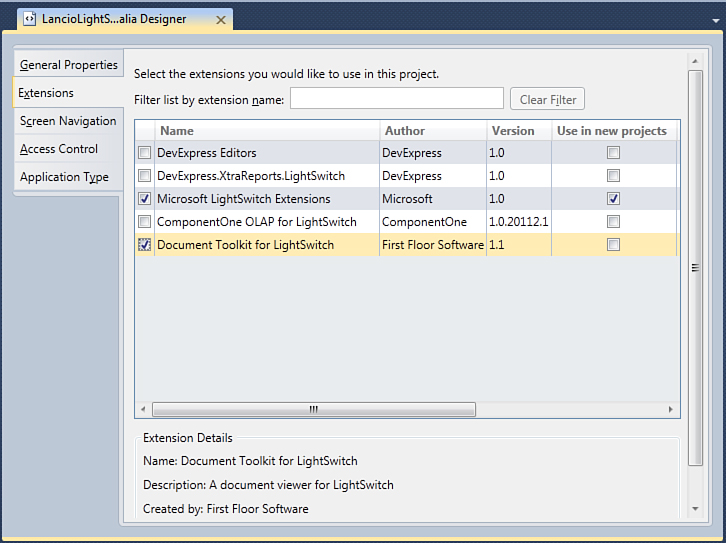
Figure 7.14. Enabling a newly installed extension.
Automatically Set Extensions for New Projects
You can enable Visual Studio LightSwitch to use a particular extension every time you create a new project. To do so, just check the Use in New Projects check box for one or more extensions. This avoids the need of enabling extensions manually every time.
To demonstrate how an extension can be used, and continuing the example of the Web Address business type that you downloaded before, you can create a new table in your application and set the type for an entity property as Web Address, as shown in Figure 7.15.
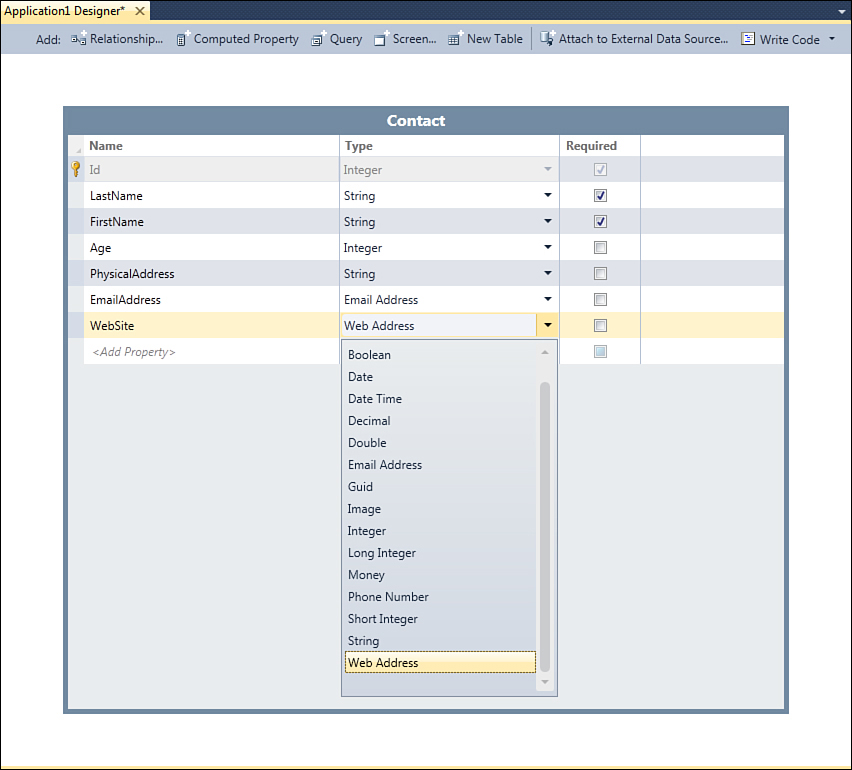
Figure 7.15. Using a downloaded extension in your project (business type).
You can easily check how the business type works by adding a new data entry screen to the project, running the application, and trying to enter a badly formed web address to raise the built-in validation for the new business type. Extensions are a great way to enhance your developer toolbox; they add lots of useful functionalities to both the development environment and applications. Downloading and installing third-party extensions is straightforward and make possible incredible new development possibilities.
Summary
Visual Studio LightSwitch is a general-purpose development environment and, because of this, it cannot cover every possible development scenario. However, LightSwitch allows adding new functionalities to applications, with additional command buttons that you can associate with specific tasks by handling the CanExecute and Executed events. In addition, the rich LightSwitch extensibility model allows downloading and installing extensions from other developers to get functionalities out of the box. In this chapter, for example, you saw how to download and install the Web Address business type to support representations of web addresses, instead of displaying them as unresponsive strings. Remember that applications can also be extended with custom controls and data sources, but this is typically for the expert developer (and so it is discussed later in this book). If LightSwitch looks cool to you at this point, you are right. But there is much more to come, such as using the same approach with data regardless of the connected data source. This is explained in the next chapter.