In this chapter you will learn to:
Configure a library.
Work with library columns.
Work with document metadata.
Create a view of a document library.
Secure a library.
Use Web folders to access a Document Library.
Use the document discussions functionality.
Delete a library.
As we discussed in the last chapter, document libraries are one of the most powerful features of Microsoft Windows SharePoint Services. The additional features available in Windows SharePoint Services—such as versioning, approval, and navigation settings— are what make SharePoint document libraries more compelling than using networked shared folders. You can use SharePoint libraries to store multiple versions of your documents, require approval for documents to be published, and sort and filter content easily.
In this chapter, you will learn how to manage document libraries and enable additional library features. You will learn how to work with a library's columns and document metadata. You will also learn how to create a view of a document library, secure the library, use Web folders to access it, use the document discussions functionality, and delete a library. You will use the document library Plant Descriptions and the form library Purchase Orders created in Chapter 5, for the exercises in this chapter.
See Also
Do you need only a quick refresher on the topics in this chapter? See the Quick Reference entries in Quick Reference.
Important
![]() Before you can use the practice files and sites provided for this chapter, you need to install them from the book's companion CD to their default locations. See "Using the Book's CD-ROM" for more information.
Before you can use the practice files and sites provided for this chapter, you need to install them from the book's companion CD to their default locations. See "Using the Book's CD-ROM" for more information.
Important
Remember to use your SharePoint site location in place of http://gardenco in the exercises.
Each document library has settings you can change from the General Settings page. You can change the library's name and description along with navigation, versioning, and approval settings.
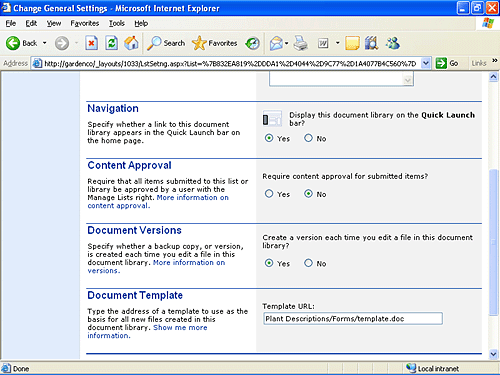
With the Navigation settings, you can specify whether to show a link to your library on the Quick Launch bar on the left side of the home page of the site. Libraries that are not shown on the Quick Launch bar can be accessed using the Documents and Lists link at the top of the home page, but using the Quick Launch bar makes it easier to find your libraries.
With the Document Versions settings, you can turn on or turn off versioning of documents that are stored in the library. If you turn on versioning, each time a document is changed, Windows SharePoint Services saves a copy of each edited version of the document. This enables you to have multiple versions of the same document, so that you can easily see what the document contained before modifications were made and revert to any previous version if need be.
With the Content Approval settings, you can specify whether documents require approval in the library. If you enable Content Approval, you must approve new and modified documents before they appear for other users. The Content Approval setting is useful in situations in which you don't want content showing up for everyone right away. For example, you might want to review vacation requests and approve them before they show up in the library on your site for all employees to see.
In General Settings, you also have the option to specify a default template for the library. If you apply a template, when a user clicks New Document in the library, Windows SharePoint Services opens a document based on this document template for the user.
In this exercise you will make changes to the settings of the Purchase Orders form library you created in Chapter 5. You have heard from your employees that they have a hard time finding the Purchase Orders library on the site, so you want the link to the library to show up in the Quick Launch bar on the front page of the site. Also, because you are making changes to the library, you decide that you want to approve purchase orders in this library before they appear in the library for other employees to see them.
OPEN the SharePoint site in which you'd like to edit library settings. If prompted, type your user name and password, and then click OK.
BE SURE TO verify that you have sufficient rights to configure a library. If in doubt, see the Appendix .
BE SURE TO complete the form library creation exercise in Chapter 5.
Alternatively, you can create a practice site for this chapter based on site template Chapter 6 Starter.stp in the practice file folder for this chapter. The practice file folder is located in the My Documents Microsoft PressSharePoint Services SBSChapter 06 folder. See "Using the Book's CD-ROM" for instructions on how to create a practice site.
On the top link bar, click Documents and Lists.
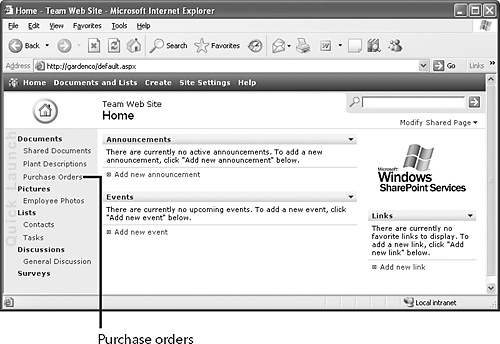
In the Document Libraries section, click Purchase Orders.
You are taken to the Purchase Orders form library.
Under Actions, click Modify Settings and Columns.
You are taken to the Customize Purchase Orders page.
In the General Settings section, click the Change General Settings link
In the Navigation section, select Yes to the question Display this form library on the Quick Launch bar?.
In the Content Approval section, select Yes to the question Require content approval for submitted items?.
 Click OK, and then in the top link bar, click Home.
Purchase Orders now is displayed on the Quick Launch bar.
Like lists, library columns enable you to enter metadata for documents. This metadata can then be used by Document Library views to filter and sort documents. Metadata can also make it easier to find documents and know what type of information a document contains without having to open the document. You need to make sure you have a sufficient number of columns to effectively describe the documents you are working with. For instance, in the Plant Descriptions document library you might want columns for Plant Color, Plant Family, and Plant Type. That way, you could quickly find, for example, all Red plants in order to narrow down the plants you are looking for.
In this exercise, you will add a column to the Plant Descriptions document library for Plant Type (Deciduous and Evergreen).
OPEN the SharePoint site in which you'd like to add columns to a document library. If prompted, type your user name and password, and then click OK.
BE SURE TO verify that you have sufficient rights to edit document library columns. If in doubt, see the Appendix .
BE SURE TO complete the document library creation exercise in Chapter 5.
Alternatively, you can create a practice site for this chapter based on site template Chapter 6 Starter.stp in the practice file folder for this chapter. The practice file folder is located in the My Documents Microsoft PressSharePoint Services SBSChapter 06 folder. See "Using the Book's CD-ROM" for instructions on how to create a practice site.
On the top link bar, click Documents and Lists.
In the Document Libraries section, click Plant Descriptions.
The Plant Descriptions document library appears.
Under Actions, click Modify Settings and Columns.
The Customize Plant Descriptions page appears.
Under Columns, click Add a New Column.
The Plant Description: Add Column page appears.
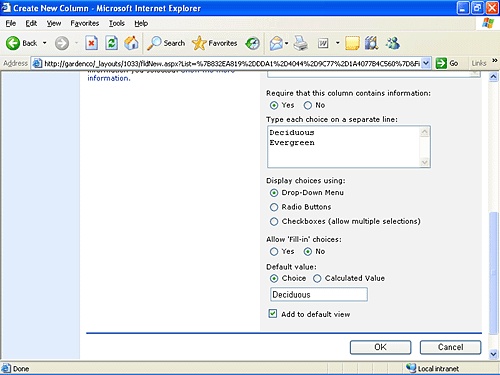
In the Column Name box, type the name of the new column, for example Plant Type.
In The type of information in this column is: list, select Choice.
Under Require that this column contains information:, select Yes.
In the Type each choice on a separate line: box, delete the text shown.
In the Type each choice on a separate line: box, type the name for your column, such as Deciduous, and then press
 .
.On the next line, type Evergreen.
Click OK, and then click Go Back to "Plant Description."
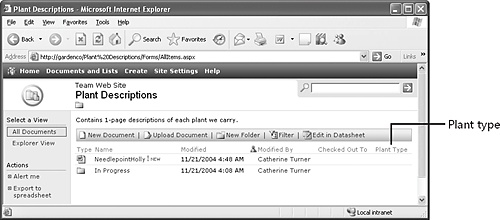
The new column named Plant Type is displayed on the far right.
When viewing documents in a SharePoint document library, often just seeing the title is not enough to know exactly what the document is about. With SharePoint libraries you can use metadata, which is data that describes the document. Using metadata, you can more easily find a specific document or a document about a specific topic. You can filter and sort documents based on specific metadata.
In this exercise, you will add metadata to the NeedlepointHolly.doc document.
OPEN the SharePoint site in which you'd like to apply metadata to a document. If prompted, type your user name and password, and then click OK.
BE SURE TO complete the adding documents exercise in Chapter 5.
Alternatively, you can create a practice site for this chapter based on site template Chapter 6 Starter.stp in the practice file folder for this chapter. The practice file folder is located in the My Documents Microsoft PressSharePoint Services SBSChapter 06 folder. See "Using the Book's CD-ROM" for instructions on how to create a practice site.
On the top link bar, click Documents and Lists.
In the Document Libraries section, click Plant Descriptions.
The Plant Descriptions document library appears.
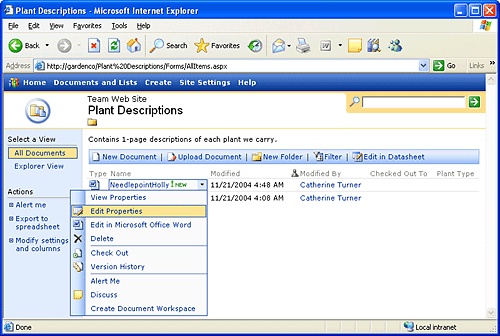
Move your mouse over NeedlepointHolly.doc, and then when an arrow appears to the right of the document name, click the arrow.
Click Edit Properties.
The Plant Descriptions: NeedlepointHolly Page appears.
In the Plant Type field, select Evergreen.
Click Save and Close.
The Plant Descriptions document library appears. Evergreen now shows up under Plant Type for NeedlepointHolly.doc.

CLOSE Internet Explorer
Document Library views are very similar to the list views you learned about in the previous chapter. Views use the metadata on documents to filter, sort, or group documents together, thus making them easier to find. For example, the Plant Descriptions library could have two different views: one that shows only documents pertaining to plants in a particular family, and another that shows the documents sorted by how long the Garden Company has been carrying a specific type of plant. If you are familiar with Microsoft Office Excel, you may think of views like PivotTables that enable you to see different sets of data pivoting on document metadata. Numerous possibilities exist for the views you can have. Bear in mind though these views are based on the document metadata, so make sure you have all the columns you would like to filter, sort, and group documents by.
In this exercise, you will open the SharePoint site and create a view of the Plant Description document library. This view will group plants by their Plant Type field (Evergreen or Deciduous).
OPEN the SharePoint site in which you'd like to create a view of a document library. If prompted, type your user name and password, and then click OK.
BE SURE TO complete the adding documents exercise in Chapter 5.
Alternatively, you can create a practice site for this chapter based on site template Chapter 6 Starter.stp in the practice file folder for this chapter. The practice file folder is located in the My Documents Microsoft PressSharePoint Services SBSChapter 06 folder. See "Using the Book's CD-ROM" for instructions on how to create a practice site.
On the top link bar, click Documents and Lists.
In the Document Libraries section, click Plant Descriptions.
The Plant Descriptions document library appears.
Under Actions, click Modify Settings and Columns.
The Customize Plant Descriptions page appears.
Under Views, click Create a New View.
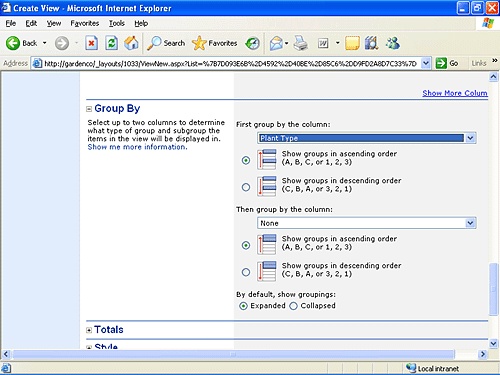
The Plant Description: Create View page appears.
Click Standard View, and then in the View Name box, type a name for the view, such as By Plant Type.
Scroll down and expand Group By.
A list of options is displayed to the left of Group By.
From the First group by the column: box, select the column you would like to group by, for example Plant Type.
Click the OK button.
The Customize Plant Description page appears.
Click Go Back to "Plant Descriptions".
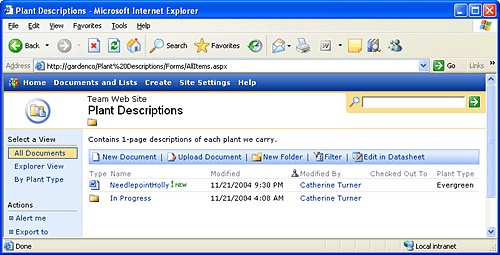
The Plant Descriptions document library appears and in the left pane, a new view called By Plant Type is displayed.
Under Select a View, click By Plant Type.
The Plant Descriptions document library appears, but the view is different. Documents are grouped by the Plant Type property.

After you have created a library, you might want to grant people more privileges or restrict their privileges. More often than not, you will want to give some people more access rights to a particular library. For instance, Catherine Turner might have given Mike Galos reader permission to the overall site when it was created. However, later she might decide that she wants him to be able to create purchase orders in the Purchase Orders library. Mike currently has only Reader access to this library because that is his overall permissions level on the site. Catherine Turner can give Mike additional access to the Purchase Orders library so that Mike can add new documents. However, Mike isn't required to create documents on the rest of the site, only to read documents.
In this exercise, you will open the SharePoint site, navigate to the Purchase Orders form library, and grant a user, such as Mike, access to add and modify Purchase Orders.
OPEN the SharePoint site in which you'd like to secure a document library. If prompted, type your user name and password, and then click OK.
BE SURE TO verify that you have sufficient rights to change document library security. If in doubt, see the Appendix .
BE SURE TO complete the form library creation exercise in Chapter 5.
Alternatively, you can create a practice site for this chapter based on site template Chapter 6 Starter.stp in the practice file folder for this chapter. The practice file folder is located in the My Documents Microsoft PressSharePoint Services SBSChapter 06 folder. See "Using the Book's CD-ROM" for instructions on how to create a practice site.
On the top link bar, click Documents and Lists.
In the Document Libraries section, click Purchase Orders.
The Purchase Orders document library appears.
Under Actions, click Modify Settings and Columns.
The Customize Purchase Orders page appears.
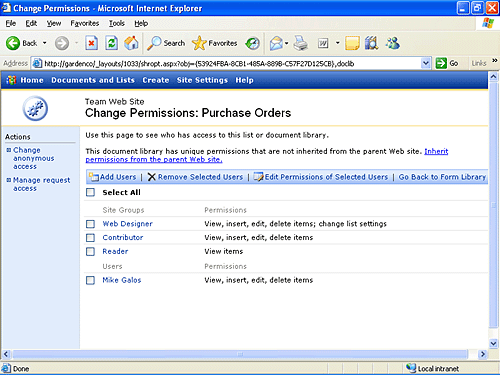
Under General Settings, click Change permissions for this Form Library.
The Change Permissions: Purchase Orders page appears.
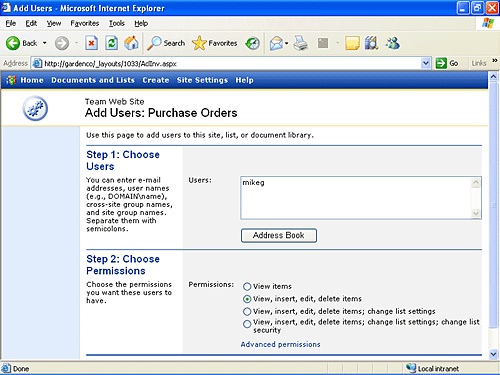
Click Add Users.
In the Users: box, type the user name or email address of the user you'd like to grant permissions to, for example, mikeg.
Under Permissions, select View, insert, edit, delete items.
Click the Next button.
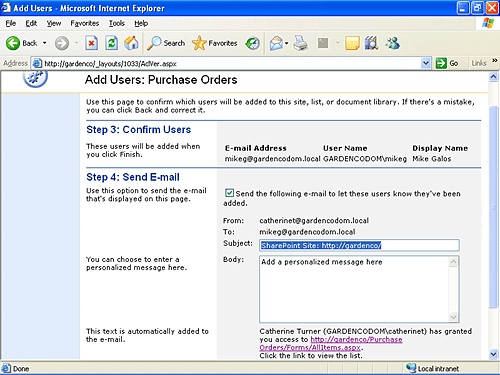
The contents of the Add Users: Purchase Orders page changes.
Click Finish.
Mike is now added as a user and can create and modify Purchase Orders. You are then taken back to the Change Permissions: Purchase Orders page where you can see Mike listed.
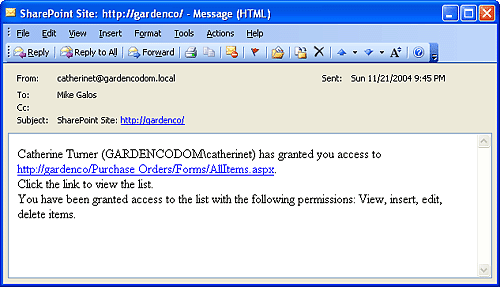
Windows SharePoint Services also sends an e-mail message to Mike to let him know he has been granted the permissions.
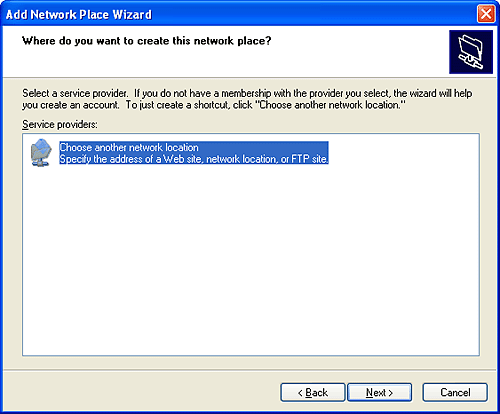
Long-time computer users are often more comfortable accessing files and folders in the standard Windows Explorer interface rather than using a Web-based interface. In addition to the Web-based interface, SharePoint document libraries can be connected to using Web folders, which are a feature of Windows 2003, Windows XP, and Windows 2000.
In this exercise, you will use Windows Explorer to create a Web folder that points to your SharePoint site. You can then use that Web folder to open a library on the site in the familiar Windows Explorer interface environment.
 Click Start, click My Computer, and then on the left side of the screen click My Network Places.
The My Network Places window appears.
If the Network Tasks pane appears on the left, click Add a network place; otherwise, double-click the Add Network Place icon.
The Add Network Place Wizard appears.
Click Next.
Click Choose another network location, and then click Next.
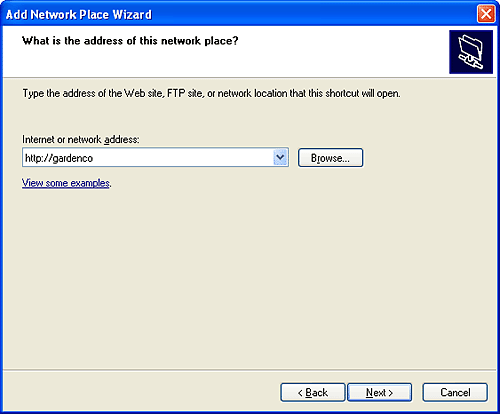
In the Internet or Network Address box, type the name of your SharePoint site, for example http://gardenco, and then click Next.
In the Type a name for this network place box, type the name of your SharePoint site, for example Garden Company SharePoint Site, and then click Next.
Click Finish.
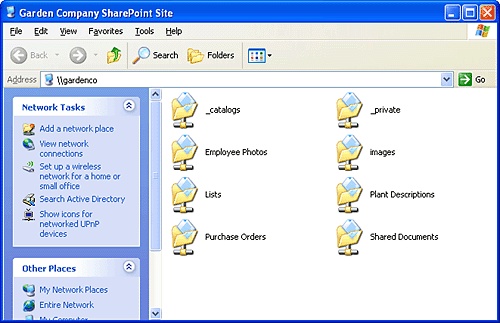
The SharePoint site that includes your document libraries appears.
Anytime you open My Network Places, you will see the link to Garden Company SharePoint Site.

CLOSE the Garden Company SharePoint Site window.
With Windows SharePoint Services, along will Microsoft Office 2003, you can store comments from a document or about a document on your SharePoint server. This is an expansion of Office Server Extensions from previous Office releases, so if you have used Office Server Extensions, you already will be familiar with SharePoint document discussions.
Document discussions functionality enables you to leave comments in a document, or about a document, much like the Comment command in Microsoft Office Word, but stores the discussions on the server rather than in the document itself. This enables multiple users to comment on a document at the same time.
In this exercise, you will add a comment on document, NeedlepointHolly.doc, stating that the document is ready for customers.
OPEN the SharePoint site in which you'd like to discuss a document. If prompted, type your user name and password, and then click OK.
BE SURE TO complete the document addition exercise in Chapter 5.
Alternatively, you can create a practice site for this chapter based on site template Chapter 6 Starter.stp in the practice file folder for this chapter. The practice file folder is located in the My Documents Microsoft PressSharePoint Services SBSChapter 06 folder. See "Using the Book's CD-ROM" for instructions on how to create a practice site.
On the top link bar, click Documents and Lists.
In the Document Libraries section, click Plant Descriptions.
The Plant Descriptions document library appears.
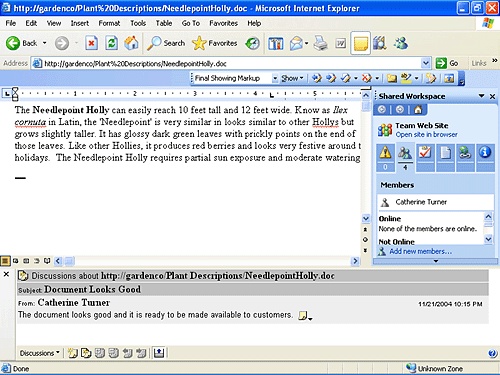
Move your mouse over NeedlepointHolly.doc and when an arrow appears to the right of the document name, click the arrow.
Click Discuss, and then in the File Download dialog box, click Open.
The file opens in Word inside the Internet Explorer shell and the Discussions bar appears at the bottom of the window.
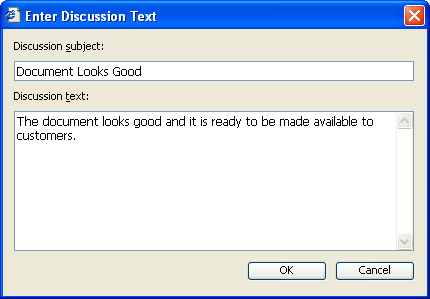
 In the lower-left corner, click Discussions, and then select Insert about the Document.
In the Discussion subject: box, type a subject for the discussion, for example Document Looks Good.
In the Discussion text: box, type the body of the discussion, for example The document looks good and it is ready to be made available to customers.
Click OK.
The text appears in the Discussions pane.

CLOSE Internet Explorer.
Over time, you might accumulate libraries that are no longer needed. You might want to delete them to create space or because corporate policy dictates that communications are only kept for a set period of time.
In this exercise you will delete a library that is no longer in use.
OPEN the SharePoint site in which you'd like to delete a library. If prompted, type your user name and password, and then click OK.
BE SURE TO verify that you have sufficient rights to delete a library. If in doubt, see the Appendix .
BE SURE TO complete the form library creation exercise in Chapter 5.
Alternatively, you can create a practice site for this chapter based on site template Chapter 6 Starter.stp in the practice file folder for this chapter. The practice file folder is located in the My Documents Microsoft PressSharePoint Services SBSChapter 06 folder. See "Using the Book's CD-ROM" for instructions on how to create a practice site.
On the top link bar, click Documents and Lists.
In the Document Libraries section, click the library you would like to delete, for example Purchase Orders.
The Purchase Orders form library appears.
Under Actions, click Modify Settings and Columns.
The Customize Purchase Orders page appears.
Under General Settings, click Delete this form library.
When the warning that the library will be permanently deleted appears, click the OK button.
You are taken back to the Documents and Lists page.
CLOSE Internet Explorer
You can use General Settings to make libraries appear on the Quick Launch bar.
You can configure a library to save all versions of a document when changes are made.
You can require approval before documents in the library appear to other users.
Views use document metadata to sort, filter, or group, so make sure you have the right columns on your library to sort, filter, and group effectively.
You can secure a document library by giving people additional permissions or restricting permissions.
Web folders can be used to access files in a document library instead of using a Web interface.
Document discussions are stored on the server and enable multiple users to comment on a document at the same time.