In this chapter you will learn to:
Create libraries.
Add documents.
Add pictures.
Create a new folder in a library.
Check documents in and out from the document library.
Check documents in and out from Office 2003.
Work with version history.
Delete documents.
Use alerts.
One of the most compelling features Microsoft Windows SharePoint Services provides is libraries. Libraries are a great place to store documents or forms. In a business, being able to quickly and effectively find and access information in documents is of paramount importance. You learned in the previous chapters that lists are a great way to work with structured data; libraries function similarly for unstructured data like Word documents. With SharePoint document libraries, you can filter and group documents, as well as see metadata for documents stored in the library.
In this chapter and the next, you will learn how to work with documents in SharePoint Services. This chapter focuses on creating libraries, adding documents and pictures to them, and working with documents in document libraries. In Chapter 6, we will focus on modifying and configuring document libraries; you will use the libraries and views created in this chapter's exercises for the exercises in Chapter 6.
See Also
Do you need only a quick refresher on the topics in this chapter? See the Quick Reference entries in Quick Reference.
Important
![]() Before you can use the practice files provided for this chapter, you need to install them from the book's companion CD to their default locations. See "Using the Book's CD-ROM" for more information.
Before you can use the practice files provided for this chapter, you need to install them from the book's companion CD to their default locations. See "Using the Book's CD-ROM" for more information.
Important
Remember to use your SharePoint site location in place of http://gardenco in the exercises.
You can use libraries to store your documents on a SharePoint site rather than on your local computer's hard drive so that other employees can more easily find and work with them. Libraries are similar to lists, but they are used instead to store files. Like lists, libraries have metadata, which lets you easily filter, sort, and group items in the libraries.
When you create a new SharePoint site, a generic document library called Shared Documents is created for you. You might not want to use this library because it lacks a descriptive name. Instead, you should create new libraries for a particular category or subject of your business. For instance, in the examples used in this book, Catherine Turner of The Garden Company could create a document library for documents describing the different plant types that the company carries, or one for company newsletters. You want to make sure that the name of a document library is descriptive and that each library has a specific topic to make it easier to find the documents. Storing all documents together in the Shared Documents document library defeats the purpose of using SharePoint sites to make information easier to find.
In this exercise, you will open your SharePoint site and create a new document library called Plant Descriptions.
OPEN the SharePoint site in which you'd like to create a document library. If prompted, type your user name and password, and then click OK.
BE SURE TO verify that you have sufficient rights to create a document library. If in doubt, see the Appendix .
On the top link bar, click Create.
The Create Page page appears.
In the Document Libraries section, click document library.
The New Document Library page is displayed.
In the Name box, type the name that you want to give the document library, for example Plant Descriptions.
In the Description box, type the description of the document library, for example Contains 1-page descriptions of each plant we carry.
In the Create a version each time you edit a file in this document library? section, select Yes.
Leave all other areas of the page on their default settings. You have entered all the information necessary to create a document library.
Click the Create button.
The new Plant Descriptions document library appears.


CLOSE Internet Explorer.
![]() Form libraries function similarly to document libraries, but store specific types of documents—forms—and have enhanced integration with Microsoft InfoPath, such as allowing you to create form libraries from InfoPath. On the companion CD, see the "Using Windows SharePoint Services with InfoPath 2003" document, which discusses in detail how Windows SharePoint Services and InfoPath work together.
Form libraries function similarly to document libraries, but store specific types of documents—forms—and have enhanced integration with Microsoft InfoPath, such as allowing you to create form libraries from InfoPath. On the companion CD, see the "Using Windows SharePoint Services with InfoPath 2003" document, which discusses in detail how Windows SharePoint Services and InfoPath work together.
![]() Forms are a more structured type of information. They have a set of fields that are filled out in a uniform manner. Form libraries are excellent for structured documents, such as Purchase Orders or Vacation Requests. To get the full benefit from form libraries, you need to use InfoPath for designing and filling out forms. The following exercise walks you through creating a new form library by using Windows SharePoint Services. On the companion CD, see the "Using Windows SharePoint Services with InfoPath 2003" document to see how to create a new form library from within InfoPath.
Forms are a more structured type of information. They have a set of fields that are filled out in a uniform manner. Form libraries are excellent for structured documents, such as Purchase Orders or Vacation Requests. To get the full benefit from form libraries, you need to use InfoPath for designing and filling out forms. The following exercise walks you through creating a new form library by using Windows SharePoint Services. On the companion CD, see the "Using Windows SharePoint Services with InfoPath 2003" document to see how to create a new form library from within InfoPath.
![]() In this exercise, you will open the SharePoint site and create a new form library called Purchase Orders. You will then associate a Purchase Order form template with that library so when someone fills out the form, they will be presented with the standard Purchase Order form.
In this exercise, you will open the SharePoint site and create a new form library called Purchase Orders. You will then associate a Purchase Order form template with that library so when someone fills out the form, they will be presented with the standard Purchase Order form.
USE the practice file Purchase Order Template.xsn in the practice file folder for this chapter. The practice file folder is located in the My DocumentsMicrosoft PressSharePoint Services SBSChapter 05 folder. OPEN the SharePoint site in which you'd like to create a form library. If prompted, type your user name and password, and then click OK. BE SURE TO verify that you have sufficient rights to create a form library. If in doubt, see the Appendix .
On the top link bar, click Create.
The Create Page page appears.
In the Document Libraries section, click Form Library.
The New Form Library page appears.
In the Name box, type Purchase Orders.
In the Description box, type Contains purchase orders..
You have entered all the information necessary to create a form library.
Click the Create button.
The form library is created and you are taken to the new Purchase Orders form library. However, at this point, if you click Fill Out This Form, you will be presented with a blank form. You still need to associate a necessary form template with the newly created library.
In the Select a View: section on the left side of the page, click Explorer View.
Double-click the Forms folder.
Copy Purchase Order Template.xsn from the practice file folder to the Forms folder by dragging the file into the Purchase Orders window.
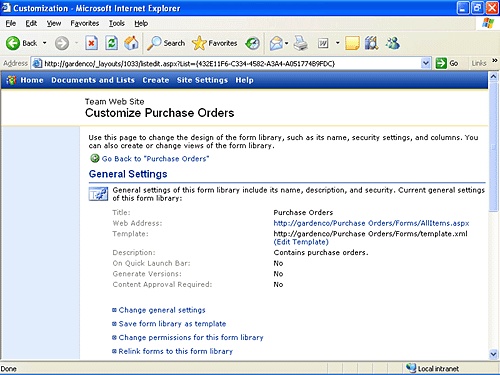
In the Actions section on the left side of the page, click Modify Settings and Columns.
In the General Settings section, click the Change General Settings link.
In the Form Template section at the bottom of the page, replace Purchase Orders /Forms/template.xml with Purchase Orders/Forms/Purchase Order Template.xsn.
Click OK, and then click Go Back to "Purchase Orders".
You are taken back to the Purchase Orders library. The form library is now ready to be used. If you click on Fill Out This Form and have InfoPath installed, you can fill out a new Purchase Order.


CLOSE Internet Explorer.
Picture libraries work the same way as document libraries, except they are optimized for storing the picture file type. The picture library provides special views for looking at all of the pictures in the library as a slideshow. It also provides enhanced features for editing and downloading pictures using integration with Microsoft Office Picture Manager.
In this exercise, you will open the SharePoint site and create a Picture Library for storing photographs of each employee.
OPEN the SharePoint site in which you'd like to create a Picture Library. If prompted, type your user name and password, and then click OK. BE SURE TO verify that you have sufficient rights to create a Picture Library. If in doubt, see the Appendix .
On the top link bar, click Create.
The Create Page page appears.
In the Picture Libraries section, click Picture Library.
The New Picture Library page appears.
In the Name box, type Employee Photos.
In the Description box, type Contains photographs of each employee.
You have entered all the information necessary to create a picture library.
Click the Create button.
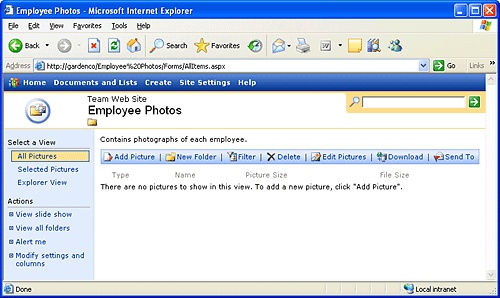
The picture library is created and you are taken to the new Employee Photos picture library.
CLOSE Internet Explorer.
Document libraries without any content in them are not very useful. After a library has been created, you can populate it with content. Once documents are in the library, you can search for and filter them to make it easier to find what you are looking for. Document libraries also give you the ability to track changes that happen in a document and revert to older versions if necessary. These topics will be covered in the next chapter, but first, you need to make sure your documents are available in the SharePoint library.
In this exercise you will make two new plant descriptions available to employees by uploading them to the Plant Descriptions library.
USE the practice files WaterOak.doc and NeedlepointHolly.doc in the practice file folder for this chapter. The practice file folder is located in the My Documents Microsoft PressSharePoint Services SBSChapter 05 folder.
OPEN the SharePoint site to which you'd like to upload a file to a document library. If prompted, type your user name and password and click OK.
On the top link bar, click Documents and Lists.
In the Document Libraries section, click the name of the document library you would like to upload a document to, for example Plant Descriptions.
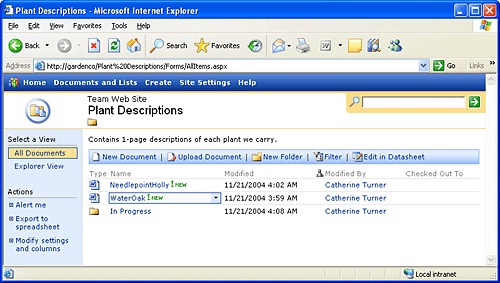
The Plant Descriptions document library appears.
Click Upload Document.
The Plant Descriptions: Upload Document page appears.
Click the Browse button.
In the Choose File dialog box, browse to the file you would like to upload, for example WaterOak.doc, and then click Open.
Click Save and Close.
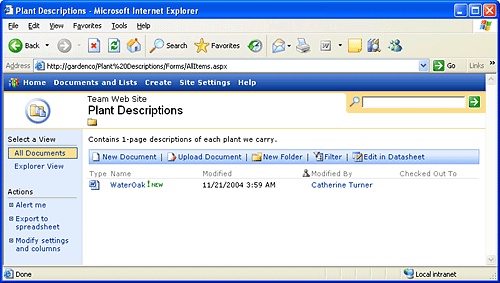
You are taken back to the Plant Descriptions library.
Repeat Steps 3–6 for the NeedlepointHolly.doc file.
Adding pictures to a picture library is much like adding documents to a document library. In this exercise, you will add an employee picture to the Employee Photos document library.
USE the practice file pjcov.jpg in the practice file folder for this chapter. The practice file folder is located in the My Documents Microsoft PressSharePoint Services SBSChapter 05 folder.
OPEN the SharePoint site that you'd like to use to upload a picture to a picture library. If prompted, type your user name and password, and then click OK.
On the top link bar, click Documents and Lists.
In the Picture Libraries section, click the picture library you would like to store a photo in, for example Employee Photos.
The Employee Photos document library appears.
Click Add Picture.
Click the Browse button.
In the Choose File dialog box, browse to the file you would like to upload, for example pjcov.jpg, and then click Open.
Click Save and Close.
You are taken back to the Employee Photos library.
CLOSE Internet Explorer.
When there are numerous documents in a library, you might want to create a new folder for documents to help organize the documents in a better way.
Tip
SharePoint Services provides other mechanisms for organization as well, such as Views and Filters, but people are often familiar with folders and it is easiest to create a folder structure. These will be discussed in Chapter 6.
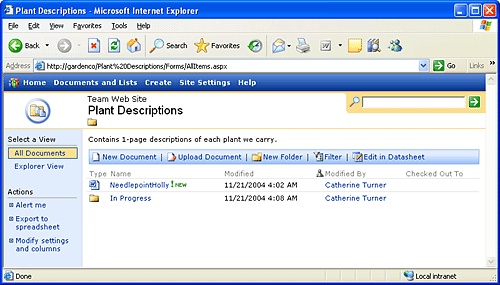
In this exercise, you will create a folder for documents that are classified as In-Progress so they can be differentiated from complete documents.
OPEN the SharePoint site that you'd like to use to add a folder to a document library. If prompted, type your user name and password, and then click OK.
On the top link bar, click Documents and Lists.
In the Document Libraries section, click Plant Descriptions.
The Plant Descriptions document library appears.
Click New Folder.
In the Name Box, type the name of the folder you would like to create, for example In Progress.
Click Save and Close.
The updated Plant Descriptions page appears with the In Progress folder added to the page.

CLOSE Internet Explorer.
One of the features that Windows SharePoint Services provides is basic document management. Checking out and checking in documents lets others know what documents you are working on so they don't work on them at the same time. Check-in also enables you to enter comments about what you've changed, which others can then view.
In this exercise, you will change the comments of a document to reflect that this is the final version of the document.
OPEN the SharePoint site from which you'd like to check a document in or out. If prompted, type your user name and password, and then click OK.
On the top link bar, click Documents and Lists.
In the Document Libraries section, click Plant Descriptions.
The Plant Descriptions document library appears.
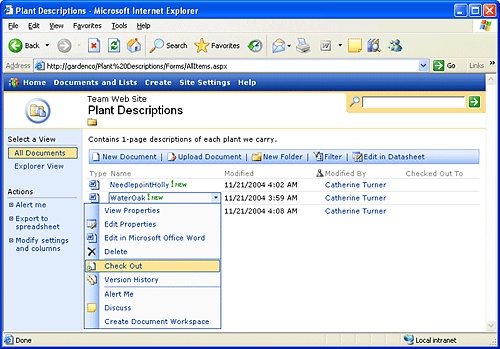
Move your mouse over the document you would like to check out, for example WaterOak.doc.
An arrow appears to the right of the document name.
Click on the arrow.
Click Check Out.
Move your mouse over WaterOak.doc and, when the arrow appears to the right of it, click on the arrow.
Click Check In.
The Check In page appears.
Select Check In Document, and then in the Check In comments box, type This is the final version of this document.
Click OK.
You are taken back to the Plant Description document library. Notice that under the Checked Out To column, your name (Catherine Turner in this exercise) is no longer listed.

CLOSE Internet Explorer.
Checking documents in or out using the browser is a nice feature, but not nearly as useful as checking documents in and out using the Microsoft Office System. Office 2003 has built-in SharePoint integration and you can easily check documents in and out using any of the Microsoft Office applications.
In this exercise, you will open a document from a SharePoint library in Word and check it out. You will make minor modifications to the document, save it, and then check it back in to the document library.
OPEN the SharePoint site from which you'd like to check a document in or out. If prompted, type your user name and password, and then click OK.
On the top link bar, click Documents and Lists.
In the Document Libraries section, click Plant Descriptions.
The Plant Descriptions document library appears.
Move your mouse over the document that you would like to edit, for example WaterOak.doc, and when the arrow appears to the right of the document name, click the arrow.
Select Edit in Microsoft Office Word.
To open the file, in the dialog box that displays a warning, click OK.
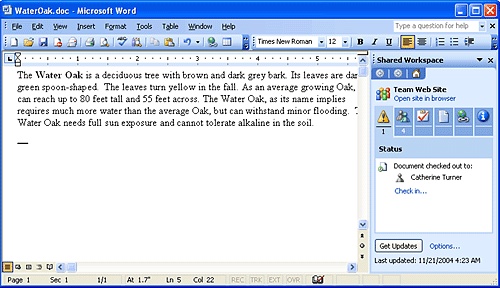
The file opens in Microsoft Office Word. You might be presented with a User Name dialog box to enter your name and initials. If so, enter your name and initials.
Click File, and then click Check Out.
 Select the first instance of Water Oak and then by using the Bold button on the Formatting toolbar, change it to bold.
Click File, and then click Save.
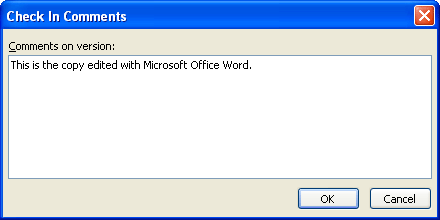
Click File, and then click Check In.
In the Check In Comments dialog box, type This is the copy edited with Microsoft Office Word..
Click OK, and then close Microsoft Office Word.
CLOSE Internet Explorer.
When versioning is enabled, Windows SharePoint Services creates a separate copy of the document each time it is edited. While this takes up extra space on the server, it makes it easy to go back to an older version of the document if necessary. A more in-depth discussion of versioning will be covered in Chapter 6.
When you view a document's Version History, you will see a list of times this document was edited and saved as well as the author's comments on those changes. In this exercise, you will see what changes have been made to the WaterOak.doc document, and then revert back to the final copy of the document.
OPEN the SharePoint site for which you'd like to see the version history for a document. If prompted, type your user name and password, and then click OK.
On the top link bar, click Documents and Lists.
In the Document Libraries section, click Plant Descriptions.
The Plant Descriptions document library appears.
Move your mouse over the document for which you want to see the version history, for example WaterOak.doc, and when an arrow appears to the right of the document name, click the arrow.
A drop-down menu appears.
Click Version History.
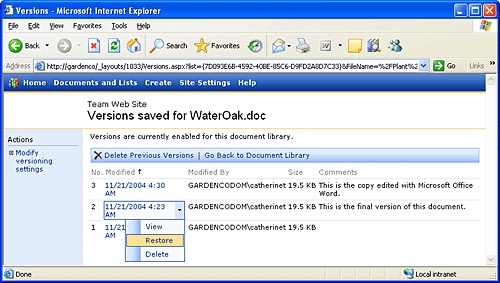
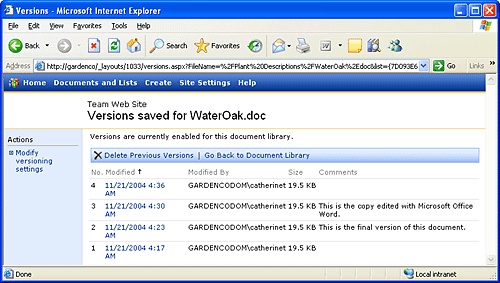
You are taken to the Versions saved for WaterOak.doc page. Each version of the document you saved, the date and time that version was created, and any comments for it appears.
Move the mouse over the date of the document where the comments read This is the final version of this document., and then click the arrow that appears.
In the dialog box indicating that you are about to replace the current version with the selected version, click OK.
You will see that there is now an additional version. Windows SharePoint Services actually copies the version you want to restore and makes it the newest version.


CLOSE Internet Explorer.
Over time, documents accumulate and you eventually need to delete those that are no longer needed.
In this exercise, you will delete a document that is no longer in use.
OPEN the SharePoint site from which you'd like to delete a document. If prompted, type your user name and password, and then click OK.
On the top link bar, click Documents and Lists.
In the Document Libraries section, click Plant Descriptions.
The Plant Descriptions document library appears.
Move your mouse over the document you would like to delete, for example WaterOak.doc, and when an arrow appears to the right of the document name, click the arrow.
On the drop-down menu, click Delete.
In the dialog box that asks if you are sure, click OK.
The document is deleted from the Plant Descriptions document library.

CLOSE Internet Explorer.
One of the most difficult things in business is knowing when information changes. Windows SharePoint Services helps with this problem by enabling you to subscribe to an alert. When a document you subscribe to changes, you will get an e-mail message stating that the document has changed.
For example, you (Catherine Turner in the example) may want to know when the document NeedlepointHolly.doc is updated. In this exercise, you will set up an alert for this document, and then receive an alert that it has been changed.
OPEN the SharePoint site on which you'd like to have an alert on a document set up. If prompted, type your user name and password, and then click OK.
On the top link bar, click Documents and Lists.
In the Document Libraries section, click Plant Descriptions.
The Plant Descriptions document library appears.
Move your mouse over the document for which you would like an alert, for example NeedlepointHolly.doc, and when an arrow appears to the right of the document name, click the arrow.
Click Alert Me.
The New Alert: Plant Descriptions: NeedlepointHolly.doc page appears. You are given several options on the frequency of alerts as well as when to be alerted. The default values are fine for this exercise. If the "My e-mail address is" box is blank, type in an e-mail address.
Click OK.
Important
If your server is not configured to send e-mail message, an Error page will appear. If this page appears, you will not be able to complete the rest of the steps in this section.
You are taken back to the Plant Descriptions document library.
Move your mouse over NeedlepointHolly.doc, and when an arrow appears to the right of the document name, click the arrow.
Select Edit in Microsoft Office Word.
In the dialog box that appears displaying a warning, click OK to open the file.
The file will open in Microsoft Office Word.
Click File, and then click Check Out.
Select the first instance of Needlepoint Holly, and then by using the Bold button on the Formatting toolbar, change it to bold.
Click File, and then click Save.
Click File, and then click Check In.
In the Check In Comments dialog box, click OK.
Close Microsoft Office Word.
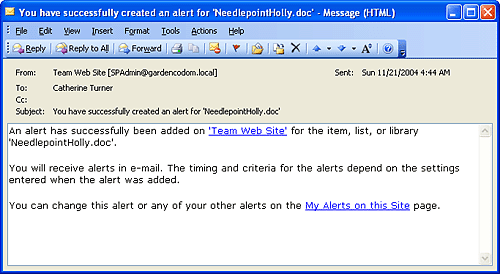
After a few minutes, you should receive two e-mail messages. The first message indicates that an alert was successfully created and looks like the following:
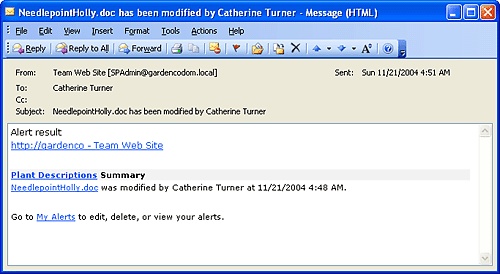
The second message indicates that NeedlepointHolly.doc has been modified and looks like the following:


CLOSE Internet Explorer.
Libraries provide a central location to store documents, forms, and pictures so they can be easily shared.
You can create Document Libraries for very specific topics and give them a descriptive name.
Remember to check out a document before you edit it.
You can check documents in and out using Microsoft Office applications.
Set up alerts on the documents when you want to know that a document has been changed.