The CD-ROM inside the back cover of this book contains practice files you'll use as you work through the exercises in this book. The CD-ROM also contains site templates that you might use if you choose to do exercises independently. By using practice files and site templates, you won't waste time creating your own samples files and sites—instead, you can jump right in and concentrate on learning how to get the most of your Microsoft Windows SharePoint Services implementation.
The CD-ROM also includes two supplemental chapters that provide valuable information. "Using Windows SharePoint Services with InfoPath 2003" (UsingInfoPath.pdf) covers how to create a form library from InfoPath 2003, modify an existing form library, fill out a form, and edit an existing form. "Finding Information on the SharePoint Site" (FindingInformation.pdf) explores Microsoft Windows SharePoint Services search at three levels: searching an entire site, searching a specific list or document library, and searching multiple document libraries simultaneously. Be sure to explore the contents of these supplemental PDFs.
Finally, the CD-ROM also includes an electronic version of the book in PDF format and the Microsoft Office System Reference Pack to help you get the most out of your SharePoint experience.
To use this book, your client computer should meet the following requirements:
Operating System Although you can use any Microsoft operating system, Microsoft Windows XP Professional Edition is recommended.
Software Microsoft Internet Explorer 5.01 SP1 or later; Internet Explorer 5.5 or later is recommended.
Microsoft Office Word 2003, Microsoft Office Excel 2003, Microsoft Office Access 2003, Microsoft Office Outlook 2003, and Microsoft Office InfoPath 2003.
To use this book, you must have access to a server running Windows SharePoint Services. The server computer should meet the following requirements:
Operating System Microsoft Windows Server 2003
Software Microsoft Windows SharePoint Services 2.0
Note
The CD-ROM for this book does not contain the Windows Server 2003 operating system or the Windows SharePoint Services software. You must have access to a working Windows SharePoint Services site before using this book. Microsoft Windows SharePoint Services 2.0 can be downloaded from Microsoft's Web site for no cost.
You must install the practice files on your hard disk before you can use them in the chapters' exercises. Follow these steps to prepare the CD's files for your use:
Insert the CD-ROM into the CD-ROM drive of your computer.
An End User License Agreement should appear automatically.
Important
If the End User License Agreement does not appear, open a window for your CD-ROM drive, and then double-click the StartCD executable file.
After you accept the End User License Agreement, a menu screen appears.
Click Install Practice Files.
Follow the on-screen instructions to install the practice files to My Documents Microsoft PressSharePoint Services SBS.
Each exercise is preceded by text that lists the files needed for that exercise. The text also explains any preparation you need to take before you start working through the exercise, as shown here:
USE the Plants_Price.xls document in the practice file folder for this chapter. This practice file is located in the My Documents Microsoft PressSharePoint Services SBSChapter 11 folder.
Wherever possible, we start each chapter with a standard Windows SharePoint Services team site. It doesn't mean that if you follow all exercises in all chapters in sequence, you have to start with a new team site for every chapter—you can use the same site throughout the whole book.
However, if you choose to do exercises independently and not in sequence, be aware that there are exercises in some chapters that depend on other exercises performed earlier in the book. If this is the case, we will tell you where the prerequisite exercise is located in the book, so that you can complete the prerequisite exercises, as shown below:
BE SURE TO complete the "Adding Documents" exercise in Chapter 5.
Alternatively, if you have sufficient rights, you can create new starting sites for chapters by using the site template STP files that are provided on the CD-ROM for those chapters that have dependencies on exercises earlier in the book. The site template will have the prerequisite exercises already completed for you. This option is for advanced users who might not want to do a prerequisite exercise in another chapter. For exercises that require a prerequisite exercise to be completed, we will tell you the name and location of the STP site template, as shown below:
Alternatively, you can create a practice site for this chapter based on site template Chapter 6 Starter.stp in the practice file folder for this chapter. The practice file folder is located in the My Documents Microsoft PressSharePoint Services SBSChapter 6 folder. See "Using the Book's CD-ROM" for instructions on how to create a practice site.
If you choose to use the provided site template STP files, please refer to "(Optional) Using the STP Site Templates" later in this section for instructions on how to create a practice site.
The following table lists the practice files and optional site templates, if the chapter or supplemental material requires them.
Folder | Chapter | Practice Files and STP Files |
|---|---|---|
Chapter 1 | Introduction to Windows SharePoint Services | No practice files |
Chapter 2 | Navigating a SharePoint Site | No practice files |
Chapter 3 | Creating and Managing Sites | No practice files |
Chapter 4 | Working with Lists | No practice files |
Chapter 5 | Creating and Managing Libraries | NeedlepointHolly.doc pjcov.JPG Purchase Order Template.xsn WaterOak.doc |
Chapter 6 | Working with Library Settings | Chapter 6 Starter.stp |
Chapter 7 | Working with Document Workspaces | Chapter 7 Starter.stp |
Chapter 8 | Working with Meeting Workspaces | Chapter 8 Starter.stp |
Chapter 9 | Working with Surveys and Discussion Boards | GardenSurvey.xls |
Chapter 10 | Using Windows SharePoint Services with Outlook 2003 | Chapter 10 Starter.stp |
Chapter 11 | Using Windows SharePoint Services with Excel 2003 and Access 2003 | GardenCo.mdb Plants_Price.xls Sales_Figures.xls |
Chapter 12 | Working with Web Parts | Chapter 12 Starter.stp |
Supplemental Material | Using Windows SharePoint Services with InfoPath 2003 (UsingInfoPath.pdf) | Purchase Orders Template.xsn |
Supplemental Material | Finding Information on the SharePoint Site (FindingInformation.pdf) | Finding Information Starter.stp |
After you finish working through this book, you can uninstall the practice files by following these steps:
In Control Panel, open Add or Remove Programs.
In the list of installed programs, click Microsoft Windows SharePoint Services Step by Step, and then click the Remove button.
Click Yes when the confirmation dialog box appears.
To create a practice site for a chapter based on a site template STP file provided on the CD-ROM, perform the following steps:
BE SURE TO verify that you have sufficient rights to upload a site template to a top-level site and to create a site in the site collection. If in doubt, see the Appendix .
OPEN the top-level SharePoint site to which you'd like to upload the site template STP file. If prompted, type your user name and password, and then click OK.
On the top link bar, click Site Settings to display the Site Settings page.
In the Administration section, click Go to Site Administration to display the Site Administration page.
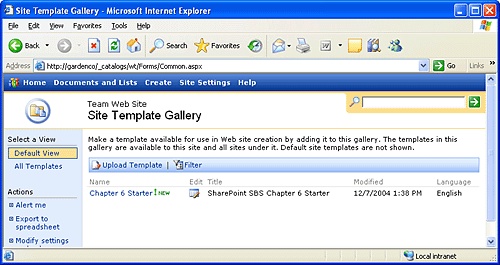
In the Site Collection Galleries section, click Manage site template gallery to display the Site Template Gallery page.
Note
If you see a Go to Top-level Site Administration link in the Site Collection Administration section at the bottom of the page, you are not on the top-level site administration page. A site template can only be uploaded to the site template gallery on a top-level site. To display the Site Administration page for the top-level site, click Go to Top-level Site Administration and then repeat the previous step.
Click Upload Template to display the Site Template Gallery: Upload Template page.
Click the Browse button to display the Choose File dialog box.
Navigate to My Documents Microsoft PressSharePoint Services SBSChapter XX (where XX is the chapter number), click the STP file that you want to use to create the new site, and then click the Open button.
Click Save and Close to complete the upload and redisplay the Site Template Gallery page.
You can now create a new child site based upon the uploaded template.
Open the SharePoint site that you'd like to create the new practice site within.
On the top link bar, click Site Settings to display the Site Settings page.
In the Administration section, click Manage sites and workspaces to display the Sites and Workspaces page.
Click Create to display the New SharePoint Site page.
In the Title text box, type a logical name for the new site; you could simply provide the chapter number, for example Chapter06.
Optionally, in the Description text box, type a description, for example SharePoint SBS Chapter 6 Practice Site.
In the URL name text box, repeat the same name as you typed into the Title text box.
In the Permissions section, leave the default Use same permissions as parent site option selected.
Click the Create button to display the Template Selection page.
In the Template list, choose the name of the template that you just uploaded, for example SharePoint SBS Chapter 6 Starter, and then click the OK button.
The Home page of the new practice site is displayed.


CLOSE the browser.
To remove the chapter starter templates from the site template gallery, perform the following steps:
BE SURE TO verify that you have sufficient rights to delete a site template from the top-level site template gallery. If in doubt, see the Appendix .
Using the Book's CD-ROM
OPEN the top-level SharePoint site where you previously uploaded the site template STP files. If prompted, type your user name and password, and then click OK.
On the top link bar, click Site Settings to display the Site Settings page.
In the Administration section, click Go to Site Administration to display the Site Administration page.
In the Site Collection Galleries section, click Manage site template gallery to display the Site Template Gallery page.
Note
If you see a Go to Top-level Site Administration link in the Site Collection Administration section at the bottom of the page, you are not on the top-level site administration page. A site template can only be removed from the site template gallery on a top-level site. To display the Site Administration page for the top-level site, click Go to Top-level Site Administration and then repeat the previous step.
 Click the Edit icon to display the details for the site template.
 Click Delete to remove the site template. You will be prompted to confirm your request. Click OK to complete the deletion and redisplay the Site Template Gallery.
Repeat the edit and delete steps to remove each site template that you no longer want available for the creation of practice sites.
CLOSE the browser.
If you created a practice site that you no longer want, you can delete it. Perform the following steps to delete a practice site:
BE SURE TO verify that you have sufficient rights to delete a site. If in doubt, see the Appendix .
OPEN the parent SharePoint site where you previously created the practice site. If prompted, type your user name and password, and then click OK.
On the top link bar, click Site Settings to display the Site Settings page.
In the Administration section, click Manage sites and workspaces to display the Sites and Workspaces page.
- In the list of sites, click the Delete icon to delete the site and to display the Delete Web Site page.
Click the Delete button to delete the site.
CLOSE the browser.