In this chapter you will learn to:
Understand Web Parts and Web Part pages.
Remove a Web Part.
Add a Web Part from a Web Part gallery.
Customize a Web Part by using the Web Part tool pane.
Customize a home page by using Web Parts.
Create a new Web Part Page by using a browser.
Web sites based on Microsoft Windows SharePoint Services use a technology known as Web Part Pages, which are special Web pages that contain one or more Web Parts. Web Parts are reusable components that can contain any kind of Web-based information, including analytical, collaborative, and database information. This technology enables Web sites to be flexible and highly customizable. To customize these sites you can use three types of tools: a browser, a Windows SharePoint Services-compatible Web page editing tool, such as Microsoft Office FrontPage 2003, or a programming tool, such as Microsoft Visual Studio .NET 2003. No one tool can do everything, and therefore it is likely that in any deployment of Windows SharePoint Services, all three tools will be used at some time or other.
This chapter introduces the basic concepts of Web Part Pages and Web Parts. Using the browser, you will learn how to view Web Part Pages in different ways, change the appearance of Web Part Pages by adding and removing Web Parts, and tailor a site by adding Web Part Pages.
See Also
Do you need only a quick refresher on the topics in this chapter? See the Quick Reference entries in Quick Reference.
Important
Remember to use your SharePoint site location in place of http://gardenco in the exercises.
Before we can talk about customizing any of the portal sites, we must cover certain basic concepts. A SharePoint site contains one or more Web Part Pages. Web Part Pages contain Web Parts that can display the contents held in the site's lists or document libraries as well as Web Parts that display other content. To customize Web sites, you must have the following rights, all of which are included in the Web Designer and Administrator site groups by default:
Manage Lists
Add and Customize Pages
Apply Themes and Borders
Apply Style Sheets
In this exercise, you will familiarize yourself with the customizing capabilities of Windows SharePoint Services.
OPEN the SharePoint site. The exercise will use the http://gardenco site, but you can use whatever SharePoint team site you want. If prompted, type your user name and password, and then click OK.
BE SURE TO verify that you have sufficient rights to add contacts to a contacts list. If in doubt, see the Appendix .
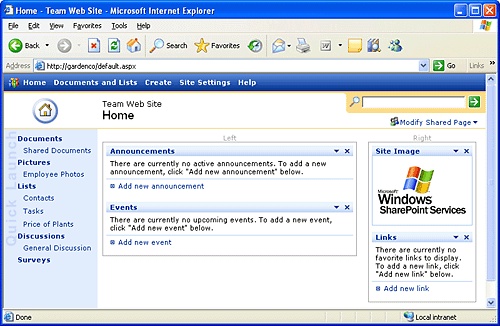
In the upper-right corner of the Home page, click Modify Shared Page.
The Web Part Page menu displays these options:
Add Web Parts
Design this Page
Modify Shared Web Parts
Shared View
Personal View
Tip

 The shared view icon is in a small orange box indicating that you are viewing this Web Part Page by using the shared view. Any changes you make to the Web Part Page are visible to all site users. As an administrator or a Web designer, when you first display a Web Part Page, the page is in the shared view and the Modify Shared Page link is shown in the upper-right corner beneath the Search box. You can make changes to a Web Part Page that only affect your view of the Web page, which is when you would use the personal view. You can switch between these two views by clicking Personal View on the Web Part Page menu. The link beneath the Search box is replaced by Modify My Page, and the personal view icon in the Web Part Page menu is placed in a small orange box to indicate that this is your current view. As an administrator or a Web designer, you cannot change the personal views of specific users, only the shared view and your own personal view. You will be shown Web Part Pages in shared view until you personalize them, then the personal view becomes your default view for that Web Part Page. You can reset the personal view to the shared view values by clicking Reset Page Content from the Web Part Page menu.
Click Design this Page.
The Web Part Page is displayed in design mode in a grid-like manner, with two Web Part Page zones denoted by two gray borders labeled at the top as Left and Right.
Tip

 Web Part Page zones are containers for Web Parts, so on a SharePoint team site the Left zone contains the Web Parts Announcements and Events, whereas the Right zone contains the Web Parts Site Image and Links. In design mode, these Web Parts have a down arrow on their title bar and a Close button. The Announcements, Events, and Links Web Parts display information held within the Announcements, Events and Links lists, whereas the Site Image Web Part is a built-in Web Part that displays the Windows SharePoint Services image.
Other Web Part Pages may have more or less than two zones, depending on the Web Part Page template used when creating the Web Part Page. You can also add or remove zones from a Web Part Page by using a tool, such as FrontPage 2003.
In the upper-right corner of the page, click Modify Shared Page.
On the drop down menu, a check mark to the left of the "Design this Page" menu item appears denoting that the page is in design mode.
Click Design this Page.
The Web Part Page is displayed in normal mode, in which the zones are no longer visible. In addition, the Close buttons in the title bar of the Web Parts and the title bar of the Site Image Web Part are no longer visible.

CLOSE Internet Explorer.
When created, SharePoint sites can contain a number of libraries, lists, one or more Web Part Pages, and on the Web Part Pages, one or more Web Parts. As you customize your site, you might decide that you do not require all the Web Parts on these Web Part Pages and want to remove them.
In this exercise, you will delete and close Web Parts to remove them from a Web site's Home page.
OPEN a SharePoint team site. The exercise will use the http://gardenco site, but you can use whatever site you want. If prompted, type your user name and password, and then click OK.
Verify that the link in the upper-right corner of the page is Modify Shared Page, indicating that you have the Web Part in Shared View.
Troubleshooting
If the link is Modify My Page, you have the page in Personal View. To switch to Shared View, click Modify My Page and on the menu, click Shared View. If the menu does not contain the Shared View option then you are not a member of the Administrator or Web Designer site group on this Web site.
Click the down arrow on the Announcements Web Part title bar, and from the Web Part menu, click Close, temporarily removing the Announcements Web Part from the Web page.
Tip
You can also close Web Parts when you have a Web Page displayed in design mode by clicking Close from the Web Part menu or by clicking the Close button in the Web Part title bar.
The Web Part Page is displayed with only three Web Parts.
In the upper-right corner of the page, click Modify Shared Page and from the Web Part Page menu, click Design this Page.
The Web Page is displayed in design mode with the zones clearly visible.
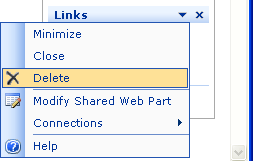
Click the down arrow on the Links Web Part title bar, and from the Web Part menu, click Delete.
When a Microsoft Internet Explorer dialog box appears asking if you want to delete this Web Part, click OK.
In the upper-right corner of the page, click Modify Shared Page, and then click Design this Page from the Web Part Page menu.
The Web Part Page is displayed in normal mode.


CLOSE Internet Explorer.
As you customize your site, you might decide to add other information, as well as remove some of the Web Parts on the Web Part Pages. You can do this by adding additional Web Parts. Windows SharePoint Services provides built-in Web Parts for each Web site created. The two types of Web Parts you will most commonly use with the browser are:
List View Web Parts (LVWP). Web Parts that display the contents of libraries and lists.
Built-in Web Parts. Web Parts that display other content. There are six built-in Web Parts, which are described in the following table.
The six built-in Web Parts available on Web sites created from the Team site, Blank site or Document Workspace templates are summarized in the following table.
Web Part | Description |
|---|---|
Content Editor Web Part | Use this Web Part to add content to a Web Part Page, such as formatted text, tables, and images. This Web Part enables you to add content by using a Rich Text Editor or a HTML source editor. The HTML <FORM> element is not allowed in the Content Editor Web Part. If you need to add a Web Part that uses the <FORM> element, consider using the Page Viewer Web Part or the Form Web Part. |
Form Web Part | Use this Web Part if you want to send data to another Web Part through a Web Part connection. The content displayed in the other Web Part will be dependant on the data it receives. |
Image Web Part | Use this Web Part to display pictures and photos. This Web Part is included by default on many sites' home Web Part Pages to display a logo. |
Members | Use this Web Part to see a list of the site members and their online status. |
Page Viewer Web Part | Use this Web Part to display content of a linked resource, such as a Web site, Web pages, files, or folders. In this way you can display a whole Web page within a Web Part. The linked content is isolated from other content on the Web Part Page and hence the content is displayed asynchronously from the rest of the page. This means that you can view and use other content in the other Web Parts on the page even if the link in this Web Part happens to take a long time to return its content. Also use this Web Part if you want to retrieve data from a server that requires authentication. |
XML Web Part | Use this Web Part for Extensible Markup Language (XML) with Extensible Stylesheet Language (XSL) to define how the XML is displayed. You might use the XML Web Part to display structured data from database tables or queries, or XML-based documents. |
Tip
In addition to the built-in Web Parts, you can create your own Web Parts by using tools, such as FrontPage 2003 and Visual Studio .NET 2003, or import custom Web Parts. With FrontPage 2003, you can add a Data View Web Part (DWVP), which can retrieve data from a variety of data sources, such as SQL databases, XML files, and Web Services, as well as data held in SharePoint lists and libraries. FrontPage 2003 provides a WYSIWYG Extensible Stylesheet Language Transformation (XSLT) editor that the developer uses to format the Data View Web Part.
In this exercise, you will customize the home page of a SharePoint site. You will add a Content Editor Web Part, a List View Web Part, and restore a Web Part from the Web Part Page Gallery.
OPEN a SharePoint site. The exercise will use the http://gardenco site, but you can use whatever site you want. If prompted, type your user name and password, and then click OK.
BE SURE TO complete the second exercise in this chapter, "Removing a Web Part" before beginning this exercise. Also, you must have a list that contains data, such as the Price of Plants list created in the "Importing Data from an Excel Spreadsheet to a List in SharePoint" exercise in Chapter 11. Alternatively, you can create a practice site for this chapter based on site template Chapter 12 Starter.stp in the practice file folder for this chapter. The practice file folder is located in the My Documents Microsoft PressSharePoint Services SBSChapter 12 folder. See "Using the Book's CD-ROM" for instructions on how to create a practice site.
In the upper-right corner of the page, click Modify Shared Page.
In the Web Part Page menu, point to Add Web Parts, and then click Browse.
After a few moments, the Web Part Page is displayed in design mode with the Web Part tool pane's four Web Part galleries visible. Web Part galleries are containers where Web Parts and Web Part templates are stored. The number in the bracket to the right of each gallery states the number of Web Parts that each gallery contains. The orange box around the Team Web Site gallery indicates that you are viewing the contents of that gallery, and the Web Part List section lists those Web Parts that are held in the Team Web Site gallery. This gallery contains a Web Part for each list or document library created for this site, plus the six built-in Web Parts described earlier in this chapter.
 Move the mouse over the icon to the left of Content Editor Web Part so that the mouse pointer changes to a four-way arrow.
While holding down the mouse button, drag the Content Editor Web Part to above the Events Web Part. As you move the Web Part, a dark blue horizontal line shows you where the Events Web Part will be added.
Note
Using the browser, Web Parts can only be added to Web Part Page zones. Web Parts that are added to a Web Part Page zone are called dynamic Web Parts. Using a tool, such as FrontPage 2003, Web Parts can be added outside Web Part Page zones called static Web Parts.
The Web Part Page is displayed in design mode with the Content Editor Web Part placed above the Events Web Part.
In the Web Part List, locate the Price of Plants Web Part.
Repeat step 3 to add the Price of Plants Web Part between the Content Editor Web Part and the Events Web Part.
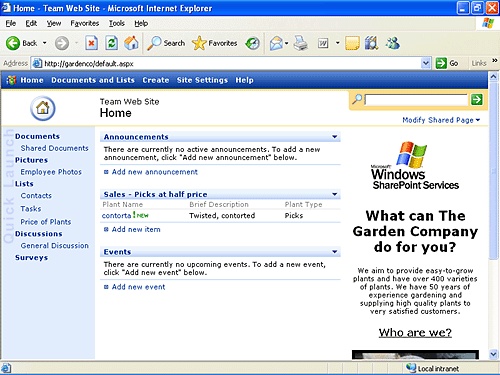
The Web Part Page is displayed in design mode with the Content Editor Web Part, the Price of Plants List View Web Part, and the Events List View Web Part in the Left Web Part Page zone.
In the Add Web Parts tool pane, click Web Part Page Gallery.
The Add Web Parts tool pane now lists the contents of the Web Part Page gallery. This gallery holds Web Parts that were temporarily removed from a Web Part Page by using the Close option, and hence it contains only one Web Part—the Announcements List View Web Part that we removed earlier in the second exercise of this chapter.
At the bottom of the Add Web Parts tool pane, click the down arrow to the right of Add to: and from the drop-down list, click Right, and then click the Add button. When you use this mechanism of adding Web Parts to a Web Part Page, the Web Part is added to the top of the zone.
Tip
The Web Part Page gallery now contains no Web Parts because you have placed the Announcements List View Web Part back onto the Web Part Page. The Web Part Page gallery is different from the other galleries because it is a temporary storage space for Web Parts that were removed from a Web Part Page. You can compare the Web Part Page gallery to the Recycle Bin, but remember, Web Parts are only placed here if you use the Close option. If you use the Delete option, then the Web Part is permanently deleted from a Web Part Page. Web Parts placed in the other galleries act like templates. Web Parts from the other three galleries can be placed on a Web Part Page multiple times. Once the Web Part is placed on a Web Part Page, it can be uniquely customized, but the template from which the Web Part was created remains in the Web Part gallery.
On the Add Web Parts tool pane title bar, click the Close button.
The Add Web Parts tool pane closes and the Web page is displayed in normal mode.


Tip
Web Parts can be badly written, and if they are not thoroughly tested, you might find that when you add a Web Part to a Web Part Page, the page will not display. In such situations, append ?Contents=1 to the Web Part Page's URL, for example, http://gardenco/default.aspx?contents=1. The Web Part Maintenance Page is displayed from which you can delete the offending Web Part.
Once you have added a Web Part to the Web Part Page, you might find you have to customize it to display the content you want your Web site users to see. You might also find you have to tailor the Web Part's properties for it to take on the look and feel you require.
In this exercise, you will customize the Content Editor Web Part and a SharePoint List View Web Part.
BE SURE TO complete the second and third exercises in this chapter, "Removing a Web Part" and "Adding a Web Part from a Web Part Gallery" before you begin this exercise. Also, you must have created and populated a picture library such as the Employee Photos picture library created in the "Creating Picture Libraries" and "Adding Pictures" exercises in Chapter 5. Alternatively, you can create a practice site for this chapter based on site template Chapter 12 Starter.stp in the practice file folder for this chapter. The practice file folder is located in the My Documents Microsoft PressSharePoint Services SBSChapter 12 folder. See "Using the Book's CD-ROM" for instructions on how to create a practice site.
OPEN a SharePoint site. The exercise will use the http://gardenco site, but you can use whatever site you want. If prompted, type your user name and password, and then click OK.
Click the down arrow on the title bar of the Content Editor Web Part, and then click Modify Shared Web Part.
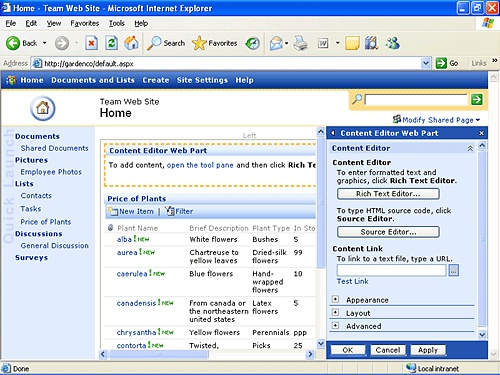
The Web page is displayed in design mode, with the Content Editor Web Part outlined in a yellow dotted line and the Content Editor Web Part tool pane visible.
In the Content Editor Web Part tool pane, click the Rich Text Editor button.
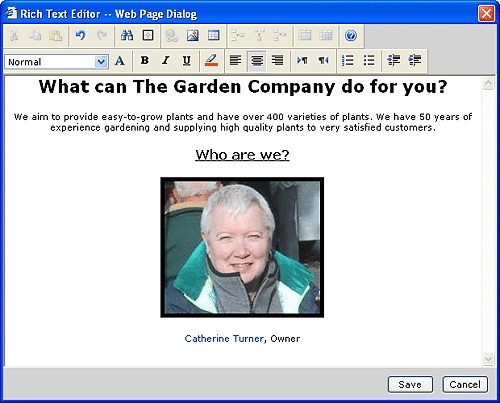
The Rich Text Editor – Web Page dialog box is displayed. You can use this editor in a very similar fashion to entering text using Microsoft Word. You will be able to enter text, change styles, insert hyperlinks, insert pictures, cut, copy, paste, undo, redo, and so on. The shortcut keys you use in Word also work with this editor.
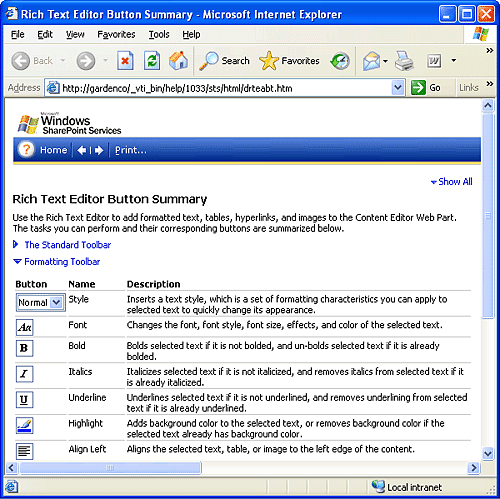
 Click the Help button for more information about the Web Part.
A new window is opened displaying the Rich Text Editor Button Summary topic.
Click the Formatting Toolbar link to expand the text.
Close the Rich Text Editor Button Summary – Microsoft Internet Explorer window.
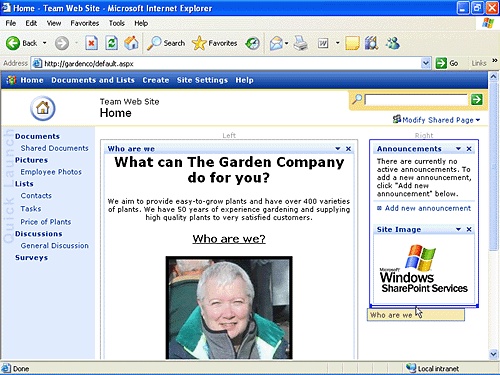
In the Rich Text Editor – Web Page Dialog box, type What can The Garden Company do for you?, and then press
 to move the cursor to a new line.
Select the sentence you just typed, click the down arrow on the style drop-down list, and then click Heading 1.
On a new line, type We aim to provide easy-to-grow plants and have over 400 varieties of plants. We have 50 years of experience gardening and supplying high quality plants to very satisfied customers.. On a second new line, type, Who are we?, and then press
. Format Who are we? as a Heading 2 style, and then click the Underline button.
 Place the cursor on a new line, and then click the Insert Image button.
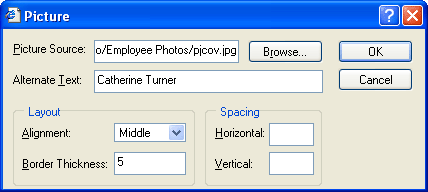
The Picture dialog box is displayed.
In the Picture Source text box type the URL http://gardenco/EmployeePhotos/pjcov.jpg. You will need to adjust the URL for your SharePoint site location.
Important
Do not refer to an image that is stored on a hard drive, such as c:/SBS_WSS/Catherinet.jpg, because, in most cases, the image will display as a broken link, and a user's browser will try to resolve the reference to the image file to the user's local hard drive, which will not contain the folder or the image. You should upload all images into picture or document libraries within the site where the Web Part Page resides, and then refer to the image by it's URL.
In the Alternate Text: text box, type Catherine Turner, from the Alignment dropdown list, click Middle, and in the Border Thickness text box, type 5.
Click OK.
On a new line beneath the picture, type Catherine Turner, Owner.
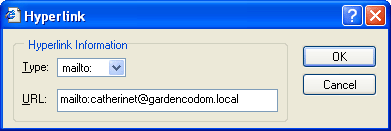
Select the text Catherine Turner, and then click the Insert Hyperlink button.
In the Type drop-down list, select mailto:.
In the URL text box, append [email protected] to mailto:.
When a user clicks on the name Catherine Turner on your Web page, their default e-mail program will open a new message for them to send an e-mail message to this person.
Click OK.
 Press
Press  to select all the content you have just entered, and then click the Center alignment button.
In the lower-right corner, click the Save button.
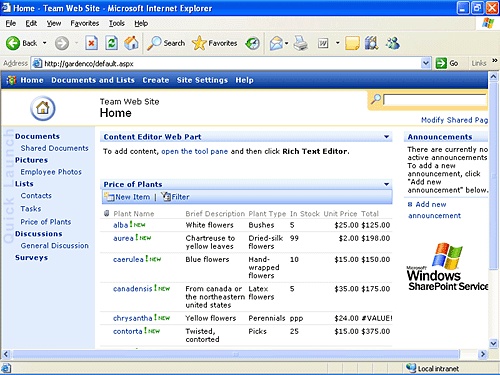
The Rich Text Editor – Web Page Dialog box closes and the content is displayed in the Content Editor Web Part.
Verify that the Content Editor Web Part tool pane is open. If it is not, click the down arrow on the Content Editor Web Part title bar, and then click Modify Shared Web Part.
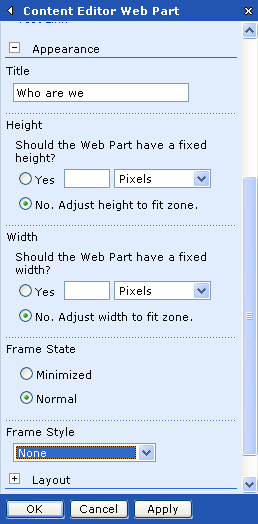
In the Content Editor Web Part tool pane click the expand (+) icon next to Appearance to expand the Appearance section.
In the Appearance section, in the Title text box, type Who are we, and then in the Frame Style drop-down list, click None.
Click OK to close the Content Editor Web Part tool pane.
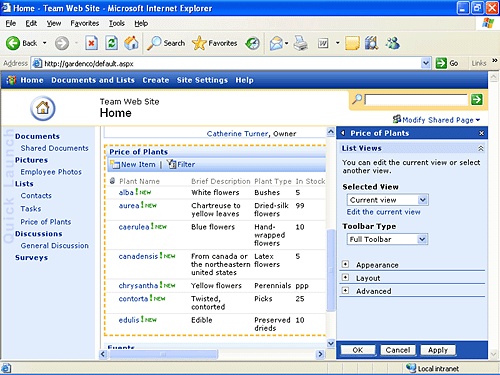
On the title bar of the Price of Plants Web Part, click the down arrow, and then click Modify Shared Web Part.
The Web page is displayed in design mode with the Price of Plants List View Web Part outlined in a yellow dotted line and the Price of Plants tool pane visible.
In the Price of Plants tool pane below the Selected View drop-down list, click the Edit the current view link.
The "Price of Plants: Edit View" Web page is displayed.
In the Columns section, clear the following check boxes: Attachments, In Stock, Unit Price, Total, and Total Cost (if shown).
Tip
In this exercise you are only displaying types of plants that are Picks; therefore you could choose not to display the Plant Type column. However, when you first customize a view, it is a good practice to leave this column in place so you are able to check that the filter is configured correctly.
Scroll down the page until the Filter section is visible, select the Show items only when the following is true option, and then in the Show the items when column drop-down list, click Plant Type. In the first blank text box type Picks.
At the bottom of the page, click OK.
Your Web page is displayed. The Price of Plants tool pane is no longer visible.
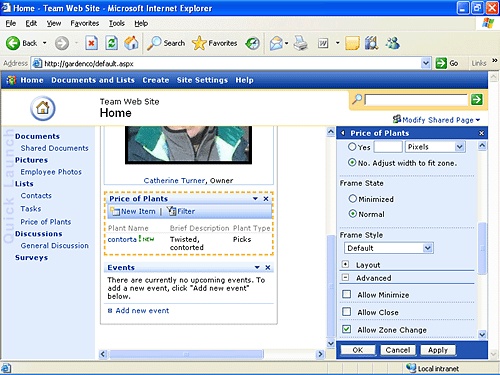
Click the down arrow on the title bar of the Price of Plants Web Part, and then from the Web Part menu, click Modify Shared Web Part.
The Price of Plants tool pane is displayed.
In the Toolbar Type drop-down list, click Summary Toolbar, click the expand (+) icon for the Appearance section, and then in the Title text box, type Sale – Picks at half price.
Click the expand (+) icon for the Advanced section, and then clear the Allow Minimize and Allow Close check boxes so that a user cannot accidentally close or minimize this Web Part.
At the bottom of the Price of Plants tool pane, click OK.
On the title bar of the Sales – Picks at half price Web Part, click the down arrow and notice that the Minimize and Close options are no longer available.


CLOSE Internet Explorer.
As you customize your Web Part Page by adding and removing Web Parts, you might find that the Web Parts are not located where you would like them to be. In this situation it is possible to move the Web Parts around on the page to obtain the layout you require.
In this exercise you will move Web Parts on a SharePoint site's home page.
BE SURE TO complete the other exercises in this chapter before beginning this exercise.
OPEN the SharePoint site. The exercise will use the http://gardenco site, but you can use whatever site you want. If prompted, type your user name and password, and then click OK.
In the upper-right corner of the page, click Modify Shared Page, and from the Web Part Page menu, click Design this Page.
The Web Page is displayed in design mode with the zones clearly visible.
Move the mouse over the title bar of the Who are we Web Part so that the pointer changes to a four-way arrow. While holding down the mouse button, drag the Web Part to below the Site Image Web Part.
As you move the Web Part, a dark blue horizontal line moves from the Web Part's current location to where the Web Part will be moved.
Move the mouse over the title bar of the Announcements Web Part so that the pointer changes to a four-way arrow. While holding down the mouse button, drag the Web Part to above the Sale – Picks at half price Web Part.
In the upper-right corner of the page, click Modify Shared Page, and then from the Web Part Page menu, click Design this Page. The page is no longer in Design mode.
CLOSE Internet Explorer.
SharePoint sites are provisioned with one or more Web Part Pages. Users can create additional Web pages, which can be stored and accessed through document libraries.
In this exercise you will create a document library to store Web Part Pages, and then create a Web Part Page.
OPEN the SharePoint site in which you would like to create Web Part Pages. The exercise will use the http://gardenco site, but you can use whatever site you want. If prompted, type your user name and password, and then click OK.
BE SURE TO verify that you have sufficient rights to create a document library. If in doubt, see the Appendix .
On the top link bar, click Create.
The Create Page page is displayed.
In the Document Libraries section, click document library.
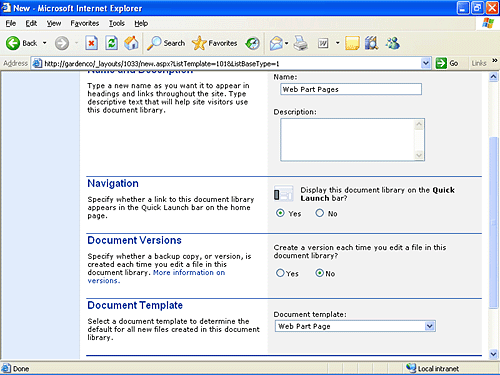
The New Document Library page is displayed.
In the Name text box, type Web Part Pages.
In the Document Template section in the Document template: drop-down list, select Web Part Page.
Tip
You do not have to create a special document library to store your Web Part Pages. You could store them in the Shared Documents document library that is created when you create a team Web site. However, if you plan to create a number of Web Part Pages, you could place them all in their own document library. Also, by creating a document library that uses the Web Part Page document template you can create Web Part Pages by clicking the New Document button.
At the bottom of the page, click the Create button.
The All Documents View of the new Web Part Pages document library is displayed.
On the top link bar, click Create.
The Create Page page is displayed.
Scroll down the page until you can see the Web Pages section, and then click Web Part Page.
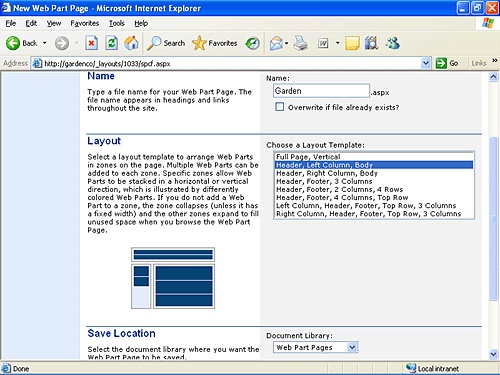
The New Web Part Page page is displayed.
In the Name text box, type Garden.
In the Layout section in the Choose a Layout Template list, click Header, Left Column, Body.
In the Save Location section in the document library drop-down list, click Web Part Pages.
At the bottom of the page, click the Create button.
After a few moments, the new Web Part Page is displayed, which has these three Web Part Page zones: Header, Left Column, and Body. Currently the page is empty, except for the top link bar, a heading with a graphic and the Modify Shared Page link. There are no Web Parts placed within the Web Part Page zones.
Tip
Because you created this Web Part Page within the SharePoint team site, the Team Web Site gallery contains a Web Part for each list or document library created in The Garden Company team site, plus the six built-in Web Parts described earlier in this chapter. If you completed all the exercises in this chapter, the number of Web Parts in the Team Web Site gallery should be one more than at the end of the previous exercise because you created a new document library in this exercise called Web Part Pages. You could now customize this Web Part Page using the techniques described earlier in this chapter.
Once a Web Part Page is created, you need to provide a link to the Web Part Page from your home page so the rest of your team can see it. Either make the Web Part Page document library appear on the Quick Launch bar, or if you have a links list, add a link item that points to the new Web Part Page.

CLOSE Internet Explorer.
Windows SharePoint Services uses a technology known as Web Part Pages, which are containers for Web Parts.
A Web Part Page contains Web Part zones where Web Parts can be placed.
Web Parts are reusable components that can contain any kind of Web-based content. They can display the contents of lists and libraries, as well as other content, such as the results of database queries, Web sites, Web pages, files, and folders.
To customize a Web site you must have certain rights or be a member of the Administrator or Web Designer site groups.
A Web Part Page can have these two views: shared view and a personal view. All users see changes made to the shared view. Changes made to the personal view are visible only to the user who altered their personal view of the Web Part Page. A user can reset their personal view back to the Shared View settings.
Web Parts are placed in one of these four Web Part galleries: Web Part Page gallery, Team Web Site gallery, Virtual Server gallery, and Online gallery.
The Web Part Page gallery is a temporary storage space for Web Parts that are removed from a Web page using the Close option.
The Team Web Site gallery contains a List View Web Part for each list or library created in the team site, plus these six built-in Web Parts: Content Editor Web Part, Form Web Part, Image Web Part, Members, Page Viewer Web Part and XML Web Part.
Using the browser, you can create additional Web Part Pages, which are stored within a document library.