
As an administrator, you need to do two main things so users throughout a network can access print devices connected to Microsoft Windows Server 2003: you need to set up a print server and you need to use the print server to share print devices on the network.
This chapter covers the basics of setting up shared printing and accessing it from the network. You’ll also find advice on administering printers and troubleshooting printer problems, which is where we’ll begin. The chapter doesn’t examine Internet printing.
An understanding of how printing works can go a long way when you’re trying to troubleshoot printer problems. Many processes, drivers, and devices work together to print documents. If you use a printer connected to a printer server, the key operations are as follows:
Printer driver. When you print a document in an application, your computer loads a printer driver. If the print device is attached to your computer physically, the printer driver is loaded from a local disk drive. If the print device is located on a remote computer, the printer driver might be downloaded from the remote computer. The availability of printer drivers on the remote computer is configurable by operating system and chip architecture. If the computer can’t obtain the latest printer driver, it’s probably because an administrator hasn’t enabled the driver for the computer’s operating system. For more information, see the section of this chapter entitled "Managing Printer Drivers."
Local print spool and print processor. The application you’re printing from uses the printer driver to translate the document into a file format understandable to the selected print device. Then your computer passes the document off to the local print spooler. The local spooler in turn passes the document to a print processor, which creates the raw print data necessary for printing on the print device.
Print router and print spooler on the print server. The raw data is passed back to the local print spooler. If you’re printing to a remote printer, the raw data is then routed to the print spooler on the print server. On Windows Server 2003 systems, the printer router, Winspool.exe, handles the tasks of locating the remote printer, routing print jobs, and downloading printer drivers to the local system, if necessary. If any one of these tasks fails, the print router is usually the culprit. See the sections of this chapter entitled "Solving Spooling Problems" and "Setting Printer Access Permissions" to learn possible fixes for this problem. If these procedures don’t work, you might want to replace or restore Winspool.exe.
The main reason for downloading printer drivers to clients is to provide a single location for installing driver updates. This way, instead of having to install a new driver on all the client systems, you install the driver on the print server and allow clients to download the new driver. For more information on working with printer drivers, see the section of this chapter entitled "Managing Printer Drivers."
Printer (print queue). The document goes from the print spooler into the printer stack–which, in some operating systems, is called the print queue–for the selected print device. Once in the queue, the document is referred to as a print job–a task for the print spooler to handle. The length of time the document waits in the printer stack is based on its priority and position within the printer stack. For more information, see the section of this chapter entitled "Scheduling and Prioritizing Print Jobs."
Print monitor. When the document reaches the top of the printer stack, the print monitor sends the document to the print device, where it’s actually printed. If the printer is configured to notify users that the document has been printed, you see a message confirming this.
The specific print monitor used by Windows Server 2003 depends on the print device configuration and type. The default monitor is Localmon.dll. You might also see monitors from the print device manufacturer, such as Hpmon.dll, which is used with most Hewlett-Packard print devices. This dynamic-link library (DLL) is required to print to the print device. If it’s corrupted or missing, you might need to reinstall it.
Print device. The print device is the physical device that prints documents on paper. Common print device problems and display errors include:
Group Policy can affect your ability to install and manage printers. If you’re having problems and believe they’re related to Group Policy, the key policies you’ll want to examine are those in:
Computer ConfigurationAdministrative TemplatesPrinters
User ConfigurationAdministrative TemplatesControl PanelPrinters
User ConfigurationAdministrative TemplatesStart Menu And Taskbar
The following sections examine techniques you can use to install printers. Windows Server 2003 allows you to install and manage printers anywhere on the network. You install and manage printers through the Printers And Faxes folder. On a local system you can access this folder by selecting Printers And Faxes from the Start Menu or by clicking Printers And Faxes in Control Panel. On a remote system you can access this folder through My Network Places. In My Network Places, access a domain, select a computer whose printer settings you want to manage, and then double-click Printers. Windows Server 2003 R2 introduces the Print Management console, which you can also use to work with printers and print servers. Print Management is designed to centralize and automate many printer and print server management tasks.
Two types of print devices are used on a network:
Local print device. A print device that’s physically attached to the user’s computer and employed only by the user who’s logged on to that computer.
Network print device. A print device that’s set up for remote access over the network. This can be a print device attached directly to a print server or a print device attached directly to the network through a network interface card (NIC).
Note
The key difference between a local printer and a network printer is that a local printer isn’t shared. A local printer can easily be made a network printer. To learn how to do this, see the section of this chapter entitled "Starting and Stopping Printer Sharing."
You install new network printers on print servers or as separate print devices attached to the network. A print server is a workstation or server that’s configured to share one or more printers. These printers can be physically attached to the computer or the network.
You can configure any Windows Server 2003 system as a print server. The print server’s primary job is to share the print device out to the network and to handle print spooling. The main advantages of print servers are that the printer will have a centrally managed print queue and you don’t have to install printer drivers on client systems.
You don’t have to use a print server, however. You can connect users directly to a network-attached printer. When you do this, the network printer is handled much like a local printer attached directly to the user’s computer. The key differences are that multiple users can connect to the printer and that each user has a different print queue. Each individual print queue is managed separately, which can make administration and problem resolution difficult.
To install or configure a new printer on Windows Server 2003, you must be a member of the Administrators, Print Operators, or Server Operators group. To connect to and print documents to the printer, you must have the appropriate access permissions. See the section in this chapter entitled "Setting Printer Access Permissions" for details.
Print Management can automatically detect all network printers located on the same subnet as the computer on which the console is running. After detection, print management can automatically install the appropriate printer drivers, set up print queues, and share the printers. To automatically install network printers and configure a print server, follow these steps:
Log on to the computer you want to configure as a print server. You can log on locally at the keyboard or remotely by using Remote Desktop.
Start Print Management by clicking Start, Programs or All Programs, Administrative Tools and then selecting Print Management.
In Print Management, expand the Print Servers node by double-clicking it and then right-click the entry for the server to which you are either locally or remotely logged on. The entry should have the server name followed by (local).
Select Automatically Add Network Printers. This displays the Automatically Add Network Printers dialog box.
Click Start to start the detection process for network printers on the current subnet. Printers found are listed by Internet Protocol (IP) address, status, and printer model. If a printer can’t be installed or configured, there will be an error status for the printer. If there are multiple possible drivers for a detected printer, you’ll be prompted to select the driver to use. Click Close.
Physically attached print devices are connected to a computer directly through a serial cable, a parallel cable, a universal serial bus (USB) cable, or an infrared (IR) port. You can configure physically attached printers as local print devices or as network print devices. The key difference is that a local device is accessible only to users logged on to the computer and a network device is accessible to any network users as a shared print device. Remember that the workstation or server you’re logged on to becomes the print server for the device you’re configuring.
You can install physically attached print devices locally by logging on to the print server you want to configure or remotely through My Network Places. If you’re configuring a local plug and play printer and are logged on to the print server, installing a print device is a snap. To install a print device, follow these steps:
Connect the print device to the server using the appropriate serial, parallel, or USB cable, and then turn the printer on.
If Windows Server 2003 automatically detects the print device, Windows begins installing the device and the necessary drivers. If the necessary drivers aren’t found, you might need to insert the Windows Server 2003 CD into the CD-ROM drive or a driver disk into the floppy disk drive.
If Windows Server 2003 doesn’t detect the print device automatically, you’ll need to install the print device manually as described in the next set of instructions. Skip the remaining steps in this section.
Windows Server 2003 automatically shares the printer for network access. The share name is set to the first eight characters of the printer name–not including spaces. Any spaces in the printer name are omitted. Thus, the printer name HP DeskJet 890C is set to the printer share HPDeskJe.
If you want to rename the print share, right-click the printer icon in the Printers And Faxes folder and then select Sharing. Then type a name for the printer share in the Share Name field. In a large organization, you’ll want the share name to be logical and helpful in locating the printer. For example, you might want to name the printer that points to a print device in the northeast corner of the twelfth floor TwelveNE.
Sometimes Windows won’t detect your printer or you’ll need to install the print device remotely. In this case, follow these steps to install the print device:
Access the Printers And Faxes folder on the computer you want to configure as a print server.
On a local system, you can access this folder by selecting Printers And Faxes from the Start menu or by clicking Printers And Faxes in Control Panel.
On a remote system, you can access this folder through My Network Places. In My Network Places, access a domain, select a computer whose printer settings you want to manage, and then select Printers And Faxes.
Select or double-click Add Printer to start the Add Printer Wizard. Click Next.
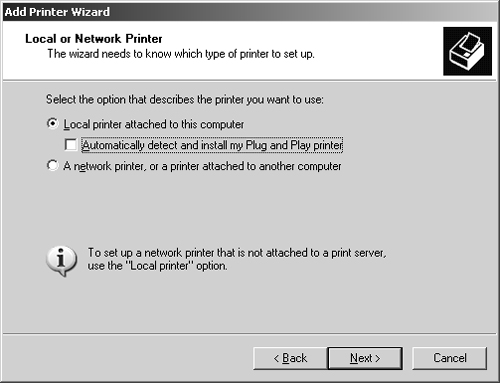
If you’re accessing the computer through a local logon, you’ll see a page similar to the one shown in Figure 17-1. Select Local Printer Attached To This Computer, clear Automatically Detect And Install My Plug And Play Printer, and then click Next.
If you’re accessing the computer remotely, the Add Printer Wizard doesn’t try to detect local printers and the wizard goes directly to the Select A Printer Port page. You need to configure the port used by the printer. Select Use The Following Port and then choose the appropriate LPT, COM, or IR port. LPT1 is the recommended printer port. You can also print to a file. If you do, Windows Server 2003 prompts users for a file name each time they print. Click Next.
As shown in Figure 17-2, you must now specify the print device manufacturer and model. This allows Windows Server 2003 to assign a printer driver to the print device. After you choose a print device manufacturer, choose a printer model. If the print device manufacturer and model you’re using isn’t displayed in the list, click Have Disk to install a new driver. For example, if you have an HP LaserJet 8150 PCL printer, you’d choose HP as the manufacturer and HP LaserJet 8150 Series PCL as the printer.
Click Next. If a printer driver is already installed, you can choose to keep the existing driver or replace it. Click Next.
Assign a name to the printer. This is the name you’ll see in the Printers And Faxes folder of Control Panel. On a local system, you can also set the printer as the local default, if you like. Click Next.
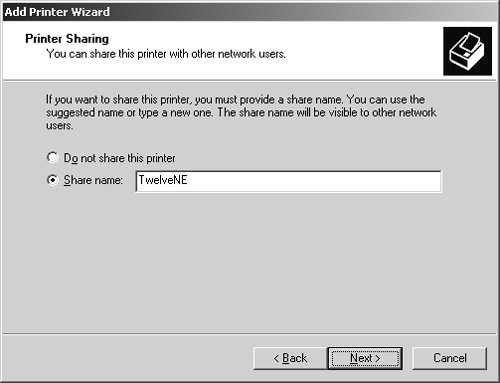
Specify whether the printer is available to remote users (see Figure 17-3). To create a printer that’s accessible to remote users, select the Share Name option button and enter a name for the shared resource. In a large organization, you’ll want the share name to be logical and helpful in locating the printer. For example, you might want to name the printer that points to the print device in the northeast corner of the twelfth floor TwelveNE.
If you like, you can enter a location description and comment. This information can help users find a printer and determine its capabilities.
The final page lets you test the installation by printing a test page to the print device. If you want to do this, select Yes. Otherwise, select No. When you’re ready to complete the installation, click Finish.

When the Add Printer Wizard finishes installing the new printer, the Printers And Faxes folder will have an additional icon with the name set the way you specified. You can change the printer properties and check printer status at any time. For more information, see the section of this chapter entitled "Configuring Printer Properties."
Tip
If you repeat this process, you can create additional printers for the same print device. All you need to do is change the printer name and share name. Having additional printers for a single print device allows you to set different properties to serve different needs. For example, you could have a high priority printer for print jobs that need to be printed immediately and a low priority printer for print jobs that aren’t as urgent.
A network-attached print device is a print device that’s attached directly to the network through a network adapter card. Network-attached printers are configured as network print devices so that they’re accessible to network users as shared print devices. Remember that the server on which you configure the print device becomes the print server for the device you’re configuring.
Install a network-attached print device by completing these steps:
Access the Printers And Faxes folder on the computer you want to configure as a print server.
On a local system, you can access this folder by selecting Printers And Faxes from the Start Menu or by clicking Printers And Faxes in Control Panel.
On a remote system, you can access this folder through My Network Places. In My Network Places, access a domain, select a computer whose printer settings you want to manage, and then select Printers And Faxes.
Double-click Add Printer to start the Add Printer Wizard. Click Next.
If you’re accessing the computer through a local logon, select Local Printer, clear Automatically Detect And Install My Plug And Play Printer, and then click Next.
If you’re accessing the computer remotely, the Add Printer Wizard doesn’t try to detect local printers and you jump directly to the Select A Printer Port page.
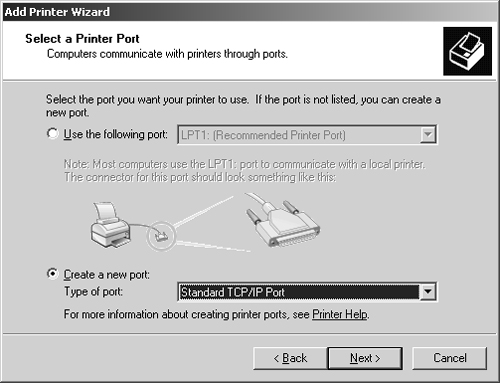
As shown in Figure 17-4, select Create A New Port and then set the type of port to Standard TCP/IP Port. Click Next to start the Add Standard TCP/IP Printer Port Wizard.
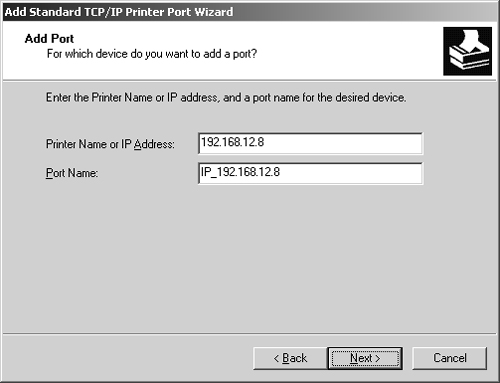
Click Next. As shown in Figure 17-5, type the printer name or IP address for the printer device. A port name is filled in for you automatically. For example, if you type the IP address 192.168.12.8, the port name is entered as IP_192.168.12.8.
Click Next and the wizard attempts to automatically detect the print device. If the wizard is unable to detect the print device, make sure that:
The print device is turned on and connected to the network.
The printer is configured properly.
You typed the correct IP address or printer name in the previous page.
If the IP address or printer name is incorrect, click Back and then retype this information.
If the information is correct, you might need to identify the device further. In the Device Type area, click Standard, and then select the printer or network adapter used by the printer. Or click Custom and then click Settings to define custom settings for the printer, such as protocol and Simple Network Management Protocol (SNMP) status.
Click Next and then click Finish. This completes the configuration of the new port. You now need to continue with the printer installation in the Add Printer Wizard.
You must now specify the print device manufacturer and model. This allows Windows Server 2003 to assign a printer driver to the print device. After you choose a print device manufacturer, choose a printer model. If the print device manufacturer and model you’re using isn’t displayed in the list, click Have Disk to install a new driver.
Click Next. If a printer driver is already installed, you can choose to keep the existing driver or replace it. Click Next.
Assign a name to the printer. This is the name you’ll see in the Printers And Faxes folder of Control Panel. On a local system, you can also set the printer as the local default, if you like. Click Next.
Check the share name for the printer. By default, the share name is set to the first eight characters of the printer name–not including spaces. Any spaces in the printer name are omitted. Thus, the printer name Canon LBP-8IV is set to the printer share CanonLBP. In a large organization, you’ll want the share name to be logical and helpful in locating the printer. For example, you might want to name the printer that points to the print device in the northeast corner of the twelfth floor TwelveNE.
Click Next. If you like, you can enter a location description and comment. This information can help users find a printer and determine its capabilities.
The final window lets you test the installation by printing a test page to the print device. If you want to do this, select Yes. Otherwise, select No. When you’re ready to complete the installation, click Finish.
When the Add Printer Wizard finishes installing the new printer, the Printers And Faxes folder will have an additional icon with the name set the way you specified. You can change the printer properties and status at any time. For more information, see the section of this chapter entitled "Configuring Printer Properties."
Tip
If you repeat this process, you can create additional printers for the same print device. All you need to do is change the printer name and share name. Having additional printers for a single print device allows you to set different properties to serve different needs. For example, you could have a high priority printer for print jobs that need to be printed immediately and a low priority printer for print jobs that aren’t as urgent.
After you create a network printer, remote users can connect to it and use it much like any other printer. You’ll need to set up a connection on a user-by-user basis or have users do this themselves. To create the connection to the printer on a Windows Server 2003 system, follow these steps:
With the user logged on, access the Printers And Faxes folder.
Select or double-click Add Printer to start the Add Printer Wizard. Afterward, select A Network Printer, and then click Next.
In the Specify A Printer dialog box, choose a method for finding the network printer. The available options are:
Find A Printer In The Directory. Choose this option if you want to search Active Directory directory service for the printer. All printers configured for sharing on Windows Server 2003 systems are automatically listed in Active Directory. Printers can be removed from the directory, however.
Type The Printer Name, Or Click Next To Browse For A Printer. Choose this option if you want to browse the network for shared printers just as you’d browse in My Network Places.
Connect To A Printer On The Internet Or On Your Intranet. Choose this option if you want to enter the Uniform Resource Locator (URL) of an Internet printer.
When the printer is selected, click OK.
Determine whether the printer is the default used by Windows applications. Select Yes or No, and then click Next.
Choose Finish to complete the operation.
The user can now print to the network printer by selecting the printer in an application. The Printers And Faxes folder on the user’s computer shows the new network printer. You can configure local property settings using this icon. By default, the printer name is set to Printer On Computer, such as HP DeskJet On ENGSVR01.
Windows Server 2003 uses the Print Spooler service to control the spooling of print jobs. If this service isn’t running, print jobs can’t be spooled. You can check the status of the Print Spooler using the Services utility. Follow these steps to check and restart the Print Spooler service:
In Administrative Tools, click or double-click Computer Management.
If you want to connect to a remote computer, right-click the Computer Management entry in the console tree and select Connect To Another Computer from the shortcut menu. You can now choose the system whose services you want to manage.
Expand the Services And Applications node by clicking the plus sign (+) next to it, and then choose Services.
Select the Print Spooler service. The Status should be Started. If it isn’t, right-click Print Spooler and then select Start. The Startup Type should be Automatic. If it isn’t, double-click Print Spooler and then set Startup Type to Automatic.
If this doesn’t resolve the problem, you might want to check other related services, including:
TCP/IP Print Server (if installed)
Print Server for Macintosh (if installed)
Print Server for UNIX (if installed)
Tip
Spoolers can become corrupted. Symptoms include a frozen printer or one that doesn’t send jobs to the print device. Sometimes the print device might print pages of garbled data. In most of these cases, stopping and starting the Print Spooler service resolves the problem. Other spooling problems might be related to permissions. See the section of this chapter entitled "Setting Printer Access Permissions" for details.
The sections that follow explain how to set commonly used printer properties. After you install network printing, you can use the Properties dialog box to set its properties. You access the Properties dialog box by doing the following:
Access the Printers And Faxes folder on the computer with which you want to work. Or select the Printers node in Print Management.
Right-click the icon of the printer you want to configure and then, from the pop-up menu, select Properties.
This opens the dialog box shown in Figure 17-6. You can now set the printer properties.
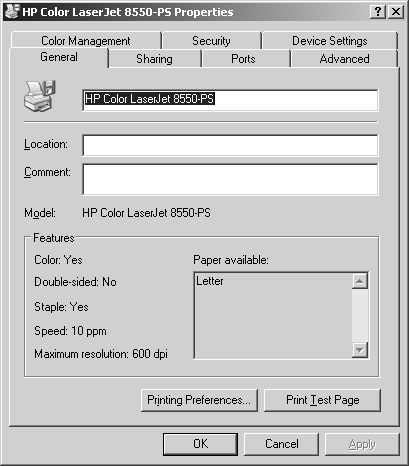
Figure 17-6. Set printer properties with the Properties dialog box for the printer you want to configure.
To make it easier to determine which printer to use when, you can add comments and location information to printers. Comments provide general information about the printer, such as the type of print device and who is responsible for it. Location describes the actual site of the print device. Once set, applications can display these fields. For example, Microsoft Word displays this information when you select Print from the File menu in the Comment and Where fields, respectively.
You can add comments and location information to a printer by using the fields in the General tab of the printer’s Properties dialog box. Type your comments in the Comment field. Type the printer location in the Location field.
In a Windows Server 2003 domain, you should configure and update printer drivers only on your print servers. You don’t need to update printer drivers on Windows clients. Instead, you configure the network printer to provide the drivers to client systems, as necessary.
You can update a printer’s driver by doing the following:
Open the printer’s Properties dialog box and click the Advanced tab.
The Driver field lets you select the driver from a list of currently installed drivers. Use the Driver drop-down list to select a new driver from a list of known drivers.
If the driver you need isn’t listed or if you obtained a new driver, click New Driver. This starts the Add Printer Driver Wizard. Click Next. Choose Have Disk to install the new driver from a file or disk.
Click Next and then click Finish.
After you install a printer or change drivers, you might want to select the operating systems that should download the driver from the print server. By allowing clients to download the printer driver, you provide a single location for installing driver updates. This way, instead of having to install a new driver on all the client systems, you install the driver on the print server and allow clients to download the new driver.
You can allow clients to download the new driver by doing the following:
Right-click the icon of the printer you want to configure and then select Properties.
Click the Sharing tab and then click Additional Drivers.
Use the Additional Drivers dialog box to select operating systems that can download the printer driver. As necessary, insert the Windows Server 2003 CD or printer driver disks, or both, for the selected operating systems. The Windows Server 2003 CD has drivers for most Windows operating systems.
Separator pages have two uses on Windows Server 2003 systems:
They can be used at the beginning of a print job to make it easier to find a document on a busy print device.
They can be used to change the print device mode, such as whether the print device uses PostScript or Printer Control Language (PCL).
To set a separator page for a print device, follow these steps:
Access the Advanced tab of the printer’s Properties dialog box and then click Separator Page.
In the Separator Page dialog box, click Browse, and then select one of the three available separator pages:
Pcl.sep. Switches the print device to PCL mode and prints a separator page before each document.
Pscript.sep. Sets the print device to PostScript mode but doesn’t print a separator page.
Sysprint.sep. Sets the print device to PostScript mode and prints a separator page before each document.
To stop using the separator page, access the Separator Page dialog box and remove the filename.
You can change the port used by a print device at any time by using the Properties dialog box for the printer you’re configuring. Open the Properties dialog box and then click the Ports tab. You can now either add a port for printing by selecting its check box or remove a port by clearing its check box. To add a new port type, click Add Port. Afterward, select the port type and then click New Port. To remove a port permanently, select it and then click Delete Port.
You use the Properties dialog box for the printer you’re configuring to set default settings for print job priority and scheduling. Open the dialog box and then click the Advanced tab. You can now set the default schedule and priority settings using the fields shown in Figure 17-7. Each of these fields is discussed in the sections that follow.
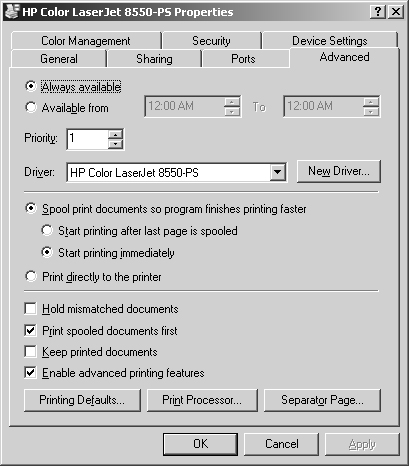
Printers are either always available or available only during the hours specified. You set printer availability using the Advanced tab. Access the Advanced tab, and then select Always Available to make the printer available at all times or select Available From to set specific hours of operation.
Use the Priority box of the Advanced tab to set the default priority for print jobs. Print jobs always print in order of priority. Jobs with higher priority print before jobs with lower priority.
For print devices attached to the network, you’ll usually want the printer to spool files rather than print files directly. Print spooling makes it possible to use a printer to manage print jobs.
To enable spooling, use one of the following options:
Spool Print Documents So Program Finishes Printing Faster. Select this option to spool print jobs.
Start Printing After Last Page Is Spooled. Select this option if you want the entire document to be spooled before printing begins. This option ensures that the entire document makes it into the print queue before printing. If for some reason printing is canceled or not completed, the job won’t be printed.
Start Printing Immediately. Select this option if you want printing to begin immediately when the print device isn’t already in use. This option is preferable when you want print jobs to be completed faster or when you want to ensure that the application returns control to users as soon as possible.
You can disable spooling by selecting the Print Directly To The Printer option button. Additional check boxes let you configure other spooling options. You use these check boxes as follows:
Hold Mismatched Documents. If selected, the spooler holds print jobs that don’t match the setup for the print device. Selecting this option is a good idea if you frequently have to change printer form or tray assignments.
Print Spooled Documents First. If selected, jobs that have completed spooling will print before jobs in the process of spooling–regardless of whether the spooling jobs have higher priority.
Keep Printed Documents. Normally, documents are deleted from the queue after they’re printed. To keep a copy of documents in the printer, select this option. Use this option if you’re printing files that can’t easily be recreated. In this way, you can reprint the document without having to recreate it. For details, see the section of this chapter entitled "Pausing, Resuming, and Restarting Individual Document Printing."
Enable Advanced Printing Features. When this option is enabled, you can use advanced printing options (if available), such as Page Order and Pages Per Sheet. If you note compatibility problems when using advanced options, you should disable the advanced printing features by clearing this check box.
You use the Properties dialog box of the printer you’re configuring to set printer sharing. Right-click the icon of the printer you want to configure and then select Sharing. You can use this tab to change the name of a network printer as well as to start sharing or stop sharing a printer. Printer sharing tasks that you can perform include:
Sharing a local printer (thus making it a network printer). To share a printer, select Share This Printer and then specify a name for the shared resource in the Share Name field. Click OK when you’re finished.
Changing the shared name of a printer. To change the shared name, simply type a new name in the Share Name field and click OK.
Stopping the sharing of a printer. To quit sharing a printer, select the Do Not Share This Printer option button. Click OK when you’re finished.
Network printers are a shared resource, and, as such, you can set access permissions for them. You use the Properties dialog box of the printer you’re configuring to set access permissions. Open the dialog box and then click the Security tab.
Permissions that can be granted or denied for printers are Print, Manage Documents, and Manage Printers. Table 17-1 summarizes the capabilities of these permissions.
Table 17-1. Printer Permissions Used by Windows Server 2003
Permission | Manage Documents | Manage Printers | |
|---|---|---|---|
Print documents | X | X | X |
Pause, restart, resume, and cancel own documents | X | X | X |
Connect to printers | X | X | X |
Control settings for print jobs | X | X | |
Pause, restart, and delete print jobs | X | X | |
Share printers | X | ||
Change printer properties | X | ||
Change printer permissions | X | ||
Delete printers | X |
The default settings of the Printer Permissions dialog box are used for any new network printer you create. These settings are as follows:
Administrators, Print Operators, and Server Operators have full control over printers by default. This allows you to administer a printer and its print jobs.
Creator or Owner of the document can manage his or her own document. This allows the person who printed a document to change its settings and to delete it.
Everyone can print to the printer. This makes the printer accessible to all users on the network.
As with other permission sets, you create the basic permissions for printers by combining special permissions into logical groups. Table 17-2 shows special permissions used to create the basic permissions for printers. Using Advanced permission settings, you can assign these special permissions individually, if necessary.
Windows Server 2003 lets you audit common printer tasks. To do this, follow these steps:
Open the printer’s Properties dialog box and then click the Security tab. Open the Access Security Settings dialog box by clicking Advanced.
In the Auditing tab, add the names of users or groups you want to audit with the Add button and remove names of users or groups with the Remove button.
Select the events you want to audit by selecting the check boxes under the Successful and Failed headings, as appropriate. Click OK when you’re finished.
Document default settings are used only when you print from non-Windows applications, such as when you print from the MS-DOS prompt. You can set document defaults by doing the following:
Access the Printers And Faxes folder on the computer with which you want to work. Or select the Printers node in Print Management.
Right-click the printer’s icon and select Properties. Click Printing Preferences in the General tab of the Properties dialog box.
Use the fields in the Layout tab and the Paper/Quality tab to configure the default settings.
Windows Server 2003 allows you to control global settings for print servers by using the Print Server Properties dialog box. You can access this dialog box by doing either of the following:
Access the Printers And Faxes folder on the print server. In the Printers And Faxes window, select Server Properties from the File menu. Or right-click in an open area of the window and select Server Properties from the shortcut menu.
In Print Management, right-click the server entry for the print server with which you want to work and then select Properties. If the print server isn’t listed, you can add it using the Add/Remove Servers dialog box, which you can display by right-clicking Print Servers and then selecting Add/Remove Servers.
The sections that follow examine some of the print server properties that you can configure.
The Spool folder holds a copy of all documents in the printer spool. By default, this folder is located at %SystemRoot%system32spoolPRINTERS. On the NTFS file system (NTFS), all users who access the printer must have Change permission on this directory. If they don’t, they won’t be able to print documents.
To check the permission on this directory if you’re experiencing problems, follow these steps:
Access the Print Server Properties dialog box.
Click the Advanced tab. The location of the Spool folder is shown in the Spool Folder field. Note this location.
Right-click the Spool folder in Windows Explorer, and then, from the pop-up menu, select Properties.
Click the Security tab. Now you can verify that the permissions are set appropriately.
Printers used in corporate environments can print hundreds or thousands of documents daily. This heavy load puts a high burden on print servers, which can cause printing delays, document corruption, and other problems. To alleviate some of this burden, you should do the following:
Use network-attached printers rather than printers attached through serial, parallel, USB, or IR ports. Network-attached printers use fewer system resources (namely CPU time) than do other printers.
Dedicate the print server to handle print services only. If the print server is handling other network duties, it might not be very responsive to print requests and management. To increase responsiveness, you can move other network duties to other servers.
Move the Spool folder to a drive dedicated to printing. By default, the Spool folder is on the same file system as the operating system. To further improve disk input/output (I/O), use a drive that has a separate controller.
You can use the Print Server Properties dialog box to configure the logging of printer events. Access this dialog box and then click the Advanced tab. Use the check boxes provided to determine which spooler events are logged.
Print servers can notify users when a document has finished printing. By default, this feature is turned off since it can become annoying. If you want to activate or remove notification, access the Advanced tab of the Print Server Properties dialog box. Then select or clear the check box labeled Notify When Remote Documents Are Printed. You might also want to select or clear the check box labeled Notify Computer, Not User, When Remote Documents Are Printed.
You manage print jobs and printers using the print management window. If the printer is configured on your system, you can access the print management window by using one of the following techniques:
Access the Printers And Faxes folder on the print server you want to manage. Double-click the icon of the printer with which you want to work. If the printer isn’t configured on your system, you can manage the printer remotely by starting Windows Explorer and then using My Network Places to access the print server. Access the Printers And Faxes folder on the print server and then double-click the icon of the printer you want to work with.
In Print Management, expand the Print Servers node by double-clicking it and the entry for the printer server itself. Select Printers. Right-click the printer with which you want to work and then select Open Printer Queue.
You can now manage print jobs and printers using the print management window shown in Figure 17-8. The print management window shows information about documents in the printers. This information tells you the following:
Document Name. The document file name, which can include the name of the application that printed it.
Status. The status of the print job, which can include the document’s status as well as the printer’s status. Document status entries you’ll see include Printing, Spooling, Paused, Deleting, and Restarting. Document status can be preceded by the printer status, such as Printer Off-Line.
Owner. The document’s owner.
Pages. The number of pages in the document.
Size. The document size in kilobytes or megabytes.
Submitted. The time and date the print job was submitted.
Port. The port used for printing, such as LPT1, COM3, or File (if applicable).

Sometimes you need to pause a printer. Using the print management window, you do this by selecting the Pause Printing option from the Printer menu (a check mark indicates that the option is selected). When you pause printing, the printer completes the current job and then puts all other jobs on hold.
To resume printing, select the Pause Printing option a second time. This should remove the check mark next to the option.
You can use the print management window to empty the print queue and delete all its contents. To do this, from the Printer menu select the Cancel All Documents option.
You set the status of individual documents using the Document menu in the print management window. To change the status of a document, follow these steps:
Select the document in the print management window.
Use the Pause, Resume, and Restart options on the Document menu to change the status of the print job:
Pause. Puts the document on hold and lets other documents print.
Resume. Tells the printer to resume printing the document from where it left off.
Restart. Tells the printer to start printing the document again from the beginning.
To remove a document from the printer or cancel a print job, follow these steps:
Document properties can tell you many things about documents that are in the printer, such as the page source, orientation, and size. You can check the properties of a document in the printer by doing either of the following:
Select the document in the print management window and then, from the Document menu, select Properties.
Double-click the document name in the print management window.
Scheduling priority determines when documents print. Documents with higher priority print before documents with lower priority. You can set the priority of individual documents in the printer by doing the following:
Select the document in the print management window and then, from the Document menu, select Properties.
In the General tab, use the Priority slider to change the document’s priority. The lowest priority is 1 and the highest is 99.
In a busy printing environment, you might need to schedule the printing of documents in the printer. For example, you might want large print jobs of low priority to print at night. To set the printing schedule, follow these steps:
Select the document in the print management window and then, from the Document menu, select Properties.
In the General tab, select the Only From option button and then specify a time interval. The time interval you set determines when the job is allowed to print. For example, you can specify that the job can print only between the hours of midnight and 5:00 a.m.