
Microsoft Windows Server 2003 provides a robust environment for working with files and folders. At the core of this environment are the two basic file system types:
FAT (file allocation table), available in 16-bit and 32-bit versions
NTFS file system (NTFS), available in 4.0 and 5.0 versions
When you work with files and folders on a Windows Server 2003 system, you’ll usually work with one of these file system types. To help you better administer FAT and NTFS volumes, this chapter explains how to perform common file and folder tasks. The chapter also discusses techniques for combating malware, using file screening, and configuring storage reporting.
This section covers the essential information you’ll need to work with files. An understanding of file basics can make your job as an administrator a lot easier.
What you can or can’t do with files and folders in Windows Server 2003 depends on the file system type. Windows Server 2003 provides direct support for FAT and NTFS.
FAT volumes rely on an allocation table to keep track of the status of files and folders. Although FAT is adequate for most file and folder needs, it’s rather limited. Two versions of FAT are supported on Windows Server 2003:
FAT16. FAT16 is the version of FAT widely used on Microsoft Windows NT 4.0. FAT16 supports a 16-bit file allocation table and is usually referred to as FAT. You’ll have optimal performance with volumes that are smaller than 2 gigabytes (GB).
FAT32. FAT32 is the version of FAT introduced with Windows 95 OEM Service Release 2 (OSR2) and Windows 98. FAT32 supports a 32-bit file allocation table and is usually referred to as FAT32. FAT32 supports smaller cluster sizes than FAT and can more efficiently allocate space. On Windows Server 2003, FAT32 supports volumes up to 32 GB.
Table 13-1 provides a brief summary of FAT and FAT32 features.
Table 13-1. FAT and FAT32 Features Comparison
Feature | FAT | FAT32 |
|---|---|---|
File allocation table size | 16-bit | 32-bit |
Maximum volume size | 4 GB; best at 2 GB or less | 2 terabytes; limited in Windows Server 2003 to 32 GB |
Maximum file size | 2 GB | 4 GB |
Operating systems supported | MS-DOS, all versions of Windows | Windows 95 OSR2, Windows 98, Windows Millennium Edition (Windows Me), Windows XP, Windows 2000, and Windows Server 2003 |
Supports small cluster size | No | Yes |
Supports NTFS 4.0 features | No | No |
Supports NTFS 5.0 features | No | No |
Use on floppy disks | Yes | Yes |
Use on removable disks | Yes | Yes |
NTFS offers a robust environment for working with files and folders. Two versions of NTFS have been implemented:
NTFS 4.0. NTFS 4.0 is the version used with Windows NT 4.0. It features full support for local and remote access controls on files and folders as well as support for Windows compression. It doesn’t support most Windows 2000 and Windows Server 2003 file system features.
NTFS 5.0. NTFS 5.0 is the version used with Windows 2000 and Windows Server 2003. It features full support for Active Directory directory service, disk quotas, compression, encryption, and other enhancements. NTFS 5.0 is fully supported by Windows 2000 and Windows Server 2003 and minimally supported by Windows NT 4.0 with Service Pack 4 or later.
Note
If you created NTFS volumes on Windows NT 4.0 and upgraded to Windows 2000 or Windows Server 2003, the volumes aren’t upgraded automatically to NTFS 5.0. You must specifically choose to upgrade the volumes during installation of the operating system or when you install Active Directory.
Table 13-2 provides a brief summary of NTFS 4.0 and NTFS 5.0. Windows NT 4.0 systems with Service Pack 4 or later can access NTFS 5.0 files and folders, provided they don’t use any of the new NTFS features.
Table 13-2. NTFS 4.0 and NTFS 5.0 Features Comparison
Feature | NTFS 4.0 | NTFS 5.0 |
|---|---|---|
Maximum volume size | 32 GB | 2 terabytes on Master Boot Record (MBR) disks; 18 exabytes on globally unique identifier (GUID) Partition Table (GPT) disks |
Maximum file size | 32 GB | Only limited by volume size |
Operating systems supported | Windows NT 4.0, Windows 2000, Windows Server 2003 | Windows 2000, Windows Server 2003, and Windows NT 4.0 SP 4 |
Advanced file access permissions | Yes | Yes |
Supports Windows compression | Yes | Yes |
Supports Windows encryption | No | Yes |
Supports Active Directory structures | No | Yes |
Supports sparse files | No | Yes |
Supports remote storage | No | Yes |
Supports disk quotas | No | Yes |
Use on floppy disks | No | No |
Use on removable disks | Yes | Yes |
Windows Server 2003 file naming conventions apply to both files and folders. For simplicity, the term file naming is often used to refer to both files and folders. Although Windows Server 2003 file names are case-aware, they aren’t case-sensitive. This means you can save a file named MyBook.doc and the file name will be displayed in the correct case. However, you can’t save a file called mybook.doc to the same folder.
Both NTFS and FAT support long file names—up to 255 characters. You can name files using just about any of the available characters, including spaces. However, there are some characters you can’t use. They are:
? * / : " < > |
Tip
Using spaces in file names can cause access problems. Any time you reference the file name, you might need to enclose the file name within quotation marks. Also, if you plan to publish the file on the Web, you might need to remove the spaces from the file name or convert them to the underscore character (_) to ensure that Web browsers have easy access to the file.
The following file names are all acceptable:
My Favorite Short Story.doc
My_Favorite_Short_Story.doc
My..Favorite..Short..Story.doc
My Favorite Short Story!!!.doc
Under MS-DOS and 16-bit FAT file systems, file and directory names are restricted to eight characters with a three-character file extension, such as chapter4.txt. This naming convention is often referred to as the 8.3 file-naming rule or the standard MS-DOS file-naming rule. Because of it, when you work with files at the command prompt you might have problems accessing files and folders.
To support access to long file names, abbreviated file names are created for all files and folders on a system. These file names conform to the standard MS-DOS file-naming rule. You can see the abbreviated file names using the command:
dir /X
A typical abbreviated file name looks like this:
PROGRA~1.DOC
When Windows Server 2003 creates an abbreviated file name from a long file name, it uses the following rules:
Any spaces in the file name are removed. The file name My Favorite Short Story.doc becomes MyFavoriteShortStory.doc.
All periods in the file name are removed (with the exception of the period separating the file name from the file extension). The file name My..Favorite..Short..Story.doc becomes MyFavoriteShortStory.doc.
Invalid characters under the standard MS-DOS naming rule are replaced with the underscore character (_). The file name My[Favorite]ShortStory.doc becomes My_Favorite_Short_Story.doc.
All remaining characters are converted to uppercase. The file name My Favorite Short Story.doc becomes MYFAVORITESHORTSTORY.DOC.
To make the file conform to the 8.3 naming convention, the file name and file extension are truncated, if necessary. The rules for truncation are as follows:
The file extension is truncated to the first three characters. The file name Mary.text becomes MARY.TEX.
The file name is truncated to the first six characters (this is the file’s root name) and a unique designator is appended. The unique designator follows the convention ~n, where n is the number of the file with the six-character file name. Following this, the file name, My Favorite Short Story.doc, becomes MYFAVO~1.DOC. The second file in this folder that’s truncated to MYFAVO becomes MYFAVO~2.DOC.
Note
The file name truncation rule described here is the one you’ll usually see, and you won’t often have to worry about anything else. However, if you have a lot of files with similar names, you might see another convention used to create the short file name.
Note
Specifically, if more than four files use the same six-character root, additional file names are created by combining the first two characters of the file name with a four-character hash code and then appending a unique designator. A folder could have files named MYFAVO~1.DOC, MYFAVO~2.DOC, MYFAVO~3.DOC, and MYFAVO~4.DOC. Additional files with this root could be named MY3140~1.DOC, MY40C7~1.DOC, and MYEACC~1.DOC.
Firewall, virus, and spyware software are your first lines of defense in keeping malicious programs off the organization’s workstations and servers. However, these programs alone aren’t enough to stop malware in its tracks. I regularly and routinely encounter malware that finds its way around the best firewall and virus software that McAfee and Symantec have to offer. Additional spyware software can often detect and block these malware programs, but this isn’t always the case. Case in point: my computer was infected recently with a malware program that activated every time I clicked the Back button in Microsoft Internet Explorer. This program redirected me to a Web page for a product that I supposedly couldn’t live without.
Having to run separate firewall, virus, and spyware programs can be frustrating for both users and administrators, especially when these combined efforts fail to stop certain types of malicious programs. To fill in the gaps, I recommend:
Combating malware through Internet security configurations.
Combating malware through add-on management.
Note
Chapter 15 of Microsoft Windows XP Professional Administrator’s Pocket Consultant, 2nd Edition, goes into detail about secure browsing, local machine lockdown, security zones, and add-ons. If you’re unfamiliar with these features, I recommend referring to this discussion before reading the following sections.
One of the easiest but most restrictive ways to combat malware is to configure the Security Zone settings for the Internet zone to prevent most types of active content from executing and to configure other zones as appropriate for your organization. The High security setting might suffice in this case because it disables or restricts usage of many types of active content. However, this setting also limits Web site functionality and might cause certain sites not to work properly.
To configure security zones on a per-computer basis, follow these steps:
Access the Internet Options utility in Control Panel and then click the Security tab.
Select the zone you want to work with and then click Custom Level. If you want to reset the zone security level, select the security level using the Reset To selection list and then click Reset.
Make any necessary changes to the security configuration and then click OK.
After you configure the security settings for the Internet, Local Intranet, Trusted Sites, and Restricted Sites zones, you can import the settings into Group Policy for a site, domain, or organizational unit to apply the settings to all computers in that site, domain, or organizational unit. You import the settings by completing the following steps:
In Group Policy, access User ConfigurationWindows SettingsInternet Explorer MaintenanceSecurity and then double-click Security Zones And Content Ratings.
Select Import The Current Security Zone And Privacy Settings.
Click Modify Settings and then check the settings you previously defined to confirm that they’re as expected.
Click OK twice to apply the policy.
Best Practices
Internet Explorer has two security configurations: standard and enhanced. To import enhanced settings, you must install the enhanced security configuration and then import the enhanced security settings. If you don’t do this, you will see a warning prompt stating that standard settings will be ignored on computers using the enhanced configuration.
A proper Internet security configuration, combined with good firewall, virus, and spyware software, will keep your organization’s computers safe from malware and viruses the vast majority of the time. Sometimes, however, programs like the one I mentioned will sneak through. Most of the time these programs attach themselves as Internet Explorer add-ons. To determine if this is the case, follow these steps:
On the infected computer, exit any running instances of Internet Explorer.
Access the Internet Options utility in Control Panel and then click the Programs tab.
Click Manage Add-ons. This displays the Manage Add-ons dialog box.
Look for adds-ons that are suspicious, such as those listed by class identifier (CLSID; a string of numbers enclosed in parentheses) or those that have an unlisted or unverified publisher.
To disable a suspect add-on, select its name in the list and then, under Settings, select Disable.
Click OK twice to apply the changes. If you start Internet Explorer and browse the Internet without the malware triggering, you’ve probably disabled the malware and this should prevent it from running again.
Note
Most malware programs that successfully bypass protections will attempt to install themselves again using the same security hole they’ve previously exploited. Typically, when they do this, they will attempt to do so using a new add-on name or identifier.
Restricting add-on attachment on a domain-wide or organizational unit–wide basis is the preferred technique for combating add-on malware. Policies for managing add-ons are found in Group Policy under User ConfigurationAdministrative TemplatesWindows ComponentsInternet ExplorerSecurity FeaturesAdd-on Management. Specifically, you should enable Deny All Add-Ons Unless Specifically Allowed In The Add-On List and then use Add-On List policy settings to define the add-ons that you specifically want to allow.
When you’re working with Windows Server 2003 R2, file screening is another tool you can use in the effort to keep networks safe from malicious programs and to block unauthorized types of content. You can use file screening in conjunction with quotas and storage reports as discussed in Chapter 14. Using file screening, you can monitor and block the usage of certain types of files. You can configure file screening in one of two modes:
Active Screening. Does not allow users to save unauthorized files
Passive Screening. Allows users to save unauthorized files but monitors or warns about usage (or both).
You actively or passively screen files by defining a file screen. All file screens have a file screen path, which is a folder that defines the base file path to which the screening is applied. Screening applies to the designated folder and all subfolders of the designated folders. The particulars of how screening works and what is screened are derived from a source template that defines the file screen properties.
Windows Server 2003 R2 includes the file screen templates listed in Table 13-3. Using the File Server Resource Manager, you can easily define additional templates that would then be available whenever you define file screens or you can set single-user custom file screen properties when defining the file screen.
Table 13-3. File Screen Templates
File Screen Template Name | Screening Type | File Group Action |
|---|---|---|
Block Audio And Video Files | Active | Block: Audio and Video files |
Block E-Mail Files | Active | Block: E-Mail files |
Block Executable Files | Active | Block: Executable files |
Block Image Files | Active | Block: Image files |
Monitor Executable And System Files | Passive | Warn: Executable files, System files |
File screen templates or custom properties define:
Screening type: active or passive
File groups to which screening is applied
Notifications: e-mail, event log, or both
The standard file groups for screening are listed in Table 13-4. Each file group has a predefined set of files to which it applies. You can modify the included file types and create additional file groups as necessary using File Server Resource Manager or File Server Management.
Table 13-4. File Screen Groups and the File Types To Which They Apply
File Group | Applies To... |
|---|---|
Audio and Video Files | .aac, .aif, .aiff, .asf, .asx, .au, .avi, .m3u, .mid, .midi, .mov, .mp1, .mp2, .mp3, .mp4, .mpe, .mpeg, .mpeg2, .mpeg3, .mpg, .qt, .qtw, .ram, .rm, .rmi, .rmvb, .snd, .swf, .wav, .wax, .wma, .wmv, .wvx |
Backup Files | .bak, .bck, .bkf, .old |
Compressed Files | .ace, .arc, .arj, .bhx, .bz2, .cab, .gz, .gzip, .hpk, .hqx, .lha, .lzh, .lzx, .pak, .pit, .rar, .sea, .sit, .sqz, .tar, .tgz, .uu, .uue, .z, .zip, .zoo |
E-Mail Files | .eml, .idx, .mbx, .msg, .ost, .otf, .pab, .pst |
Executable Files | .bat, .cmd, .com, .cpl, .exe, .inf, .js, .jse, .msi, .msp, .ocx, .pl, .reg, .vb, .vbs, .wsf, .wsh |
Image Files | .bmp, .dib, .gif, .img, .jfif, .jpe, .jpeg, .jpg, .pcx, .png, .psd, .raw, .rif, .spiff, .tif, .tiff |
Office Files | .doc, .dot, .mad, .maf, .mda, .mdb, .mdm, .mdt, .mdw, .mdz, .mpd, .mpp, .mpt, .pot, .ppa, .pps, .ppt, .pwz, .rqy, .rtf, .rwz, .slk, .vdx, .vsd, .vsl, .vss, .vst, .vsu, .vsw, .vsx, .vtx, .wbk, .xla, .xlb, .xlc, .xld, .xlk, .xll, .xlm, .xls, .xlt, .xlv, .xlw |
System Files | .acm, .dll, .ocx, .sys, .vxd |
Temporary Files | .temp, .tmp, ~* |
Text Files | .asc, .text, .txt, .wri |
Web Page Files | .asp, .aspx, .css, .dhtml, .hta, .htm, .html, .mht, .shtml, .url |
You can configure exception paths as well to designate specifically allowed save locations for blocked file types. You can use this feature to allow specific users to save blocked file types to designated locations or to allow all users to save blocked file types to designated locations. As an example, you might want to deter illegal downloading of music and movies within the organization. To do this, you might want to prevent users from saving audio and video files and thereby prevent them from downloading music and movies. However, if your organization has an audio/video department that needs to be able to save audio and video files, you could configure an exception to allow files to be saved on a folder accessible only to members of this group.
You can generate storage reports as part of quota and file screening management. Table 13-5 provides a summary of the available standard storage reports and their purposes. The three general types of storage reports that can be generated based on one of the standard storage reports are:
Incident Reports. Generated automatically when a user tries to save an unauthorized file or when a user exceeds a quota
Scheduled Reports. Generated periodically based on a scheduled report task
On-Demand Reports. Generated manually upon request
Table 13-5. Standard Storage Reports
Description | |
|---|---|
Duplicate Files | Lists files that appear to be duplicates based on the file size and last modification time. Helps reclaim wasted space due to duplication. |
File Screening Audit | Lists file screening audit events on the server for a specified period. Helps identify users and applications that violate screening policies. Report parameters can be set to filter events based on the minimum days since screening event occurred and user. |
Files By File Group | Lists files by file group. Helps identify usage patterns and types of files that are using large amounts of disk space. Report parameters can be set to include or exclude specific file groups. |
Files By Owner | Lists files by users who own them. Helps identify users who use large amounts of disk space. Report parameters can be set to include or exclude specific users as well as specific files by name pattern. |
Large Files | Lists files that are of a specified size or larger. Helps identify files that are using large amounts of disk space. Report parameters can be set to define the minimum file size that is considered as a large file. The default parameters are set so that size 5 MB or larger are considered to be large files. You can include and exclude files only by name pattern. |
Least Recently Accessed Files | Lists files that haven’t been accessed recently. Helps identify files that you might be able to delete or archive. Report parameters can be set to define what constitutes a least recently used file. By default, any file that hasn’t been accessed in the last 90 days is considered to be a least recently used file. You can also include or exclude specific files by name pattern. |
Most Recently Accessed Files | Lists files that have been accessed recently. Helps identify frequently used files. Report parameters can be set to define what constitutes a most recently used file. By default, any file that has been accessed within the last seven days is considered to be a most recently used file. You can also include or exclude specific files by name pattern. |
Quota Usage | Lists the quotas that exceed a minimum quota usage value. Helps identify file usage according to quotas. Report parameters can be set to define the quotas that should be included according to the percentage of the quota limit used. |
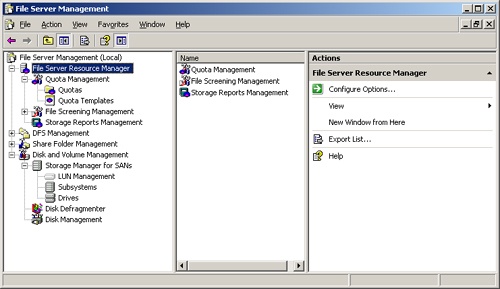
You manage file screening and storage reporting using the File Server Resource Manager snap-in, which is available in the File Server Resource Management and File Server Management consoles as well as custom consoles you create. When you select the File Server Resource Manager node in any of these consoles, you’ll see three additional nodes, as shown in Figure 13-1:
Quota Management. Used to manage the quota features of Windows Server 2003 R2 and discussed in Chapter 14
File Screening Management. Used to manage the file screening features of Windows Server 2003 R2 and discussed in this chapter
Storage Reports Management. Used to manage the storage reporting features of Windows Server 2003 R2 and discussed in this chapter
File screening and storage reporting management can be divided into these key areas:
Global options. Control global settings for file server resources, including e-mail notification, storage report default parameters, report locations, and file screen auditing
File groups. Control the types of file to which screens are applied
File screen templates. Control screening properties (screening type: active or passive, file groups to which screening is applied; notifications: e-mail, event log, or both)
File screens. Control file paths that are screened
File screen exceptions. Control file paths that are screening exceptions
Report generation. Controls whether and how storage reports are generated
Each of these management areas is discussed in the sections that follow.
You use global file resource options to configure e-mail notification, storage report default parameters, report locations, and file screen auditing. You should configure these global settings prior to configuring quotas, file screens, and storage reporting.
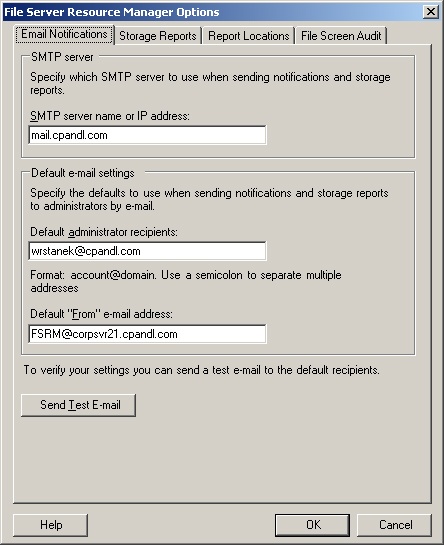
Notifications and storage reports are e-mailed through a Simple Mail Transfer Protocol (SMTP) server. For this process to work, you must designate which organizational SMTP server to use, default administrative recipients, and the From address to be used in mailing notifications and reports. To configure these settings, follow these steps:
In File Server Management, select the File Server Resource Manager node. On the Action menu or in the Actions pane, click Configure Options. This displays the File Server Resource Manager Options dialog box with the Email Notifications tab selected by default, as shown in Figure 13-2.
In the SMTP Server Name Or IP Address text box, type the fully qualified domain name (FQDN) of the organization’s mail server, such as mail.cpandl.com, or the Internet Protocol (IP) address of this server, such as 192.168.10.52.
In the Default Administrator Recipients field, type the name-mail address of the default administrator for notification, such as [email protected]. Typically, you’ll want this to be a separate mailbox that is monitored by an administrator or a distribution list that goes to the specific administrators responsible for file server resource management. You can also enter multiple e-mail addresses. Be sure to separate each e-mail address with a semicolon.
In the Default "From" E-Mail Address field, type the e-mail address you want the server to use in the From field of notification messages. Remember, users as well as administrators may receive notifications.
To test the settings, click Send Test E-Mail. The test e-mail should be delivered to the default administrator recipients almost immediately. If it isn’t, check to ensure that the e-mail addresses used are valid and that the From e-mail address is acceptable to the SMTP server as a valid sender. Click OK.
Each storage report has a default configuration that you can review and modify using File Server Resource Manager Options. Default parameter changes apply to all future incident reports and any existing report tasks that use the default configuration. You’re able to override the default settings as necessary if you subsequently schedule a report task or generate a report on demand.
You can access the standard storage reports and change their default parameters by completing the following steps:
In File Server Management, select the File Server Resource Manager node. On the Action menu or in the Actions pane, click Configure Options. This displays the File Server Resource Manager Options dialog box.
Click the Storage Reports tab.
To review a report’s current settings, select the report name in the Reports list and then click Review Reports.
To modify a report’s default parameters, select the report name in the Reports list and then click Edit Parameters.
When you’re finished, click Close or OK as appropriate.
By default, incident, scheduled, and on-demand reports are stored on the server on which notification is triggered in separate subfolders under %SystemDrive%StorageReports. You can review or modify this configuration by completing the following steps:
In File Server Management, select the File Server Resource Manager node. On the Action menu or in the Actions pane, click Configure Options. This displays the File Server Resource Manager Options dialog box.
Click the Report Locations tab.
The report folders currently in use are listed under Report Locations. To specify a different local folder for a particular report type, type a new folder path or click Browse to search for the folder path you want to use. Click OK.
All file screening activity can be recorded in an auditing database for later review by running a File Screen Auditing Report. This auditing data is tracked on a per server basis, so that the server on which the activity occurs is the one where the activity is audited. To enable or disable file screen auditing, follow these steps:
In File Server Management, select the File Server Resource Manager node. On the Action menu or in the Actions pane, click Configure Options. This displays the File Server Resource Manager Options dialog box.
Click the File Screen Audit tab.
To enable auditing, select the Record File Screening Activity In Auditing Database check box.
To disable auditing, clear the Record File Screening Activity In Auditing Database check box. Click OK.
You use file groups to designate sets of similar file types to which screening can be applied. In File Server Management, you can view the currently defined screening file groups by expanding the File Server Resource Manager and File Screening Management nodes and then selecting File Groups. Table 13-4, shown previously, lists the default file groups and the included file types.
You can modify existing file groups by completing the following steps:
In File Server Management, expand the File Server Resource Manager and File Screening Management nodes and then select File Groups.
Currently defined file groups are listed along with included and excluded files.
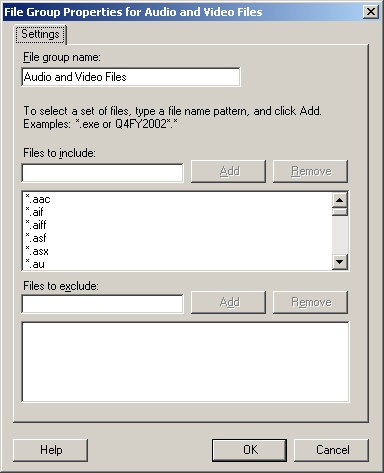
To modify file group properties, double-click the file group name. This displays a related properties dialog box similar to the one shown in Figure 13-3.
In the Files To Include text box, type the file extension of an additional file type to screen, such as .pdf, or the file name pattern, such as Archive*.*. Click Add. Repeat this step to specify other file types to screen.
In the Files To Exclude text box, type the file extension of a file type to exclude from screening, such as .doc, or the file name pattern, such as Report*.*. Click Add. Repeat this step to specify other file types to exclude from screening.
Click OK to save the changes.
You can specify additional file groups to screen by completing the following steps:
In File Server Management, expand the File Server Resource Manager and File Screening Management nodes and then select File Groups.
On the Action menu or in the Actions pane, click Create File Group. This displays the Create File Group Properties dialog box.
In the File Group Name text box, type the name of the file group you’re creating.
In the Files To Include field, type the file extension to screen, such as .pdf, or the file name pattern, such as Archive*.*. Click Add. Repeat this step to specify other file types to screen.
In the Files To Exclude text box, type the file extension to exclude from screening, such as .doc, or the file name pattern, such as Report*.*. Click Add. Repeat this step to specify other file types to exclude from screening.
Click OK to create the file group.
You use file screen templates to define screening properties, including the screening type, the file groups to which screen is applied, and notification. In File Server Management, you can view the currently defined file screen templates by expanding the File Server Resource Manager and File Screening Management nodes and then selecting File Screen Templates. Table 13-3, shown previously, provides a summary of the default file screen templates.
You can modify existing file screen templates by completing the following steps:
In File Server Management, expand the File Server Resource Manager and File Screening Management nodes and then select File Screen Templates.
Currently defined file screen templates are listed by name, screening type, and file groups affected.
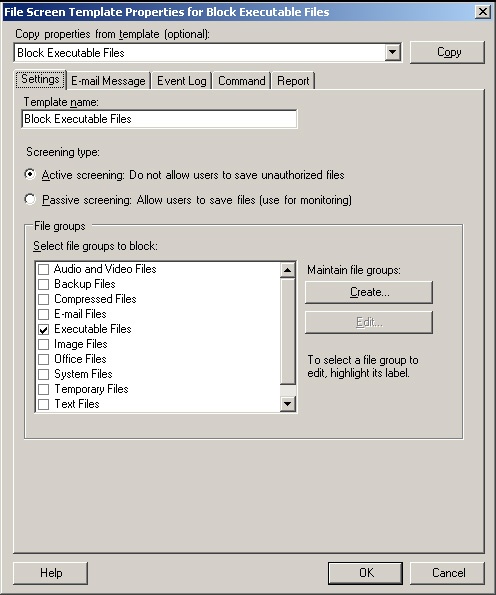
To modify file screen template properties, double-click the file screen template name. This displays a related properties dialog box (shown in Figure 13-4).
In the Settings tab, you can set the template name, screen type, and file groups affected using the text boxes provided.
In the E-Mail Message tab, you can configure notification:
To notify an administrator when the file screen is triggered, select the Send E-Mail To The Following Administrators check box and then type the e-mail address or addresses to use. Be sure to separate multiple e-mail addresses with a semicolon. Use the value [Admin Email] to specify the default administrator as configured previously under the global options.
To notify users, select the Send E-Mail To The User Who Attempted To Save An Unauthorized File check box.
To specify the contents of the notification message, use the Subject and Message Body text boxes. Table 13-6 lists available variables and their meaning.
Table 13-6. File Screen Variables and Their Meaning
Variable Name
Description
[Admin Email]
Inserts the e-mail addresses of the administrators defined under the global options
[File Screen Path]
Inserts the local file path where the user attempted to save the file, such as C:data
[File Screen Remote Path]
Inserts the remote file path where the user attempted to save the file, such as \servershare
[File Screen System Path]
Inserts the canonical file path where the user attempted to save the file, such as \?VolumeGUID
[Server Domain]
Inserts the domain of the server on which the notification occurred
[Server]
Inserts the server on which the notification occurred
[Source File Owner Email]
Inserts the e-mail address of the owner of the unauthorized file
[Source File Owner]
Inserts the user name of the owner of the unauthorized file
[Source File Path]
Inserts the source path of the unauthorized file
[Source Io Owner Email]
Inserts the e-mail address of the user who caused notification
[Source Io Owner]
Inserts the name of the user who caused notification
[Source Process Id]
Inserts the process ID (PID) of the process that caused notification
[Source Process Image]
Inserts the executable for the process that caused notification
[Violated File Group]
Inserts the name of the file group in which the file type is defined as unauthorized
In the Event Log tab, you can configure event logging. Select Send Warning To Event Log to enable logging and then use the Log Entry field to specify the text of the log entry. Table 13-6 lists available variables and their meaning.
In the Report tab, select the Generate Report check box to enable incident reporting and then select the check boxes for the types of reports you want to generate. Incident reports are stored under %SystemDrive%StorageReportsIncident by default and can also be sent to designated administrators. Use the value [Admin Email] to specify the default administrator as configured previously under the global options.
Click OK when you’re finished modifying the template.
You can create a new file screen template by completing the following steps:
In File Server Management, expand the File Server Resource Manager and File Screening Management nodes and then select File Screen Templates.
On the Action menu or in the Actions pane, click Create File Screen Template. This displays the Create File Screen Template dialog box.
Follow Steps 4–8 of the previous procedure.
You use file screens to designate file paths that are screened. In File Server Management, you can view current file screens by expanding the File Server Resource Manager and File Screening Management nodes and then selecting File Screens. Before you define file screens, you should specify screening file groups and file screen templates that you will use, as discussed in the sections of this chapter entitled "Managing the File Groups to Which Screens Are Applied" and "Managing File Screen Templates."
After you’ve defined the necessary file groups and file screen templates, you can create a file screen by completing the following steps:
In File Server Management, expand the File Server Resource Manager and File Screening Management nodes and then select File Screens.
Click Create File Screen on the Action menu or in the Actions pane.
In the Create File Screen dialog box, set the local computer path to screen by clicking Browse and then using the Browse For Folder dialog box to select the path to screen, such as C:Data.
Use the Derive Properties selection list to choose the file screen template that defines the screening properties you want to use.
Click Create.
You use exception paths to specifically designate folder locations where it’s permitted to save blocked file types. Based on the NTFS permissions on the excepted file path, you can use this feature to allow specific users to save blocked file types to designated locations or to allow all users to save blocked file types to designated locations.
You can create a file screen exception by completing the following steps:
In File Server Management, expand the File Server Resource Manager and File Screening Management nodes and then select File Screens.
Click Create File Screen Exception on the Action menu or in the Actions pane.
In the Create File Screen Exception dialog box, set the local path to exclude from screening by clicking Browse and then using the Browse For Folder dialog box to select the path to exclude from screening, such as C:DataImages.
Select the file groups to exclude from screening on the designated path. Click OK.
Incident reports are generated automatically when triggered, as defined in the Reports tab properties of a file screen template (for details, see the section of this chapter entitled "Managing File Screen Templates"). Scheduled and on-demand reports are configured separately. In File Server Management, you can view currently scheduled reports by expanding the File Server Resource Manager node and then selecting Storage Reports Management.
You can schedule reports on a per volume or folder basis by completing the following steps:
In File Server Management, expand the File Server Resource Manager node and then select Storage Reports Management.
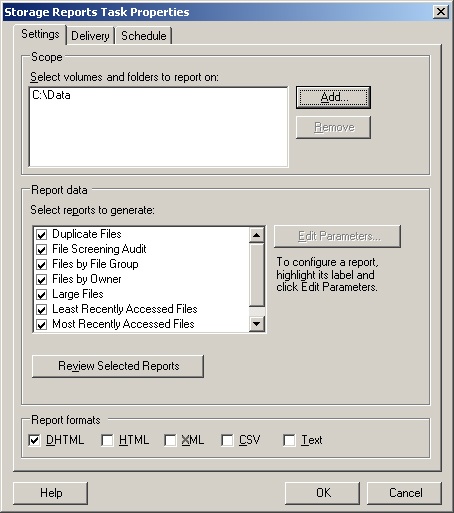
On the Action menu or in the Actions pane, click Schedule A New Report Task. This displays the Storage Reports Task Properties dialog box shown in Figure 13-5.
In the Settings tab under Scope, click Add. Use the Browse For Folder dialog box to select the volume or folder on which you want to generate scheduled storage reports. Repeat to add other volumes or folders.
Under Report Data, select the types of reports to generate.
Under Report Formats, select the format for the report, such as Dynamic HTML (DHTML).
By default, Windows Server 2003 R2 stores scheduled storage reports as they’re generated in the %SystemDrive%StorageReportsScheduled folder. If you’d also like to deliver reports by e-mail to administrators, click the Delivery tab and then select the Send Reports To The Following Administrators check box. Enter the e-mail address or addresses to which reports should be delivered, making sure to separate each e-mail address with a semicolon.
In the Schedule tab, click Create Schedule. In the Schedule dialog box, click New and then define the run schedule for reporting.
Click OK twice to schedule the report task.
You can generate an on-demand report by following these steps:
In File Server Management, expand the File Server Resource Manager node and then select Storage Reports Management.
On the Action menu or in the Actions pane, click Generate Reports Now. This displays the Storage Reports Task Properties dialog box.
In the Settings tab under Scope, click Add. Use the Browse For Folder dialog box to select the volume or folder on which you want to generate the on-demand storage reports. Repeat to add other volumes or folders.
Under Report Data, select the types of reports to generate.
Under Report Formats, select the format for the report, such as DHTML.
Windows Server 2003 stores on-demand storage reports in the %SystemDrive%StorageReportsInteractive folder. If you’d also like to deliver reports by e-mail to administrators, click the Delivery tab and then select the Send Reports To The Following Administrators check box. Enter the e-mail address or addresses to which reports should be delivered, making sure to separate each e-mail address with a semicolon.
Click OK. When prompted, specify whether to wait for the reports to be generated and then display them or to generate the reports in the background for later access. Click OK.