
A key part of your job as an administrator is to create accounts, and this chapter will show you how to do so. User and group accounts allow Microsoft Windows Server 2003 to track and manage information about users, including permissions and privileges. When you create user accounts, the primary account administration tools you use are:
Active Directory Users And Computers, which is designed to administer accounts throughout an Active Directory directory service domain
Local Users And Groups, which is designed to administer accounts on a local computer
Creating domain accounts, as well as local users and groups, is covered in this chapter.
The most important aspects of account creation are account setup and organization. Without the appropriate guidelines and policies, you might quickly find that you need to rework all your user accounts. So, before you create accounts, determine the policies you’ll use for setup and organization.
A key policy you’ll need to set is the naming scheme for accounts. User accounts have display names and logon names. The display name (or full name) is the name displayed to users and the name referenced in user sessions. The logon name is the name used to log on to the domain. Logon names were discussed briefly in the section entitled "Logon Names, Passwords, and Public Certificates" in Chapter 8.
For domain accounts, the display name is normally the concatenation of the user’s first name, middle initial, and last name, but you can set it to any string value. The display names must follow these rules:
Local display names must be unique on an individual computer.
Display names must be unique throughout a domain.
Display names must be no more than 64 characters long.
Display names can contain alphanumeric characters and special characters.
Logon names must follow these rules:
Local logon names must be unique on an individual computer, and global logon names must be unique throughout a domain.
Logon names can be up to 256 characters. However, it isn’t practical to use logon names that are longer than 64 characters.
A pre-Windows 2000 logon name is given to all accounts, which by default is set to the first 20 characters of the Windows logon name. The pre-Windows 2000 logon name must be unique throughout a domain.
Users logging on to the domain with Windows 2000 or later can use their standard logon name or their pre-Windows 2000 logon name, regardless of the domain operations mode.
Logon names can’t contain certain characters. Invalid characters are:
″ / [ ] ; | = , + * ? < >
Logon names can contain all other special characters, including spaces, periods, dashes, and underscores. But, it’s generally not a good idea to use spaces in account names.
You’ll find that most small organizations tend to assign logon names that use the user’s first or last name. But you can have more than one Tom, Dick, or Jane in an organization of any size. So, rather than having to rework your logon naming scheme when you run into problems, select a good naming scheme now and make sure other administrators use it. For naming accounts, you should use a consistent procedure that allows your user base to grow, limits the possibility of name conflicts, and ensures that your accounts have secure names that aren’t easily exploited. If you follow these guidelines, the types of naming schemes you might want to use include:
User’s first name and last initial
User’s first initial and last name
User’s first initial, middle initial, and last name
User’s first initial, middle initial, and first five characters of the last name
User’s first name and last name
Security
In tight security environments, you can assign a numeric code for the logon name. This numeric code should be at least 20 characters long. Combine this strict naming method with smart cards and smart card readers to allow users to quickly log on to the domain without having to type in all those characters. Don’t worry, users can still have a display name that humans can read.
Domain accounts use passwords or private keys from certificates to authenticate access to network resources. This section focuses on passwords.
A password is a case-sensitive string that can contain in excess of 127 characters with Active Directory and up to 14 characters with Windows NT Security Manager. Valid characters for passwords are letters, numbers, and symbols. When you set a password for an account, Windows Server 2003 stores the password in an encrypted format in the account database.
But simply having a password isn’t enough. The key to preventing unauthorized access to network resources is to use secure passwords. The difference between an average password and a secure password is that secure passwords are difficult to guess and crack. You make passwords difficult to guess and crack by using combinations of all the available character types–including lowercase letters, uppercase letters, numbers, and symbols. For example, instead of using happydays for a password, you would use haPPy2Days&, Ha**y!dayS, or even h*PPY%d*ys.
You might also want to use password phrases. With a password phrase, you use multiple words and punctuation, like a sentence, as the password. For example, you might use the password phrase: This problem is 99 times ten! A password phrase that includes punctuation and numbers meets all complexity requirements and is incredibly difficult to crack.
Unfortunately, no matter how secure you initially make a user’s password, eventually the user usually chooses the password. Because of this, you’ll want to set account policies that define a secure password for your systems. Account policies are a subset of the policies configurable as a group policy.
As you know from previous discussions, you can apply group policies at various levels within the network structure. You manage local group policies in the manner discussed in the section entitled "Managing Local Group Policies" in Chapter 4. You manage global group policies as explained in the section of Chapter 4 entitled "Managing Site, Domain, and Organizational Unit Policies."
Account policies should be configured in the highest precedence Group Policy Object (GPO) linked to a domain. By default, the highest precedence GPO linked to a domain is the Default Domain Policy GPO. Once you access the Default Domain Policy GPO or other appropriate GPO, you can set account policies by completing the following steps:
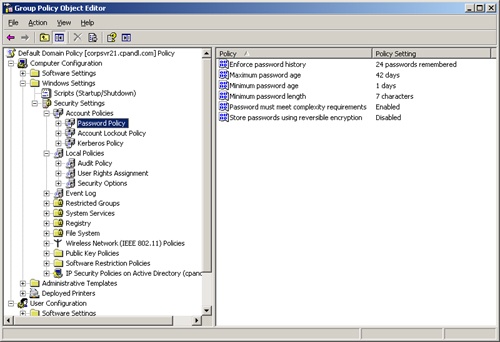
As shown in Figure 9-1, access the Account Policies node within Group Policy. To do so, expand Computer Configuration, then Windows Settings, and then Security Settings.
You can now manage account policies through the Password Policy, Account Lockout Policy, and Kerberos Policy nodes.
To configure a policy, double-click its entry or right-click it and select Properties. This opens a Properties dialog box for the policy.
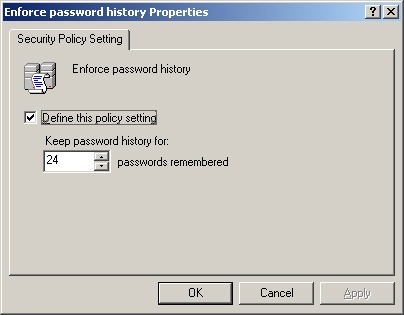
For a local policy, the Properties dialog box is similar to the one shown in Figure 9-2. In domains, the effective policy for the computer is displayed but you can’t change it. For stand-alone servers, you can change the local policy settings, however. Use the fields provided to configure the local policy. For a local policy, skip the remaining steps; those steps apply to global group policies.
For a domain, the Properties dialog box is similar to the one shown in Figure 9-3.
All policies are either defined or not defined. That is, they are either configured for use or not configured for use. A policy that isn’t defined in the current container could be inherited from another container.
Select or clear the Define This Policy Setting check box to determine whether a policy is defined.

Tip
Policies can have additional fields for configuring the policy. Often these fields are option buttons labeled Enabled and Disabled. Enabled turns on the policy restriction. Disabled turns off the policy restriction. Some policies are negations, which means that by enabling them you are actually negating the item. For example, Disable Log On As A Service is the negation of the item Log On As A Service.
Specific procedures for working with account policies are discussed in the sections of this chapter entitled "Configuring Password Policies," "Configuring Account Lockout Policies," and "Configuring Kerberos Policies." This chapter’s next section, "Viewing Effective Policies," teaches you more about viewing the effective policy on a local computer.
When working with account policies and user rights assignment, you’ll often want to view the effective policy on a system and see from where a particular policy setting originates. The effective policy is the policy being enforced, and, as discussed in the section of Chapter 4 entitled "Group Policy Management," the effective policy depends on the order in which you apply the policies.
To view the effective policy on a system and see from where it originates, complete the following steps:
Open the Run dialog box by clicking Start and then selecting Run.
Type mmc in the Open field and then click OK. This opens the Microsoft Management Console (MMC).
In MMC, select File, and then select Add/Remove Snap-In. This opens the Add/Remove Snap-In dialog box.
In the Standalone tab, click Add.
In the Add Standalone Snap-In dialog box, select Resultant Set Of Policy, and then click Add.
Close the Add Standalone Snap-In dialog box by clicking Close, and then click OK.
Right-click the Resultant Set Of Policy node and then select Generate RSoP Data. This starts the Resultant Set Of Policy Wizard. Click Next twice.
To view Computer Configuration policy settings for the local computer, select This Computer. Otherwise, select Another Computer and then type the name of the system to check. Click Browse if you want to use the Select Computer dialog box to find the system you want to use. Click Next.
To view User Configuration policy settings for the current user, select Current User. Otherwise, choose Select A Specific User and then select the account entry for a different user who’s logged on to the system.
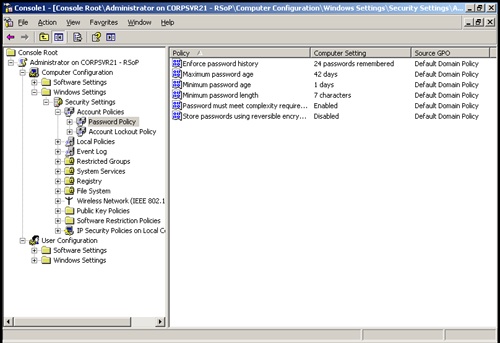
Click Next twice and then click Finish. Now when you access a policy node in the Resultant Set Of Policy console as shown in Figure 9-4, you’ll see the effective setting, listed as the Computer Setting, and the source Group Policy Object (GPO).
As you learned in the previous section, there are three types of account policies: password policies, account lockout policies, and Kerberos policies. The sections that follow show you how to configure each one of these policies.
Password policies control security for passwords, and they are:
The uses of these policies are discussed in the following sections.
Enforce Password History sets how frequently old passwords can be reused. You can use this policy to discourage users from changing among a set of common passwords. Windows Server 2003 can store up to 24 passwords for each user in the password history.
To disable this feature, set the size of the password history to zero. To enable this feature, set the size of the password history using the Passwords Remembered field. Windows Server 2003 then tracks old passwords using a password history that’s unique for each user, and users aren’t allowed to reuse any of the stored passwords.
Note
To discourage users from bypassing Enforce Password History, you shouldn’t allow them to change passwords immediately. This prevents users from changing their passwords several times to get back to their old passwords. You set the time required to keep a password with the Minimum Password Age policy, as discussed in the next section.
Maximum Password Age determines how long users can keep a password before they have to change it. The aim is to force users to change their passwords periodically. When you use this feature, set a value that makes sense for your network. Generally, you use a shorter period when security is very important and a longer period when security is less important.
You can set the maximum password age to any value from 0 to 999. A value of zero specifies that passwords don’t expire. Although you might be tempted to set no expiration date, users should change passwords regularly to ensure the network’s security. Where security is a concern, good values are 30, 60, or 90 days. Where security is less important, good values are 120, 150, or 180 days.
Minimum Password Age determines how long users must keep a password before they can change it. You can use this field to prevent users from bypassing the password system by entering a new password and then changing it right back to the old one.
If the minimum password age is set to zero, users can change their passwords immediately. To prevent this, set a specific minimum age. Reasonable settings are from three to seven days. In this way you make sure that users are less inclined to switch back to an old password but are able to change their passwords in a reasonable amount of time if they want to. Keep in mind that a minimum password age could prevent a user from changing a compromised password. If a user can’t change the password, then an administrator will have to do it for them.
Minimum Password Length sets the minimum number of characters for a password. If you haven’t changed the default setting, you’ll want to do so immediately. The default in some cases is to allow empty passwords (passwords with zero characters), which is definitely not a good idea.
For security reasons you’ll generally want passwords of at least eight characters. The reason for this is that long passwords are usually harder to crack than short ones. If you want greater security, set the minimum password length to 14 characters.
Beyond the basic password and account policies, Windows Server 2003 includes facilities for creating additional password controls. These facilities enforce the use of secure passwords that follow these guidelines:
Passwords must be at least six characters long.
Passwords can’t contain the user name, such as stevew, or parts of the user’s full name, such as steve.
Passwords must use at least three of the four available character types: lowercase letters, uppercase letters, numbers, and symbols.
To enforce these rules, enable Passwords Must Meet Complexity Requirements. Passwords are then required to meet the security requirements listed previously.
Passwords in the password database are encrypted. This encryption normally can’t be reversed. The only time you’d want to change this setting is if your organization uses applications that need to be able to read the password. If this is the case, you could enable Store Password Using Reversible Encryption For All Users In The Domain. With this policy enabled, passwords might as well be stored as plain text. It presents the same security risks. With this in mind, a much better technique would be to enable the option on a per-user basis and then only as required to meet the user’s actual needs.
Account lockout policies control how and when accounts are locked out of the domain or the local system. These policies are:
Account Lockout Threshold
Account Lockout Duration
Reset Account Lockout Counter After
Account Lockout Threshold sets the number of logon attempts that are allowed before an account is locked out. If you decide to use lockout controls, you should set this field to a value that balances the need to prevent account cracking against the needs of users who are having difficulty accessing their accounts.
The main reason users might not be able to access their accounts properly the first time is that they forgot their passwords. If this is the case, it might take them several attempts to log on properly. Workgroup users could also have problems accessing a remote system where their current passwords don’t match the passwords that the remote system expects. If this happens, the remote system might record several bad logon attempts before the user ever gets a prompt to enter the correct password. The reason is that Windows Server 2003 might attempt to automatically log on to the remote system. In a domain environment, this normally doesn’t happen because of the Single Log-On feature.
You can set the lockout threshold to any value from 0 to 999. The lockout threshold is set to zero by default, which means that accounts won’t be locked out because of invalid logon attempts. Any other value sets a specific lockout threshold. Keep in mind that the higher the lockout value, the higher the risk that a hacker might be able to break into your system. A reasonable range of values for this threshold is between 7 and 15. This is high enough to rule out user error and low enough to deter hackers.
If someone violates the lockout controls, Account Lockout Duration sets the length of time the account is locked. You can set the lockout duration to a specific length of time using a value between 1 and 99,999 minutes or to an indefinite length of time by setting the lockout duration to zero.
The best security policy is to lock the account indefinitely. When you do, only an administrator can unlock the account. This prevents hackers from trying to access the system again and forces users who are locked out to seek help from an administrator, which is usually a good idea. By talking to the user, you can determine what the user is doing wrong and help the user avoid problems.
Every time a logon attempt fails, Windows Server 2003 raises the value of a threshold that tracks the number of bad logon attempts. To balance potential lockouts due to valid security concerns against lockouts that could occur due to simple human error, there’s another policy that determines how long to maintain information regarding bad logon attempts. This policy is called Reset Account Lockout Counter After, and it’s used to reset the bad logon attempts counter to zero after a certain waiting period. The way the policy works is simple: if the waiting period for Reset Account Lockout Counter After has elapsed since the last bad logon attempt, the bad logon attempts counter is reset to zero. The bad logon attempts counter is also reset when a user logs on successfully.
If the Reset Account Lockout Counter After policy is enabled, you can set any value from 1 to 99,999 minutes. As with Account Lockout Threshold, you need to select a value that balances security needs against user access needs. A good value is from one to two hours. This waiting period should be long enough to force hackers to wait longer than they want to before trying to access the account again.
If the Reset Account Lockout Counter After policy isn’t set or is disabled, the bad logon attempts counter is reset only when a user successfully logs on.
Kerberos v5 is the primary authentication mechanism used in an Active Directory domain. To verify the identification of users and network services, Kerberos uses tickets. Tickets contain encrypted data that confirm identity for the purposes of authentication and authorization.
You can control ticket duration, renewal, and enforcement with the following policies:
These policies are discussed in the sections that follow.
Security
Only administrators with an intimate understanding of Kerberos security should change these policies. If you change these policies to inefficient settings, you might cause serious problems on the network. The default Kerberos policy settings usually work just fine.
Enforce User Logon Restrictions ensures that any restrictions placed on a user account are enforced. For example, if the user’s logon hours are restricted, this policy is what enforces the restriction. By default, the policy is enabled and you should disable it only in rare circumstances.
Maximum Lifetime For Service Ticket and Maximum Lifetime For User Ticket set the maximum duration for which a service or user ticket is valid. By default, service tickets have a maximum duration of 600 minutes and user tickets have a maximum duration of 10 hours.
You can change the duration of tickets. For service tickets, the valid range is from 0 to 99,999 minutes. For user tickets, the valid range is from 0 to 99,999 hours. A value of zero effectively turns off expiration. Any other value sets a specific ticket lifetime.
A user ticket that expires can be renewed, provided the renewal takes place within the time set for Maximum Lifetime For User Ticket Renewal. By default, the maximum renewal period is seven days. You can change the renewal period to any value from 0 to 99,999 days. A value of zero effectively turns off the maximum renewal period, and any other value sets a specific renewal period.
Maximum Tolerance For Computer Clock Synchronization is one of the few Kerberos policies that you might need to change. By default, computers in the domain must be synchronized within five minutes of one another. If they aren’t, authentication fails.
If you have remote users who log on to the domain without synchronizing their clock to the network time server, you might need to adjust this value. You can set any value from 0 to 99,999. A value of zero says that there’s no tolerance for a time difference, which means the remote user’s system must be precisely time-synchronized or authentication will fail.
Chapter 8 covered built-in capabilities and user rights. Although you can’t change built-in capabilities for accounts, you can administer user rights for accounts. Normally, you apply user rights to users by making them members of the appropriate group or groups. You can also apply rights directly, and you do this by managing the user rights for the user’s account.
Security
Any user who’s a member of a group that’s assigned a certain right also has that right. For example, if the Backup Operators group has a right and jsmith is a member of this group, jsmith has this right as well. Keep in mind that changes that you make to user rights can have a far-reaching effect. Because of this, only experienced administrators should make changes to the user rights policy.
You assign user rights through the Local Policies node of Group Policy. As the name implies, local policies pertain to a local computer. However, you can configure local policies and then import them into Active Directory. You can also configure these local policies as part of an existing group policy for a site, domain, or organizational unit. When you do this, the local policies apply to computer accounts in the site, domain, or organizational unit.
To administer user rights policies, complete the following steps:
Access the group policy you want to work with, and then access the Local Policies node by working your way down the console tree. To do so, expand Computer Configuration, Windows Settings, Security Settings, and then Local Policies.
Select User Rights Assignment and you can now manage user rights. To configure a user rights assignment, double-click a user right or right-click it and select Properties. This opens a Properties dialog box.
You can now configure the user rights as described in Steps 1–4 of the section entitled "Configuring User Rights Locally," later in this chapter, or in Steps 1–6 of the following section.
For a site, domain, or organizational unit, you configure individual user rights by completing the following steps:
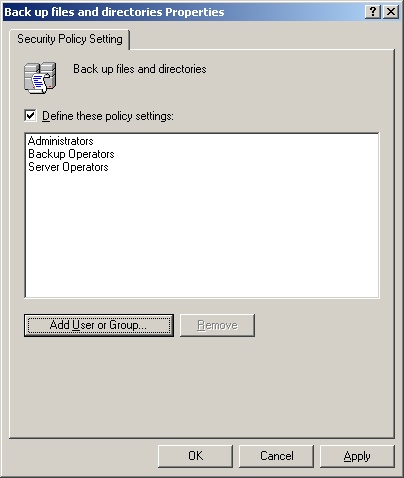
Open the Properties dialog box for the user right, which will be similar to the one shown in Figure 9-5. If the policy isn’t defined, select Define These Policy Settings.
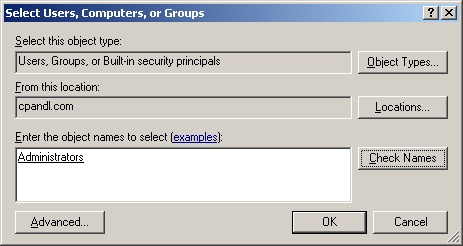
To apply the right to a user or group, click Add User Or Group. Then, in the Add User Or Group dialog box, click Browse. This opens the Select Users, Computers, Or Groups dialog box shown in Figure 9-6.
Figure 9-6. Use the Select Users, Computers, Or Groups dialog box to apply the user right to users and groups.
Security
Windows Firewall running on a domain controller might prevent you from using the Select Users, Computers, Or Groups dialog box. This can occur when you aren’t logged on locally to the domain controller and are working remotely. You might need to configure an exception on the domain controller for incoming Transmission Control Protocol (TCP) port 445. You can do this by expanding Computer ConfigurationAdministrative TemplatesNetworkNetwork ConnectionsWindows FirewallDomain Profile. In the details pane, double-click Windows Firewall: Allow Remote Administration Exception policy and then select Enabled. Alternatively, you can configure an exception by typing the following at a command prompt on the remote computer: netsh firewall set portopening tcp 445 smb enable. See Microsoft Knowledge Base Article 840634 (http://support.microsoft.com/default.aspx?scid=kb;en-us;840634) for more details.
Type the name of the user or group you want to use in the field provided and then click Check Names. By default, the search is configured to find built-in security principals and user accounts. To add groups to the search, click Object Types in the list box, select Groups, and then click OK.
After you select the account names or groups to add, click OK. The Add User Or Group dialog box should now show the selected accounts. Click OK again.
The Properties dialog box is updated to reflect your selections. If you made a mistake, select a name and remove it by clicking Remove.
When you’re finished granting the right to users and groups, click OK.
For local computers, you apply user rights by completing the following steps:
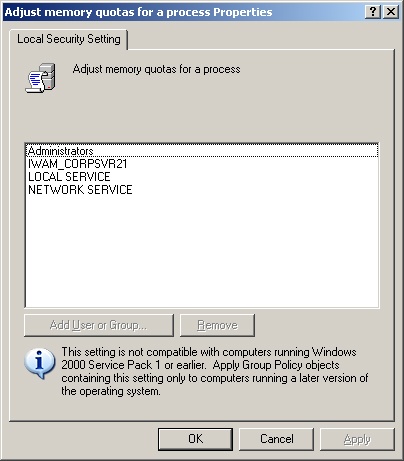
Open the Properties dialog box for the user right, which will be similar to the one shown in Figure 9-7.
Remember that site, domain, and organizational unit policies have precedence over local policies.
The Properties dialog box shows current users and groups that have been given a user right. To remove the user right, select a user or group and click Remove.
You can apply the user right to additional users and groups by clicking Add User Or Group. This opens the Select Users, Computers, Or Groups dialog box shown previously in Figure 9-6. You can now add users and groups.
You need to create a user account for each user who wants to use your network resources. You create domain user accounts with Active Directory Users And Computers. You create local user accounts with Local Users And Groups.
Generally, there are two ways to create new domain accounts:
Create a completely new user account. Create a completely new account by right-clicking the container in which you want to place the user account, selecting New, and then selecting User. This opens the New Object - User wizard shown in Figure 9-8. When you create a new account, the default system settings are used.
Base the new account on an existing account. Right-click the user account you want to copy in Active Directory Users And Computers, and then select Copy. This starts the Copy Object - User wizard, which is essentially the same as the New Object - User wizard. However, when you create a copy of an account, the new account gets most of its environment settings from the existing account. For more information on copying accounts, see the section entitled "Copying Domain User Accounts" in Chapter 10.
When either the New Object - User wizard or the Copy Object - User wizard is started, you can create the account by completing the following steps:
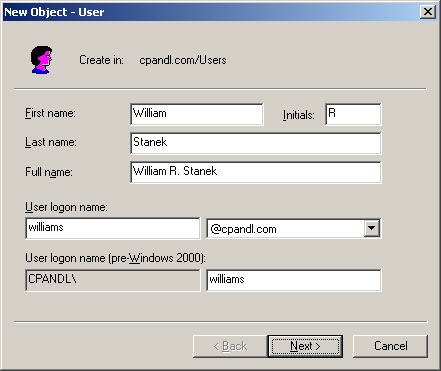
As shown in Figure 9-8, the first wizard page lets you configure the user display name and logon name.
Type the user’s first name, middle initial, and last name in the fields provided. These fields are used to create the full name, which is the user’s display name.
Make changes to the Full Name field as necessary. For example, you might want to type the name in LastName FirstName MiddleInitial format or in FirstName MiddleInitial LastName format. The full name must be unique in the domain and must be 64 characters or less.
In User Logon Name, type the user’s logon name. Then use the drop-down list to select the domain with which the account is to be associated. This sets the fully qualified logon name.
The first 20 characters of the logon name are used to set the pre-Windows 2000 logon name. This logon name must be unique in the domain. If necessary, change the pre-Windows 2000 logon name.
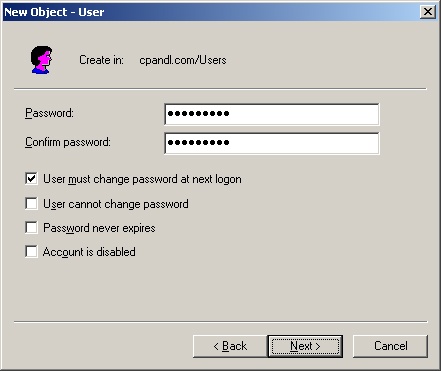
Click Next. Then configure the user’s password using the wizard page shown in Figure 9-9. The options for this page are used as follows:
Password. The password for the account. This password should follow the conventions of your password policy.
Confirm Password. A field to ensure that you assign the account password correctly. Simply reenter the password to confirm it.
User Must Change Password At Next Logon. If selected, the user must change the password upon logon.
User Cannot Change Password. If checked, the user can’t change the password.
Password Never Expires. If selected, the password for this account never expires. This setting overrides the domain account policy. Generally, it’s not a good idea to set a password so it doesn’t expire because this defeats the purpose of having passwords in the first place.
Account Is Disabled. If checked, the account is disabled and can’t be used. Use this field to temporarily prevent anyone from using an account.
Click Next and then click Finish to create the account. If there are problems creating the account, you’ll see a warning and you’ll need to use the Back button to retype information in the user name and password pages, as necessary.
After you create the account, you can set advanced properties for the account as discussed later in this chapter.
You create local user accounts with Local Users And Groups. You can access this utility and create an account by completing the following steps:
Choose Start, All Programs, Administrative Tools, and then Computer Management. Or select Computer Management in the Administrative Tools folder.
Right-click the Computer Management entry in the console tree and select Connect To Another Computer on the shortcut menu. You can now choose the system whose local accounts you want to manage. Domain controllers don’t have local users and groups.
Expand the System Tools node by clicking the plus sign (+) next to it, and then choose Local Users And Groups.
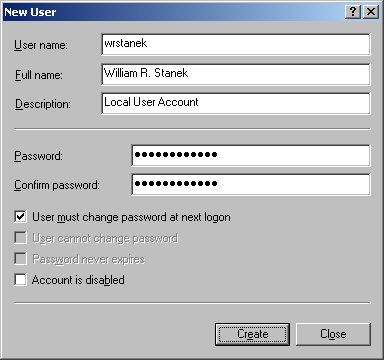
Right-click Users and then select New User. This opens the New User dialog box shown in Figure 9-10. You use each of the fields in the dialog box as follows:
User Name. The logon name for the user account. This name should follow the conventions for the local user name policy.
Full Name. The full name of the user, such as William R. Stanek.
Description. A description of the user. Normally, you’d type the user’s job title, such as Webmaster. You could also type the user’s job title and department.
Password. The password for the account. This password should follow the conventions of your password policy.
Confirm Password. A field to ensure that you assign the account password correctly. Simply reenter the password to confirm it.
User Must Change Password At Next Logon. If selected, the user must change the password upon logon.
User Cannot Change Password. If checked, the user can’t change the password.
Password Never Expires. If selected, the password for this account never expires. This setting overrides the local account policy.
Account Is Disabled. If checked, the account is disabled and can’t be used. Use this field to temporarily prevent anyone from using an account.
Click Create when you’re finished configuring the new account.
You use group accounts to manage privileges for multiple users. You create global group accounts in Active Directory Users And Computers. You create local group accounts in Local Users And Groups.
As you set out to create group accounts, remember that you create group accounts for similar types of users. Following this, the types of groups you might want to create include the following:
Groups for departments within the organization. Generally, users who work in the same department need access to similar resources. Because of this, you can create groups that are organized by department, such as Business Development, Sales, Marketing, or Engineering.
Groups for users of specific applications. Often users will need access to an application and resources related to the application. If you create application-specific groups, you can be sure that users get proper access to the necessary resources and application files.
Groups for roles within the organization. Groups could also be organized by the user’s role within the organization. For example, executives probably need access to different resources than supervisors and general users. Thus, by creating groups based on roles within the organization, you can ensure that proper access is given to the users who need it.
To create a global group, complete the following steps:
Start Active Directory Users And Computers. Right-click the container in which you want to place the user account. Afterward, select New, and then select Group. This opens the New Object - Group dialog box shown in Figure 9-11.
Type a name for the group. Global group account names follow the same naming rules as display names for user accounts. They aren’t case sensitive and can be up to 64 characters long.
The first 20 characters of the group name are used to set the pre-Windows 2000 group name. This group name must be unique in the domain. If necessary, change the pre-Windows 2000 group name.
Select a group scope, either Domain Local, Global, or Universal.
Universal groups are available only when Active Directory is running in Windows 2000 native operations mode or in Windows Server 2003 operations mode. For more information on operations modes, see the section entitled "Using Windows NT and Windows 2000 Domains with Active Directory" in Chapter 6.
Select a group type, either Security or Distribution.
Click OK to create the group. After the account is created, you can add members and set additional properties, as discussed later in this chapter.

You create local groups with Local Users And Groups. You can access this utility and create a group by completing the following steps:
Choose Start, then Programs or All Programs as appropriate, then Administrative Tools, and then Computer Management. Or select Computer Management in the Administrative Tools folder.
Right-click the Computer Management entry in the console tree and select Connect To Another Computer on the shortcut menu. You can now choose the system whose local accounts you want to manage. Domain controllers don’t have local users and groups.
Expand the System Tools node by clicking the plus sign (+) next to it and then choose Local Users And Groups.
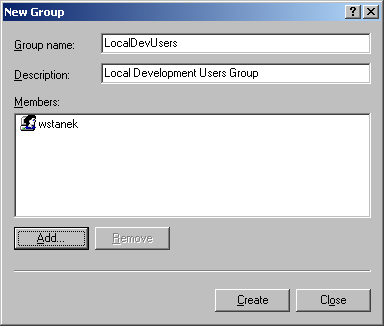
Right-click Groups and then select New Group. This opens the New Group dialog box shown in Figure 9-12.
After you type a name and description of the group, use the Add button to add names to the group. This opens the Select Users dialog box.
In the Select Users dialog box, type the name of a user you want to use in the Name field and then click Check Names. If matches are found, select the account you want to use and then click OK. If no matches are found, update the name you entered and try searching again. Repeat this step as necessary, and then click OK when you are finished.
The New Group dialog box is updated to reflect your selections. If you made a mistake, select a name and remove it by clicking Remove.
Click Create when you’ve finished adding or removing group members.
To configure group membership, you use Active Directory Users And Computers. When working with groups, keep the following points in mind:
All new domain users are members of the group Domain Users, and their primary group is specified as Domain Users.
All new domain workstations and member servers are members of Domain Computers, and their primary group is Domain Computers.
All new domain controllers are members of Domain Controllers and their primary group is Domain Controllers.
Active Directory Users And Computers gives you several ways to manage group membership. You can:
Manage individual membership.
Manage multiple memberships.
Set primary group membership for individual users and computers.
You can add or remove group membership for any type of account by completing the following steps:
Double-click the user, computer, or group entry in Active Directory Users And Computers. This opens the account’s Properties dialog box.
Click the Member Of tab.
To make the account a member of a group, click Add. This opens the Select Groups dialog box, which is the same as the Select Users Or Groups dialog box discussed in previous examples. You can now choose groups of which the currently selected account should be a member.
To remove the account from a group, select a group and then click Remove. Click OK.
If you’re working exclusively with user accounts, you can add users to groups by following these steps:
Another way to manage group membership is to use a group’s Properties dialog box to add or remove multiple accounts. To do this, follow these steps:
Double-click the group entry in Active Directory Users And Computers. This opens the group’s Properties dialog box.
Click the Members tab.
To add accounts to the group, click Add. This opens the Select Users, Computers, Or Groups dialog box. You can now choose users, computers, and groups that should be members of this currently selected group.
To remove members from a group, select an account and then click Remove. Click OK.
Users who access Windows Server 2003 through services for Macintosh use primary groups. When a Macintosh user creates files or directories on a system running Windows Server 2003, the primary group is assigned to these files or directories.
All user and computer accounts must have a primary group whether or not the accounts access Windows Server 2003 systems through Macintosh. This group must be a group with global or universal scope, such as the global group Domain Users or the global group Domain Computers.
To set the primary group, complete the following steps:
Double-click the user or computer entry in Active Directory Users And Computers. This opens the account’s Properties dialog box.
Click the Member Of tab.
Select a group with global or universal scope in the Member Of list box.
Click Set Primary Group.
All users must be a member of at least one primary group. You can’t revoke membership in a primary group without first assigning the user to another primary group. To do this, complete the following steps:
Select a different group with global or universal scope in the Member Of list box, and then click Set Primary Group.
In the Member Of list box, click the former primary group and then click Remove. The group membership is now revoked.
In the Member Of list box, click the former primary group and then click Remove. The group membership is now revoked.