
This chapter discusses the techniques you’ll use to set up and manage Domain Name System (DNS) on a network. DNS is a name resolution service that resolves computer names to Internet Protocol (IP) addresses. Using DNS, the fully qualified host name omega.microsoft.com, for example, could be resolved to an IP address, which enables computers to find one another. DNS operates over the Transmission Control Protocol/Internet Protocol (TCP/IP) protocol stack and can be integrated with Windows Internet Name Service (WINS), Dynamic Host Configuration Protocol (DHCP), and Active Directory directory service. Full integration with these Microsoft Windows networking features allows you to optimize DNS for Microsoft Windows Server 2003 domains.
DNS organizes groups of computers into domains. These domains are organized into a hierarchical structure, which can be defined on an Internet-wide basis for public networks or on an enterprise-wide basis for private networks (also known as intranets and extranets). The various levels within the hierarchy identify individual computers, organizational domains, and top-level domains. For the fully qualified host name omega.microsoft.com, omega represents the host name for an individual computer, microsoft is the organizational domain, and com is the top-level domain.
Top-level domains are at the root of the DNS hierarchy and are therefore also called root domains. These domains are organized geographically, by organization type, and by function. Normal domains, such as microsoft.com, are also referred to as parent domains. They’re called parent domains because they’re the parents of an organizational structure. Parent domains can be divided into subdomains, which can be used for groups or departments within an organization.
Subdomains are often referred to as child domains. For example, the fully qualified domain name (FQDN) for a computer within a human resources group could be designated as jacob.hr.microsoft.com. Here, jacob is the host name, hr is the child domain, and microsoft.com is the parent domain.
As stated in Chapter 6, Active Directory domains use DNS to implement their naming structure and hierarchy. Active Directory and DNS are tightly integrated, so much so that you must install DNS on the network before you can install Active Directory.
During installation of the first domain controller on an Active Directory network, you’ll have the opportunity to automatically install DNS if a DNS server can’t be found on the network. You’ll also be able to specify whether DNS and Active Directory should be integrated fully. In most cases, you should respond affirmatively to both requests. With full integration, DNS information is stored directly in Active Directory. This allows you to take advantage of Active Directory’s capabilities. The difference between partial integration and full integration is very important:
Partial integration. With partial integration, the domain uses standard file storage. DNS information is stored in text-based files that end with the .dns extension, and the default location of these files is %SystemRoot%System32Dns. Updates to DNS are handled through a single authoritative DNS server. This server is designated as the primary DNS server for the particular domain or area within a domain called a zone. Clients that use dynamic DNS updates through DHCP must be configured to use the primary DNS server in the zone. If they aren’t, their DNS information won’t be updated. Likewise, dynamic updates through DHCP can’t be made if the primary DNS server is offline.
Full integration. With full integration, the domain uses directory-integrated storage. DNS information is stored directly in Active Directory and is available through the container for the dnsZone object. Because the information is part of Active Directory, any domain controller can access the data and a multimaster approach can be used for dynamic updates through DHCP. This allows any domain controller running the DNS Server service to handle dynamic updates. Furthermore, clients that use dynamic DNS updates through DHCP can use any DNS server within the zone. An added benefit of directory integration is the ability to use directory security to control access to DNS information.
When you look at the way DNS information is replicated throughout the network, you see more advantages to full integration with Active Directory. With partial integration, DNS information is stored and replicated separately from Active Directory. By having two separate structures, you reduce the effectiveness of both DNS and Active Directory and make administration more complex. Because DNS is less efficient than Active Directory at replicating changes, you might also increase network traffic and the amount of time it takes to replicate DNS changes throughout the network.
To enable DNS on the network, you need to configure DNS clients and servers. When you configure DNS clients, you tell the clients the IP addresses of DNS servers on the network. Using these addresses, clients can communicate with DNS servers anywhere on the network, even if the servers are on different subnets.
When the network uses DHCP, you should configure DHCP to work with DNS. To do this, you need to set the DHCP scope options 006 DNS Servers and 015 DNS Domain Name as specified in the section entitled "Setting Scope Options" in Chapter 18.
Additionally, if computers on the network need to be accessible from other Active Directory domains, you need to create records for them in DNS. DNS records are organized into zones, where a zone is simply an area within a domain.
Note
Configuring a DNS client is explained in the section entitled "Configuring DNS Resolution" in Chapter 16. Configuring a DNS server is explained in the following section of this chapter.
You can configure any Windows Server 2003 system as a DNS server. Four types of DNS servers are available:
Active Directory–integrated primary server. A DNS server that’s fully integrated with Active Directory. All DNS data is stored directly in Active Directory.
Primary server. The main DNS server for a domain that uses partial integration with Active Directory. This server stores a master copy of DNS records and the domain’s configuration files. These files are stored as text with the .dns extension.
Secondary server. A DNS server that provides backup services for the domain. This server stores a copy of DNS records obtained from a primary server and relies on zone transfers for updates. Secondary servers obtain their DNS information from a primary server when they’re started, and they maintain this information until the information is refreshed or expired.
Forwarding-only server. A server that caches DNS information after lookups and always passes requests to other servers. These servers maintain DNS information until it’s refreshed or expired or until the server is restarted. Unlike secondary servers, forwarding-only servers don’t request full copies of a zone’s database files. This means that when you start a forwarding-only server, its database contains no information.
Before you configure a DNS server, you must install the DNS Server service. Afterward, you can configure the server to provide integrated, primary, secondary, or forwarding-only DNS services.
All domain controllers can act as DNS servers, and you might be prompted to install and configure DNS during installation of the domain controller. If you responded affirmatively to the prompts, DNS is already installed and the default configuration is set automatically. You don’t need to reinstall.
If you’re working with a member server instead of a domain controller or if you haven’t installed DNS, complete the following steps to install DNS:
Click Start, choose Programs or All Programs, Administrative Tools, and then select Configure Your Server Wizard. Click Next.
Click Next. All the possible server roles are shown with an indication of which roles have already been configured. Select DNS Server and then click Next.
Click Next. The wizard installs DNS and begins configuring the server. As necessary, insert the Windows Server 2003 CD when prompted.
The Configure A DNS Server Wizard starts. Click Next.
Select Configure Root Hints Only to specify that only the base DNS structures should be created at this time.
Click Next. The wizard searches for existing DNS structures and modifies them as necessary.
Click Finish twice. Close the Manage Your Server console.
From now on, DNS should start automatically each time you reboot the server. If it doesn’t start, you’ll need to start it manually. See the section of this chapter entitled "Starting and Stopping a DNS Server."
Every domain should have a primary DNS server. This server can be integrated with Active Directory or it can act as a standard primary server. Primary servers should have forward lookup zones and reverse lookup zones. Forward lookups are used to resolve domain names to IP addresses. Reverse lookups are needed to authenticate DNS requests by resolving IP addresses to domain names or hosts.
After you install the DNS Server service on the server, you can configure a primary server by completing the following steps:
Start the DNS console. Click the Start menu, select Programs or All Programs as appropriate, choose Administrative Tools, and then select DNS. This displays the DNS console shown in Figure 20-1.
If the server you want to configure isn’t listed in the tree view, you’ll need to connect to the server. Right-click DNS in the tree view and then choose Connect To DNS Server. Now do one of the following:
An entry for the DNS server should be listed in the tree view window of the DNS console. Right-click the server entry and then, from the shortcut menu, select New Zone. This starts the New Zone Wizard. Click Next.
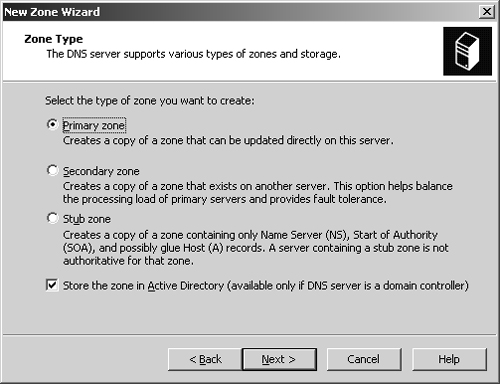
As Figure 20-2 shows, you can now select the zone type. If you’re configuring a primary server integrated with Active Directory (domain controller), select Primary Zone and ensure that the Store The Zone In Active Directory check box is selected. If you don’t want to integrate DNS with Active Directory, select Primary Zone and then clear the Store The Zone In Active Directory check box. Click Next.
If you’re integrating the zone with Active Directory, choose a replication strategy; otherwise, proceed to Step 6.
To All DNS Servers In The Active Directory Forest. Choose this strategy if you want the widest replication strategy. Remember, the Active Directory forest includes all domain trees that share the directory data with the current domain.
To All DNS Servers In The Active Directory Domain. Choose this strategy if you want to replicate DNS information within the current domain and child domains of the current domain.
To All Domain Controllers In The Active Directory Domain. Choose this strategy if you want to replicate DNS information to all domain controllers within the current domain and child domains of the current domain. Although this strategy gives wider replication for DNS information within the domain, not every domain controller is a DNS server as well (and you don’t need to configure every domain controller as a DNS server either).
Click Next. Select Forward Lookup Zone and then click Next.
Type the full DNS name for the zone. The zone name should help determine how the server or zone fits into the DNS domain hierarchy. For example, if you’re creating the primary server for the microsoft.com domain, you should type microsoft.com as the zone name. Click Next.
If you’re configuring a primary zone that isn’t integrated with Active Directory, you need to set the zone file name. A default name for the zone’s DNS database file should be filled in for you. You can use this name or type a new file name. Click Next.
Specify whether dynamic updates are allowed. You have three options:
Allow Only Secure Dynamic Updates. When the zone is integrated with Active Directory, you can use access control lists (ACLs) to restrict which clients can perform dynamic updates. With this option selected, only clients with authorized computer accounts and approved ACLs can dynamically update their resource records in DNS when changes occur.
Allow Both Nonsecure And Secure Dynamic Updates. Choose this option to allow any client to update its resource records in DNS when changes occur. Clients can be secure or nonsecure.
Do Not Allow Dynamic Updates. Choosing this option disables dynamic updates in DNS. You should use this option only when the zone isn’t integrated with Active Directory.
Click Next and then click Finish to complete the process. The new zone is added to the server and basic DNS records are created automatically.
A single DNS server can provide services for multiple domains. If you have multiple parent domains, such as microsoft.com and msn.com, you can repeat this process to configure other forward lookup zones. You also need to configure reverse lookup zones. Follow the steps listed later in the chapter in the section entitled "Configuring Reverse Lookups."
You need to create additional records for any computers you want to make accessible to other DNS domains. To do this, follow the steps listed later in this chapter in the section entitled "Managing DNS Records."

Real World
Most organizations have private and public areas of their network. The public network areas might be where Web, File Transfer Protocol (FTP), and external e-mail servers reside. Your organization’s public network areas shouldn’t allow unrestricted access. Instead, they should be configured as a part of perimeter networks (also known as DMZs, demilitarized zones, and screened subnets) and refer to areas protected by your organization’s firewall that have restricted external access and no access to the internal network or be in a completely separate and firewall-protected area.
The private network areas are where the organization’s internal servers and workstations reside. On the public network areas, your DNS settings are in the public Internet space. Here, you might use a .com, .org, or .net DNS name that you’ve registered with an Internet registrar and public IP addresses that you’ve purchased or leased. On the private network areas, your DNS settings are in the private network space. Here, you might use adatum.com as your organization’s DNS name and private IP addresses as discussed in the section of Chapter 16 entitled "Configuring TCP/IP Networking."
Secondary servers provide backup DNS services on the network. If you’re using full Active Directory integration, you don’t really need to configure secondaries. Instead, you should configure multiple domain controllers to handle DNS services. Active Directory replication will then handle replicating DNS information to your domain controllers. On the other hand, if you’re using partial integration, you might want to configure secondaries to lessen the load on the primary server. On a small or medium-sized network, you might be able to use the name servers of your Internet service provider (ISP) as secondaries; in this case, you should contact your ISP to configure secondary DNS services for you.
Because secondary servers use forward lookup zones for most types of queries, reverse lookup zones might not be needed. But reverse lookup zone files are essential for primary servers, and they must be configured for proper domain name resolution.
If you want to set up your own secondaries for backup services and load balancing, follow these steps:
Start the DNS console and connect to the server you want to configure, as described previously.
Right-click the server entry and then, from the shortcut menu, select New Zone. This starts the New Zone Wizard. Click Next.
For Zone Type, select Secondary Zone. Click Next.
Secondary servers can use both forward and reverse lookup zone files. You’ll create the forward lookup zone first, so select Forward Lookup Zone and then click Next.
Type the full DNS name for the zone then click Next.
Type the IP address of the primary server for the zone and then click Add. If you want to copy zone data from other servers in case the first server isn’t available, repeat this step.
Click Next and then click Finish.
On a busy or large network, you might need to configure reverse lookup zones on secondaries. If so, follow the steps listed in the following section of this chapter, "Configuring Reverse Lookups."
Forward lookups are used to resolve domain names to IP addresses. Reverse lookups are used to resolve IP addresses to domain names. Each segment on your network should have a reverse lookup zone. For example, if you have the subnets 192.168.10.0, 192.168.11.0, and 192.168.12.0, you should have three reverse lookup zones.
The standard naming convention for reverse lookup zones is to type the network ID in reverse order and then use the suffix in-addr.arpa. With the previous example, you’d have reverse lookup zones named 10.168.192.in-addr.arpa, 11.168.192.in-addr.arpa, and 12.168.192.in-addr.arpa. Records in the reverse lookup zone must be in sync with the forward lookup zone. If the zones get out of sync, authentication might fail for the domain.
You create reverse lookup zones by doing the following:
Start the DNS console and connect to the server you want to configure in the way described previously.
Right-click the server entry and then, from the shortcut menu, select New Zone. This starts the New Zone Wizard. Click Next.
If you’re configuring a primary server integrated with Active Directory (domain controller), select Primary Zone and ensure that Store The Zone In Active Directory is selected. If you don’t want to integrate DNS with Active Directory, select Primary Zone and then clear the Store The Zone In Active Directory check box. Click Next.
If you’re configuring a reverse lookup zone for a secondary server, select Secondary Zone and then click Next.
If you’re integrating the zone with Active Directory, choose a replication strategy:
To All DNS Servers In The Active Directory Forest. Choose this strategy if you want the widest replication strategy. Remember, the Active Directory forest includes all domain trees that share the directory data with the current domain.
To All DNS Servers In The Active Directory Domain. Choose this strategy if you want to replicate DNS information within the current domain and child domains of the current domain.
To All Domain Controllers In The Active Directory Domain. Choose this strategy if you want to replicate DNS information to all domain controllers within the current domain and child domains of the current domain. Although this strategy gives wider replication for DNS information within the domain, not every domain controller is a DNS server as well (and you don’t need to configure every domain controller as a DNS server either).
Select Reverse Lookup Zone. Click Next.
Type the network ID for the reverse lookup zone. The values you enter set the default name for the reverse lookup zone. Click Next.
If you’re configuring a primary or secondary server that isn’t integrated with Active Directory, you need to set the zone file name. A default name for the zone’s DNS database file should be filled in for you. You can use this name or type a new file name. Click Next.
Specify whether dynamic updates are allowed. You have three options:
Allow Only Secure Dynamic Updates. When the zone is integrated with Active Directory, you can use ACLs to restrict which clients can perform dynamic updates. With this option selected, only clients with authorized computer accounts and approved ACLs can dynamically update their resource records in DNS when changes occur.
Allow Both Nonsecure And Secure Dynamic Updates. Choose this option to allow any client to update its resource records in DNS when changes occur. Clients can be secure or nonsecure.
Do Not Allow Dynamic Updates. Choosing this option disables dynamic updates in DNS. You should use this option only when the zone isn’t integrated with Active Directory.
Click Next and then click Finish to complete the process. The new zone is added to the server and basic DNS records are created automatically.
After you set up the reverse lookup zones, you need to ensure that delegation for the zone is handled properly. Contact your Information Services department or your ISP to ensure that the zones are registered with the parent domain.
The DNS console is the tool you’ll use to manage local and remote DNS servers. As shown in Figure 20-3, the DNS console’s main window is divided into two panes. The left pane allows you to access DNS servers and their zones. The right pane shows the details for the currently selected item. You can work with the DNS console in three ways:
Double-click an entry in the left pane to expand the list of files for the entry.
Select an entry in the left pane to display details such as zone status and domain records in the right pane.
Right-click an entry to display a context menu with available options.
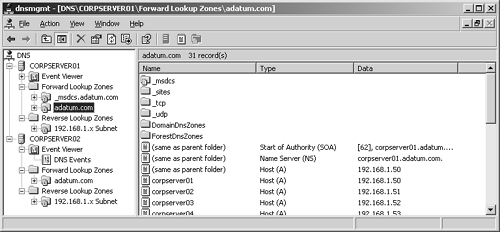
Figure 20-3. Manage domains and subnets through the Forward Lookup Zones and Reverse Lookup Zones folders.
The Forward Lookup Zones and Reverse Lookup Zones folders provide access to the domains and subnets configured for use on this server. When you select domain or subnet folders in the left pane, you can manage DNS records for the domain or subnet.
You can manage servers running DNS from the DNS console by completing the following steps:
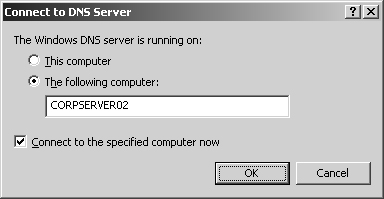
Right-click DNS in the console tree and then select Connect To DNS Server. This opens the dialog box shown in Figure 20-4.
If you’re trying to connect to the local computer, select This Computer. Otherwise, select The Following Computer and then type the IP address or fully qualified host name of the remote computer to which you want to connect.
Click OK. Windows Server 2003 attempts to contact the server, and if it does, it adds the server to the console.
In the DNS console, you can delete a server by selecting its entry and then pressing the Delete key. When prompted, click OK to confirm the deletion. Deleting a server only removes it from the server list in the console tree. It doesn’t actually delete the server.
To manage DNS servers, you use the DNS Server service. You can start, stop, pause, resume, and restart the DNS Server service in the Services node of Computer Management or from the command line. You can also manage the DNS Server service in the DNS console. Right-click the server you want to manage in the DNS console, choose All Tasks, and then select Start, Stop, Pause, Resume, or Restart, as appropriate.
Using the DNS console, you can create child domains within a zone. For example, if you created the primary zone microsoft.com, you could create hr.microsoft.com and mis.microsoft.com subdomains for the zone. You create child domains by completing the following steps:
In the DNS console, expand the Forward Lookup Zones folder for the server with which you want to work.
Right-click the parent domain entry, and then, from the shortcut menu, select New Domain.
Enter the name of the new domain, and then click OK. For hr.microsoft.com, enter hr. For mis.microsoft.com, enter mis.
As your organization grows, you might want to organize the DNS name space into separate zones. At the corporate headquarters, you could have a zone for the parent domain microsoft.com. At branch offices you could have zones for each office, such as memphis.microsoft.com, newyork.microsoft.com, and la.microsoft.com.
You create child domains in separate zones by completing the following steps:
Install a DNS server in each child domain, and then create the necessary forward and reverse lookup zones for the child domain as described earlier in this chapter in the section entitled "Installing DNS Servers."
On the authoritative DNS server for the parent domain, you delegate authority to each child domain. Delegating authority allows the child domain to resolve and respond to DNS queries from computers inside and outside the local subnet.
You delegate authority to a child domain by completing the following steps:
In the DNS console, expand the Forward Lookup Zones folder for the server with which you want to work.
Right-click the parent domain entry and then, from the shortcut menu, select New Delegation. This starts the New Delegation Wizard. Click Next.
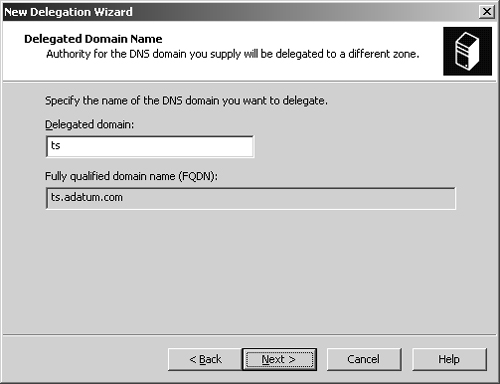
As shown in Figure 20-5, type the name of the delegated domain, such as ts, and then click Next. The name you enter updates the value in the Fully Qualified Domain Name (FQDN) text box. Click Next.
Click Add. In the Server name text box, type the fully qualified host name of a DNS server for the child domain, such as corpserver01.memphis.adatum.com.
In the IP Address text box, type the primary IP address for the server. Click Add. Repeat this process to specify additional IP addresses for this server. The order of the entries determines which IP address is used first. Change the order as necessary using the Up and Down buttons.
Click OK and then repeat steps 3–5 to specify other authoritative DNS servers for the child domain.
Click Next and then click Finish to complete the process.
Deleting a domain or subnet permanently removes it from the DNS server. To delete a domain or subnet, follow these steps:
In the DNS console, right-click the domain or subnet entry.
From the shortcut menu, select Delete, and then confirm the action by clicking Yes.
If the domain or subnet is integrated with Active Directory, you’ll see a warning prompt. Confirm that you want to delete the domain or subnet from Active Directory by clicking Yes.
Note
Deleting a domain or subnet deletes all DNS records in a zone file but doesn’t actually delete the zone file on a primary or secondary server that isn’t integrated with Active Directory. You’ll find that the actual zone file remains in the %SystemRoot%System32Dns directory. You can delete this file after you have deleted the zones from the DNS console.
After you create the necessary zone files, you can add records to the zones. Computers that need to be accessed from Active Directory and DNS domains must have DNS records. Although there are many types of DNS records, most of these record types aren’t commonly used. So, rather than focus on record types you probably won’t use, let’s focus on the ones you will use:
A (address). Maps a host name to an IP address. When a computer has multiple adapter cards or IP addresses, or both, it should have multiple address records.
CNAME (canonical name). Sets an alias for a host name. For example, using this record, zeta.microsoft.com can have an alias as www.microsoft.com.
MX (mail exchange). Specifies a mail exchange server for the domain, which allows mail to be delivered to the correct mail servers in the domain.
NS (name server). Specifies a name server for the domain, which allows DNS lookups within various zones. Each primary and secondary name server should be declared through this record.
PTR (pointer). Creates a pointer that maps an IP address to a host name for reverse lookups.
SOA (start of authority). Declares the host that’s the most authoritative for the zone and, as such, is the best source of DNS information for the zone.
Each zone file must have a start of authority (SOA) record (which is created automatically when you add a zone).
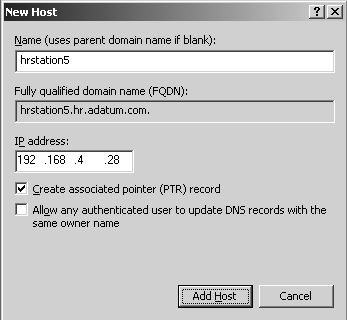
The A record maps a host name to an IP address, and the PTR record creates a pointer to the host for reverse lookups. You can create address and pointer records at the same time or separately.
You create a new host entry with A and PTR records by doing the following:
In the DNS console, expand the Forward Lookup Zones folder for the server with which you want to work.
Right-click the domain you want to update and then, from the shortcut menu, select New Host (A). This opens the dialog box shown in Figure 20-6.
Type the single-part computer name, such as corpserver01, and then the IP address, such as 192.168.1.50.
Select the Create Associated Pointer (PTR) Record check box.
Note
You can create PTR records only if the corresponding reverse lookup zone is available. You can create this file by following the steps listed earlier in this chapter in the section entitled "Configuring Reverse Lookups." The Allow Any Authenticated Users... option is only available when a DNS server is configured on a domain controller.
Click Add Host, and then click OK. Repeat as necessary to add other hosts. Click Done when you’re finished.
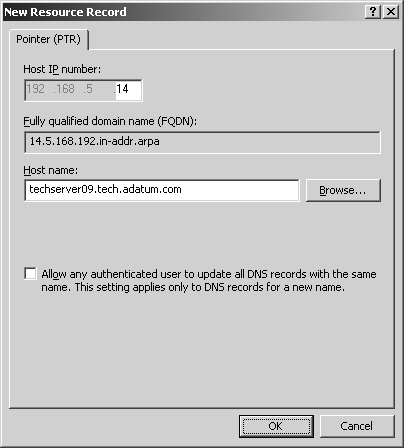
If you need to add a PTR record later, you can do so by completing the following steps:
In the DNS console, expand the Reverse Lookup Zones folder for the server with which you want to work.
Right-click the subnet you want to update and then, from the shortcut menu, select New Pointer (PTR). This opens the dialog box shown in Figure 20-7.
Type the Host IP Number, such as 14, and then type the Host Name, such as techserver09.tech.adatum.com. Click OK.
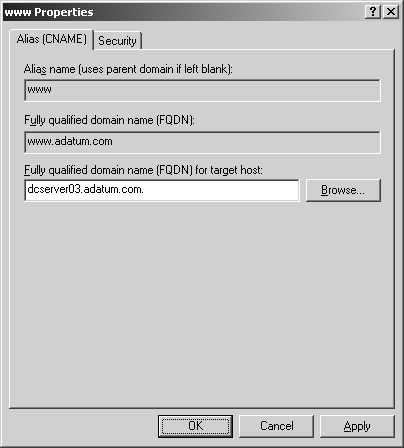
You specify host aliases using CNAME records. Aliases allow a single host computer to appear to be multiple host computers. For example, the host gamma.microsoft.com can be made to appear as www.microsoft.com and ftp.microsoft.com.
To create a CNAME record, follow these steps:
In the DNS console, expand the Forward Lookup Zones folder for the server with which you want to work.
Right-click the domain you want to update and then, from the shortcut menu, select New Alias (CNAME). This opens the dialog box shown in Figure 20-8.
Type the alias in the Alias Name text box. The alias is a single-part host name, such as www or ftp.
In the Fully Qualified Domain Name (FQDN) For Target Host text box, type the full host name of the computer for which the alias is to be used. Click OK.
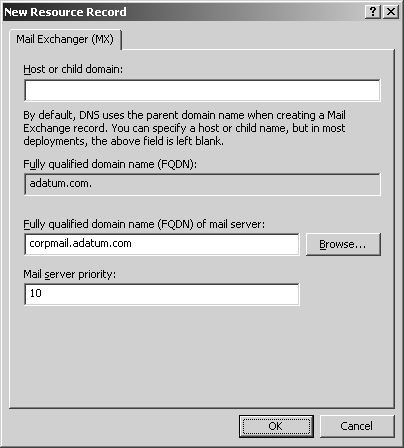
MX records identify mail exchange servers for the domain. These servers are responsible for processing or forwarding mail within the domain. When you create an MX record, you must specify a preference number for the mail server. A preference number is a value from 0 to 65,535 that denotes the mail server’s priority within the domain. The mail server with the lowest preference number has the highest priority and is the first to receive mail. If mail delivery fails, the mail server with the next lowest preference number is tried.
You create an MX record by doing the following:
In the DNS console, expand the Forward Lookup Zones folder for the server with which you want to work.
Right-click the domain you want to update and then, from the shortcut menu, select New Mail Exchanger (MX). This opens the dialog box shown in Figure 20-9.
You can now create a record for the mail server by filling in these text boxes:
Host Or Child Domain. Enter the single-part name for the mail exchanger if desired. In most cases, you’ll want to leave this blank, which specifies that the mail exchanger name is the same as the parent domain name.
Fully Qualified Domain Name (FQDN). Enter the FQDN of the domain to which this mail exchanger record should apply, such as tech.adatum.com.
Fully Qualified Domain Name (FQDN) Of Mail Server. Enter the FQDN of the mail server that should handle mail receipt and delivery, such as corpmail.tech.adatum.com. E-mail for the previously specified domain is routed to this mail server for delivery.
Mail Server Priority. Enter a preference number for the host from 0 to 65,535.
Click OK.
NS records specify the name servers for the domain. Each primary and secondary name server should be declared through this record. If you obtain secondary name services from an ISP, be sure to insert the appropriate Name Server records.
You create an NS record by doing the following:
In the DNS console, expand the Forward Lookup Zones folder for the server with which you want to work.
Display the DNS records for the domain by selecting the domain folder in the tree view.
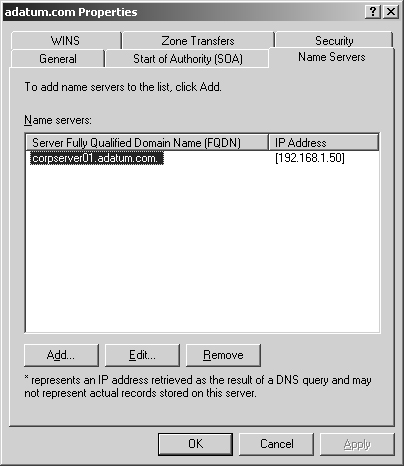
Right-click an existing Name Server record in the view pane and then select Properties. This opens the Properties dialog box for the domain with the Name Servers tab selected, as shown in Figure 20-10.
Click Add.
In the Server Fully Qualified Domain Name (FQDN) text box, type the fully qualified host name of the DNS server you’re adding, such as corpserver01.adatum.com.
In the IP Address text box, type the primary IP address for the server. Click Add. Repeat this process to specify additional IP addresses for the server. The order of the entries determines which IP address is used first. Change the order as necessary using the Up and Down buttons.
Click OK. Repeat Steps 5–7 to specify other DNS servers for the domain.
To view or update DNS records, follow these steps:
Each zone has separate properties that you can configure. These properties set general zone parameters by using the SOA record, change notification, and WINS integration. In the DNS console, you set zone properties by doing the following:
Right-click the zone you want to update and then, from the shortcut menu, select Properties.
Or, select the zone and then, from the Action menu, select Properties.
Properties dialog boxes for forward and reverse lookup zones are identical except for the WINS and WINS-R tabs. In forward lookup zones, you use the WINS tab to configure lookups for NetBIOS computer names. In reverse lookup zones, you use the WINS-R tab to configure reverse lookups for NetBIOS computer names.
An SOA record designates the authoritative name server for a zone and sets general zone properties, such as retry and refresh intervals. You can modify this information by doing the following:
In the DNS console, right-click the zone you want to update and then, from the shortcut menu, select Properties.
Click the SOA tab and then update the text boxes shown in Figure 20-11.
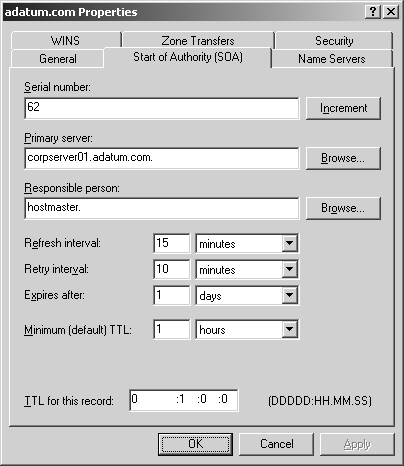
Figure 20-11. Use the zone’s Properties dialog box to set general properties for the zone and to update the SOA record.
You use the text boxes in the SOA tab as follows:
Serial Number. A serial number that indicates the version of the DNS database files. The number is updated automatically whenever you make changes to zone files. You can also update the number manually. Secondary servers use this number to determine if the zone’s DNS records have changed. If the primary server’s serial number is larger than the secondary server’s serial number, the records have changed and the secondary server can request the DNS records for the zone. You can also configure DNS to notify secondary servers of changes (which might speed up the update process).
Primary Server. The FQDN for the name server, followed by a period. The period is used to terminate the name and ensure that the domain information isn’t appended to the entry.
Responsible Person. The e-mail address of the person in charge of the domain. The default entry is hostmaster followed by a period, meaning hostmaster@your_domain.com. If you change this entry, substitute a period in place of the @ symbol in the e-mail address and terminate the address with a period.
Refresh Interval. The interval at which a secondary server checks for zone updates. If it’s set to 60 minutes, NS record changes might not get propagated to a secondary server for up to an hour. You reduce network traffic by increasing this value.
Retry Interval. The time the secondary server waits after a failure to download the zone database. If it’s set to 10 minutes and a zone database transfer fails, the secondary server waits 10 minutes before requesting the zone database once more.
Expires After. The period of time for which zone information is valid on the secondary server. If the secondary server can’t download data from a primary server within this period, the secondary server lets the data in its cache expire and stops responding to DNS queries. Setting Expires After to seven days allows the data on a secondary server to be valid for seven days.
Minimum (Default) TTL. The minimum Time to Live (TTL) value for cached records on a secondary server. The value is set in the format Days : Hours : Minutes : Seconds. When this value is reached, the secondary server causes the associated record to expire and discards it. The next request for the record will need to be sent to the primary server for resolution. Set the minimum TTL to a relatively high value, such as 24 hours, to reduce traffic on the network and increase efficiency. However, keep in mind that a higher value slows down the propagation of updates through the Internet.
TTL For This Record. The TTL value for this particular SOA record. The value is set in the format Days : Hours : Minutes : Seconds and generally should be the same as the minimum TTL for all records.
Zone transfers send a copy of zone information to other DNS servers. These servers can be in the same domain or in other domains. For security reasons, Windows Server 2003 disables zone transfers. To enable zone transfers for secondaries you’ve configured internally or with ISPs, you’ll need to permit zone transfers and then specify the types of server to which zone transfers can be made.
Although you can allow zone transfers with any server, this opens the server up to possible security problems. Instead of opening the floodgates, you should restrict access to zone information so that only servers that you’ve identified can request updates from the zone’s primary server. This allows you to funnel requests through a select group of secondary servers, such as your ISP’s secondary name servers, and to hide the details of your internal network from the outside world.
To allow zone transfers and restrict access to the primary zone database, follow these steps:
In the DNS console, right-click the domain or subnet you want to update and then, from the shortcut menu, select Properties.
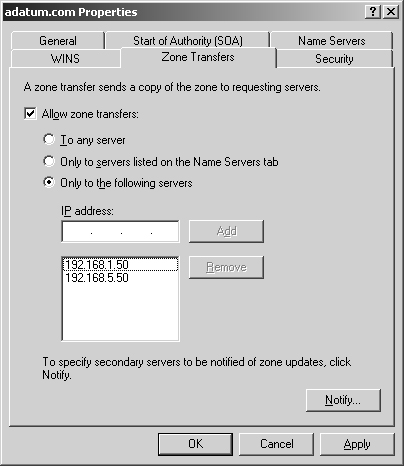
Click the Zone Transfers tab as shown in Figure 20-12.
To restrict transfers to name servers listed in the Name Servers tab, select the Allow Zone Transfers check box and then choose Only To Servers Listed On The Name Servers Tab.
To restrict transfers to designated servers, select the Allow Zone Transfers check box and then choose Only To The Following Servers. Afterward, type the IP addresses for the servers that should receive zone transfers and click Add. Click OK.
You set properties for a zone with its SOA record. These properties control how DNS information is propagated on the network. You can also specify that the primary server should notify secondary name servers when changes are made to the zone database. To do this, follow these steps:
In the DNS console, right-click the domain or subnet you want to update and then, from the shortcut menu, select Properties.
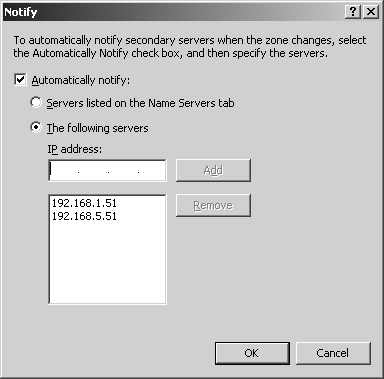
In the Zone Transfers tab, click Notify. This displays the dialog box shown in Figure 20-13.
To notify secondary servers listed in the Name Servers tab, select the Automatically Notify check box and then choose Servers Listed On The Name Servers Tab.
If you want to designate specific servers to notify, select the Automatically Notify check box and then choose The Following Servers. Afterward, type the IP addresses of a secondary server to notify and then click Add. You can repeat this process to configure notification for multiple servers. Click OK twice.
When you create zones, they’re designated as having a specific zone type and Active Directory integration mode. You can change the type and integration mode at any time by completing the following steps:
In the DNS console, right-click the domain or subnet you want to update and then, from the shortcut menu, select Properties.
Under Type in the General tab, click Change. In the Change Zone Type dialog box, select the new type for the zone.
To integrate the zone with Active Directory, select the Store The Zone In Active Directory check box.
To remove the zone from Active Directory, clear the Store The Zone In Active Directory check box. Click OK twice.
Dynamic updates allow DNS clients to register and maintain their own address and pointer records. This is useful for computers dynamically configured through DHCP. By enabling dynamic updates, you make it easier for dynamically configured computers to locate one another on the network. When a zone is integrated with Active Directory, you have the option of requiring secure updates. With secure updates, you use ACLs to control which computers and users can dynamically update DNS.
You can enable and disable dynamic updates by completing the following steps:
In the DNS console, right-click the domain or subnet you want to update and then, from the shortcut menu, select Properties.
Use the following options of the Dynamic Updates drop-down list to enable or disable dynamic updates:
None. Disable dynamic updates.
Nonsecure And Secure. Enable nonsecure and secure dynamic updates.
Secure Only. Enable dynamic updates with Active Directory security. This is available only with Active Directory integration.
Click OK.
Note
DNS integration settings must also be configured for DHCP. See the section of Chapter 18 entitled "Integrating DHCP and DNS."
You use the Server Properties dialog box to manage the general configuration of DNS servers. Through it, you can enable and disable IP addresses for the server and control access to DNS servers outside the organization. You can also configure monitoring, logging, and advanced options.
By default, multihomed DNS servers respond to DNS requests on all available network interfaces and the IP addresses they’re configured to use.
Through the DNS console, you can specify that the server can answer requests only on specific IP addresses. To do this, follow these steps:
In the DNS console, right-click the server you want to configure and then, from the shortcut menu, select Properties.
In the Interfaces tab, select Only The Following IP Addresses, type an IP address that should respond to DNS requests, and then click Add. Repeat this step as necessary. Only these IP addresses will be used for DNS. All other IP addresses on the server will be disabled for DNS.
Click Add. Repeat Steps 2 and 3 to specify additional IP addresses. Click OK.
Restricting access to zone information allows you to specify which internal and external servers can access the primary server. For external servers, this controls which servers can get in from the outside world. You can also control which DNS servers within your organization can access servers outside it. To do this, you need to set up DNS forwarding within the domain.
With DNS forwarding, you configure DNS servers within the domain as:
Nonforwarders. Servers that must pass DNS queries they can’t resolve on to designated forwarding servers. These servers essentially act like DNS clients to their forwarding servers.
Forwarding-only. Servers that can only cache responses and pass requests on to forwarders. This is also known as a caching-only DNS server.
Forwarders. Servers that receive requests from nonforwarders and forwarding-only servers. Forwarders use normal DNS communication methods to resolve queries and to send responses back to other DNS servers.
Conditional forwarders. Servers that forward requests based on the DNS domain. Conditional forwarding is useful if your organization has multiple internal domains.
Note
You can’t configure the root server for a domain for forwarding (except for conditional forwarding used with internal name resolution). You can configure all other servers for forwarding.
To create a nonforwarding DNS server, follow these steps:
In the DNS console, right-click the server you want to configure and then, from the shortcut menu, select Properties.
In the Forwarders tab, select All Other DNS Domains in the DNS Domain list.
Enter the IP addresses of the network’s forwarders.
Click Add. Repeat this process to specify additional IP addresses.
Set the Forward Time Out. This value controls how long the nonforwarder tries to query the current forwarder if it gets no response. When the Forward Time Out interval passes, the nonforwarder tries the next forwarder on the list. The default is five seconds. Click OK.
To create a forwarding-only server, follow these steps:
In the DNS console, right-click the server you want to configure and then, from the shortcut menu, select Properties.
In the Forwarders tab, select All Other DNS Domains in the DNS Domain list and then select Do Not Use Recursion For This Domain.
Click Add. Repeat this process to specify additional IP addresses.
Set the Forward Time Out. This value controls how long the server tries to query the server if it gets no response. When the Forward Time Out interval passes, the server tries the next forwarder on the list. The default is five seconds. Click OK.
Any DNS server that isn’t designated as a nonforwarder or a forwarding-only server will act as a forwarder. Thus, on the network’s designated forwarders you should make sure that Do Not Use Recursion For This Domain is not selected and that you haven’t configured the server to forward requests to other DNS servers in the domain.
If you have multiple internal domains, you might want to consider configuring conditional forwarding, which allows you to direct requests for specific domains to specific DNS servers for resolution. Conditional forwarding is useful if your organization has multiple internal domains and you need to resolve requests between these domains.
To configure conditional forwarding, follow these steps:
In the DNS console, right-click the server you want to configure and then, from the shortcut menu, select Properties.
In the Forwarders tab, click New. In the New Forwarder dialog box enter the name of domain to which queries should be forwarded, such as adatum.com, and then click OK.
With the domain you previously entered selected in the DNS Domain list, enter the IP address of an authoritative DNS server in the specified domain. Click Add. Repeat this process to specify additional IP addresses.
Repeat Steps 2 and 3 to configure conditional forwarding for other domains. Click OK.
By default, the DNS service tracks all events for DNS in the DNS event log. This means all informational, warning, and error events are recorded. You can change the logging options by completing the following steps:
You normally use the DNS Server event log to track DNS activity on a server. This log records all applicable DNS events and is accessible through the Event View node in Computer Management. If you’re trying to troubleshoot DNS problems, it’s sometimes useful to configure a temporary debug log to track certain types of DNS events. To do this, follow these steps:
In the DNS console, right-click the server you want to configure and then, from the shortcut menu, select Properties.
In the Debug Logging tab, select the Log Packets For Debugging check box and then select the check boxes for the events you want to track temporarily. Don’t forget to clear these events after you’ve finished debugging.
In the File Path And Name text box, enter the name of the log file, such as dns.log. Logs are stored in the %SystemRoot%System32Dns directory by default.
Click OK. When you’re finished debugging, turn off logging by clearing Log Packets For Debugging.
Windows Server 2003 has built-in functionality for monitoring DNS server. You can configure monitoring to occur manually or automatically by completing the following steps:
In the DNS console, right-click the server you want to configure and then, from the shortcut menu, select Properties.
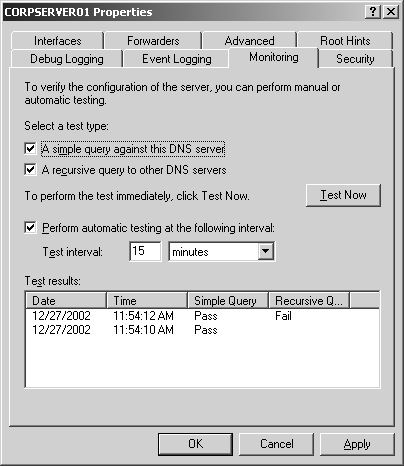
Click the Monitoring tab, shown in Figure 20-14. You can perform two types of tests. To test DNS resolution on the current server, select the A Simple Query Against This DNS Server check box. To test DNS resolution in the domain, select the A Recursive Query To Other DNS Servers check box.
You can perform a manual test by clicking Test Now or schedule the server for automatic monitoring by selecting the Perform Automatic Testing At The Following Interval check box and then setting a time interval in seconds, minutes, or hours.
The results of testing are shown in the Test Results panel. You’ll see a date and time stamp indicating when the test was performed and a result, such as Pass or Fail. Although a single failure might be the result of a temporary outage, multiple failures normally indicate a DNS resolution problem.
Note
If all recursive query tests fail, the advanced server option Disable Recursion might be selected. Click the Advanced tab and check the server options.
Real World
If you’re actively troubleshooting a DNS problem, you might want to configure testing to occur every 10–15 seconds. This will provide a rapid succession of test results. If you’re monitoring DNS for problems as part of your daily administrative duties, you’ll want a longer time interval, such as two or three hours.
You can integrate DNS with WINS. WINS integration allows the server to act as a WINS server or to forward WINS requests to specific WINS servers. When you configure WINS and DNS to work together, you can configure forward lookups using NetBIOS computer names, reverse lookups using NetBIOS computer names, caching and time-out values for WINS resolution, and full integration with NetBIOS scopes.
When you configure WINS lookups in DNS, the leftmost portion of the FQDN can be resolved using WINS. The procedure works in the following manner. The DNS server looks for an address record for the FQDN. If a record is found, the server uses the record to resolve the name using only DNS. If a record isn’t found, the server extracts the leftmost portion of the name and uses WINS to try to resolve the name (as a NetBIOS computer name). You configure WINS lookups in DNS by doing the following:
In the DNS console, right-click the domain you want to update and then, from the shortcut menu, select Properties.
In the WINS tab, select the Use WINS Forward Lookup check box and then type the IP addresses of the network’s WINS servers. You must specify at least one WINS server.
If you want to ensure that the WINS record on this server isn’t replicated to other DNS servers in zone transfers, select the Do Not Replicate This Record check box. Selecting this option is useful to prevent errors and transfer failures to non-Windows DNS servers. Click OK.
When you configure reverse WINS lookups in DNS, the host’s IP address can be resolved to a NetBIOS computer name. The procedure works in the following manner. The DNS server looks for a pointer record for the specified IP address. If a record is found, the server uses the record to resolve the FQDN. If a record isn’t found, the server sends a request to WINS, and, if possible, WINS returns the NetBIOS computer name for the IP address and the host domain is appended to this computer name.
You configure reverse WINS lookups in DNS by doing the following:
In the DNS console, right-click the subnet you want to update and then, from the shortcut menu, select Properties.
In the WINS-R tab, select the Use WINS-R Lookup check box, and then, if you wish, select the Do Not Replicate This Record check box. As with forward lookups, you usually don’t want to replicate the WINS-R record to non-Windows DNS servers.
In the Domain To Append To Returned Name text box, type the DNS parent domain information. This domain is appended to the computer name returned by WINS. For example, if you use seattle.adatum.com and WINS returns the NetBIOS computer name gamma, the DNS server will combine the two values and return gamma.seattle.adatum.com. Click OK.
When you integrate WINS and DNS, you should also set WINS caching and time-out values. The caching value determines how long records returned from WINS are valid. The time-out value determines how long DNS should wait for a response from WINS before timing out and returning an error. These values are set for both forward and reverse WINS lookups.
You set caching and time-out values for WINS in DNS by doing the following:
In the DNS console, right-click the reverse lookup zone subnet you want to update and then, from the shortcut menu, select Properties.
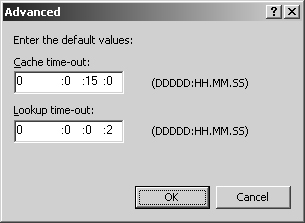
Click the WINS or WINS-R tab, as appropriate, and then click Advanced. This opens the dialog box shown in Figure 20-15.
Set the caching and time-out values using the Cache Time-Out text box and the Lookup Time-Out text box. By default, DNS caches WINS records for 15 minutes and times out after 2 seconds. For most networks you should increase these values. Sixty minutes for caching and 3 seconds for time-outs might be better choices.
Click OK. Repeat this process for other domains and subnets, as necessary.
When you configure full integration, lookups can be resolved using NetBIOS computer names and NetBIOS scopes. Here, a forward lookup works in the following manner. The DNS server looks for an address record for the FQDN. If it finds a record, the server uses the record to resolve the name using only DNS. If it doesn’t find a record, the server extracts the leftmost portion of the name as the NetBIOS computer name and the remainder of the name as the NetBIOS scope. These values are then passed to WINS for resolution.
You configure full integration of WINS and DNS by doing the following:
After you enable WINS lookups for all the appropriate zones, you should enable reverse WINS lookups as well. When you access the Advanced dialog box from the WINS-R tab, you’ll see an additional option that allows you to Submit DNS Domain As NetBIOS Scope. Select this check box to enable full integration
Click OK. Repeat this process for other domains and subnets, as necessary.
Before you use this technique, make sure that the NetBIOS scope is properly configured on the network. You should also make sure that a consistent naming scheme is used for all network computers. Because NetBIOS is case-sensitive, queries resolve only if the case matches exactly. Note also that if the domain has subdomains, the subdomains must be delegated the authority for name services in order for WINS and DNS integration to work properly.