
Microsoft Windows Server 2003 is a powerful, versatile, and fully featured version of Windows Server. As a server operating system, Windows Server 2003 is fundamentally different from Windows desktop editions, such as Windows Vista and Windows XP Professional. Beginning with Service Pack 1 (SP1), Windows Server 2003 has many security and maintenance enhancements that change the way the operating system works in domains and workgroups. These security enhancements are further complemented with the introduction of Release 2 of Windows Server 2003, referred to in this book as Windows Server 2003 R2.
As with earlier versions of Windows Server 2003, Service Pack 1, Release 2, and later versions of Windows Server 2003 build on and extend the underlying technology architecture introduced with Windows 2000, including the following:
Active Directory directory service. An extensible and scalable directory service that uses a namespace based on the Internet standard Domain Name System (DNS).
IntelliMirror. Change and configuration management features that support mirroring of user data and environment settings, as well as central management of software installation and maintenance.
Security Architecture. Architecture that provides improvements for smart cards, public and private encryption keys, and security protocols. It also features tools for analyzing system security and for applying uniform security settings to groups of systems.
Terminal Services. Services that allow you to remotely log on to and manage other Windows Server 2003 systems.
Windows Script Host. A scripting environment for automating common administration tasks, such as creating user accounts or generating reports from event logs.
Although Windows Server 2003 SP1 and R2 have dozens of other new features, each of the features just listed has far-reaching effects on how you perform administrative tasks. None has more effect than Active Directory technology. A sound understanding of Active Directory structures and procedures is essential to your success as a Windows Server 2003 systems administrator.
That said, the Windows Server 2003 security architecture also has a far-reaching effect on how you perform administrative tasks. Through Active Directory and administrative templates, you can apply security settings to workstations and servers throughout the organization. Thus, rather than managing security on a machine-by-machine basis, you can manage security on an enterprise-wide basis.
The focus of this book is on managing the Windows Server 2003 family of operating systems. If you want to learn more about managing Windows XP and Windows Vista, good resources are Microsoft Windows XP Professional Administrator’s Pocket Consultant 2nd Edition (Microsoft Press, 2005) and Microsoft Windows Vista Administrator’s Pocket Consultant (Microsoft Press, 2006).
The Windows Server 2003 family of operating systems consists of Windows Server 2003, Standard Edition; Windows Server 2003, Enterprise Edition; Windows Server 2003, Datacenter Edition; and Windows Server 2003, Web Edition. Each edition has a specific purpose, as follows:
Windows Server 2003, Standard Edition. Designed to provide services and resources to other systems on a network. It’s a direct replacement for Windows NT 4.0 Server and Windows 2000 Server. The operating system has a rich set of features and configuration options. Windows Server 2003, Standard Edition supports two-way and four-way symmetric multiprocessing (SMP) and up to 4 gigabytes (GB) of memory on 32-bit systems and 32 GB on 64-bit systems.
Windows Server 2003, Enterprise Edition. Extends the features provided in Windows Server 2003, Standard Edition to include support for Cluster Service, metadirectory services, and Services for Macintosh. It also supports 64-bit systems, hot swappable RAM, and nonuniform memory access (NUMA). Enterprise servers can have up to 32 GB of RAM on x86 and 1 terabyte (TB) of RAM on 64-bit systems and eight CPUs.
Windows Server 2003, Datacenter Edition. The most robust Windows server. It has enhanced clustering features and supports very large memory configurations with up to 64 GB of RAM on x86 and 1 TB of RAM on 64-bit systems. It has a minimum CPU requirement of eight and can support up to 64 CPUs on Datacenter Itanium Edition (single partition).
Windows Server 2003, Web Edition. Designed to provide Web services for deploying Web sites and Web-based applications. As such, this server edition includes the Microsoft .NET Framework, Microsoft Internet Information Services (IIS), ASP.NET, and network load-balancing features but lacks many other features, including Active Directory. In fact, the only other key Windows features in this edition are the Distributed File System (DFS), Encrypting File System (EFS), and Remote Desktop for administration. Windows Server 2003, Web Edition supports up to 2 GB of RAM and two CPUs.
Note
The various server editions support the same core features and administration tools. This means you can use the techniques discussed in this book regardless of which Windows Server 2003 edition you’re using. Note also that because you can’t install Active Directory on the Web Edition, you can’t make a server running Windows Server 2003, Web Edition a domain controller. The server can, however, be a part of an Active Directory domain.
When you install a Windows Server 2003 system, you configure the system according to its role on the network.
Servers are generally assigned to be part of a workgroup or a domain.
Workgroups are loose associations of computers in which each individual computer is managed separately.
Domains are collections of computers that you can manage collectively by means of domain controllers, which are Windows Server 2003 systems that manage access to the network, to the directory database, and to shared resources.
Note
In this book "Windows Server 2003" and "Windows Server 2003 family" refer to the family of four products: Windows Server 2003, Standard Edition; Windows Server 2003, Enterprise Edition; Windows Server 2003, Datacenter Edition; and Windows Server 2003, Web Edition. The various server editions support the same core features and administration tools.
All versions of Windows Server 2003 allow you to configure different views for the Start Menu. The views for the Start Menu are:
Classic Start Menu. The view used in previous versions of Windows. With this view, clicking Start displays a pop-up dialog box with direct access to common menus and menu items.
With the Classic Start Menu, you access administrative tools by clicking Start, clicking Programs, and then clicking Administrative Tools. You access the Control Panel by clicking Start, pointing to Settings, and then clicking Control Panel.
Simple Start Menu. Allows you to directly access commonly used programs and directly execute common tasks. You can, for example, click Start and then click Log Off to log off the computer quickly.
With the Simple Start Menu, you access administrative tools by clicking Start and then clicking Administrative Tools. You access the Control Panel by clicking Start and then clicking Control Panel.
When you install Windows Server 2003 on a new system, you can configure the server to be a member server, a domain controller, or a stand-alone server. The differences between these types of servers are extremely important. Member servers are a part of a domain but don’t store directory information. Domain controllers are distinguished from member servers because they store directory information and provide authentication and directory services for the domain. Stand-alone servers aren’t a part of a domain and have their own user database. Because of this, stand-alone servers also authenticate logon requests themselves.
Windows 2000 and Windows Server 2003 don’t designate primary or backup domain controllers. Instead, they support a multimaster replication model. In this model any domain controller can process directory changes and then replicate those changes to other domain controllers automatically. This differs from the Windows NT single master replication model in which the primary domain controller stores a master copy and backup controllers store backup copies of the master. In addition, Windows NT distributed only the Security Account Manager (SAM) database, but Windows 2000 and Windows Server 2003 distribute an entire directory of information called a data store. Inside the data store are sets of objects representing user, group, and computer accounts as well as shared resources, such as servers, files, and printers.
Domains that use Active Directory are referred to as Active Directory domains. This distinguishes them from Windows NT domains. Although Active Directory domains can function with only one domain controller, you can and should configure multiple domain controllers in the domain. This way, if one domain controller fails, you can rely on the other domain controllers to handle authentication and other critical tasks.
In an Active Directory domain, any member server can be promoted to a domain controller, and you don’t need to reinstall the operating system as you had to in Windows NT. To promote a member server, all you need to do is install the Active Directory component on the server. You can also demote domain controllers to be member servers, provided that the server isn’t the last domain controller on the network. You promote and demote domain controllers by using the Active Directory Installation Wizard and following these steps:
Servers running Windows Server 2003 are configured based on the services they offer. You can add or remove services at any time by using the Configure Your Server Wizard and following these steps:
Click Start.
Select Programs or All Programs as appropriate.
Select Administrative Tools, and then select Configure Your Server Wizard.
Click Next twice. Windows Server 2003 gathers information about the server’s current roles. The Server Role page displays a list of available server roles and specifies whether they’re configured. Adding and removing roles is easy. Just perform the following steps:
If a role isn’t configured and you want to add the role, click the role in the Server Role column and then click Next. Follow the prompts.
If a role is configured and you want to remove the role, click the role in the Server Role column and then click Next. Read any warnings displayed carefully and then follow the prompts.
Any server can support one or more of the following server roles:
Application server. A server that provides Extensible Markup Language (XML) Web services, Web applications, and distributed applications. When you configure a server with this role, IIS, COM+, and the Microsoft .NET Framework are installed automatically. You also have the option of adding Microsoft FrontPage Server Extensions and enabling or disabling ASP.NET.
DHCP server. A server that runs the Dynamic Host Configuration Protocol (DHCP) and can automatically assign Internet Protocol (IP) addresses to clients on the network. This option installs DHCP and starts the New Scope Wizard.
DNS server. A server that runs DNS resolves computer names to IP addresses and vice versa. This option installs DNS and starts the DNS Server Wizard.
Domain controller. A server that provides directory services for the domain and has a directory store. Domain controllers also manage the logon process and directory searches. This option installs DNS and Active Directory.
File server. A server that serves and manages access to files. This option enables you to quickly configure disk quotas and indexing. You can also install the Web-based file administration utility, which installs IIS and enables Active Server Pages (ASP).
Mail server (POP3, SMTP). A server that provides basic Post Office Protocol 3 (POP3) and Simple Mail Transfer Protocol (SMTP) mail services so that POP3 mail clients can send and receive mail in the domain. Once you install this service, you define a default domain for mail exchange and then create and manage mailboxes. These basic services are best for small offices or remote locations where e-mail exchange is needed but you don’t need the power and versatility of Microsoft Exchange Server.
Print server. A server that provides and manages access to network printers, print queues, and printer drivers. This option enables you to quickly configure printers and print drivers that the server should provide.
Remote access/VPN server. A server that routes network traffic and manages dial-up networking or virtual private networking (VPN). This option starts the Routing and Remote Access Setup Wizard. You can configure routing and remote access to allow outgoing connections only, incoming and outgoing connections, or no outside connections at all.
Server cluster node. A server that operates as part of a group of servers working together called a cluster. This option starts the New Server Cluster Wizard, which allows you to create a new cluster group, or the Add Nodes Wizard, which allows you to add the server to an existing cluster. (This server role is supported by the Enterprise and Datacenter versions only.)
Streaming media server. A server that provides streaming media content to other systems on the network or the Internet. This option installs Windows Media Services. (This server role is supported by the Standard and Enterprise versions only.)
Terminal Server. A server that processes tasks for multiple client computers running in terminal services mode. This option installs Terminal Server. You don’t need to install Terminal Server to remotely manage this server. Remote Desktop is installed automatically with the operating system.
WINS server. A server that runs Windows Internet Name Service (WINS), resolves NetBIOS names to IP addresses, and vice versa. This option installs WINS.
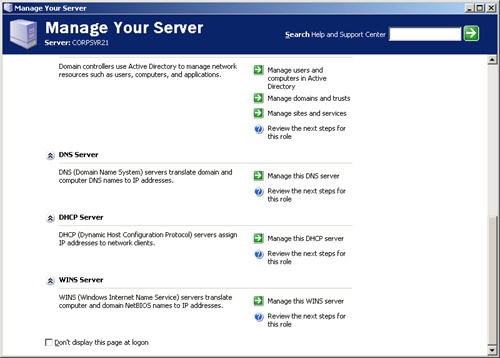
Once installed, you can manage server roles using Manage Your Server. This enhanced utility in Windows Server 2003 might just become your command and control center. As shown in Figure 1-1, the current role(s) of the server are displayed in Manage Your Server. You access this tool from the Administrative Tools menu. Click Start, Program or All Programs, and then select Manage Your Server. Use the quick links provided to manage the installed server roles and related information.
Tip
Use the arrow icons to the left of the role name to shrink or expand the role information provided. Don’t overlook Tools And Updates and See Also. Under these headings you’ll find links for quick access to Administrative Tools, Windows Update, the System Properties dialog box, Help And Support, and more. As a final note, although you might be tempted to select the Don’t Display This Page At Logon check box (it’s in the lower-left corner of the dialog box), I don’t suggest doing it. I’ve found that most of the tools I routinely work with and the tasks I regularly perform can be quickly accessed from this dialog box. It really is a good command and control center.
Many utilities are available for administrating Windows Server 2003 systems. The tools you’ll use the most include:
Control Panel. A collection of tools for managing system configuration. With Classic Start Menu, you can access these tools by selecting Start, choosing Settings, and then selecting Control Panel. With Simple Start Menu, you can access these tools by selecting Start and then selecting Control Panel.
Graphical administrative tools. The key tools for managing network computers and their resources. You can access these tools by selecting them individually on the Administrative Tools submenu.
Administrative wizards. Tools designed to automate key administrative tasks. Unlike in Windows NT, there’s no central place for accessing wizards. Instead, you access wizards by selecting the appropriate menu options in other administrative tools.
Command-line utilities. You can launch most administrative utilities from the command line. In addition to these utilities, Windows Server 2003 provides others that are useful for working with Windows Server 2003 systems.
The following sections provide brief introductions to these administrative utilities. Additional details for key tools are provided throughout this book. Keep in mind that to use these utilities you might need an account with administrator privileges.
Control Panel contains utilities for working with a system’s setup and configuration. You can organize the Control Panel in different ways according to the view you’re using. A view is simply a way of organizing and presenting options. The key utilities you’ll want to use include:
Add Hardware. Starts the Add Hardware Wizard, which you can use to install and troubleshoot hardware.
Add Or Remove Programs. Used to install programs and to safely uninstall programs. Also used to modify Windows Server 2003 setup components. For example, if you didn’t install an add-on component, such as Certificate Services, during installation of the OS, you can use this utility to add it later.
Date And Time. Used to view or set a system’s date, time, and time zone. Rather than manually setting the time on individual computers in the domain, you can use the Windows Time Service to automatically synchronize time on the network.
Display. Used to configure backgrounds, screen savers, video display mode, and video settings. You can also use this utility to specify desktop icons and to control visual effects, such as the menu fade effect.
Folder Options. Used to set a wide variety of folder and file options, including the type of desktop used, the folder views used, whether offline files are used, and whether you need to single-click or double-click to open items.
Licensing. On a workstation you use this utility to manage licenses on a local system. On a server it also allows you to change the client-licensing mode of installed products, such as Windows Server 2003 or Microsoft SQL Server.
Network Connections. Used to view network identity information, to add network components, and to establish network connections. You can also use this utility to change a system’s computer name and domain. See Chapter 7, and Chapter 16, for details.
Printers And Faxes. Provides quick access to the Printers And Faxes folder, which you can use to manage print devices on a system. See Chapter 17, for more information on managing network printers.
Scheduled Tasks. Allows you to view and add scheduled tasks. You can schedule tasks on a one-time or recurring basis to handle common administrative jobs. To learn more about scheduled tasks, see Chapter 4.
System. Used to display and manage system properties, including properties for startup/shutdown, environment, hardware profiles, and user profiles. This utility is explored in Chapter 2.
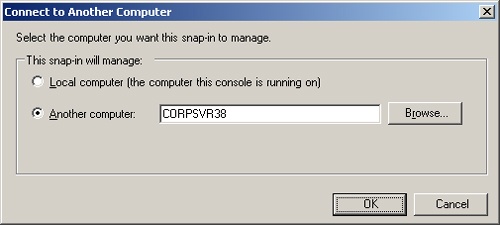
Windows Server 2003 provides several types of tools for system administration. The graphical user interface (GUI)-based tools are the ones you’ll use the most. Usually you can use graphical administrative tools to manage the system to which you’re currently logged on, as well as systems throughout Windows Server 2003 domains. For example, in the Component Services console you specify the computer you want to work with by right-clicking the Event Viewer entry in the left panel and then choosing Connect To Another Computer. This opens the Select Computer dialog box shown in Figure 1-2. You can then choose Another Computer and type the name of the computer, as shown. You can access the graphical administrative tools by selecting them on the Administrative Tools submenu or by double clicking Administrative Tools in the Control Panel.
Which administrative tools are available on your system depends on its configuration. When you add services, the tools needed to manage those services are installed on the server. These same tools might not be available in Windows XP Professional or on another server. In this case, you might want to install the administration tools on the workstation you’re using. To install Windows Server 2003 Administration Tools, complete the following steps:
Log on to the workstation using an account with administrator privileges.
Insert the Windows Server 2003 CD-ROM into the CD-ROM drive.
When the Autorun screen appears, click Perform Additional Tasks, and then click Browse This CD. This starts Windows Explorer.
Double-click I386 and then double-click Adminpak.msi. The complete set of Windows Server 2003 management tools are installed on your workstation or server.
Real World
The Windows 2000 administration tools are incompatible with Windows XP Professional and Windows Server 2003. If you upgraded to Windows XP Professional from Windows 2000 Professional, you’ll find that many of the Windows 2000 administration tools won’t work and you’ll encounter errors frequently. You should uninstall these tools and instead install the Windows Server 2003 Administration Tools Pack (Adminpak.msi) on the Windows XP Professional systems that administrators use. The Windows Server 2003 administration tools are compatible with both Windows 2000 and Windows Server 2003.
Many command-line utilities are included with Windows Server 2003. Most of the utilities you’ll work with as an administrator rely on Transmission Control Protocol/Internet Protocol (TCP/IP). Because of this, you should install TCP/IP networking before you experiment with these tools.
As an administrator, you should familiarize yourself with the following command-line utilities:
ARP. Displays and manages the IP-to-Physical address mappings used by Windows Server 2003 to send data on the TCP/IP network.
AT. Schedules programs to run automatically.
DNSCMD. Displays and manages the configuration of DNS services.
FTP. Starts the built-in FTP client.
HOSTNAME. Displays the computer name of the local system.
IPCONFIG. Displays the TCP/IP properties for network adapters installed on the system. You can also use it to renew and release DHCP information.
NBTSTAT. Displays statistics and current connections for NetBIOS over TCP/IP.
NET. Displays a family of useful networking commands.
NETSH. Displays and manages the network configuration of local and remote computers.
NETSTAT. Displays current TCP/IP connections and protocol statistics.
NSLOOKUP. Checks the status of a host or IP address when used with DNS.
PATHPING. Traces network paths and displays packet loss information.
PING. Tests the connection to a remote host.
ROUTE. Manages the routing tables on the system.
TRACERT. During testing, determines the network path taken to a remote host.
To learn how to use these command-line tools, type the name at a command prompt followed by /?. Windows Server 2003 then provides an overview of how the command is used (in most cases).
You can more easily manage most of the tasks performed with the NET commands by using graphical administrative tools and Control Panel utilities. However, some of the NET tools are very useful for performing tasks quickly or for obtaining information, especially during telnet sessions to remote systems. These commands include:
NET SEND. Sends messages to users logged in to a particular system.
NET START. Starts a service on the system.
NET STOP. Stops a service on the system.
NET TIME. Displays the current system time or synchronizes the system time with another computer.
NET USE. Connects and disconnects from a shared resource.
NET VIEW. Displays a list of network resources available to the system.
To learn how to use any of the NET command-line tools, type NET HELP followed by the command name, such as NET HELP SEND. Windows Server 2003 then provides an overview of how the command is used.
Beginning with Service Pack 1, Microsoft introduced many system security and maintenance enhancements to Windows Server 2003. Two specific changes have a major impact on how Windows Server 2003 is installed:
Post-Setup Security Update. Designed to safeguard the server from malicious users and infection between the time the computer is installed and the most current security updates are applied through Windows Update. On a new installation of Windows Server 2003 with Service Pack 1 or later included, Post-Setup Security Update typically starts the first time an administrator logs on and blocks all inbound traffic to the server until updates are made or declined. After the initial log on the tool typically isn’t displayed or run again.
Security Configuration Wizard. Designed to reduce the attack surface of a server. This wizard can be used to guide you through the process of creating security policies based on the roles performed by a specific server. Similarly configured servers can use the same security policy, and this policy can be edited or undone (rolled back) at any time.
Unlike Post-Setup Security Update, the Security Configuration Wizard is not installed by default. To install the Security Configuration Wizard, follow these steps:
In Control Panel, double-click Add Or Remove Programs.
Start the Windows Component Wizard by clicking Add/Remove Windows Components.
On the Windows Components page, select Security Configuration Wizard and then click Next.
When prompted, insert the Windows Server 2003 with SP1 CD-ROM into the CD-ROM drive and then click OK.
Click Finish. Close Add Or Remove Programs.
After it’s installed, you can run the Security Configuration Wizard from the Administrative Tools menu. Click Start, Programs or All Programs, Administrative Tools and then select Security Configuration Wizard. Files and other resources used by the wizard are stored under %WinDir%Security. The wizard has a command-line counterpart which can be started by typing scwcmd at a command prompt.
Similar to desktops running Windows XP Professional Service Pack 2 or later, key additional features for servers running Windows Server 2003 Service Pack 1 or later include:
Windows Firewall. A software-based firewall designed to help protect a server against network-based attacks and other security threats from remote systems. Windows Firewall requires the Windows Firewall/Internet Connection Sharing (ICS) service to be enabled and running. In a typical new installation of Windows Server 2003 with SP1, this service is disabled. If you want to use Windows Firewall, you can configure the service and start the firewall by completing the following steps:
Data Execution Protection. A set of hardware and software technologies designed to help protect against malicious code. To better safeguard computers from memory-based vulnerabilities such as buffer overruns that allow too much data to be copied into areas of a computer’s memory, the core components of the operating system were recompiled for Service Pack 1. Core code was also updated to support hardware-enforced execution protection (referred to as a no execute or NX feature). Execution protection tells the CPU to mark all memory locations in an application as nonexecutable unless the location explicitly contains executable code. This prevents malicious code such as a virus from inserting itself into most areas of the memory because only specific areas of memory are marked as having executable code. Typically Data Execution Protection is enabled if supported, and you can check the status of Data Execution Protection by completing the following steps:
Open System in Control Panel.
On the Advanced tab of the System dialog box, click Settings.
Select the Data Execution Prevention tab in the Performance Options dialog box. See Chapter 2 for more information.
Secure Browsing. A set of features to enhance Internet Explorer security and lock down the local machine. The key features include Browser Information Bar, which is displayed in Internet Explorer just below the address bar whenever Information Bar messages are displayed; Add-on Manager, which allows you to view and manage currently installed add-ons for Internet Explorer; and Pop-up Blocker, which allows you to block many types of pop-up windows. Chapter 15 of Microsoft Windows XP Professional Administrator’s Pocket Consultant 2nd Edition describes these features in detail.
RPC Interface Restriction. A set of changes to the Remote Procedure Call (RPC) service and the Distributed Component Object Model (DCOM) to help safeguard server systems against some types of remote attacks. The changes affect the interaction of programs across networks and also ensure that both RPC and DCOM work with the Windows Firewall.
Windows Server 2003 R2 is an update release of the Windows Server 2003 operating system that is built on top of Windows Server 2003 SP1. After you install Windows Server 2003 R2, you can install additional features for manageability and reliability like other Windows components using Add Or Remove Programs in Control Panel. To install additional features, complete the following steps:
In Control Panel, double-click Add Or Remove Programs.
Click Add/Remove Windows Components.
On the Windows Components page, select components to install. Click Next.
When prompted, insert the Windows Server 2003 R2 CD-ROM into the CD-ROM drive and then click OK.
Click Finish. Close Add Or Remove Programs.
Windows Server 2003 R2 features include the following:
File Server Resource Manager. Provides an improved disk quota management system that allows you to manage quotas for individual folders, sets of folders, and volumes. Quotas can be set per folder and per user, and there’s an AutoQuota feature. You can also create storage reports. See Chapter 14 for details.
DFS Management. Provides improved management and functionality for the DFS. DFS replication enhancements improve handling of large files and large numbers of files. With Enterprise Edition and Datacenter Edition, compression features are included.
Print Management. Provides a central management interface for all Windows 2000 or later print servers as well as the related printers and print queues. Printer drives, forms, and ports can also be centrally managed, and there’s an automatic detection feature that can add network printers to a local print server automatically. See Chapter 17 for details.
File Server Management. Provides an integrated interface for File Server Resource Manager, the DFS Management console, and Storage Manager for storage area networks (SANs). Also includes extensions for shared folder, disk, and volume management. See Chapter 11 to Chapter 15 for details.
Storage Manager for SANs. Provides a central management interface for SAN devices. You can view storage subsystems, create and manage logical unit numbers (LUNs), and manage Internet SCSI (iSCSI) target devices. The SAN device must support Visual Disk Services in Windows Server 2003.
Before we examine administration tools, let’s look at other resources that make Windows Server 2003 administration easier. One of the system administrator’s greatest resources is the Windows Server 2003 distribution disk. It contains all the system information you’ll need whenever you make changes to a Windows Server 2003 system. Keep the disk handy whenever you modify a system’s configuration. You’ll probably need it.
To avoid having to access a Windows Server 2003 distribution disk whenever you make system changes, you might want to copy the I386 directory to a network drive. When you’re prompted to insert the CD-ROM and specify the source directory, you simply point to the directory on the network drive. This technique is convenient and saves time. Other resources you might want to use are examined in the sections that follow.
While you’re working with the distribution CD-ROM, you might want to install the Windows Server 2003 Support Tools. The support tools are a collection of utilities for handling everything from system diagnostics to network monitoring.
To install the support tools:
Insert the Windows Server 2003 CD-ROM into the CD-ROM drive.
When the Autorun screen appears, click Perform Additional Tasks, and then click Browse This CD. This starts Windows Explorer.
In Windows Explorer, double-click Support and then double-click Tools.
Note
Throughout this book I refer to double-clicking, which is the most common technique used for accessing folders and running programs. With a double-click, the first click selects the item and the second click opens and runs the item. In Windows Server 2003 you can also configure single-click open/run. Here, moving the mouse over the item selects it; a click opens and runs it. You can change the mouse click options with the Folder Options utility in the Control Panel. To do this, select the General Tab, and then choose Single-Click To Open An Item or Double-Click To Open An Item, as appropriate.
Double-click Suptools.msi. This starts the Windows Support Tools Setup Wizard. Click Next.
Read the End User License Agreement and then, if you agree and want to continue, click I Agree and then click Next.
Enter your user information, and then click Next.
Select the destination directory for the support tools. The default location is %ProgramFiles%Support Tools. If you don’t want to use the default location, type a new directory path or click Browse to search for a location. The tools use about 23 MB of disk space.
Click Install Now. Click Finish.
After installation you can access the support tools through the Tools Management Console shown in Figure 1-3. To start the console, click Start, click Programs or All Programs as appropriate, click Windows Support Tools, and then select Support Tools Help.
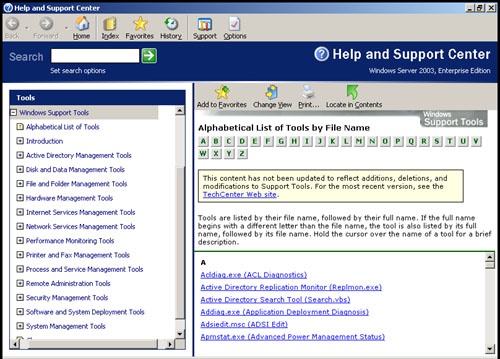
As the figure shows, the tools are organized by file name, tool name, and category. Clicking a tool name accesses a help page that displays the online help documentation for the tool and that you can also use to run the tool.