Web Parts, including Data Views, can exchange data, even when different companies produce the Web Parts, as long as they adhere to the Web Part connection interface specification. One Web Part acts as a data provider, while the other acts as a consumer of the data. A Web Part developer can choose to implement both the consumer and provider interfaces, one of the interfaces, or neither of the interfaces; for example, the List View Web Part of a Picture Library does not support Web Part connections. You can use a browser or SharePoint Designer to connect Web Parts, but SharePoint Designer provides you with additional options.
Typically, you connect Web Parts so that when you click an item in one Web Part, the contents in one or more other Web Parts change. The data sources that supply content to both provider and consumer Web Parts must share a common field that you use to link both the Web Parts. When you use a browser, you must display this common field in both Web Parts; however, this is not a requirement when you use Data Views and use SharePoint Designer to create the Web Part connection. Using SharePoint Designer, you can connect to Web Parts on the same page as well as Web Parts on other pages.
Note
A Web Part cannot connect to itself, either directly or through a series of Web Part connections.
In this exercise, you will create a Web Part connection to a Web Part on another page.
Note
USE the site you modified in the pervious exercise.
OPEN the site in SharePoint Designer, if it is not already open.
In the Folder List task pane, expand WebPages, and double-click Products.aspx to open the page in the document window.
In Design view, right-click Products, and then click Web Part Connections.
The Web Part Connections Wizard starts.
Click Next to display the second page of the Web Part Connections Wizard.
Click Browse to open the Edit Hyperlink dialog box.
Double-click WebPages, and then click Consigments.aspx.
The Address text box now contains WebPages/Consignments.aspx.
Click OK to close the Edit Hyperlink dialog box.
In the Web Part Connections Wizard, the Page text box contains Consignments.aspx.
Click Next to display the third page of the Web Part Connections Wizard.
Click Next to display the fourth page of the Web Part Connections Wizard.
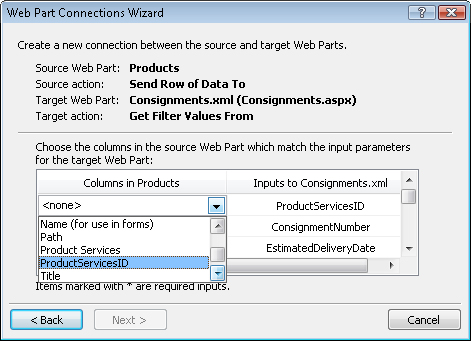
Click the first cell under Columns in Products. Click the down arrow that appears in the cell, scroll down the list, and then click ProductServicesID.
Click Next to display the fifth page of the Web Part Connections Wizard.
Click Next, and then click Finish to close the Web Part Connections Wizard.
On the Common toolbar, click Save.
A Microsoft Office SharePoint Designer message box opens, warning you that both pages must be saved. If this warning message does not appear, save both files.
Click OK to save both pages.
Under Express, click Express 9:00.
The Consignments.aspx page is displayed in a Multiple Item Form Data View format, showing three consignments for the Express 9:00 delivery service.