Chapter at a Glance
✓ | |
✓ | |
✓ | |
✓ | |
✓ | |
✓ | |
✓ | |
In the previous chapter, you created a custom list form, which added a SharePoint control named the Data Form Web Part (DFWP) to your Web page. You also saw how easy it is in Microsoft Office SharePoint Designer 2007 to manipulate this Web Part. In the previous version of Windows SharePoint Services, the DFWP was known as the Data View Web Part (DVWP) or Data Views, because at that time, the Web Part allowed you only to view data. The DFWP SharePoint control not only allows you to view data, but it can provide you with a form for entering data into a variety of data sources, such as Microsoft SQL Server databases, XML files, and Web services, as well as data held in SharePoint lists and libraries. The data from these data sources is exposed as XML data, to which the DFWP applies an Extensible Stylesheet Language for Transformations (XSLT) to present the data as HTML. The terms Data View Web Part or Data Views are still used to refer to the DFWP SharePoint control.
Tip
XSLT is a language for formatting the presentation of XML data. Like XML, XSLT is both human-readable and computer-readable and is an open standard.
Using Data Views, you can display, edit, and modify list item data in a more flexible manner than when you use the List View Web Part (LVWP). You can use Data Views in many business scenarios where traditionally a developer created a custom Web Part. Even if you find that the DFWP control does not meet all your business requirements, it is still a superb prototyping tool to obtain business signoff.
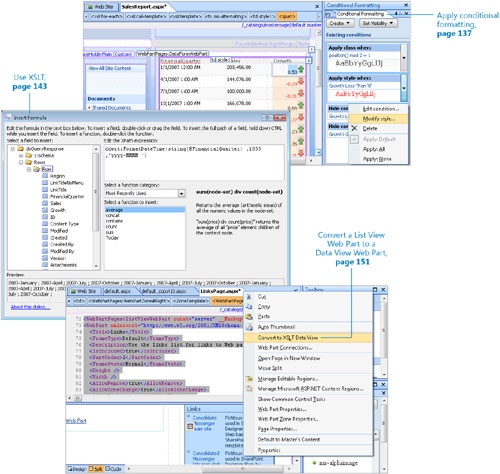
In this chapter, using lists and libraries as your data source, you will create and modify Data Views. You will format the data based on specific criteria defined by the metadata, and work with the XSLT. You will learn how to convert an LVWP to a DVWP and review the XSLT that is generated to match the Collaborative Application Markup Language (CAML) that the LVWP uses to render the contents of the list. You will also learn how to deploy the DVWP to other sites.
Important
Before you can use the practice files in this chapter, you need to install them from the book’s companion CD to their default location. You will need to create a practice site for this chapter based on the site template DataView_Starter.stp located in this chapter’s practice file folder. Then when you perform the exercises in this chapter, remember to use your SharePoint site location in place of teams.consolidatedmessenger.com.
For more information about practice files, see "Using the Book’s CD" at the beginning of this book.
Troubleshooting
Graphics and operating system–related instructions in this book reflect the Windows Vista user interface. If your computer is running Windows XP and you experience trouble following the instructions as written, please refer to the "Information for Readers Running Windows XP" section at the beginning of this book.
The Data View Web Part (DVWP) is a very flexible Web Part that you can create only by using Office SharePoint Designer 2007. Like other Web Parts, DVWPs follow these rules:
They can be placed inside and outside Web Part zones.
They have the standard properties shared by all Web Parts, such as Title, Height, Width, and Frame State.
Depending on the settings of the Web Part zone properties, they can be relocated to other Web Part zones by using the browser.
Web Part properties can be accessed through the browser Web Part tool pane.
When inside a Web Part zone, they support personal and shared views.
Additionally, you can edit the XSL and the parameters passed to the XSL without needing to open the page in SharePoint Designer.
In this exercise, you will create a DVWP that displays the contents of a list.
Note
USE your own SharePoint site location in place of the teams.consolidatedmessenger.com team site.
BE SURE TO start SharePoint Designer before beginning this exercise. Turn off ASP.NET Non-visual Controls, if they are still on, by using the View, Visual Aids menu.
OPEN the DataViews child site in SharePoint Designer.
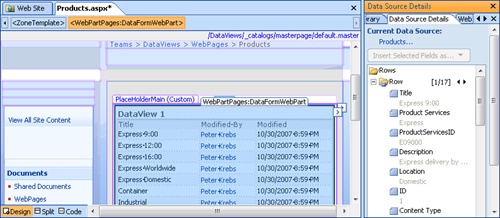
In the Folder List task pane, expand the WebPages folder, and then double-click Products.aspx to open the page in the document window.
Click the Main Web Part zone. Then on the Data View menu, click Insert Data View.
A Data Form Web Part control is added to the Web Part zone and the Data Source Library task pane opens, where the lists for the Web site are displayed under the Current Site section. The number of lists displayed should match the number in brackets to the right of the SharePoint Lists header and should match the number of lists that you can see in the Folder List task pane. Lists configured to be hidden from the browser are not listed in the Data Source Library task pane.
In the Data Source Library task pane, expand SharePoint Libraries to display non-hidden libraries contained in this Web site.
In the Data Source Library task pane, under SharePoint Lists, drag Products into the DataFormWebPart control.
Within the DataFormWebPart control, an HTML table appears with Title, Modified By, and Modified columns, together with the list data in the body of the table as HTML rows and cells. The Data Source Details task pane opens, and to the right of Row, [1/17] denotes that the list contains 17 list items. The 1 indicates that the value of the first item is displayed below Row.
In the Data Source Details task pane, to the right of Row, click the Next arrow to view the second list item value.
The text in the square brackets to the right of Row indicates you are now viewing the second of 17 list items.
On the Common toolbar, click Save button and then press
 .
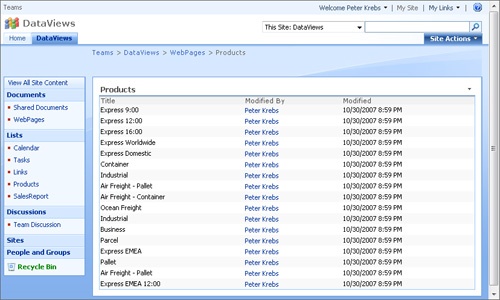
.The page opens in the browser.