
In This Chapter
Understanding clustering terminology.
The new Cluster Service.
Using Network Load Balancing.
Clustering Windows components.
Windows Server 2003 doesn't introduce many new clustering concepts, but it does extend clustering capabilities throughout most of the Windows Server 2003 family. New clusterable applications and services are also available, making creating high-availability network services easier.
One of the most important changes to clustering is that the Cluster Service is now available on three of the four Windows Server 2003 editions: Standard, Enterprise, and Datacenter. Cluster Service clusters can also contain up to eight nodes, double the number of Windows 2000. Note that Standard Edition supports only two-node clusters.
Windows's other major clustering technology, Network Load Balancing (NLB), is now available in four editions of Windows Server 2003, not just Enterprise (formerly Advanced) and Datacenter, as was the case in Windows 2000. Network Load Balancing is a crucial technology for deploying scalable, high-workload Web sites and .NET Web Services, so it's easy to understand why Microsoft chose to include the technology in all editions.
Both of these clustering technologies have been available in prior versions of Windows. However, some of the details of their operation, as well as how they're managed, have been updated for Windows Server 2003. We'll cover both technologies in this chapter, including detailed, step-by-step instructions for using them.
Unfortunately, Microsoft hasn't brought any new logic to how its cluster technologies are named. To avoid mass confusion, you must realize that Microsoft offers two distinct clustering technologies. Each is designed for a different purpose, each is more or less incompatible with the other, and the two have nothing in common—yet they're both called clustering. They are
Cluster Service—. This clustering is designed for high availability. Essentially, between two and eight servers function entirely on their own but are also capable of taking on the tasks of another server in the cluster should one fail. This behavior is similar to how most offices work: Joe and Bob normally have their own job tasks. However, when Joe goes on vacation, Bob gets to wear both hats and perform Joe's job tasks along with his own. In Windows terms, Joe and Bob are nodes in a Cluster Service cluster.
Network Load Balancing—. This clustering is designed for high availability and scalability. Each server in the cluster—up to 32 are possible—is completely independent but performs the exact same work as the other servers. Work is more or less evenly distributed between them. In office terminology, this is similar to a customer service call center. Each call center employee can handle the same tasks, and the phone system directs incoming calls to the next available representative.
You'll find the Cluster Service most often used to cluster enterprise back-end servers, such as Exchange Server computers or SQL Server computers. Generally, companies build so-called active-active clusters, in which each computer is an independent, fully functional server. Should one server fail, however, another server in the cluster picks up the failed server's work. You can also create active-passive clusters, in which one server performs useful work and the other simply waits for the active server to fail. At that point, the passive server seizes control and becomes active, performing useful work.
NLB, on the other hand, is most often used in Web server applications. Large groups, or farms, of Web servers are configured to use NLB. Each server in the farm (or cluster) can perform the same work, and incoming user requests are distributed to the server that's least busy at the time. If the farm becomes overworked, new servers can be added at any time. NLB provides high availability because, if a server in the farm fails, other servers are already performing the same work. Therefore, users are able to continue working with the farm, if not with a particular server.
The Cluster Service is a special piece of software that runs on Windows Server 2003 and manages the relationships between the servers in the cluster, which are referred to as nodes. You don't manually install Cluster Service like you did in prior versions of Windows; you simply use the Cluster Administrator console to create a new cluster. We'll walk through that procedure later in this chapter.
Windows Server 2003 clusters are a bit picky about who they'll allow in a cluster. If you've built the first cluster node on Windows Server 2003, Enterprise Edition, all other nodes that are running Windows Server 2003 must also be running Enterprise Edition. The same restriction applies to the Standard and Datacenter editions; the edition of the first cluster node sets the edition that all other Windows Server 2003 nodes must follow. However, you can have clusters that have a mix of nodes running Windows Server 2003 and Windows 2000 Server.
You can build the following three types of clusters:
Single node—. In this type of cluster, only one node exists. Essentially, all clusters start out this way: You create the first node and then add more nodes. However, clusters with only one node don't have any failover capabilities, which defeats the purpose of clustering. The only practical use for a single-node cluster is to experiment with the Cluster Service in a lab or classroom.
Single quorum device—. The quorum, as we explain in the next section, is a special resource the cluster uses to store the cluster configuration. The quorum is accessible to all nodes in this type of cluster, generally through an external drive array physically attached to each cluster member.
Majority node set—. A new type of cluster for Windows Server 2003, this stores the quorum across the nodes, and the nodes might not be physically attached to one another. This type of clustering enables you to create geographically dispersed clusters, but setting them up is very complex because Windows is incredibly picky about little implementation details. Microsoft recommends that you use this type of cluster only if it is provided preconfigured from a server manufacturer, and we tend to concur.
The next section discusses some of the basic concepts you'll need to start building your own clusters.
Imagine you have a single server you want to make into a SQL Server computer. You can simply install Windows and then install SQL Server. Suppose that, for reasons of your own, you install Windows on one hard drive and install SQL Server onto a completely separate RAID array. Now imagine that you make that RAID array an external array, connected to the computer by a small computer system interface (SCSI) cable or by fibre channel. This shouldn't be that hard to imagine; most database servers are set up in this fashion.
Conceptually, all you need to do now to build a cluster is attach a second server to the external drive array. You'll install Windows and SQL Server on that server, too. However, SQL Server's services will remain stopped, and the two servers will communicate via a special service, sending a heartbeat signal to one another. If the first server stops sending the heartbeat, the second server knows that something has gone wrong. It immediately seizes control of the external drive array, starts the SQL Server services, and takes over where its failed companion left off.
Even though this example omits a few crucial details, it's essentially how an active-passive cluster operates. Active-active clusters are more difficult to conceptualize. Imagine that you have two servers, each running SQL Server and each connected to two external drive arrays. One server owns a single external drive array and stores the SQL Server databases there. If one server fails, the other one detects it and seizes control of its external drive array (now owning two drive arrays total). The second server starts a second copy of SQL Server and takes over where the failed server left off. Now, the remaining server is effectively two SQL Server computers, all running in one box.
Note
For details on how the Cluster Service operates and handles failovers, go to the book's product page at www.informit.com/store/product.aspx?isbn=0789728494. Click the Extras tab and locate article ID# A011201.
Each cluster, then, is comprised of a variety of resources, which can include the following:
One or more IP addresses—. These are addresses users and client computers use to communicate with the cluster. Each cluster node has its own private IP addresses, as well, which nobody really uses.
One or more computer names—. As with IP addresses, these belong to the cluster and not to any one cluster node. Users and client computers communicate with these names, and not with the nodes' private computer names.
A quorum resource—. This resource contains all the information about the cluster's resources, which node owns each resource, and so forth.
Logical drives—. These represent shared drive arrays, which can be external SCSI arrays or fibre channel arrays.
Application services—. This might be the DHCP service, SQL Server, or any other clustered application.
Each resource can be owned by only one node at a time. Each resource does, however, have a list of all nodes that could possibly own the resource. When the node that owns a resource fails, the resource's other possible owners detect the failure and one of them takes ownership of the resource. Administrators can also manually transfer resource ownership from one node to another. This enables you to transfer workload off of one node, letting you shut down the node for maintenance without interrupting your users' work.
Resources can have dependencies. For example, most clustered applications require TCP/IP (other network protocols aren't supported under clustering), so a node can't own an application resource unless the node already owns the shared TCP/IP address the application requires. To keep dependencies easy to manage, Windows lets you organize resources into groups. Resource groups can be transferred from node to node as a single unit, so you don't have to worry about forgetting a dependency when transferring ownership of an application to another node.
To create a new cluster, first make sure your hardware is ready. Then, launch Cluster Administrator on any Windows Server 2003 computer and follow these steps:
If your cluster nodes have a shared storage device, such as an external SCSI drive array, power down all nodes except the first one.
In Cluster Administrator, select File, New, Cluster.
Enter the domain in which the first cluster node exists and its name. This step is necessary to identify the first node because you don't have to perform this process on the first node—you can perform it on any computer capable of running Cluster Administrator.
Enter a name for the cluster; this name must not conflict with any other NetBIOS names on your network.
Provide an IP address to be used by the cluster. The cluster can't use DHCP to obtain an address, so be sure the address you provide isn't in use on your network and won't be issued by a DHCP server to another computer.
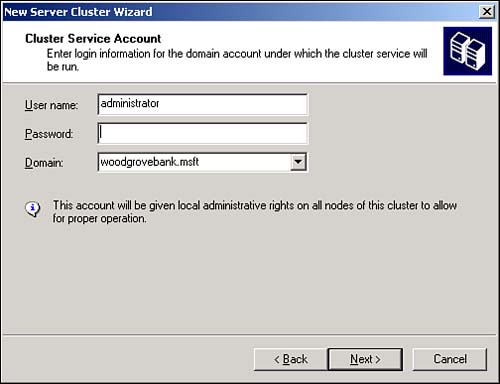
Enter the credentials the Cluster Service should use, as shown in Figure 12.1. This account will be granted local Administrator privileges on the node.
Wait for the wizard to install and configure the Cluster Service.
After your first cluster node is fully functional, you can add more nodes to the cluster. Simply right-click the cluster in Cluster Administrator. Then, from the pop-up menu, select New, Node.
You'll use Cluster Administrator to manage your clusters. With it, you can add and remove cluster resources and resource groups, add and remove nodes, and transfer resource ownership from one node to another.
To add a new resource group, just right-click a cluster and select New from the pop-up menu; then select Group. Enter the name and details for the new group, and you're ready to go. To add a new resource to an existing group, right-click the group and select New; then select Resource from the pop-up menu. You'll see a dialog box similar to the one in Figure 12.2, which allows you to specify the type of resource you want to add.
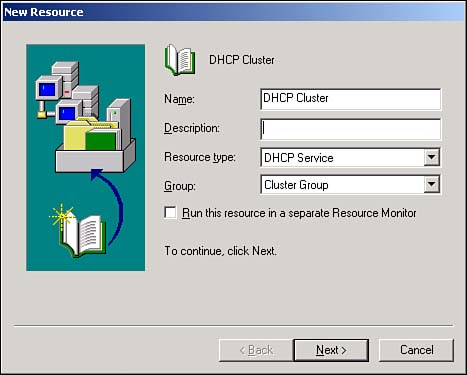
In the New Resource dialog box, you'll specify the following:
A brief description of the resource. This is especially useful when you have multiple resources of the same type because it enables other administrators to more easily figure out which is which.
The resource type, which can include clusterable Windows services, file shares, and so forth. We'll discuss those in the next section.
A group to which the new resource will belong.
After clicking Next, you can specify the nodes that are allowed to own the resources. For example, the DHCP Service resource can be owned only by nodes that have the DHCP Service already installed, so you use that condition to limit the potential owners for a DHCP Service resource. After specifying the potential owners, click Next.
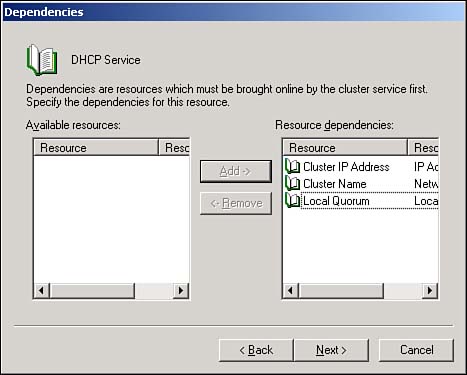
Last, you'll specify any resources on which your new resource depends. As shown in Figure 12.3, you can choose from all existing resources as possible dependencies, and you typically must specify at least one resource of the Storage type. That's because most resources, especially applications and services, have to store their data somewhere. In a cluster, that data must be on a cluster-owned (shared) storage location, making the application or service dependent on the availability of that storage location.
Transferring resources from one node to another is easy. If you want to perform a transfer that tests your resources' capability to fail over from one node to another, simply right-click a resource group and select Initiate Failure from the pop-up menu. The resource will immediately fail and transfer to another possible owner.
Note that resources have their own properties that affect their behaviors. To access these properties, right-click a resource and select Properties from the pop-up menu. The Properties dialog box enables you to change the resource's name, description, and list of possible owners; you can also change the resource's dependencies. As shown in Figure 12.4, you can also configure advanced properties. For example, you can configure the Cluster Service to automatically try to restart a service any time it stops, and you can configure how often the Cluster Service checks a service to see whether it's responding.

Resource groups have properties, too, which you can access by right-clicking the group and selecting Properties from the pop-up menu. Group properties include failover and failback policies, which are defined as follows:
Failover policy—. Determines how many times a group is allowed to fail from node to node within a given time period. The default is 10 times in 6 hours. If the failovers exceed this threshold, the Cluster Service assumes the group is not working correctly and takes it offline. You must manually restore the group to service after correcting its problems.
Failback policy—. Disabled by default, this allows the Cluster Service to move a group back to its original cluster node. You can either allow an immediate failback, in which case the group returns to its original node (referred to as the preferred node) as soon as that node becomes available or specify that failback occur only during certain hours. Specifying hours for failback allows the group to remain where it is until a relatively idle period when users won't be affected by the failback.
Cluster Administrator includes a comprehensive help file that can provide step-by-step instructions for other cluster operations.
Network Load Balancing used to be included in the Advanced (now named Enterprise) and Datacenter versions of Windows. With Windows Server 2003, NLB is available in all editions.
In NLB, each cluster member is a separate, individual computer connected to the other cluster members only by a network. Cluster members don't share storage space as in a Cluster Service cluster.
User requests are sent to one or more IP addresses that are shared by all cluster members. All cluster members receive all requests sent to the cluster, but only one cluster member responds to each request. NLB determines which member will respond based on a set of internal rules and request affinity. The NLB service on each cluster member constantly communicates with the NLB services on the other cluster members, exchanging information about how busy each cluster member is from moment to moment. That workload information factors into NLB's decision about which member will handle incoming requests. NLB uses the following rules to make that decision:
Any members that are offline or haven't recently responded to other cluster members are removed from consideration.
If the request has been received by a known client and affinity is enabled, the server with affinity for the client handles it.
If the request is from a new client or affinity is disabled, the least-busy member with the highest priority handles the request.
You configure many of these properties, including priority and affinity, when you set up a new cluster.
Note
For details on how NLB operates and distributes requests between cluster members, go to the book's product page at www.informit.com/store/product.aspx?isbn=0789728494. Click the Extras tab and locate article ID# A011202.
To create a new NLB cluster, open the Network Load Balancing Manager console. Then follow these steps:
From the Cluster menu, select New.
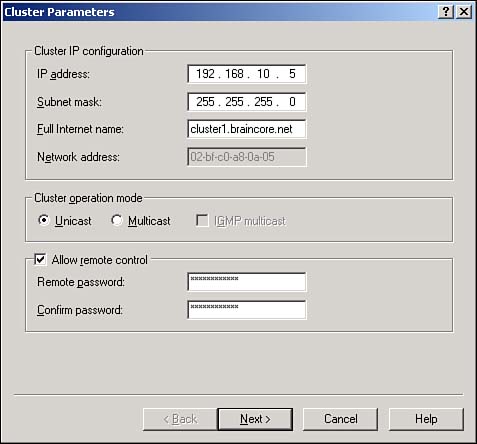
As shown in Figure 12.5, enter an IP address, a subnet mask, and a name for the new cluster. You can also choose to enable or disable remote control for the cluster and configure the cluster for Unicast or Multicast mode.
Note

For more information on Unicast and Multicast modes, go to the book's product page at www.informit.com/store/product.aspx?isbn=0789728494. Click the Extras tab and locate article ID# A011203.
If the cluster will use any additional IP addresses, enter them as shown in Figure 12.6. Web servers with multiple Web sites, for example, often use multiple IP addresses that you'll need to identify here.
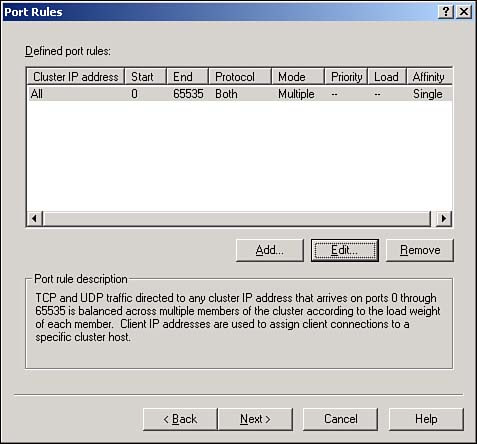
Specify port rules and affinity modes. By default, NLB enables itself for all TCP and UDB ports and sets Single Client affinity mode. Figure 12.7 shows the defaults, and we'll discuss changing them in the next section.
Select the network interface NLB will use. In servers with multiple network adapters, NLB typically runs on only one adapter.
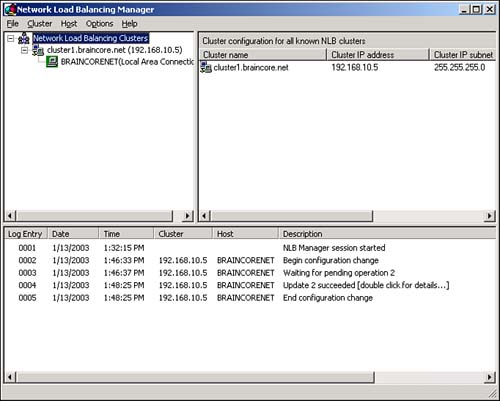
Wait as NLB configures itself on the new cluster member. Be sure to check the log messages, shown in Figure 12.8, for any errors that might occur.

You're done, and you're ready to add new members to your new cluster. Simply right-click the cluster itself and select Add Host to Cluster from the pop-up menu.
You can decide to which TCP and UDP ports NLB will respond. This enables your cluster members to run a clustered application, such as a Web server on TCP port 80, and to run nonclustered applications that NLB ignores. You can also configure each port range with a different affinity setting.
To control a cluster's ports, right-click the cluster and select Control Ports from the pop-up menu. For each configured port range, you can do the following:
Enable or disable the range by clicking the appropriate buttons. Disabled ranges are ignored by NLB.
Drain the range by clicking the Drain button. Draining instructs NLB to refuse new connections but to allow cluster members to finish any work for connections they've already accepted. This is a great way to take a cluster offline.
You can also edit the port settings. To do so, right-click the cluster and select Properties from the pop-up menu. Then, select the Port Rules tab. Click the appropriate button to add, edit, or remove any existing port ranges. When you add or edit a range, you'll see a dialog box similar to the one in Figure 12.9.

Port ranges have the following properties:
Affinity setting—. This controls how NLB load balances incoming requests to this port range. Available options are
None—. In this mode, all incoming requests are load balanced across the cluster. This is appropriate when cluster members aren't maintaining any information between user requests or when the information is being maintained in a back-end database server accessible to all cluster members.
Single—. In this mode, requests from new IP addresses are load balanced normally. From then on, the same server handles all requests from a given IP address. If servers are maintaining state information locally, this is a good setting for an intranet. However, Internet clients might seem to be coming from multiple IP addresses because of their service providers' network address translations, so this affinity mode won't work.
Class C—. In this mode, each range of 253 IP addresses in a Class C range is handled by a single cluster member. This mode largely defeats load balancing, but it ensures that Internet users will always connect to the server that's maintaining their state information locally.
A port range—. This is expressed as a starting port number and an ending port number. Port numbers in this range are handled by NLB and use the affinity mode designated.
A protocol—. This can be TCP, UDP, or both. It specifies to which IP protocol the port range applies.
NLB Manager enables you to configure and control your NLB clusters. Most importantly, it allows you to set the status of your cluster members, taking them offline for maintenance if necessary.
A valuable option in NLB Manager is the capability to specify alternative login credentials. Normally, the console uses your regular login credentials to attempt to connect to NLB clusters for management. However, your workstation login credentials might not have administrative privileges on the NLB cluster members, which results in NLB Manager being incapable of connecting. To specify alternative credentials, select Credentials from the Options menu. Then, provide the correct domain, username, and password that NLB Manager should use to connect to NLB clusters.
Windows Server 2003 includes a number of applications and services that can be clustered using either the Cluster Service or NLB. They are as follows:
Internet Information Services (IIS)—. Supported by both the Cluster Service and NLB. Using NLB makes the most sense because you can have up to 32 independent servers in an NLB cluster. NLB provides both failover and load balancing, whereas the Cluster Service can provide only failover.
Distributed file system (DFS) roots—. Even though NLB could technically load balance between DFS roots, there's usually little need to do so. The Cluster Service provides failover for the DFS root, which is what enterprises are usually interested in.
Distributed Transaction Coordinator—. Supported only by the Cluster Service.
File shares—. Technically, you could provide load balancing of file servers by using NLB. However, it's unsafe to do so because no provision exists for synchronizing copies for changes and so forth. The Cluster Service provides failover for file shares, and DFS allows you to load balance and synchronize file shares across multiple servers.
Printer spools—. Supported only by the Cluster Service. Theoretically, you could use NLB to provide load balancing between identical print queues on separate servers, but the queues would still be competing for the same physical print devices, so there would be little point in doing so.
Volume Shadow Copy Service Tasks—. Supported only by the Cluster Service.
WINS Service (WINS)—. Supported by the Cluster Service. You could potentially use NLB to provide load balancing between WINS servers, provided the servers were configured as replication partners. However, WINS typically isn't used so heavily that load balancing would be useful.
Of course, NLB can potentially support any TCP/IP-based application, and the Cluster Service can support TCP/IP-based applications that meet certain requirements. For more details, consult Windows Server 2003's online Help and Support Center.