
In This Chapter
Automating Windows Server 2003 Installations.
Product Activation.
Remote OS Deployments.
Upgrading from Previous Versions .
Much of installing and deploying Windows Server 2003 is the same as in Windows 2000. As you will see in this chapter, some changes have occurred, primarily in the way of improvements and extensions to the previous methodologies. Improvements have also been made in the creation of unattended setup files and extensions to RIS to include support for deploying more operating systems, including the Windows Server 2003 server platforms. A new feature that affects installation and deployments, Windows Product Activation, is also discussed, including the differences between deploying with retail and volume product license keys. Finally, we will take a look at what's involved in upgrading to Windows Server 2003, such as supported upgrade paths, deployment methodologies, and considerations for mass upgrades.
The installation process for Windows Server 2003 is basically the same as in Windows 2000. You can perform network installations or CD-based installations, including booting from CD. Similar to the previous version, the setup process has several phases. There is a DOS-style initial phase for configuring and formatting drives and selecting the installation location. This is followed by a graphical (GUI) phase in which system hardware is detected; licensing is configured, including entering the license key; the computer name and administrator password are specified; network settings and regional options are configured; and the computer can be joined to a domain. All this is basically the same as in previous versions—the differences in the installation process are in the available options and what you can configure.
Just like in previous versions, you can perform an installation from the Windows CD or from source files across the network. We'll start with a walk-through of a CD-based install, specifically booting from CD, and then take a look at network-based installations. As we walk through the installation process, you'll note how similar it is to Windows 2000.
To start installing Windows Server 2003 on a new system, simply insert the Windows Server 2003 CD and turn on the system. If the system is configured to boot from CD and there are no configured disk partitions, the setup program launches automatically and begins installing Windows Server 2003. If disk partitions are configured, it displays the following prompt: Press Any Key to Boot from CD. You then must press a key to launch the setup program. If you don't have a bootable CD-ROM drive, you can boot to a DOS floppy disk with CD-ROM drivers and launch setup by running winnt.exe from the i386 directory of the Windows CD. Alternatively, if you have a previous installation of Windows on your system, you can perform an upgrade or fresh installation by running winnt32.exe, which is also in the i386 directory. We will look at upgrading from previously installed operating systems later in this chapter.
When booting from the Windows Server 2003 CD, the initial phase looks exactly like Windows 2000. You get the familiar blue Windows Setup screen, as shown in Figure 2.1.

Figure 2.1. Windows Server Setup starts off looking exactly like previous versions of Windows NT and Windows 2000.
If you need to install device drivers for your disk array, press F6 when prompted at the bottom of the screen, just like Windows 2000. After it detects initial hardware devices and loads the setup application, you are prompted to set up Windows, repair a previous windows installation, or quit.
Assuming you choose to continue with the installation of Windows, the license agreement is displayed and you must press F8 to agree to the terms and continue. Next, you are given the opportunity to create/delete partitions and select the installation drive. When booting from CD, you can do just about anything to the drive partitions. You can create new partitions and delete any or all of the existing partitions. After you have the drives partitioned the way you want, select a partition on which to install Windows Server 2003. Next, setup detects whether there is an existing version of Windows on the partition you chose. If there is, you are prompted to upgrade it or erase it and start fresh. Next, you are prompted on what to do to the existing file system. You can format with NTFS, format with FAT, or leave it unchanged, just like Windows 2000. However, as shown in Figure 2.2, if previous partitions exist, you now have the option to perform quick formats with NTFS or FAT to save time.
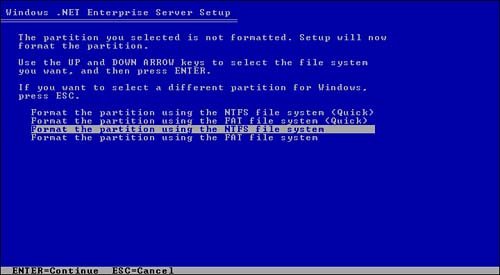
The default is to format the partition using the NTFS file system. The system then formats the drive (if that's what you chose). It checks the integrity of the drive and then copies the Windows files. After the file copy is complete, setup reboots and the GUI phase starts.
After the reboot following the DOS phase, Setup enters the GUI phase. The first option you have during the GUI phase of the installation is to configure Regional and Language options. Next is personalizing the installation by entering your name and company name. You are then prompted to enter the product license key and to select the licensing mode—per server or per seat. This is followed by the configuration of the computer name and administrator password. One new feature is an insecure password warning: If you enter an insecure password, as shown in Figure 2.3, Setup pops up with a message warning that your password is too simple and suggests criteria for a stronger password.
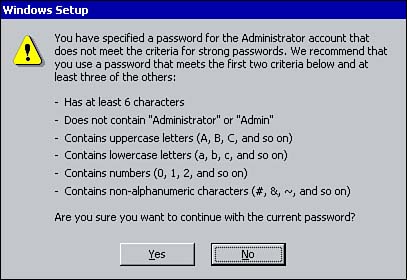
Figure 2.3. Setup detects whether the password you entered is insecure and prompts you to enter a stronger one.
The next step is entering the date, time, and time zone. Setup then detects any network components (such as network cards) that might be installed and prompts you to configure them. If you have multiple cards, you can configure the settings independently for each card. You have the option to configure with Typical Settings (Client for Microsoft Networks, File and Print Sharing for Microsoft Networks, TCP/IP configured to use DHCP) or Custom Settings.
Selecting Custom Settings enables you to specify static IP addresses or add/remove services and protocols. Next is the option to join a domain or specify a workgroup. After that, Setup finishes copying files and configuring the system, reboots, and starts Windows Server 2003. The first time you log on, the Manage Your Server Wizard starts and enables you to configure your server for its custom role, as shown in Figure 2.4.

Figure 2.4. The Manage Your Server Wizard starts automatically after installation and enables the configuration of the server for its particular role.
You might have noticed that, unlike Windows 2000, there is no opportunity in the installation process to specify which server components and services (DNS, WINS, DHCP, RIS, IIS, and so on) to install. Installation and configuration of server components are performed after the OS is installed, unless you specify otherwise in an unattended installation script. You build those scripts the same way that you did in Windows 2000; for more details, search Windows Server 2003's online Help and Support Center for “unattended installation”. We'll also touch on unattended installs later in this chapter.
Installing Windows Server 2003 from the network is basically the same as installing from CD—there is just an extra initial phase for copying the setup files prior to the DOS-based setup phase. It is also the same as in Windows 2000; you simply map a drive to the network location containing the Windows Server 2003 CD files and run winnt.exe or winnt32.exe from the i386 directory. The main difference between running Setup using winnt.exe or winnt32.exe (either across the network or from CD) and running it by booting from CD is the restrictions on what you can do when partitioning drives in the DOS phase. When installing from the network, the files for the Setup program itself must be downloaded to the local system. Consequently, the partition containing those files cannot be deleted during the drive partition phase of setup.
After Setup gets past the drive configuration step, the rest of the setup process for a network-based install is identical to a CD-based install.
A new feature of Windows Server is Emergency Management Services. This new feature is available on systems that have special hardware that supports firmware console redirection and have a Serial Port Console Redirection (SRPC) table. Essentially, Emergency Management Services provides out-of-band access to your servers. It is a sort of text-mode console into the server even when the operating system is down. This gives you access to do anything on the server, short of physically removing and installing hardware.
As such, it provides an additional option for installing Windows Server 2003. For example, you could perform remote installations of Windows Server 2003. After the console is redirected, you can insert the Windows Server 2003 CD, boot the system, and run through an install. Unfortunately, because of the way Emergency Management Services works, you won't be able to see the GUI phase of setup. Consequently, when Setup reaches the end of the DOS phase, it prompts to automatically configure the GUI portion. Selecting this option enables you to proceed with the GUI installation; however, you won't have any choice in what it installs. It installs with the default options, but at least it gets the OS installed. One way to overcome this drawback is by using an automated install using an unattended answer file.
For the most part, unattended installations are the same as in Windows 2000: They can be launched from the network or CD using winnt.exe or winnt32.exe. Windows Server 2003, however, supports the use of an unattended installation file and an optional uniqueness database file to specify the answers to setup questions.
Because new and different features and components are available in Windows Server 2003, the main differences from Windows 2000 are in the answer files themselves and the methods for creating them.
The Setup Manager Wizard, which is used to create the answer files, has been improved to ease the creation of automated installation files. It walks through all the questions asked during setup, allowing you to specify the answers. It then creates the appropriate unattended installation file(s) based on your answers. The Setup Manager Wizard can be installed by extracting setupmgr.exe from deploy.cab in the SupportTools directory of the Windows Server 2003 CD (Windows 2000 also requires an additional file, setupmgx.dll). The Setup Manager Wizard on the Windows Server 2003 CD can be used for creating answer files for all Windows XP and Windows 2003 editions, except Data Center. To create answer files for Windows 2000, use the Windows 2000 Setup Manager Wizard.
The main improvement in the Setup Manager Wizard is the interface. Rather than a screen-by-screen prompt for each question and answer, all the main options are on one screen, as shown in Figure 2.5.
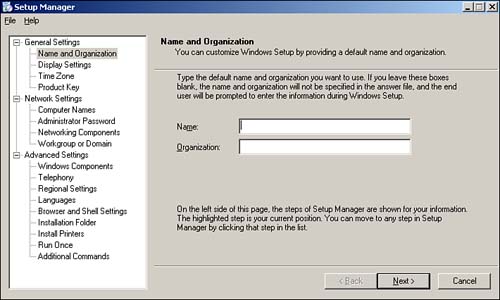
The Windows Server 2003 Setup Manager Wizard also includes a number of additional options. First, in Windows 2000, the Setup Manager Wizard does not prompt for the product license key, so you have to manually edit the answer files or get prompted for the license key during setup. In the Windows Server 2003 Setup Manager Wizard, you can specify the product license key to use.
Another problem with the Windows 2000 wizard is specifying the local administrator password. If you enter it in the wizard, it is stored in the answer file in clear text. Obviously, anyone who has access to the file would then know the local administrator password, which is a potential security risk. In the Windows Server 2003 Setup Manager Wizard, not only can you specify the local administrator password, but you also have the option to encrypt it in the answer file. This eliminates the potential security risk of the local administrator password being stored in clear text.
Two additional options the Windows Server 2003 Setup Manager Wizard prompts for that the Windows 2000 one does not are Windows Components and Additional Commands. Windows Components enables you to specify the installed Windows Components, such as World Wide Web Service, SMTP Service, Remote Installation Service, Terminal Server, and so on. Additional Commands enables you to automatically run programs after the unattended setup completes while the computer is starting up. This can be used to further customize the installation by installing programs or setting configuration settings—anything that can be executed without requiring a user to be logged on.
Just like the Windows 2000 version, the Setup Manager Wizard in Windows Server 2003 creates the answer file, the udf file, if any, and a sample batch file based on the answers provided. You can then use these files as is to automate your deployments or further customize with a text editor.
Note
For an explanation of unattended installations in Windows 2000, go to the book's product page at www.informit.com/store/product.aspx?isbn=0789728494. Click the Extras tab and locate article ID# A010202.
Yet another method for deploying Windows Server 2003 is by using third-party imaging software. The process is largely the same as in Windows NT 4.0 and Windows 2000. A reference machine is prepared with all software installed and configured the way you like it. The sysprep.exe utility is then run to remove all machine-specific information, such as SID, computer name, and so on. This generic installation is then copied to a network share using third-party imaging software, which makes an exact bit-by-bit copy of the hard drives on the system. The image is stored on a server and later downloaded to one or more target machines. When the target machine boots up from the deployed image, a mini-setup wizard starts asking for all the machine-specific information removed by sysprep, such as the computer name, license key, and the like. When it's done, a brand-new system is up and running with a hardware and software installation identical to the original.
Windows Server 2003 supports deployment via imaging, just like previous versions. What's new is the sysprep.exe file that is used to strip out the computer-specific information.
A nice feature of the new sysprep is that it is more forgiving of different hardware. A switch (–bmsd) can be used to generate a list of available mass storage devices for sysprep.inf. You can then specify any additional mass storage devices that the mini-setup wizard should attempt to detect.
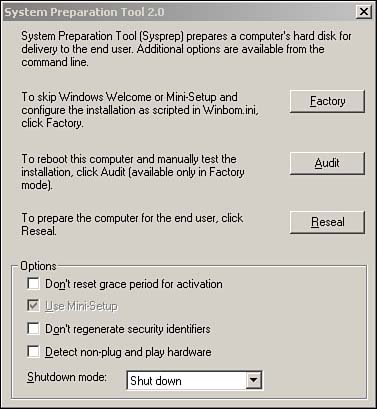
Additionally, a new Factory Mode is available. If sysprep is run with the –factory switch, when the system reboots and you log on, it comes up into Factory Mode, as shown in Figure 2.6, instead of running the mini-setup wizard. When in this mode you can perform other operations, such as installing software or drivers, which helps to minimize the number of base images you need to store. You can store a few images sysprepped to boot to factory mode; then when it comes time to deploy, you can download the image to a target machine and load the software and drivers for the particular machine type. Finally, you can select the reseal option to run sysprep again to clean up, and the system will be ready to be imaged again to be deployed en masse.
Windows Server 2003 has a new anti-piracy feature for ensuring software licensing compliance—Windows Product Activation. When Windows is installed, you are prompted to enter a license key, which forms the basis for your product ID.
When activating Windows Server 2003, a hash is created from the existing hardware in your machine. This hardware hash is then used to uniquely identify your machine and is sent to Microsoft, along with your product ID, when you activate Windows Server 2003. This associates the product ID to your specific hardware, thus ensuring that the product license key cannot be used on other hardware.
Once installed, you have a limited time (30 days) before you have to “activate” the installation. If the Windows Server 2003 is not activated within the grace period, it ceases to function. A reminder pops up in the Notification Area until you activate it. Clicking the reminder balloon brings up the Activate Windows screen shown in Figure 2.7.

Figure 2.7. Windows Product Activation is required only when using a retail version of Windows Server 2003.
As you can see, a couple of different methods are available for activating Windows. You can activate it immediately by selecting Yes, Let's Activate Windows Over the Internet Now. Alternatively, you can call Microsoft to obtain an Activation Key and manually enter it. If you call Microsoft, you need to provide the installation ID for your system (a 54-character numeric string). You will then be given a corresponding 42-character string that you must enter—talk about tedious! Obviously, activating over the Internet is much easier, provided you have an Internet connection.
After you have activated Windows, if you attempt to install Windows Server 2003 on a different machine using the same product license key, Windows Activation fails. Because you are using the same product license key, you will have the same product ID; however, because it is a different machine, you will have a different hardware hash. When this information is sent to Microsoft during Windows Activation, the hardware hash won't match and the activation request will be rejected. Upgrading the hardware in an existing machine can potentially cause Windows Activation to fail. If too much hardware is upgraded, the hardware hash could be different. Obviously, valid reasons exist for using the same license on different hardware, such as replacing the existing machine with a newer one. You can still use the product license key in these situations, but you must call Microsoft to obtain an Activation Key and then use that key to manually activate Windows.
The process outlined previously is required for any retail or original equipment manufacturer (OEM) version of Windows Server 2003. The product license keys obtained in retail copies of Windows Server 2003 require activation.
What about volume licenses? Must you activate every installation of Windows Server 2003? For large organizations, this could be particularly troublesome because large corporations usually purchase Microsoft licenses in bulk via one of the volume licensing programs such as Select or Open license. These programs generally have a single license key for each platform that is used for installation of all the machines for the respective platform. What are these organizations to do? Must they call Microsoft and manually key in the Activation Key for every installation after the first? Of course not—that would be ridiculous and the industry would revolt.
If an organization purchases a Select or Enterprise license agreement, it obtains a special installation CD that has a setup program coded to automatically enter the Select program license key. This special license key does not require activation. If you use this Select CD, you aren't prompted to enter a product license key during setup and you also don't have to activate Windows after installation.
Other license programs, such as the Open license agreement, allow you to purchase a single physical copy with a single product license key, but you are allowed to install it on multiple machines because you have purchased (on paper) the appropriate server licenses. In these cases, a single product license key is used for hundreds, even thousands, of installations. With these license programs, a special volume license key is obtained from Microsoft that bypasses the Windows Activation, thus machines installed with these keys do not require activation.
As with the other deployment methods, Remote Installation Services (RIS) in Windows Server 2003 is similar to Windows 2000. The major difference is the platforms supported for RIS installations. When Windows 2000 was released, it supported only RIS installations of Windows 2000 Professional. Hot fixes and service packs eventually added support for Windows 2000 server and Windows XP. Windows Server 2003 RIS supports the installation of all versions of Windows 2000, Windows XP, and Windows Server 2003, except Windows 2000 Data Center and Windows Server 2003 Data Center, of course.
Note
For a brief overview of RIS in Windows 2000, visit http://www.samspublishing.com/ and enter this book's ISBN number (no hyphens or parenthesis) in the Search field; then click the book cover image to access the book details page. Click the Web Resources link in the More Information section, and locate article ID# A010201.
Remote Installation Services in Windows Server 2003 is installed the same as it is in Windows 2000—by installing the Remote Installation Service Windows Component in Add or Remove Programs. Just like in Windows 2000, installing the Windows component only installs the service components. However, installing the service in Windows Server does not require a reboot like Windows 2000 does. RIS still needs to be configured separately before it can be used. Unlike Windows 2000, the configuration of RIS is much more straightforward and easier to find. In Windows 2000, you must find the risetup.exe file to launch the configuration program. In Windows Server 2003, however, a shortcut to risetup.exe (Remote Installation Services Setup Properties) is placed on the Administrative Tools menu. Running this shortcut creates the initial CD-based image and configures RIS to respond to client requests.
Remote Installation Services properties are configured in the same place as they were in Windows 2000—on the Remote Install tab of the Computer object of the RIS server in Active Directory Users and Computers. A new Verify Server button appears on the Remote Install tab that can be useful in troubleshooting a RIS installation. Clicking this button launches the Check Server Wizard that runs diagnostics to determine whether any problems exist with the Remote Installation Services installation on the specified computer. It can also restart the RIS services and attempt to authorize the RIS server as a DHCP server in Active Directory. These same diagnostics can be performed by running the Remote Installation Services Setup Properties. After RIS has been configured, this wizard has a new option labeled Check This Remote Installation for Errors. Selecting this option runs the RIS server diagnostics.
Another new button on the Remote Install tab is the Show Clients button. This button runs an Active Directory query to display all the RIS installed clients associated with the specified RIS server. This enables you to see how many clients each server is managing, which helps in load balancing your RIS deployments.
Furthermore, the client RIS experience can be managed with the same group policies as Windows 2000. The RIS group policy settings determine the options available to the user and the amount of interaction during the setup process, whether the user can restart a previously failed setup, whether he sees the RIS maintenance and troubleshooting tools, how much he can interact with the installation, whether it is fully automated, whether he is prompted for anything, and whether he can customize and change anything.
For more information on Group Policies, see “New Group Policies,” p. 93.
As mentioned previously, existing operating systems can be upgraded by running winnt32.exe. This launches the setup wizard, where you are given the choice to perform an upgrade or a fresh install. Next, you are prompted to accept the license agreement and then enter the license key. The next step is something new in Windows Server 2003: You are prompted to connect to the Internet to update the setup files, as shown in Figure 2.8. This downloads the latest setup files and drivers, as well as updates the compatibility database.

Figure 2.8. Windows Setup can use dynamic update to check for critical product updates prior to installing Windows Server 2003.
Setup then scans your system and compares it to the compatibility database in an attempt to detect any known hardware or software incompatibilities. Before performing any upgrade, you should always verify that the current hardware and software are compatible with the new OS.
After the compatibility scan, a report is displayed showing any detected incompatibilities and suggestions on how to correct them, as shown in Figure 2.9.
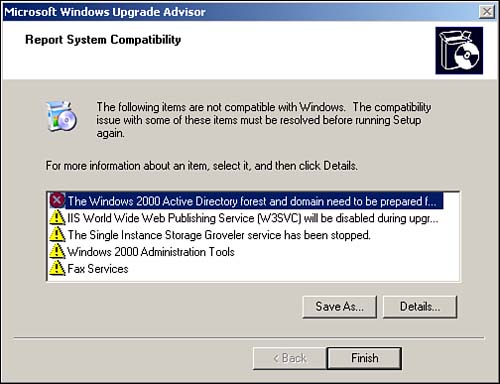
Figure 2.9. The Windows Compatibility Report displays any applications or drivers that might not be compatible with Windows Server 2003.
Provided there are no critical incompatibilities, Setup then copies the setup files from the source location (CD or network) to the system and reboots. The rest of the setup process is virtually identical to a fresh install. It proceeds with the DOS phase of setup and then the GUI phase. The only difference is that, if you chose to upgrade the existing system instead of a fresh install, you aren't prompted for anything because it uses the same configuration settings as the previously installed operating system.
One of the things restricting your choice of whether to do an upgrade or a full install is the supported upgrade paths. The following are the supported upgrade paths for Windows Server 2003, Standard Edition:
Windows NT Server 4.0 with Service Pack 5 or later
Windows NT Server 4.0 Terminal Server Edition with Service Pack 5 or later
Windows 2000 Server
The supported upgrade paths to Windows Server 2003, Enterprise Edition are
Windows NT Server 4.0 with Service Pack 5 or later
Windows NT Server 4.0 Terminal Server Edition with Service Pack 5 or later
Windows NT Server 4.0 Enterprise Edition with Service Pack 5 or later
Windows 2000 Server
Windows 2000 Advanced Server
Windows Server 2003, Standard Edition
The supported upgrade paths can be summed up in a single statement: Any Windows NT 4.0 (with SP5) or Windows 2000 server platform can be upgraded to the same platform or better, but downgrades are allowed.
Operating systems prior to Windows NT 4.0, such as Windows NT 3.51, require an upgrade to one of the previously mentioned operating systems first; then you can upgrade to Windows Server 2003 (or reinstall from scratch, of course).
The easiest upgrade to Windows Server 2003 is from Windows 2000 as the underlying technology, and much of the processes is basically the same.
Although the upgrade from Windows 2000 is the smoothest, special care needs to be taken when upgrading domain controllers. Before you can upgrade Windows 2000 domain controllers or install new Windows Server 2003 domain controllers into an existing Windows 2000 domain, the Active Directory schema must be extended to support the new Windows Server 2003 domain controllers. This schema extension is performed by first running adprep /forestprep, allowing it to replicate, and then performing adprpep /domainprep. Does this mean you have to raise the domain functional level to Windows 2000 Native or Windows Server 2003? No. You can still have “down-level” domain controllers. Windows Server 2003 maintains compatibility at the lower functional levels with Windows NT 4 domain controllers and Windows 2000 domain controllers.
For more information about Active Directory, see “Active Directory Functional Levels,” p. 66.
Whenever possible, I recommend a fresh install over an upgrade to ensure that no legacy files or Registry settings are left lying around that could potentially cause problems. You also have the opportunity to reconfigure the underlying hardware, such as hard drive partitions, and even reformat the drives to start clean. The choice of whether to upgrade is usually a matter of logistics and what is possible. Usually, it comes down to how difficult it would be to reinstall the existing applications. An upgrade maintains the installed applications and Registry settings, whereas a fresh install obviously does not. Sometimes taking a server down and doing a complete reinstall is simply not feasible. For example, you might have an application whose configuration settings are not completely documented. That, of course, never happens, right? All the configuration settings of every application on every server throughout the entire organization are all completely documented, right? Okay, maybe not. In those cases you might be forced to upgrade.
For mass deployments of fresh installations of Windows Server 2003, the same methods are available as Windows 2000: RIS, automated installations, or third-party imaging applications. However, to perform mass upgrades of existing systems, your only option is to automate the upgrade by using answer files. You can create an unattended installation file that upgrades the existing OS; the trick is kicking off the upgrade and specifying the answer file. If you have some type of software distribution infrastructure then you can use that to deploy the upgrade package. Alternatively, you can use group policy to deploy the upgrade package.
As you have seen in this chapter, deploying Windows Server 2003 is very similar to deploying Windows 2000. It should be because it is based on the same technology. However, although the basic processes and techniques are the same, a few improvements and additions have been included that could help smooth your deployments.