
In This Chapter
Using Software Update Services.
Automating administration via scripting.
Backing up your server.
Using Automated System Recovery.
Maintenance is a curious area for the Windows Server 2003 editions. In some ways, you'll find that the product hasn't changed much from Windows 2000. In other ways, you won't recognize the product because so much has changed. The biggest changes come in areas of totally new or improved functionality, such as Automated System Restore (ASR) and Software Update Services. Other major maintenance tools, such as Windows's built-in backup and restore application, have changed very little.
Hotfix and service pack management is one of the biggest areas of improvement in Windows Server 2003. In previous versions of Windows, hotfixes were usually applied individually, or in batches by using add-on tools such as Microsoft's Qchain.exe. Windows Server 2003 eliminates the need for these services by including hotfix installation and management software right in the core OS. In addition, Microsoft's new Software Update Services (SUS) provides tools that allow corporations to deploy security hotfixes (now called security updates) and service packs directly to other servers and to client computers.
If you've been working with Windows XP, you'll notice that a number of its maintenance features have found their way into Windows Server 2003. ASR, for example, originally appeared in earlier versions of Windows and is fully integrated into Windows Server 2003. Windows XP's expanded Windows Management Instrumentation is also included in Windows Server 2003, providing an excellent interface for VBScript-savvy administrators who want to automate common management tasks.
The process of keeping your computers up-to-date with the latest fixes has always been somewhat difficult. Microsoft actually offers different types of fixes, which many administrators choose to deal with in different ways:
Hotfixes—. Also called quick-fix engineering (QFE) or simply updates, these offer fixes for bugs and other anomalous conditions. Generally, these fixes aren't fully regression-tested, which means they haven't been subjected to an extensive beta-testing process to ensure full compatibility with all operating environments. Microsoft usually recommends that you apply a hotfix only if you're experiencing the specific problem the hotfix corrects.
Security hotfixes—. Now called security updates, these correct specific security flaws in Windows. Because they address security issues, these updates are almost always considered critical and Microsoft recommends that they be deployed to all your computers as rapidly as possible. These updates are generally available from Windows Update (and are, in fact, listed in the “Critical Updates” section of Windows Update). Deploying these fixes has been a major nightmare for most organizations: Unfortunately, Microsoft has had to release a lot of these for Windows 2000 and Windows XP, and hasn't—until recently—offered great tools to make the deployment process easy and automatic.
Service packs—. These are collections of hotfixes, security updates, new features, and other product improvements that are released periodically. Service packs go through a complete beta-testing process, making them more stable than individual hotfixes. Service packs are cumulative, which means they contain all fixes from prior service packs, hotfixes, and security updates.
Managing these updates involves two distinct tasks: Deploying updates and inventorying updates. Windows Server 2003 includes tools that assist with both tasks.
You can think of SUS as a corporate internal version of Windows Update, Microsoft's Web-based application for software update management. In fact, SUS was originally named Windows Corporate Update, reflecting its Windows Update origins.
Note
To learn more about Windows Update and how it works, go to the book's product page at www.informit.com/store/product.aspx?isbn=0789728494. Click the Extras tab and locate article ID# A011402.
Windows Update enables users to easily check for updates to their operating systems, download the updates, and install them automatically. Unfortunately, Windows Update has several major drawbacks in a corporate environment:
Most updates require users to be administrators of their computers—. That was fine on Windows 98 (where Windows Update debuted), which had no concept for administrative privileges. However, in Windows 2000 and Windows XP, administrative privileges aren't usually provided to end users, making Windows Update less useful.
Windows Update provides a one-on-one update service—. This means each computer must connect to the Windows Update Web site individually to retrieve updates. In organizations with hundreds or thousands of computers, this technique is inefficient and unreliable. It's mainly a waste of Internet bandwidth because each computer must individually download the same updates.
Windows Update isn't automatic—. Windows XP did introduce a new feature called Automatic Updates (which was released for Windows 2000 in Service Pack 3); this feature automatically checks for updates, downloads them, and asks for permission to apply them.
Windows Update also includes the Windows Update Catalog, which allows administrators to access the entire update library. Using the Catalog, administrators can download individual updates for any operating system. Unfortunately, there is no tool to easily distribute the downloaded updates.
SUS is designed to fix all of that. Essentially, SUS is your very own version of Windows Update, which you install on one or more servers within your environment. Each SUS server can be configured to download updates from Windows Update (which serves as the central worldwide source for updates) or from another SUS server. Client computers and other servers running the Automatic Updates client (also referred to as the SUS client) can be directed to a SUS server for their updates. This architecture allows you to create your own internal, distributed update infrastructure, such as the one shown in Figure 14.1.
Figure 14.1. A SUS infrastructure utilizes your network resources more efficiently than Windows Update.
SUS is available as a free download from Microsoft's Web site. It can be installed on any Windows 2000 Server or Windows Server 2003 computer, except domain controllers. During the installation, you specify where you want downloaded updates to be saved, as shown in Figure 14.2. Updates can be saved to a local folder, or they can be retained on the Windows Update server. Generally, you'll store updates locally; if you leave them on Windows Update, each client will have to use your Internet bandwidth to download its updates.
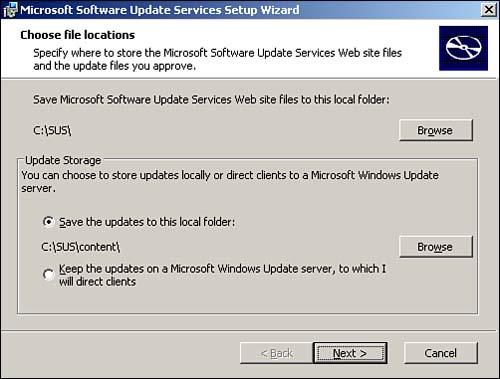
Figure 14.2. Saving updates to a local folder can take quite a bit of space, so make sure your server has plenty to spare.
After you install SUS, you configure its synchronization schedule. To do so, click the Synchronize item in the left menu bar and then click the Schedule button. The dialog box shown in Figure 14.3 appears, allowing you to tell SUS when to download recent updates from the Windows Update servers. We recommend a weekly synchronization during idle hours, such as Sunday mornings at 3 a.m.

Figure 14.3. Your initial synchronization can take several hours because SUS has a few years' worth of updates to download.
Keep in mind that you can change SUS's operating options at any time by clicking the Options menu item. As shown in Figure 14.4, you can choose to store updates locally, automatically approve new versions of updates, and select the languages supported in your environment. (You'll read more about automatically approving new versions of updates a little later.) Language support is useful in large, multinational corporations because it allows SUS to maintain updates in multiple languages, supporting all of a corporation's users.

Because your first SUS synchronization can take several hours, you might want to start it manually, so that you can keep an eye on it as it downloads the available updates. Simply click the Synchronize button to start the synchronization process and, as shown in Figure 14.5, SUS will display progress bars indicating how it's doing. As we've mentioned, your first synchronization will include every available update for the products SUS supports: Internet Explorer 5.0x, Internet Explorer 5.5x, Internet Explorer 6.x, Windows 2000, Windows XP, and Windows Server 2003.

Microsoft recognizes that not all organizations will want to deploy every single update to their computers. For example, one of the updates available for Windows XP is the Windows Movie Maker, which probably isn't a major line-of-business application for most companies. To give administrators maximum control, SUS doesn't make any of its updates available to your network until you approve them. To approve updates, click the Approve Updates menu item. You'll see a list of all updates, as shown in Figure 14.6.

Figure 14.6. Updates must be manually approved one at a time before being made available to your network.
The list of updates includes several pieces of valuable information:
The name of the update and the date on which it was released.
The size of the update.
Whether the installation of the update requires a reboot.
The operating systems to which the update applies. Note that SUS doesn't support Windows NT or Windows 9x operating systems; only Windows 2000 and higher are supported.
The language of the update. If you're downloading multiple languages, you'll find each update listed multiple times—once for each language you support.
A brief description of the update. A Details link pops up a new window with a more complete description of the update.
After you approve an update, it becomes available to clients running Automatic Updates. Where do your computers get Automatic Updates? A version of it is included with Windows XP, but that's not the latest version and it isn't SUS compatible. The correct version can come from several places:
You can manually install the client by using the Windows Installer package you download from the Windows Web site.
Any Windows XP computers that have been using the built-in Automatic Update have probably already downloaded and installed the new version.
Windows 2000 Service Pack 3 contains the new version of Automatic Updates.
Windows XP Service Pack 1 contains the new version of Automatic Updates.
All editions of Windows Server 2003 ship with the correct version of Automatic Updates.
Administrators can use group policies to centrally configure Automatic Updates within a domain; doing so enables you to create a consistent update configuration for all computers in a domain. You can also manually configure Automatic Updates on each computer. On Windows XP and Windows Server 2003, right-click My Computer and select Properties from the pop-up menu. Locate the Automatic Updates tab, shown in Figure 14.7, and select the desired update option.

Figure 14.7. The SUS Client (Automatic Updates) appears similarly on Windows XP, Windows 2000, and Windows Server 2003.
It's important to remember that Automatic Updates is configured by default to use only the Windows Update Web site to obtain updates. If you've deployed SUS on your network, you must reconfigure Automatic Updates on your client computers to use your SUS server. This configuration must come from a centralized group policy, which means your computers must all belong to a Windows 2000 or Windows Server 2003 Active Directory domain.
Automatic Updates uses new group policy settings that aren't included in Windows 2000 domains by default. The new settings are specified in the WUAU.adm file, which is added to the %windir%inf folder when you install Automatic Updates. To create a group policy object (GPO) that configures Automatic Updates, first install the newest Automatic Updates client on an administrative workstation (any Windows 2000 or Windows XP computer with Active Directory Users and Computers installed). Then, follow these steps:
Open Active Directory Users and Computers.
Right-click the organizational unit (OU) to which you want to apply your Automatic Updates configuration. You can also right-click the domain to apply the configuration to all computers in your domain.
Select Properties from the pop-up menu, and select the Group Policy tab.
Click New to create a new policy.
Specify a name for the policy, and click Edit to open the Group Policy Object Editor.
Under Computer Settings, right-click Administrative Templates.
Select Add/Remove Templates from the pop-up menu, and then click Add.
Specify the
WUAU.admfile. If it's not present on your computer, you can copy it from the%windir%inffolder on any server with SUS installed.Click Open to load the template, and click Close to close the dialog box.
Expand the Computer Configuration section, and then expand Administrative Templates.
Expand Windows Components, and then click Windows Update.
Two policy settings will be shown in the right pane of the console: Configure Automatic Updates and Specify Intranet Windows Update Server Location. Double-click either policy to configure it.
Use the Configure Automatic Updates policy to define the behavior of the Automatic Updates client. Generally, you should select the Auto Download and Schedule the Install option, which provides the most automatic operation.
Use the Specify Intranet Windows Update Server Location policy setting to specify the name of your SUS server.
The Automatic Updates client runs at all times, even when no user is logged on to the computer. If you've configured the client to automatically download and install updates, its behavior is as follows:
If no user is logged on, updates are automatically installed. If a restart is required, the computer is automatically restarted.
If an administrator is logged on, updates are automatically installed. If a restart is required, a warning is displayed before installation begins, giving the administrator time to shut down any critical processes. Administrators can cancel the update, which will remain pending. The update will automatically apply at a later time, even if cancelled.
If a non-administrative user is logged on, a countdown is displayed before updates are automatically installed. If a restart is required, the computer is automatically restarted. The countdown is designed to give users time to shut down their applications without allowing them to interrupt the update process.
You should be aware of how Automatic Updates functions when configured via group policy, and when other group policies exist that define Windows Update behavior:
If you've enabled the Remove Access to Use All Windows Update Features policy setting, Automatic Updates continues to function but displays no notices to logged-on users. This policy setting is available only on Windows XP.
If you've enabled the Remove Links and Access to Windows Update policy setting, Automatic Updates continues to operate if configured to download updates from an intranet SUS server. If you don't enable this policy, users can still manually access Windows Update. We recommend enabling this policy in conjunction with SUS to ensure that users' computers obtain updates only from your SUS server or servers.
After your clients are configured, they'll contact your SUS server according to the schedule you set. If you've configured them to automatically download and install updates and configured your SUS server(s) to automatically download new updates, you'll have an almost hands-off system for managing software updates in your environment. The only regular task you'll need to perform is approving new updates for deployment to your clients.
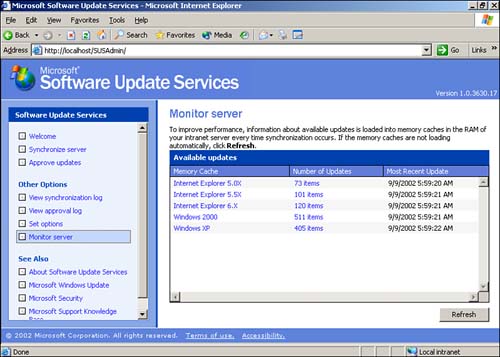
SUS provides two tools for managing and monitoring updates: the Approval Log and the Monitor Server link. Both are accessible as menu items from the main SUS administration screen. The Approval Log, shown in Figure 14.8, simply lists the approval actions that have been taken on the server. This log enables you to review which updates might have been approved by other administrators, and it can be useful when troubleshooting problems with package deployment. The Monitor Server page, shown in Figure 14.9, displays a summary of updates available from your SUS server broken down by operating system or product. Clicking a product name displays a complete list of packages, including their globally unique identifiers (GUIDs), file sizes, and other information.

Sadly, Microsoft has provided better free tools for deploying updates than for finding out which ones have already been deployed. Unfortunately, SUS is designed only to make updates available; it can't force client computers to download updates unless they're properly configured, and SUS can't help you determine whether all your clients have successfully downloaded and applied a particular update. Microsoft SMS can do all of these things, but it represents a significant additional investment in both time and money.
The best you can do for free is a downloadable tool from Microsoft called Hfnetchk.exe. This tool, combined with an XML-based database, is designed to check for the presence and proper installation of Microsoft security updates. The tool can be run against remote computers, providing a rudimentary centralized update inventory. Unfortunately, the tool is designed for use only with security updates, not other hotfixes, and not for service packs in general (although the tool does properly detect security updates installed as part of a service pack).
After Hfnetchk is installed, you execute it from a command line. For example, running Hfnetchk -v -z -s 1 produces a basic output. The tool is primarily designed to list security updates that are defined in its database but not found on the system that the tool is scanning. The -v switch provides specific details about why an update wasn't found; reasons can range from missing files or Registry keys to incorrect configuration settings on the computer. Hfnetchk always provides a reference to a Microsoft Security Bulletin or Knowledge Base article that provides instructions on how to obtain and properly install each update.
You can have Hfnetchk scan multiple remote computers simultaneously by using the -h switch: hfnetchk -h computer1, computer2, computer3. Alternatively, you can use the -fh switch to point to a text file containing a computer name on each line of the file. For example, hfnetchk -fh computers.txt opens a text file named Computers.txt, looks for one computer name on each line of the file, and scans those computers for security updates.
Other Hfnetchk options include
-Iipaddress, ipaddress—. This option specifies IP addresses rather than hostnames and attempts to scan the computer using each IP address provided.-fip—. Works similarly to the-fhoption, pointing to a text file of IP addresses rather than computer names.-r—. Specifies a range of IP addresses to scan and can be useful when you want to scan an entire subnet.-d—. Specifies an entire Active Directory or Windows NT domain to scan.-n—. Scans all computers on the network. Both this switch and the-dswitch rely on the Network Neighborhood to obtain a computer list. Unfortunately, Network Neighborhood isn't the most reliable directory of your network, so you might have greater success using an IP address range of a file of computer names.-x—. Specifies the XML database to use during the scan. This can be an XML filename, a compressed XML in acabfile, or a URL. If not specified, Hfnetchk defaults to using theMssecure.cabfile located on the Microsoft Web site.-s—. Suppresses specific messages.-s 1suppresses “Note” messages, whereas-s 2suppresses both “Note” and “Warning” messages.-v—. Lists the reason a particular update was not considered installed, which can help you find out exactly how to go about installing it.-f—. Outputs Hfnetchk's results to a file, which may be easier to review than scrolling through the command-line output.-uand-p—. Allow you to specify an alternate username and password to use during the scan. For example, you may want to specify a domain user account that has local Administrator privileges on all computers that will be scanned. Don't include this switch if you're using Hfnetchk in a batch file; doing so would expose a powerful user account's password to anyone with access to the batch file.
Microsoft contends that SMS is the ideal method to inventory and manage software updates, including security updates. We feel that this position is unreasonable; asking customers to purchase an entirely separate product to support their base operating systems is asking too much. SUS is a huge step in the right direction, providing in-house automatic updates for service packs and other critical updates. Some equivalent for inventorying updates—and automatically deploying missing ones, perhaps—is necessary, and we hope that Microsoft will provide such a tool in the future at no additional charge.
In recent years, Windows administrators have begun to move away from batch file-based automation to more powerful and flexible administrative scripts written in ActiveX Scripting languages such as Visual Basic Scripting Edition (VBScript).
Batch files have always offered a reasonable degree of flexibility, and with the expanded command-line support in Windows Server 2003, batch files get a new lease on life. However, batch files' functionality is limited to the features provided by command-line utilities and the evaluation of relatively simple logical conditions. Scripts written in VBScript, on the other hand, offer much more flexibility.
For more information on Windows Server 2003's new command-line tools, see “New Command Line Tools,” p. 225.
VBScript scripts can be written using Windows Notepad, although experienced script authors prefer tools such as the free Programmer's File Editor (PFE; downloadable from www.download.com), which displays line numbers and has some features better suited for writing scripts. VBScripts can take advantage of almost any operating system feature because VBScripts can use Component Object Model (COM) objects, the basic building blocks of Windows features such as database access, file manipulation, and so forth. VBScript can also fully manipulate Windows Management Instrumentation, querying and modifying operating system and application configuration settings. For example, Listing 14.1 shows a simple script that queries a remote computer for key configuration information, which might help you remotely inventory computers on your network.
Example 14.1. Using WMI to Query Remote Information
Set System = GetObject("winmgmts:{impersonationLevel=impersonate} !//products1/root/cimv2:Win32
ComputerSystem=""PRODUCTS1""")

WScript.Echo System.Caption
WScript.Echo System.PrimaryOwnerName
WScript.Echo System.Domain
WScript.Echo System.SystemType
To test this script, type it into Windows Notepad. Save the file with a vbs filename extension (be sure to enclose the entire filename in quotes; otherwise, Notepad will add a txt extension automatically). Double-click the vbs file to run the script.
So, what does the script in Listing 14.1 do? The first line sets a variable named System equal to a WMI query. You'll actually need to modify this query for use in your organization, replacing the two instances of products1 with the computer name from which you want to query information. After the query executes, the System variable becomes a WMI object, with properties such as PrimaryOwnerName, SystemType, and Domain. The remaining lines of the script simply display the values of these properties by using the Wscript.Echo command, which displays the values in a pop-up message box.
Scripting can be useful without WMI, too. Listing 14.2 shows a sample VBScript that rotates the log files from IIS, saving old log files to an archive folder and deleting the oldest archived logs.
Example 14.2. IIS Log File Rotation Script
' We'll take yesterday's log and move it to
' an archive folder. We'll delete the log file
' that's 30 days old from the archive

' ----------------------------------------------------------
'declare variables
Dim varLogPath, varService, varArchive, varLogFile
Dim varYear, varMonth, varDay
Dim objFS
Dim var30Days

' ----------------------------------------------------------
' set up variables
varLogPath = "c:winntsystem32logfiles"
varService = "w3svc2"
varArchive = "c:winntLogArchive"

' ----------------------------------------------------------
' get yesterday's date
varYesterday = DateAdd( "d", -1, Date() )

' ----------------------------------------------------------
' create a formatted log file name
' for yesterday's log file
' 1. then the 2-digit year
varYear = Right( DatePart( "yyyy", varYesterday), 2)

' 2. Now the month - make sure it's 2 digits!
varMonth = DatePart( "m", varYesterday )
If Len(varMonth) = 1 then
  varMonth = "0" & varMonth
End If

' 3. Now the day - make sure it's 2 digits!
varDay = DatePart( "d", varYesterday )
If Len(varDay) = 1 then
  varDay = "0" & varDay
End If

' 4. Complete the log file name
varLogFile = "ex" & varYear & varMonth & varDay & ".log"

' ----------------------------------------------------------

' Create a file system object
Set objFS = WScript.CreateObject("Scripting.FileSystemObject")

' ----------------------------------------------------------

' Move the file to the archive path
objFS.MoveFile varLogPath & varService & varLogFile, varArchive & varLogFile

' ----------------------------------------------------------

' get date for 30 days ago
var30Days = DateAdd( "d", -30, Date() )

' ----------------------------------------------------------
' create a formatted log file name
' for 30-day-ago log file

' 1. then the 2-digit year
varYear = Right( DatePart( "yyyy", var30Days), 2)

' 2. Now the month - make sure it's 2 digits!
varMonth = DatePart( "m", var30Days )
If Len(varMonth) = 1 then
  varMonth = "0" & varMonth
End If

' 3. Now the day - make sure it's 2 digits!
varDay = DatePart( "d", var30Days )
If Len(varDay) = 1 then
  varDay = "0" & varDay
End If

' 4. Complete the log file name
varLogFile = "ex" & varYear & varMonth & varDay & ".log"

' ----------------------------------------------------------
' Delete the file from the archive path
objFS.DeleteFile varArchive & varLogFile
This script performs some pretty straightforward tasks:
The script starts by declaring variables, which store values used by the rest of the script.
The script defines the file paths for the IIS logs, the particular IIS instance, and the archive folder. You'll need to change these definitions to match your environment.
The next several sections manipulate dates to create log filenames. Keep in mind that IIS log filenames are based on dates.
The script uses Windows's
FileSystemObjectto manipulate files and folders, moving the current log file to the archive path and then deleting the log file from 30 days ago (if one exists).
This script isn't perfect. As is, for example, it displays an error if the paths you provide aren't correct. But the script is a good example of how VBScript can make administration easier and more automated. You could, for example, use Task Scheduler to configure this script to run every morning, automatically rotating your script files.
Note
For a quick tutorial in using VBScript for administrative purposes, go to the book's product page at www.informit.com/store/product.aspx?isbn=0789728494. Click the Extras tab and locate article ID# A011403.
Windows Server 2003's built-in Windows Backup application hasn't changed much from Windows 2000, which is to say you still need a third-party backup application if you want to manage backups on more than a couple of servers.
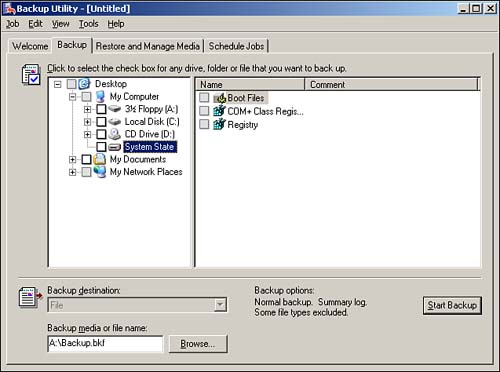
Figure 14.10 shows one of Windows Backup's most important features: the capability to back up the server's system state. The system state includes the server's Registry and, on a domain controller, a copy of the Active Directory database. Even if you're not worried about managing backups on your other servers, you must make a backup copy of the system state on your domain controllers; otherwise, you won't have any recovery options in the event of a total Active Directory failure, accidental deletion of an Active Directory object, and so forth.
Popular alternatives to Windows Backup include Veritas's BackupExec (www.veritas.com) and Computer Associates' BrightStor (www.ca.com). Both provide support for managing backups on multiple servers, utilizing robotic tape drives that hold multiple backup tapes, support for magneto-optical backup devices, and so forth. Windows Backup, on the other hand, supports only directly attached single-tape devices or backups to a file. Windows Backup supports only backing up the local server or network file shares; you cannot back up the all-important system state of a remote server.
Note
For a quick tutorial on Windows Backup, go to the book's product page at www.informit.com/store/product.aspx?isbn=0789728494. Click the Extras tab and locate article ID# A011401.
One important feature that's unique to Windows Backup is Automated System Recovery, Windows's built-in last-resort recovery system.
There's a bit of confusion between ASR and System Restore, another feature of Windows XP. System Restore periodically makes checkpoints of the system state, including driver files. System Restore allows you to roll back to a previous checkpoint, effectively restoring the computer to a known-good condition. Windows Server 2003 does not include System Restore, which was designed primarily as a means of enhancing the reliability of client computers, which often have devices added and removed by end users. As a server operating system, Windows Server 2003 should be managed by experienced administrators (such as yourself), who can manually create backups prior to adding or changing hardware devices.
ASR is a feature of both Windows Server 2003 and Windows XP and is designed as a last-ditch means of returning a computer to operation. Essentially, ASR repeats the operating system setup and then overlays that setup with your last-known system state, services, and other baseline information. Prior to using ASR to restore a server, you should try restarting in Safe Mode, using the Last Known Good configuration and the other recovery tools you've become accustomed to in Windows 2000.
ASR consists of two parts: the ASR backup set and the ASR restore process. You create an ASR backup set by using Windows Backup. The backup set contains the system state data, system services, and disk signatures. This backup enables the ASR restore process to reinstall Windows Server 2003, your system state, disk signatures, and system services in one operation.
To create an ASR backup set, simply launch Windows Backup. The Backup or Restore Wizard includes an option to create an ASR set: Select All Information on This Computer when the wizard asks you the following: What do you want to back up? You can also use Windows Backup's Advanced mode: Simply select ASR Wizard from the Tools menu, and follow the instructions on the screen.
Restoring a system by using ASR is straightforward. You'll need your ASR backup set, the backup media containing your files and application data, and the Windows Server 2003 installation CD. You'll also need a floppy disk containing drivers for your mass storage devices, if those drivers aren't included with Windows Server 2003.
Simply start your computer by booting with the Windows Server 2003 installation CD. During installation, press F2 to enter ASR restore mode. You'll be prompted to provide your ASR backup set. After the ASR restore is complete, you can restore your files and application data.
Keep in mind that ASR restores your system files to the state contained on the installation media. Unless you have an install CD with the most recent service pack integrated, you'll need to reinstall the latest service pack after ASR completes its restore. Also, you'll need to review your hotfix and security update situation to ensure that the server is brought up-to-date after the ASR restore completes. Tools such as Hfnetchk and SUS, both discussed earlier in this chapter, can help identify and apply recent updates.