
Play Favorite Scenes of a DVD Any Time, Instantly
Set Up Dual Monitors for Maximum Exposure
Tweak Your Computer for Peak Performance
Turn Your Computer into a Music Studio
Stay Secure While Wandering the Web
In the not-too-distant future, your computer, stereo system, DVD player, game system, television, day planner, e-mail, Internet portal, and entertainment center will be encased in a single unit. Everything will be combined into what’s currently being called a "media center." A lot of activities, including some of the activities we’ll discuss in this chapter, such as watching DVDs and listening to music, will be performed using Windows Media Player. To prepare for the future, to join the ranks of the high tech, and to fully enjoy and get the most out of your current system, you need to start preparing (and tweaking) today!

In this chapter you’ll learn how to get the most out of Windows Media Player 9. You’ll learn how to enhance your musical experience with dual monitors, how to watch DVDs, and how to fine-tune both audio and video settings. I’ll also show you how to increase your audio and video performance by tweaking your computer using the Sounds And Audio Devices option in My Computer and by configuring settings from inside Windows Media Player. In addition to increasing performance by working with sound and video directly, you’ll also learn that a good, clean, and organized computer increases performance on its own. System tools such as Disk Defragmenter and Disk Cleanup can improve performance, as can deleting programs and unnecessary files.
Windows Media Player comes with some fun stuff that can improve performance, including a graphic equalizer that’s probably just like the one you installed in your first car, as well as stereo, speaker, and video enhancements to boost performance and increase your listening and viewing experience.
Finally, you’ll want to be safe while downloading music and video online, so I’ll show you how to maintain your privacy, avoid running harmful scripts and code, and get updated information about your media automatically. Let’s start the fine-tuning!
I’ve come to rely on Windows Media Player for listening to music, and it has become an integral part of my workday and my life. In fact, I’ve turned my computer into a home entertainment center by purchasing high-end video and sound cards, a rewriteable DVD drive, a second monitor so I can always view the Media Player, and an outlandishly unnecessary surround sound speaker system. After getting your feet wet with the last two chapters, you might be feeling that same tingle too.
Hardware has to be the greatest (albeit most expensive) way to improve a desktop-computer-turned-home-entertainment system. However, you don’t have to go overboard like I did; an enhancement such as a good pair of speakers can make a tremendous improvement quickly, as can a new sound card or video card. Dual monitors are easy to set up as long as you have two video cards installed, and with two monitors you can leave Windows Media Player on all the time.
If you’re interested in upgrading your system, Windows Catalog is a great place to start looking for additional hardware. Visit Windows Catalog at www.windowscatalog.com to see what’s available. Click the Hardware tab and search for various hardware upgrades, or click the Windows Experiences tab and click Enjoy Music And Video. There you’ll find additional ways to enhance your music and video experience with offerings that enable you to do things you never even imagined. Take a look at what’s possible:
Mix your music using tricks and effects just like an experienced DJ using EZ-DJ 1.2.
Turn your computer into a movie theater with a new video card and a large plasma monitor. DVDs never looked so good!
Take your music with you wherever you go with a portable media player.
Get better sound by upgrading your sound card and speakers.
Create your own music using one of several available synthesizers. The synthesizers can be used to create realistic instrument sounds, including drums.
Watch TV, listen to FM radio, and record video on your computer using Aver-Media tuners.
Set up dual monitors by purchasing additional video cards (if necessary) and/or an additional CRT, flat-screen, or plasma monitor.
If your significant other doesn’t share your enthusiasm for everything newer, smaller, and better, and would rather you pay the mortgage than improve your sound and video, there are plenty of free ways to express yourself, as you’ll find out in this chapter.
Although I’ve mostly concentrated on listening to music and watching visualizations thus far, if you have a DVD player you can watch DVDs using Windows Media Player too. With the right equipment, you can turn your home into a mini-movie theater. Imagine being able to watch the latest DVD on your dual plasma screens and listen to it on your new surround sound speakers!
Watching a DVD is just like listening to a CD; just pop it in and it’ll start automatically. Unlike listening to a CD, when watching a DVD, video size becomes more important, and you’ll probably want to tweak it. Here’s how you can change the size of the video you are watching from the Now Playing section:
On the View menu, point to Video Size, and then click a video size percentage or choose Fit Video To Player On Resize. I recommend leaving both Fit Video To Player On Resize and Fit Player To Video On Start selected. Experiment with other options (especially the 200% choice) if you want to zoom in on a particular track or view a video differently than it was originally intended.
To set the options for watching a film in full screen mode, click View, point to Full Mode Options, and select (or clear) the options as desired. By default the menu bar and the Taskbar show, but these can be hidden. Hiding the Taskbar is a good one to select, as shown in Figure 5-1.
To view a DVD in full mode, click View and click Full Screen. To exit full screen mode, use the mouse to locate the icon on the interface, and click Exit Full Screen.

If you upgraded your computer to Windows XP from another operating system and you have a DVD drive in your computer, there’s a slim chance you’ll have problems viewing DVDs. Licensing decoders are required to play DVDs, and you’ll be informed the first time you try to play one if a new decoder is necessary. If prompted, choose Web Help. From Microsoft’s Web site, you can choose from several options, including purchasing a decoder from a third-party. Before you decide to purchase a decoder, check the computer and DVD manufacturers’ Web sites for updates, and try Windows Update, as well. You might just find the update you need for free.
PLAY IT AGAIN, SAM

Sometimes a line from a movie really hits the old funny bone. Other times it’s just cool to hear it or say the line in the middle of a conversation. Famous movie lines have certainly made their way into the mainstream over the years. Maybe you’ll recognize these: "I’ll be back." (The Terminator); "Frankly Scarlet, I don’t give a damn!" (Gone with the Wind); "We’re gonna need a bigger boat." (Jaws); and "Mrs. Robinson, are you trying to seduce me?" (The Graduate).
Now, you can locate and play memorable clips to your heart’s content because many newer digital media (DVDs and VCDs) contain markers, which are like music tracks on an audio CD. You can use these markers to locate your favorite movie clips, video clips, and tracks on a disc. A marker is simply a pointer to a location in an audio or video file. To locate markers on the View menu, point to File Markers, and then click a marker to play. If the File Markers command is dimmed (unavailable), there are no markers on the media.
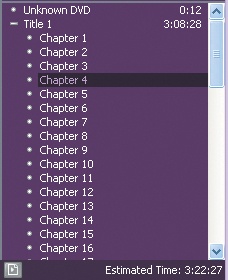
If the DVD doesn’t contain any markers, you might still be able to locate popular scenes. Most DVDs have a Root Menu, which can contain pointers to alternate endings, various parts of the movie, and other special features. In this example, you can locate a particular chapter of a book-turned-movie from the Root Menu. In addition, most DVDs include special features, information on the cast and crew, scene selections, and more as a bonus.
To view special features and locate specific scenes on a DVD, follow these steps:
Verify that the DVD is playing in Windows Media Player. Now Playing should be selected on the Taskbar.
Click View, click DVD Features, and click Root Menu to view the menu shown earlier. If Root Menu is dimmed, choose Title Menu.
From the available menu, select a scene, chapter, or section. Browse through the available choices for additional title pages, cut scenes, alternate endings, or other DVD features. The available options will differ depending on the DVD.
Double-click a scene, chapter, or section to view that scene.
DUAL-ING BANJOS...UH, I MEAN MONITORS

To spice up a DVD-watching party, to extend your desktop viewing experience, or to configure the monitors so you can leave Windows Media Player running on one of them all of the time, set up dual monitors. With dual monitors, you can play a DVD and show it on two screens, and you can position those screens across the room from one another and seat people everywhere. Imagine how cool this setup would be in a game room with surround sound speakers and a great DVD playing on a couple of plasma monitors!
To get started, you’ll need to make sure you can physically connect a second monitor to your computer. Some newer computers come with this capability, so you might not have to purchase anything beside a second monitor. However, if your computer isn’t dual-monitor-ready, you’ll have to purchase and install a second video card (also called a display adapter) in addition to the monitor. This means purchasing a card, opening the case, and installing the new card into an available slot. If you aren’t comfortable with this, there are several shops that can do it for you, and there are lots of cards to choose from. Purchase a card that fits your budget, but remember, better quality generally means a higher price tag.
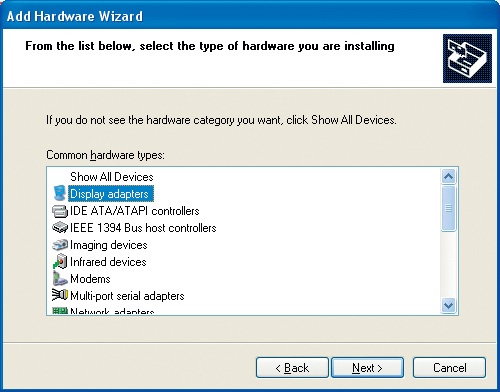
Once you’ve installed the card, reboot Windows XP and let the magic begin. Most of the time the card will be installed automatically, but if it isn’t, you can install it yourself by following the screen prompts. The Add Hardware Wizard is being used to install a new display adapter in this graphic.
Once the adapter is installed, turn off the computer and plug in the second monitor to a wall outlet and to the new adapter now located at the back of the computer. Restart your computer. To finalize the installation and enable the second monitor, follow these steps:
Right-click the desktop and click Properties.
Click the Settings tab, and click Extend My Desktop Onto This Monitor. Click OK.
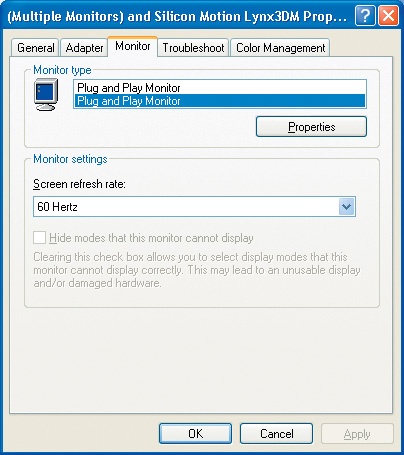
From the Settings tab, click Advanced. Click the Monitor tab to see both monitors and set properties for them. In the graphic you can see two plug-and-play monitors successfully installed; this is what you’re shooting for!
Most likely, the monitor will turn right on, but if it doesn’t (especially if you are using a laptop), look for a keyboard function key with a picture of a monitor on it. Occasionally, you’ll have to press this to get the additional monitor to work. In addition, dual monitors won’t work if you have Adobe Type Manager installed. You can uninstall it from Add Or Remove Programs in Control Panel.
There are several ways to fine-tune your audio settings, and you’ll want to give them each a go to make sure you are getting all you can out of your system and Windows Media Player. This is especially true if you’ve purchased some high-end equipment and you plan to sell tickets at the door!
While your mind probably is wandering off to Control Panel and Sounds And Audio Devices, there are other ways to get the most out of your hardware. For instance, you should set Windows Media Player’s general options to look for updates to Media Player and codecs that you use. Codecs are software or hardware used to compress and decompress the digital media you listen to. From inside Media Player you can adjust settings using the graphic equalizer, adjust audio and video effects, configure performance options including connection speed and buffering settings, and more. Let’s start with Control Panel.
If you want to turn your computer into a multimedia entertainment center, or if you simply want to get good sound out of your desktop speakers, you’ll want to start by configuring the options for your hardware in Sounds And Audio Devices, as described here:
Open Control Panel and double-click Sounds And Audio Devices.
On the Volume tab, click Advanced under Speaker Settings.
In the Advanced Audio Properties dialog box, click the Speakers tab.
In the Speaker Setup list, select the type of speaker system you have installed. Figure 5-2 shows this dialog box with Surround Sound Speakers chosen. (Don’t click OK just yet!)
Click the Performance tab.
Set Hardware Acceleration to Full and Sample Rate Conversion Quality to Best. (This is true unless your particular speakers came with instructions to set these differently.) Click OK.
On the Volume tab, click Advanced under Device Volume. Verify that no settings are muted or positioned at the highest settings. Verify that the balance and other options are set to your preferences. Click the × (the Close button) to close this dialog box.
Click the Audio tab to configure similar settings for any recording devices or MIDI music playback devices you have installed. Click OK when finished.

There are general options for getting the most out of Media Player, one of which involves automatically checking for updates for the player at specific intervals. You can also add an anchor window when the player is in skin mode, which allows you to return to full mode easily. There are other useful options, which I’ll describe next. By configuring these options according to your preferences, you can optimize both your audio and video experience automatically. Follow these steps:
Log on as an administrator, and on Windows Media Player Tools menu, click Options.
Click the Player tab and choose from these options:
To have Media Player automatically check for updates, click Once A Day, Once A Week, or Once A Month. You’ll be prompted when updates are available.
To download codecs automatically, select Download Codecs Automatically. Codecs are required to play digital media. If a third-party codec is needed, you’ll be prompted; otherwise the codec will be downloaded without any prompt. Clear this check box to always be prompted.
To keep Media Player in the foreground while it is in skin mode and when other programs are running, select Display On Top When In Skin Mode.
To allow an anchor to show while in skin mode, select Display Anchor Windows When In Skin Mode.
Click OK to close the dialog box, or leave this dialog box open to set Performance options next.
Note
The Devices tab offers a quick way to access hardware on your computer, including all CD, DVD, and removable drives, speakers, and portable devices. From here, you can change the properties of these devices. You can also access the hardware from My Computer and Control Panel.
You should also verify that Windows Update is configured to look for updates automatically. Click Start, click Control Panel, and click System. On the Automatic Updates tab, select Keep My Computer Up To Date. With this setting enabled, Windows Update software may be automatically updated prior to applying any other updates.
As you might have noticed in the previous section, the Options dialog box also has a Performance tab. On this tab you can optimize how you listen to the music you download from the Internet by setting the Internet connection speed, specifying how content is buffered, and setting the hardware acceleration speed. Generally, the defaults are fine; however, you will want to tweak these settings if you are having playback problems. Here are some settings you can experiment with:
Modem speed. Although Media Player can detect your modem speed, you can configure it as well. Try both automatic detection and a set speed to compare performance. You can see this and other options in Figure 5-3.
Buffering speed. When you choose to play a track you’ve chosen from the Internet, the song is not completely downloaded before it’s played. Instead, several seconds of the audio is downloaded into an area of memory called a buffer. When the buffer is full, the audio plays. As the audio plays and data is cleared from the buffer, new data is downloaded. If all goes well, you don’t miss anything and the playback isn’t choppy.
Although Use Default Buffering is the default, you can choose to set your own buffering speed. Reducing the Media Player buffer to a number between 1 and 4 reduces the buffer size and increases how quickly you can hear the music, but you might have deterioration of data; increase the buffer value to more than 5 and you’ll have a longer wait but presumably better quality. If you notice that your playback contains interruptions, increase the buffer size. The buffer can be configured between 1 and 60.
Video acceleration settings. These settings control how smooth a video will appear on screen during download and playback. Full is the default and is the recommended setting. If you are having problems with the video skipping or appearing jumpy, try a lower setting. If you have a low-end video card and only basic video capabilities, try None.
Advanced settings. These settings (click the Advanced button) are used to customize digital video resolution, DVD video settings, and similar settings. The defaults are generally fine, and changing them is discouraged unless you really know your hardware and software.

THINKING OUTSIDE THE BOX

Sometimes you can purchase the best computer, the best equipment, and the best speakers; set up dual monitors and hang the speakers from the wall; and still not get the results you want! The best hardware in the world is useless if your computer is slow, if files are fragmented, or if you are getting poor performance from your computer in general. If you’re really serious about performance, you’ll want to do more than just tweak Windows Media Player and the Sounds And Audio Devices settings. To make sure you are getting the best performance possible, take some time now to get your computer in tip-top shape by using Disk Cleanup and Disk Defragmenter in System Tools, and by deleting files and programs you don’t use. I strongly recommend performing one or all of the following procedures to spiff up your computer’s performance:
Click Start, point to All Programs, point to Accessories, point to System Tools, and click Disk Cleanup. Click OK to clean up your computer by deleting temporary Internet files, emptying the Recycle Bin, and more.
Open Control Panel and click Add Or Remove Programs. Take a look at the programs listed. If you see any programs that you don’t think you’ll use anymore, programs installed for hardware you don’t have anymore, or programs that came preinstalled with your computer that you will never use, uninstall them. Uninstalling a program is as simple as clicking Remove.
Open My Documents, My Videos, My Music, and My Pictures and delete files, pictures, music, and videos you no longer want. Music, videos, and pictures take up lots of space on the hard disk. Run Disk Defragmenter after performing the deletions.
Click Start, point to All Programs, point to Accessories, point to System Tools, and click Disk Defragmenter. Click Analyze to see if the disk needs to be defragmented. If it does, click Defragment.
When I was 16 and got my first car, I just had to install a graphic equalizer. I remember it was expensive and that I spent a lot of time adjusting the settings; I even had specific settings for specific songs. In Windows Media Player, the equalizer is a virtual one, and it’s on the screen! It isn’t expensive either (free, in fact), and I still enjoy messing around with the controls. The equalizer is available in full mode and in most (if not all) skin modes.
Besides the equalizer, you can access additional sound and audio effects from the View menu by clicking Enhancements and selecting an option. You can choose from many enhancements including SRS WOW Effects and Quiet Mode, which we’ll explore right after we check out the equalizer.
A graphic equalizer is a sophisticated set of bass and treble controls. The equalizer allows you to control specific frequencies in an audio track and configure the sound however you prefer it. The latest trend is to have as much bass as your system will allow, although I’m not so keen on that myself.
To access the graphic equalizer, on the View menu, point to Enhancements and click Graphic Equalizer. In the Enhancements pane, click the Turn On link, if necessary. The equalizer will appear, as shown in Figure 5-4
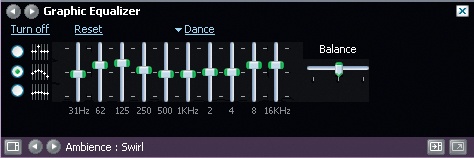
You can move the equalizer sliders yourself or you can choose from several custom options, including Rock, Rap, Grunge, Techno, Dance, Blues, Opera, and others. In Figure 5-4, Dance is selected. If you move the sliders yourself, the configuration will be saved as the Custom setting.
SRS WOW Effects is a stereo enhancement technology that simulates enhanced bass, dynamic range, and 3-D audio effects, even if you only have two speakers. SRS WOW enhances both MP3 and Windows Media formatted files. This technology makes any speaker sound better than it would without any enhancements.
To access the SRS WOW Effects, on the View menu, point to Enhancements and click SRS WOW Effects. In the Enhancements pane, click the Turn On link, if necessary. Configure the effects by moving the sliders until you get the sound you like. You can also click Large Speakers, Normal Speakers, or Headphones to switch between these hardware options.
The Quiet Mode feature allows you to control the contrast between the loudest and softest sounds in a piece of music or in a DVD or video. Changes in volume during a song are especially notable in classical music where there can be extreme quiet moments with a single oboe or piano playing followed by extremely loud sounds when the entire symphony orchestra joins in. These changes in volume are also quite disruptive when watching a DVD. You’ve probably experienced it; you have to turn the volume up to hear the dialog and turn the volume down during the inevitable chase scene or shootout. Controlling these changes in volume is called dynamic range control, and can be configured from the View menu, by pointing to Enhancements, and then clicking Quiet Mode. The Quiet Mode pane is shown in Figure 5-5.
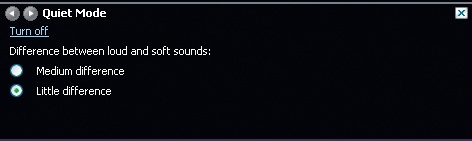
Figure 5-5. Quiet Mode allows you to control the contrast between the loudest and softest sounds in a piece of music or in a DVD or video.
There are three options:
Off. Use this option to play the content in its recorded and default dynamic range with no processing.
Medium Difference. Use this option to play the content in a limited dynamic range where there is only a medium difference between loud and soft sounds.
Little Difference. Use this option to play the content in a limited dynamic range where there is only a slight difference between loud and soft sounds.
Try Little Difference when listening to music through headphones, and Little or Medium when watching DVDs. Use Off when listening to classical music, opera, or rock and roll, where changes in volume are important to the feel of the music.
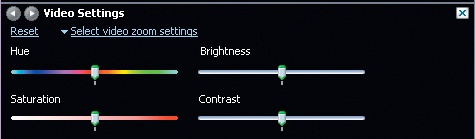
When recording and playing back your movies, you might notice that the movie is too dark, doesn’t have enough contrast, or has problems with color. If you have videos that are saved to your hard disk, you can increase their brightness and contrast (as well as choose other options) from the View menu. Here’s how to adjust the video enhancements:
On the View menu, point to Enhancements and click Video Settings.
In the Quick Access box area, select All Video Clips.
If you created a photo story in Chapter 2, choose it; otherwise, choose a video file or the Windows Movie Maker 2 Sample File.
Increase the brightness by moving the Brightness slider to the right. You can also increase or decrease Hue, Saturation, and Contrast (see Figure 5-6).
If you have purchased Microsoft Plus!, you have access to Plus! Speaker Enhancement, a program that improves playback sound quality by setting up profiles specific to your hardware. To enable this feature, click Tools, point to Plus! Speaker Enhancement, and then click Enable. Once it is enabled, you’ll be prompted by a series of dialog boxes to configure your speakers (see Figure 5-7).
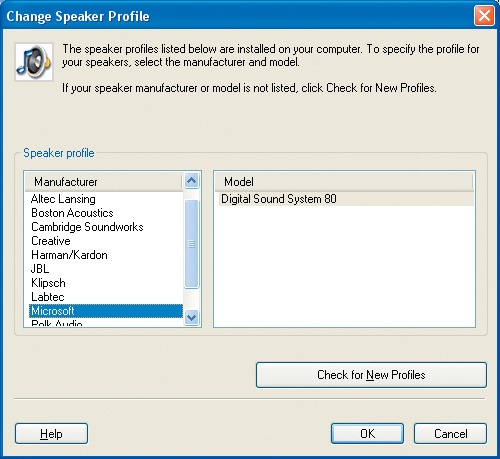
The Plus! Speaker Enhancement program works by improving the sound quality automatically, by fine-tuning the raw data delivered to the speakers. It uses information about the speakers’ default characteristics and produces sounds that are better than the original recording. It makes quite an effective difference and is well worth the upgrade.
ATTENTION ALL BAND MEMBERS

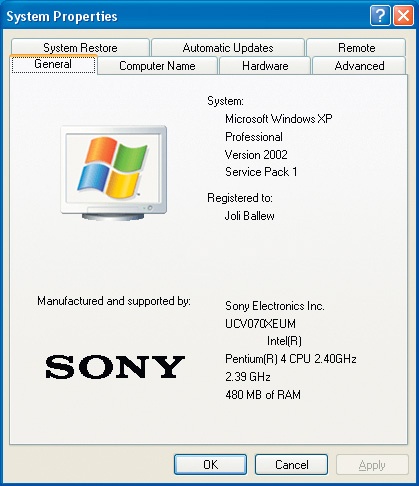
If you’re an aspiring musician and want to record and mix your own music, burn your own CDs for distribution, and create a music studio in your own home, it’s easier than you think. For starters, you’ll need to purchase or obtain (and install) specialty hardware and software. Before you go on a spending spree, make sure you have the available ports, connections, and the required resources for items you plan to buy. You can find a lot of information by right-clicking the My Computer icon and taking a look at the General tab, as shown in the graphic here.
Once you’ve verified that you have enough RAM, a fast enough CPU, and the correct operating system, click the Hardware tab. Click Device Manager to view other available resources, including the hard disk size, ports, USB ports, and storage volumes. Make a note of what’s available. Now, head off to the store and see how many of these items you can afford:
A professional sound card with one-quarter-inch inputs for guitars, basses, and similar equipment, and additional inputs that can handle at least one microphone and possibly a headset.
For a fuller sound, a MIDI instrument such as a keyboard or drum machine and a way to connect it. Some MIDI instruments can connect via your USB port; others may require specialized audio cards or cables.
A software program such as Cakewalk’s Music Creator Pro.
Depending on how much equipment you want to plug in and record at the same time, a separate piece of hardware that allows for multiple instruments to be used at once. Many sound cards accept multiple inputs, so this may or may not be necessary.
If you’re using MIDI instruments, a printer is a good investment. You can print out the music on staff paper with specialized software.
Microsoft is just as concerned about your privacy and security as you are. In fact, they state in their Privacy Statement, "Windows Media Player at no time requests from you any ’Personally Identifiable Information’ (information that personally identifies you, such as your name, address, or phone number). However, there are occasions when unique machine-identifying information is transmitted across the Internet." Not all sites and vendors are so scrupulous. In these days of identity theft, spyware, viruses, and unauthorized use of your personal data by deceitful vendors, it pays to be aware. There are lots of ways to protect yourself. Some of these options are built right in to Media Player and can be configured from the Privacy and Security tabs in the Options dialog box. Figure 5-8 shows the Windows Media Player’s Options dialog box.

Since you will be accessing the Internet for music and video, and because you’ll most likely be automatically downloading updates and codecs and having cookies placed on your computer, it is important that you protect yourself as much as you can on your own. Here are some suggestions:
Purchase, install, and regularly update trusted and well-known virus-protecting software. When the subscription runs out, renew!
Only play and download music and videos from sites you know like MusicNow. Many third-party sites download software onto your system right after you click the "I Agree To The Terms" button. This software at best will bog down your computer or prompt you with unwanted pop-up ads, and at worst will acquire personal information about you, including what other sites you visit, your name and e-mail address, and more. This software, called spyware, is capable of monitoring online behavior and mining personal data right from your PC, including obtaining passwords and credit card numbers.
If you’ve downloaded music illegally and without paying for it from a third-party Web site, such as www.kazaa.com, or if you used Napster before it went legit, purchase and run a spyware killer–type program immediately.
Don’t click "Yes, Always Trust..." whoever when prompted with a pop-up box. Read the box carefully and decide if you trust the company. I almost always answer "No," unless it is a codec.
Read and understand a Web site’s privacy policy before giving them personal information. Many sites will tell you flat out that they plan to use your e-mail address and personal information for their own use.
Keep your computer updated with the latest security patches.
Once all of this has been done, you can move on to configuring Windows Media Player with the optimal security settings.
You can certainly just accept the defaults on the Privacy tab; I do and have never had any problems. However, if you want to tweak the privacy settings or if you share your computer and user account with others, I’ll include a brief summary of each option here, and you can follow along by looking back at Figure 5-8. To access the Privacy settings, click Tools, click Options, and click the Privacy tab.
Here are your options for configuring privacy from the Privacy tab:
Retrieve Media Information For CDs And DVDs From The Internet. If you choose to receive this information (which includes artist name, track name, and similar data), WindowsMedia.com will gather information about your CDs and DVDs and send it to a database operated by WindowsMedia.com.
Update My Music Files (WMA And MP3 Files) By Retrieving Missing Media Information From The Internet. If you choose to receive this information, data about your CDs and DVDs are sent to the WindowsMedia.com database in hopes of finding missing media information such as album or artist name. If it finds the missing information, it will add it. You can choose to overwrite the information by selecting Overwrite Existing Information on the Media Library tab.
Acquire Licenses Automatically For Protected Content. To play a song that requires a license, you have to obtain the license. This task can be performed automatically by selecting this option. Note that if you do this, information about your computer will be sent to the appropriate Web entity automatically, which can be a content provider or the content owner, neither of which are directly affiliated with Microsoft.
Send Unique Player ID To Content Providers. If a content provider requires it, or if you simply desire it, you can select this option to send a unique player ID to a content provider. The content provider uses this ID to monitor your connection, gather statistics, and provide content. The provider can often improve your playback quality after understanding your system using this unique ID. This box is not selected by default.
Cookies. If you want the Web servers and content providers from which you download content to remember specific things about you, such as your favorite genres, favorite songs, what song you last downloaded, your favorite display settings and similar settings, you’ll want to enable cookies. By default, the setting is at Medium, which allows the "good" cookies while blocking ones that require or use personally identifiable information. Using advanced settings, you can also block or allow cookies from specific Web sites and override default cookie handling.
I Want To Help Make Microsoft Software And Services Even Better By Sending Player Usage Data To Microsoft. If you want to be a part of the Customer Experience Improvement Program, select this option. Note that no personally identifiable information will be sent to Microsoft, but anonymous information about your hardware and how you use the software and services will be. Microsoft will use this information to collect information about trends and usage patterns so that they can improve Media Player and their services.
Save File And URL History In The Player. If you want to keep your list of recently played files private, select this option. Otherwise, anyone who uses Media Player under your user account can see what you’ve been playing.
Clear History. If you want to clear the list on the File menu and from the lists in the Open and Open URL dialog boxes, click here.
Clear CD/DVD. If you want to remove all stored media information about CDs and DVDs that you have played, click here.
Security and privacy are two different things. If you want privacy in your home, you can simply turn off the phone and close the door. If you want security, you’ll need an answering machine, a smoke detector, and an alarm system. In the last section you learned how to increase the privacy of your Web experience; here you’ll learn a little about securing that experience.
There are several ways to feel secure, of course, and I introduced some of those ways earlier; get a good virus-protection program, keep it updated, and don’t randomly give out personal information. You might also consider a password for your computer, a locked door to the office, or a battery backup system. If your PC isn’t on a network, Windows XP’s built-in firewall should be enabled; if you are on a network, consider a hardware router or a third-party software firewall. Windows Media Player offers other ways too. One of the most secure is to work offline because disconnecting from the Internet is like coming into a building, locking the doors, and enabling the alarm system. When you do go back online, log on with a limited account. Logging on with a limited user account lessens the harm a virus could potentially do because limited users have limited access to the computer.
Tip
Don’t just install a virus-protection program; visit the Web site regularly in search of updates, and configure the software to scan for viruses weekly.
There are additional options on the Security tab of the Options dialog box, as shown in Figure 5-9. To access these options, click Tools, click Options, and click the Security tab. Read through the brief descriptions of the options that follow to determine what works best for your situation:
Run Script Commands When Present. Scripts are little pieces of code that contain instructions and are used to enhance the playback experience by reputable music content providers. These scripts can be quite useful by providing additional information about the artist or song, or by opening a Web page that is relevant to the content. However, scripts can also be used to create viruses and to run malicious code on your computer. This option is not selected by default, and I’d suggest leaving it that way.
Do Not Run Script Commands And Rich Media Streams If The Player Is Running Inside A Web Page. Scripts can be run when you listen to media that is embedded in a Web page. Selecting this option might prevent rich media streams from running and is not selected by default.
Zone Settings. Use this command to open the Internet Options Security dialog box where you can control what type of content can be displayed and accessed. It can also be used to determine how much access Web sites can have in regard to your computer. If you make the wrong changes here, you can affect how much information is shown in Media Player itself, as well how Outlook Express, Internet Explorer, and Microsoft Outlook perform. For more information about security settings and zones, refer to Chapter 11.

The system tray is the area on the Windows taskbar where the system clock resides. You can put an icon for Windows Media Player there and have access to some basic options if you want to. You’ll need to download and install the Windows Media Player Bonus Pack for Windows XP before you can do this. There’s more information on downloading and installing software in the Introduction of this book; refer there for help if you need it.
Once you’ve downloaded and installed the Bonus Pack, follow these steps:
Click Start, point to All Programs, point to Windows Media Bonus Pack For Windows XP, and click Window Media Player Tray Control. The icon will appear in the system tray, as shown in Figure 5-10.
Right-click the icon to see the available options. You can choose from several: Play/Pause, Stop, Previous Track, Next Track, Must, Volume Up, Volume Down, and Hide Media Player. You can also choose Options and Close, both of which have additional choices.
Pointing to Options offers three options: Run Tray Control At Startup, Clear MRU, and Turn Off Media Player MRU. Pointing to Close offers three more options: Close Media Player, Close Tray Control, and Close Both.
MRU stands for "Most Recently Used," which is used to describe lists that contain information about your most recently used items on the computer. These lists contain information about what you’ve been listening to, looking at, and even what you’ve opened and saved. You can use the Clear MRU option to remove information from these lists, and the Turn Off Media Player MRU option to turn off this feature.
- acceleration
How fast the video frames are shown when a video plays. If the frame rate is too low, the videos appear jerky and hang up on frames, but too high a frame rate can cause the system to slow down and require too many system resources. Adjusting video acceleration can increase the performance of downloaded video.
- anchor window
A small window that appears in the lower-right corner of the screen when Windows Media Player is in compact mode. The anchor window allows you to return to full screen mode quickly.
- buffered
Data, such as music or video, that has been downloaded from the Internet and is ready to be played. Buffering is a technique that allows the downloaded data to be played while the rest of the file is still downloading. This makes the wait time shorter for the user.
- codecs
Software or hardware used to compress and decompress the digital media you listen to. Codecs are required to translate the media file information into the appropriate format for playing on the computer and are generally downloaded automatically.
- contrast
The difference between the lightest and darkest parts of a photograph or the loudest and quietest parts of a video. Windows Media Player offers the Quiet Mode feature, which allows you to change the contrast of the sounds in the video and allows you to hear both the softest dialogue while at the same time not being blown out of your chair when the music is played!
- cookies
Information placed on your computer when you visit a Web site. Each time you revisit the Web site, you are given personalized treatment because the cookie contains information about your past purchases, your preferences, and your interests.
- display adapter
A piece of hardware, generally a PCI card, that is installed inside the computer. The card offers a place to connect a monitor to the computer.
- privacy policy
A statement issued by a Web site that explains what they will and will not do with the information you send them or information that they receive automatically.
- rich media streams
A faster way to stream media. Rich media streams send millions of megabytes of data between computers and thus send data faster than other streaming technologies.
- scripts
Pieces of computer code that contain instructions that are carried out by a particular program to perform a specific task or function. Scripts can be harmful and are often the basis of viruses and worms.
- surround sound speaker system
A group of speakers (usually four or more) that can be connected to a PC to give better audio playback. Surround sound is a technology that makes audio sound more realistic than simple stereo and is used in movies, television, and DVDs.
- unique player ID
An identification number that is unique to your Windows Media Player. This unique ID is used by Web sites to identify your computer and to differentiate it from other computers receiving the same media.
- Windows Update
Automatic updates from Microsoft that keep your computer running smoothly. Automatic updates can be used to update Media Player, Movie Maker, and the operating system, or to protect the computer from viruses, worms, and holes in security.