
Customize Your Window to the Web
Drop In on the World with the Media Bar
Create Your Own Home Page
Enhance Your Computer’s Exploring Performance
Save Time Online with the Profile Assistant
Take a Break from Reality and Play Games Online
Learn Tips and Tricks for Safe Surfing
Open Up the World (Wide Web) to Your Kids
Even if you don’t realize it, you’re becoming more and more dependent on the Internet every day. If you own your own business, you use the Internet to create bids, e-mail clients, and shop for materials; if you have kids, they use it to get help with their homework, IM friends, and download music. It’s certainly a necessity in the corporate environment where getting real-time stock quotes, e-mailing coworkers, and researching competitors’ products are vital. You simply can’t afford to ignore this amazing technology, especially when access to data is right at your fingertips! And because the time you spend using the computer and the Internet will most likely increase as time passes, isn’t it worth a few minutes now to personalize your Internet experience so that you can work faster and smarter? You bet it is.

For Internet browsing both at work and home, most people use Internet Explorer 6 (IE6). In this chapter, you’ll learn how to customize IE6 so that it suits your needs and personality. You can tailor-make the IE6 toolbars to customize the look and feel of your browsing experience, use the Media bar to experience media in a whole new way, and create a personalized home page that contains information about your city, your weather, and your interests. In addition to personalizing the interface, you’ll learn how to optimize your Web surfing by fine-tuning your browsing settings, using keyboard shortcuts, and efficiently using temporary files.
While all of these things will help you work faster, you won’t work smarter until you learn how to protect yourself while you’re online. Although the Internet is full of wonderful surprises, it can also be a dangerous place. So, without spoiling your fun, I’ll show you how to protect your computer and your privacy while surfing by staying in a safe zone, using secure sites when performing transactions, and limiting what personal information you share with others. Using the Internet and IE6, you can indeed do amazing things, and most of the time, tasks done online are done faster, smarter, and more efficiently than doing them using any other method. Let’s go surfing!
In this section, you’ll learn how to personalize IE6 to make it uniquely yours. You’ll learn how to change the appearance of IE6, including the look of the toolbars and fonts, as well as the colors and color schemes. You’ll learn how to add or remove toolbars and how to customize which icons and text are shown in the basic IE6 interface. You can choose the order in which icons appear, whether or not text appears on the toolbar, and similar customizations. It’s pretty easy to enhance your IE experience by creating a simple Web page too, and that’s just the beginning of the fun!
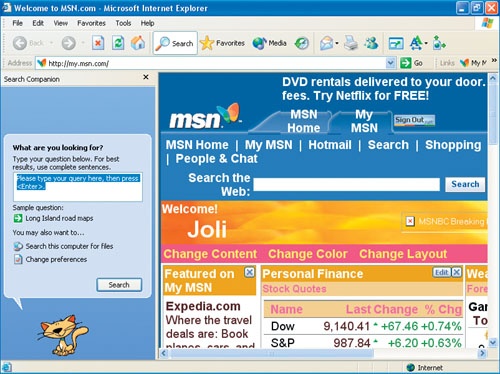
Internet Explorer 6 has a specific default appearance; the toolbar looks a certain way, the menu bar is available, and the fonts are a certain size and style. You can change all of that and personalize IE6 in a hundred different ways. Figure 11-1 shows what my IE6 interface looks like, and it’s pretty close to the default look.
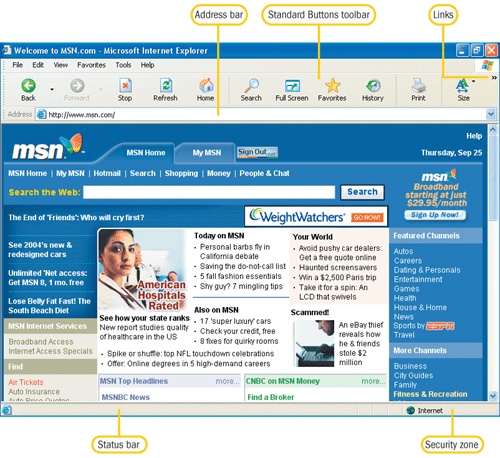
In Figure 11-1, all of the toolbars—the Standard Buttons toolbar, the Address bar, and Links—and the status bar are showing, but the Explorer bar is not. The Explorer bar is a separate pane that you can add to the left side of the screen, which can contain Search options, Favorites, Media options, History links, or Folders. We’ll take a look at the Explorer bar later in this section. Notice that you can also sign in to My MSN at www.msn.com, and using your passport you can further customize the interface. You can change the default colors for visited and unvisited sites, and personalize the interface to suite your needs or your mood. You’ll learn more about this later in the chapter.
The Standard Buttons toolbar should contain the icons and buttons you use most often. To see what icons are available to you by default, hover the mouse over the icon. If you see an icon that you don’t use much, you can remove it; for instance, if you don’t have a printer installed, there’s no need for the Print icon! Conversely, if you feel that the toolbar is lacking somehow, you have the option of adding icons. There are a variety of icons that can be added to your toolbar, and we’ll look at those here.
To customize which icons (or text) are showing on the toolbar, right-click an empty area of it and choose Customize. The Customize Toolbar dialog box appears, as shown in Figure 11-2. The list on the left shows the available toolbar buttons, and the list on the right shows the current toolbar buttons. You can highlight any button in either list to add or remove it. For instance, to delete the Print icon, click the icon to highlight it, and then click Remove. When you’re done making your selections, click Close. If you decide later that you’d like to add the icon back to your toolbar, you’d do the same thing, except click Add.
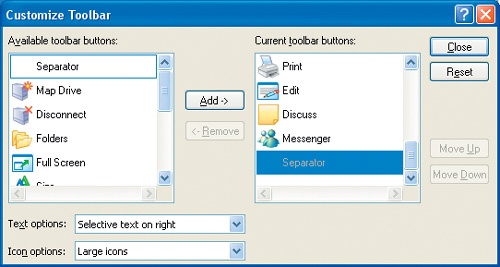
Figure 11-2. You can customize the Standard Buttons toolbar by right-clicking it and choosing Customize.
If you’d like to organize your icons into groups, the separators come in handy for that. Separators are lines that can be added to the toolbar to separate groups of icons. To add a separator, click Separator in the Available Toolbar Buttons list, click Add, and in the Current Toolbar Buttons list, click and drag the new separator to the desired position. The new separator will appear on the toolbar immediately. You can continue to move separators and existing icons up or down in the list until you get the desired effect. It takes a little while to figure out what works best for you, but once you find that right combination, you’ll be one efficient Web surfer.
Here are some of the available icons and reasons you might or might not want to remove them:
Print icon. Allows you quick and easy access to printing screens directly from your Web browser. If you don’t have a printer or want to discourage the use of it, remove the Print icon.
Discuss icon. Allows instant access to discussion servers that your administrator (usually at work) has provided. If you need this option, add the Discuss icon.
Edit icon. Allows you to access and edit the HTML code for a Web site using Notepad. If you won’t be editing Web pages, remove the Edit icon.
Full Screen icon. Allows you to quickly change from whatever mode you are in to full screen mode. If you have trouble viewing the pages or if you simply enjoy using full screen mode, add the Full Screen icon.
Text icon. Allows you to change the size of the text on a Web page quickly. If you change the font size often or if multiple users with different viewing needs use the same computer, add the Text icon.
Related icon. Allows you to quickly open the Explorer bar with Related Info links listed. Showing related links can help you locate information on the Internet faster. If you do a lot of searching and need to see related links, add the Related icon.
Do the default screen colors and colors on Web pages you visit just not move you? Do you find that the colors for the links you’ve visited don’t stand out enough? What about the color for the Web page’s background? You can change these and more quite easily. For instance, I changed the colors on my dad’s computer because he has a hard time telling the difference between reds and greens, and blues and yellows. I changed the default colors to ones more suited to his visible color range. This might be something you haven’t considered before, and you might want to run over to your mom’s house and change the colors to something brighter if she has problems viewing the pages. While enlarging the text seems like an obvious option for viewing problems, bigger isn’t always the way to go.
To change the default colors you see on Web pages, follow these steps:
Click Tools, and then click Internet Options. The Internet Options dialog box appears.
Click the General tab to access the Colors and Accessibility buttons, as shown in Figure 11-3.
Click the Accessibility button. In the Accessibility dialog box, select Ignore Colors Specified On Web Pages. Click OK.
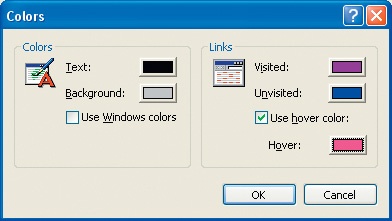
Click Colors to open the Colors dialog box shown in Figure 11-4. Notice that you can change the colors for text, background, visited and unvisited links, and the hover color. To change a color for any of the options, click the box that contains the color to change.
In the Color dialog box that appears, choose a new color and click OK. Make any other changes to the other color options and click OK in the Colors dialog box. You’ll be able to see the changes immediately.
To change more colors, repeat steps 4 and 5. Once you’ve gotten the colors the way you want them, click OK in the Internet Options dialog box.
The least-used option available in IE6 on my computer is the Explorer bar, and every time I use it I wonder why I don’t use it more often. You’ll probably think the same thing once you discover it! Customizing the Explorer bar might be just the ticket for spicing up your Internet explorations, and it might end up being the ultimate personalization for your needs.
To select one of the Explorer bars available to you, click View, point to Explorer Bar, and click one of these options:
Search. Offers options to search for items on the Internet by category. You can choose from several, including searching for a specific Web page, a person’s address, a business, a map, a word, a picture, or to even search through previous searches. It’s hosted by MSN Search.
Favorites. Shows your Favorites and any folders you’ve created on the Favorites menu. If you use that menu often, this might be a good option for you.
Media. Connects automatically to WindowsMedia.com, where you can view music videos, download music, see movie clips, and listen to Internet radio. If you’re into media, this is definitely for you.
History. Shows your latest movements on the Internet. It shows what Web sites you’ve visited during the last three weeks, and you can view them by the day you visited them, by most frequently visited, and by the order you’ve visited the sites today. If you move between a few sites often or if you want to find a page you visited recently but can’t remember the name, this is the way to go.
Folders. Shows the folders on your computer’s hard disk. This Explorer bar is a great option for those who use the Internet a lot at work, and must have fast and easy access to information on their own hard disk.
Tip of the Day. Offers a quick suggestion for enhancing your Internet experience. This Explorer bar does not appear on the left side of the screen as the other Explorer bars do; it shows at the bottom. A recent Tip of the Day informed me that I could drag my toolbar, Links bar, and Address bar anywhere I want them, and that I can combine them to save space.
Discuss. Shows the Discussion options as a separate pane. If you use the Discuss icon, consider adding this Explorer bar.
Depending on what programs you have installed, you might have several other options on your list; I’ve only shown the default ones. Figure 11-5 shows what the interface looks like with Favorites chosen as an Explorer bar, and how it is displayed on the screen. The Links folder is expanded to show a link inside the folder.
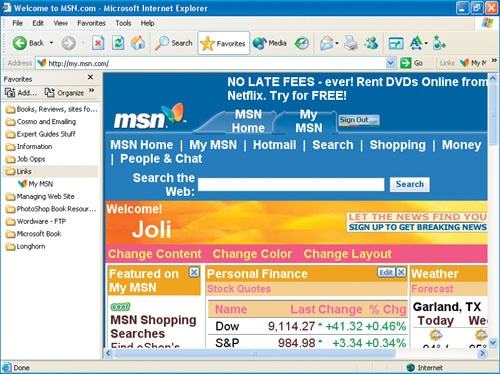
Figure 11-5. The Explorer bars are accessed from the View menu, and in this figure the Favorites Explorer bar is showing.
If the size of the Explorer bar is too big or small for your needs, you can resize it. Just position the mouse over the separator, and when the mouse pointer turns into a two-headed arrow, drag it to the appropriate size. (This trick also comes in handy for resizing the toolbars or for combining or expanding them.) Figure 11-6 shows a resized Search bar.
There are many reasons to change the size of the text on your screen. Personally, I don’t need to enlarge the text size because I’m old, mind you; it’s just that my monitor is located a little too far away from where I sit (yeah, that’s it).
If you’re having problems viewing the small text on Web pages, you can increase or decrease the text size easily. To increase the text size, click View, point to Text Size, and then click the size you want. This menu is shown in Figure 11-7.
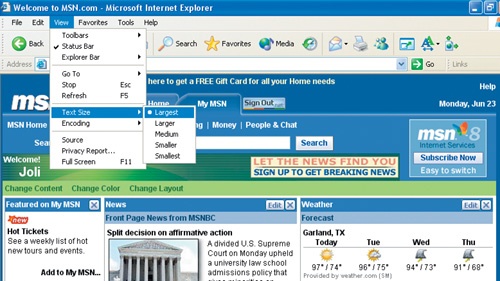
Figure 11-7. Changing the text size is easy, but sometimes the Largest text size isn’t large enough.
Unfortunately, the Largest setting is sometimes not large enough, and many Web pages don’t change very much when the Text Size settings are adjusted (some don’t change at all). Take a look at Figure 11-7. Text Size is set to Largest, but you can tell from looking at the screen shot that your grandfather would probably need his glasses to read it.
If you want to use the Largest text size no matter what Web page you’re visiting, and thus make the text large enough for even your great-grandmother to read, do this:
Click View, point to Text Size, and click Largest.
Click Tools, click Internet Options, and click the General tab.
Click Accessibility.
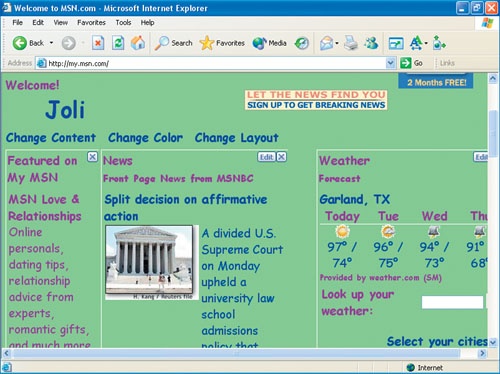
Select Ignore Font Sizes Specified On Web Pages. Click OK, and click OK again. Look at how the font size changed on the MSN page by comparing Figure 11-7 to Figure 11-8.

If you have a favorite font or fonts, you can tell IE6 to use your favorite font when you visit Web pages. The fonts you select are displayed on Web pages and documents that do not have a specified text font. As with text size, if you want your font to be used no matter what, you’ll have to specify it in the Accessibility dialog box, as described here:
Click Tools, click Internet Options, and click the General tab.
Click Accessibility.
In the Accessibility dialog box, select Ignore Font Styles Specified On Web Pages, as shown in Figure 11-9. (You might have additional options already selected.) Click OK.
In the Internet Options dialog box, click Fonts.
Select the fonts you want from the Web Page Font list and the Plain Text Font list. The Web page font is the font used when displaying formatted text in Web pages; the plain text font is used when displaying unformatted text in Web pages. Click OK. You’ll see the changes instantaneously, so if you don’t like what you see, repeat steps 4 and 5.
Click OK in the Internet Options dialog box when finished.

Figure 11-10 shows a drastic change in color, font style, and text size. Making drastic changes can make the computer look and seem friendlier to those who are new to the Internet, like children and seniors. Changing the colors on computers in kiosks and public areas can also be a good way to bring attention to yourself and your business. The possibilities are endless, so have fun and personalize to your heart’s content!
A new feature of Internet Explorer 6 is the Media bar. I touched on this option earlier, but you haven’t really been properly introduced. The Media bar will definitely enhance your Internet experience. As with other Explorer bars, it’s an optional pane in the IE6 interface that you can toggle on and off, and this bar offers a place to play music, view videos, or access other media files on the Web from right inside the browser! Having the Media bar as a separate pane in the browser eliminates the need to download and save a media file manually (like in the old days), and you won’t have to open the file in Windows Media Player to view it, either. It has its own viewer, so there’s no more toggling between the browser and Media Player. The Media bar is also a great place to search for additional media files, purchase songs, get the latest information about what’s playing, and more. WindowsMedia.com is also a full-service site, and because it’s part of the Media bar, it’s always handy. Figure 11-11 shows the Media bar in its default state.
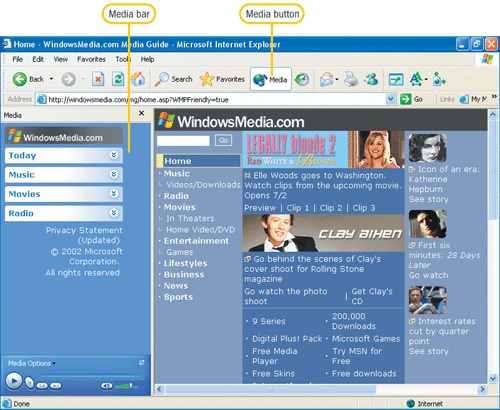
Figure 11-11. The Media bar is a new feature of Internet Explorer 6. The Media button on the Standard Buttons toolbar can be used to show or hide it.
To use the Media bar, you’ll have to enable it. Once it’s enabled, you can use the Media bar to view all types of media. Here’s how to turn the Media bar on:
Open Internet Explorer and browse to your favorite site. Any site will do.
Click View, point to Explorer Bar, and click Media. This will place a check mark next to Media in the list. (To remove the Media bar from the IE6 interface, repeat this step to clear the check mark.) If you have the Media button on the Standard Buttons toolbar of IE6, you can click that, too.
In the left pane, you’ll see four options: Today, Music, Movies, and Radio. I’ll explain each one in the following sections. For now, let’s just explore.
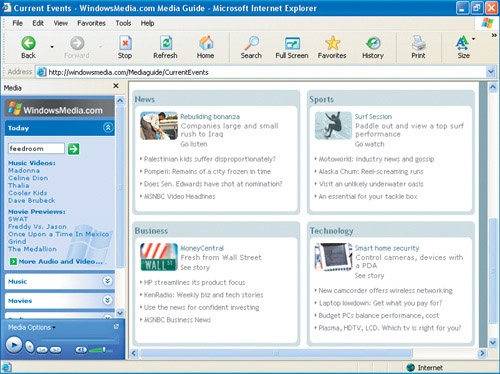
Click Media Options and click More Media to open http://windowsmedia.com. In Figure 11-12, I’ve scrolled over to show the links for movie clips. WindowsMedia.com is a site maintained by Microsoft that offers all types of media files. If you are new to online media, this is a good place to start. Have fun!

MUSIC VIDEOS AREN’T JUST FOR TV ANYMORE

Forget MTV, VH1, or BET; you can view your favorite videos from right inside IE6. Don’t think there aren’t any videos you’ll like either. There’s a wide variety of music, from blues to classical, country to hip-hop, and jazz to rock and roll. You’re bound to find something you like. To see the music options, in the Media bar, click the down arrows next to Music to expand it and to see a list of available music videos. If you want to view one of the videos listed, simply click it. If you want to search for a specific video or see what else is offered, click Music Videos. If you select a specific music video from the list, it will most likely play in the media player in the Media bar. Let’s give that a shot, and talk about what happens if it automatically opens in Windows Media Player instead. Follow these steps:
Expand the Music options by clicking the down arrows.
Click a specific music video from the list. You might be taken to a Web site where you must click the video again before it can be played, or the video might start automatically.
If prompted, choose Yes to play this media in Internet Explorer 6. (If you choose No, the media will play in Windows Media Player 9, which defeats the purpose of using the Media bar!) Depending on the media selected, a pop-up window might appear that contains additional information about the artist, the song, or an available Web site for the artist. Generally, you can close or minimize this window without any problem, although you might find the content interesting. (There’s a slim chance you will be taken to a completely different Web site to watch the video; what you get is up to the content provider.)
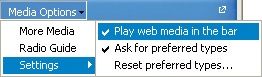
If the media does not open in the Media bar and you have not been prompted on how to open the media, click Media Options in the Media bar, point to Settings, and click Play Web Media In The Bar, as shown in the graphic.
While the video is playing, you can control playback using the media player in the Media bar. As with Windows Media Player, there are controls for setting the volume, pausing, stopping, and playing the video, and a slider for forwarding or rewinding to a particular part of the song, as shown below. (I’ve undocked the player by clicking the Undock button, and I’ve resized it by dragging from the bottom corner of the player.)

If you choose Music Videos instead of a particular video, in the browser’s main pane, you’ll see all sorts of videos you can watch, and you can search for others. You’ll probably have to sift through some sites to find the video you want, and you might have to register or pay to view a video or listen to music. The majority of the sites are free, though, so just browse until you find what you want.
The content in the Today section changes daily, offering music videos, movie previews, and additional audio and video. You never know—you just might decide to see a movie tonight after viewing the preview! Besides movies, there’s a choice for More Audio And Video, which connects you to current events, news, editor’s picks for music, videos, and music, radio stations, and more. I particularly like the Current Events section where I can view videos and hear the latest news and current events. Figure 11-13 shows the Web site where news, video, and media content can be accessed and viewed.
In addition to videos, you can also download music instantly. In the Media bar, expand Music, and choose a music download from the Music Downloads list, or choose More Great Music. You’ll have to pay for some music, and if that’s the case, follow the instructions for signing up, and have a credit card ready. If you just want to listen to music, browse through the More Great Music options, click the song you want to hear, and wait for it to play. You might even get a video as a bonus!
Have you ever wanted to see a film’s trailer before seeing it in a theater? What about viewing a clip or two to decide whether it’s too violent, too sophomoric, or too dark? You can!
Viewing movie clips is easy; just click Movies in the Media bar and the Movies section expands, offering you additional links. There are links to the latest movies, coming attractions, and finding more movies. Both the Media bar and the WindowsMedia.com window offer options to view movie clips. Most of the time the clip will show in the media player of the Media bar. However, on some occasions, you’ll have to access it from another site, deal with pop-up windows, or sit through a short commercial before viewing the video.
You can listen to Internet radio from the Media bar and IE6, too. Imagine being able to listen to any radio station any time you want, from any computer with an Internet connection and IE6. When your grandparents come to town you can wow them with a radio station from the "old country," or you can listen to a station in another country to help you learn a new language or to hear the news from a different point of view.
To listen to Internet radio, follow these steps:
From the Media bar in IE6, click the down arrows next to Radio to expand it. If Music or Movies is still open, you will have to scroll down or close these sections.
Click any station in the Radio section. As with other media, it might play automatically in the Media bar, or you might have to go to the station’s Web site. Depending on the station selected, you might have to register, pay a monthly fee, and click to connect, and you might have to choose your media player type. If prompted, fill out the required information or choose Windows Media Player.
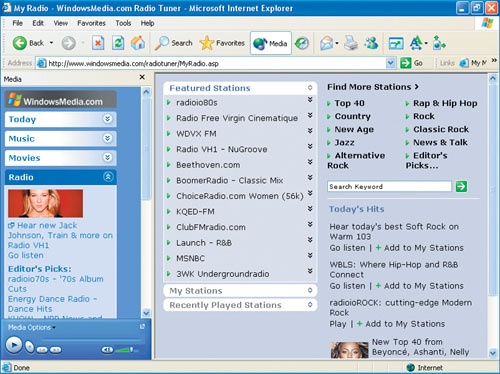
If you don’t see the station listed that you want to listen to, click Media Options and click Radio Guide. In the browser window you’ll see options for searching for stations, selecting stations by genre, collecting stations in the My Stations folder, viewing recently played stations, and more. It’s all pretty intuitive, and is similar to the Radio option in Windows Media Player 9. Figure 11-14 shows the Radio Guide.
You might have figured out by now that you can change the size of the Media bar by dragging from the separator bar. What you might not know is that you can also change the Media Options and undock the media player too. You can also view the content in full screen mode, although there might be some distortion at that size, and you can open any clip in Windows Media Player.
There are three Media Options: More Media, Radio Guide, and Settings. You already know that More Media and Radio Guide bring you more music, video, and radio selections, but what about the settings? Here’s what the settings are and what they mean:
Play Web Media In The Bar. When this option is selected, the digital media that you open in IE6 are automatically played in the Media bar. If this option is not selected, the media will play in Windows Media Player. If you’d rather view all media in Windows Media Player, clear this option.
Ask For Preferred Types. If you want to be prompted whether you’d like to play the media in the Media bar or not, leave this selected. If you select Remember My Preference when opening a file, the next time that same file type is opened, it’ll open in the Media bar without prompting.
Reset Preferred Types. Select this to clear the list of file types that automatically open in the Media bar.
By default, the media player in the Media bar is docked at the bottom of the pane. However, you can undock the player by clicking the icon above the volume slider. This Undock button allows you to place the media player anywhere on the screen, resize it, move it by dragging, and even maximize the media player window. Clicking the × returns the player to its docked position.
Consider moving the player to the upper-right corner of the interface so that you can see more of the Media bar content, or resize it to get a better view of the clip that’s playing. You can always restore the player to its original location by pressing the Esc key, and the Media bar can be closed by clicking the Media button on the toolbar or by clicking the × in the upper-right corner of the pane.
To further enhance your exploring experience, you can create a home page that not only looks the way you want it to look, but also contains your most often-used features so that you’re not only styling, but also efficient at the same time. A home page is the page that opens automatically each time you open Internet Explorer, and you can create a personalized one quite easily. My home page, shown in Figure 11-15, is a page I created at www.msn.com that contains information about the local weather, summaries of both national and local news, links to Hotmail, MSN Messenger, and Alerts. I also have "Welcome! Joli" at the top of my home page because I like seeing my name when I log on, and I use the custom Flower Power color scheme for a little extra pizzazz. If you’d like to have your own personalized page like this, follow me!

You can create almost any type of page using MSN’s easy-to-use options. Here’s an easy way to start personalizing:
Using IE6, go to www.msn.com.
Locate and click the Sign In button.
Type your passport e-mail address and password in the .NET Passport Sign-In area of the page, and click Sign In. If you don’t have a passport, register for one on this same page.
Once you’ve logged in, click Change Content, Change Color, and Change Layout to personalize what’s on your page and to make it look the way you want.
To configure your own fonts, colors, or font styles, and to override any options you configured in step 4, click Tools, click Internet Options, and follow the instructions given earlier for changing the default settings.
Consider these home page options:
Create a passport page for your computer at work, and configure the color to match your working style while you’re at the office. Add appropriate content such as Headlines from AP, Newsweek, Local News from MSNBC, Business Week Online, Expedia.com, MSN Communication Links, and Stock Quotes. Additionally, consider changing the size of the text to Smaller so that more content can be shown on the page. Combine toolbars.
Create a passport page for your computer at home (you’ll need a second passport) with colors that fit your at-home personality or match the decor. Add content such as MSNBC Travel, Horoscopes, TV Highlights, a comic strip or two, your local city guide, Celebrity Highlights, Fun and Games, and New Movie Trailers.
Let your kids create their own My MSN page that includes a color scheme that’s more playful and content that’s kid-friendly, such as Coming Movie Attractions, MSN Learning and Research, MSN Kids, MSN Games, and Fun and Games.
Create a page for your parents that includes a high-contrast color scheme with large text and relevant content, including MSN Family, Local News from MSNBC, WebMD Health News, MSN Fitness and Recreation, Personal Finance options, and Encarta Word of the Day. Make sure that the toolbar includes the Full Screen icon, and the icons are configured with text names underneath.
Remember, to change the default colors and fonts and to further personalize your IE interface, you’ll have to override the default Web settings. If you do this, remember to enable the Accessibility options on the General tab of the Internet Options dialog box, as detailed earlier. You can also change the look and feel of the toolbars, and add an Explorer bar.
Once you’ve created a My MSN page, you can make it your default home page easily. By setting it as the default, each time you open IE6, this page will open first. Of course, you can set any page as your home page in the same manner.
To configure your newly created home page as your default home page, follow these steps:
While changing the font and the background, customizing the toolbars, playing around with the Media bar, and creating a home page are fun (and oftentimes useful), there are additional options you can configure in IE6 that can make browsing the Web much more efficient. There are plenty of ways to enhance your computer’s performance, no matter what your Internet connection speed is or how old or new your computer is. Let’s tweak, people!
If you have an older computer, or if you want to get to where you want on the Web as quickly as possible, there are a few things you can do. Because graphics take a long time to load, you can turn them off. Because it takes a while to type in a Web address, you can turn AutoComplete on. You can also allow cookies on your computer, which will allow you to log in automatically to your favorite Web sites and businesses. If it’s speed you need, read and heed!
If there’s no need to see the graphics when loading a Web page, turn them off and your pages will load much faster. You might not need sound or want to play videos in Web pages, which is usually the case at work. You can speed up your access to Web pages by disabling all of these features.
Here’s how to configure your computer to work faster and smarter while you’re on the job:
Click Tools, click Internet Options, and click the Advanced tab, as shown in Figure 11-16.
Scroll down to Multimedia.
Clear any or all of the following options: Play Animations In Web Pages, Play Sounds In Web Pages, Play Videos In Web Pages, and Show Pictures. Click OK.

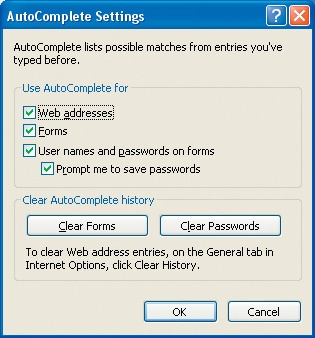
The AutoComplete feature saves previous entries that you’ve entered for Web addresses, forms, and passwords, and suggests them when you are filling in information that matches what it has in its cache. The matches make typing information much faster and are another way to make working with IE6 and the Internet more efficient. If what AutoComplete suggests is correct, use the arrow keys to select it, and press Enter. Figure 11-17 shows an example.

Figure 11-17. AutoComplete tries to guess what you might want to type by offering previously used words and searches.
If you share a computer with others or others have access to your computer, you might want to turn AutoComplete off. While AutoComplete does offer user names, addresses, and phone numbers, more private information like credit card numbers and passwords are shown cryptically. This makes it fairly secure, but if you want to keep your browsing and searches private, or you don’t want people logging on as you to a particular Web site, you won’t want this turned on.
To turn AutoComplete on or off, follow these steps:
Click Tools, click Internet Options, and click the Content tab.
Click AutoComplete.
Select or clear the appropriate check boxes. Figure 11-18 shows the choices available to you; notice that you can also clear the AutoComplete History and Passwords.
SAVE TIME WITH THE PROFILE ASSISTANT

If you want to shop online, order prints of your digital pictures, register at Web sites, or ask for (or expect) personalized treatment on the Web, you’re going to have to give out information about yourself and cookies just don’t cut it. With IE6’s Profile Assistant you can give out your information safely and efficiently.
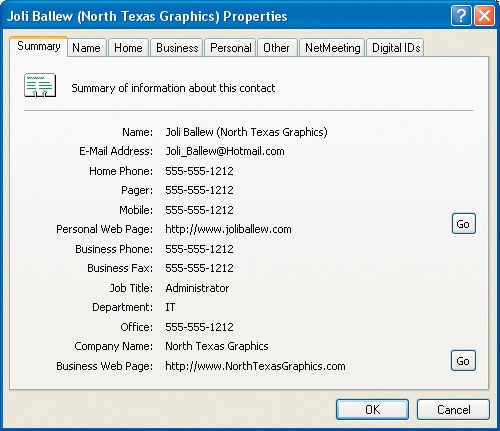
The Profile Assistant saves you from having to enter your personal information each time you visit a new Web site that asks for it. The information is safely stored on your computer, and only you can give it out. The Profile Assistant will also give you information about the site that’s asking for your information, including their Web address, what information is requested, how it will be used, and whether or not the site is considered a "safe" site. The information can even be encrypted as it is sent.
To set up the Profile Assistant, follow these steps:
In IE6, click Tools, click Internet Options, and click the Content tab.
Click My Profile.
If your profile doesn’t come up automatically, click Create A New Entry In The Address Book To Represent Your Profile, and click OK.
Fill out the required information and click OK twice to apply it. Now, anytime you need to fill out a form and the Web site requests information, you can use this data.
When you choose to clear entries in AutoComplete, all entries are deleted. You cannot pick and choose which entries you want to delete. The same is true of Web addresses, forms, user names, and passwords.
You might not have any cookies in the cupboard, but you’ve got them on your computer! Cookies are little bits of information that tell Web sites who you are, what your preferences are, and how the Web site can contact you. In almost all cases, cookies are good things, and they make surfing the Internet more pleasurable and personal. For instance, when I go to Amazon.com, the Web page automatically shows me what it thinks I’d like to see, which includes technical books as well as calendars, and when I visit Microsoft’s support page it automatically knows I use Windows XP, and what my last search was.
There’ll be much more on cookies later in the "More About Cookies" section when I discuss security and privacy. For now, you should verify that cookies are enabled on your computer.
Here’s how to make sure you’ve got some cookies in the cookie jar:
Do you want to know when a new version of Internet Explorer is available? Wouldn’t you like to stop those pop-ups telling you there’s a script error on the page you’re viewing? How would you like the URLs of Web sites to be a little friendlier? You can do all of this and more from the Advanced tab of the Internet Options dialog box shown in Figure 11-19.
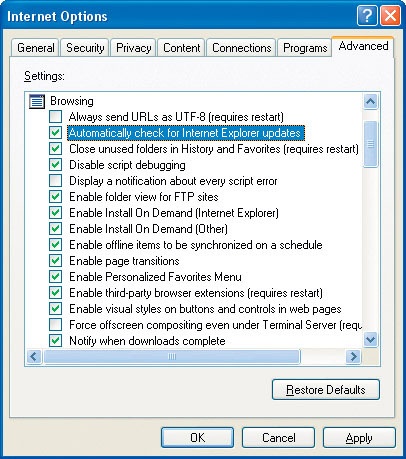
I won’t go through each of the options because you can read through them yourself. However, these are worth noting and can be quite useful:
Automatically Check For Internet Explorer Updates. Keep this option selected so you’ll know when service packs or newer versions are released.
Display A Notification About Every Script Error. Clear this option if you want to avoid seeing information about script errors on a page.
Disable Script Debugging. Clear this option if you cleared the Display A Notification About Every Script Error option described above. It is enabled by default when you install Microsoft Office or any of the standalone Office applications.
Enable Install On Demand (Internet Explorer). Keep this option selected so that components can be automatically downloaded and installed as needed.
Enable Personalized Favorites Menu. Clear this option if you want to turn off personalized lists. Personalized lists only show your most-used Favorites pages; to see the others in the list you must click the bottom of the list or wait a second or two for the rest of the list to automatically show.
Show Friendly URLs. Select this option if you’d prefer to see URLs displayed in the status bar that are more intuitive rather than the exact Web address, which can be rather unwieldy. For instance, instead of http://www.microsoft.com, you’ll see Shortcut To www.microsoft.com.
Search From The Address Bar. In this section, select the desired behavior when searching. I prefer Just Display Results In The Main Window, which is not the default.
Almost everything you can do on a computer can be done with keyboard shortcuts. If you knew all of them, you could probably get away with not using a mouse. I learned quite a few shortcuts in the middle of the night once in a quiet hotel room when the battery in my laptop’s wireless mouse went dead and I couldn’t find another one. (As you might have guessed, I was using the wireless mouse because the laptop’s touch pad had given up the fight months prior.)
IE6 has several shortcuts of its own. Using them can make surfing the Web more efficient, but it’s also a great way to surf for people who find using a mouse uncomfortable because of arthritis or a broken finger, or impossible because of a broken mouse. Here are a few of my favorites:
Alt+Home. Goes to your home page.
Alt+P. Prints the page.
Arrow keys. Scroll through the page.
Backspace. Goes to the previous page.
Ctrl+D. Adds the current page to your Favorites list.
Ctrl+E. Opens the Search bar.
Ctrl+Enter. Adds www to the beginning and .com to the end of an address typed in the Address bar.
Ctrl+I. Opens the Favorites bar.
F1. Displays Help.
F11. Toggles between regular view and full screen mode.
Tab. Moves forward through items on a Web page, the Address bar, and the Links bar. (Shift+Tab moves backward.)
F4. Displays a list of addresses you’ve typed.
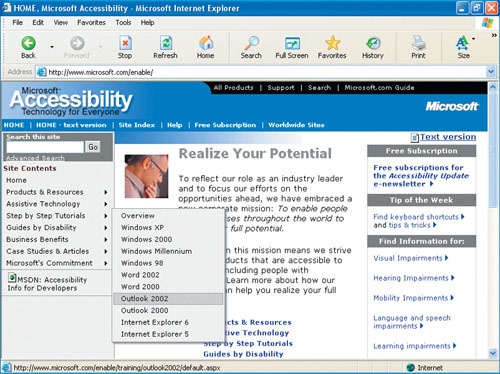
If you need more options to make IE6 more accessible, visit the Accessibility Web page at http://www.microsoft.com/enable. There, you can get a free subscription to the Accessibility Update e-newsletter, find more keyboard shortcuts, find information for visual, hearing, or mobility impairments, and even read case studies and articles. In Figure 11-20 you can see that the accessibility data isn’t limited to IE6; there are tutorials for all of the Windows platforms, Office programs, and various Internet Explorer versions.
When you visit a Web site, the Web page and its graphics are stored temporarily on your computer’s hard disk. The information is stored so that the next time you visit the site, the page can be loaded from your hard disk instead of from the Internet. It’s faster that way, and is a nice perk to have if you visit the same page frequently and it doesn’t change much. If you have a large hard disk, you should consider allotting more space to this file folder so that more information can be cached in this manner. If you have a small hard disk, you should make the folder smaller.
To create more space for the Temporary Internet Files folder, follow these steps:
In Internet Explorer, click Tools, click Internet Options, and click the General tab.
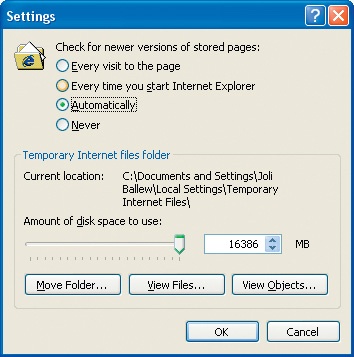
Click Settings to open the Settings dialog box, as shown in Figure 11-21.
To create more space to store pages temporarily, move the slider to the right; for less space, move the slider to the left.
Before you close the Settings dialog box, notice that you can tell IE6 when you want it to check for newer versions of the page. If you select Every Visit To The Page, the page will always open slowly because it has to check for a newer version each time. As you go down that list, the speed at which the page opens increases. Automatically is the default choice and is generally the one most appropriate.
Click OK in the Settings box when you are finished, and click OK in the Internet Options dialog box to close it.
If you think you’re not getting the most up-to-date version of a Web page, if you’re having problems viewing a Web page you’ve visited before, if your network administrator has instructed you to delete temporary files, if you think the computer is sluggish, or if you simply have an unidentified problem, you should clean out the Temporary Internet Files folder. You should do this occasionally anyway, perhaps once a week, and then follow it up with an analysis of the hard disk using Disk Defragmenter. If it needs it, defrag it.
To remove the temporary files that have been stored on your computer, follow these steps:
There’s a second way to clean up your Temporary Internet Files folder, and using this technique you can also clean up other areas of your hard disk like your Recycle Bin, Offline Files, other temporary files on the computer.
To clean up temporary files, the Recycle Bin, and other areas of the hard disk, follow these steps:
Click Start, point to All Programs, point to Accessories, point to System Tools, and click Disk Cleanup.
In the Select Drive dialog box, select the drive to clean up as well as the one that contains the system files and the Temporary Internet Files folder. Click OK and wait while the computer analyzes the files.
In the Disk Cleanup dialog box, select the files to clean up, as shown in Figure 11-22. Notice that Temporary Internet Files is an option, as are others. You can safely delete any of these files to free up space on your computer.

Note
Forgetting to clean out the Temporary Internet Files results in only being able to save an image file as a BMP rather than its native JPEG format. How often the temporary Internet files should be cleaned out depends on how much surfing is done. If I were you, I’d put it on my monthly "to do" list.
Note
If your company’s network administrator asks you to not save any temporary files or if you want to empty the Temporary Internet Files folder after each session, in the Internet Options dialog box (click Tools, and then Internet Options), select Empty Temporary Internet Files Folder When Browser Is Closed from the options under the Advanced tab.
YOU DESERVE A BREAK TODAY

After you’ve worked hard all day, whether you’re a stay-at-home mom, policeman, teacher, firefighter, corporate CEO, or Wall Street trader, you need and deserve a break from reality. A 30-minute rest period isn’t too much to ask of your kids or your boss; in fact, I totally recommend it! To help you out in this regard and to get you started on the road to a better life and saner existence, Microsoft offers a Web site just for gaming. You don’t have to be a pro either; in fact, you don’t have to know anything at all about gaming, and you don’t even have to own a joystick. That’s right—just log on, choose your game, and take a break.

The first time you visit this site, you’ll need to sign up. That really just involves signing in with your passport, choosing a nickname, and downloading the required software. You only have to do this once; from then on you’re home free! Here’s the basic setup:
At http://zone.msn.com/default/aspx, either select a game from any of the lists offered or click All Games or All Free Games to see a list of every single game available. There are also choices for kids’ games, board games, and casino games, just to name a few. Once you’ve chosen a game and clicked the link, you’ll be directed to the playing area where you might see information on how to play, and tips and strategies. You might also have to choose a room, which connects you to players who are of the same skill level as you are.
Sign in with your passport. Doing so gets you access to over a hundred online games, allows you to chat with your opponents while playing, puts you in the running for prizes, and more.
At the prompt to install and run the required software, click Yes to continue.
Once the download is complete (it took about three seconds on my 56 K modem), click Continue.
As you play new games for the first time, you might be prompted to install additional files. This only has to be done once, so click Install if prompted. If prompted, read and agree to the terms of agreement.
Once the files are installed, you can choose to put a shortcut to the Gaming Zone on the desktop, reconfigure privacy settings, add friends, and more. Close or minimize the ZoneFriends dialog box to continue.
Click Return Me To My Game to start playing. From here on out, you’ll simply be connected to the game, and the previous steps won’t be necessary.
Repeat step 1 to select a game. You’ll be prompted on how to proceed. In the graphic to the right, I’m ready to play a game of Chess in the Park Bench room. I "sat down" at table 5, and I’m logged on as Joli7228. I’m ready to chat and play!

While the Internet holds a mesmerizing array of data and information, it also contains material you don’t want your family to see, and things you don’t want to get into yourself. Protecting the kids from inappropriate material is certainly high on the "things-to-do" priority list. Surfing safely doesn’t just involve content; you also have to make sure that you don’t download anything that could harm your computer, and that you don’t give away too much information about who you are and how you can be contacted. To stay safe while surfing, you’ll want to take a few precautions and understand the options for protecting yourself. In this section, you’ll learn how to do just that.
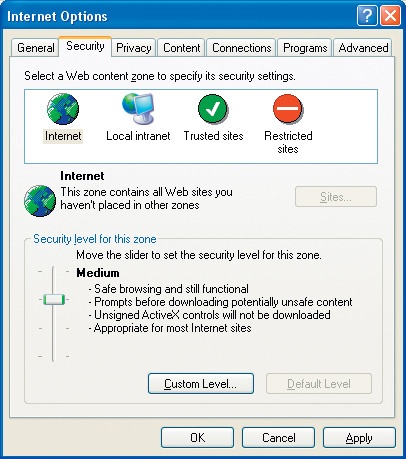
One of the options for safeguarding your computer is to take advantage of Internet Explorer’s security zones. There are four: Internet, Local Intranet, Trusted Sites, and Restricted Sites. The Internet zone is the default. It contains all of the Web sites that are not on your computer or your local network and that you haven’t manually placed in other zones. The security level is set to Medium in the Internet zone, which allows you to download files and fonts, collect (safe) cookies, and download controls and plug-ins that are needed for viewing Web pages, while at the same time disallowing harmful downloads like unsigned ActiveX controls or automatic installation of desktop items.
The Local Intranet zone contains computers and servers on the local network, and you can add addresses manually. As with the Internet zone, the security level is a medium setting, but in this case it’s Medium-Low because your local network is most likely a safe place to visit. For the Trusted Sites and Restricted Sites zones, you also add addresses manually, but the security levels are set to Low and High, respectively. You can place sites in these zones as you wish.
Here are some ideas for configuring your security zones if you just want to tweak them a bit:
Put your own Web site, Microsoft’s Web site, or other sites that you trust in the Trusted Sites zone if you want to automatically use a Low security setting when visiting those particular sites. Using a Low setting allows you to run content without prompts and to run ActiveX content.
Put any offensive sites, sites with illegal content, or sites that you do not want your family, visitors, or workers exposed to in the Restricted Sites zone.
If you have a local network with computers that contain Web pages, add those computers to the Local Intranet zone. The default setting for this zone is Medium-Low, which allows you to run content without prompts and contains other settings appropriate for a local network.
By default, all Web addresses fall into the Internet zone, but adding a site to another zone is easy, as described here:
In Internet Explorer, click Tools, click Internet Options, and click the Security tab, as shown in Figure 11-23. (Your Security tab options will be different than this if you’ve configured custom levels for your zones previously. That’s okay for now.)
Click the zone to add a Web address to.
Click Sites. If you’ve chosen Local Intranet, you’ll have to click Advanced as well. The Sites button will appear dimmed for the Internet zone because all sites are in that zone by default.
Type the address and click Add. If there are any requirements or suggestions for configuring the zone, you’ll be prompted.
Click OK until you return to Internet Explorer.
TRICKS FOR SAFE SURFING

Let’s talk about some ways to be safe when you’re shopping online or surfing the Net. You’ll want to protect your identity from the bad guys, of course, but you’ll also want to use the Internet for what it’s meant for—to make your life easier! There is a middle ground where you can do both. Here are some ideas to protect yourself and your family:
Obtain a credit card that you use only for the Internet, and tell the credit card company of your intentions. Set the credit limit on the card to $200 or less (or whatever is appropriate for you), and make sure your credit card company has policies for Internet fraud cases.
Create a second e-mail account to give out when asked for an address by companies you don’t know or trust. They’ll spam you—you can count on it—so you don’t want to give them your personal address. Check the messages at this new address once a week or so and delete unwanted mail. A Hotmail account is good in these cases because Hotmail has Junk Mail Filter, quite an effective tool for automatically categorizing and deleting unwanted e-mail.
Purchase books, clothes, wedding gifts, tools, computer equipment, and other items from well-known and trusted companies. They are more likely to have secure lines of communication and less likely to be problematic if you want to return an item.
If asked, always tell Internet sites you do not want them to share your information with any other companies.
Always use virus protection software and enable Windows XP’s Internet Firewall.
Don’t visit sites that offer illegal activities like sharing music files; these sites can put spyware or adware on your computer. With this software, your computer activity can be monitored, and personal information can be obtained and shared without your knowledge. Besides that, these spyware programs can severely affect the performance of your computer.
Be extremely careful about free downloads from Web sites in general. Only download from Web sites you trust.
Change your passwords occasionally and make sure they’re difficult to guess, read privacy policies on Web sites, and don’t give away too much about yourself on your personal Web site (if you have one).
Only use credit cards at or send payments to Web sites that start with https://. The s means the http site is secure. Secure sites will display a small padlock in the bottom-right corner of the Status bar. If you don’t see the padlock, don’t buy the product or service.

Look again at Figure 11-23 and you’ll see that the Internet zone has a default security level of Medium, and you’ll also see a slider. You can move the slider up or down to increase or decrease the security level for that zone. You might need to move that slider if your computer is not used in a "normal" environment. For instance, you might configure the Internet zone to High security if the computer is in a kiosk or public place, or if people have access to it when you’re not around, or Low security if you use the computer for testing Beta products or for performing lab tests for your company. For the most part, the settings are good the way they are and should be left as is.
There is a chance that you don’t have a slider available, and you might be getting a little dizzy from the confusion. If your Security tab looks like what’s shown in Figure 11-24, then someone (maybe you) has been poking around in there already! If that’s the case and you want to revert back to the default settings, you’ll have to make a little tweak:
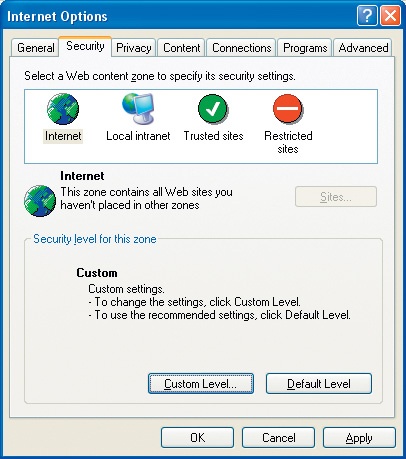
In the Internet Options dialog box, on the Security tab, click Custom Level.
Click Reset in the Security Settings dialog box, click Yes to verify you want to change the security settings for the zone, and click OK.
Click Default Level to apply the default security settings and the slider will appear.
Note
Don’t change the security settings on a computer you use at work without asking someone for permission. Those IT guys probably spent a lot of time getting those settings just right.
To see what the different security settings offer, follow these steps:
Click Tools, click Internet Options, and click the Security tab.
On the Security tab, move the slider up or down the scale to adjust your Internet zone’s security level. Figure 11-25 shows an example of Medium-Low security.

Notice in Figure 11-25 that the description of the Medium-Low setting is different from the description of the Medium setting shown earlier in Figure 11-24. It shows that most content will be run without prompts and that it’s an appropriate setting for a local network. This is a dangerous setting for the Internet zone, and you would not be well protected if you chose it; however, on a local network, the setting is appropriate. As with the other zones, for the most part it’s best to stick with the default security settings.
Zones can be customized, and doing this is a little safer than lowering or raising an entire security level for a zone. By customizing a particular zone, you can pick and choose what you’d like to configure. If you’re testing ActiveX controls in a lab, you might want to enable all ActiveX options; if you don’t want your kids to have the ability to download files, you can disable File Download.
To customize your own computer’s zones, work through these steps:
Click Tools, click Internet Options, and click the Security tab.
Click any zone to customize.
Click Custom Level.
In the Security Settings dialog box, shown in Figure 11-26, make the desired changes. If you need help on any item, click the question mark in the upper-right corner and then click the item you need more information about.
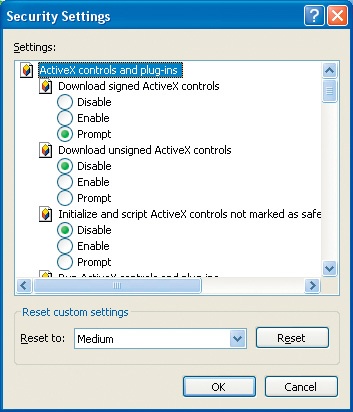
Consider these changes to the default Medium settings for the Internet zone:
If you want to be prompted when ActiveX controls and plug-ins are run, change the default for this from Enable to Prompt. ActiveX controls are small programs or animations for Web pages, generally, but they can be malicious code.
If the computer is in a public place such as a library, hospital, kiosk, lobby, or a small shop and is accessible to various people, change File Download from Enable to Disable. You should have other precautions in place as well, but this will offer additional security.
Many servers require logon information including a user name and password. The default setting is Automatic Logon Only In Intranet Zone, but this can be changed. If you’re the only person with access to your computer, consider changing this to Automatic Logon With Current Username And Password. If you’re sharing a computer or if the computer is in a public place, click Prompt For User Name And Password.
Cookies were mentioned earlier in this chapter, but now we need to talk about them a bit more in the context of security. As you recall, cookies are bits of information stored in text files on your computer that are created and put there by Web sites you visit. These files are generally harmless and contain information about you and your computer that makes surfing the Internet more personal. While cookies can come off seeming a little intrusive, they are really quite helpful. In fact, cookies are so widely used, if you chose to disable them, the way you surf the Web would be severely affected. If you change the default Internet zone setting to High, for instance, most cookies will be blocked, and if you block cookies you won’t be able to take advantage of personalization features of Web sites or even view some Web pages.
Note
A Web site can only know personally identifiable information if you provide it. They do not get any information like this off of your computer. If you don’t want them to know who you are, don’t tell them!
The problem with cookies is that some of them are not created and used on the up and up. Some sites use cookies that offer your personal information to others without your consent. This is a clear violation of your privacy. The only real way to take control of the cookies placed on your computer is to configure the privacy settings so that you’re prompted before any cookie is placed on your machine. While this might take a few extra seconds when visiting a Web page, it allows you to decide whether you trust the Web site or not, and whether you do want a cookie from them or you don’t. If you don’t, you can decline to have a cookie placed on your machine. You might want to do this if you visit less-than-reputable sites.
There are two types of cookies—first party and third party. First-party cookies are from the Web site you are visiting; third-party cookies are from the Web site’s advertisers or content providers. The default IE6 settings allow first-party cookies to be placed on your computer while restricting third-party ones, but you can change that setting on the Privacy tab of the Internet Options dialog box.
Note
Cookies and privacy settings only work for sites in the Internet zone. IE6 knows to trust cookies from the Trusted and Local Intranet zones, and not to allow cookies from Restricted Sites zone.
If you want to change the default cookie settings, follow these steps:
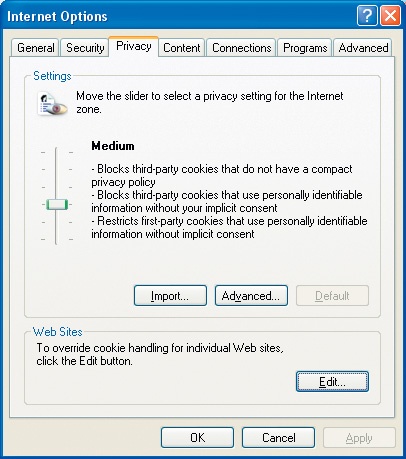
Click Tools, click Internet Options, and click the Privacy tab.
Read the information about cookies and the Medium setting. Move the slider up and down to view the information for the other settings. Figure 11-27 shows the default settings, which are generally the best choices.
Select a setting that meets your privacy needs. Click Advanced.
If you want to override any cookie-handling settings, click Override Automatic Cookie Handling and configure as desired. Click OK.
To block or allow cookies from a particular Web site, click Edit.
Type the Web address and click Block or Allow as desired. Click OK.
I know all of this security talk can seem a little, well, daunting at times, but it’s about staying safe, and that’s the ultimate goal. The Internet is full of content and information that anyone with only a little knowledge can access, which means your kids can access it too, and you have to protect them. There are several ways to do that, including making sure they never give out any personal information including their real name or address. Beyond that, it’s up to you to keep your kids safe while surfing. In this section, I’ll discuss some of those ways.
Internet Explorer 6 comes with a feature called Content Advisor. You’ll want to enable it if you have kids who use the computer or if they have a computer of their own. Figure 11-28 shows the Content Advisor dialog box. There are options to set limits for Language, Nudity, Sex, and Violence, as well as tabs for configuring additional limits.
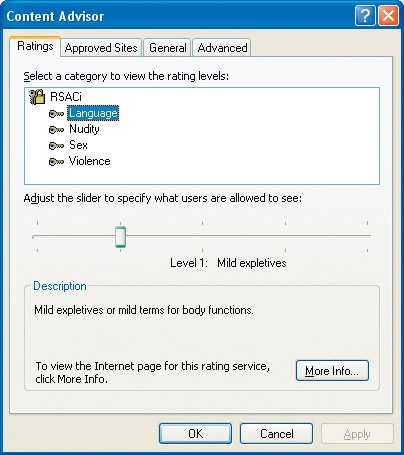
Figure 11-28. The Content Advisor dialog box allows you to set limits to specify what users are allowed (and not allowed) to access.
To set up the Content Advisor the first time, follow these steps:
Open IE6, click Tools, click Internet Options, and click the Content tab.
Click Enable. If you haven’t used Content Advisor before, you’ll be prompted to create and confirm a password so that your kids can’t change the settings. If you’ve used it before, type the password you created and click OK. Click OK again if prompted.
In the Content Advisor dialog box, click Language and move the slider to the appropriate level of protection. The further left you go, the stronger the protection. Repeat these steps for the other four options. The Description and the More Info button can be used to obtain more information about a particular category.
To add sites that are approved or disallowed, click the Approved Sites tab. Type the Web site name and click Always or Never.
Click OK when finished.
You can enable and disable Content Advisor each time you log off or on the computer. This means you can work with Content Advisor disabled, and when your kids are on, you can enable it. Your children will not be able to disable content advisor without a password, which you can change on the General tab at any time.
Stronger and more effective than IE6’s Content Advisor are MSN Parental Controls. You’ll have to upgrade to MSN 8, but the move is worth it if your goal is to keep your kids safe. MSN 8 is a combination messenger program and Web browser, and works with your existing Hotmail or MSN account. You can switch to MSN 8’s ISP too, or just get the software. If you just want the software, it’s only $9.95 (US) a month.
Here are some of the advantages of using MSN 8:
You can designate content filter settings according to your child’s age, and then choose content categories that they can have access to.
Kids can send an e-mail message to mom or dad if they want to request broader access. The child sends the e-mail, and the parent can access that e-mail from any computer that has Internet access.
Parents can receive a weekly e-mail report of a child’s activity for that week, including how much they were online and what sites they visited.
Kids can create their own home page, messenger picture, and more.
GROWING UP ONLINE

Growing up these days is a lot different than when most of us were growing up. Today’s kids are growing up online, and whether that’s good or bad, the jury is still out. Having the ability to locate anything imaginable on the Internet has its advantages, that’s for sure, but for a kid, it’s just as easy to find information on the seven wonders of the world as it is to find a paper already written on them. In addition, while kids can certainly expand their brains and hand-eye coordination at their computer, it might come at the expense of stimulating outdoor activities and social engagements. However it turns out in the long run, growing up online is what it’s all about, so we have to make sure we’re making the most of it!
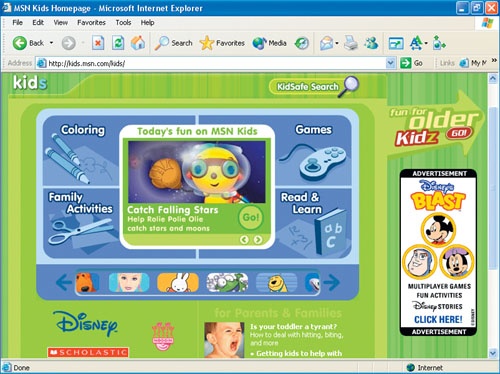
MSN KIDS
MSN Kids (www.kids.msn.com) is a great Web site for children under eight. There are sound effects, a friendly interface, games, and information about music, movies, TV, and more. There are also age-appropriate sections where kids can use a KidSafe Search engine, color, play games, view family activities, and read and learn about all kinds of things.
Besides MSN Kids, there are thousands of other kid-friendly sites. Check out these sites that are just for kids:
www.yahooligans.com This site contains links to age-appropriate games, music, news, e-cards, movies, jokes, and science, among other things. There’s even a place to "Ask Earl," where kids can pose questions and get answers.
www.funbrain.com As with similar sites for kids, FunBrain offers links to games, games, and more games, but these are intellectually stimulating. It’s a great place for kids to have their cake and eat it too!
www.4kids.com 4Kids.com has sections for parents and kids, so everyone can be involved in the surfing process. There are links for the kids that involve cartoons, movies, music, and video games, but there is also a wide array of sites and pages where information can be found on anything from anatomy and astronomy to zoos and zoology.
www.hhmi.org/coolscience Check out this site for cool science stuff, including science projects you can do at home and information about all things science.
As your kids get older, they’ll discover all kinds of ways to purchase items on the Web. They’ll download music, purchase clothes, or order prints of their digital pictures. I give my daughter $200 a year to pick stocks, and we buy them online together. She’s learning about managing money and the stock market, and we get to spend time together doing it. We also manage her savings account online and discuss automatic deductions, interest, and similar concepts.
Of course, they’ll want their independence! For teenagers, you might consider giving them a credit card number with a monthly allowance on it (say $50) for purchasing items they need. You can see on your credit card statement what they’ve purchased, and it’s a great way to promote safe and useful things to do on the Internet, as well as responsible shopping.
Check out these sites just for teenagers:
www.afterschool.gov/kidsnteens2.html Offers information and help with all school subjects; has sections for teen issues like college opportunities, community service, and safety and health issues; and also has a place to do fun stuff including games, activities, and brain teasers.
www.nationalgeographic.com/kids A great place for kids of any age to find information on virtually anything, including Guinness World Records, help with homework, world maps, games, experiments, and more.
www.cyberteens.com Offers links for shopping, creative pursuits, games, work, and school, and links to cool stuff like museums, music sites, sports, and entertainment.
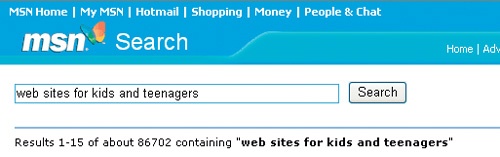
To find other sites for kids or teens, just use your favorite search engine to search for Web sites for kids and teenagers. There are lots out there; in fact, my latest search yielded almost 90,000 results!
Now that you’ve enhanced the look and feel of Internet Explorer, optimized your settings to work faster, engaged the kids with kid-friendly sites, and protected yourself against all of those cyber-hoodlums, you can let your hair down and relax. Explore the Internet with confidence and get out there and have some fun!
- ActiveX controls
Small components of a Web page that can be downloaded automatically to the user’s computer so the user can view animations and similar items on a page. Signed ActiveX controls are generally safe; unsigned ones might not be. These controls are similar to the older Java applets, which also run small scripts on the Web page for the purpose of enhancing the Web page with animations, calculations, and other straightforward tasks.
- cache
An area in the computer where information is stored temporarily. Each time you visit a Web site, the site is cached in the computer’s Internet cache files. When you click the Back button while surfing, the computer pulls the information it needs from its cache instead of having to retrieve it from the Web. Cache speeds up your surfing experience.
- cookies
Generally harmless pieces of information that are stored on your hard disk that tell Web sites who you are, what your preferences are, and how the Web site can contact you. Cookies make surfing the Internet more pleasurable and personal.
- Disk Defragmenter
A utility in Windows XP and previous Microsoft operating systems that allows you to defragment your hard disk. Fragmentation of a hard disk occurs after files and programs have been installed and deleted over a period of time. Defragmenting improves the hard disk’s performance by moving the files on the hard disk to a more effective location.
- Favorites
In Internet Explorer, a list of Web sites a user denotes as ones he or she would like to remember and visit again. The Web site list is located under the Favorites menu, and users can add to the list, organize the list, or remove items from the list.
- fonts
The style of lettering used on a Web page, in a document or on any other printed page. There are thousands of available fonts, ranging from the common ones like Arial and Times New Roman, to not so common ones like Thickhead and Haettenschweiler.
- History
An option in Internet Explorer where the user can browse through a list of the Web sites he or she has visited over the last three weeks. A History icon can be placed on the Standard Buttons toolbar, or History can be accessed from the View menu, Explorer Bar option.
- HTML
Hypertext Markup Language, the code used for creating Web pages. This code tells the Web browser how to display the Web page, including what fonts to use, where pictures should be placed, and where text and other items should be positioned on the page.
- intranet
Similar to the Internet, which is a collection of computers networked for communication with each other, an intranet is a collection of computers networked and connected in a defined space such as a single company or home. Intranets allow companies and businesses to create an Internet-type atmosphere within their own confines and maintain control over what is available, what data goes in and out, and who can access the information.
- local network
Similar to an intranet, a local network is a group of connected computers in a limited, definable space. Local networks can consist of two computers or thousands and exist for the purpose of sharing information and data with members of the network.
- offline files
Files that a user downloads to his or her computer, usually from a network server. This action makes these files available even if the user is not connected to the server that holds them. Offline files are a great way for corporate users to take work with them while they’re on the road or when they aren’t connected, and it allows them to work on airplanes, in hotel rooms, and even from their car. Once back at the office, the user synchronizes his or her laptop with the network server so that both contain the same versions of the files.
- secure sites
Sites that have an address that starts with https://. Secure sites guarantee that transactions and data sent back and forth are protected. Before purchasing anything online, doing any online banking, or giving out any personal information, verify that you are using a secure site.
- server
A computer in an intranet, on the Internet, or in a local network that holds files for users. Servers can do more than simply hold data; they can also be print servers, fax servers, e-mail servers, or they can simply exist for the purpose of securely logging on users to a corporate domain.
- temporary files
In conjunction with Internet Explorer, files on a computer’s hard disk that hold information temporarily and pertain to Web pages you’ve visited. Having temporary files on your computer allows you to access information more quickly than having to retrieve the same information over a 56 K modem connection each time you visit the page. Temporary files can be deleted without causing any harm to existing data on your computer.