
Most people take photographs to chronicle their lives and preserve memories of family, friends, and events. A lot of time and expense goes into taking these pictures, and over a lifetime hundreds (if not thousands) of pictures can be accumulated. Although many of us consider our photographs among our most precious items, most of the time we don’t take care of them like we should. In fact, I’d venture to guess that you probably have a bunch of photographs held captive in shoeboxes that you haven’t looked at in years.

It’s time to change the way you think about photography. Armed with Microsoft Windows XP and a digital camera, you can import your photographs directly to your computer where you can organize, print, and share them with very little effort. With proper care, these images will last many, many years, and certainly much longer than your printed pictures would. Add a scanner to the mix and you’ll be able to scan all of those old printed photographs too, which will not only make them easily available, but will also preserve them for future generations.
Putting your images on a computer or a CD makes it much easier to enjoy and share your pictures. With Windows XP you can view images as a slide show, create a photo story with music and narration, send a photo greeting card, and use the pictures as screen savers and desktop backgrounds. You can now make your favorite photographs part of your daily life, and view them whenever you want!
In this chapter I’ll introduce the basics of getting started with a digital camera. I’ll walk you through hooking it up, installing the drivers and software, and importing and exporting pictures. I’ll also include a section on scanning that has tips for getting the most out of scans for both prints and slides. Within no time, you’ll be experiencing photography in a whole new way. Whatever your level of expertise, you and Windows XP are going to click!
Welcome to the twenty-first century. Isn’t it time you went digital? If you have a digital camera, you might have already taken photographs, but if you haven’t, well, that’s OK too. It is certainly understandable if you’ve been putting off using your new digital camera for fear that you’d "lose" your pictures in a computer crash or that you wouldn’t be able to share them with your friends and family easily. With Windows XP, these are unnecessary concerns!
In this section, you’ll learn how to hook up your new digital camera, get it working, and import pictures from it to your computer. You’ll also learn how to save pictures, where to view and e-mail them, and how to back them up in case of a computer crash. Before you know it, you’ll have gone completely digital!
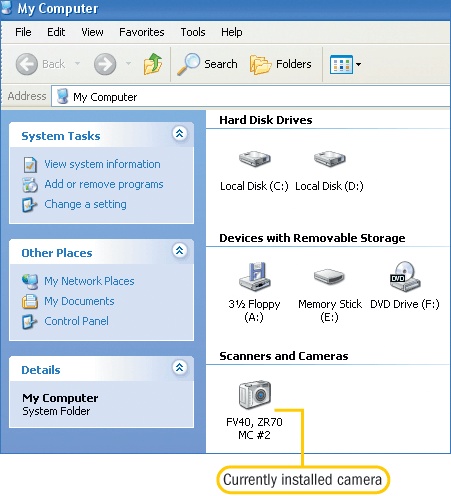
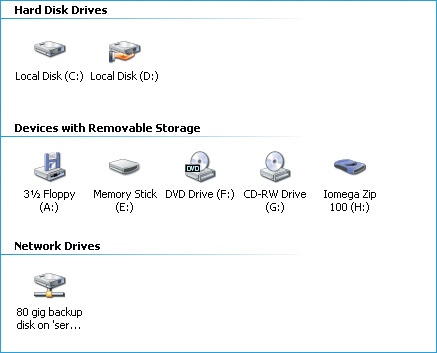
If you haven’t installed your digital camera, you need to read the directions that came with your camera, charge the camera or plug it in, connect it to the computer, and install the drivers or software or both. Because camera types and connections vary, read the directions carefully. While I can’t give you step-by-step instructions for every type of camera, I can tell you that they all either plug into a wall outlet or are charged using batteries. They also all connect to the computer through one of only a few types of cables. Once installed, connected, and turned on, you’ll see the camera in My Computer, as shown in Figure 1-1.
There are really only two types of digital cameras to choose from—digital still cameras and digital video cameras. Digital still cameras take digital pictures and store them either in internal memory or on an additional memory card. They generally run on regular AA batteries or can be plugged into a wall outlet. The quality is superb, and the camera is easily connected to the computer via a USB cable. Digital still cameras take excellent pictures and are usually compact enough to fit in a briefcase or purse. Because of this, you can carry them with you everywhere you go. You never know when you might come across the perfect photograph moment!
VIRTUAL VACATION, ANYONE?

When traveling, take along your digital still camera to document your journey. Because of the compact size of most newer cameras, there’s no need to have a dedicated camera bag, which makes carrying one quite easy. Add a larger memory card, and you can take literally hundreds of pictures before you have to import or delete them to free up space. If you bring along a laptop, you can connect the camera, import the pictures, burn them to a CD or e-mail them, and share your vacation memories with others before you arrive home! Later, you can use these same digital pictures to personalize your screen saver, create holiday cards, or produce awesome slide shows for viewing by family and friends. (Burning your images to a CD or importing them to a laptop while you’re still on vacation is also a neat back-up trick in case the camera is lost or stolen. More on how to do that in Chapter 2.)
The other type of digital camera is the digital video (DV) camera. Many of these cameras also take digital still photos. DV cameras generally run off of a battery pack that’s charged through a wall outlet. The movies are stored on a MiniDV tape, and the digital pictures are stored on a memory card. The camera connects to the computer via a FireWire port for downloading movies and via a USB port for downloading the digital images.
You can view, e-mail, and copy your digital pictures using your laptop while you’re still on vacation.
Although DV cameras are great for shooting movies, they’re a little bulkier than the newer digital still cameras. If you were taking a trip with this kind of camera, you’d really need a dedicated camera bag for the battery packs, charger, extra tapes, and additional lenses. In addition, lower-end DV cameras take digital pictures in only a few resolutions. Many low-end digital still cameras offer higher resolutions than most DV cameras. Having the ability to take high-resolution pictures is important if you want to print pictures larger than 4 by 6 inches.
Digital cameras (depending on the brand, the age of the camera, and other factors) connect to computers via FireWire or IEEE 1394 cable, USB cable, serial cable, Mini USB cable, or a proprietary cable that is purchased from the manufacturer, such as Sony’s iLink. If you are given the option, I’d suggest opting for a camera that uses a generic 4-pin to 6-pin FireWire cable.
Most of the time, installation is as simple as charging the camera or plugging it into a wall outlet, connecting it to the computer, and turning on the camera. Windows XP has a vast library of drivers, and the camera is often installed without any help from you. Once installed, you’re prompted to choose a program to use with the camera. For a digital camera, select the Scanner And Camera Wizard.
Note
Before installing your digital camera, make sure you’ve read the instruction manual as well as the installation manual that came with the camera. Some cameras require you to install specific drivers or software before connecting the camera to the computer.
If, after making the connection and turning on the camera, you see the page shown in Figure 1-2, work through the next section to install the camera.
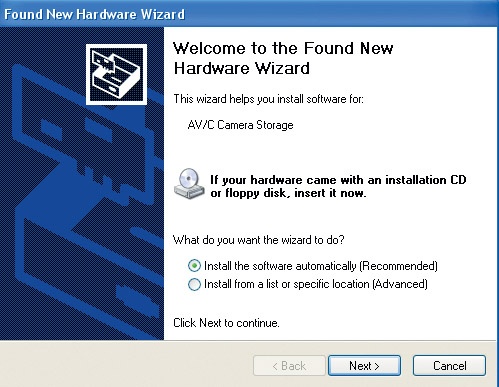
If Windows XP doesn’t automatically install the camera’s software and displays a page similar to the one shown in Figure 1-2, insert the CD that came with your camera and manually install the driver yourself, as described here:
Since there might be several disks, be sure to insert the disk that has the camera driver on it. Later, you might also want to install the software.
From the Welcome To The Found New Hardware Wizard page, click Install From A List Or Specific Location (Advanced). Click Next.
Click Search For The Best Driver In These Locations and then Search Removable Media (Floppy, CD-ROM). Click Next.
Wait while Windows XP installs your software.
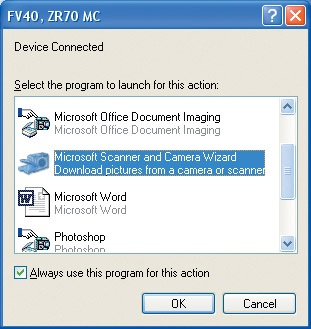
You might be prompted to select a program to launch when the camera is connected. If so, choose Microsoft Scanner And Camera Wizard, as shown in Figure 1-3. Click OK.
If for whatever reason you don’t have the appropriate drivers for your camera, visit the Web site of your camera manufacturer. Usually, there is a link to a driver page, support page, or similar page where you can download the latest drivers for the camera. Make sure you download the driver for Windows XP, that you save it to your hard disk, and that you read the directions carefully before installing it.
After you’ve installed the camera and taken some pictures, you can import the pictures to a computer. Once they’re imported you’ll be able to e-mail them, use them as screen savers and desktop backgrounds, and do a million other fun things!
The easiest way to get those pictures from your camera to your computer is to use the Scanner And Camera Wizard located in Control Panel. There are other ways too, including using the software that came with the camera or accessing the camera from My Computer. I prefer the Scanner And Camera Wizard, and I think you will too; let’s start there.
Note
To import pictures from the camera to the hard disk, the camera will need to be connected to your computer, turned on, and set to its computer, VCR, or Playback option.
The Scanner And Camera Wizard can be accessed from Control Panel. Clicking the Cameras And Scanners icon, highlighting the camera to use, and then clicking Get Pictures from the Scanners And Cameras window opens the Scanner And Camera Wizard (so does double-clicking the camera’s icon). The Scanner And Camera Wizard can then be used to import pictures from the camera. Figure 1-4 shows the Scanners And Cameras window with a Canon DV Camcorder selected. Notice that in the left pane there’s an option to Get Pictures.
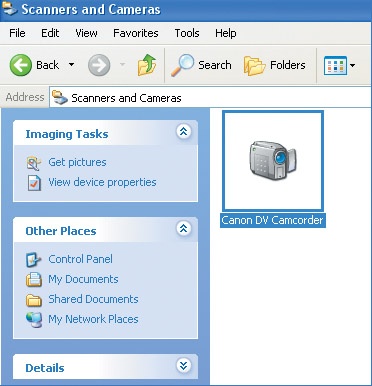
Figure 1-4. Use the Scanners And Cameras icon in Control Panel to import pictures from a digital camera.
With the camera turned on, connected, and on the correct setting, open Control Panel and click the Scanners And Cameras icon.
Double-click the camera icon.
On the Welcome To The Scanner And Camera Wizard page, click Next to start the wizard. (Notice there is an option for advanced users, allowing you to work directly from the device; we’ll talk about that later. For now, just click Next.)
On the Choose Pictures To Copy page, select the check box for each picture you want to download. Click Next.
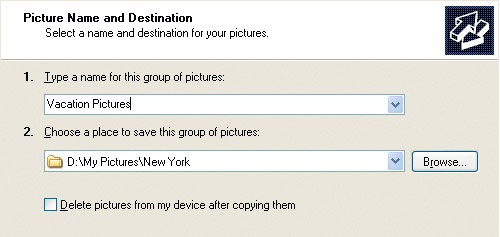
On the Picture Name And Destination page shown in Figure 1-5, type a name for the picture or group of pictures. On the same page, click Browse to locate the folder to save the pictures to, or accept the default folder, My Pictures. Click Next.
On the Other Options page, click Nothing, I’m Finished Working With These Pictures. Click Next. Click Finish.
Tip
Once your pictures are saved to the hard disk, consider publishing them to a Web site, ordering prints of them online, or e-mailing them to friends and family.
In step 3, I noted there was an advanced option for using the Scanner And Camera Wizard. Selecting the advanced option opens a window for the digital camera. The window contains thumbnails of the pictures on the camera. (You might have to double-click a folder to get to the thumbnails.)
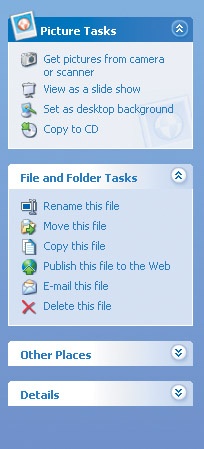
When using the advanced options, you can work directly with the camera and have more control over camera processes. The amount of control you have can differ from camera to camera. In general, using the advanced options allows you to do the following:
Delete all pictures from the camera.
Click a picture to open it in Windows Picture And Fax Viewer.
Copy the picture to another folder on the computer.
Publish a picture to the Web.
Delete a single image.
See details about the image.
Right-click the image to e-mail, save, preview, or view the properties of the image.
To use the advanced options, open Control Panel, click Scanners And Cameras, double-click the camera icon, and on the Welcome To The Scanner And Camera Wizard page, click Advanced Users Only. The camera window opens and either the thumbnails of the images or a folder with the thumbnails inside it is available.
You now have advanced access to your pictures! To use the advanced options, highlight the picture with the mouse and choose any of the available options, which are now accessible from the left pane. One you’ll become familiar with right away is the option to print the pictures. You’ll learn more about working with pictures in Chapter 2.
If the camera is seen as either an additional hard disk or if it’s listed in the Scanners And Cameras window, you can use My Computer. Here, pictures can be transferred from the camera to the computer by opening the drive and dragging the pictures you want to import to a folder.
Tip
Some older cameras that are not recognized by Windows XP won’t show up in the Scanners And Cameras window. When this happens, the computer will see the camera as a separate hard disk. To import pictures from the camera, you’ll have to locate and install a newer driver for the camera, use the camera’s software, or work with the camera from inside My Computer as detailed here.
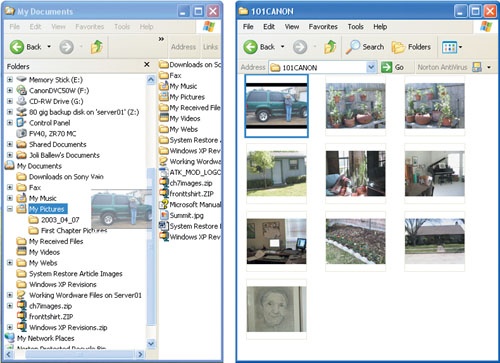
Double-clicking the camera’s icon in My Computer opens the camera folder and displays the pictures in it. In this folder, you’ll have advanced access to the camera as detailed earlier. To copy a picture from the camera’s folder to another folder on the computer, simply drag it to its new location. Figure 1-6 shows two open windows: one is Windows Explorer and the other is the camera folder opened from My Computer. Pictures can be dragged from the camera folder to any of the folders in Windows Explorer. To copy multiple images, hold down the Ctrl key while selecting the images.
Backing up the images you’ve stored on your hard disk is as important as making copies of financial records, storing birth certificates and wills in a safe deposit box, and having insurance on your home and car. In fact, it might actually be more important. If you don’t have any backups of your images and you have a hard disk crash, all of your pictures will be lost. Insurance can’t replace your photos. To make a simple backup of the images currently stored in My Pictures, follow these steps:
Open My Computer, and then double-click the Zip drive, external hard disk, or other backup device.
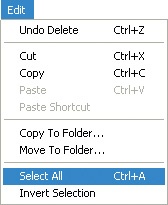
Open My Pictures, click the Edit menu, and choose Select All, as shown in Figure 1-7.
From My Pictures, click and drag the selected images to the backup device folder you opened in step 1.
WHAT’S THE BIG DEAL WITH BACKING UP?

In Chapter 2, you’ll learn how to copy your images to CDs. Backing up your images on a CD is the optimal way to keep your images safe because you can put these discs in a different location for safekeeping. Transferring the images to disc is also a great way to preserve the photos, and the disc will last much longer than your printed photos will. In fact, I will venture to say they will last forever, as long as you make copies of them every 50 years or so!
If you don’t have a CD burner, there are other ways to safeguard your images. You can copy or move them to a Zip disk (these disks usually hold 100 MB or 250 MB of information), or you can copy or move them to another computer, or you can copy them to a removable disk drive. However you do it, you should do it soon!

You can export (or upload) pictures that are stored on your hard disk to your digital camera. Having the ability to pick and choose what pictures are stored on your digital camera offers a great way to take your favorite photos with you when visiting friends and family, or for just showing off on the back porch with the neighbors.
To export pictures from your computer to a digital camera, the pictures will have to meet the format and size requirements set by your camera. Most cameras will only accept JPEG files, and you’ll have specific file size requirements to meet. You’ll also need to have installed the software that came with the camera. Although software will differ, there are general guidelines for exporting pictures to a camera, as follows:
With the camera turned on, connected, and on the correct setting, click the Start button and point to All Programs.
In the All Programs list, click the software that you installed for the camera.
Follow the instructions for your specific software to upload images. For my Canon ZR 70 MC, I click Camera & Memory Card, and then I click Upload Images. Your software is probably similar.
Locate the images to upload and select them. Continue to follow the directions for your software.
Because there are so many different types of cameras, the Scanner And Camera Wizard can’t be used to upload images. In addition to this limitation, others exist depending on the camera used. Some cameras can’t upload images that were not previously downloaded by the same camera, while others can upload several types of images but those images can’t be viewed in the camera’s window after the upload is complete. You’ll be alerted to any problems during the upload process.
With scanners becoming more and more affordable these days, I suggest you run out and purchase one today if you don’t already have one! You won’t regret the purchase if you’re like so many other people who have boxes filled with printed photos gathering dust. I have a couple of scanners myself; a cheap one (which I won’t suggest for you), and another that is quite a bit more advanced and was more expensive. With a scanner, you can transfer your old family photos to the computer, clean them up, edit their contents, and save them to CDs or DVDs for viewing almost anywhere. With the newer portable DVD players, you can even take the DVDs with you to parties, family gatherings, and conferences. You can burn copies of your DVDs or CDs for your friends and relatives too. What a hit you’ll be at the next family reunion!
IT’S BETTER THAN THE REFRIGERATOR

No, I’m not talking about the scanner. The it I’m referring to is the gallery of artwork you can display on your computer instead of on your already-filled refrigerator. If your refrigerator is anything like mine, finding the perfect place for the new watercolor artwork your five-year-old created in kindergarten today isn’t an easy task.
Instead of putting that wonderful art away in a box somewhere to make room for new creations, scan them, create a folder for the work in the My Pictures folder, and place the images in the folder. Once there, you can view the pictures anytime you want. You can use the art as a screen saver too, or view them as a slide show, and you can even burn the images to a CD for showing friends and relatives!


Installing a scanner and installing a camera require the same steps. As with a camera, most scanners connect to the computer using a USB or FireWire cable. Some scanners plug into a wall outlet as well, but many brands power off of the USB port and don’t require an outlet at all. Occasionally, you will need to install a driver, but for the most part, a USB scanner will install automatically. If your scanner doesn’t install automatically, follow the instructions for installing a camera detailed earlier in this chapter.
Scanning old photos and editing them for family and friends is great fun! Thanks to Windows XP it’s easy too. Once the scanner is installed, you’re only a few clicks away from putting those old images on your computer. Once you have the image on the computer, you can treat it like any other image you acquire; it can be edited, saved, burned to disc, or e-mailed—just to name a few options. So, dig out that old image of your mom and dad getting married or your Uncle Sid with a lampshade on his head (this might be the same picture) and let’s get started!
As with importing pictures from a camera, there are several options for scanning an image to a computer. Almost all scanners come with software for scanning and editing images, and the software is generally quite useful and comprehensive. For a beginner, though, the software can be overwhelming. Before you dive into anything very complex, let’s give Windows XP a shot. For beginning enthusiasts I suggest the Scanner And Camera Wizard, as detailed here:
Open Control Panel, and then double-click Scanners And Cameras.
In the Scanners And Cameras window, double-click the icon for the scanner you want to use. (If you have multiple scanners, you’ll see multiple icons.)
On the Welcome To The Scanner And Camera Wizard page, click Next.
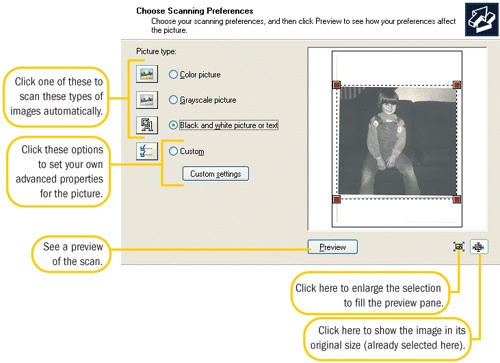
On the Choose Scanning Preferences page shown in Figure 1-8, configure the preferences as shown in the figure.
After the settings on this page are complete, click Next.
On the Picture Name And Destination page, type a name for the picture, select a file format, and choose a folder to save the image to. (For information on file formats and general tips for better scans, read the next section, "Tips for Better Scans.") Click Next.
Wait while the image scans.
On the Other Options page, select an action. If you’re finished scanning, click Next.
On the Complete The Scanner And Camera Wizard page, click the link to the folder where your picture is stored to see it. You can also click Finish.
WHO SAYS YOU CAN’T TRAVEL BACK IN TIME?

Be the hit of your next family or high school reunion, a coworker’s retirement party, or an anniversary party by collecting and scanning old photographs, and then using them to create a collage on a poster or a slide show that you project on a screen with your laptop during the party. You could even save the slide show to a CD and hand them out as party favors. The possibilities are endless!
Consider this scenario: Mary Anne is in charge of organizing her 20th high school reunion. She reserves the old high school hangout (a skating rink) and sends out invitations, urging her classmates to mail old photos of themselves, fellow alumni, the school, sporting events, teachers—anything that stirs memories. With photos in hand, she scans each one, along with photos from the senior yearbook, saving all of them to her computer’s hard disk. With the photos she’s scanned, she begins her creations. She makes nametags with yearbook pictures accompanying each name. She creates a slide show with the pictures she’s received, which she shows as entertainment during the reunion dinner (with the help of her laptop and a projector). As a sign that she was appropriately voted Most Likely to Succeed, she burns the slide show to CDs, creates labels for them, puts the discs in CD cases, and then sells the discs (which can be played on almost any computer) for $5.00 each, making a profit of $4.00 on each sold. They’re a hit, and she uses the money earned for the next reunion! Wondering how you could make a slide show like this? Read on.

Download the free slide show generator from http://www.Microsoft.com/windowsxp/pro/downloads/powertoys.asp. Once you have downloaded and installed it, follow these steps to create an awesome CD slide show:
Place a blank, writable CD into the CD recording drive.
Open My Pictures or the folder that contains the images you want to copy to a CD.
Select the pictures to copy, and in the Picture Tasks pane click Copy To CD. Make sure you’re only copying image files.
In My Computer, double-click the CD recording drive. Verify that the temporary files are the ones you want to copy.
In the CD Writing Tasks pane, click Write These Files To CD.
On the Welcome To The CD Writing Wizard page, type a name for your CD. Click Next.
On the Do You Want To Make A Picture CD page (which is the result of downloading the CD Slide Show Generator), verify that Yes, Add A Picture Viewer is selected, and click Next. The disk will be created.
VIEWING THE CD SLIDE SHOW
The newly created slide show can be viewed on virtually any Windows-based computer. The computer doesn’t have to have Windows XP and doesn’t have to have the CD Slide Show Generator installed. Just place the CD in the CD-ROM drive. The slide show will most likely start automatically. If it doesn’t start automatically, do one of the following:
If you use Windows XP, choose View a Slide Show of the Images Using Windows Picture and Fax Viewer, when prompted.
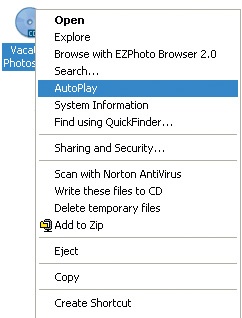
If you don’t use Windows XP, open My Computer, right-click the CD-ROM drive, and click AutoPlay.
With the picture scanned and saved to a folder on the hard disk, you can work with the picture as you would any other image. It can be opened in Windows Picture And Fax Viewer, or it can be opened using an image-editing program such as Microsoft Picture It!, Microsoft Digital Image Pro, Microsoft Office Picture Manager, or Adobe Photoshop. To open the image in a specific program, right-click it, point to Open With, and click the appropriate program name.
Note
You can also right-click the image, point to Send To, and click Mail Recipient to e-mail the image. This task and others will be detailed in Chapter 2.
Even though scanning with the Scanner And Camera Wizard is easy, getting beautiful scans every time can require a bit more effort. If you find that your scans are lacking in areas of color, resolution, or clarity, try the following helpful hints:
Purchase the best scanner you can afford, but don’t go overboard. A good scanner can be purchased for around $100. Shoot for an optical resolution of 1200×1200 or greater.
Clean the scanner bed with glass cleaner and wipe it with a lint-free or antistatic cloth before scanning.
Start with a good, dust-free photograph. You can’t get a great scan from a mediocre or dirty photo.
If possible, crop the images before you scan by masking out undesirable parts of the image. Place blank paper over the areas you don’t want in the final scan.
Position the image squarely on the scanner bed. You’ll have a hard time straightening out a crooked scan!
Scan line art at 600 to 800 dpi if possible. (Scanning at this resolution will require more RAM and hard disk space than scanning at a lower resolution.) Scanning at a high resolution will increase the clarity of the edges of art and type. Scan color images at 300 to 600 dpi. If you plan to order prints online, use the resolution setting that the vendor requires. Usually 300 dpi is acceptable.
Save images that will be printed as TIFF files; images for the computer as TIFF files; images for the Internet or for e-mailing as JPEG files; and images with only a few distinct colors as GIF files.
If possible, calibrate your monitor, printer, and scanner. In general, only high-end devices and some graphic-imaging software come with calibration tools. They all have specific requirements and procedures, so follow the manufacturer’s instructions for calibration.
Use a resolution of 600 to 800 dpi when you scan a small picture that you’d like to later enlarge electronically.
Preview the image before performing the scan. By previewing, you can verify that the color, position, and size of the image are correct.
Scan the image at 100 percent to get the best possible results. Neither enlarge nor reduce the image during the scan.
Install extra RAM if the computer is performing slowly or if you receive "Out of Memory" errors.
For more scanning options, use the software that came with the scanner. Most scanners come with several software options and software packages.

If you plan to use a scanner to scan images professionally, note that there are hundreds of books devoted solely to the scanning process, and how to get better output. There are also online tutorials from amateurs and professionals as well as documentation and tips from the scanner manufacturer’s Web site.
If you have old negatives or slides you want to reproduce or save for the future, you can do that with Windows XP, though you’ll need a special kind of scanner to get proper output. Scanning slides requires that the scanner have special attributes like a media holder, transparency adapter, or a drawer with a dedicated light source. The scanner also has to have higher optical resolution specifications because the image you’ll need to scan will be quite small, while the output will be quite a bit larger. Although you can scan slides and negatives with a mid-range scanner with the proper attributes, scanning film is best achieved with a dedicated film scanner.
Note
If you don’t have a scanner that accepts film, you can take your slides and negatives to a photo lab for processing. They’ll put your images on a disc suitable for output of 8-by-10-inch prints.
If you do have a scanner that can scan slides and negatives, the scanning process is the same as detailed earlier, plus the additional task of getting the media onto or into the scanner (you’ll need to read the documentation for the specifics). As with regular photographs, you can use the Scanner And Camera Wizard or the scanner’s own software. In many instances, the software that comes with high-end scanners includes automatic dust and scratch removal options and the latest technology for scanning.
Even if you purchase and install a high-end film scanner, you can still improve the quality of the scans by following a few simple rules:
Start with a good, clean, dust-free slide or negative.
Clean the scanner bed to prevent unwanted dust particles from appearing on the print.
Preview the scan to verify that color, size, and position are correct.
Use the scanner software or an image-editing program to adjust the color, contrast, shadows, and other image data; there are several options for software. Many experienced photographers and graphic designers use Adobe Photoshop, an expensive, comprehensive, and complicated program created for and used by professional artists. If you aren’t a professional artist but consider yourself a serious hobbyist, consider Microsoft Digital Image Pro. It’s a great program for the price and allows high-quality image retouching and lots of advanced editing options. If you’re new to digital photography, an even friendlier program is Microsoft Picture It!. It’s probably the best program for a beginner and it’s inexpensive.
Scan at the maximum optical resolution of the scanner.
Use the calibration software with the scanner once a month to verify that the scanner is still calibrated properly.
And remember, since you’re most likely scanning and saving these slides and negatives for future generations, don’t change the originals in any way. If you want to open the image in an image-editing program and draw a moustache on Aunt Edna, make sure you have a good, clean copy of the original first!
- drivers
Software that enables the computer to communicate with a hardware device such as a camera, printer, scanner, or similar device.
- film scanner
A scanner that’s used to scan film instead of photographs. Film includes negatives, slides, and similar media. Film scanners generally have both a flatbed and a film adapter, allowing many different types of media to be scanned.
- FireWire
A high-speed plug-and-play interface used to connect portable devices such as digital cameras, printers, audio players, keyboards, and other hardware to the computer without having to have a specialized adapter. FireWire is usually required to upload digital video from digital video cameras.
- GIF
A file format used when the file being saved has only a few distinct colors. Generally, GIF files are used when the image is 256 colors or fewer. It’s also a good choice when saving images for the Internet.
- iLink
A high-speed plug-and-play interface used to connect portable devices such as digital cameras and audio players. iLink is the Sony implementation of the IEEE 1394 connectivity technology.
- IEEE 1394
A high-speed plug-and-play interface used to connect peripheral devices to a computer. FireWire is an implementation of this technology.
- image-editing program
A software program that’s used to enhance or edit a photograph or digital picture. Microsoft Digital Image Pro is an example. Using an image-editing program, pictures can be darkened, lightened, sharpened, cropped, and more.
- JPEG
A file format for digital images, including photographs. When images are saved as JPEG files, the resulting file is generally quite small and takes up less space on the hard disk than most other file types. They are lossy too, meaning that as they are compressed they lose detail and quality. In a photograph though, this loss is minimal. As a result, JPEG files are popular for saving to digital cameras because a small 64 MB card can hold literally hundreds of images without any perceptible loss of quality.
- memory card
A small storage device used with digital cameras to store pictures until they can be uploaded to a computer. They can also store text, audio, and video with compatible remote computing devices.
- Mini USB cable
Smaller USB cables generally used to connect digital devices like cameras and audio players to a computer. One end of the cable is a regular USB size and plugs into the computer; the other end is much smaller, thus allowing the camera or other device to be smaller as well.
- MiniDV
Small tapes used in MiniDV digital video cameras for storing video. MiniDV tapes can’t be played in VCR players, but are instead used to hold digital video until it can be moved from the camera to a computer for editing, viewing, and copying.
- resolution
An image’s resolution is determined by how many pixels per inch or pixels per centimeter the image has. A high resolution like 1200×1600 creates a high-quality image; a low resolution like 800×600 creates a lower-quality image.
- thumbnails
Small representations of images stored on a computer. Using thumbnails, you can view the image without actually opening it in an image-editing program.
- TIFF
A file format that is widely used in digital graphic design. TIFF files can be saved using a lossless compression scheme, making the resulting image of higher quality than their smaller counterparts, JPEG files. Better quality creates a larger file, and TIFF files are thus larger than JPEGs.
- USB (universal serial bus)
A high-speed plug-and-play interface used to connect portable devices such as digital cameras, printers, audio players, keyboards, and other hardware to the computer without having to have a specialized adapter.