
You film and edit projects and create movies for many reasons, but I’d guess that it’s mostly to share your memories, experiences, and stories with your family and friends. Perhaps you’re the family historian, genealogist, or archivist who’s responsible for preserving your family’s history for future generations. Maybe you created a project for work or created a movie of your band and sent it off to an agent. Possibly you even wrote, directed, and shot short films for the pure enjoyment of it. Whatever the reason, the subject, or the purpose for creating a movie, you’ll want to save, share, and protect it. That’s the subject of this chapter, and really, the most important part of creating a movie. Share your movies now and preserve them for future audiences to view and enjoy.

In this chapter you’ll take the final steps of moviemaking—putting your movie "in the can" and distributing it to the public. You’ll learn how to create a movie from the project you’ve been editing and adding effects to. I’ll also show you how to save your movie to a hard disk or a CD. And although you can always hand deliver or mail a CD to friends and family, I’ll show you how to share your movies immediately without having to leave your computer by e-mailing or instant messaging (IMing) shortened versions to them. You’ll also learn how to reach an even wider audience by saving your movies to a Web site or taking your movies to the streets with your DV camera or Pocket PC. Whatever method you choose to present your movie, isn’t it about time you started sharing your creations?
As you learned in previous chapters, a collection is created when you capture raw data—video, stills, or video clips—to your computer, and as you edit that footage, a project is born. Once the project is complete, the next step is transforming it into a movie. The movie is what you share—with friends, with family, with coworkers, and with agents and bosses. So, open that project you’ve been working on, and let’s turn it into a real movie!
Tip
I’ve assumed that you’ve saved your work in progress, but if you haven’t, click File and click Save Project As to save a new project, or click Save Project to resave an existing one.
You must use the Save Movie Wizard to create your movie. Once your project’s turned into a movie, you can’t edit it, so make sure it’s how you want it before you continue. If after creating the movie you do decide to make changes, you’ll have to open the project file, edit it there, and then create a new movie. Here’s how to create a movie:
Open Windows Movie Maker 2, click File, click Open Project, and select the project you want to work with.
In the Movie Tasks pane (click the Tasks button if you don’t see the Movie Tasks pane), expand Edit Movie and click Save To My Computer. For a first-time save, it’s best to save to the hard disk. Later you can burn it to a CD, send it to the Web, or send it via e-mail. Figure 9-1 shows the Finish Movie options and an open project entitled "Our Trip to the West End."
Enter a file name and choose a location on the hard disk where you want to save the new movie. You might want to save to an external drive if you are low on disk space. Click Next.
Tip
When choosing a name, try to include the location or event as well as the date. Including a name and date will not only help you identify the file, but as your library grows and you begin to share movies with others, it will also help your viewers. Identifying files quickly is also important when trying to create montages of multiple films.
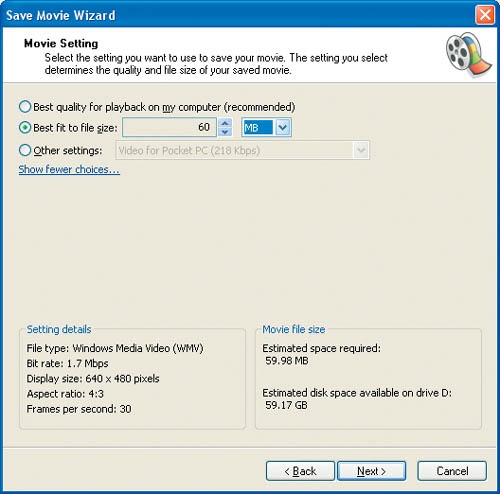
Close any running programs so that Movie Maker 2 can access all of the computer’s resources, and on the Movie Setting page, choose Best Quality For Playback On My Computer (Recommended) and click Next. The file will be saved as a WMV file and you’ll be given an approximation of how much disk space is required to save the movie. If you do not have the required space, click Show More Choices, click Best Fit To File Size, and change the number of MB to something smaller than the amount of available disk space you have. Figure 9-2 shows these options. Click Next.
Wait, wait, and wait some more while your computer and Movie Maker 2 crank out the movie. Depending on the size of the project, this could take quite some time. For a really long movie, you should set it to save overnight. Movie Maker 2 encodes everything that you’ve added to the Storyboard or Timeline and turns that data into what will become your movie. The time this takes depends on many factors, including the speed of your computer and the amount of data you are saving. Once it’s done, you can either click Finish to end the process or select Play Movie When I Click Finish if you’d like to watch your movie immediately. If you decide to watch the movie right away, it’ll open in Windows Media Player. (See the next section to get the most out of viewing movies on your computer.)

Note
Movies you create in Movie Maker 2 will be quite large, which makes it important to have a large and fast hard disk. It certainly doesn’t hurt to have a fast CPU and lots of RAM too. Also, it may save time later to save your finished projects as DV-AVI files because they are far more versatile in the long run especially if the final destination of the project has not yet been decided.
Once the movie has been saved, you’re ready to move on. To make sure your movie is just right and exactly what you’d hoped for, invite a trusted friend or family member to view the movie with you. Bill it as a "sneak peek" of the final cut and ask for an honest opinion of the movie. If, after the constructive criticism (if there is any), there are any changes you’d like to make before you send your movie off for its debut worldwide release, simply rework the project, and create the movie again. You can save the movie with a new name, perhaps the same name as before with a 2 after it. Once you’ve decided on a final version, you can delete any previous versions you’ve decided not to keep.
Once your movie has been created and saved to your hard disk, you can watch it on your computer any time. If you’d like a more cinematic experience right in your home, you could set up dual monitors and install a surround sound system (there’s more about this in Chapter 11). Since you’ll be watching the movies you created in Windows Media Player, it’s good to know how to get the best video and audio and to make sure you are familiar with the controls. So, bring on the popcorn, ask a couple of friends to stop by, and follow me:
Open Windows Media Player 9.
Click Tools and click Search For Media Files. Configure the search options. If you just created the new video file, it’ll need to be added to the Media Library. Click Search, and then click Close when complete. Although Windows Media Player searches for new files occasionally, if you just created the video it won’t appear in Media Library yet.
Click Media Library.
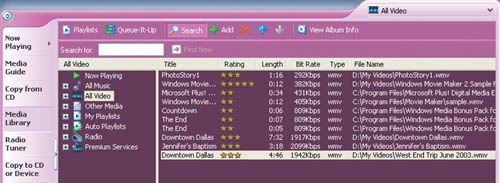
Click All Video and scroll down to find the newest additions. Figure 9-3 shows the West End movie I created in the previous section. You should see your movie here too.
Double-click the video to play it, or select it and click the Play button.
To view the video in full screen mode, click the View Full Screen icon located just above the Playback Controls area. If you want to remain inside Windows Media Player, consider decreasing the size of the Playlist pane or hiding it altogether, or click Maximize The Video And Visualization Pane, also located just above the Playback Controls area. When you are finished watching the movie, press the Escape key to get out of full screen mode if necessary.
There are many ways to share your movies with the world. The simplest way is to show a movie on your computer, as described in the previous section. However, getting all of your friends and family to bunch up in your home office for viewing can be tricky and might not be the best option.
A high-tech twist for viewing on your computer would be to show your movie on a Smart Display—a wireless monitor for your computer. A Smart Display is small, generally pretty hardy, and can be placed on a stand in any room, making it quite the novelty. You could take your Smart Display out to the patio or into the kitchen and show your movies on that. If you want, you can even pass it around to your guests!
If neither of these seems like a good option, Movie Maker 2 offers many other choices. These include creating CDs of your movies, sending them via e-mail or instant message, posting them to the Web, and saving them back to your DV camera. In this section, we’ll talk about the pros and cons of each option, and you’ll see why I think burning the movie to a CD is generally the best choice.
Saving your movies to CD-Rs or CD-RWs is a great way to share them with others and is usually the optimal way to go. It’s important to note though, that a CD-RW will take much longer to burn than a CD-R, so choose your saving medium wisely. Once you’ve made that decision, there are several ways to save your movie to a CD; the two most popular ways are burning the CD from inside Movie Maker 2 and using Windows XP’s built-in CD-burning capabilities. If you’ve already saved the movie to your hard disk, using Windows XP’s CD Writing Wizard is the easiest and fastest method. It might sound silly to mention this (perhaps even egotistical), but you should probably make some extra copies for your friends and family as long as you are burning CDs. You’ll be amazed at how many people will ask for a copy after watching your movie. And, with CD-Rs down to 7 cents apiece or so, it is really worth it just to see the looks on their faces when you hand them one. You can also create multiple copies of videos to send to folks who missed "the big event." They’ll be so happy you thought of them.
Finally, when passing out your CDs, make sure to mention that the movie you’ve created is saved in the Windows Media Player 9 format and that it can only be played in the more recent versions of Windows Media Player. If your viewers have an older version (say Version 7 or lower), they can download the newest version by clicking Tools and then clicking Check For Player Upgrades.
Note
Because Windows XP does not come with its own DVD-burning program, if you plan to burn DVDs using a DVD burner, you will need to purchase and install third-party software. A popular program is Sonic MyDVD Plus 4. You might also try Roxio’s DVD Creator 6 and Easy CD; for more information, visit their web site at http://www.microsoft.com/windowsxp/moviemaker/learnmore/dvdburn.asp.
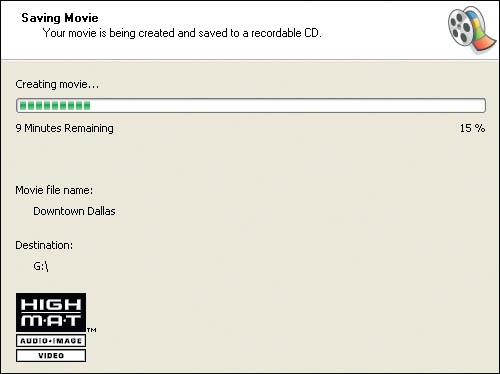
If you haven’t saved the file to your hard disk, or if you just prefer to work inside Movie Maker 2, you can burn the movie to a CD using Movie Maker 2. From the Movie Tasks pane, expand Finish Movie, and click Save To CD. Place a CD-R in the appropriate drive and work through the wizard pages. As with other CD-burning options, you’ll be informed of the progress, as shown in Figure 9-4.
To burn a CD using Windows XP’s CD Writing Wizard, the movie needs to be created and saved to your hard disk. If you haven’t done this, follow the instructions in Chapter 8 before proceeding. Once that’s done, put a blank writable CD into the CD-R drive and follow these steps:
Locate the movie you’d like to burn to a CD by using My Computer or Windows Explorer.
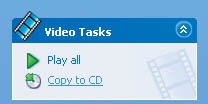
Select the WMV file and click Copy To CD in the Video Tasks pane. See Figure 9-5.
Switch to the CD-R drive folder by selecting it in My Computer or by clicking the appropriate icon on the taskbar.
From the CD Writing Tasks pane, click Write These Files To CD.
Name the CD, click Next, and wait for the CD Writing Wizard to finish copying the CD.
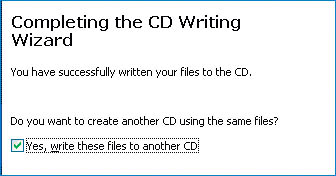
You can copy extra CDs easily (after the first CD has been created) simply by selecting the appropriate check box. Figure 9-6 shows the CD Writing Wizard’s last option—to write these same files to another CD.
Full-length movies are generally too large to send via e-mail, but you can easily e-mail short movie clips. What a kick to be able to create a short movie on your laptop using your DV camera and Movie Maker 2 while vacationing in the Bahamas, and e-mail it to all of your friends back home! There’s no better way to reduce the miles between faraway friends and family than by sending images of things that just happened.
Once you’ve shot some footage that you want to send across the wires, open Movie Maker 2 and follow along with these steps:
Import the video, add the clips to the Storyboard or Timeline, edit as desired, and then save the file as a project.
In the Movie Tasks pane, expand Finish Movie, and then click Send In E-Mail.
The movie will be saved automatically using the most appropriate settings for e-mailing. On the Ready To Send By E-Mail page, you can play the movie or save a copy of it to the computer if you want to. Click Next when finished.
If prompted with a Choose Profile dialog box, choose a user profile to use. Click OK.
Make sure when you send the movie that it is of a reasonable size (under 2 MB). Most ISPs have size limits and anything larger will be rejected. Also, you don’t want to fill up a recipient’s mailbox. If that happens, the user won’t be able to receive any more e-mail until they download yours.
INSTANT MESSAGE IT!

IMing a short video in real time is so much fun! You can share, immediately, what’s happening at a party, at work, or just on the back porch. It’s kind of like having a videophone—you remember the Jetsons, right?
To send a movie using Windows Messenger, just create the movie like you would normally, and use Movie Maker 2 to select only a few short clips. In the Movie Tasks pane, click Save To My Computer. Once the file has been saved to the hard disk, it can easily be sent using Windows Messenger. Here’s how:
Open Windows Messenger, sign in, and double-click a contact to send the movie to.
In the Windows Messenger window, click File, and then click Send A File Or Photo.
Browse to the location of the saved file, and click Open.
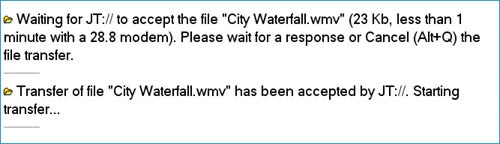
An invitation will be sent to the recipient. Once the invitation has been accepted, the file will be sent as shown in the graphic.
For more information on sending files via Windows Messenger, see Chapter 10.
Tip
If you plan to send a video using your free Hotmail account, remember that these accounts have a 1 MB attachment limit. If you upgrade to MSN Hotmail Extra Storage, the limit will be raised to 3 MB. Visit http://join.msn.com/ for more information.
If you use Microsoft Outlook or Outlook Express, you might have problems e-mailing your video because you don’t have a user profile or the mail program you use doesn’t allow you to send video attachments. If you encounter problems, try this:
Open Control Panel, switch to Classic View (if necessary), and click the Mail icon.
Under Profiles, click Show Profiles.
If you do not see Outlook Express, click Add, and in the New Profile dialog box type Outlook Express. Click OK. (If you see Outlook Express listed, skip to step 8.)
On the E-Mail Accounts page, click Add A New E-Mail Account and click Next.
On the Server Type page, select the type of e-mail server you have. Click Next.
On the following settings page(s), type the required information. Click Next.
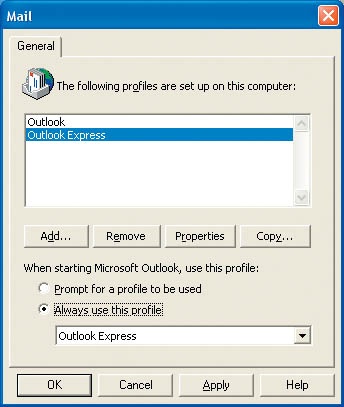
Once the new profile has been created, it will look similar to Figure 9-7. You can choose to be prompted for a profile or to always use a specific one. Click OK when finished.
Open Internet Explorer, click Tools, and click Internet Options.
On the Programs tab, verify that Outlook Express is the default e-mail program. Click OK.
It doesn’t matter whether you have a Web site of your own or not, you can still share movies on the Web. You can choose and sign in to a video Web hosting provider from right inside Movie Maker 2. Video Web hosting providers are generally third-party companies that let you store your movies on their Web servers, which then allow you to share your videos with friends and family using a Web address the company gives you. Generally, there’s a free trial, but the cost for such services is not very much.
Here are some great ideas for sharing videos on the Web:
Make a montage of your baby’s firsts—first smile, first bath, first step.
Create a virtual tour of your new home for relatives who can’t visit in person.
Promote yourself by creating a video portfolio that includes your personal and professional achievements, such as footage of speeches you’ve given or training classes you’ve offered.
Show Fido doing his best Stupid Pet Trick; maybe David Letterman’s talent scouts will see it!
Keep family connections alive by sharing videos of distant relatives with other relatives across the globe.
Shoot and produce short music videos of your band and generate an Internet fan base.
Post a video of yourself wielding a golf club like a light saber and become the next reluctant Internet star.
Post clips of your best original films and wait for Matt Damon and Ben Affleck to call.
When posting video to the Web using a free Web hosting provider, there will be strict limits on how large the file can be. Some allow only 1 MB files, which are quite small indeed, while others might allow up to 10 MB. You can always purchase extra space though, so if you need it, it’s certainly available. In addition to file size, the Web hosting provider might also place limitations on the bit rate of the movie itself. It’s best to check first. The information is usually readily available from the site’s FAQ page.
Just like everything else in Movie Maker 2, sending a movie to the Web is achieved through a wizard-like interface that walks you through all of the steps. In this example, you’ll work through the entire process, and when you are finished, you can e-mail your friends and tell them to take a look!
To prepare and post a movie to the Web, follow these steps:
Open a project you’d like to send to the Web, keeping in mind that it’ll have to be pretty short. You might want to select only a few clips from a larger video as a trailer of sorts.
In the Movie Tasks pane, expand Finish Movie, and click Send To The Web.
Type a name for the new movie file and click Next.
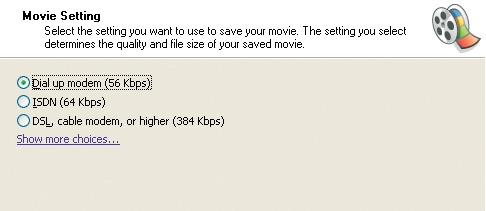
On the Movie Setting page, select a modem speed that you believe represents most of your viewers. I think Dial Up Modem (56 Kbps) is good in most cases. You’ll be able to see the estimated space required, the bit rate, and other information on this page, as shown in Figure 9-8. Click Next.
Wait while the movie is saved, then select a video Web hosting provider from the list of providers and enter the account sign-up information. Click Sign Up Now for more information and to register if necessary. At the time this book was written, the preferred host was Neptune Mediashare. Sign in at the provider’s Web site using your new user name and password.
Return to the sign-in page of Windows Movie Maker 2, and type your user name and password. Complete the Save Movie Wizard after registration and upload is complete. Take note of the location of your saved files, any account information including passwords or billing information, and instructions for accessing your files (if applicable).

You’ll want to visit your site now, read through the tutorials to create albums, and invite people to view the videos you’ve posted. This process will vary for different providers, so it is difficult to provide explicit directions. However, the Help files and wizards at these sites are comprehensive, and once you have your page set up, it’ll be a breeze to share! Figure 9-9 shows my free trial site, as well as one available video. Creating this album and site took only about 5 minutes. If you look closely you can see the controls on the TV set.

There’s yet another way to share videos on the Web—MSN Groups. It’s a great option if publishing using Movie Maker 2 doesn’t work for some reason, if the video is already saved to the hard disk of your computer, or if you want to publish your videos without paying for the privilege.
MSN Groups let you create your own personalized Web site and group in a matter of minutes. Creating a group allows you to post videos and pictures to the Web and allows others to see them. Once the group is created, so is your Web site. Automatically. Yes, it’s really your own individual, and very free, Web site! Once the site is created, people join the group through the site, and then they can view all of the content stored there. Because it’s your group and your site, you have complete control over everything, including what’s on it, who can access it, and more.
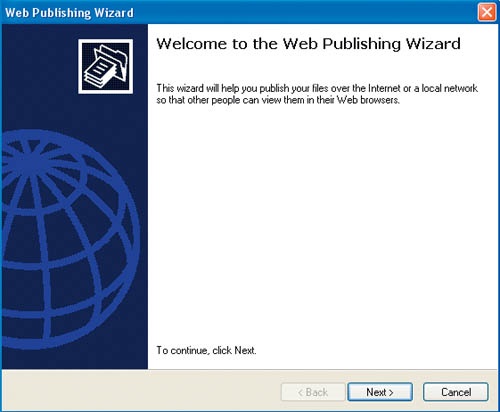
Open the folder where your movie is saved on your hard disk, select the movie, and in the File And Folder Tasks pane, click Publish This File To The Web. The Web Publishing Wizard will open, as shown in Figure 9-10.
To create your very own free Web site, follow these steps:
Click Next to start the Wizard, and on the Change Your File Selection page, verify that the correct video is selected. Clear any other selections if necessary and click Next.
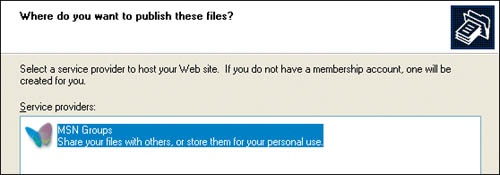
On the Where Do You Want To Publish These Files page, select the MSN Groups service provider from the list, as shown in Figure 9-11. Click Next.
Wait (and wait some more) while information is downloaded to your computer. On the Select Where You Want Your Files Stored page, select Create A New MSN Group To Share Your Files and click Next.
Enter a name for the group, enter your passport e-mail address, and read and accept the Code of Conduct. Click Next.
Type a description for the new group, choose a language, and choose whether Microsoft should list your group in the directory or not. If this is a private site for your family’s eyes only, I’d select No on the directory question. Click Next.
The Web Publishing Wizard will list the location of your uploaded videos and pictures, as shown in Figure 9-12, and ask you if you want to add the address to your browser’s Favorites list. Select Yes or No and click Next.
Accept the default folders for saving documents and pictures, or change the names as desired, and click Next. Wait as the file is uploaded. You’ll be notified when the upload is finished.

Once you’ve created a group (and thus a site), people will have to join if they want to view your magnificent videos and pictures. Here’s what to tell them:
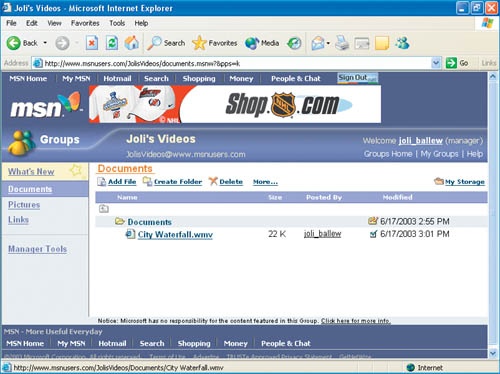
Browse to your group. In my case that would be http://www.msnusers.com/JolisVideos.
Locate the Join Now option.
Click the Documents folder or the Pictures folder to locate the files and click them to view or play them. Figure 9-13 shows the City Waterfall video and an example of how your page might look.
Most of the time, uploading video to the Web using Movie Maker 2 (or Windows XP) goes flawlessly. However, problems can and do arise. Most of the problems I’ve had in getting movies to the Web revolve around not being able to access a Web hosting provider or being rejected because the video is too large. The following list summarizes common problems such as these and their solutions:
Cannot download latest hosting provider from the Web. Verify that you are connected to the Internet. If this is not the problem, there could be a problem with contacting the Microsoft Web site or with your own computer or ISP. Wait for a while and try again.
Movie isn’t accepted by the hosting provider. Verify that the file meets the provider’s requirements for size, bit rate, and format, and make sure there is enough free space on the server to hold your video (if possible). If necessary, resave the file with different settings, shorten the video, or otherwise edit it appropriately.
No hosting providers available for your region or country. There are no hosts available for your region. Verify that your regional settings are correct in Control Panel by clicking Regional And Language Options. If the settings are correct, consider creating your own Web site or contacting Web hosting providers in your area.
If all else fails, you can restart the computer and log on again to your ISP. Sometimes, this little trick is all that’s needed!
CREATE A FAMILY WEB SITE

If you don’t have a Web site yet, you absolutely must get one! I just purchased www.joliballew.com, and I have big plans for it. I’m going to have a separate area just for my family where I’ll put family videos and pictures there. My relatives will be able to drop by and look at them anytime. If your family name or company name is available, you should really consider buying it. Creating a Web site is easy with Microsoft Office FrontPage 2003 too, and Web hosting providers have made it downright simple to put up a one-page site.
When adding video to a Web site of your own, you’ll have to read the host’s support pages to see what’s required to post a video to their site. There will be limits on file types, bit rates, and file sizes, and you’ll have to upload the files to the site in the manner and format they dictate. It’s a bit more difficult than posting to a video Web hosting provider, but well worth the effort.
If you’re interested in creating your own Web site, here’s the lowdown in general terms:
Locate a Web service provider. Ask your local ISP to host your site, or choose from one of several options in your local phone book (just look under "Web Hosting Providers"). You can also set up your site using Yahoo! Web Hosting. If you have a larger site to set up, try Microsoft bCentral (www.bcentral.com). If you’re using FrontPage, the best place to look for a Web hosting provider is www.microsoft.com/frontpage/wppsearch/default.htm.
Choose a domain name and inform your Web hosting provider who will register your name for you. If you’d like to check out what names are available or register the name yourself, go to www.netsol.com or www.interland.com and browse around. Make sure to compare prices before purchasing a domain name though; prices can vary greatly.
Register and pay for your domain name. There will be a yearly fee, so register and set up a payment plan with your Web host.
Create a one-page Web site using either FrontPage or the ISP or Web host’s software. Most Web hosting providers offer simple options for creating a simple Web page, and some even have templates that do most of what you’ll need to do automatically. You just have to input the information. There are generally options to have a Web designer create the site for you too.
When you are ready to send a movie to your new site, create the movie using the Send To The Web option in Movie Maker 2. The wizard will walk you through the process, which was detailed earlier in this chapter. In the graphic shown, I used the Save Movie Wizard to save the movie with the option Dial Up Modem (56 Kbps) because that’s the most commonly used connection for people who will be accessing my Web site and watching the movie. You might want to consider doing the same.
Continue through the wizard. When the movie has been created, click Finish.
Add a link to your home page that connects to the movie file you created and upload the revised home page and the video file to the Web hosting provider.
Taking a movie with you is sometimes the only way to share it. No matter how ubiquitous computers and laptops have become, there are times when there just aren’t any around. Also, not everyone has a computer, a VCR, a DVD player, or even an Internet connection. And, how do you share a video with a beach buddy or a neighbor over the back fence if there’s no electricity? What to do? Luckily, you’ve got a couple of options.
If you’re going somewhere where there’s no computer and you’d like to take your movies with you, you can record them back to your DV camera and show those pictures to anyone, anywhere. You can play back the movie on the beach, on someone’s porch, at a conference, or anywhere. If you and your viewer have compatible cameras, you need only take the tape itself. Hooking up the DV camera to a VCR is easy too and only requires a single cable.
To record the video back to a DV camera, follow these steps:
Connect the camera to the computer and set it to its VCR mode setting.
Open the project to record back to the camera, and in the Movie Tasks pane, expand Finish Movie.
Click Send To DV Camera.
Cue the tape to the position where you want the movie to begin recording using the controls on the camera itself. Click Next in the Save Movie Wizard after this is completed.
As the movie records to the camera, you can watch the progress in the Save Movie Wizard. It’ll take a few minutes for the tape to record because it records back to the tape the same way you captured from it. How much you can record back to your camera depends on the camera itself, the length of the tape, where on the tape you begin to record, and the amount of free space on it.
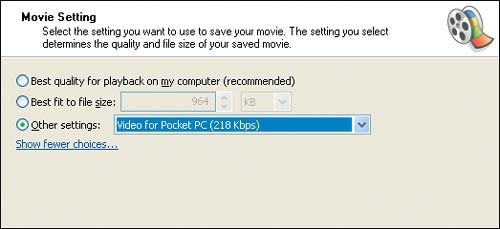
If you’re traveling light and can’t bring along your DV camera, there’s still one more way you can share your movies—with your Pocket PC! Saving your movie to a Pocket PC is as easy as saving it to your local hard disk. Just connect the Pocket PC as required, and in Movie Maker 2 click Save To My Computer. When prompted to choose a quality setting, choose Other Settings, and select Video For Pocket PC, as shown in Figure 9-14.
Note
A Windows Media Player update for the Pocket PC 2002 is available at http://www.microsoft.com/windows/windowsmedia/software/pocket/playerupdate.aspx. Also worth noting is that Windows Media Player 9 is only available for Pocket PCs running Windows Mobile 2003.
The quality is really great on these machines; it’s a huge step forward for the technology. In my mind, I think if you have a Pocket PC, you’ve really got the world on a string. Imagine having a virtual photo album, video player, and music player all in the palm of your hand. Access to the Internet, e-mail, and other information is at the tips of your fingers as well. If you are considering purchasing a Pocket PC, this is a terrific option for sharing your movies and I highly recommend it. Be sure to consider buying a large SD or CF card for your Pocket PC too because these video files can get quite large!
CREATING CUSTOM PROFILES

When you create a movie in Movie Maker 2, you decide on the quality and size of both the captured digital media file and the saved movie, choosing from the available options. If you want to create custom settings, you have to take an extra step. You need to create a custom profile.
To create a custom profile, you need to download and install the Windows Media Profile Editor. This tool is automatically installed when you install Windows Media Encoder 9 Series. (For more information on where and how to download, refer to the Introduction.) Once the Profile Editor is installed, you can create a custom profile like this:
Open the Profile Editor by clicking Start, pointing to All Programs, pointing to Windows Media, and pointing to Utilities, and then clicking Windows Media Profile Editor.
In the Profile Editor, on the General tab, type a name for the profile. This name will appear in the Other Settings drop-down list in Windows Movie Maker 2 when you capture and save a movie. (To use the profile later, just select it!)
Select the Audio check box, and make a choice for audio quality. For best results choose either CBR or Quality VBR. For more about encoding modes, see Windows Media Profile Editor Help.
In the Codec drop-down list for audio, click the codec that best matches what you plan to capture or create.
Select the Video check box, and make a choice for video quality. For best results choose either CBR or Quality VBR. For more about encoding modes, see Windows Media Profile Editor Help.
In the Codec drop-down list for video, select Windows Media Video 9. If you think that your viewers will be watching your videos on older computers running Windows 95 or Windows NT, choose Windows Media Video V7 or Windows Media Video V8.
In the Target Bit Rates area, click Add. In the Bit Rate box, type a bit rate value followed by K for kilobits or M for megabits. Click OK. You won’t be prompted to enter a bit rate if you have chosen to create a VBR profile.
Click the General tab and clear the Allow Interlace Processing and Allow Nonsquare Pixel Output check boxes if they are selected. If desired, input any additional information on the bit rate tab. A completed profile is shown here.
Click Save And Close. Name the new profile, and save the profile here: <root drive>:Program FilesMovie MakerSharedProfiles.

Using a profile is easy. When capturing or saving video, select Other Settings when working through the wizard. In the Other Settings drop-down list, select your custom profile, as shown in the graphic below. Now you can tweak to your heart’s content!

- e-mail server
A network server specifically designed to accept, pass on, and retrieve e-mail messages for clients. In addition to an e-mail server, larger companies could also have print servers, data servers, and fax servers.
- instant messaging
Also called text messaging, instant messaging (IMing) is a way to send text messages in real time to other people. Windows Messenger and MSN Messenger are Microsoft’s versions of instant messaging programs.
- modem speed
The rate at which data can be sent and received through a particular modem. A typical dial-up modem speed is 56 Kbps (although federal restrictions currently restrict download speeds to 53 Kbps); DSL or cable modem speeds are higher.
- Pocket PC
A smaller version of the desktop computer. A Pocket PC allows a user to view videos and pictures, create and edit documents, spreadsheets, and databases using Pocket Office software, retrieve and send e-mail, check appointments, make notes, play MP3s, surf the Internet, and more, all from a single, compact, and handheld unit.
- Smart Display
A 10- or 15-inch wireless monitor for a desktop computer. This device allows the user to work from the computer without actually being in front of it. Smart Displays can be taken from one office or room to another, are lightweight, have thin, portable designs, and generally have a range of 75 to 100 feet. While working at a Smart Display, a user can perform any function that he could perform while sitting directly in front of the computer. Smart Displays generally run between $700 and $1,000 (US).