
Resize Photos to Fit Your Needs
Transform Photos into Gifts that Break Out of the Frame
Save and Find Photos Easily in Your Organized Picture Library
Print Your Photos the High- or Low-Tech Way
Dive into Digital Scrapbooking
Publish Slide Shows for the Web
Create Photo Stories with Pizzazz
Personalize Your Computer with Your Pictures
Digital pictures are great; they’re easy to take, easy to import, easy to print, and the quality is superb. Sharing pictures stored on your computer is a little different from passing around a handful of snapshots. While you could bring everyone into your home to look at the images on your computer monitor, this might be a little too much sharing! So, now that you have those photos of your vacation, wedding, or graduation on your computer, what can you do with them?

With Microsoft Windows XP, you can view and share your digital pictures in literally hundreds of ways. In this chapter, I’ll show you how to use the Windows Picture And Fax Viewer to view your digital images on your computer and to zoom in and out, rotate, delete, print, and save them. I’ll also show you two ways to resize your photos—with Windows Paint and with the Image Resizer PowerToy, a free download that lets you resize images with a simple right-click of your mouse.
After a period of time and after amassing large quantities of photos, you’ll probably discover you need a system to organize them. In Windows XP, you can use the My Pictures folder to store and organize your photos for quick and easy access. Some of the My Pictures folder’s organizational options include renaming images, creating folders with descriptive names, and moving pictures into them so they’re easy to find. No more searching for hours for that one sweet shot!
Once your pictures are organized, I’ll show you how to order professional prints online, print pages for a scrapbook, and even print photos on t-shirts! Of course, you can always e-mail your pictures or share them using Windows Messenger, so I’ll discuss that as well. What if you want to share more than printed photos? You’ve already learned how to view your digital images as a slide show in Chapter 1, and here I’ll show you how to create high-quality slide shows, called photo stories, from still photos with Microsoft Plus! Digital Media Edition. You’ll be able to add narration and music, play your photo story on your computer, send it via e-mail, or publish it to the Web. Once you finish this chapter, you’ll be able to do all of these amazing things!
Before I discuss sharing your photos with friends and family, let’s talk about how you can use Windows XP to view your own pictures however and whenever you want. Storing and viewing pictures digitally changes everything. You no longer have to drag out that photo album or shoebox; your images are always right at your fingertips.
The Windows Picture And Fax Viewer is a great tool for viewing, and it’s simple to use. Just follow these steps:
Click the Start button, and then click My Documents.
Double-click the My Pictures folder.
Double-click a picture. It will open automatically in the Windows Picture And Fax Viewer. (If it doesn’t, the defaults for your system have been changed. To open the image using the Windows Picture And Fax Viewer, right-click the image, point to Open With, and click Windows Picture And Fax Viewer.) Figure 2-1 shows the Windows Picture And Fax Viewer and the available options.
 Show the best fit for the picture
 Show the picture’s actual size
 Start a slide show with the pictures in the selected folder
 Rotate the image to the right 90 degrees
 Rotate the image to the left 90 degrees
 Copy the picture to another folder
 Close the Windows Picture And Fax Viewer and open an image-editing program
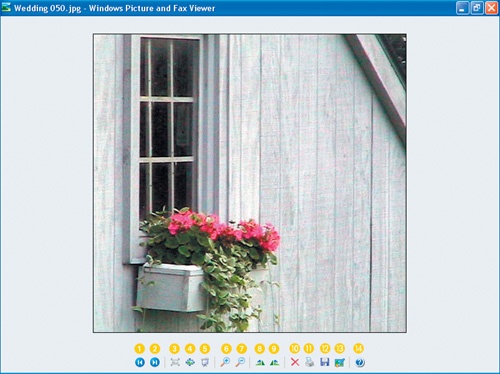
When taking pictures with a digital camera, sometimes you need to turn the camera sideways to get the perfect shot. When you do this, the picture will show in the Windows Picture And Fax viewer sideways as well. To rotate a picture in the Windows Picture And Fax Viewer, click the Rotate Clockwise icon or the Rotate Counterclockwise icon.
The size of any image you import from your digital camera depends on how you configure the settings on the camera itself, and what the camera is capable of. Most cameras can capture images at 1024×768 pixels and at 640×480 pixels. These numbers describe the actual size of the image in pixels. The amount of space (in KB or MB) an image takes up on your hard disk is determined by these settings and by the subject, recording condition, and other aspects of the photo. An image that is 1024×768 pixels can take up 1 MB of hard disk space or more.
Note
KB (kilobyte), MB (megabyte), and GB (gigabyte) are terms used to represent how large a file is and how much space it takes on the hard disk. 1,000 KB equals 1 MB, and 1,000 MB equals 1 GB.
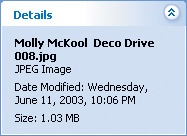
You can find out how large a file is from the My Pictures folder. Just highlight the picture and expand the Details pane. Figure 2-2 shows the Details pane for a JPEG image that was taken at a resolution of 1200×1600. You can see that it is over 1 MB in size.
Before e-mailing an image or putting it up on a Web site, you’ll probably need to decrease its size. By decreasing the size of the image, you can decrease the amount of space it takes up on the hard disk and decrease how long the image takes to download. Be careful when resizing though, because resizing an image can cause distortion and pixellation. For the most part, decreasing an image’s size causes fewer problems than increasing it.
Note
To resize an image to make it smaller, the computer has to determine which pixels to throw away. When resizing an image to make it larger, the computer has to determine the number and the nature of pixels to add, which requires quite a bit of guessing about the color, amount, texture, and other attributes of what it needs to add. When it guesses wrong, you get pixellation and distortion.
As a rule, the higher the resolution of an image, the larger the file size will be. An image that is taken using a resolution of 1024×768 will take up more space on the hard disk than an image that is taken with a resolution of 640×480. The number of pixels in the image determines how "dense" the image is; the more pixels in an image, the denser it is, and the higher the quality and detail. The upside of creating an image with more pixels is higher quality, of course, but the downside is that the file will take more hard disk space to store.
So if you’re saving digital pictures to a hard disk for viewing on your computer using the Windows Picture And Fax Viewer, and you have unlimited hard disk space (say, 80 GB), you don’t need to worry much about a high resolution or the size of the file. If you’re going to e-mail the picture, you should stay below 1 MB and below 800×600 resolution. For Web images, stay around 250 to 350 pixels with a file size between 20 and 100 KB. If you are planning to print your pictures, there are guidelines for that too. Table 2-1 sorts out all of these variables for you.
Table 2-1. Guidelines for Resolution and File Size[*]
IMAGE RESOLUTION | APPROXIMATE FILE SIZE | USE FOR PRINTING | E-MAILING |
|---|---|---|---|
Less than 640×480 | Under 1 MB | Wallet size only | Great |
640×480 | Under 1 MB | 4 by 6 inches or smaller | Great |
800×600 | Under 1 MB | 4 by 6 inches | Good |
1024×768 | 1 MB or more | 4 by 6 inches | Okay, but try to reduce file size |
1152×768 | 1 MB or more | 5 by 7 inches | Poor |
1600×1200 | 2 MB or more | 8 by 10 inches | Dreadful |
[*] These guidelines are for digital pictures that are JPEG images. | |||
You will undoubtedly want to use your pictures in many different ways, so you will need to know how to resize them according to the task. Luckily there are several ways to resize images. They can be resized using Microsoft programs such as Paint and Photo Editor (called Picture Manager in Office 2003) or using third-party image-editing programs. There’s also a free download available from Microsoft called Image Resizer. Since Microsoft Paint comes with Windows XP, let’s explore that option first and then take a look at the free download.
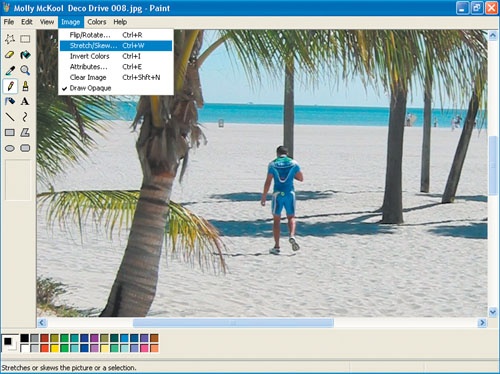
Microsoft Paint works well as an image resizer. You can resize your images by choosing commands from the Image menu or by dragging from the handles located in the bottom right corner of the image. I prefer the following technique, which reduces the file size by a percentage, and generally fits the bill perfectly. Follow along and see if you agree:
Open My Pictures (or the folder where your pictures are stored) and righ-tclick the image to open. Point to Open With, and click Paint.
On the Image menu, click Stretch/Skew. Figure 2-3 shows the Paint interface.
Type in the desired values to reduce the width and height of the image by a percentage of its original size, as shown in Figure 2-4. Click OK.
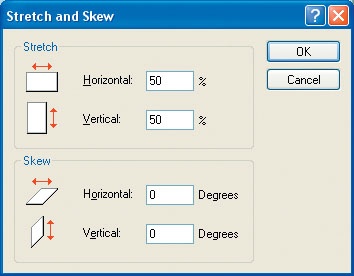
Now all you have to do is save the file and you’re ready to e-mail! Your friends will appreciate the extra time you spent reducing the file size; not only will it be a faster download, but it can be viewed more easily inside an e-mail message.
You can also resize images without opening them using the PowerToy Image Resizer. It’s fast, easy, and straightforward. Image Resizer isn’t part of the Windows XP operating system, so you’ll need to download the program from http://www.microsoft.com/windowsxp/pro/downloads/powertoys.asp. If you need help with this, turn to the Introduction at the beginning of this book.
Once you’ve downloaded Image Resizer, follow these steps and you’ll see how incredibly easy it is to use:
Open My Pictures.
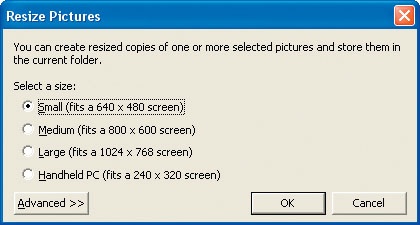
Right-click any picture, then click Resize Pictures.
In the Resize Pictures dialog box, shown in Figure 2-5, select a picture size.
Click Advanced. Click Make Pictures Smaller But Not Larger and/or click Resize The Original Pictures (Don’t Create Copies), if desired.
Click OK. If a copy was created, it will appear in the folder of the original image.
There are many other ways to resize images. Third-party programs abound, and you probably have several installed on your computer that could do the job. Whichever one you decide to use, make sure to use it before e-mailing your pictures.
CREATE UNIQUE GIFTS (CHEAP)!

Are you always in search of that perfect gift? Would you like to create something special for your parents’ wedding anniversary or a friend’s retirement? If you can find the right photo, there are many creative gifts you can craft from a simple image. You can order customized mugs, playing cards, mouse pads, calendars, puzzles, pillows, and plates, just to name a few. It’s pretty easy too, and most of these things can be ordered online.
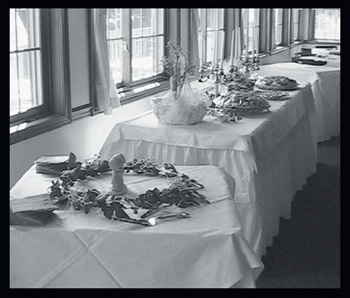
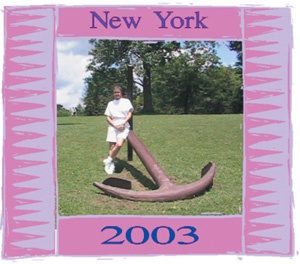
Start planning now for your parents’ upcoming wedding anniversary. The next time your parents are out of the house, sneak up to the attic, down to the basement, or reach way back in the hall closet; locate a few old photos of their wedding; scan them, save them, and return them before anyone notices they’re missing. That’s the hard part. Now you just need to decide what you want to do with the photos. Your present could be as simple as a photo cake with their wedding picture reproduced in the icing or something much more elaborate such as a quilt made up of squares with pictures printed in the fabric. With a quilt you can incorporate many pictures in addition to the traditional wedding poses. I found some pictures in my picture library that would make awesome quilt squares; here’s an example of one of them.
Now that you’re importing and opening images taken from your digital camera, it’s time to start thinking about how to organize the image files that you’ve saved to your hard disk. If you accepted the defaults for saving images, you probably have all of your digital pictures saved in the My Pictures folder. In addition to having your images amassed in a single folder, the image names are probably not indicative of their contents. Before you start seeing pink elephants, let’s see if we can get you organized!
When an image is imported from a digital camera to a computer, a name is automatically assigned to the image. If you’re simply dragging and dropping images, the names are probably something like IMG_001 or RIMG_22. If you use the Windows Picture And Fax Viewer, you’ll be able to name images as you go, and their names will be in sequence. However you import images, you’ll probably want to rename some of them. Renaming a single image is easy; just right-click the image, click Rename, and then type in the new name of the image followed by the file type (Image Name.jpg). You can also highlight the image in the My Pictures folder and in the left pane, click Rename This File.
Note
Renaming images is essential when you are e-mailing, storing, preserving, cataloging, classifying, organizing, or sharing images. It will not only help you find files faster, but will benefit those viewing the files as well.
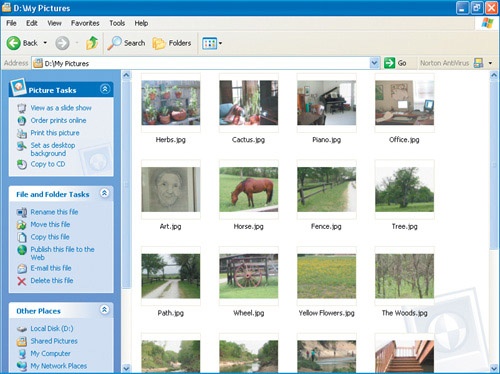
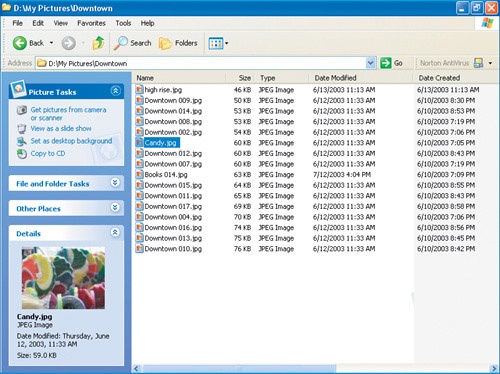
Figure 2-6 shows the My Pictures folder as it might look on your computer after renaming the images. You can see from this figure that there are quite a few pictures saved to the folder, and they have names that are indicative of their contents.
Note
In Figure 2-6, I chose to view the images as thumbnails. To change the view of the My Pictures folder, on the View menu, click Filmstrip, Thumbnails, Tiles, Icons, List, or Details.
When the My Pictures folder has only a few images in it, keeping track of them and organizing them are not difficult. However, after you’ve saved a hundred or so pictures, locating the picture you want for sharing, e-mailing, or printing can be a little more difficult. To keep your pictures organized, you can create folders inside the My Pictures folder and move images into them.
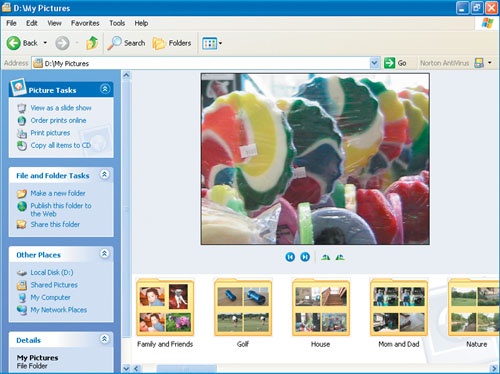
Take a look at Figure 2-6 and then at Figure 2-7. I customized the My Pictures folder by adding additional folders (House, Nature, Family and Friends), and I moved the images into those folders. I also changed the view from Thumbnails to Filmstrip. Now I can easily locate a picture simply by looking in the correct folder. I can also burn CDs, send off for prints, and e-mail multiple pictures without having to search through all of the pictures on the hard disk.
You can organize all of your images easily by creating folders. Creating a folder takes just a few simple mouse movements. Before you start, take a look at your pictures and decide on four or five folder names that represent the types of pictures you want to classify and organize. Here are some folder names to consider: The Kids, My Wedding, Family, Friends, My Vacation, Thanksgiving 2003, or Images that Need Work. Once the folders are created and named, you can begin moving images into them (you can also save directly to the folders once they are created). Just follow these steps:
Open the My Pictures folder, or if you’ve saved your images to a different folder, open the folder that has your digital images in it.
Make sure no images or previously created folders are selected, and on the File menu, point to New, and then click Folder.
Type a name for the folder and press Enter.
Repeat steps 2 and 3 until all your folders are created. You can now start moving the images into these new folders. As with most things in Windows XP, there are multiple ways to do this. To continue, first verify that the My Pictures folder is open and that there are both images and new folders inside it. Now move the files in any of these ways:
To move a single picture that is currently in the My Pictures folder to the newly created folder, click and drag the image to the new folder. Hold down the Ctrl key to select multiple images before dragging.
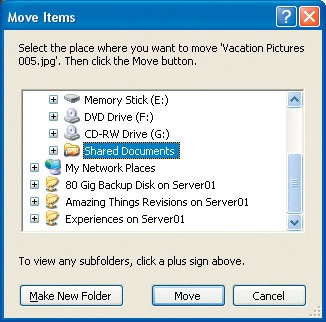
To move a single picture that is currently in the My Pictures folder or in any other folder you’ve created, highlight a single image or select multiple images, and in the left pane of the My Pictures folder, click Move This File or Move The Selected Items. In the Move Items dialog box, expand the folders if necessary, click the folder you want to move the new image to, and then click Move. Figure 2-8 shows how to move an image to the Shared Documents folder. Moving an image to this folder allows anyone who has an account on the computer to view it.
To move a single image that is currently in the My Pictures folder or in any other folder you’ve created, highlight it or select multiple images in the My Pictures folder, and on the Edit menu, click Move To Folder. In the Move Items dialog box, expand the folders if necessary, click the folder to move the image to, and then click Move.
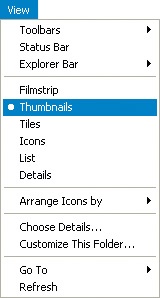
On the View menu, click Thumbnails or Filmstrip, as shown in Figure 2-9. You can now see the contents of the folders.
That looks quite a bit better! Now when you want to see an image of your wedding, kids, vacation, or a holiday, you can find them easily. You can also burn CDs by group—for instance, a CD that only contains wedding photos for everyone in the wedding party, or a CD that only contains images from your last vacation for your immediate family.
Renaming images in groups is ideal when you have several images of the same event, people, or scenic view. You can rename images to organize them by groups with titles like Yellowstone_01, Yellowstone_02, Yellowstone_03, and so on. Renaming in groups is essential when importing multiple images from a digital camera because names are automatically assigned based on their sequential position in the camera’s memory. Renaming is also a great way to view a group of pictures in the correct order and in the order they were taken. To rename groups of images, follow these steps:
Open My Pictures or the folder that contains the pictures to rename.
Select the files to rename.
To select all of the images in a folder, on the Edit menu, click Select All. To select multiple images in a row, highlight the last image in the row, hold down the Shift key, and highlight the first image. To select nonsequential images, highlight the last image and hold down the Ctrl key while highlighting the additional images. The last image you select will be the first image renamed.
On the File menu, choose Rename.
Type in the new name for the selected image. The others will be renamed sequentially.
If you decide you don’t like the new names, on the Edit menu, click Undo Rename.
There are several final ways to customize the My Pictures folder. As you can probably guess, I prefer viewing thumbnails when I open the My Pictures folder, but depending on your preferences and needs, you might prefer something else. A few popular ways to view files include viewing files by the date they were modified, viewing files in a filmstrip, and viewing files according to size. In the next couple of sections, you’ll learn how to personalize the My Pictures folder in many different ways.
As mentioned earlier, you can use the View menu to select Thumbnails, Filmstrip, and other choices, but there are lots of other ways to customize the My Pictures folder. Let’s take a look at the other options available on the View menu after you click Arrange By and see what they do:
Name. Groups files alphabetically.
Size. Displays files in groups of similar sizes.
Type. Groups files by file type.
Modified. Groups files according to when they were modified.
Picture Taken On. Groups files according to their creation date.
Dimensions. Groups files according to their physical dimensions.
Show In Groups. Arranges files by groups.
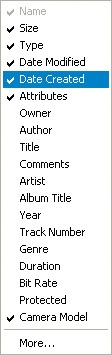
If you really want to get down to the nitty-gritty details, check out the Details view shown in Figure 2-10. Once you’re in the Details view, you can see the file name, its size, the last time it was modified, the date it was created, and more. Just click one of the options in the pop-up menu shown in Figure 2-11. You can also personalize the headers by right-clicking the title bar, and then placing check marks by the details you want to see. Viewing by details offers a quick way to see if your files are the correct size for e-mailing or printing, and can be used to organize your files by date. Can’t remember when a picture was taken or uploaded to the computer? Want to organize your files by camera model? You can now!
No matter how tech-savvy you think your friends and family are, there will always be a need for printed pictures. While you might be successful at burning CDs and DVDs, e-mailing images, and putting your pictures on the Web, you won’t be able to reach everyone. Perhaps Grandma Nana doesn’t have a computer, the kids can’t afford a DVD player, or those people you took the wedding pictures for really want to display them on their wall. You’ll have to print them out.
You can use the Windows XP Photo Printing Wizard in the Windows Picture And Fax Viewer to guide you through this task. Of course, there are other ways too, including printing from a third-party image-editing program, printing from Paint, or printing from any folder in Windows XP, but the printing wizard is the easiest.
If you don’t have much experience in the printing arena, you should definitely print your pictures this way. You’ll use the Windows Picture And Fax Viewer to preview the pictures first, and then use the Print icon directly from the viewer. Clicking the Print icon opens the Photo Printing Wizard, which walks you through the printing process. While you normally wouldn’t need help working through a wizard, there are some finer points to printing that I’d like to work through with you. Follow these steps:
Open the folder that contains the images you want to print. This might be My Pictures, a folder you created inside My Pictures, or any other folder that contains pictures you have saved on your hard disk.
Double-click an image to open it in the Windows Picture And Fax Viewer.
In the Windows Picture And Fax Viewer, click the Print icon. Click Next to start the Photo Printing Wizard.
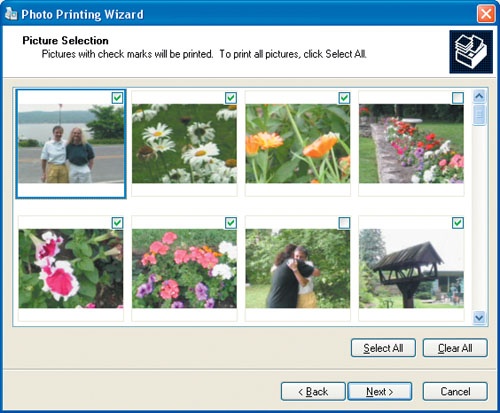
Select the pictures to print by placing check marks in the check boxes. Remove pictures from the print list by removing their check marks. Figure 2-12 shows an example; click Next.
On the Printing Options Wizard page, in the printer list, click the printer you want to use.
On the same page, click Printing Preferences.
On the Printer Properties page, configure the printer settings. Depending on the quality of your printer, you’ll have various options. Select the number of copies, decide if the print is to be portrait or landscape, choose the correct paper type, set the resolution, and configure the print quality. For high-quality color JPEG images, configure the resolution to 300 to 600 dpi and don’t use ink saver settings. If dithering is offered, choose Fine. Click OK; click Next.
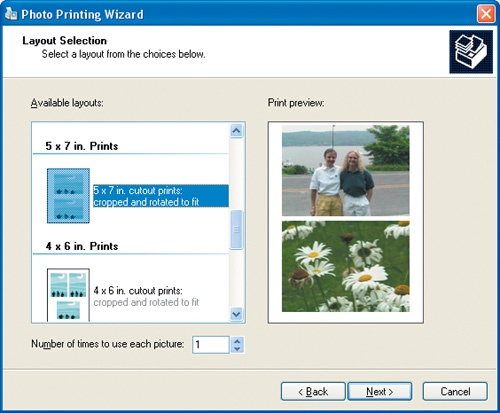
On the Layout Selection page, use the scroll bar to see the available layouts. These range from a single 8 by 10 inch to wallet prints. You can also select Contact Sheet to make a library of your images for your records. Figure 2-13 shows the 5-by-7-inch layout. Notice that two images will be printed per page. Click Next.
As the images print, click Finish to close the wizard.
GETTING PROFESSIONAL PRINTS

Sometimes you just need to print your photos. Though you can always print them with your own ink-jet or laser printer, you might want higher-quality prints. If that’s the case, you should consider ordering prints online.
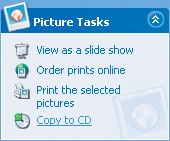
To order prints online, open My Pictures, and in the Picture Tasks pane on the left, click Order Prints Online. Follow the prompts in the Online Print Ordering Wizard to choose the photographs, select print sizes and quantities, and provide billing and shipping information. As you work through the wizard, you’ll be given total costs for each print and for the order. (I must say that the first time I did this, I was shocked at how inexpensive the prints were. A 4-by-6-inch print was only about $0.46!)
During the ordering process, you’ll be cautioned if the images you want printed were taken using a low resolution. This caution is the printing company’s way of telling you that the image might not look as good as you would like, at the size you have chosen. Refer to Table 2-1 shown earlier in the chapter to help you decide what resolution works best for what size print.
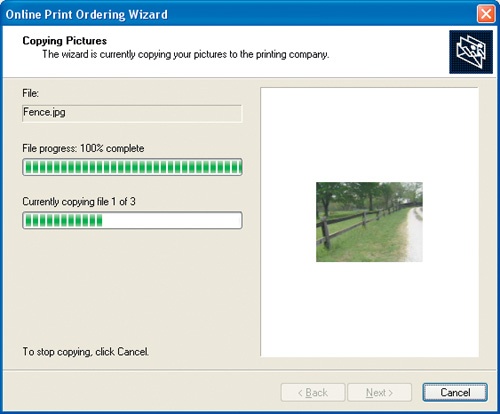
When you complete the ordering process, the printing company will upload your pictures to their computers, as shown in the graphic below. The printing company will then mail you your prints.
SCRAPBOOKING GOES DIGITAL

Digital scrapbooking is the latest and greatest craze for digital photography enthusiasts, new moms and dads, homesick college kids, or anyone with a box full of pictures and mementos to organize. After importing or scanning your images, edit and place them into digital scrapbook pages that you create either manually using an image-editing program or (almost) automatically with software specifically designed for digital scrapbooking. Once created, these pages can then be easily shared with friends and family via e-mail, online photo-sharing Web sites, or simply by printing and binding them into an album. Printed scrapbooks are a perfect way to share your memories with others and are great gifts. Here’s how to get started:
Select images you’d like to use in your scrapbook from your digital picture library.
Open a single picture in an image-editing program like Microsoft Publisher (or in the digital scrapbooking software you’ve purchased).
Edit the photo as necessary for size and quality.
Add text to the image. This might be a title or date, word art (text with effects like shadows, bends, stripes, or similar features), or even a paragraph that describes the photo.
Add a border. Borders are clip art, so look through your clip art library for the one you want.
Save this image in a folder specifically created for these files, and repeat the steps for the other scrapbook pages you want to create.
When you’ve finished creating the scrapbook pages, open the folder where the pages are stored and complete your project by either printing and binding them, burning them to a CD, or sending the files digitally.
If your computer has a CD burner, you can save photos onto discs. Saving images to a disc is a great way to back up your photo library and also offers an easy way to share images with others. Take the disc with you anywhere and share your images through the host’s computer or bring your own portable device. You can also pop the disc in the mail to share pictures with a friend who has a slow Internet connection and would have trouble viewing them over e-mail or the Web.
In addition to saving pictures for sharing, you should consider how important it is to save pictures for posterity. I have a recurring nightmare that in 20 years there will be a 20-year period where people don’t have any photographic records because everyone used digital cameras and didn’t back up their pictures to disc, or perhaps just forgot to transfer them over when they purchased a new computer. Let’s not let this happen! It’s important that you create backups of all of your images, and you might even want to make backups of the backups. Just follow these steps:
Place a blank, writable CD into the recordable CD drive.
Open My Pictures or the folder that contains the images you want to copy to a CD.
Select the pictures to copy. This can be achieved by highlighting an entire folder, a single image in the folder, or multiple files within a folder. Remember, you can hold down the Shift key while selecting to choose files in unison, or hold down the Ctrl key to select nonsequential files.
In the Picture Tasks pane, click Copy To CD, as shown in Figure 2-14.
In My Computer, double-click the CD drive. Verify that the temporary files are the ones you want to copy.
From CD Writing Tasks, click Write These Files To CD.
PUT YOUR TEAM PHOTO ON T-SHIRTS

If you or your children play softball, soccer, hockey, or any other team sport, you can create a t-shirt with the team photo on it, using your own ink-jet printer and iron. You might also consider photo t-shirts for birthday party gifts, end-of-the-year celebrations, family reunions, and even informal get-togethers. Creating them is simple. Here’s what you’ll need:
A good picture of the team or group.
Depending on the shirt color and transfer paper used, an image-editing software program that can flip the image horizontally. Scanners can usually do this too, and some printers are capable of flipping images.
Iron-on transfer paper.
An iron.
A t-shirt.
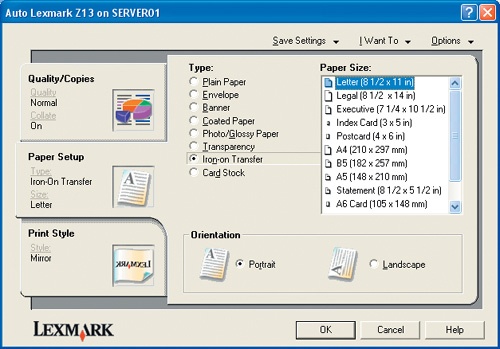
With these items in hand, scan or open the photo and edit it for size and quality. Read the directions that came with the transfer paper you will use, and if necessary, flip the image horizontally. Put a regular piece of paper in the printer and print a test page to make sure you’ve edited, positioned, and flipped the image correctly. Finally, print the image on the iron-on transfer paper. When printing, choose Iron-On Transfer from the Paper Setup options. (Be careful though; as shown here, some printers flip the image for you if you choose the iron-on transfer choice. If you flip it, and the software flips it again, it won’t actually be flipped!) Once the photo is printed, follow the directions on the paper for ironing the transfer onto the shirt.
Now that you’ve taken the photos, saved them to your hard disk, organized them into nice, neat folders, burned them to disc, and sent off for prints, let’s talk about sharing your experiences (versus just passing around some photos).
Sharing experiences is quite different from sharing images. The word experience implies that people won’t just look at pictures of your vacation, they’ll also get a feel for what you experienced. Flipping through a stack of snapshots of a friend’s vacation hardly compares to the experience of watching a slide show of the very same vacation on your computer, or viewing the pictures from a disc or a Web page. Even better than this, though, is watching the images through a photo story with titles, music, and narration. Now that makes for a nicer experience!
Creating CD slide shows was covered in Chapter 1. You’ll find that it’s just as easy to create a slide show for a Web page. Before you start, you need to download the HTML Slide Show Wizard PowerToy from http://www.microsoft.com/windowsxp/pro/downloads/powertoys.asp. If you need help with the download and installation, turn to the Introduction at the beginning of this book where you’ll find complete and easy instructions.
Once downloaded and installed, the HTML Slide Show Wizard is easy to access and use. Just follow these steps:
Click Start, point to All Programs, point to PowerToys For Windows XP, and click Slide Show Wizard. Click Next.
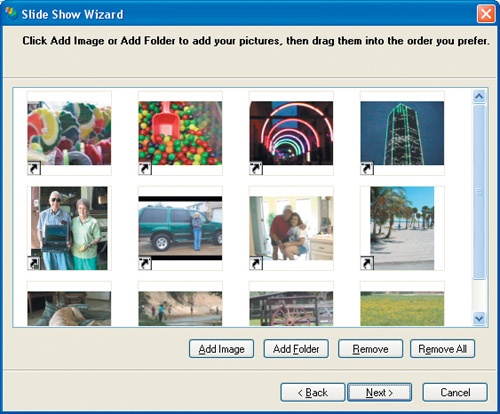
On the next page, click Add Image or Add Folder to add pictures to the layout, as shown in Figure 2-15. (Click Remove or Remove All as needed.) Click Next.
On the Options page, type a name for the slide show, the author’s name, and select a folder to save the slide show to.
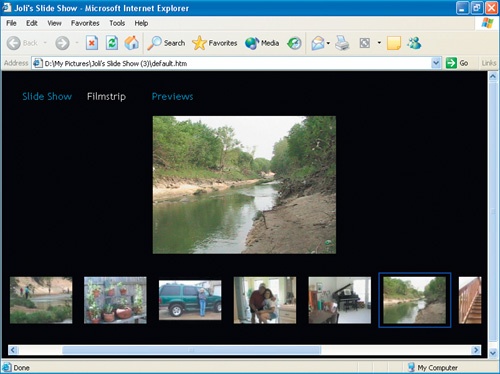
On the same page, select a picture size and select a slide show type. The Simple option shows the pictures one at a time and shows nothing else on the screen; Advanced shows thumbnails of other pictures across the bottom of the screen. Select Full Screen to have the slide show run in full screen mode. Click Next to create the slide show.
On the Completing the Slide Show Wizard page, click View The Slide Show Now. The first page of the slide show will include the slide show title and the author’s name. When you click to watch the slide show, you’ll see something similar to what is shown in Figure 2-16.
Slide shows are cool, but what if you want more? With Microsoft Plus! Digital Media Edition, you can have more. This software is a must-have package that offers some really neat programs for anyone who wants to truly experience music and digital pictures. Plus! Photo Story, one of the programs included in the suite, helps you create exciting video stories by adding panning and zooming options, narration, a title page, background music, and more. It automatically saves your story to Media Library in Windows Media Player.
To purchase Microsoft Plus! Digital Media Edition, go to http://www.microsoft.com/windows/plus/plushome.asp. If you need further instructions, turn to the Introduction at the beginning of this book.
Note
If your story depends on voice and narration, you’ll have to have a microphone installed. Microphones are inexpensive and can be purchased at any computer store. Once installed, the microphone will need to be set up. This can be done from Control Panel and Sounds And Audio Devices, or it can be set up from inside the Plus! Photo Story program.
It’s easy to create a photo story. Once you have Microsoft Plus! Digital Media Edition installed and pictures saved to your hard disk, you’re ready to begin. Follow these steps:
Click Start, point to All Programs, point to Microsoft Plus! Digital Media Edition, and click Plus! Photo Story.
If you need to test and configure a microphone, on the Welcome To Plus! Photo Story page, click Configure Microphone. Work through the Sound Hardware Test Wizard.
Click Begin A Story.
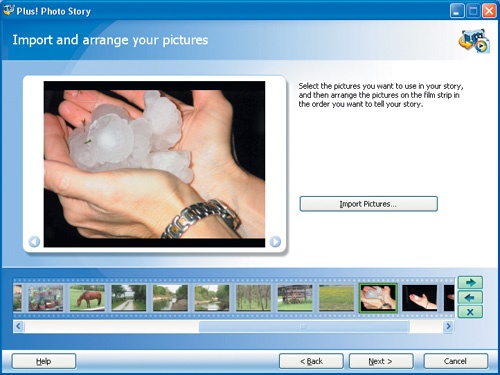
On the Import And Arrange Your Pictures page, click Import Pictures.
In the Open dialog box, browse to the pictures to import. Select them, then click Open.
Repeat steps 4 and 5 until all images are imported, as shown in Figure 2-17.
To change the order of the pictures, click any picture in the filmstrip and drag it to a new location.
To delete any picture, click the picture, then click the × button on the filmstrip.
To move any picture one space left or right, click the left and right arrows on the filmstrip.
Click Next when the pictures are in the correct order.
On the Record Your Story page, click the red Record button. As you talk, move your mouse pointer over the areas of the picture you wish to emphasize. Move from picture to picture by clicking the large blue Next Picture button. When you are finished narrating the story, click the Stop button located directly underneath the Record button.
Click Advanced to configure how Photo Story will pan and zoom while you narrate and work with the mouse. Check Control Pans And Zooms Manually and then select where the start and stop positions for how the zoom and pan should be positioned. Click Preview to preview the motion selected. Click OK.
To preview the story so far, click Preview Story. Click Next.
On the Add A Title Page screen, type in a title and description for the story. Click the font icons to make changes to the font style, color, and size, among other options.
On the same page, select how many seconds to display the title page, and choose to add a background image if desired. If configuring a background image, simply browse to the image you want to use and click Open. Click Next.
On the Add Music And Preview Your Story page, click Browse to add background music to your story. Set the background music volume using the volume slider. Click Preview Final Story. Click Back or Next as needed.
On the Select Quality Settings And Save Your Story page, choose the video and audio quality. Remember, the higher the quality, the larger the file size. If file size is important (especially if you plan to e-mail it or use it on the Web), choose the lower quality settings.
Click Browse to select a folder for saving the file. By default, the file will be saved in the My Videos folder. Click Next.
Click View Your Story. Click Back to edit the story. (Don’t click Exit because the story will not be editable!) Click Exit when finished.
Once your story is complete, you can share it with others in a variety of ways. If it’s small enough, you can e-mail it or you can burn it to a disc to pass on to others. The people you send the photo stories to don’t need to have Microsoft Plus! Digital Media Edition or Photo Story installed—the story simply plays in Media Player.
You’ll probably think of a million reasons to create photo stories once you’ve learned how to create them. Here are a few I thought of:
Create a photo story that includes still pictures from a recital and use the recorded audio from the performance as the background music.
Create a photo story to document the possessions in your home and narrate it. These pictures will be invaluable if you have a theft or fire.
Create a photo story to use as documentation for a new invention.
Record the building or renovation of your home. (That’s where the gas line is!)
Create a This Is Your Life photo story for your children and give it to them as a gift when they leave home to start the next stage of their life.
I don’t know about you, but I spend a lot of time personalizing my computer. To me, changing the background, the screen saver, my logon picture, and my desktop is incredibly relaxing. It also makes the computer seem to "fit" better because I get to choose things I find aesthetically pleasing. In this section you’ll learn how to customize your computer’s look, including using your own digital pictures as a screen saver, creating a personalized desktop background, and changing your logon picture.
The easiest way to personalize your computer is by setting any picture in your picture library as a desktop background (wallpaper). Pictures that have solid colors (or a lot of the same color) and only one focal point seem to make the best backgrounds (like a photo of a dog, a child, a building, a flower, or an object), while pictures that are busy (with several focal points) tend to be distracting. You can easily get an idea about what you’ll prefer by working through the following steps a few times:
Open My Pictures.
Click the picture that you want to use for your desktop background.
Under Picture Tasks, click Set As Desktop Background.
Close the My Pictures folder.
That’s it! To change this picture, perform the same steps, or from Control Panel, double-click Display, click the Desktop tab, and select a new desktop picture from the Background list.
If you like changing your desktop’s background and you just can’t decide which one is your favorite, fret no more! Stop changing your wallpaper every 15 minutes and let the Windows XP Desktop Wallpaper Changer PowerToy do it for you. It’s a free download at www.microsoft.com/windowsxp/experiences/downloads/create_powertoy.asp and it’s a good one. If you need help with this download, there are easy instructions available in the Introduction.
CREATE YOUR OWN SCREEN SAVERS
Would you like to view your favorite pictures every day? If so, you can configure your favorite pictures to be your screen saver. Not only can you view them every day, but anyone who comes into your office or home can see them as well. The images can be displayed on the screen for anywhere from six seconds to three minutes before switching to the next picture in the folder. You can select from several transitions, too. Transitions "bring in" the next picture and include Fade, Rolling, Album, Cube, Carousel, Random, and Ferris Wheel.
To create your own screen savers, follow these steps:
Open the My Pictures folder and verify that you have at least two pictures saved in it.
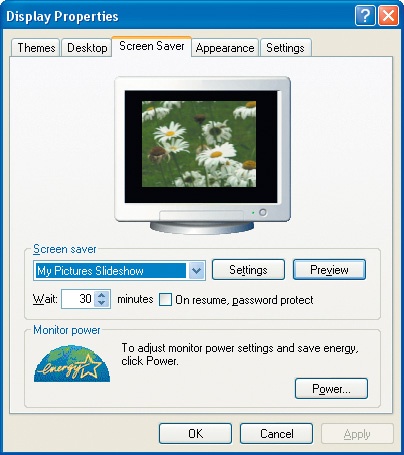
From Control Panel, double-click Display.
On the Screen Saver tab, under Screen Saver, click My Pictures Slideshow in the list, as shown in the graphic below.
Click Settings, and in the My Pictures Screen Saver Options dialog box, use the sliders to configure how many seconds should pass before the pictures change, how big the pictures should be on the screen, and what folder the pictures are stored in.
You can also configure options to stretch small pictures, show file names, use transition effects, and allow scrolling through the pictures with the keyboard. Click OK when all settings have been configured.
Click Preview to see how your new screen saver will look.
With this PowerToy you can choose any group of pictures you want, including your favorite family photos, vacation photos, or the wallpaper photos included with Windows XP. If you own your own business, you can use the Wallpaper Changer Power-Toy to display different backgrounds of your shop, your storefront, and your company’s logo. The possibilities are endless!
Once you download and install the Wallpaper Changer PowerToy, follow these steps:
Click Start, point to All Programs, point to PowerToys For Windows XP, and click Wallpaper Changer Wizard.
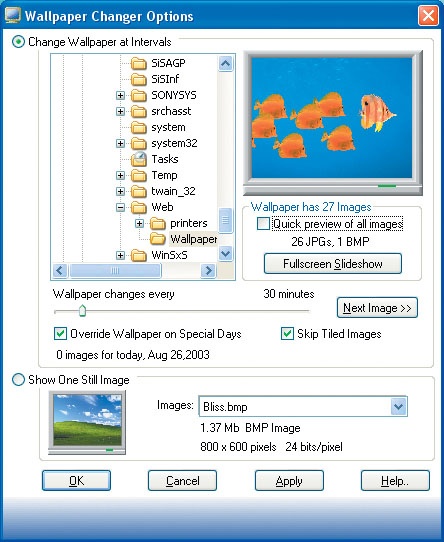
If the preview of the images makes your eyes bug out, uncheck Quick Preview Of All Images.
By default, the images you can choose from are the images in the Wallpaper folder (see Figure 2-18), but you can select any folder of images you like.
Click Help for more information, click Full Screen Slideshow to preview what you’ve selected, and click OK when finished.
Tired of the same old logon picture? Have you tried the soccer ball, the blue fish, the beach chairs, and the green frog? Besides these generic pictures offered by Windows XP, there’s another way to show who’s who. You can create a customized logon picture that’s uniquely you. Just have someone take a picture of you (or take a picture of your favorite pet, your house, or your favorite food) and save it to the My Pictures folder. Then the rest is easy! Just follow these steps:
In Control Panel, double-click User Accounts.
In the User Accounts window, double-click an account to change.
In the What Do You Want To Change About Your Account window, click Change My Picture.
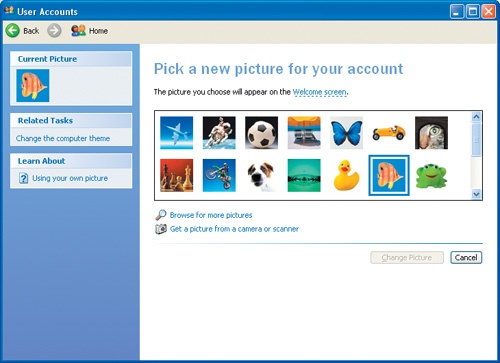
In the Pick A New Picture For Your Account window, click a picture from the available choices and then click Change Picture, or click Browse For More Pictures to locate a picture saved to your hard disk, as shown in Figure 2-19.
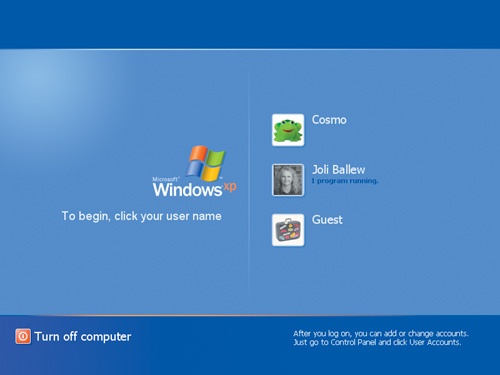
If Browse was selected, locate the picture saved to your hard disk, click it, and choose Open. The picture will be changed automatically, as shown in Figure 2-20.
And now, what you’ve all been waiting for! Sharing pictures with friends and family over the Internet is one of the easiest and fastest ways to share pictures with people across the country or across the globe. For the most part, sending an image via e-mail is as simple as clicking E-Mail This File in the File And Folder Tasks section of a folder containing images. However, there are a few things to consider before pressing Send—mainly the size of the file itself.
If you’ve ever been on the receiving end of an e-mail that took 20 minutes to download, or if you’ve ever received a response to one of your e-mails, blasting you about how long it took to download, you’ll want to read this section.
Many Internet service providers (ISPs) won’t let any e-mail or attachment through that’s larger than 2 MB. That means if you send a picture to your sister in New York that’s 2.5 MB, it will probably be rejected. If it does get through, and assuming she has a 56.6 KB modem, it could take an hour or more to download. It’s a no-win situation.
To make sure you are sending files of the appropriate size (I suggest staying under 1 MB), hover the mouse over the image in the My Pictures folder (or whatever folder you are using) and look at the information presented in the Details pane. An example is shown in Figure 2-21. After viewing the information, you can decide if you need to resize the image, crop it, or save it as a different file type.
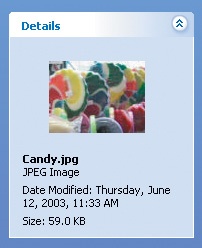
Although the picture itself might be an appropriate size, say 59.0 KB, if you type a long e-mail message and add a few animated icons, you’ll increase the size of the e-mail. Your mail program needs to add some information too. These are all things to keep in mind when e-mailing images. The 59.0 KB picture in Figure 2-21 was 83.0 KB when it was received, and it didn’t even include a message! If you were to add two or three more pictures to the e-mail, it would be quite large.
If the image you want to send is larger than 1 MB, there are several ways to decrease its size, including:
When prompted, choose Make All My Pictures Smaller. This option works if the image is larger than 640×480 pixels. There will be information on how to do this in the next section.
Zip the file or send the file to a compressed folder before e-mailing.
Resize the file using Image Resizer, Paint, or any other image-editing program.
Open the file and save it as another file type, preferably JPEG.
Change the resolution of the image in any third-party image-editing program.
With an appropriately sized file, you’re ready to e-mail!
There are several ways to e-mail an image. The easiest way is to open the folder where the image is stored, select the picture, and click E-Mail This File in the File And Folder Tasks pane. Another way to e-mail an image is to right-click it, point to Send To, and click Mail Recipient. Outlook Express will open automatically with the picture attached to a new message window. Microsoft Outlook 2003 goes further than that, and will ask you if you want to send the images in their original size or resize them. With that done, all you have to do is type your message. If you’ve already written the e-mail message and you want to add a picture as an attachment to it, the process is a little different.
You can insert a picture into the body of an e-mail so that the recipient doesn’t have to open it manually. When you insert a picture into an e-mail, the picture appears in the message body of that e-mail, and is not configured as an attachment. Follow these steps:
Open Outlook Express and click the Create Mail button. Compose the e-mail.
On the Insert menu, click Picture.
In the Picture dialog box, click Browse.
Locate the picture and click Open.
In the Alternate Text box, type in text that describes the picture. This text will appear in the e-mail when the recipient hovers over it with the mouse pointer.
Under Layout, select how you want the image to be aligned in the e-mail.
If you want a border around the picture, type in a number for Border Thickness.
If you want space around the sides of the image, type in numbers for Horizontal and Vertical under Spacing. Click OK.
Finish the e-mail and click Send. (You can resize the image after inserting it by dragging the handles on the outside of the picture.)
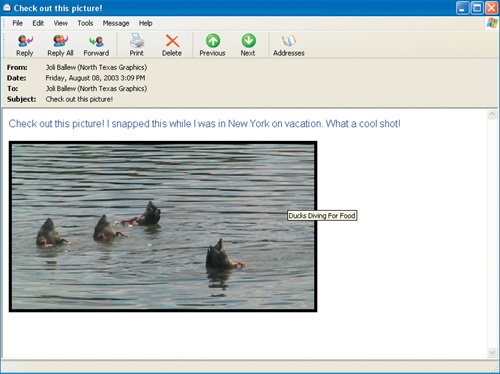
Figure 2-22 shows what the e-mail looks like once it is received. Notice that the picture is inserted directly into the e-mail message body. This figure also shows the alternate text and the black border around the image.
You can also insert a picture as an attachment. When you insert a picture this way, the image is not added to the body of the message, but is attached to the message instead, and must be opened separately. Sending images this way gives the recipient the option of opening it or not, and is generally preferred. The recipient opens the image by clicking the paper clip icon that represents the attachment. Here’s how to send a picture as an attachment:
Open Outlook Express and click the Create Mail button. Compose the e-mail.
On the Insert menu, click File Attachment.
Browse to the picture you want to attach, and then click Attach.
Complete the e-mail and click the Send button.
Note
Once you download and install Service Pack 1, opening attachments will be disabled by default. To restore the ability to open attachments, inside Outlook Express click Tools, and click Options. From the Security tab, uncheck Do Not Allow Attachments To Be Saved Or Opened That Could Potentially Be A Virus.
You can also send pictures using Windows Messenger. (If you haven’t set up and used Windows Messenger yet, please turn to Chapter 10 before continuing.) Windows Messenger can be used only if you’ve previously set up a .NET Passport, and it is a superb way to communicate in real time to anyone, anywhere.
To send a picture using Messenger, follow these steps:
Click Start, point to All Programs, and click Windows Messenger.
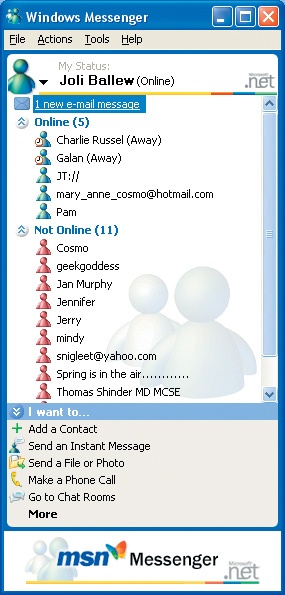
Select the contact who should receive the picture by right-clicking the contact name and then clicking Send A File Or Photo. Alternatively, on the File menu, click Send A File Or Photo, and then click a contact’s name and click OK. From the I Want To area, click Send A File Or Photo. See Figure 2-23 to see the Windows Messenger interface.
In the Send A File dialog box, browse to and click the file you want to send. Click Open.
The request is sent and you are notified when the recipient accepts it. (Clicking Cancel will withdraw the request.)
Before we end, take a look at the Windows XP Expert Zone at www.microsoft.com/windowsxp/expertzone. There, you can find lots and lots of other ideas for using your images to do amazing things. From this page, click New Downloads, PowerToys For Windows XP, More Windows XP Downloads, and read the articles about taking and working with digital pictures. You’ll be surprised at what you can do! I recently found a new download that contains card templates, which are like frames for photographs, and include captions like "Happy Mother’s Day" or "Play Ball!" These make great frames for digital scrapbooking, and they’re also a great way to quickly and easily send memorable photos suitable for printing.
- handles
Located at the edge of selected photographs in image-editing programs, handles are used to resize the image by dragging inward or outward. Handles can also be used to distort the image by resizing it so that it is no longer proportionate in height and width.
- Internet service providers
Companies that provide Internet access to subscribers, generally for a fee. Popular ISPs include MSN, AOL, Earthlink, AT&T, and NetZero.
- landscape
A way of printing a photo or image so that the image is printed "longways." In an 8½-by-11-inch photograph, the 11-inch side is the width, and the 8½-inch side is the height.
- pixels
In a digital photograph or on a computer monitor, pixels are small squares that contain color information. An image’s resolution is determined by how many pixels there are in a single image. The more pixels, the higher the resolution, and the better the quality of the image.
- portrait
A way of printing a photo or image so that the image is printed the conventional way, up and down. In an 8½-inch-by-11-inch photograph, the 8½-inch side is the width, and the 11-inch side is the height.
- transitions
The effect used to change from one image to the next. Transitions can be used to move between images in photo stories and between clips in movies. Common transitions include fading in and out, or sliding in from a side or a corner.
- wallpaper
The image shown on the computer screen’s desktop. Wallpaper is synonymous with Desktop. It can be changed as desired to one of the available images included with Windows XP or from images from a user’s personal library.