
Azure creates an initial domain for every Azure AD tenant that is created in a subscription. This domain name consists of the tenant name, followed by onmicrosoft.com (packtpub.onmicrosoft.com). You cannot change or delete the initial domain name, but you can add custom domains to your Azure AD tenant.
This custom domain name can be registered at a third-party domain registrar and, after registration, can be added to the Azure AD tenant.
To add a custom domain to Azure AD from the Azure portal, follow these steps:
- Navigate to the Azure portal by going to https://portal.azure.com.
- From the left menu, select Azure Active Directory.
- In the Azure AD Overview blade, under Manage, select Custom domain names. To add a custom domain, select the + Add custom domain button from the top menu, as follows:
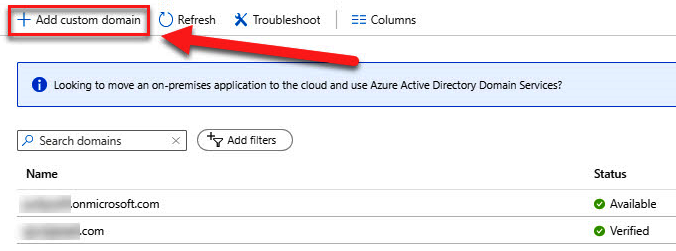
Adding a custom domain
- Type the custom domain name into the Custom domain name field (for example, packtpub.com) and select Add domain, as follows:
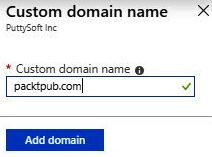
Providing a custom domain name
- After you've added your custom domain name to Azure AD, you need to create a TXT record inside the DNS settings of your domain registrar. Go to your domain registrar and add the Azure AD DNS information from your copied TXT file. Creating this TXT record for your domain verifies ownership of your domain name. After creating the TXT file, click Verify, as follows:
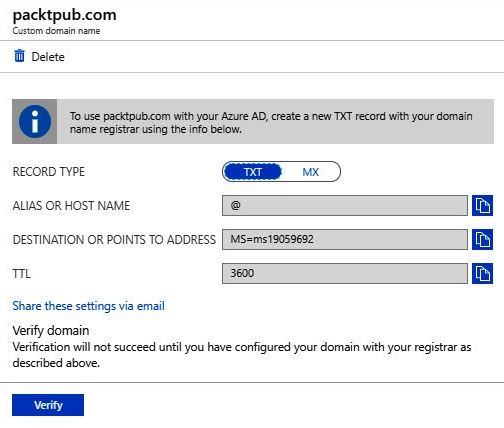
Verifying the ownership of the domain
- After you've verified your custom domain name, you can delete your verification TXT or MX file.
Now, we have configured a custom domain for our Azure AD tenant. Your users can now use this domain name to log in to the various Azure resources they have access to.