Chapter 7
Azure Traffic Manager
Overview
Azure Traffic Manager is a service that performs DNS-based load balancing of incoming traffic to internet-facing endpoints. Traffic Manager service facilitates the distribution of traffic globally across applications hosted in various Azure regions or external endpoints hosted in client environments or other cloud services.
One of the most important aspects of Azure Traffic Manager is that it performs DNS-based redirects based on traffic-routing policies defined in the service. It does not act as a front-end gateway or proxy for application traffic. This implies that no application traffic passes through the service; it is simply redirected to designated endpoint(s), after which the client connects to the designated application endpoint directly. It also shows that Traffic Manager works on layer 7 (the application layer) of the OSI model.
You can define different types of endpoints for use with Traffic Manager. You can also deploy different routing algorithms to handle the incoming traffic based on your organization’s unique availability requirements and application design. This is covered in more detail later in this chapter.
Traffic Manager features
Traffic Manager has a number of key features to improve the availability, resiliency, and redundancy of client applications. These include the following:
Multiple routing algorithms to meet complex requirements Traffic Manager provides different traffic-routing algorithms that can be used in isolation or in combination based on the needs of the client environment. Each type of algorithm improves the redundancy and availability of the application in different ways. Combining routing methods can help address even the most complex scenarios.
Increased application resiliency and availability Traffic Manager continuously monitors application endpoints and automatically routes traffic based on endpoint availability. Traffic to offline endpoints is automatically paused until the endpoints come back online.
Enhanced application performance You can set up Traffic Manager to route traffic to endpoints that offer the lowest latency to the end client to improve the user experience.
Support for non–Azure-based endpoints Traffic Manager supports the use of public-facing endpoints hosted both inside and outside Azure (on-premises environments, other cloud services, etc.). A single Traffic Manager routing profile can contain endpoints from different sources to address different scenarios, such as on-premises to Azure cloud migration, IaaS to PaaS migration, disaster recovery to Azure, and so on.
Improved application scalability Traffic Manager can help organizations provide scaling capabilities to their applications by bursting to use Azure cloud capacity in the event of resource crunch issues in their primary hosting locations.
Reduced maintenance windows Traffic Manager can help reduce or eliminate maintenance windows for application upgrades or security updates by routing traffic to endpoints that are not under maintenance.
Design concepts and deployment considerations
The Traffic Manager service can be integrated into your environment in different ways, depending on your workloads, redundancy requirements, and routing requirements. To identify the right strategy for your workloads, it is important to understand the different components that make up the Traffic Manager service, as well as how they function. This will help you to identify all the different factors to consider when designing and deploying this service in your Azure environment.
Traffic Manager endpoints
Traffic Manager allows the use of different endpoint types for traffic distribution. Based on the routing method defined in the Traffic Manager profile, Traffic Manager assesses endpoint availability and applies the routing algorithm to determine which endpoint to route traffic to.
Traffic Manager supports three types of endpoints:
Azure endpoints These are services hosted inside Azure—for example, using App Services or virtual machines (VMs) running a public-facing application.
External endpoints These are referred to services hosted outside Azure, either on-premises or by another hosting provider (including other cloud providers). Traffic Manager refers to these using either their IPv4/IPv6 address or FQDN.
Nested endpoints These combine multiple Traffic Manager profiles to create more complex traffic routing configuration. This helps to address the requirements of larger deployments.
The following sections discuss each endpoint type in more detail.
Azure endpoints
Azure-hosted services are set up as Azure endpoints in Traffic Manager. A number of Azure services are supported for use with Traffic Manager, including the following:
Web apps
Web app slots
VM-connected public IP addresses
Load balancer–connected public IP addresses
PaaS cloud services
The main benefit of using Azure endpoints is that Azure can detect the state of services, such as Azure Web Application service, to confirm whether it is running or stopped. Azure can then automatically stop billing for Traffic Manager while the back-end endpoint is stopped and resume once it’s back online. This feature is not supported for public IP address–based endpoints, as no detection of the actual resource is possible in that instance.
External endpoints
External endpoints are services referenced only using public IPv4/IPv6 addresses or FQDNs, or hosted outside Azure. These include applications hosted in on-premises environments and in other hosted or non-Microsoft cloud environments. They also include applications hosted in Azure that must be published using only their IPv4/IPv6 addresses.
For some Azure services, such as Azure Web Application service, the Traffic Manager profile can reference only one endpoint per region as an Azure endpoint. However, if added as an external endpoint using the web app’s FQDN, this limitation can be overcome.
With Azure endpoints, billing can be automatically turned off for offline or deactivated Azure-hosted services. The same does not apply to external endpoints, however. The only way to turn off billing for an external endpoint is to disable or delete the endpoint.
You can combine external and Azure endpoints in the same Traffic Manager profile. For example, an application’s FQDN could be routed to endpoints hosted in an on-premises datacenter and an Azure VM. This does not apply for endpoints that are specified using IPv4 or IPv6 addresses, however. These can only be set up individually as external endpoints.
When Azure and external endpoints are combined in a single Traffic Manager profile, various design scenarios become viable. These include the following:
Increased resiliency through the provision of active-active or active-passive failover options for applications hosted between Azure and on-premises or Azure and other hosting provider–managed environments.
Resource-burst capabilities for on-premises applications through the provision of capacity in the Azure cloud to scale as and when required.
Improve application performance through the hosting of applications closer to the user’s region and through the use of performance-based routing to make on-premises applications available with reduced latency.
Nested endpoints
Nested endpoints are a combination of multiple Traffic Manager profiles consisting of different endpoints. A “parent” profile is set up with an endpoint pointing to a “child” profile that contains different endpoints than the parent profile. Such a combination creates complex routing logic that can help provide global scale and redundancy for an application. The endpoints in the parent and child profile can be different and can even be other nested Traffic Manager profiles (discussed in the next section).
Nested Traffic Manager profiles
Nested Traffic Manager profiles combine multiple profiles to enable complex traffic-routing capabilities. This works well for larger application-deployment scenarios that call for a mixture of routing capabilities to address the complex needs of the organization.
In general, a single Traffic Manager profile can use a single traffic-routing method. With nested profiles, you can define a “child” Traffic Manager profile inside a “parent” profile to serve as an endpoint. This allows multiple profiles with different routing policies and endpoint types to work together in a single nested profile to address complex routing requirements.
Figure 7-1 shows how a parent profile is set up to use the performance-traffic routing method (discussed in a moment) and how one of its endpoints is a child profile set up to use the weighted-traffic routing method (again, discussed in a moment) and its own set of endpoints. This build allows for a small subset of traffic to be routed to the “trial” endpoint to test application upgrades or patches without affecting the majority of the environment.

FIGURE 7-1 Azure Traffic Manager service overview.
Traffic routing methods
One of the most important aspects of Traffic Manager is to understand the different traffic-routing methods and algorithms it provides. There are various routing methods available, each with different capabilities, that can be used individually or combined in nested profiles to address various complex requirements. Four of these methods are as follows:
Priority traffic routing
Weighted traffic routing
Performance traffic routing
Geographic traffic routing
You can configure any of these traffic-routing methods as part of a Traffic Manager profile and apply it to a set of endpoints. The routing method you set up can be swapped out at any time and the changes applied with zero downtime. However, as mentioned, to address more complex scenarios, you can nest Traffic Manager profiles to apply multiple routing methods in combination. The following sections discuss these traffic-routing methods in more detail.
Priority traffic routing
Suppose your organization has designed an application such that a single primary server runs the application and one or more backup servers handle application traffic in the event that the primary server fails. This might be because application limitations prevent it from supporting more than one active server at a time. Or it could be meant to address disaster-recovery scenarios in which the secondary endpoint cannot be used until the primary endpoint is offline.
In such instances, the most effective traffic-routing method is the priority method. Priority traffic routing defines the primary endpoint to route any client traffic to, and one or more backup endpoints, organized by priority, to failover to in case of a problem. The highest-priority endpoint receives traffic until it becomes unavailable, at which stage the traffic is redirected to the second-highest-priority endpoint. (See Figure 7-2.)

FIGURE 7-2 Priority traffic routing.
With this method, all endpoints have a unique priority; that is, no two endpoints can have the same priority. Unless an endpoint has been taken offline or disabled—for example, for maintenance purposes—or experiences an outage, it will automatically receive traffic if the endpoint that is prioritized immediately above it experiences a problem. If no priority has been defined for an endpoint, it is automatically assigned one based on the order in which it was added to the service.
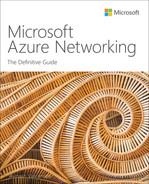
Weighted traffic routing
In scenarios in which traffic must be distributed evenly across a set of endpoints, weighted traffic routing is often the most suitable method. With this method, you can define a weight for each application endpoint; endpoints with higher weights receive more traffic. Put another way, the higher the endpoint’s weight, the higher its priority. (See Figure 7-3.)
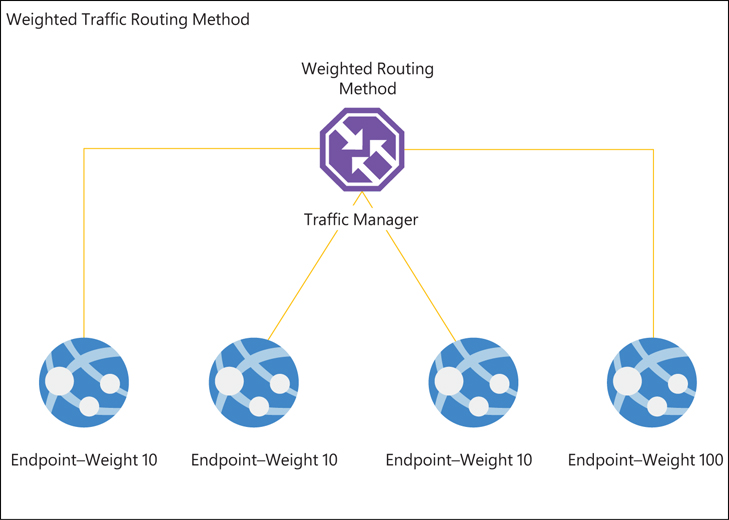
FIGURE 7-3 Weighted traffic routing.
You can assign the same weight to multiple endpoints to distribute traffic evenly across them. This approach is effective in scenarios in which traffic must be routed first to multiple active endpoints in a primary location and second to multiple active endpoints in a failback or disaster-recovery site.
Be aware that DNS responses are cached by end clients and by recursive DNS servers servicing those clients. This can result in traffic being distributed unevenly, as DNS caching behavior cannot be centrally controlled across all possible access points. You should take this into account when deciding whether this is the right routing method for your environment.
Performance traffic routing
With performance traffic routing, Traffic Manager routes traffic based on which endpoint will provide the lowest latency. Sometimes this will be the endpoint that is closest to the client IP address, but not always. To determine whether another endpoint might offer lower latency, Traffic Manager refers to an internet latency table, which it generates and maintains by tracking round-trip times between source IP ranges and various Azure regions. (See Figure 7-4.) If the Azure region identified by Traffic Manager as offering the lowest latency contains multiple active endpoints, Traffic Manager automatically distributes traffic to that region evenly across all the available endpoints.

FIGURE 7-4 Performance traffic routing.
Performance traffic routing supports the use of external endpoints hosted outside Azure and of nested endpoints. In these cases, you must define the location of the endpoint by selecting the Azure region closest to that endpoint. If the endpoints in the closest Azure region are offline or degraded, Traffic Manager will move traffic to active endpoints in the next-closest Azure region.
The source IP of the endpoint performing the DNS query also helps gauge latency. In most cases, this will be a recursive DNS server; therefore, the Azure region returned in the DNS response will be the one closest to the DNS server. If an organization uses a centralized DNS server for all clients hosted in its datacenter, traveling employees may have to connect to the Azure region closest to the organization’s datacenter, even if they themselves are connecting from the other side of the globe. You’ll need to factor this in when choosing which traffic-routing method to use.
Geographic traffic routing
Geographic traffic routing defines the endpoints to which traffic should be routed based on the origin of the request. For example, you might route traffic from different locales to different endpoints based on data-sovereignty, content-localization, or compliance requirements.
You can define multiple endpoints to address traffic from different regions by redirecting them to specific external or nested endpoints hosted in Azure. You must assign each endpoint a set of geographic regions so that Traffic Manager understands how traffic must be routed after it determines the source geography of the DNS request. You can use different levels of granularity to define the geographic region:
World Any region.
Region A specific region—for example, Asia, Africa, North America, Australia/Pacific, and so on.
Country A specific country—for example, India, France, United States, Canada, and so on.
State/Province A specific state or province—for example, Australia-Victoria, Canada-Victoria, Canada-Ontario, USA-Florida, and so on (currently applicable only to Australia, Canada, and the US).
Depending on the regions associated with an endpoint, traffic is routed only to endpoints located in those regions. Routing occurs in the following order, based on the endpoint’s configuration (see Figure 7-5):
State/Province
Country
Region
World
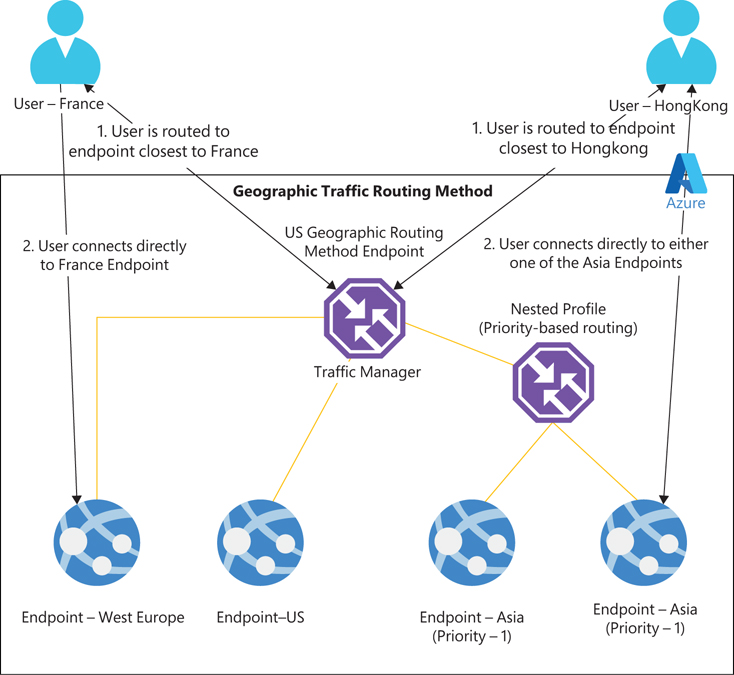
FIGURE 7-5 Geographic traffic routing.
There are a few key points to note about this traffic-routing method:
Each geographic region can be associated with only one endpoint.
Traffic Manager does not check the health of the endpoint. It returns that endpoint as a response, even if the endpoint is in an unhealthy state.
If a request matches the geographic mapping of multiple endpoints, the one that is defined with granularity closest to the request’s region is returned.
The use of nested endpoints is recommended to define a geographic mapping to cover unknown sources or scenarios in which endpoints are offline, as multiple endpoints can be defined in a nested endpoint.
It’s a best practice to use geographic traffic routing with nested Traffic Manager profiles so you can configure multiple endpoints to address all unknown traffic sources.
Disabled endpoints are excluded from any response.
Endpoint monitoring
One of the most important features of Traffic Manager is its ability to automatically failover traffic away from non-functional endpoints. This requires continuous monitoring to ensure that information about the health of every active endpoint is up to date. Any change in status that identifies an endpoint as offline, deactivated, or disabled leads to an action based on the routing method and endpoint configuration in place. Fortunately, Azure Traffic Manager has a built-in endpoint-monitoring feature that you can set up to monitor the health of endpoints and perform automated failover to other active or passive endpoints. This involves selecting a monitoring protocol and other critical settings. (You’ll learn how to configure this feature in the next section.)
Traffic Manager walkthrough
The following sections walk you through the process of setting up Azure Traffic Manager using the Azure Portal, Azure PowerShell, and the Azure CLI.
Using the Azure Portal
To set up Traffic Manager using the Azure Portal, follow these steps:
Log in to the Azure Portal, type Traffic Manager in the search box to locate the service, and select it from the list that appears. (See Figure 7-6.)
Click Create or Create Traffic Manager Profile to start the Create a Traffic Manager wizard. (See Figure 7-7.)
FIGURE 7-6 Searching for the Traffic Manager service.

FIGURE 7-7 Click Create Traffic Manager Profile.
In the Create Traffic Manager Profile wizard (see Figure 7-8), enter the following information and click Create:
Name Type a unique name for the profile.
Routing Method Select the desired routing method—in this case, Performance.
Subscription Select the subscription to host the profile.
Resource Group Select the resource group you want to host the profile. Alternatively, click the Create New link and follow the prompts to create a new profile.
Resource Group Location This value is automatically populated based on the resource group you select.

FIGURE 7-8 Set up profile settings.
After the Traffic Manager profile is created, open its service configuration blade.
In the left pane, click Endpoints. Then click Add. (See Figure 7-9.)
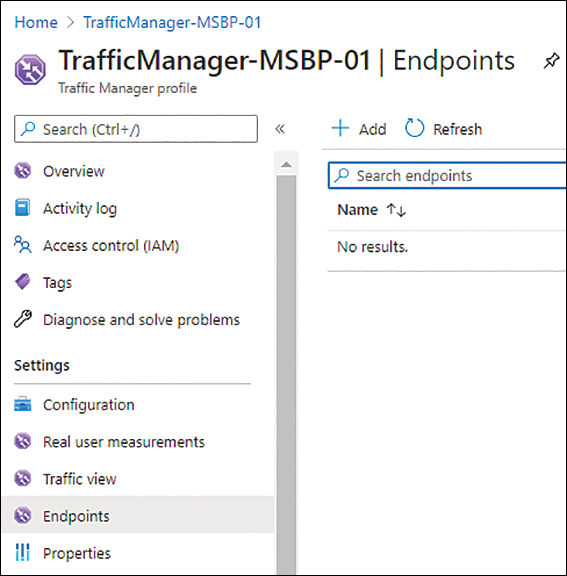
FIGURE 7-9 Add a Traffic Manager endpoint.
The Add Endpoint wizard starts (see Figure 7-10). Enter the following information and click Add:
Type Select the type of endpoint you want to use.
Name Enter a unique name for the endpoint.
Target Resource Type Select the type of resource you want to add—in this case, Public IP address.
Public IP Address Select the public IP address you want to associate with the profile.
Custom Header Settings Add the host header information using the tags host: and customheader:.
Add as Disabled Select this check box if you want to add the endpoint now, but not make it live.
Repeat step 6 to add all necessary endpoints. Then verify they’ve been added correctly. (See Figure 7-11.)

FIGURE 7-10 Add endpoint.

FIGURE 7-11 Endpoints in Traffic Manager.
In the left pane of the Traffic Manager profile’s service configuration blade, click Configuration. Then enter the following configuration information in the right pane of the blade (see Figure 7-12):
Protocol Select the protocol you want to use (HTTP, HTTPS, or TCP) to monitor application health.
Port Specify the application port to be queried by Traffic Manager to verify endpoint health.
Path Specify a path to identify which endpoint should be monitored. This can be a relative path, such as a forward slash (/); a relative path, such as a forward slash (/) and the name of the web page; or a relative path, such as a forward slash (/) and the name of a file.

FIGURE 7-12 Configure endpoint monitoring.
Custom Header Settings Set the custom HTTP header to use to connect to the endpoint. This header can be defined at a profile level (to apply to all endpoints) or at an individual endpoint level (to apply only to that endpoint). The header can also be applied at both the profile and endpoint level to accommodate custom endpoint requirements.
Expected Status Code Ranges Set the status codes to confirm successful connectivity. Success code responses appear in the format 200–299, 301–301.
Probing Interval Specify a probing interval to define how often an endpoint’s health check should be performed. There are options: 30 (seconds), which is the default, and 10 (seconds), which is referred to as fast probing. (Note that additional service charges apply when you select the fast probing option.)
Tolerated Number of Failures Specify the total number of failures to tolerate before initiating failover. This parameter can be set to any value between 0 and 9, with 0 implying that a single failure will result in the endpoint being moved out of service. (The default value is 3.)
Probe Timeout Specify a response timeout value appropriate for your environment. This setting defines the total time the probing agent must wait for a response before assuming a health probe check has failed. This value depends on the Probing Interval setting. If Probing Interval is set to 30 (seconds), Probe Timeout must be set between 5 and 10 (seconds). (The default value is 10.) If Probing Interval is set to 10, Probe Timeout must be set between 5 and 9. (The default value is 9.)
Click the Overview tab and browse to the DNS name shown in the right pane to test whether you are connecting to one of the two VMs you provisioned as the endpoints. If so, turn off that Azure VM and repeat the process to validate that you are now connected to the other VM. (See Figure 7-13.)

FIGURE 7-13 Traffic Manager Overview tab.
Using Azure PowerShell
You can create a Traffic Manager profile using Azure PowerShell with the New-AzTrafficManagerProfile command and various switches to set the profile’s parameters. The following code shows you how:
#Query Resource ID for the endpoints. Record these for use later in the script.
Get-AzResource -Name "VM01-PIP01" | select ResourceID
Get-AzResource -Name "VM02-PIP01" | select ResourceID
#Define required variables
$AzureRegion="EastUS2"
$RG="RG01"
$TrafficMgrprofile="TrafficManager-MSBP-01"
#Create Traffic Manager Profile
New-AzTrafficManagerProfile `
-Name $TrafficMgrProfile `
-ResourceGroupName $RG `
-TrafficRoutingMethod Performance `
-ProfileStatus Enabled `
-MonitorPath '/' `
-MonitorProtocol "HTTP" `
-RelativeDnsName $TrafficMgrProfile `
-Ttl 30 `
-MonitorPort 80
#Create Traffic Manager Endpoint-01
#Replace the value for TargetResourceID with the one you gathered earlier for "VM01-PIP01"
New-AzTrafficManagerEndpoint -Name "Endpoint01" `
-ResourceGroupName $RG `
-ProfileName "$TrafficMgrProfile" `
-Type AzureEndpoints `
-TargetResourceId /subscriptions/7719ec11-92dd-457c-b393-5adc483e4c79/resourceGroups/RG01/
providers/Microsoft.Network/publicIPAddresses/PublicIP-01 `
-EndpointStatus "Enabled"
#Create Traffic Manager Endpoint-02
#Replace the value for TargetResourceID with the one you gathered earlier for "VM02-PIP01"
New-AzTrafficManagerEndpoint -Name "Endpoint02" `
-ResourceGroupName $RG `
-ProfileName "$TrafficMgrProfile" `
-Type AzureEndpoints `
-TargetResourceId "/subscriptions/7719ec11-92dd-457c-b393-5adc483e4c79/resourceGroups/RG01/
providers/Microsoft.Network/publicIPAddresses/publicip-02" `
-EndpointStatus "Enabled"
Using theAzure CLI
You can create a Traffic Manager profile using the Azure CLI with the az network traffic-manager profile create command and various switches to set the profile’s parameters. The following code shows you how:
#Query Resource ID for the endpoints. Record these for use later in the script.
az resource list --name "VM01-PIP01"
az resource list --name "VM02-PIP01"
#Define required variables
rg="RG01"
azureregion="eastus2"
trafficmgrprofile="TrafficManager-MSBP-02"
endpoint01name="endpoint01"
endpoint02name="endpoint02"
#Create Traffic Manager Profile
az network traffic-manager profile create
                      --name $trafficmgrprofile
                      --resource-group $rg
                      --routing-method Performance
                      --path "/"
                      --protocol HTTP
                      --unique-dns-name $trafficmgrprofile
                      --ttl 30
                      --port 80
#Create Traffic Manager Endpoint-01
#Replace the value for TargetResourceID with the one you gathered earlier for "VM01-PIP01"
az network traffic-manager endpoint create
    --name $endpoint01name
    --resource-group $rg
    --profile-name $trafficmgrprofile
    --type azureEndpoints
    --target-resource-id '/subscriptions/7719ec11-92dd-457c-b393-5adc483e4c79/resourceGroups
/RG01/providers/Microsoft.Network/publicIPAddresses/PublicIP-01'
    --endpoint-status Enabled
#Create Traffic Manager Endpoint-02
#Replace the value for TargetResourceID with the one you gathered earlier for "VM02-PIP01"
az network traffic-manager endpoint create
    --name $endpoint02name
    --resource-group $rg
    --profile-name $trafficmgrprofile
    --type azureEndpoints
    --target-resource-id '/subscriptions/7719ec11-92dd-457c-b393-5adc483e4c79/resourceGroups
/RG01/providers/Microsoft.Network/publicIPAddresses/PublicIP-02'
    --endpoint-status Enabled
Best practices
Traffic Manager can be a critical component in your application design and is generally used for enabling complex application routing scenarios. It is recommended that you set up the service taking the following best practices into consideration:
Use RBAC to control access Limit access to Traffic Manager to required administrators. Making unauthorized changes to the service can result in outages. Generally, Traffic Manager is used for applications that require high levels of redundancy and availability; hence it is imperative that you keep the access to the service restricted. You can add admins who require access to manage Traffic Manager configuration to the Traffic Manager Contributor role in Azure instead of providing them with Subscription Owner or other extended access. This role limits access to managing profiles.
Set up Real User Measurements When using the performance-based routing algorithm, Traffic Manager must direct traffic based on the latency between the incoming client endpoint and the different Azure regions where the application is hosted and online. To achieve this, Traffic Manager maintains an internet latency table that monitors and records the latency between different client networks to active Azure regions for that application. You can obtain more accurate measurements at the application level to fine-tune this logic by enabling a feature called Real User Measurements. This feature embeds a piece of code in the application, which is used by end-user devices to test latency from those devices to the various active Azure regions hosting the application. This information is then shared with the web application, which forwards it to Traffic Manager. Because this information is collected over and over again, it helps Traffic Manager perform a deeper analysis of latency from those networks and redirect incoming traffic more accurately.
Enable Real User Measurements using the Azure Portal
Log in to the Azure Portal and browse to the Traffic Manager profile you created in the walkthrough earlier in this chapter.
In the left pane, click Real User Measurements. (See Figure 7-14.)
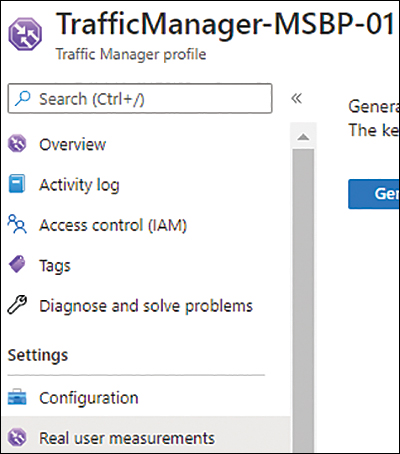
FIGURE 7-14 Real User Measurements.
In the right-pane, click Generate Key (see Figure 7-15) to create a unique key and measurement script to be embedded into the web application.

FIGURE 7-15 Generate a key.
Copy the measurement script and paste it into an HTML page that your end users consistently visit when accessing the web application—for example, the home page. (See Figure 7-16.)

FIGURE 7-16 Real User Measurements key and JavaScript code.
Enable Traffic View Traffic View is an add-on service in Traffic Manager that enables you to monitor and gain deeper insights into the traffic to the Traffic Manager service. Using Traffic View, you can gain a better understanding of the following:
Where the source traffic for an application is generated from
The volume of traffic from different source client regions
Latency experienced by users in different source client regions
Traffic patterns between the source client regions and the Azure regions hosting their endpoints
These insights can help you make better decisions about which regions to scale in to address latency or performance issues, or in which to invest further for growth based on the volume of traffic currently being generated.
Use Azure Activity and Azure Monitor to centralize security logs Azure Activity log captures all information related to any operations performed on any Traffic Manager resources on the control plane level. You can monitor these logs in the Activity Log section of the service or ingest them into a central repository via Azure Monitor for data aggregation and analysis.
Enable threat detection All Traffic Manager logs can be forwarded and centralized using a SIEM such as Azure Sentinel or a third-party SIEM solution. You can use this to perform analysis and automate actions for any threats and breaches recorded in the logs.
Use Azure Policy to standardize configuration You can use Azure Policy to monitor the configuration of Traffic Manager resources to ensure they are in line with organizational standards. Azure Policy can detect whether Traffic Manager resource logging is enabled to ensure all operations on the control plane are recorded and centrally stored for security and compliance.
Enable monitoring and alerts using Azure Monitor Traffic Manager provides a couple of key service-specific metrics that can be monitored and can generate alerts using Azure Monitor:
Endpoint status by endpoint This metric monitors and confirms the health status of all endpoints in a Traffic Manager profile. It records whether an endpoint is up or down, and the value can be monitored by Azure Monitor to raise alerts as needed.
Queries by endpoint returned This metric monitors the load on different endpoints based on the number of queries received by the Traffic Manager profile and individual endpoints for a specific period of time. You can set up alerts to flag when there is an imbalance in query distribution, and you can address application capacity if alerts persist for a given period of time.