Chapter 2
Azure Application Gateway
Overview
Azure Application Gateway is an ideal load balancer for web servers and applications that require HTTP/HTTPS traffic load-balancing and routing. It operates at the application layer (OSI layer 7 of the TCP and UDP stack) and can therefore analyze incoming traffic for custom routing based on URL paths and host headers in the incoming request. (See Figure 2-1.)

FIGURE 2-1 The Azure Application Gateway handles incoming traffic using routing rules to back-end services.
Traditional load balancers operate at OSI layer 4, meaning they can only route traffic with limited parameters, such as the source IP or port and the destination IP and port. Due to these limitations, complex application traffic routing is difficult on traditional load balancers. In contrast, Azure Application Gateway can route traffic based on the URL in the header information of the incoming traffic request. This makes it possible to route traffic for the same host header, directed to the same Azure Application Gateway IP, to a different server or server pool. For example, a request with the URL www.contoso.com/videos can be routed to one server or server pool hosting video-based content, a request for www.contoso.com/images can be routed to another server or server pool hosting image-based content, and so on. (See Figure 2-2.) This can help you design and optimize a web application server pool based on the content hosted by the pool.

FIGURE 2-2 Azure Application Gateway URL-based routing.
You can deploy an Azure Application Gateway in one of two ways:
As an internal-only Azure Application Gateway This is ideal for environments in which the application must be accessible only over internal virtual networks (vNETs). The gateway has an internal IP address, and the DNS records for it are set up in an internal or custom DNS server or service that is accessible only via vNETs for client connectivity.
As an internet-facing Azure Application Gateway This has a public IP, which publicly exposes the gateway. So, back-end applications can be publicly accessed by clients by way of the internet. The DNS name for a public-facing load balancer is added to the public DNS by the Azure service.
Azure Application Gateway features
The following list outlines the main features of the Azure Application Gateway. These features help explain how this service can be a key component of any web application design:
Web application firewall (WAF) The Azure Application Gateway can act as a WAF, monitoring incoming traffic from clients and intercepting any malicious activities to provide centralized protection from well-known vulnerabilities for multiple web applications in your environment. You can host an application behind the WAF even if you have not yet been able to patch the vulnerabilities on the web servers themselves. You can centrally protect an application or even a large server farm that needs patching from a known vulnerability by patching the WAF. This serves as an interim solution until the application or server farm itself can be updated.
Multiple-site hosting Azure Application Gateway supports the use of multiple host, domain, or subdomain names on the same application gateway. So, you can use a single application gateway to handle web traffic for multiple web applications. This enables you to maximize your investment in the service by using each instance to its fullest capacity. You can map more than 100 web applications to a single application gateway. And, by using multi-site listeners, you can route traffic sent to a single public IP to different back-end server pools based on the URL request or host header.
Web-traffic redirection By redirecting web traffic meant for one port to another, you can mask the application ports used internally on the web application servers, which can improve the security of your web applications. Traffic redirection also enables you to centrally route HTTP traffic to HTTPS, ensuring that no unencrypted communication occurs between your clients and web services. Web-traffic redirection supports the following scenarios:
Global traffic redirection This type of redirection enables you to redirect all traffic from HTTP to HTTPS on a site or to any other non-standard port required by the web application.
Path-based redirection With this type of redirection, you can redirect HTTP to HTTPS or any other non-standard port only on specific site areas, such as traffic to /videos/* or /checkout/*.
Redirection to an external site This type of redirection allows you to redirect traffic to an external site.
Secure Sockets Layer/Transport Layer Security (SSL/TLS) termination You can use Azure Application Gateway to offload SSL/TLS processing for your web applications. This helps reduce the overhead of SSL/TLS encryption/decryption as well as server resource consumption. Traffic between the application gateway to the web application hosted internally behind it can be unencrypted. In some scenarios, however, you might need the back-end traffic to be encrypted for compliance or application-design reasons. Azure Application Gateway supports these types of end-to-end encryption scenarios, too.
Session affinity handling You can set up Azure Application Gateway to support cookie-based session affinity, thereby ensuring that any sessions that are interrupted or dropped will reconnect to the same server as before. This can be a critical requirement for some applications where a user’s session state is stored locally on the server.
Static virtual IP (VIP) assignment The Standard_v2 version of Azure Application Gateway supports the use of static VIP addresses, ensuring the VIP is maintained as-is for the lifetime of the application gateway.
Zone redundancy You can set up Azure Application Gateway to span multiple availability zones, thereby improving the gateway’s SLA and resiliency.
Path-based routing This enables you to analyze and route traffic based on the path indicated in the incoming web request. You can set up the application gateway to route traffic to different back-end servers or server pools based on the paths found in the request. So, content for different paths of a URL can be hosted on different servers or server pools, and the content itself can be optimized to deliver the best end-user experience possible.
Automatic scaling You can set up Azure Application Gateway to automatically scale up or down based on traffic load at any given time. You need not select the “perfect” size for the application gateway when you provision it, because the gateway can scale as needed as traffic grows over time.
Support for WebSocket and HTTP/2 traffic Azure Application Gateway natively supports WebSocket and HTTP/2 protocols. WebSocket is enabled by default and cannot be turned off. It allows full duplex communication between the web application server and client over long-running TCP connections, which can be optimized and used for multiple requests and responses. HTTP/2 protocols can be used only for client-to-application gateway communications. HTTP/2 is designed to function more efficiently than HTTP-based communications by eliminating the need for the constant polling required by HTTP to keep long-running sessions alive, which reduces the application gateway’s overhead with client communications. Both protocols are designed to work over ports 80 and 443, so you can easily incorporate them into an environment without making firewall changes.
Design concepts and deployment considerations
Azure Application Gateway consists of a number of components that come together to filter traffic and provide secure routing services for your web applications. The main components of the Azure Application Gateway service are as follows (see Figure 2-3):
Front-end IP addresses
Back-end pools
Listeners
Request routing rules
HTTP settings
Health probes

FIGURE 2-3 Azure Application Gateway components.
It is important to have a solid understanding of each of these components to be able to design and deploy them appropriately based on your environment’s requirements. In addition, you should have a strong grasp of sizing and scaling as well as TLS policy. This section covers all of these topics.
Front-end IP addresses
A front-end IP address is the ingress point for the application gateway to receive web application traffic. It is referenced in the internal and/or public DNS and used to route application traffic. The front-end IP address can be an internal private IP address, a public IP address, or both.
If a private IP address is to be used, the gateway should be deployed in the same region as the vNET with which it is associated. Similarly, you should create any public IP that must be associated as the front-end IP address in the same region as the application gateway.
The application gateway supports both static and dynamic IP addresses for the private and public IP addresses. However, based on the SKU of the gateway, the support varies for each. SKU v1 supports dynamic public IP addresses and static or dynamic private IP addresses; there is no support for static public IP addresses. SKU v2 supports static and dynamic private and public IP addresses. You cannot set up a static private IP address along with a dynamic public IP address, but you can set up a static public IP address with a dynamic private IP address if required.
Back-end pools
Back-end pools are back-end servers or services to which web traffic requests from clients are routed. They serve the client request with the required application response via the application gateway.
Back-end pools support the following types of services:
Virtual network interfaces
Virtual machine scale sets (VMSS)
Public IP addresses associated with Azure virtual machines (VMs) or services
Internal IP addresses associated with Azure or on-premises servers or services
Fully qualified domain names (FQDNs)
Azure services, such as App Service
Back-end pools can be located across Azure regions, across different clusters, or outside Azure in a client’s or third-party datacenter. As long as the application gateway can reach the back-end endpoint over TCP/IP, it can serve as a front-end to that web application.
For communications with on-premises servers, a VPN gateway or Azure ExpressRoute connection is necessary. For communication with Azure VMs and services over their private internal IPs, vNET peering or VPN gateway integration is needed.
Listeners
Every application gateway requires a minimum of one listener and can contain multiple listeners. A listener helps you define the protocol, port, hostname, and source IP address that is allowed to communicate with the back-end pool. Based on the configuration of the listeners defined on the application gateway, traffic is passed through or dropped. If the listener allows traffic through, the gateway evaluates it against routing rules configured to route traffic to the correct back-end pool.
There are two types of listeners:
Basic A basic listener can listen for requests only for a single domain.
Multi-site A multi-site listener can listen to requests for multiple host names or domain names. This type of listener can support more than 100 websites, which you can route to their own back-end pool.
Both types of listeners support the following ports:
SKU V1 Ports 1 – 65502
SKU V2 Ports 1 – 65199
In addition, they support the following protocols:
HTTP
HTTPS
HTTP/2
WebSocket
There are a few caveats to be aware of, as follows:
WebSocket protocol support is enabled by default and cannot be turned off.
HTTP/2 protocol support is disabled by default and must be turned on manually.
HTTP/2 protocol support is limited to the client and application gateway communications. Any back-end communications occur over HTTP/1.1.
Request routing rules
A request routing rule defines how traffic received by the application gateway should be routed. It binds the listener to a back-end server pool based on the HTTP settings defined to monitor in the request. One listener can be attached to only one rule.
Routing to the back-end pool depends on the rule configuration that defines which back-end pool binds to which URL or URL path. The routing rule also specifies whether any request must be rewritten before being routed to the back-end pool.
There are two types of request routing rules:
Basic A basic request routing rule forwards all traffic to the associated back-end pool based on the HTTP settings associated with the rule.
Path-based A path-based request routing rule analyzes the URL path in the request to identify the back-end pool to which to route the request. The rule contains different URL paths, set up to route to different back-end pools. If the incoming request does not match any of the rules, the traffic is routed to the default back-end pool based on associated HTTP settings.
A request routing rule is evaluated based on the priority assigned to that rule. By default, the priority is automatically assigned based on the order of rule creation (unless a specific priority is provided at the time of rule creation or set later on).
It is important to take priority into consideration in case there are rules that contain domains that overlap—for example, *.fabrikam.com and blogs.fabrikam.com. In such cases, wildcard rules should be lower in priority to ensure the individual domain rules are evaluated before the wildcard rules. Otherwise, requests will be routed to the back-end pools associated with the wildcard domains only.
Redirection support
In addition to routing traffic to back-end pools, request routing rules can be set up to redirect traffic to and from any port to a redirection target. The redirection could be to another listener or an external site. Redirection routing helps redirect HTTP traffic to HTTPS, or traffic from a standard web port (such as 80) to a non-standard port.
Azure Application Gateway supports different types of redirection:
310 Permanent Redirect
302 Found
303 See Other
307 Temporary Redirect
Rewriting of HTTP headers and URLs
Azure Application Gateway allows HTTP request and response headers to be modified before the packet is sent to the back-end pool. So, the URL can be rewritten with custom security header fields, removing sensitive header information such as port information on X-Forwarded-For (XFF) headers. This feature can apply these changes only when certain conditions are met, so you can target rewrites to address any complex scenario as required.
HTTP settings
HTTP settings define the back-end servers’ port number, protocol, encryption settings, and other details. The application gateway uses these settings to route traffic to back-end servers when it receives a matching request.
HTTP settings are also used to define other settings, such as the following:
Cookie-Based Session Affinity This setting instructs the gateway to use affinity to always route requests from the same client to the same hosts (assuming the host is online).
Connection Draining This setting instructs the application gateway to gracefully drain connections on back-end servers, as they may be taken down for maintenance.
Custom Health Probe This setting helps the gateway understand how it should validate the health of the back-end pool.
Health probes
Monitoring the health of back-end pool instances is a critical function. It helps the service decide which back-end pool instances are healthy and usable for request routing and which ones need to be taken out of service to avoid application outages. Health probes provide the application gateway with the hostname, URL path, probe interval, and failed response limits to help it identify unhealthy back-end pool instances. The application gateway performs health monitoring by default. However, custom health probes help the gateway target the right parameters to evaluate instance health. Therefore, it is highly recommended to define custom health probes for each individual back-end pool.
Sizing and scaling
The v1 SKU offers different gateway sizes:
Small Appropriate for test and dev scenarios.
Medium Appropriate for small environments with a few hundred users accessing a web application.
Large Recommended for most enterprise or multi-site scenarios, to handle higher loads.
With the v2 SKU, autoscaling is available, eliminating the need for different gateway sizes. In this case, you use manual scaling or auto-scaling configurations to handle load instead of attempting to determine the right instance size at the outset.
TLS policy
With Azure Application Gateway, you can offload SSL/TLS. This way, SSL connections from clients are terminated on the application gateway, and internal communications with the application back-end can be encrypted or unencrypted (thereby reducing overhead on instances of the application). If the back-end instances are set up to communicate with the application gateway in an unencrypted manner, application certificates can be deployed and managed only on the application gateway. This makes it easier to track, maintain, and update them.
A TLS policy defines the different TLS protocol versions and cipher suites to be used during a TLS handshake. The order of the ciphers specifies the order in which they are evaluated at the time of the handshake. There are two mechanisms to control this, as follows:
Using a predefined TLS policy Every application gateway interface includes three predefined TLS policies—each one defined to support different TLS protocol versions and cipher suites. The names of the policies indicate the dates on which they were introduced; it’s recommended that you use the newer ones.
Using a custom TLS policy If a predefined policy does not meet your requirements, you can customize a policy to include the TLS protocols and cipher suites (and their priority) based on your needs.
With both predefined and custom TLS policies, SSL 2.0 and 3.0 are set to disabled, and you cannot override this. However, with a custom policy, you can set up any of the three TLS protocol versions (v1_0, v1_1, or v1_2) as the minimum required version. You can also set up all three of these with no minimum requirement if needed.
Application gateway walkthrough
The following sections walk you through the process of creating an application gateway using the Azure Portal, Azure PowerShell, and the Azure CLI. If you are following along, be sure to select resources and resource names based on your environment, including a unique application gateway name for each of your deployments. Also be sure to delete any unwanted resources after you have completed testing to reduce charges levied by Microsoft for these resources. Finally, to complete this walkthrough, you need to have created at least two back-end VMs with IIS web services to integrate with the Application Gateway. Microsoft provides Windows Server templates in the Azure Marketplace that install and set up IIS with the default configuration; alternatively, you can create a custom configuration based on your requirements.
Using the Azure Portal
To create an application gateway using the Azure Portal, follow these steps:
Log into the Azure Portal, type application gateway in the search box to locate the service, and select it from the list that appears.
Click Create or Create Application Gateway to start the Create Application Gateway wizard. (See Figure 2-4.)
FIGURE 2-4 Click Create Application Gateway.
In the Basics tab of the Create Application Gateway wizard (see Figure 2-5), enter the following information and click Next: Frontends:
Subscription Select the subscription to host the application gateway.
Resource Group Select the resource group you want to host the application gateway. Alternatively, click the Create New link and follow the prompts to create a new resource group.
Name Type a name for the application gateway. If the name you type is already in use, the wizard will prompt you to enter another name.
Region Select the Azure region in which you want to create the application gateway.
Tier Choose Standard V2.
Enable Autoscaling Select the Yes option button.
Minimum Instance Count Enter the minimum number of hosts to set up.
Maximum Instance Count Enter the maximum number of hosts to which the gateway should scale.
Availability Zone Leave this set to None.
HTTP2 Leave this set to Disabled.
Virtual Network Select an existing vNET for which you have created back-end VMs.
Subnet Select a subnet for the application gateway.
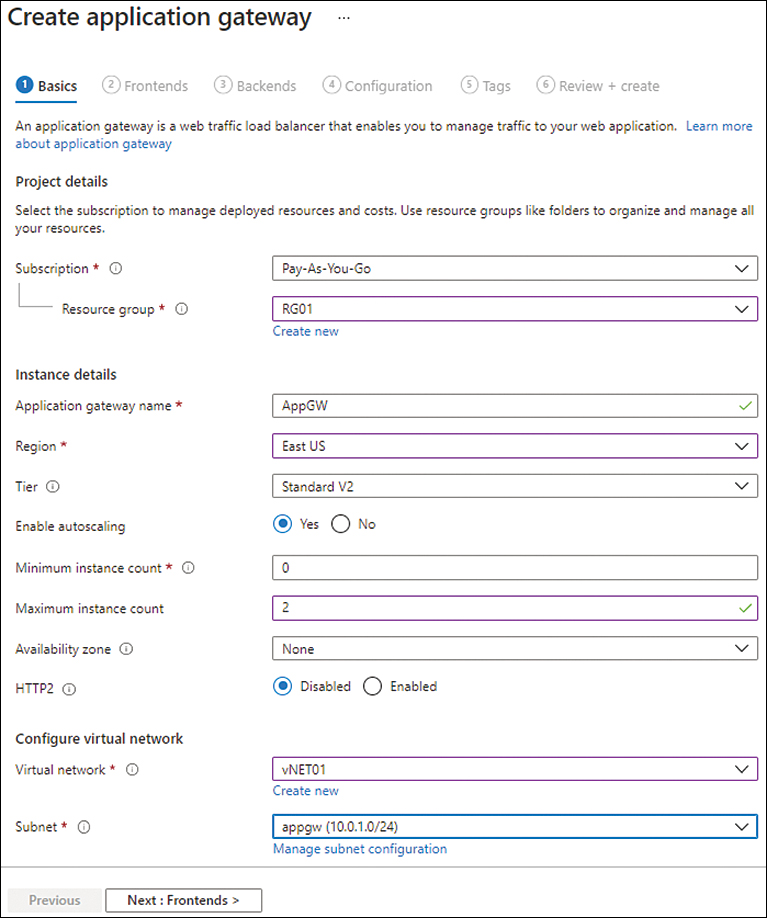
FIGURE 2-5 The Basics tab of the Create Application Gateway wizard.
In the Frontends tab of the Create Application Gateway wizard (see Figure 2-6), for Frontend IP Address Type, select the Public option button.

FIGURE 2-6 The Frontends tab of the Create Application Gateway wizard.
Under the Public IP Address box, click the Add New link.
On the Add a Public IP page, in the Name box, type a name for the public IP address. (See Figure 2-7.) Then click OK.
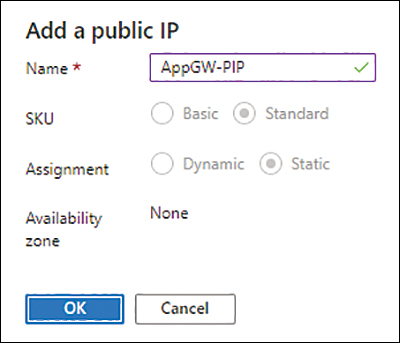
FIGURE 2-7 The Add a Public IP dialog box.
In the Frontends tab of the Create Application Gateway wizard, click Next: Backends.
In the Backends tab of the Create Application Gateway wizard (see Figure 2-8), click the Add a Backend Pool link.
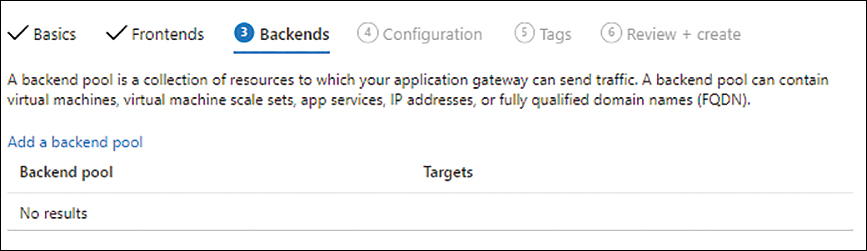
FIGURE 2-8 The Backends tab of the Create Application Gateway wizard.
In the Add a Backend Pool dialog box (see Figure 2-9), enter the following information and click Add:
Name Type a name for the back-end pool.
Add Backend Pool Without Targets Click No.
Target Type Select Virtual Machine.
Target Select one of the VMs you created for this walkthrough.

FIGURE 2-9 The Add a Backend Pool dialog box.
In the Backends tab of the Create Application Gateway wizard (see Figure 2-10), verify that the back-end pool configuration is correct and click Next: Configuration.

FIGURE 2-10 The updated Backends tab of the Create Application Gateway wizard.
In the Configuration tab of the Create Application Gateway wizard (see Figure 2-11), click Add a Routing Rule to create a routing rule for incoming traffic.

FIGURE 2-11 The Configuration tab of the Create Application Gateway wizard.
In the Listener tab of the Add a Routing Rule settings (see Figure 2-12), enter the following information:
Rule Name Type a name for the rule.
Listener Name Type a name for the listener.
Frontend IP Select Public.
Protocol Select the protocol used by your application.
Port Type the port used by your application.
Listener Type Select the Basic option button.
Error Page URL Select the No option button.
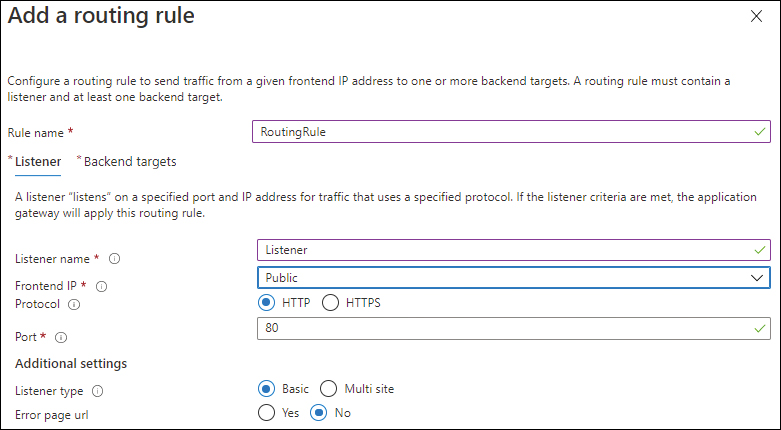
FIGURE 2-12 The Listener tab in the Add a Routing Rule settings.
Click the Backend Targets tab (look ahead to Figure 2-13).
For Target Type, select the Backend Pool option button.
Open the Backend Target drop-down list and select the back-end pool target.
Under HTTP Settings, click the Add New link.
In the Add a HTTP Setting settings (see Figure 2-14), enter the following information and click Add. (Leave the other settings as is.)
HTTP Settings Name Enter a name for the HTTP settings.
Backend Protocol Select the back-end protocol used by the application.
Backend Port Type the back-end port used by your application.
Cookie-Based Affinity Select the Disable option button.
Connection Draining Select the Disable option button.
Request Time-Out (Seconds) Enter a request time-out value (in seconds) that reflects the responsiveness of your application.
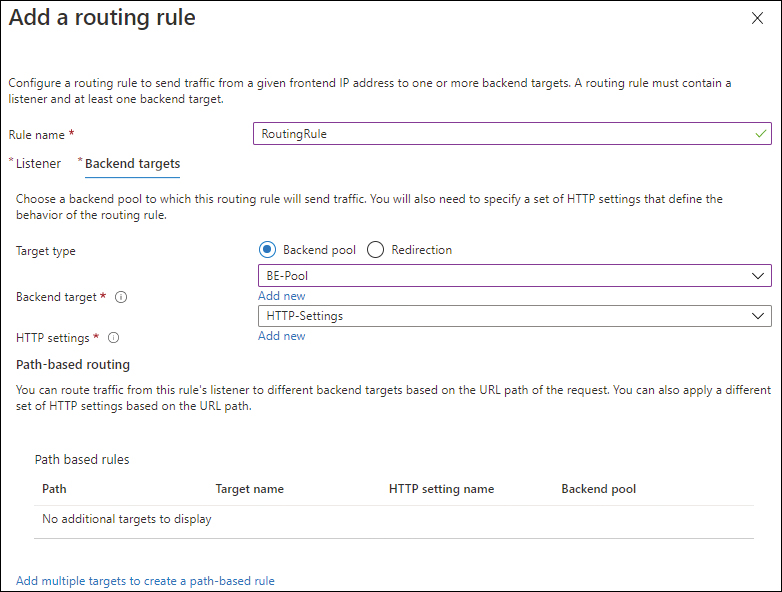
FIGURE 2-13 The Backend Targets tab of the Add a Routing Rule settings.
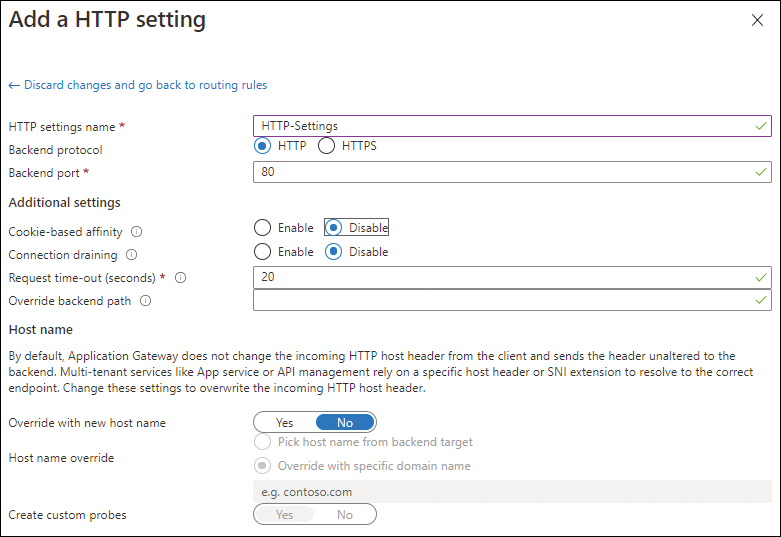
FIGURE 2-14 The Add a HTTP Setting settings.
In the Configurations tab (see Figure 2-15), confirm that the configuration is correct and click Next: Tags.

FIGURE 2-15 The updated Configuration tab of the Create Application Gateway wizard.
In the Tags tab, enter any tags required for the application gateway or leave the fields blank (see Figure 2-16) and click Next: Review + Create.

FIGURE 2-16 The Tags tab of the Create Application Gateway wizard.
On the Review + Create tab (see Figure 2-17), review your settings, and click Create. You can now test whether your application is accessible by accessing the application gateway URL. (The URL will be visible in the application gateway’s Overview tab.)

FIGURE 2-17 The Review + Create tab of the Create Application Gateway wizard in the Azure Portal.
Using Azure PowerShell
You can create an application gateway using Azure PowerShell with the New-AzVirtualNetworkGateway and New-AzVirtualNetworkGatewayConnection commands and various switches to set the application gateway’s parameters. The following code shows you how. Use this snippet to create the same application gateway as you did in the Azure Portal. (Replace all the variables and on-premises firewall configuration as per your environment.) When you do, be sure to either delete the previous application gateway or give this new application gateway a different name:
#Define variables
$agSubnetConfig = New-AzVirtualNetworkSubnetConfig `
  -Name myAGSubnet `
  -AddressPrefix 10.21.0.0/24
$backendSubnetConfig = New-AzVirtualNetworkSubnetConfig `
  -Name myBackendSubnet `
  -AddressPrefix 10.21.1.0/24
New-AzVirtualNetwork `
  -ResourceGroupName myResourceGroupAG `
  -Location eastus `
  -Name myVNet `
  -AddressPrefix 10.21.0.0/16 `
  -Subnet $agSubnetConfig, $backendSubnetConfig
New-AzPublicIpAddress `
  -ResourceGroupName myResourceGroupAG `
  -Location eastus `
  -Name myAGPublicIPAddress `
  -AllocationMethod Static `
  -Sku Standard
#Create IP Config and front-end port
$vnet   = Get-AzVirtualNetwork -ResourceGroupName myResourceGroupAG -Name myVNet
$subnet = Get-AzVirtualNetworkSubnetConfig -VirtualNetwork $vnet -Name myAGSubnet
$pip    = Get-AzPublicIPAddress -ResourceGroupName myResourceGroupAG -Name myAGPublicIPAddress
$gipconfig = New-AzApplicationGatewayIPConfiguration `
  -Name myAGIPConfig `
  -Subnet $subnet
$fipconfig = New-AzApplicationGatewayFrontendIPConfig `
  -Name myAGFrontendIPConfig `
  -PublicIPAddress $pip
$frontendport = New-AzApplicationGatewayFrontendPort `
  -Name myFrontendPort `
  -Port 80
#Create backend pool
$backendPool = New-AzApplicationGatewayBackendAddressPool `
  -Name myAGBackendPool
$poolSettings = New-AzApplicationGatewayBackendHttpSetting `
  -Name myPoolSettings `
  -Port 80 `
  -Protocol Http `
  -CookieBasedAffinity Enabled `
  -RequestTimeout 30
#Create listener and add rule
$defaultlistener = New-AzApplicationGatewayHttpListener `
  -Name myAGListener `
  -Protocol Http `
  -FrontendIPConfiguration $fipconfig `
  -FrontendPort $frontendport
$frontendRule = New-AzApplicationGatewayRequestRoutingRule `
  -Name rule1 `
  -RuleType Basic `
  -HttpListener $defaultlistener `
  -BackendAddressPool $backendPool `
  -BackendHttpSettings $poolSettings
#Create application gateway
$sku = New-AzApplicationGatewaySku `
  -Name Standard_v2 `
  -Tier Standard_v2 `
  -Capacity 2
New-AzApplicationGateway `
  -Name myAppGateway `
  -ResourceGroupName myResourceGroupAG `
  -Location eastus `
  -BackendAddressPools $backendPool `
  -BackendHttpSettingsCollection $poolSettings `
  -FrontendIpConfigurations $fipconfig `
  -GatewayIpConfigurations $gipconfig `
  -FrontendPorts $frontendport `
  -HttpListeners $defaultlistener `
  -RequestRoutingRules $frontendRule `
  -Sku $sku
Using the Azure CLI
You can create an application gateway using the Azure CLI with the az network vnet-gateway create command and various switches to set the application gateway’s parameters. The following Bash script shows you how. Use this snippet to create the same application gateway as you did in the Azure Portal. (Replace all the variables and on-premises firewall configuration as per your environment.) When you do, be sure to either delete the previous application gateway or give this new application gateway a different name:
#Define variables
#Create network
az network vnet create
  --name myVNet
  --resource-group myResourceGroupAG
  --location eastus
  --address-prefix 10.21.0.0/16
  --subnet-name myAGSubnet
  --subnet-prefix 10.21.0.0/24
az network vnet subnet create
  --name myBackendSubnet
  --resource-group myResourceGroupAG
  --vnet-name myVNet
  --address-prefix 10.21.1.0/24
az network public-ip create
  --resource-group myResourceGroupAG
  --name myAGPublicIPAddress
  --allocation-method Static
  --sku Standard
#Create application gateway
address1=$(az network nic show --name myNic1 --resource-group myResourceGroupAG | grep
""privateIpAddress":" | grep -oE '[^ ]+$' | tr -d '",')
address2=$(az network nic show --name myNic2 --resource-group myResourceGroupAG | grep
""privateIpAddress":" | grep -oE '[^ ]+$' | tr -d '",')
az network application-gateway create
  --name myAppGateway
  --location eastus
  --resource-group myResourceGroupAG
  --capacity 2
  --sku Standard_v2
  --public-ip-address myAGPublicIPAddress
  --vnet-name myVNet
  --subnet myAGSubnet
  --servers "$address1" "$address2"
Best practices
Following are some recommended practices for deploying and managing your application gateway environment. These practices can help you make the most of your investment in this service:
Monitor and plan instance count to avoid resource crunch Azure Application Gateway v2 supports auto-scaling, but if you are using Azure Application Gateway v1, you will have to scale manually. The v1 SKU supports scaling up to 32 instances. To identify the right instance count, monitor CPU utilization for the application gateway for at least a month and identify the peak CPU usage. Then add a buffer of 15% to 20% to handle unexpected spikes and growth. Finally, select your instance count based on this sizing.
Upgrade to the v2 SKU as soon as possible As mentioned, Azure Application gateway v1 supports manual scaling only—which is not the most efficient or cost-effective way to manage your gateway instances. In addition to auto-scaling, the v2 SKU offers other performance benefits, including SSL/TLS offloading, improved deployment performance, zone redundancy, and many others. You should upgrade to the v2 SKU as soon as you can so you can benefit from all these (and other) features.
Set the maximum instance count in the v2 SKU Because the v2 SKU supports auto-scaling, and because charges are levied based on how many units are used, it is important to consider budgetary requirements when setting the maximum instance count. The v2 SKU supports a maximum of 125 instances—which means unplanned spikes can result in more instances being activated than are budgeted for.
Size the gateway subnet for future growth Size the subnet in which you plan to host application gateway instances to take into account future scalability requirements. Changes to the subnet configuration are not currently supported and require a redeployment of the service, resulting in possible disruption.
Set the minimum instance count for v2 SKU Bringing additional instances online to accept traffic when auto-scaling does take some time—usually between six and seven minutes. Any unexpected spikes during this period can result in traffic drops or higher response latency. You should monitor CPU usage for at least a month to identify the minimum instances required, and maintain a buffer of 15% to 20% to allow for unexpected spikes.
Monitoring and alerting Set up alerts for different gateway metrics to monitor CPU usage, instance scaling, and network utilization so you can be notified of any anomalies that might cause potential outages. Examples of alerts could include average CPU usage spiking by 75% to 80% for a sustained period of time, too many failed requests, gateway not responding, logs containing numerous 4xx or 5xx errors (indicating response issues), and too many unhealthy back-end hosts.
Set up geo-filtering to block unwanted countries/regions The v2 SKU supports geo-filtering, which enables you to allow or block traffic from specific countries or regions. It is a good practice to use this feature to prevent (or allow) traffic from certain locales to connect to your web applications to reduce your attack surface.
Set up bot protection to prevent attacks The v2 SKU has a feature to prevent traffic from known bot networks. Enable this feature to intercept known malicious traffic before it reaches your web applications.
Set up diagnostics logging and long-term retention Collect firewall, performance, and access logs for your application gateway instances and save them in Azure storage, Log Analytics, or an event stream. These logs can help you identify potential issues and take proactive action. Set up retention policies based on historical data storage comparison and compliance requirements for your organization.
Set up the latest TLS policy version for extra security Use the latest TLS policy version (currently AppGwSslPolicy20170401S) to enforce TLS 1.2 and stronger ciphers.