
Chapter 8
Azure Front Door
Overview
Azure Front Door is a fully managed scalable global service that provides a secure front end for any web application. It uses Microsoft’s global edge network to improve speed of access and to provide better security and enhanced scalability for consumer-facing or internal web applications.
Organizations that have a global audience for their web applications can benefit from the proximity of the web application to the end user’s region. To provide such an audience with a consistent experience, organizations can use content delivery networks (CDNs). The Azure Front Door service provides CDN capabilities along with security and routing features that are part of a Web Application Firewall (WAF) and Azure Traffic Manager services.
The Front Door service works on layer 7 (the application layer) of the OSI model. It uses the anycast protocol with split TCP; this provides the traditional CDN as well as security features such as distributed denial-of-service (DDoS) protection. The Front Door service’s traffic-routing functionality provides global load balancing and automated failover capabilities to any public-facing services hosted in or external to Azure. Regional failure-handling capabilities are built into the service, ensuring it remains online in disaster scenarios.
Key features
Azure Front Door service provides a number of key features and benefits:
Improved application performance The Front Door service accelerates application performance using the split TCP–based anycast protocol.
Global scalability The Front Door service provides global scalability for web applications to allow access by users via edge locations closest to them.
Intelligent traffic routing The Front Door service can perform intelligent traffic routing to back-end services hosted inside or outside of Azure. Different routing algorithms support complex routing requirements.
Monitoring and automated failover Front Door provides health probes to monitor back-end resources and trigger automated failover actions.
WAF features The Front Door service provides all the features provided by WAF, such as URL-based routing, URL rewrites, session affinity, SSL offloading, custom domain and certificate management, and application security.
Multiple website hosting The Front Door service supports multiple websites at the same time, allowing for efficient use of the application infrastructure.
Native support for advanced features The Front Door service natively supports dynamic site acceleration (DSA), TLS/SSL offloading, end-to-end IPv6 connectivity, and the HTTP/2 protocol.
Figure 8-1 shows how the Front Door service can support different scenarios, including the following:
Failover between Azure regions
Traffic routing–based URL paths
Different back-end host types
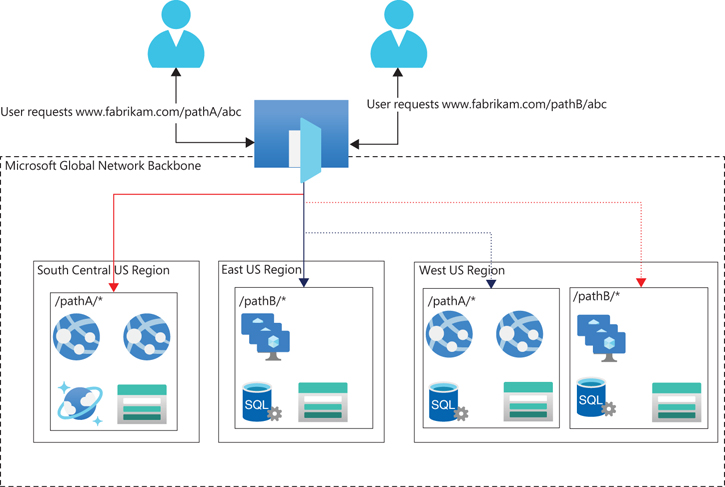
FIGURE 8-1 Azure Front Door service.
Design concepts and deployment considerations
Azure Front Door service provides different components and features that can be applied in combination to make full use of the service’s CDN, WAF, and other security features. Before incorporating these features into your design, it helps to understand them in more detail so you can identify how best to apply them in any given environment to meet your organization’s application, security, and compliance needs. The following sections review various components and features of Azure Front Door service.
Back ends
Back ends are web-based applications deployed inside or outside of Azure. Back end refers to the server or service hosting the application front end. Front Door service supports applications hosted on any on-premises infrastructure or hosting or cloud infrastructure provider. Back ends can be referenced using their host name or public IP address.
Front Door service supports a variety of Azure services for use as back ends, including the following:
App Service
Cloud Service
Azure Storage
Public IP address
For any other Azure or non-Azure services, custom hosts can be defined.
A back end can contain multiple instances of the same web application hosted in the same or different Azure regions or in a hybrid setup. You can assign priorities and weight to the different back-end endpoints to define which ones should be used as the primary endpoints and which should be used as backup.
Back-end pools
Multiple back-end endpoints can be combined into a back-end pool, which receives traffic for the web application. These endpoints can serve a web application hosted in the same or different Azure regions or in a hybrid setup between on-premises, Azure, and other cloud-hosting services.
A back-end pool in the Front Door service describes the set of back ends that receive similar traffic for an app. In other words, it's a logical grouping of app instances across the world that receive the same traffic and respond with expected behavior. These back ends are deployed across different regions or within the same region. All back ends can be in Active/Active Deployment mode or in Active/Passive configuration.
Health probes
The Front Door service can monitor the health of back-end endpoints using health probes. Health probes help the Front Door service identify the back ends that are currently available to handle incoming client requests. A health probe is a synthetic request from the Front Door service to each of the back ends over HTTP/HTTPS, defined during the configuration phase. The response from the endpoints helps the Front Door service determine the best back end to route the incoming traffic.
The service takes into account different parameters to determine the back end that is best-suited for a given request. This includes the following:
Identifying enabled endpoints and ignoring disabled ones
Identifying endpoints that have no existing health probe errors and ignoring endpoints that do
Accounting for the latency for each healthy back end in its calculations
Load balancing
The back-end pool holds the configuration for a web application’s load-balancing policies. These settings define how the health probe responses are evaluated to determine whether a back end is healthy or not, based on the following parameters:
Sample size This establishes how many samples of health probes should be considered for health evaluation.
Successful sample size This defines how many successful samples out of the collected samples based on the sample size qualify an endpoint to be deemed healthy.
Latency sensitivity This defines how the endpoints’ latency will be considered when making routing decisions.
Traffic routing
The Front Door service supports different traffic-routing algorithms that define how to identify the most appropriate back-end endpoint for incoming application traffic. When the Front Door service receives HTTP/HTTPS traffic matching a host header, the traffic-routing algorithm helps identify the most appropriate back-end endpoint to connect to based on the active endpoints associated with it. All methods support automated monitoring and failover to active endpoints, but the basis of endpoint selection changes for each.
The four different traffic routing methods are as follows:
Latency-based routing This method identifies the endpoint with the least latency to the end user and routes traffic to that endpoint if it is available for use.
Priority-based routing This method identifies the primary endpoint that should receive application traffic and backup endpoints in case the primary is offline.
Weight-based routing This method identifies the different weights for each endpoint for traffic distribution. Traffic is evenly distributed among all endpoints that share the highest weight. If those back ends are unavailable, traffic is automatically routed to the next set of endpoints. Based on the acceptable latency range defined for the pool, traffic is evenly distributed when the endpoint is deemed to be within acceptable limits.
Session affinity This method ensures that incoming client requests from the same end client are sent to the same back-end instance. This is useful for applications that require session affinity to function correctly.
URL rewrite
URL rewrite enables you to set up custom forwarding rules when constructing the URL request to route the request to the back end. This helps in scenarios in which traffic must be routed to a custom path for specific incoming requests due to page changes or masking.
In the example shown in Figure 8-2, a request to /path1 is forwarded to the custom path /path2 with a wildcard at the end to denote that it applies to all segments below that path. This results in all incoming requests for path1 being redirected to path2.
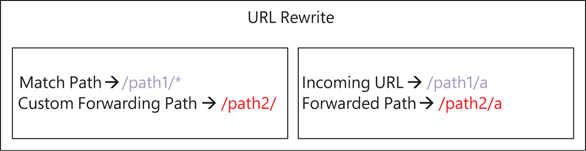
FIGURE 8-2 Set up URL rewrite.
URL redirect
The Front Door service supports URL redirect. This allows rules to be defined for traffic redirection based on protocol, app hostname, app path, and query string. Because this redirection is granular and works even on the path level, it can be configured for individual microservices as well as global redirections, thereby optimizing service usage.
Figure 8-3 shows the parameters in the Azure Portal for URL redirection. These include the following settings:
Route Type Set this to Redirect to make the redirection configuration options available.
Redirect Type This indicates the purpose of the redirect, which helps end clients correctly interpret the response from the service.
Redirect Protocol This indicates whether traffic is to be allowed only over HTTP or HTTPS or retained as is.
Destination host Destination host indicates whether the traffic must be redirected to a different hostname instead of the one indicated in the incoming request. This can help to redirect traffic to internal URLs. For example, traffic for https://www.fabrikam.com/* can be set to redirect to https://www.contoso.com/*.
Destination Path Set this to Replace if the path segment of a URL must be replaced with a different path. For example, traffic to https://www.fabrikam.com/* can be set to redirect to https://www.fabrikam.com/redirected-path.
Query String Set this to Replace to replace query string parameters in the redirected URL.
Destination Fragment This indicates a fragment of a URL to redirect to. This fragment is part of the URL after # character that helps a browser land on a specific section of a web page. You can use this setting to set up the redirected URL to use destination fragments.

FIGURE 8-3 Set up URL redirect.
Wildcard domains
The Front Door service supports the use of wildcard domains for mapping front-end endpoints in a profile. Using wildcard domains provides multiple benefits, such as the following:
It reduces the need to set up individual child domains in the Front Door service profile and facilitates HTTPS certificate binding for each domain.
You can simplify traffic-routing behavior for multiple subdomains using a single routing rule. For example, a single rule for *.domain.com can be used to define routing policies for subdomain1.domain.com, subdomain2.domain.com, subdomain3.domain.com, and so on.
You can easily bring new subdomains online without requiring changes to the Front Door service configuration. Policies that have already been defined are automatically applied to the new subdomain.
Rules Engine
The Rules Engines provided with the Front Door service give you the ability to define rules and control how incoming HTTP and HTTPS requests are handled at the edge. You can use this feature to address various requirements such as the following:
Enforce HTTP-to-HTTPS redirection so that all end-user traffic occurs only over a secure connection.
Prevent exploitation of browser-based vulnerabilities in HTTP Strict-Transport-Security (HSTS), X-XSS-Protection, Content-Security-Policy, X-Frame-Options, and Access-Control-Allow-Origin headers for Cross-Origin Resource Sharing (CORS) scenarios. You can also define security-based attributes with cookies.
Route requests to mobile or desktop versions of the application based on patterns in request header contents, cookies, or query strings.
Use redirect capabilities to return 301, 302, 307, and 308 redirects to the client to direct to new hostnames, paths, or protocols.
Dynamically modify the caching configuration of your route based on incoming requests.
Rewrite the request URL path and forward the request to the appropriate back end in your configured back-end pool.
Caching
The Front Door service has caching capabilities similar to those provided by CDNs, except the Front Door service also provides dynamic site acceleration and load-balancing features. The caching functionality helps to reduce the load on the back ends—for example, due to high demand for the service or to traffic generated by a DDoS attack. In these cases, caching results in the Front Door service edge nodes responding to client requests to prevent the attack or to prevent the requests from reaching the back-end nodes.
Cache-related features available in the Front Door service include the following:
Support for large file chunking The Front Door service can cache and deliver large files by splitting them into smaller (8 MB) chunks during ingestion from the back end. As one chunk is cached and delivered to the user, the Front Door service immediately initiates the retrieval of the next chunk. That way, it is available for delivery when the delivery of the previous chunk is complete. This continues until either the entire file is delivered or the client connection is terminated.
Dynamic content compression The Front Door service supports dynamic content compression on edge nodes to reduce file sizes. This results in faster delivery to end clients. Content must be of specific supported MIME types for compression to work, and the file sizes currently supported range from 1 KB to 8 MB. Compression is carried out using either Brotli- or gzip-based compression methods, with Brotli preferred over gzip if both are supported.
Query string behavior The Front Door service can manage caching behavior based on the query string contained in a web request. A query string is the section of the web request that comes after the question mark (?) in the request string. Management options are as follows:
Ignore query strings This ensures that the Front Door service passes any query strings in an initial request to the back end and caches the content that is retrieved. In subsequent requests, the query string is ignored, and cached content is returned to the requestor until that content expires.
Cache every unique URL In this case, the Front Door service caches the content associated with every unique URL—including the query string. All content is retained in cache and returned when requested until expiry.
Purging the cache Any files cached on the Front Door service edge nodes have an associated time-to-live (TTL) value. This value indicates when the file expires, after which the Front Door service removes it from its cache. If the Front Door service receives any subsequent requests for that file or content, it will retrieve it again from the back end and cache it with a new TTL value. Depending on the content served and the frequency of refresh required, files or content can be published with version numbers and as new URLs to force updates at the time of the next request. You can purge all cached content as well, if you have a need to do so.
Cache expiration You can set the expiration period for cached files using the response headers for a request. Specifically, you can set Cache-Control response headers to indicate how long the content should be stored in the cache. If this header is missing, the content is randomly cached between 1 to 3 days.
Request headers When caching is enabled, there are two request headers—Content-Length and Transfer-Encoding—that are not forwarded to a back-end node.
Cache duration This is the minimum amount of time content will be kept in cache. This can be set using Front Door Designer or a Rules Engine. If you set the cache duration using Front Door Designer, the minimum cache duration is defined on the global level. Unless a cache control header contains a higher cache duration, this will be the minimum TTL value. However, if you set the cache duration using the Rules Engine, that is accepted as the true cache value, regardless of it being higher or lower than the value in a cache control header.
Network and security
The Front Door service has a number of built-in security features as well as integrations with other Azure services to provide high levels of security and prevent large-scale DDoS attacks that can disrupt applications. Some of these features are unique to the Front Door service, while others overlap with services such as WAF. The following sections discuss these security features in more detail.
Azure DDoS Protection Basic
The Front Door service is integrated with Azure DDoS Protection Basic by default, meaning the service is automatically protected from commonly occurring DDoS attacks such as layer 3 and layer 4 attacks on public endpoints with high traffic volume and layer 7 attacks that involve overloading DNS with massive numbers of queries. Microsoft uses Azure Front Door to protect several of their public-facing consumer services, such as Office365, Dynamics365, and so on, proving the strength of this service against such attacks.
Protection against unwanted protocols
The Front Door service accepts traffic only on HTTP and HTTPS for requests with known host headers. This helps prevent a number of known DDoS attack types, such as DNS amplification attacks, TCP poisoning attacks, and volumetric attacks. Because this is a built-in feature of the Front Door service, no additional configuration is required to achieve this level of security.
Handling large volumes of traffic
As mentioned, Microsoft uses the Front Door service for its consumer-facing cloud services, which handle traffic from millions of clients globally. The global scaling, caching, and security capabilities built into the Front Door service help it handle large volumes of traffic and attacks without issues.
WAF security features
The Front Door service has a number of security features that overlap with the Azure WAF service. These provide a number of key benefits, such as the following:
You can filter or redirect traffic based on the source geographic region using geo-filtering. This helps restrict traffic from unwanted locales to the application.
You can prevent known malicious public IP addresses and IP ranges from connecting.
You can define rule sets to protect against common and known attack vectors.
You can prevent DDoS attacks by applying rate limits to the number of connections allowed from each IP address.
Front Door service walkthrough
The following sections walk you through the process of setting up a Front Door service using the Azure Portal, Azure PowerShell, and the Azure CLI. If you are following along, provision two web apps in the Azure environment, to be used during the setup process.
Using the Azure Portal
To set up Front Door using the Azure Portal, follow these steps:
Log in to the Azure Portal, type Front Door in the search box to locate the service, and select it from the list that appears. (See Figure 8-4.)

FIGURE 8-4 Searching for the Front Door service.
Click the Create or Create Front Door button to start the Create a Front Door wizard. (See Figure 8-5.)

FIGURE 8-5 Click Create Front Door.
In the Basics tab of the Create a Front Door wizard (see Figure 8-6), enter the following information and click Next:
Subscription Select the subscription to host the Front Door service.
Resource Group Select the resource group you want to host the Front Door service. Alternatively, click the Create New link and follow the prompts to create a new resource group.
Resource Group Location This box is automatically populated based on the resource group you select.

FIGURE 8-6 The Basics tab of the Create a Front Door wizard.
In the Configuration tab of the Create a Front Door wizard (see Figure 8-7), under Frontend/Domains, click the Add a Frontend Host button (marked with a plus sign).

FIGURE 8-7 The Configuration tab of the Create a Front Door wizard.
In the Add a Frontend Host settings (see Figure 8-8), enter the following information and click Add:
Host Name Type a unique host name for the front-end host.
Session Affinity Status Specify whether session affinity should be enabled or disabled.
Web Application Firewall Status Specify whether WAF should be enabled or disabled.

FIGURE 8-8 Add a frontend host.
In the Configuration pane of the Create a Front Door wizard (see Figure 8-9), under Backend Pools, click the Add a Backend Pool button (marked with a plus sign).

FIGURE 8-9 Add a backend pool.
In the Add a Backend Pool settings, in the Name box, type a unique name for the back-end pool. (See Figure 8-10.)

FIGURE 8-10 Add a backend pool.
Click the Add a Backend link.
In the Add a Backend settings (see Figure 8-11), enter the following information and click Add:
Backend Host Type Select Custom Host to set up web applications hosted outside Azure as back-end hosts.
Backend Host Name Enter the host name associated with the back-end host. (I typed mbsp-webapp-01.azurewebsites.net.)
Backend Host Header Enter the host header associated with the back-end host. (Again, I typed mbsp-webapp-01.azurewebsites.net.)
HTTP Port Enter the HTTP port associated with the back-end host—here, 80.
HTTPS Port Enter the HTTPS port associated with the back-end host—in this case, 443.
Priority Enter the priority for this back-end host. (I entered 1.)
Weight Assign a weight to this back-end host. (I entered 50.)
Status Specify whether the host is enabled or disabled—in this case, Enabled.

FIGURE 8-11 Set up the backend host.
Repeat steps 8 and 9 to add another custom back-end host, named mbsp-webapp-02.azurewebsites.net. Figure 8-12 shows the result.
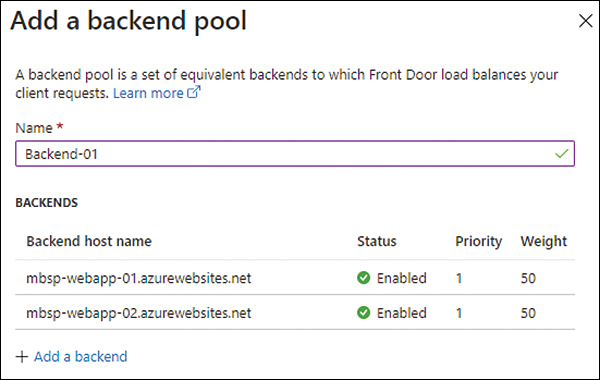
FIGURE 8-12 Summary of backend pools.
Let’s create a health probe for the back-end pool. In the Add a Backend Pool settings, under Health Probes (see Figure 8-13), enter the following information:
Path Enter the path you want the health probe to check.
Protocol Choose either HTTP or HTTPS based on your application setup.
Probe Method Choose either HEAD or GET.
Interval (Seconds) Specify how frequently, in seconds, you want the probe to perform health checks. The default is set to 30 (seconds).

FIGURE 8-13 Create a health probe.
Next, enter the load-balancing settings. In the Add a Backend Pool settings, under Load Balancing (see Figure 8-14), enter the following information. Then click Add:
Sample Size Set the sample size to take into consideration—for example, 4.
Successful Samples Required Set the minimum successful samples required to consider a host to be healthy—in this case, 2.
Latency Sensitivity Set the expected latency for a response from a healthy endpoint—here, 0.

FIGURE 8-14 Set up load balancing.
In the Configuration pane of the Create a Front Door wizard (see Figure 8-15), under Routing Rules, click the Add a Rule button (marked with a plus sign).

FIGURE 8-15 Set up routing rules.
In the Add a Rule settings (see Figure 8-20), enter the following information:
Name Enter a unique name for the routing rule that reflects the rule’s purpose. I typed ForwardingRule.
Accepted Protocol Select the protocol the rule will support, especially if you want to enforce the use of HTTP/HTTPS. I chose HTTPS Only.
Frontends/Domains Specify the front ends or domains you want to associate with the rule. In this case, choose the front end you created earlier (Frontend-MBPS-01.azurefd.net).

FIGURE 8-16 Adding a routing rule.
In the Add a Rule settings, under Patterns to Match (look ahead to Figure 8-17), enter the pattern that incoming requests must match to trigger the rule—in this case, /path.
In the Add a Rule settings, under Route Details (see Figure 8-17), enter the following information. Then click Next:
Route Type Specify the route type—in this example, Forward.
Backend pool Select the back-end pool to associate the rule with—here, Backend-01.
Forwarding Protocol Select the protocol to use when forwarding the request to the back-end pool. I chose HTTPS Only.
URL Rewrite Specify whether URL rewrite should be enabled or disabled. I chose Disabled.
Caching Specify whether caching should be enabled or disabled. I chose Disabled.

FIGURE 8-17 Set up a routing rule.
In the Tags tab, enter any tags required for the Front Door service or leave the fields blank (see Figure 8-18). Then click Next.
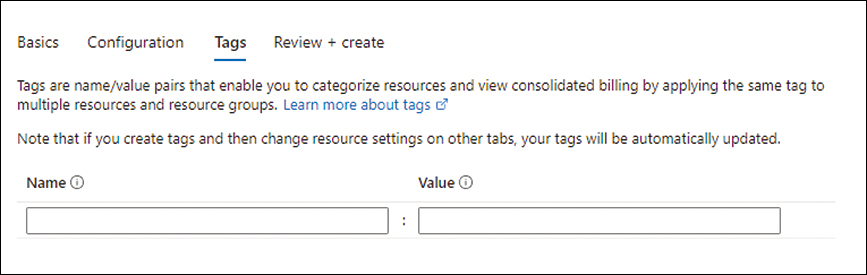
FIGURE 8-18 The Tags tab of the Create a Front Door wizard.
In the Review + Create tab of the Create a Front Door wizard (see Figure 8-19), review your settings and click Create.
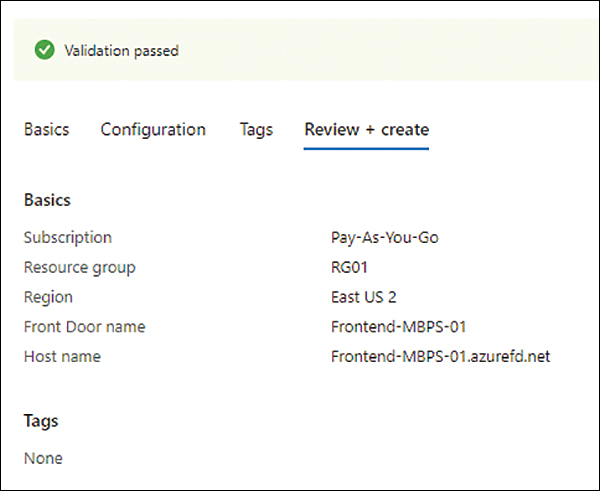
FIGURE 8-19 The Review + Create tab of the Create a Front Door wizard.
Using Azure PowerShell
You can create a Front Door service using Azure PowerShell with the New-AzFrontDoor command and various switches to set its parameters. The following code shows you how. Use this snippet to create the same Front Door service as you did in the Azure Portal. Be sure you delete the service you created earlier or modify its variables as appropriate before you use the following code before testing:
#Define required variables
$Azureregion1="EastUS2"
$Azureregion2="EastUS"
$RG="RG01"
$AppServicePlan01="MBSP-ASP-01"
$AppServicePlan02="MBSP-ASP-02"
$frontend="MBSP-Frontend-01"
$BackendPool="MBSP-Backendpool-01"
$frontdoorname="MBSP-Frontdoor-01"
# Create first web app in East US 2 region.
$app01 = New-AzWebApp -Name "WebApp-MBSP-01" `
-Location $azureregion1 `
-ResourceGroupName $RG `
-AppServicePlan $AppServicePlan01
# Create second web app in East US region.
$app02 = New-AzWebApp -Name "WebApp-MBSP-02" `
-Location $azureregion2 `
-ResourceGroupName $RG `
-AppServicePlan $AppServicePlan02
#Create the front-end object
$FrontendObject01 = New-AzFrontDoorFrontendEndpointObject -Name $frontend -HostName
$frontdoorname".azurefd.net"
# Create back-end objects that point to the hostname of the web apps
$backend01 = New-AzFrontDoorBackendObject -Address $app01.DefaultHostName
$backend02 = New-AzFrontDoorBackendObject -Address $app02.DefaultHostName
# Create a health probe
$HealthProbe = New-AzFrontDoorHealthProbeSettingObject -Name "HealthProbe"
# Create load balancing settings
$LoadBalancing = New-AzFrontDoorLoadBalancingSettingObject -Name "Loadbalancing" `
-SampleSize "4" `
-SuccessfulSamplesRequired "2" `
-AdditionalLatencyInMilliseconds "0"
# Create a back-end pool
$BackendPool01 = New-AzFrontDoorBackendPoolObject -Name "$BackendPool" `
-FrontDoorName $frontdoorname `
-ResourceGroupName $RG `
-Backend $backend01,$backend02 `
-HealthProbeSettingsName "HealthProbe" `
-LoadBalancingSettingsName "Loadbalancing"
# Create Routing rule connecting the front end to the back-end pool
$RoutingRule = New-AzFrontDoorRoutingRuleObject `
-Name RoutingRule `
-FrontDoorName $frontdoorname `
-ResourceGroupName $RG `
-FrontendEndpointName $frontend `
-BackendPoolName $BackendPool `
-PatternToMatch "/*"
# Creates Azure Front Door
New-AzFrontDoor `
-Name $frontdoorname `
-ResourceGroupName $RG `
-RoutingRule $RoutingRule `
-BackendPool $BackendPool01 `
-FrontendEndpoint $FrontendObject01 `
-LoadBalancingSetting $LoadBalancing `
-HealthProbeSetting $HealthProbe
Using the Azure CLI
You can create a Front Door service using the Azure CLI with the az network front-door create command and various switches to set its parameters. The preceding Front Door configuration can be created using the following PowerShell script in Azure CLI. The following code shows you how. Use this snippet to create the same Front Door service as you did earlier. Be sure you delete the service you created earlier or modify its variables as appropriate before you use this code before testing:
#Define required variables
azureregion1="EastUS2"
azureregion2="EastUS"
rg="RG01"
appserviceplan01="MBSP-ASP-01"
appserviceplan02="MBSP-ASP-02"
frontend="MBSP-Frontend-01"
backendpool="MBSP-Backendpool-01"
frontdoorname="MBSP-Frontdoor-01"
app01="WebApp-MBSP-01"
app01="WebApp-MBSP-02"
#Create test app service plans and webapps in different regions
az appservice plan create
--name $appserviceplan01
--resource-group $rg
--location $azureregion1
az appservice plan create
--name $appserviceplan02
--resource-group $rg
--location $azureregion2
az webapp create
--name MBSP-WebApp-03
--resource-group $rg
--plan $appserviceplan01
az webapp create
--name MBSP-WebApp-04
--resource-group $rg
--plan $appserviceplan02
#Create Azure Front Door Service
az network front-door create --backend-address $app01.azurewebsites.net
                                                     --name $frontdoorname
                                                     --resource-group $rg
#Create Front Door Health Probe
az network front-door probe create --front-door-name  $frontdoorname
                                                     --interval 30
                                                     --name "Healthprobe"
                                                     --resource-group $rg
                                                     --path "/"
#Create Load Balancing Rule
az network front-door load-balancing create --resource-group $rg
                                                     --front-door-name $frontdoorname
                                                     --name "LoadBalancingSetting"
                                                     --sample-size 4
                                                     --successful-samples-required 2
                                                     --additional-latency 0
#Create Back-end Pool
az network front-door backend-pool create --address $app01.azurewebsites.net
                                                     --front-door-name $frontdoorname
                                                     --load-balancing "LoadBalancing
                                                       Setting"
                                                     --name $backendpool
                                                     --probe "HealthProbe"
                                                     --resource-group $rg
az network front-door backend-pool backend add --resource-group $rg
                                                     --front-door-name $frontdoorname
                                                     --pool-name $backendpool
                                                     --address $app02.azurewebsites.net
                                                     --disabled false
#Create Routing Rule
az network front-door routing-rule create --front-door-name  $frontdoorname
                                                     --frontend-endpoints  $frontend
                                                     --name RoutingRule
                                                     --resource-group $rg
                                                     --route-type Forward
                                                     --backend-pool $backendpool
                                                      --accepted-protocols "HTTPSOnly"
Best practices
Following are some best practices associated with the Azure Front Door service:
Use Azure Monitor to monitor and alert You can integrate the Azure Front Door service with Azure Monitor to monitor key Front Door metrics. These include Front Door performance counters such as the following:
RequestCount
RequestSize
ResponseSize
TotalLatency
BackendRequestCount
BackendRequestLatency
BackendHealthPercentage
WebApplicationFirewallRequestCount
Use activity and diagnostic logs You can use activity logs to identify, monitor, and alert on any administrative actions performed on the Front Door service. You can use diagnostic logs to monitor, analyze, and alert on operations performed by the Front Door service.
Use geo-filtering when applicable With geo-filtering, you can allow traffic only from specified regions or block traffic from unwanted regions. If applicable, use geo-filtering for a client environment based on its location and on the countries from which you expect it to be used to limit the application’s attack surface.
Use virtual network service tags Virtual network service tags define network access controls on network security groups (NSGs) applied to back-end resources. It’s easier to use, manage, and maintain these service tags than to use specific IP addresses in security rules.
Restrict administrative access You can use Azure role-based access control (RBAC) to restrict access to the Front Door service only to required administrative accounts. Ensure that this access is restricted as needed and reviewed on a regular basis to prevent unwanted access as early as possible.
Encrypt sensitive information in transit The Front Door service supports TLS and HTTPS protocols for communication between services and back ends. Use encryption where possible to limit the risk of traffic snooping on that environment.
Use Azure Policy to restrict Azure service usage Azure Policy helps audit and restrict the usage of Azure services in an environment. Use Azure Policy to restrict the deployment of the Front Door service only to required administrators. You can use Azure Monitor to trigger alerts when a deviation is detected.
Enable network traffic logging You can set up network flow logs to monitor network traffic passing through the Front Door service. You can retain these logs in an Azure storage account based on the organization’s long-term retention and auditing requirements.
Restrict access to back ends only via Front Door You can set up back-end resources to accept traffic only from the Front Door service, thereby limiting the attack surface on these services. You can also set up rules on back-end services to monitor for the X-Azure-FDID header value in incoming traffic to identify traffic originating from the Front Door service.
Use HTTPS as the forwarding protocol Connections between the Front Door service and the back end happen over public IP. Therefore, it’s a good idea to configure the Front Door service to use HTTPS only to forward traffic to back ends. This will restrict malicious activity if traffic is intercepted.