In this chapter, you will learn how to set up pooled and personal session hosts; set up host pools using the Azure portal, PowerShell, Azure CLI, Azure Resource Manager (ARM) templates; and configure host pool settings such as USB redirect and audio redirect. Also, you will learn about the recommended process to assign users to host pools, including pooled and personal desktops.
Finally, you will look at OS patching options and recommendations and how to apply security and compliance settings on the session host.
Let’s get started with pooled and personal host pool/session host creation.
Create a Host Pool by Using the Azure Portal
Host pool: A host pool is a collection of Azure virtual machines (VMs) that act as session hosts for AVD. Users obtain access to host pools by being allocated to a host pool via an assigned application group.
Pooled: You can configure a pooled host pool where several users sign in and share a VM. Typically, none of those users would be a local administrator on the pooled VM. With pooled VMs, you can use one of the recommended images that includes a Windows 10 Enterprise multisession. This operating system is exclusive to AVD. You can also create/use your own custom image.
Personal: A personal host pool is where each user has their own dedicated VM. Those users would typically be local administrators for the VM. This enables the user to install or uninstall apps without impacting other users.
Let’s see how you can create both host pool types from the Azure portal.
Personal Host Pool Creation Using the Azure Portal
A personal virtual desktop is a virtual machine hosted on a Remote Desktop virtualization host and assigned to a dedicated user. A personal virtual desktop is one VM per user assignment and retains all changes made by the user. The Remote Desktop (RD) Connection Broker Manager can be used to assign an unassigned virtual machine to a new user. The assignment is stored in Active Directory (AD) and stays intact even after the user logs off from the personal virtual desktop. An administrator can reassign a personal virtual desktop or make changes to the assignment through the RD Connection Broker Manager.
- 1.
Log in to portal.Azure.com with an appropriate account. The login account should have contributor or an equivalent permission so that you can create virtual desktop resources in Azure.
- 2.
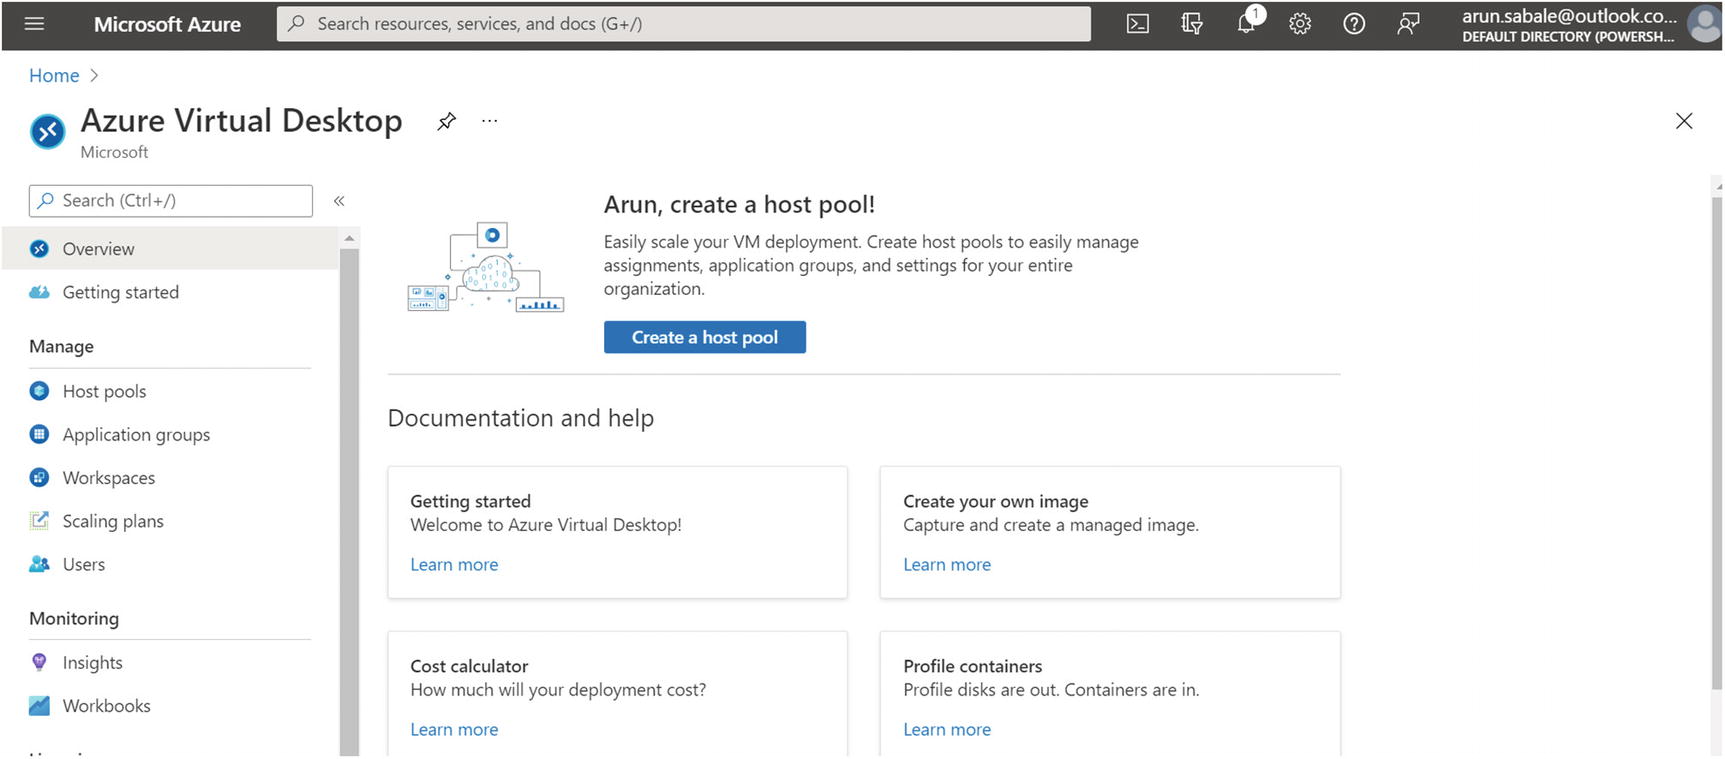
Use the top search box to navigate to Azure Virtual Desktop.
- 3.
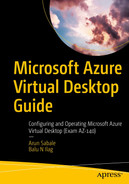
On the Azure Virtual Desktop page, click the “Create a host pool” button to get started. See Figure 8-1.

Azure Virtual DesktopHost pool creation
- 4.
On the Basic tab you will enter common details such as a resource group, a host pool name, and the location. Set the host pool type to Personal and the assignment type to Automatic/Direct based on your requirements.
Automatic assignment : You must assign the user to the personal desktop host pool, and this option will assign the next available VM automatically to a new user at the first login. The assignment will be permanent after the first login.
Direct assignment : When you use direct assignment, you must assign the user to both the personal desktop host pool and a specific session host before they can connect to their personal desktop.
Click the Next button and go to the Virtual Machines tab. See Figure 8-2.
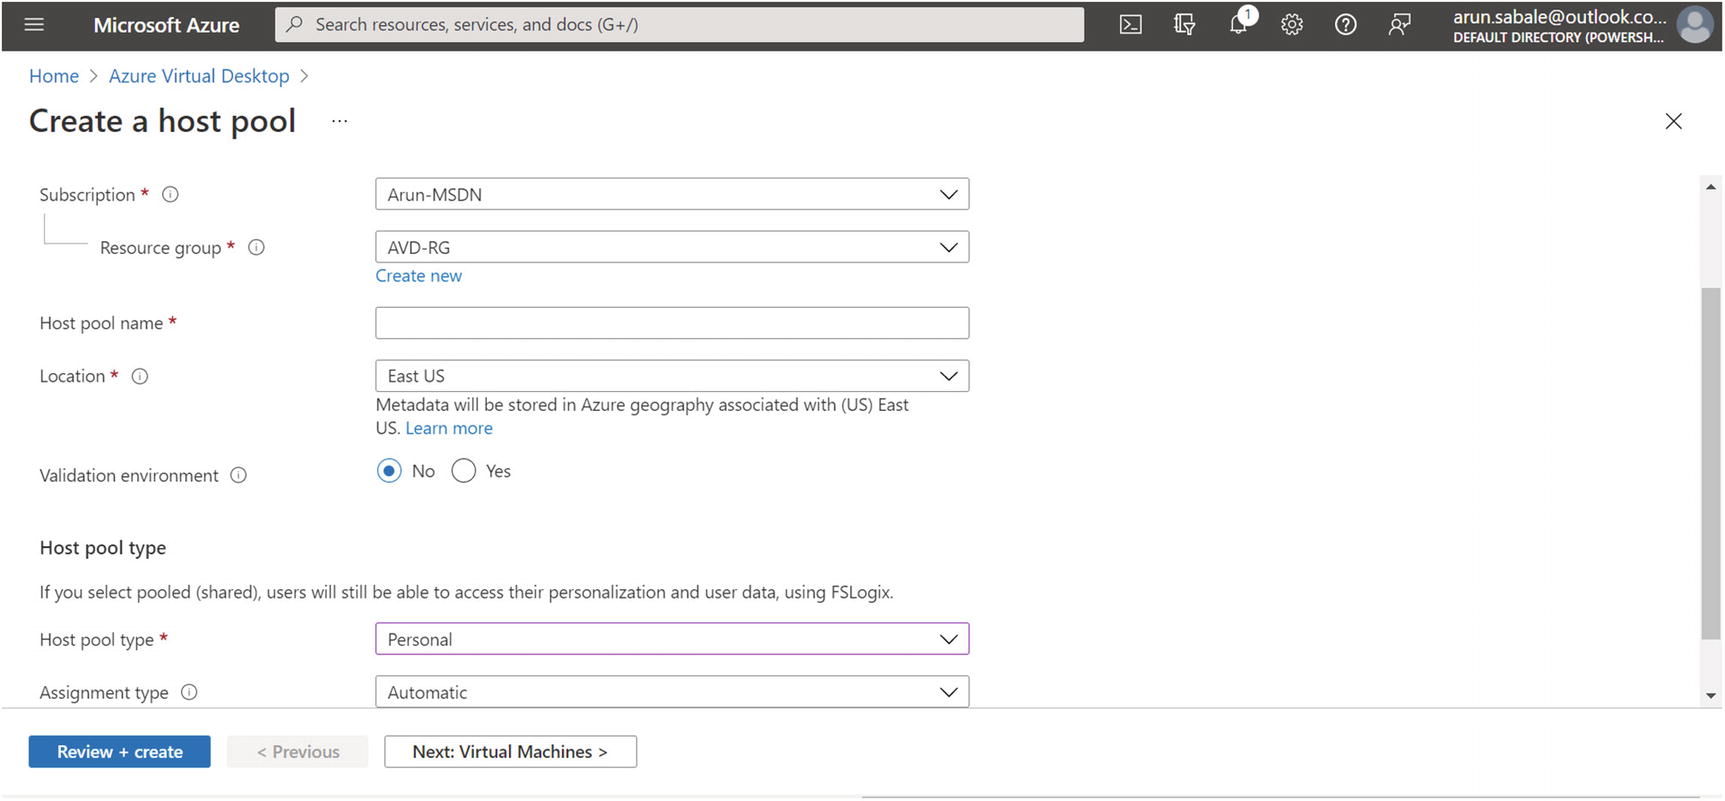
Azure Virtual Desktop, personal host pool creation
- 5.
On the Virtual Machines tab, you can create a session host, or you can add a session host after the host pool creation. If you select virtual machine creation, then enter all the required details for the virtual machine, as shown here:
Name prefix: This will be the prefix for the VM in the host pool, and the suffix will be added by Azure Virtual Desktop at the end of the name.
VM location: You can choose a different region for virtual machines than the host pool, especially if you want metadata to be stored in a particular geography, but you want the virtual machines closer to the user.
Availability zone: Azure offers a range of options for managing the availability and resiliency for your applications. Architect your solution to use replicated virtual machines in availability zones or availability sets to protect your apps and data from data center outages and maintenance events. See Figure 8-3.
Azure Virtual Desktop, personal hostpool creation, Virtual Machines tab
Image and size: You can select the size and image based on the assessment and your organization’s requirements (refer to Chapter 2).

Azure Virtual Desktop, personal host pool creation, VM size and Network tab
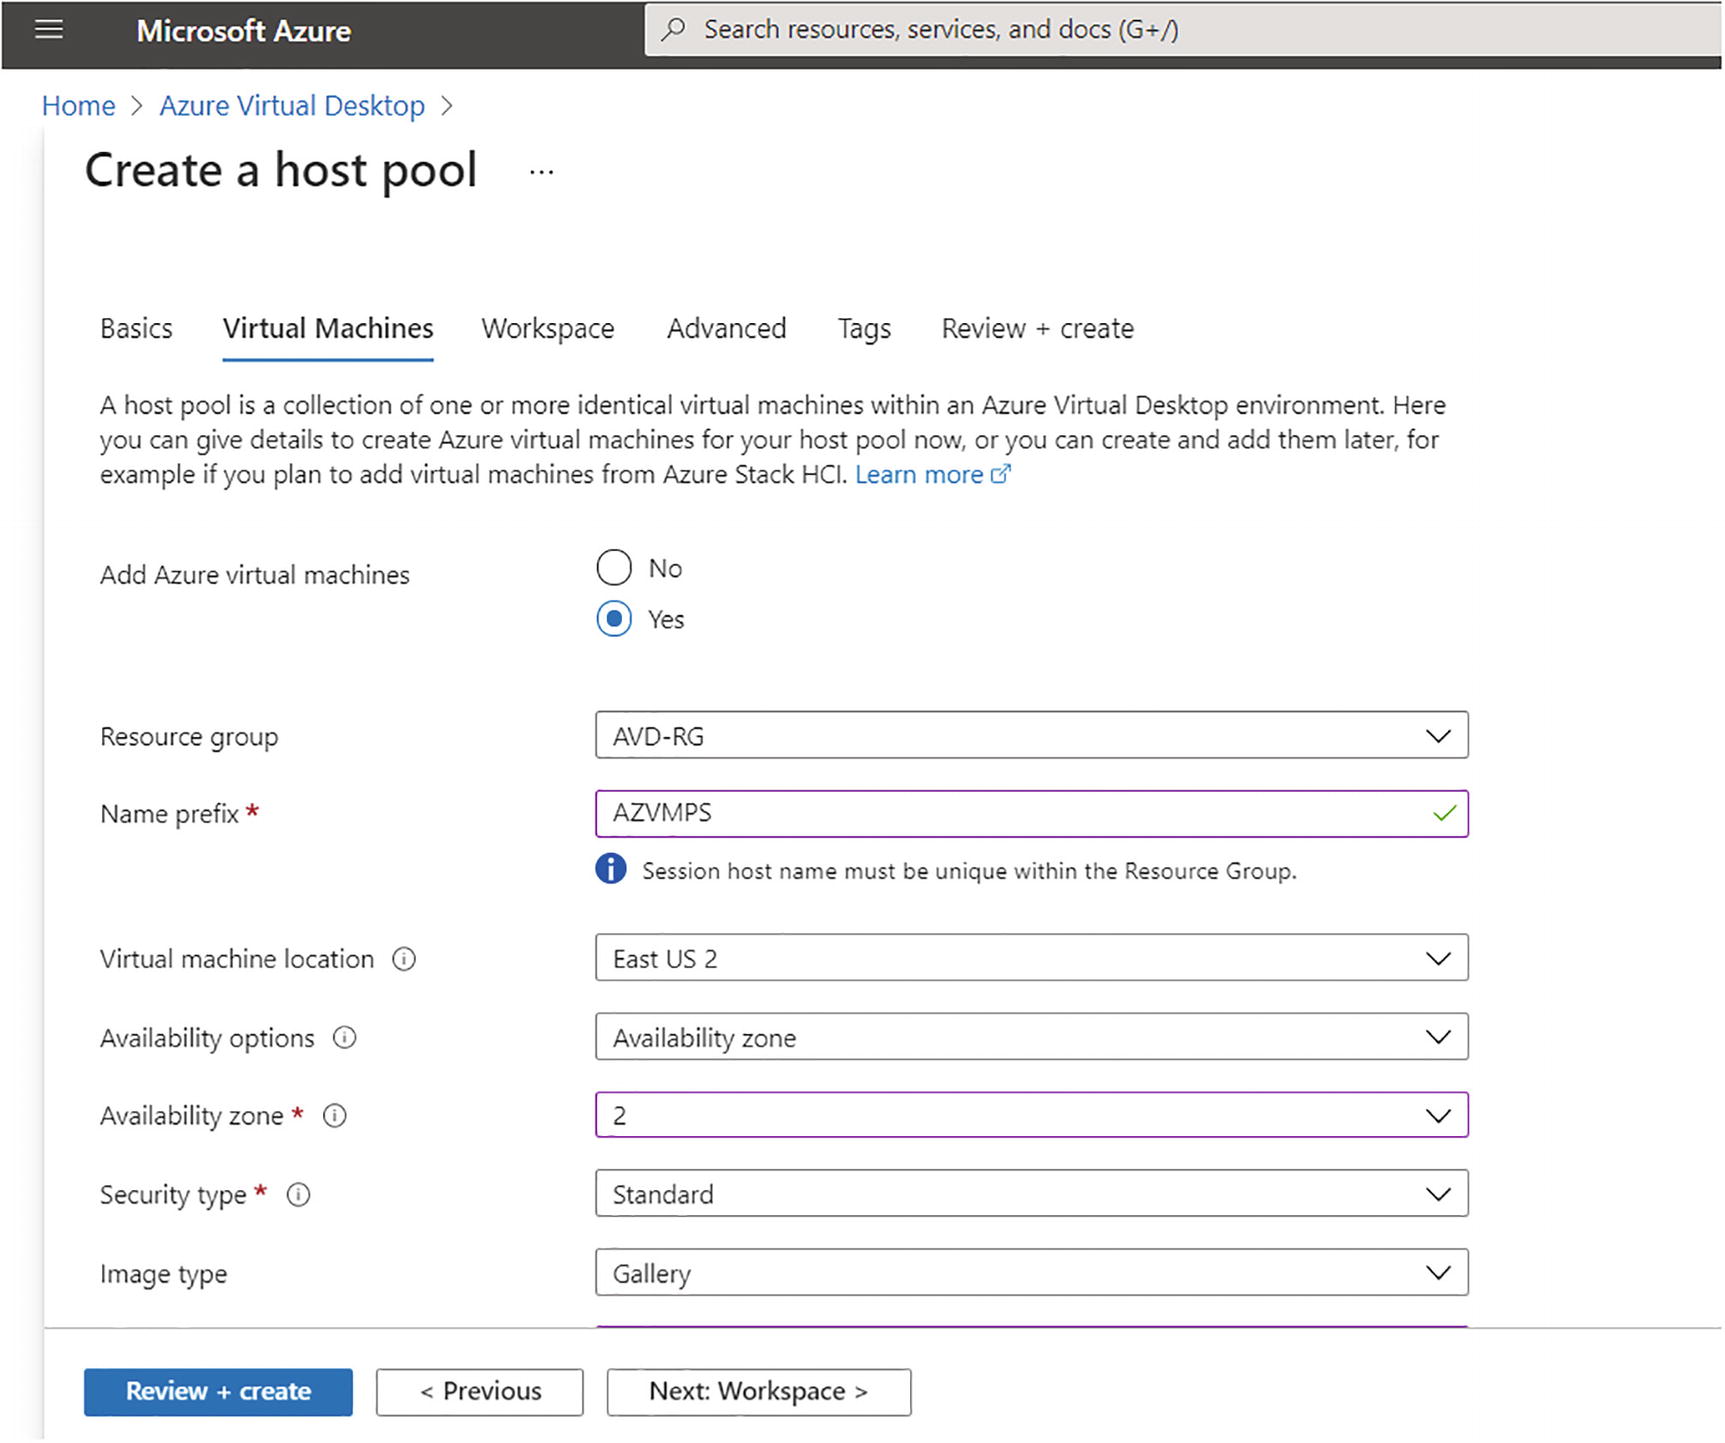
Domain join: You can select Active Directory (on-premises) and enter the domain join OU plus credentials. If you are using Azure ADDS, then the default computer OU for domain join is OU=AADDC Computers,DC=powershelltalk,DC=com (replace powershelltalk with your correct domain name).
Azure Virtual Desktop, personal hostpool creation, Domain join tab
- 6.
Click the Next button and go to the Workspace tab. On the Workspace tab, select the existing workspace or create a new one for the host pool. See Figure 8-6.
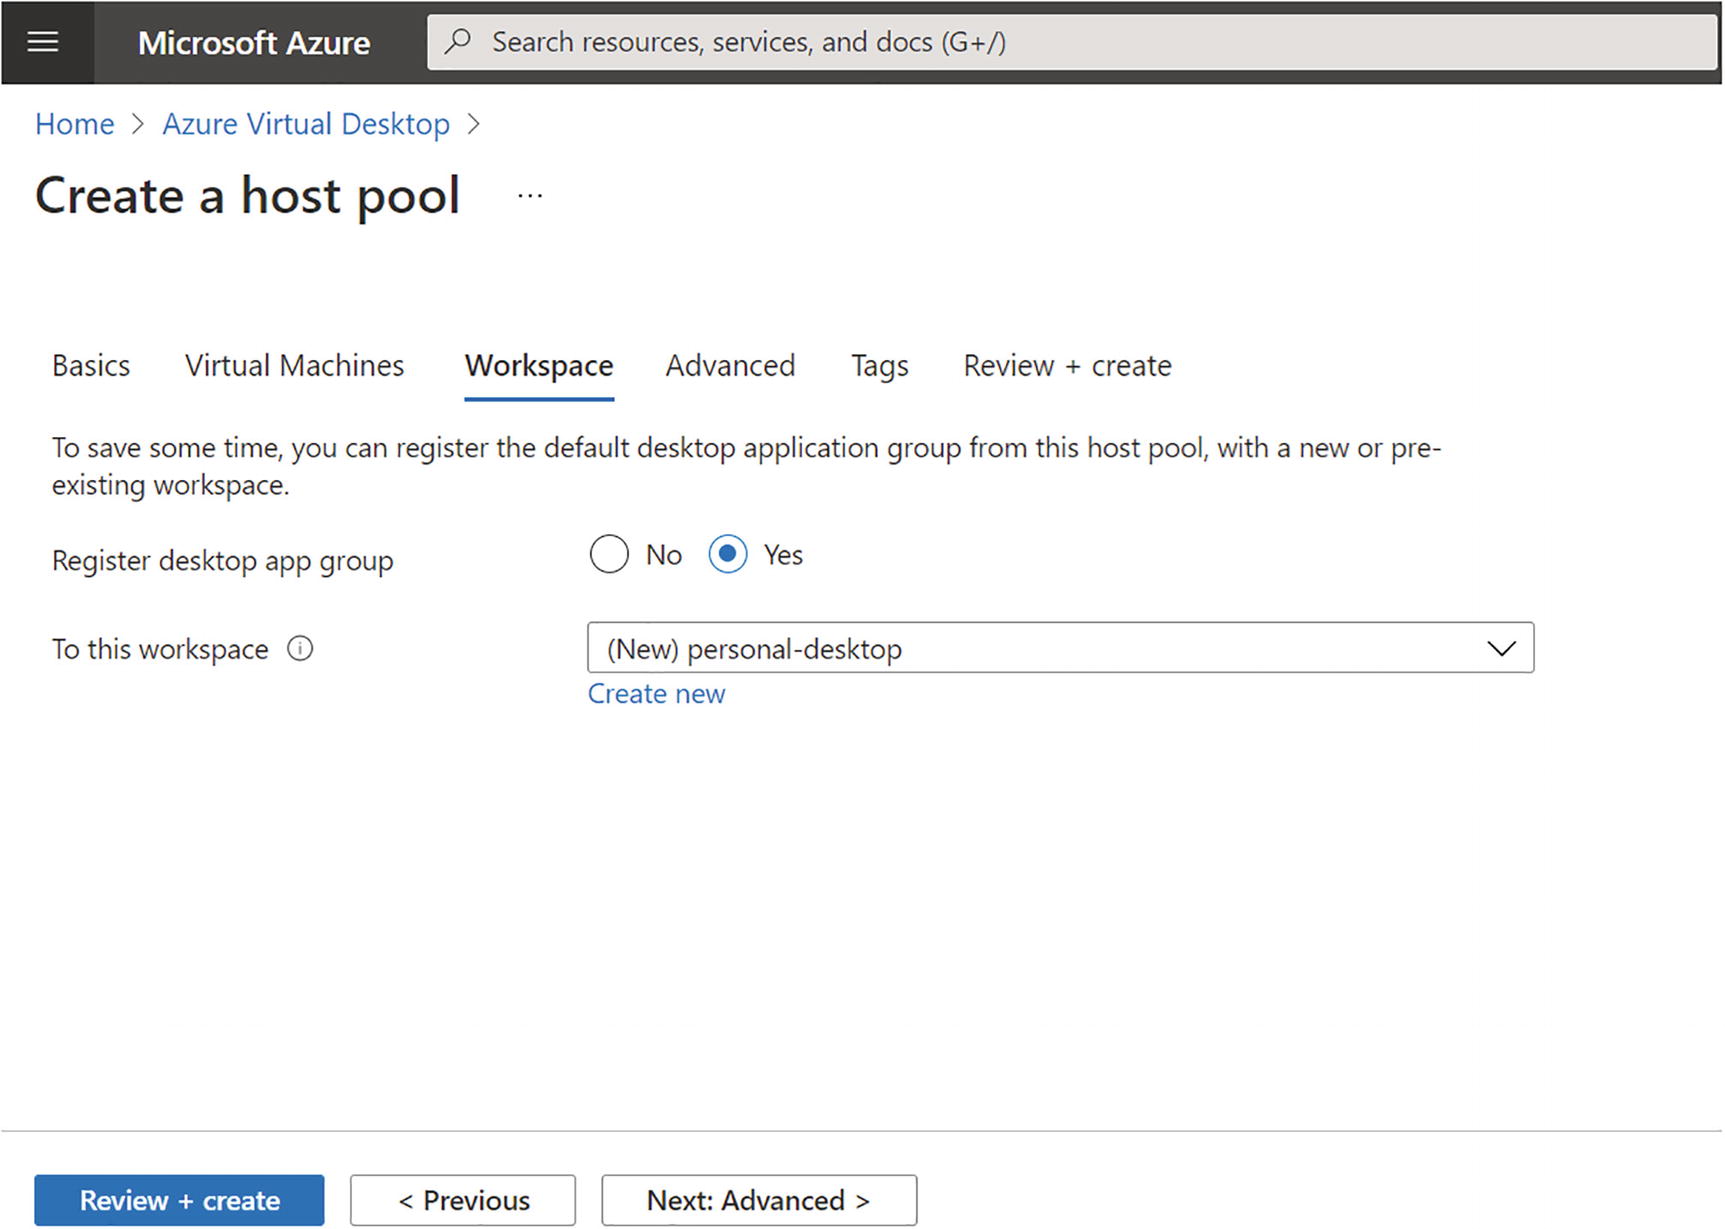
Azure Virtual Desktop, personal hostpool creation, Workspace tab
- 7.
Next is the Advanced tab on which you can define the Azure Virtual Desktop diagnostic log location; you can store diagnostic logs in log analytics, storage accounts, and event hubs. The diagnostic log contains all the connection information such as successful connections, failed connections, and AVD host pool health, so it is recommended to enable diagnostic logs. If you are planning to create an Azure dashboard for AVD, then you can use log analytics to store all the diagnostic logs. See Figure 8-7.
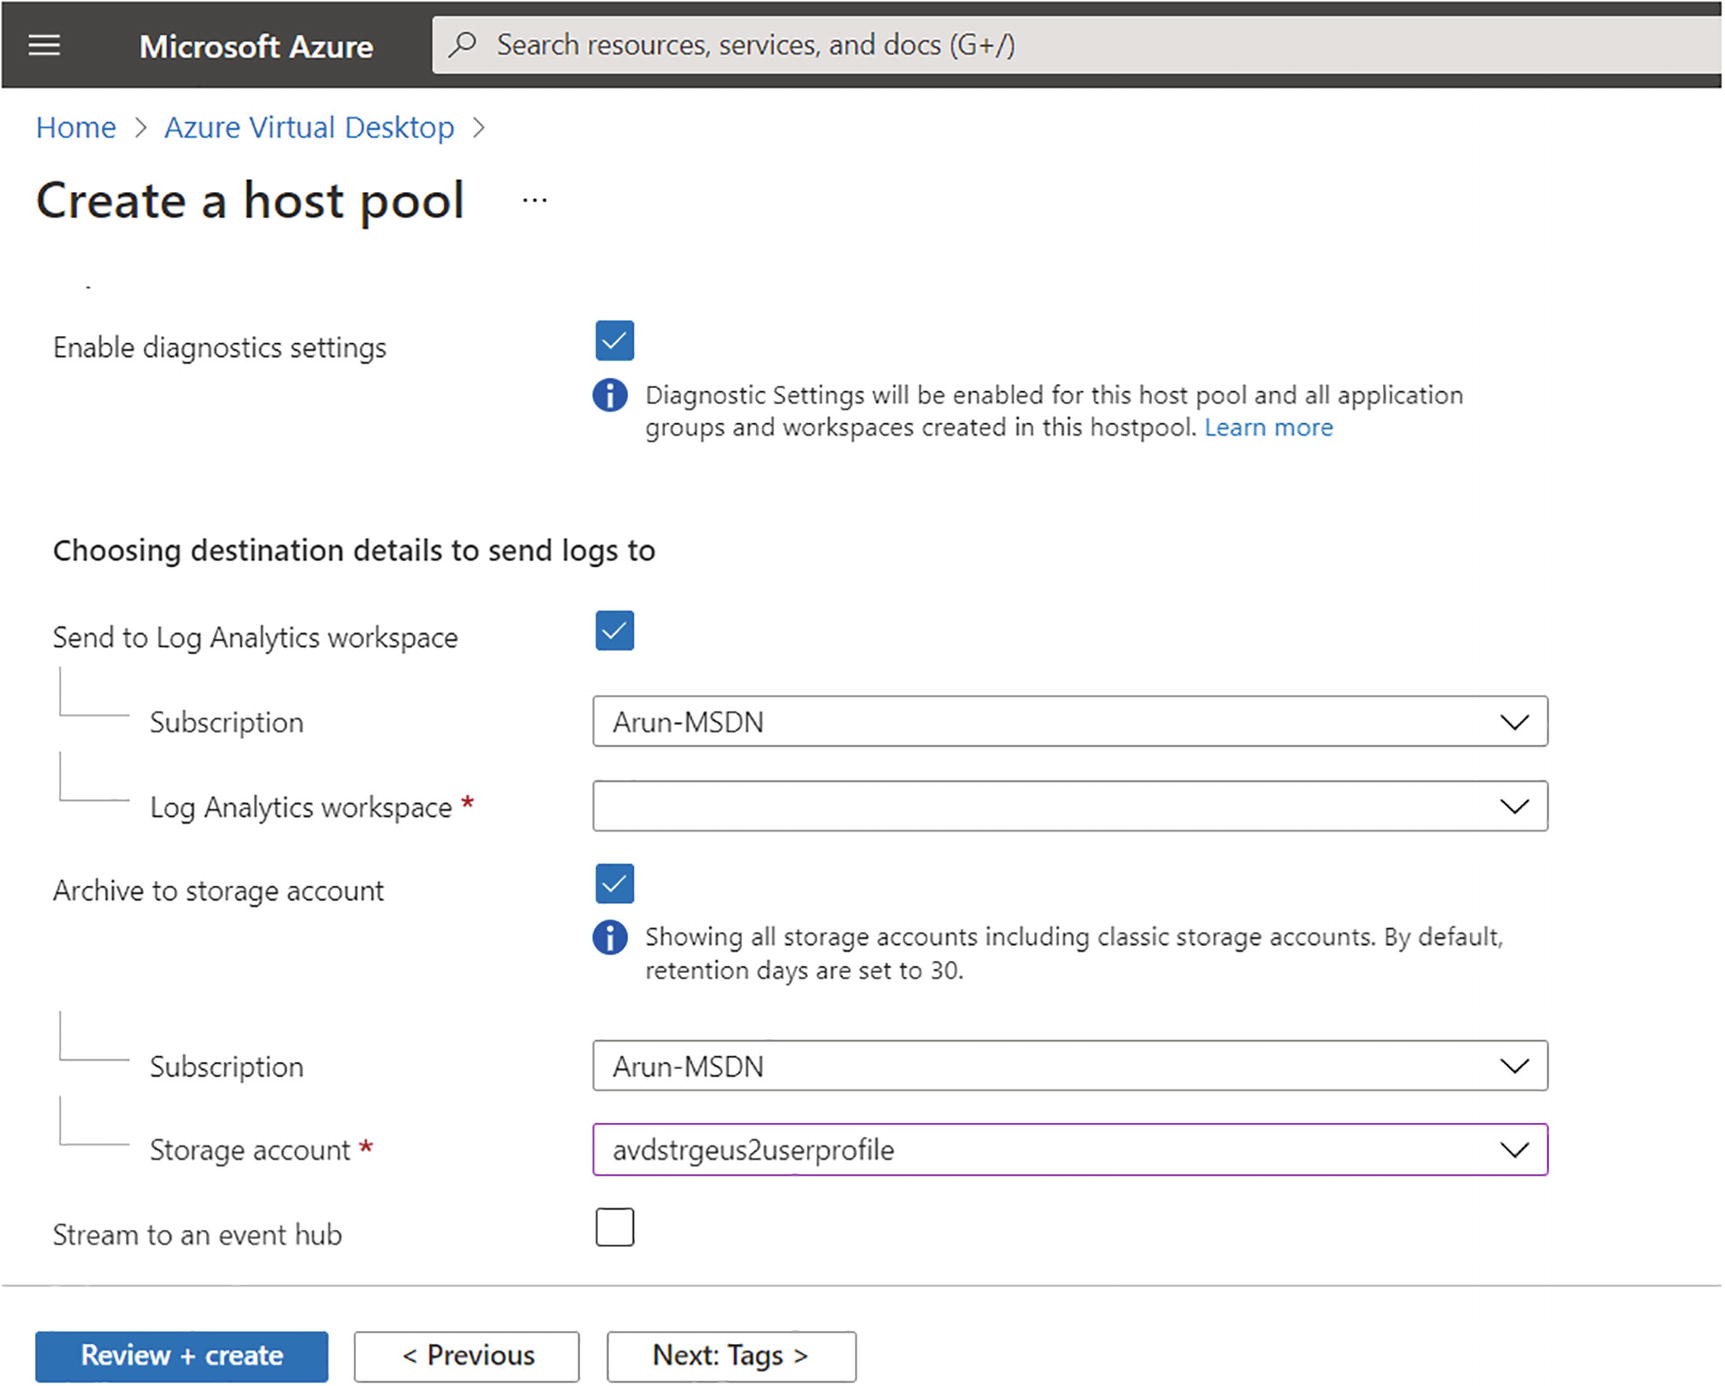
Azure Virtual Desktop, personal hostpool creation, diagnostics
- 8.
Click the “Review + create” button and then the Create button to create your host pool.
Pooled Host Pool Creation Using the Azure Portal
- 1.
Log in to portal.azure.com with an appropriate account. The login account should have contributor permission or an equivalent permission so that you can create virtual desktop resources in Azure.
- 2.
Use the top search box to navigate to Azure Virtual Desktop.
- 3.
On the Azure Virtual Desktop page, Click the “Create a host pool” button to get started. See Figure 8-8.
Azure Virtual Desktop, pooled host pool creation
- 4.
On the Basics tab you will enter common details such as a resource group, a host pool name, and the location. Set the host pool type to Pooled and the load balancing type to Depth first or Breadth first, based on your requirements.
Pooled session load balancing algorithm: Session host load balancing is achieved by either the depth-first or breadth-first algorithm. The broker decides how new incoming sessions are to be distributed across the VMs in a host pool.
Breadth-first: This is the default configuration for new nonpersistent host pools. It distributes new user sessions across all available session hosts in the host pool. When you configure the breadth-first load balancing, you may set a maximum session limit per session host in the host pool.
Depth-first: This distributes new user sessions to an available session host with the highest number of connections, but that has not reached its maximum session limit threshold. When you configure the depth-first load balancing, you must set a maximum session limit per session host in the host pool.
Max session limit: This is the maximum number of users who have concurrent sessions on a session host. When setting a host pool to have depth-first load balancing or when you’re planning to use autoscaling, you must set an appropriate max session limit according to the configuration of your deployment and capacity of your VMs. It is important to calculate the max session limit per session host properly to avoid performance issues in production (refer to Chapter 2 for more details).
Azure Virtual Desktop Usage Profile
Workload Type | Maximum Users/ vCPU | Example Azure Instances | Profile Storage Minimum |
|---|---|---|---|
Light | 6 | D8s_v4, F8s_v2, D8as_v4, D16s_v4, F16s_v2, D16as_v4 | 30 GB |
Medium | 4 | D8s_v4, F8s_v2, D8as_v4, D16s_v4, F16s_v2, D16as_v4 | 30 GB |
Heavy | 2 | D8s_v4, F8s_v2, D8as_v4, D16s_v4, F16s_v2, D16as_v4 | 30 GB |
Power | 1 | D8s_v4, F8s_v2, D8as_v4, D16s_v4, F16s_v2, D16as_v4, NV12, NVv4 | 30 GB |
It is always recommended to consider application/software recommendations and operating system requirements while deciding the usage profile for the pooled desktop.
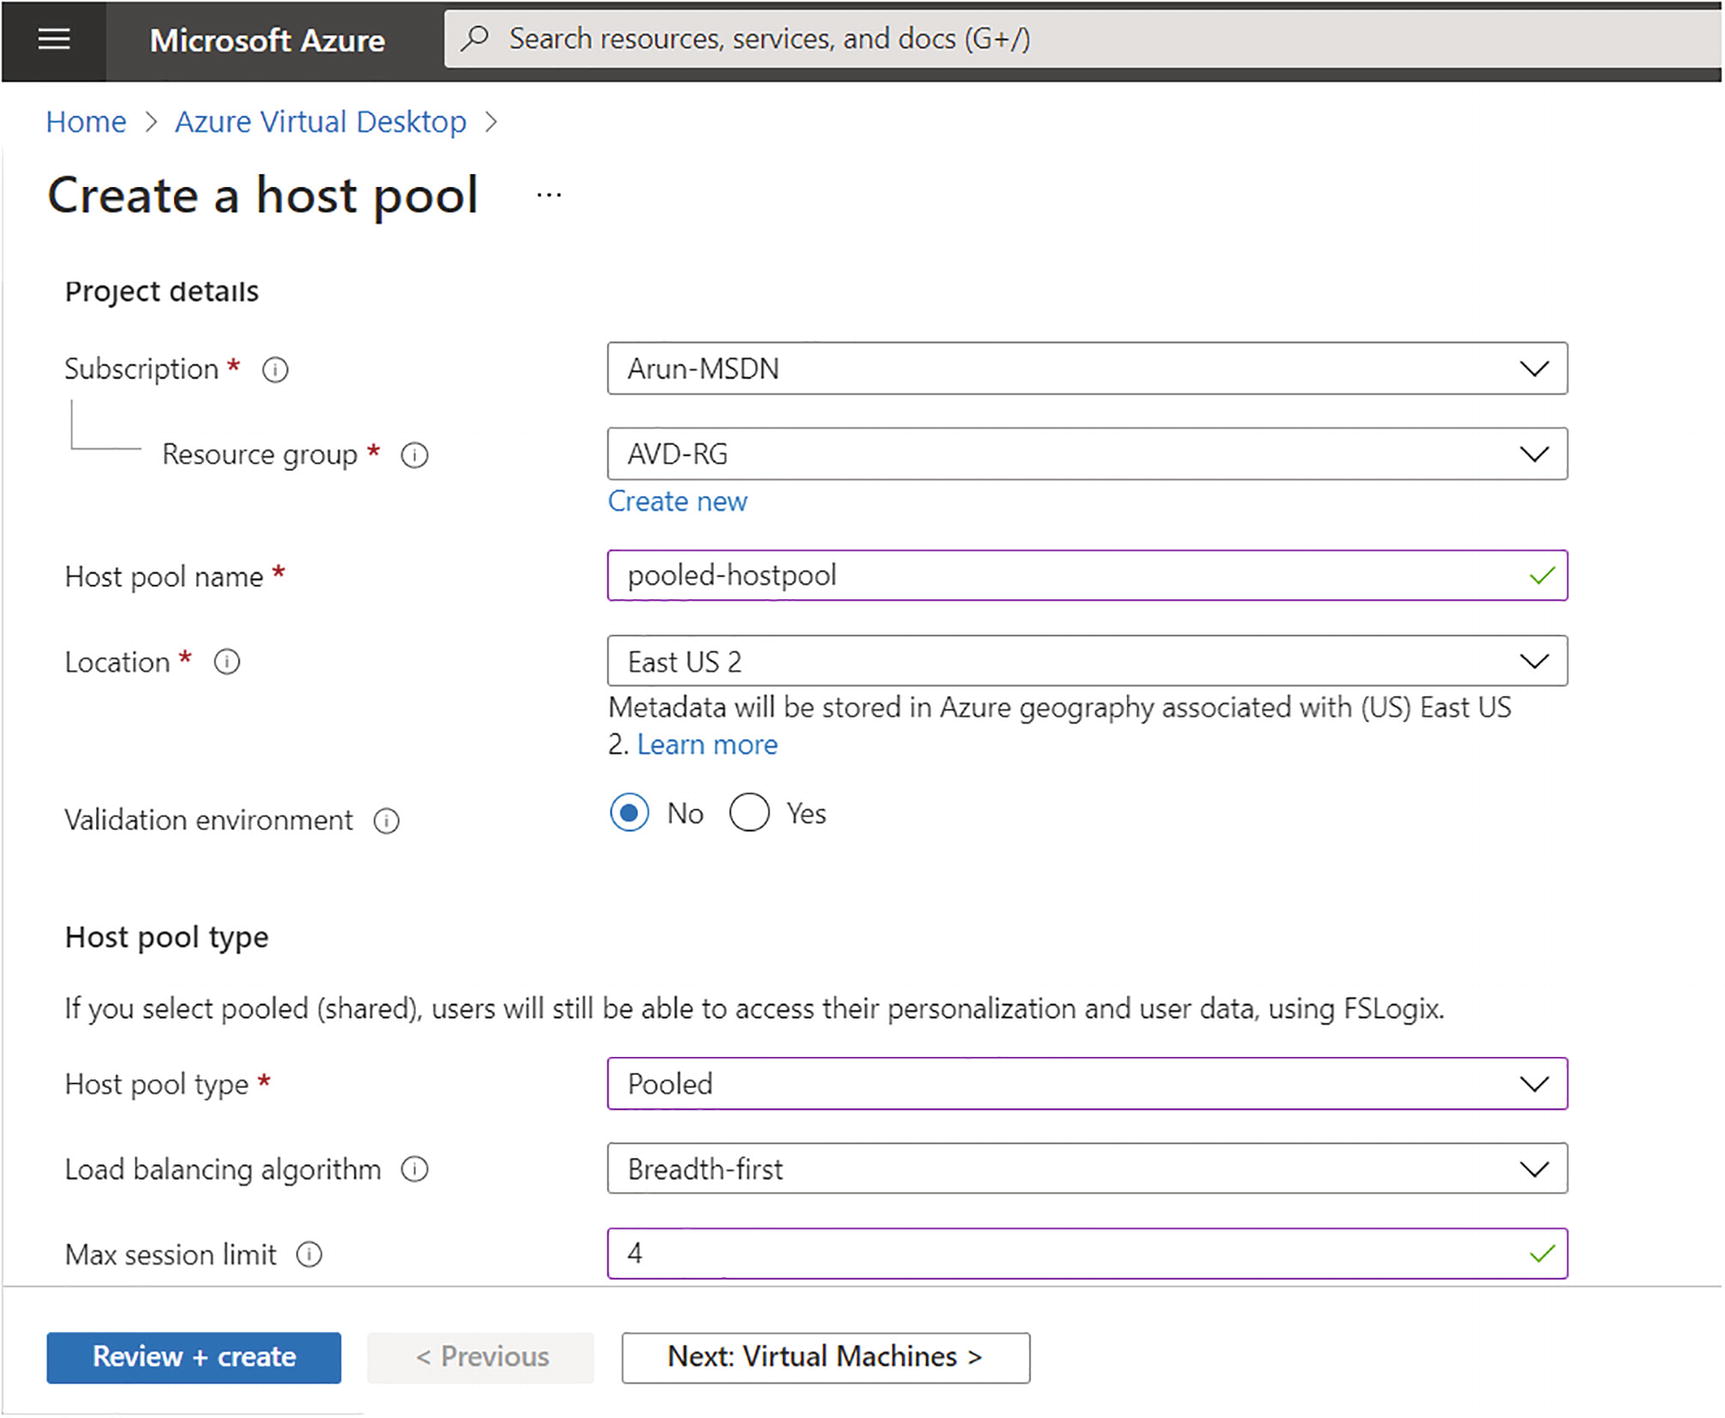
Azure Virtual Desktop pooled hostpool creation, step 1
- 5.
On the Virtual Machines tab, you can a create session host or you can add a session host after the host pool creation. If you select to create a virtual machine, then enter all the required details for the virtual machine, as shown here:
Name prefix: This will be the prefix for the VM in the host pool, and a suffix will be added by Azure Virtual Desktop at the end of the name.
VM Location: You can choose a different region for virtual machines than the host pool, especially if you want metadata to be stored in a particular geography, but you want the virtual machines closer to the user.
Availability zone: Azure offers a range of options for managing the availability and resiliency of your applications. Architect your solution to use replicated virtual machines in availability zones or availability sets to protect your apps and data from data center outages and maintenance events. See Figure 8-10.

Azure Virtual Desktop pooled hostpool creation, Virtual Machines tab
Image and size: You can select the size and multisession image based on the assessment and your organization requirement (refer to Chapter 2).

Azure Virtual Desktop, pooled hostpool creation, VM size and network tab

Azure Virtual Desktop, pooled hostpool creation, Domain join tab
- 6.
Click the Next button and go to the Workspace tab on which you select the existing workspace or create a new one for the host pool. See Figure 8-13.

Azure Virtual Desktop pooled hostpool creation, Workspace tab
- 7.
The next tab is Advanced, where you can define the Azure Virtual Desktop diagnostic log location; you can store diagnostic logs in log analytics, a storage account, and an event hub. The diagnostic log contains all the connection information such as successful connections, failed connections, and AVD host pool health, so it is recommended to enable the diagnostic logs. If you are planning to create an Azure dashboard for AVD, you can use the log analytics to store all the diagnostic logs. See Figure 8-14.

Azure Virtual Desktop pooled hostpool creation, diagnostics
- 8.
Click the “Review + create” button and then the Create button to create your host pool. See Figure 8-15.

Azure Virtual Desktop workspace creation via PowerShell
Automate the Creation of Azure Virtual Desktop Host and Host Pools
The following sections cover creation of azure virtual desktop including session host, hostpool and hostpool config using Powershell, Azure CLI, ARM. If you are thinking about automating Azure Virtual Desktop deployment then this section will help you to understand all automation options.
Personal Host Pool Creation Using PowerShell/CLI or ARM
In this section, you will see the automation options for creating a personal host pool. The PowerShell module Az.DesktopVirtualization allows you to create a personal host pool as well as add a session host in the personal host pool.
I always recommend using the Azure Resource Manager (ARM) template wherever it is possible to get additional benefits from IAC.
Resource group to group all host pool–related resources
AVD workspace to group multiple host pools
Personal host pool and app group
VM/session host creation
Domain join extension
Azure ARM JsonADDomainExtension extension to join a VM to the host pool with a host pool token
The full PowerShell and ARM code to create an Azure Virtual Desktop personal desktop can be found at https://github.com/Ar-Sa/Arun/blob/master/PowerShell/PowerShell%20and%20ARM%20to%20create%20Azure%20virtual%20desktop%20personal%20desktop/New-AVDPersonalHostpool.ps1.
First you have to log in to Azure using the Connect-AzAccount command and select the correct subscription in which you want to create the Azure Virtual Desktop host pool. You can create a new resource group and the AVD workspace using the following PowerShell command, or if you already have a resource group and workspace, then you can skip this step. The following command also checks if the resource group and workspace are already present in the selected subscription, and if it is, then PowerShell will skip the resource creation. See Figure 8-15.
The cmdlet New-AzWvdHostPool will create the host pool, and you can use the New-AzWvdApplicationGroup cmdlet to create a desktop application group. Additionally, Register-AzWvdApplicationGroup will register the desktop app group with the workspace. You can either create a workspace with this cmdlet or use an existing workspace.

Azure Virtual Desktop host pool creation via PowerShell
Azure Virtual Desktop creation via PowerShell and ARM
Pooled Host Pool Creation Using PowerShell/CLI and ARM
Pooled desktop is different then personal desktop and thats why you need additional detail for automation/script to create pooled hostpool. Since everything is possible with automation, we can use PowerShell and ARM in such a way that they can create pooled as well as personal desktops, and you must make sure you are passing the correct parameter required for the pooled desktop using the same PowerShell and ARM versions mentioned in earlier section (section - personal Host Pool Creation Using PowerShell/CLI and ARM).
$HostpoolType must set to pooled as follows so that the script will create the pooled host pool:
$loadBalancerType can be BreadthFirst or DepthFirst for a pooled host pool. Change the value in the script param as shown here:
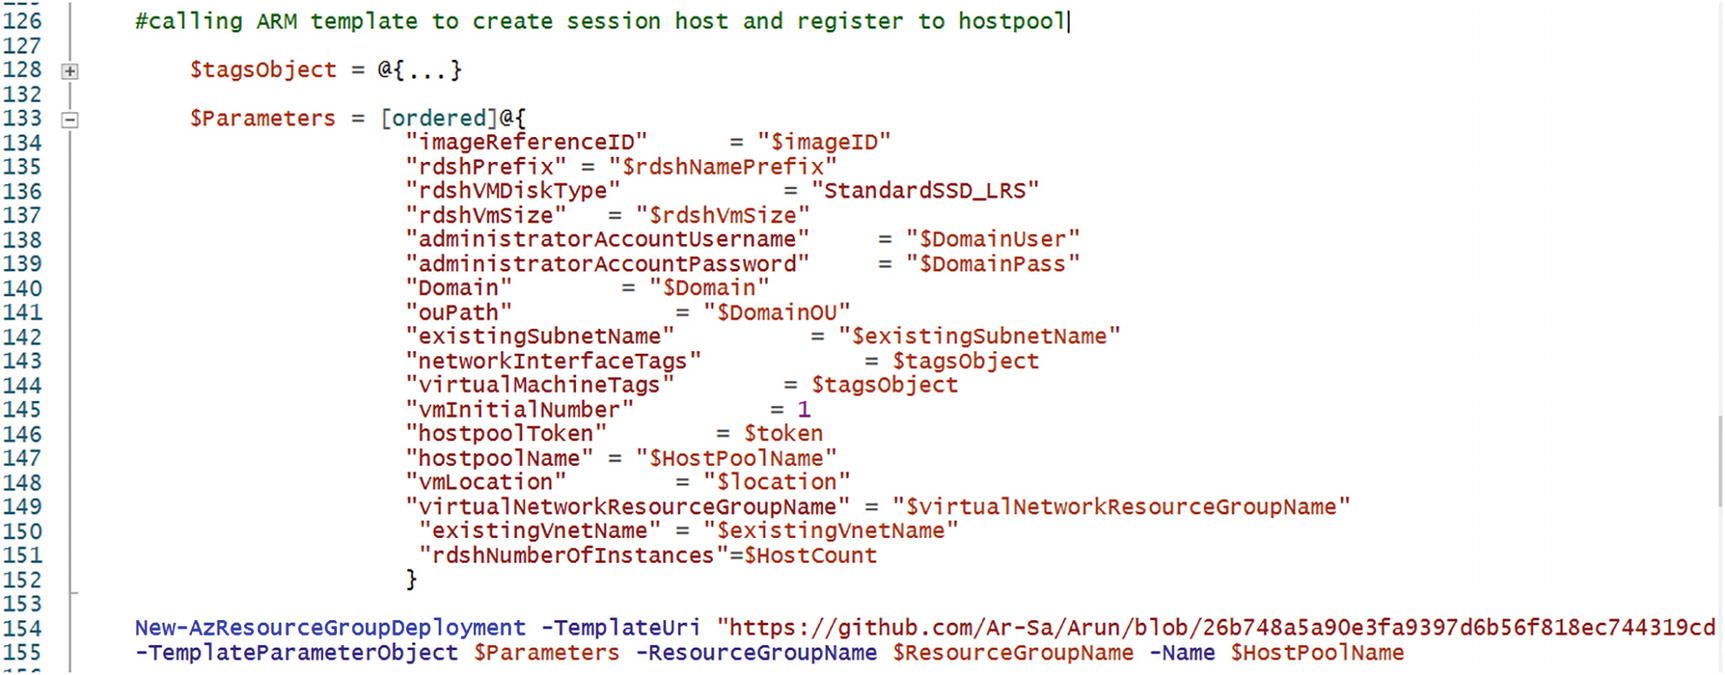
The $MaxSessionLimit parameter is required only for pooled host pools, and it will define the number of concurrent sessions per VM/session hosts on the pooled host pool. Make sure you are changing values before triggering PowerShell and ARM. See Figure 8-18.

Azure Virtual Desktop creation via PowerShell plus ARM
Follow the same steps mentioned here for the personal host pool creation and create a pooled host pool just by changing the host pool type, load balancing type, and the max session limit parameter in the PowerShell mentioned in the previous section.
Configure Host Pool Settings
Customizing a host pool’s Remote Desktop Protocol (RDP) properties, such as multimonitor experience and audio/video redirection, allows you to set up an optimal experience for your users, based on their needs. It also allows you to set up Azure Virtual Desktop as per your organization’s compliance requirements. You can set the RDP properties at the time of the host pool creation using PowerShell automation (described earlier), or if you would like to change the default RDP file properties, you can customize the RDP properties in Azure Virtual Desktop either by using the Azure portal or by using the -CustomRdpProperty parameter in the Update-AzWvdHostPool cmdlet.
By default, the CustomRdpProperty field is null in the Azure portal. A null CustomRdpProperty field will apply all the default RDP properties to your host pool.
RDP Setting for Azure Virtual Desktop
SESSION BEHAVIOR | |||
|---|---|---|---|
RDP Setting | Description | Values | Default Value |
autoreconnection enabled:i:value | Determines whether the client will automatically try to reconnect to the remote computer if the connection is dropped, such as when there’s a network connectivity interruption. | 0: Client does not automatically try to reconnect | 1 |
1: Client automatically tries to reconnect | |||
bandwidthautodetect:i:value | Determines whether to use automatic network bandwidth detection. Requires bandwidthautodetect to be set to 1. | 0: Disables automatic network type detection | 1 |
1: Enables automatic network type detection | |||
networkautodetect:i:value | Determines whether the automatic network type detection is enabled | 0: Doesn’t use automatic network bandwidth detection | 1 |
1: Uses automatic network bandwidth detection | |||
compression:i:value | Determines whether bulk compression is enabled when it is transmitted by RDP to the local computer | 0: Disables RDP bulk compression | 1 |
1: Enables RDP bulk compression | |||
videoplaybackmode:i:value | Determines if the connection will use RDP-efficient multimedia streaming for video playback | 0: Doesn’t use RDP efficient multimedia streaming for video playback | 1 |
1: Uses RDP-efficient multimedia streaming for video playback when possible | DEVICE REDIRECTION | ||
audiocapturemode:i:value | Microphone redirection: | 0: Disables audio capture from the local device | 0 |
Indicates whether audio input redirection is enabled | 1: Enables audio capture from the local device and redirection to an audio application in the remote session | ||
encode redirected video capture:i:value | Enables or disables encoding of redirected video | 0: Disables encoding of redirected video | 1 |
1: Enables encoding of redirected video | |||
redirected video capture encoding quality:i:value | Controls the quality of encoded video | 0: High-compression video; quality may suffer when there is a lot of motion | 0 |
1: Medium compression | |||
2: Low-compression video with high picture quality | |||
audiomode:i:value | Audio output location: | 0: Plays sounds on the local computer (plays on this computer) | 0 |
Determines whether the local or remote machine plays audio | 1: Plays sounds on the remote computer (plays on remote computer) | ||
2: Does not play sounds | |||
camerastoredirect:s:value | Camera redirection: | *: Redirects all cameras | Don’t redirect any cameras |
Configures which cameras to redirect; this setting uses a semicolon-delimited list of KSCATEGORY_VIDEO_CAMERA interfaces of cameras enabled for redirection. | List of cameras, such as camerastoredirect:s:?usb#vid_0bda&pid_58b0&mi | ||
Can exclude a specific camera by prepending the symbolic link string with - | |||
devicestoredirect:s:value | Plug and play device redirection: | *: Redirects all supported devices, including ones that are connected later | Don’t redirect any devices |
Determines which devices on the local computer will be redirected and available in the remote session | Valid hardware ID for one or more devices | ||
DynamicDevices: Redirects all supported devices that are connected later | |||
drivestoredirect:s:value | Drive/storage redirection: | No value specified: don’t redirect any drives | Don’t redirect any drives |
Determines which disk drives on the local computer will be redirected and available in the remote session | *: Redirects all disk drives, including drives that are connected later | ||
DynamicDrives: redirects any drives that are connected later | |||
The drive and labels for one or more drives, such as drivestoredirect:s:C:;E:;: Redirects the specified drive(s) | |||
keyboardhook:i:value | Determines when Windows key combinations (Windows key, Alt+Tab) are applied to the remote session for desktop connections | 0: Windows key combinations applied on the local computer | 2 |
1: Windows key combinations applied on the remote computer when in focus | |||
2: Windows key combinations applied on the remote computer in full-screen mode only | |||
redirectclipboard:i:value | Clipboard redirection: | 0: Clipboard on local computer isn’t available in remote session | 1 |
Determines whether clipboard redirection is enabled | 1: Clipboard on local computer is available in remote session | ||
redirectcomports:i:value | COM ports redirection: | 0: COM ports on the local computer are not available in the remote session | 0 |
Determines whether COM (serial) ports on the local computer will be redirected and available in the remote session | 1: COM ports on the local computer are available in the remote session | ||
redirectprinters:i:value | Printer redirection: | 0: The printers on the local computer not available in the remote session | 1 |
Determines whether printers configured on the local computer will be redirected and available in the remote session | 1: The printers on the local computer available in the remote session | ||
redirectsmartcards:i:value | Smart card redirection: | 0: The smart card device on the local computer is not available in the remote session | 1 |
Determines whether smart card devices on the local computer will be redirected and available in the remote session | 1: The smart card device on the local computer is available in the remote session | ||
usbdevicestoredirect:s:value | USB redirection | *: Redirects all USB devices that are not already redirected by another high-level redirection | Don’t redirect any USB devices |
{Device Setup Class GUID}: Redirects all devices that are members of the specified device setup class | |||
USBInstanceID: Redirects a specific USB device identified by the instance ID | |||
DISPLAY SETTINGS | |||
use multimon:i:value | Determines whether the remote session will use one or multiple displays from the local computer | 0: Doesn’t enable multiple display support | 1 |
1: Enables multiple display support | |||
selectedmonitors:s:value | Specifies which local displays to use from the remote session; the selected displays must be contiguous; requires use of multimon to be set to 1 | Comma separated list of machine-specific display IDs; IDs can be retrieved by calling mstsc.exe /l. The first ID listed will be set as the primary display in the session | All displays |
Available only on the Windows Inbox (MSTSC) and Windows Desktop (MSRDC) clients | |||
maximizetocurrentdisplays:i:value | Determines which display the remote session goes full-screen on when maximizing; requires use multimon to be set to 1 | 0: Session goes full-screen on the displays initially selected when maximizing | 0 |
1: Session dynamically goes full-screen on the displays touched by the session window when maximizing | |||
Available only on the Windows Desktop (MSRDC) client | |||
singlemoninwindowedmode:i:value | Determines whether a multidisplay remote session automatically switches to single display when exiting full-screen; requires use multimon to be set to 1 | 0: Session retains all displays when exiting full-screen | 0 |
1: Session switches to single display when exiting full-screen | |||
Available only on the Windows Desktop (MSRDC) client | |||
screen mode id:i:value | Determines whether the remote session window appears full-screen when you launch the connection | 1: The remote session will appear in a window | 2 |
2: The remote session will appear full-screen | |||
smart sizing:i:value | Determines whether the local computer scales the content of the remote session to fit the window size | 0: The local window content won’t scale when resized | 0 |
1: The local window content will scale when resized | |||
dynamic resolution:i:value | Determines whether the resolution of the remote session is automatically updated when the local window is resized | 0: Session resolution remains static for the duration of the session | 1 |
1: Session resolution updates as the local window resizes | |||
desktop size id:i:value | Specifies the dimensions of the remote session desktop from a set of predefined options. This setting is overridden if desktopheight and desktopwidth are specified. | -0: 640×480 | Match the local computer |
- 1: 800×600 | |||
- 2: 1024×768 | |||
- 3: 1280×1024 | |||
- 4: 1600×1200 | |||
desktopheight:i:value | Specifies the resolution height (in pixels) of the remote session | Numerical value between 200 and 8192 | Match the local computer |
desktopwidth:i:value | Specifies the resolution width (in pixels) of the remote session | Numerical value between 200 and 8192 | Match the local computer |
desktopscalefactor:i:value | Specifies the scale factor of the remote session to make the content appear larger | Numerical value from the following list: 100, 125, 150, 175, 200, 250, 300, 400, 500 | Match the local computer |
Here is a PowerShell example to update the custom RDP properties.
Assign Users to Host Pools
There are multiple ways to assign the user to a Azure Virtual Desktop host pool; you can use the Azure portal, PowerShell, or the CLI to add users to the host pool.
- 1.
Log in to the Azure portal with the appropriate credentials that have permissions on the host pool and application group.
- 2.
Go to Azure Virtual Desktop and click the host pool on which you want to add users. See Figure 8-19.
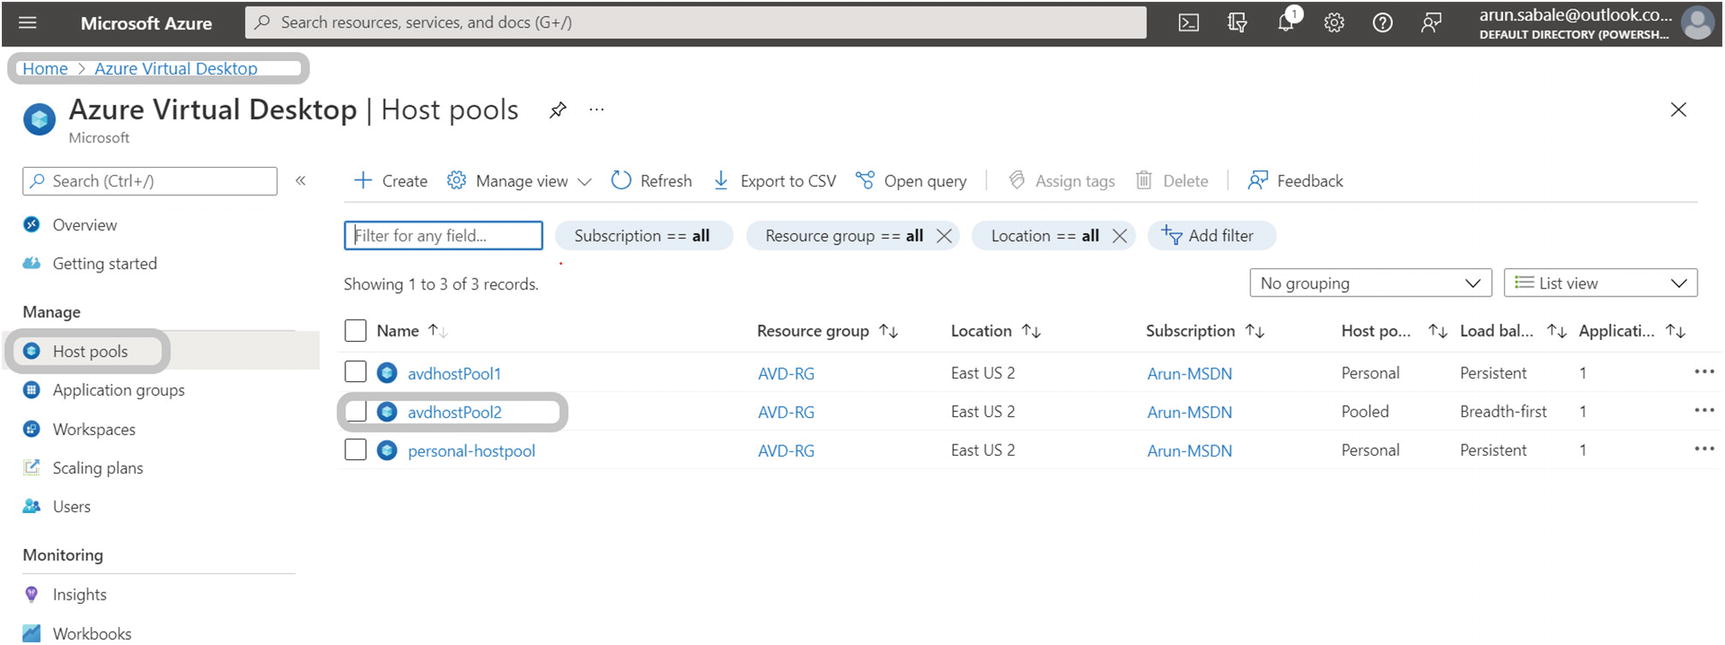
Azure Virtual Desktop, user or group assignment
- 3.
Click the Applications in the left pane and then click the application group name. See Figure 8-20.

Azure Virtual Desktop, Application groups tab
- 4.
On the Application groups page, click Assignment and then the Add button at the top. See Figure 8-21.

Azure Virtual Desktop, application group assignment
- 5.
In the Add User pop-up, you can add a single user ID or group. The user or group must be synced/present in Azure AD. Click Save to add the user or group on the host pool and then you can use the Remote Desktop client on Windows/the Web/Mac and access Azure Virtual Desktop.
If you are using the direct assignment type on the personal host pool, then you must assign the user to the session host in addition to the previous steps.
Apply OS and Application Updates to a Running Azure Virtual Desktop Host
Group Policy: You can configure Group Policy to set the Windows update or registry setting. The Group Policy can found under Computer Configuration ➤ Administrative Templates ➤ Windows Components ➤ Windows Update ➤ Configure Automatic Updates. If you don’t want to set up Group Policy, then you can try the registry setting in the VM image or individually on each VM or using Group Policy. Windows update registry settings are available at HKEY_LOCAL_MACHINE ➤ SOFTWARE ➤ Policies ➤ Microsoft ➤ Windows ➤ WindowsUpdate ➤ AU. The main problem with this option is the VM reboot; you cannot simply reboot the VM anytime and kick the user session off the host pool. Unfortunately, users can’t reboot the VM by themselves after a patch installation, because of the default limited permissions. So, in short, this is not a good option for an Azure Virtual Desktop production environment.
SCCM/Intune/Azure update management: These are all better options to patch an Azure Virtual Desktop environment, with specific maintenance windows, and you can always create different schedules and a different group of session hosts so that all the sessions will not be down at the same time. Additionally, you can test the patches on a dev environment to observe the impact on the application/services and then install them in production to avoid any outages in the production environment.
It is always recommended to update the session host image frequently so that you will not have any noncompliant VMs when you create a new session host using the image. You can refer to the image creation steps for all the details.
Apply Security and Compliance Settings to Session Hosts
Azure Virtual Desktop is a managed virtual desktop service that includes many security capabilities for keeping your organization safe. In an Azure Virtual Desktop deployment, Microsoft manages portions of the services on the customer’s behalf. The service has many built-in advanced security features, such as Reverse Connect, that reduce the risk involved with having remote desktops accessible from anywhere. Still, there are additional steps you can take to keep your Azure Virtual Desktop deployments secure.
The main difference between traditional on-premises Virtual Desktop Infrastructures (VDIs) and Azure Virtual Desktop is the security responsibilities. The customer is fully responsible for traditional on-premises VDI security, but, for most of the cloud services, these responsibilities are shared between the you and the cloud provider. When you use Azure Virtual Desktop, the physical host, network, and data center environment are already secured by the provider. The following are the best practices you can implement for Azure Virtual Desktop.
Enable Microsoft Defender for the cloud: It is recommended that you enable the Microsoft Defender for Cloud service to enhance the security features.
Multifactor authentication (MFA) : Enable multifactor authentication for all users and admins in Azure AD to improve Azure Virtual Desktop security while accessing Azure Virtual Desktop over the Internet.
Enable conditional access: Enabling conditional access lets you manage risks before you grant users access to your Azure Virtual Desktop environment. Conditional access allows you to consider who the user is, how they sign in, and which device they’re using while granting AVD access.
Audit/diagnostic logs: Enable the audit log to allow you to view user and admin activity related to Azure Virtual Desktop.
Using RemoteApps: You can provide remote users with access to entire virtual desktops or only selected applications. Remote applications, or RemoteApps, provide a seamless experience as the user works with apps on their virtual desktop. RemoteApps reduce risks by only letting the user work with a subset of the remote machine exposed by the application.
Monitor usage with Azure Monitor: Monitor your Azure Virtual Desktop service’s usage and availability with Azure Monitor. You can create service health alerts for the Azure Virtual Desktop service to receive notifications whenever there’s a service-impacting event.
Enable endpoint protection: To protect your deployment from known malicious software, we recommend enabling endpoint protection (Windows Defender or a third-party tool) on all session hosts. Make sure you are excluding FSLogix VHD files (user profile) so that the endpoint protection will not impact the user performance.
Patch software vulnerabilities in your environment: Once you identify a vulnerability, you must patch it. It’s recommended to patch your base images monthly to ensure that newly deployed machines are as secure as possible.
Establish maximum inactive time and disconnection policies: Signing users out when they’re inactive preserves resources and prevents access by unauthorized users. Disconnecting long-running applications that continue to run if a user is idle, such as a simulation or CAD rendering, can interrupt the user’s work and may even require restarting the computer.
Set up screen locks for idle sessions: You can prevent unwanted system access by configuring an Azure Virtual Desktop to lock a machine’s screen during idle time and requiring authentication to unlock it.
Establish tiered admin access: Granting admin access to virtual desktops is not recommended. If you need software packages, we recommend you make them available through configuration management utilities such as Microsoft Endpoint Manager. In a multisession environment, we recommend you don’t let users install software directly.
Consider which users should access which resources: By default, session hosts can connect to any resource on the Internet. There are several ways you can limit traffic, including using Azure Firewall, network virtual appliances, or proxies. If you need to limit traffic, make sure you add the proper rules so that Azure Virtual Desktop can work properly.
Windows Defender Credential Guard: Windows Defender Credential Guard uses virtualization-based security to isolate and protect secrets so that only privileged system software can access them. This prevents unauthorized access to these secrets and credential theft attacks, such as pass-the-hash attacks.
Network security group: Apply NSG rules to the subnet and make sure the traffic is limited and restricted only for required resources.
There are some additional security recommendations by Microsoft that you should consider implementing in your Azure Virtual Desktop environment. Refer to https://docs.microsoft.com/en-us/security/benchmark/azure/baselines/virtual-desktop-security-baseline for more detail about AVD security.
Summary
In this chapter, you learned how to create an Azure Virtual Desktop host and host pools using the Azure portal, PowerShell, the command-line interface (CLI), and Azure Resource Manager templates.