© The Author(s), under exclusive license to APress Media, LLC, part of Springer Nature 2022
A. Sabale, B. N. IlagMicrosoft Azure Virtual Desktop Guidehttps://doi.org/10.1007/978-1-4842-8063-8_7

7. Create and Manage Session Host Images

Arun Sabale1   and Balu N Ilag2
(1)
New Jersey, NJ, USA
(2)
Tracy, CA, USA
 

In this chapter, you will learn about golden images and how to create a golden image for Azure Virtual Desktop. You will also learn about the benefits of using a shared image gallery and how to update the images stored in it.

Let’s get started with creating a golden image for Azure Virtual Desktop.

Creating a Golden Image

A golden image is a custom operating system image with all the applications and software installed and configured so that you can create a VM with the image. A golden image is like a preconfigured template for a VM; it saves you time installing and configuring applications on all the VMs after their creation, and it reduces errors and adds consistency across all the VMs.

Let’s see how to create a golden image and what other automation options we have that can automate the image creation. See Figure 7-1.
Figure 7-1

Golden image creation steps/process

The golden image creation process is simple: you can pick an image from the Azure marketplace or use an existing golden image from a shared image gallery and create the VM. You can connect the image VM with Bastion so that you can do all the customization including installing and configuring the applications. Also, you can configure all the compliance policies and settings on the image VM. Once you are done with all the customizations, then the next step is to generalize the VM and capture the image.

Generalizing and Capturing a VM Image

Generalizing a VM is nothing more than running the sysprep command to remove all personal account information and prepare the machine to be used as an image. The following are the steps to generalize the VM:
  1. 1.

    Connect to the image virtual machine.

     
  2. 2.

    Open the Command Prompt window as Administrator. Change the directory to %windir%system32sysprep, and then run sysprep.exe.

     
  3. 3.

    In the System Preparation Tool dialog box, select Enter System Out-of-Box Experience (OOBE), and make sure that the Generalize checkbox is selected. In Shutdown Options, select Shutdown and then click OK.

     
  4. 4.

    When Sysprep completes, it will shut down the virtual machine. Do not start/restart the VM. See Figure 7-2.

     
Figure 7-2

Sysprep to generalize image

  1. 5.

    The VM needs to be deallocated and marked as generalized in Azure. Use the Stop-AzVM PowerShell command to deallocate the VM.

     
  2. 6.

    Start PowerShell, log in to the Azure subscription, and make sure the correct subscription is selected. Here is the code:

     
###########################################################################
# Modify below parameter
$resourceGroup = <myResourceGroup>
$VMName= <myVM-name>
$subscriptionID= <subscription-ID>
###########################################################################
Connect-AzAccount
Select-AzSubscription $subscriptionID
Stop-AzVM -ResourceGroupName $resourceGroup -Name $VMName -Force
Set-AzVM -ResourceGroupName $resourceGroup -Name $VMName -Generalized
  1. 7.

    Now you can go back to the Azure portal and select the image from the virtual machines listed.

     
  2. 8.

    Check the virtual machine status.

     
  3. 9.

    On the “Virtual machine” page for the VM, on the upper menu, select Capture.

     
  4. 10.

    Enter all the details and select “Yes, share it to a gallery as a VM image version” on the “Create an image” page, and click “Review + create.” See Figure 7-3.

     
Figure 7-3

Creating an image

  1. 11.

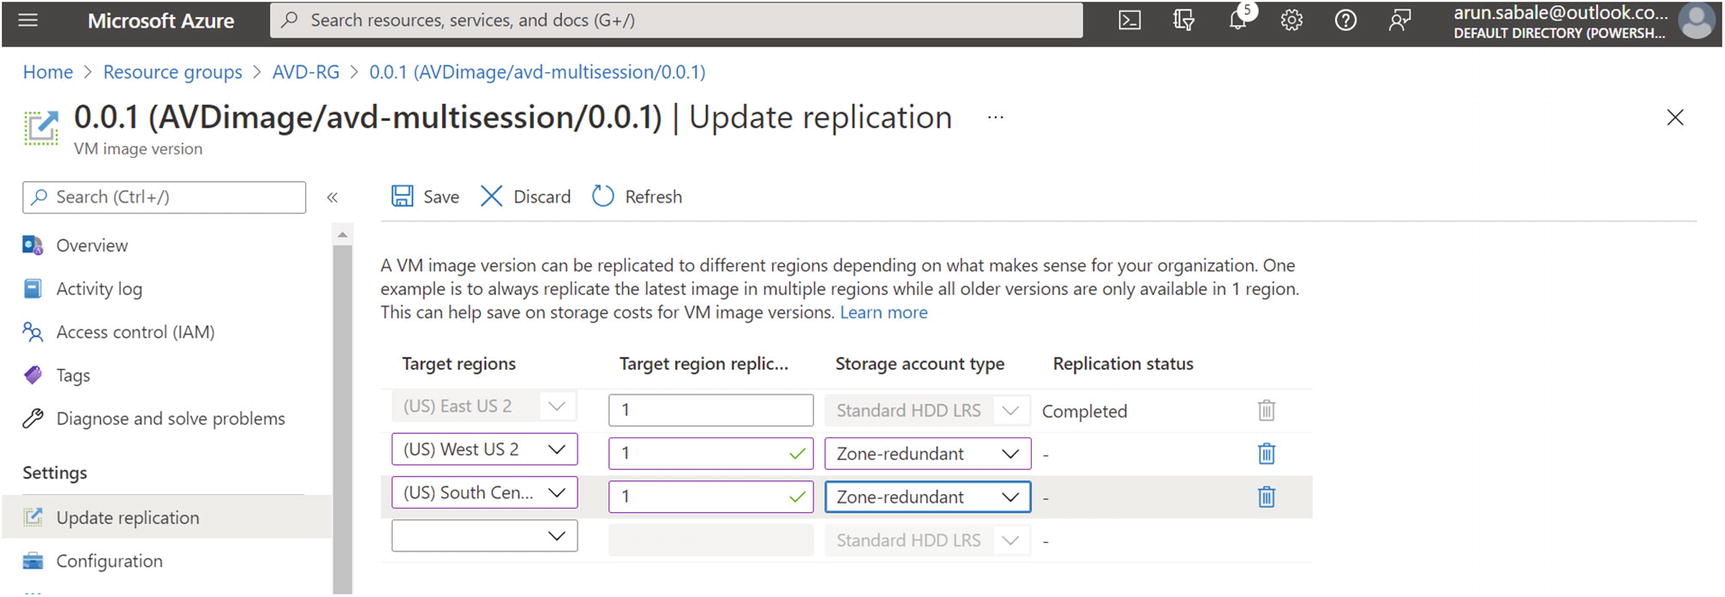
    Select image replication if you want to replicate the image to another region and click the “Review + create” button. See Figure 7-4.

     
Figure 7-4

Creating an image, step 2

Once the image is created, you will be able to see the image in the shared image gallery. See Figure 7-5.
Figure 7-5

Creating an image, image gallery

Automated Image Creation with the Azure Image Builder

Azure Image Builder (AIB) is a free, Azure-native tool that allows you to automate the image creation process, and you can still add customization with a PowerShell/Python/Shell script. AIB uses CLI and PowerShell commands to automate image creation with Microsoft.VirtualMachineImages provider. See Figure 7-6.
Figure 7-6

Creating an image, AIB flow

AIB allows you to automate the source, customization, and distribution of the image to the shared image gallery.

With AIB, you can migrate your existing image customization pipeline to Azure while continuing to use existing scripts, commands, and processes to customize images. Using Image Builder, you can integrate your core applications into a VM image so your VMs can take on workloads immediately after creation. You can even add configurations to build images for Azure Virtual Desktop or as VHDs for use in Azure Stack or for ease of exporting.

Image Builder lets you start with Windows or Linux images from the Azure Marketplace or existing custom images and add your own customizations. You can also specify how you would like your resulting images hosted in the Azure Compute Gallery (formerly known as the Shared Image Gallery), as managed images or as VHDs.

Creating and Using a Shared Image Gallery

A shared image gallery, which is now known as the Azure Compute Gallery , helps admins/operation teams to share images and application packages across subscriptions in your organization. The Azure Compute Gallery lets you store custom VM images and application packages and share them within or across regions. The image gallery also lets you choose a region to replicate the images and select storage residency (LRS, ZRS). You can create multiple galleries so that you can logically group resources and apply Azure role-based access control (Azure RBAC) .

An Azure Compute Gallery provides the following:
  • Global replication.

  • Versioning and grouping of resources for easier management.

  • Highly available resources with zone redundant storage (ZRS) accounts in regions that support availability zones. ZRS offers better resilience against zonal failures.

  • Premium storage support (Premium_LRS).

  • Sharing across subscriptions, and even between Active Directory (AD) tenants, using Azure RBAC.

  • Scaling your deployments with resource replicas in each region.

You can share image and application with different users, service principals, or AD groups within your organization using the image gallery. Resources can be replicated to multiple regions for quicker scaling of your deployments.

Image Management

A golden image is a copy of a full VM including any attached data disks (if any). You can create VMs from an image multiple times, and a copy of the VHD from the image is used to create a new VM disk. If you have multiple images that you need to maintain and would like to make them available throughout your company and let specific teams access specific images, then the Azure Image Gallery is your best option to manage multiple images with RBAC.

The following resources get created when you use the Azure Image Gallery to store images:
  • Image definition: Image definitions are a logical grouping of image versions, and they carry information about the image and any requirements for using it to create VMs. There are three parameters for each image definition that are used in the combination: Publisher, Offer, and SKU. These parameters are used to find a specific image definition. This includes whether the image is Windows or Linux, release notes, and minimum and maximum memory requirements. It is a definition of a type of image.

  • Image version: An image version is what you use to create a VM when using a gallery and image version, which allows you to store/create multiple versions of an image as needed for your environment. See Figure 7-7.

Figure 7-7

Azure image gallery version and definition

Generalized and Specialized Images

There are two operating system states supported by Azure Compute Gallery. Typically, images require that the VM used to create the image has been generalized before taking the image. Generalizing is a process that removes machine- and user-specific information from the VM. For Windows, the Sysprep tool is used. For Linux, you can use the waagent -deprovision or -deprovision+user parameter.

Specialized VMs have not been through a process to remove machine-specific information and accounts. Also, VMs created from specialized images do not have an osProfile associated with them. This means that specialized images will have some limitations in addition to some benefits.
  • VMs and scale sets created from specialized images can be up and running quicker. Because they are created from a source that has already been through the first boot, VMs created from these images boot faster.

  • Accounts that can be used to log into the VM can also be used on any VM created using the specialized image created from that VM.

  • VMs will have the computer name of the VM the image was taken from. You should change the computer name to avoid collisions.

  • The osProfile is how some sensitive information is passed to the VM, using secrets. This may cause issues using KeyVault, WinRM, and other functionality that uses secrets in the osProfile. In some cases, you can use Managed Service Identities (MSI) to work around these limitations.

Azure Image Gallery Limits

There are limits, per subscription, for deploying resources using Azure Compute Gallery:
  • 100 galleries per subscription per region

  • 1,000 image definitions per subscription, per region

  • 10,000 image versions per subscription per region

  • 10 image version replicas per subscription per region

Any disk attached to the image must be less than or equal to 1 TB in size.

Azure Image Gallery High Availability

Azure zone redundant storage (ZRS) provides resilience against an availability zone failure in the region. With the general availability of Azure Compute Gallery, you can choose to store your images in ZRS accounts in regions with availability zones. See Figure 7-8.
Figure 7-8

Azure image gallery zone redundant storage and image replication

You can also choose the account type for each of the target regions. The default storage account type is Standard_LRS, but you can choose Standard_ZRS for regions with availability zones. See Figure 7-9.
Figure 7-9

Azure image gallery zone redundant storage and image replication option

Steps to Create an Azure Image Gallery

You can create an Azure image gallery during the image capture process, but if you want to create an image gallery separately before capturing image, then these are the steps to do so:
  1. 1.

    Sign into the Azure portal at https://portal.azure.com.

     
  2. 2.

    Search for Azure Compute Gallery in the top search box and select Azure Compute Gallery in the results.

     
  3. 3.

    On the Azure Compute Gallery page, click Add.

     
  4. 4.

    On the “Create Azure compute gallery” page, select the correct subscription and resource group.

     
  5. 5.

    In Name, type the image gallery name based on the organization-specific naming standards and select the appropriate region for the image gallery. See Figure 7-10.

     
  6. 6.

    Click “Review + create.”

     
  7. 7.

    After validation passes, select Create to create the image gallery.

     
Figure 7-10

Azure image gallery creation

Install Language Packs in Azure Virtual Desktop

Azure Virtual Desktop is a service that your users can deploy anytime, anywhere and access it from anywhere. That’s why it’s important that your users are able to customize which language their Windows 10 Enterprise multisession image displays. There are two ways you can accommodate the language needs of your users.
  • Build separate host pools with a customized image for each language.

  • Build a single host pool with different language and localization requirements for different users, but customize their images to ensure they can select whichever language they need. This method is a lot more efficient and cost-effective.

You can automate language pack installation with the following PowerShell script during the image creation process. You can use the following script sample to install the Spanish (Spain), French (France), and Chinese (PRC) language packs and satellite packages for Windows 10 Enterprise multisession, version 2004. The script integrates the language interface pack and all necessary satellite packages into the image. However, you can also modify this script to install other languages. Just make sure to run the script from an elevated PowerShell session, or else it won’t work.

The script is available at https://github.com/Ar-Sa/Arun/blob/master/Powershell/Add%20language%20packs%20to%20a%20Windows%2010%20multisession%20image/Add-AVDLanguagePack.ps1.
########################################################
## Add Languages to running Windows Image for Capture##
########################################################
##Disable Language Pack Cleanup##
Disable-ScheduledTask -TaskPath "MicrosoftWindowsAppxDeploymentClient" -TaskName "Pre-staged app cleanup"
##Set Language Pack Content Stores##
[string]$LIPContent = "E:"
##Spanish##
Add-AppProvisionedPackage -Online -PackagePath $LIPContentes-esLanguageExperiencePack.es-es.Neutral.appx -LicensePath $LIPContentes-esLicense.xml
Add-WindowsPackage -Online -PackagePath $LIPContentMicrosoft-Windows-Client-Language-Pack_x64_es-es.cab
Add-WindowsPackage -Online -PackagePath $LIPContentMicrosoft-Windows-LanguageFeatures-Basic-es-es-Package~31bf3856ad364e35~amd64~~.cab
Add-WindowsPackage -Online -PackagePath $LIPContentMicrosoft-Windows-LanguageFeatures-Handwriting-es-es-Package~31bf3856ad364e35~amd64~~.cab
Add-WindowsPackage -Online -PackagePath $LIPContentMicrosoft-Windows-LanguageFeatures-OCR-es-es-Package~31bf3856ad364e35~amd64~~.cab
Add-WindowsPackage -Online -PackagePath $LIPContentMicrosoft-Windows-LanguageFeatures-Speech-es-es-Package~31bf3856ad364e35~amd64~~.cab
Add-WindowsPackage -Online -PackagePath $LIPContentMicrosoft-Windows-LanguageFeatures-TextToSpeech-es-es-Package~31bf3856ad364e35~amd64~~.cab
Add-WindowsPackage -Online -PackagePath $LIPContentMicrosoft-Windows-NetFx3-OnDemand-Package~31bf3856ad364e35~amd64~es-es~.cab
Add-WindowsPackage -Online -PackagePath $LIPContentMicrosoft-Windows-InternetExplorer-Optional-Package~31bf3856ad364e35~amd64~es-es~.cab
Add-WindowsPackage -Online -PackagePath $LIPContentMicrosoft-Windows-MSPaint-FoD-Package~31bf3856ad364e35~amd64~es-es~.cab
Add-WindowsPackage -Online -PackagePath $LIPContentMicrosoft-Windows-Notepad-FoD-Package~31bf3856ad364e35~amd64~es-es~.cab
Add-WindowsPackage -Online -PackagePath $LIPContentMicrosoft-Windows-PowerShell-ISE-FOD-Package~31bf3856ad364e35~amd64~es-es~.cab
Add-WindowsPackage -Online -PackagePath $LIPContentMicrosoft-Windows-Printing-WFS-FoD-Package~31bf3856ad364e35~amd64~es-es~.cab
Add-WindowsPackage -Online -PackagePath $LIPContentMicrosoft-Windows-StepsRecorder-Package~31bf3856ad364e35~amd64~es-es~.cab
Add-WindowsPackage -Online -PackagePath $LIPContentMicrosoft-Windows-WordPad-FoD-Package~31bf3856ad364e35~amd64~es-es~.cab
$LanguageList = Get-WinUserLanguageList
$LanguageList.Add("es-es")
Set-WinUserLanguageList $LanguageList -force
##French##
Add-AppProvisionedPackage -Online -PackagePath $LIPContentfr-frLanguageExperiencePack.fr-fr.Neutral.appx -LicensePath $LIPContentfr-frLicense.xml
Add-WindowsPackage -Online -PackagePath $LIPContentMicrosoft-Windows-Client-Language-Pack_x64_fr-fr.cab
Add-WindowsPackage -Online -PackagePath $LIPContentMicrosoft-Windows-LanguageFeatures-Basic-fr-fr-Package~31bf3856ad364e35~amd64~~.cab
Add-WindowsPackage -Online -PackagePath $LIPContentMicrosoft-Windows-LanguageFeatures-Handwriting-fr-fr-Package~31bf3856ad364e35~amd64~~.cab
Add-WindowsPackage -Online -PackagePath $LIPContentMicrosoft-Windows-LanguageFeatures-OCR-fr-fr-Package~31bf3856ad364e35~amd64~~.cab
Add-WindowsPackage -Online -PackagePath $LIPContentMicrosoft-Windows-LanguageFeatures-Speech-fr-fr-Package~31bf3856ad364e35~amd64~~.cab
Add-WindowsPackage -Online -PackagePath $LIPContentMicrosoft-Windows-LanguageFeatures-TextToSpeech-fr-fr-Package~31bf3856ad364e35~amd64~~.cab
Add-WindowsPackage -Online -PackagePath $LIPContentMicrosoft-Windows-NetFx3-OnDemand-Package~31bf3856ad364e35~amd64~fr-fr~.cab
Add-WindowsPackage -Online -PackagePath $LIPContentMicrosoft-Windows-InternetExplorer-Optional-Package~31bf3856ad364e35~amd64~fr-FR~.cab
Add-WindowsPackage -Online -PackagePath $LIPContentMicrosoft-Windows-MSPaint-FoD-Package~31bf3856ad364e35~amd64~fr-FR~.cab
Add-WindowsPackage -Online -PackagePath $LIPContentMicrosoft-Windows-Notepad-FoD-Package~31bf3856ad364e35~amd64~fr-FR~.cab
Add-WindowsPackage -Online -PackagePath $LIPContentMicrosoft-Windows-PowerShell-ISE-FOD-Package~31bf3856ad364e35~amd64~fr-FR~.cab
Add-WindowsPackage -Online -PackagePath $LIPContentMicrosoft-Windows-Printing-WFS-FoD-Package~31bf3856ad364e35~amd64~fr-FR~.cab
Add-WindowsPackage -Online -PackagePath $LIPContentMicrosoft-Windows-StepsRecorder-Package~31bf3856ad364e35~amd64~fr-FR~.cab
Add-WindowsPackage -Online -PackagePath $LIPContentMicrosoft-Windows-WordPad-FoD-Package~31bf3856ad364e35~amd64~fr-FR~.cab
$LanguageList = Get-WinUserLanguageList
$LanguageList.Add("fr-fr")
Set-WinUserLanguageList $LanguageList -force
##Chinese(PRC)##
Add-AppProvisionedPackage -Online -PackagePath $LIPContentzh-cnLanguageExperiencePack.zh-cn.Neutral.appx -LicensePath $LIPContentzh-cnLicense.xml
Add-WindowsPackage -Online -PackagePath $LIPContentMicrosoft-Windows-Client-Language-Pack_x64_zh-cn.cab
Add-WindowsPackage -Online -PackagePath $LIPContentMicrosoft-Windows-LanguageFeatures-Basic-zh-cn-Package~31bf3856ad364e35~amd64~~.cab
Add-WindowsPackage -Online -PackagePath $LIPContentMicrosoft-Windows-LanguageFeatures-Fonts-Hans-Package~31bf3856ad364e35~amd64~~.cab
Add-WindowsPackage -Online -PackagePath $LIPContentMicrosoft-Windows-LanguageFeatures-Handwriting-zh-cn-Package~31bf3856ad364e35~amd64~~.cab
Add-WindowsPackage -Online -PackagePath $LIPContentMicrosoft-Windows-LanguageFeatures-OCR-zh-cn-Package~31bf3856ad364e35~amd64~~.cab
Add-WindowsPackage -Online -PackagePath $LIPContentMicrosoft-Windows-LanguageFeatures-Speech-zh-cn-Package~31bf3856ad364e35~amd64~~.cab
Add-WindowsPackage -Online -PackagePath $LIPContentMicrosoft-Windows-LanguageFeatures-TextToSpeech-zh-cn-Package~31bf3856ad364e35~amd64~~.cab
Add-WindowsPackage -Online -PackagePath $LIPContentMicrosoft-Windows-NetFx3-OnDemand-Package~31bf3856ad364e35~amd64~zh-cn~.cab
Add-WindowsPackage -Online -PackagePath $LIPContentMicrosoft-Windows-InternetExplorer-Optional-Package~31bf3856ad364e35~amd64~zh-cn~.cab
Add-WindowsPackage -Online -PackagePath $LIPContentMicrosoft-Windows-MSPaint-FoD-Package~31bf3856ad364e35~amd64~zh-cn~.cab
Add-WindowsPackage -Online -PackagePath $LIPContentMicrosoft-Windows-Notepad-FoD-Package~31bf3856ad364e35~amd64~zh-cn~.cab
Add-WindowsPackage -Online -PackagePath $LIPContentMicrosoft-Windows-PowerShell-ISE-FOD-Package~31bf3856ad364e35~amd64~zh-cn~.cab
Add-WindowsPackage -Online -PackagePath $LIPContentMicrosoft-Windows-Printing-WFS-FoD-Package~31bf3856ad364e35~amd64~zh-cn~.cab
Add-WindowsPackage -Online -PackagePath $LIPContentMicrosoft-Windows-StepsRecorder-Package~31bf3856ad364e35~amd64~zh-cn~.cab
Add-WindowsPackage -Online -PackagePath $LIPContentMicrosoft-Windows-WordPad-FoD-Package~31bf3856ad364e35~amd64~zh-cn~.cab
$LanguageList = Get-WinUserLanguageList
$LanguageList.Add("zh-cn")
Set-WinUserLanguageList $LanguageList -force

The script might take a while depending on the number of languages you need to install.

Enable Languages in the Windows Settings App

Once you deploy the host pool, you have to add the language to each user’s language list so they can select their preferred language in the Settings menu. You can set up the following script as an automated task or logon script that activates when the user signs into their session:
$LanguageList = Get-WinUserLanguageList
$LanguageList.Add("es-es")
$LanguageList.Add("fr-fr")
$LanguageList.Add("zh-cn")
Set-WinUserLanguageList $LanguageList -force

After a user changes their language settings, they’ll need to sign out of their Azure Virtual Desktop session and sign in again for the changes to take effect.

Summary

In this chapter, you learned about creating a Azure Virtual Desktop image and publishing the image to the shared image gallery. We also talked about options to automate the image creation process, manage the image versions, and create image replicas in different regions. Since you know everything about image creation, the next chapter will cover Azure Virtual Desktop session host creation.

..................Content has been hidden....................

You can't read the all page of ebook, please click here login for view all page.
Reset
3.144.113.30