This chapter demonstrates how to plan and implement Azure virtual network connectivity, manage connectivity to the Internet and on-premises networks, implement and manage security aspects for Azure Virtual Desktop, and manage Azure Virtual Desktop (AVD) session hosts by using Azure Bastion. Additionally, this chapter provides detailed information on monitoring and troubleshooting network connectivity and best practices.
Remember, Azure Virtual Desktop on Microsoft Azure is a desktop and application virtualization service that operates on the Microsoft cloud. Azure Virtual Desktop works on multiple devices such as Windows, Mac, iOS, Android, and Linux, with apps that you can use to access remote desktops and apps. You can also use most modern browsers to access Azure Virtual Desktop–hosted experiences.
You will gain experience implementing and managing virtual desktop experiences, connecting to a network, implementing security, and optimizing the desktop to run in virtual environments.
Implement Azure Virtual Network Connectivity
As you know, Azure Virtual Desktop is a desktop and application virtualization service that runs in the Azure cloud. Azure Virtual Desktop works across devices (Windows, Mac, iOS, Android, and Linux) with apps that you can use to access remote desktops and apps.
First you need to understand how this works before digging in more. Azure offers a cloud service that accesses a container for all the virtual machines in your deployment. All the virtual machines in this cloud service are talking to each other and are on the same network.
What Is Azure Virtual Network?
Azure Virtual Network (VNet) is the foundation for a private network in Azure. VNet allows various kinds of Azure resources, including virtual machines, to firmly communicate with each other, the Internet, and on-premises networks. VNet facilitates Azure resources to securely communicate with each other, the Internet, and on-premises networks.
By linking Azure Virtual Desktop host pools to an Active Directory domain, you can specify the network topology to gain access to virtual desktops and virtual apps from the intranet or Internet, based on company policy. You can connect an Azure Virtual Desktop instance to an on-premises network utilizing a virtual private network (VPN) or, with the help of Azure ExpressRoute, expand the on-premises network into the Azure cloud over a private connection.

Azure VNet
Communicate with the Internet
All resources in a virtual network can communicate outbound to the Internet by default. You can communicate inbound to a resource by assigning a public IP address or a public load balancer. You can also use a public IP or public load balancer to manage your outbound connections.
When using only an internal standard load balancer, outbound connectivity is not available until you define how you want outbound connections to work with an instance-level public IP or a public load balancer.
Connect to Azure Resources
Through a virtual network: You can deploy VMs and several other types of Azure resources to a virtual network, such as Azure app service environments, Azure Kubernetes Service (AKS), and Azure Virtual Machine Scale Sets.
Through a virtual network service endpoint: Extend your virtual network private address space and the identity of your virtual network to Azure service resources, such as Azure Storage accounts and Azure SQL Database, over a direct connection. Service endpoints allow you to secure your critical Azure service resources to only a virtual network.
Through VNet peering: You can connect virtual networks to each other, enabling resources in either virtual network to communicate with each other, using virtual network peering. The virtual networks you connect can be in the same or different Azure regions.
Creating a Virtual Network for AVD
VNet and on-premises connectivity are important prerequisites for Azure Virtual Desktop. It is important to set up VNet correctly with the required subnet, DNS settings, and peering with a hub virtual network for on-premises connectivity (or hub shared service connectivity) so that users can use their domain credentials to log in to AVD and access their on-premises applications/services.
- 1.
Log in to the Azure portal and select the correct directory and subscription where you want to create the AVD host pool and desktops. Make sure you have correct permissions (contributor or owner) to create network resources. See Figure 4-2.

Azure subscription selection
- 2.
Search for virtual network in the top search bar. See Figure 4-3.

Azure virtual network search
- 3.
Click Create to create a new virtual network. See Figure 4-4.

Azure virtual network creation
- 4.
Select the correct subscription and resource group names from the drop-down where you want to create the AVD desktops. If the resource group does not exist, then you can create a new resource group by clicking the Create New option. See Figure 4-5.

Azure virtual network creation page
- 5.
Additionally, provide the virtual network name as per your organization’s naming standard and select the correct region (the same as AVD desktops). Click the Next button once, and enter all the information. See Figure 4-6.

Azure virtual network creation, Basic tab
- 6.
Provide the IP address space/range for VNet on the IP Addresses tab. You must coordinate with the network team to get the correct IP address range for AVD VNet that does not conflict with an existing VNet or on-premises IP address range. See Figure 4-7.

Azure virtual network creation, IP Addresses tab
- 7.
Additionally, create an appropriate subnet on the same IP Addresses tab. You can click the “Add subnet” option to add additional subnets. You must consider the number of session hosts/VMs you are planning to create under each subnet plus some buffer IP addresses for future use and create the subnet accordingly. Create the subnet, remembering that each host pool needs to be placed in different subnets if they belong to different business units and don’t want to share any user data. See Figure 4-8.

Azure virtual network creation, add subnet
- 8.
You will get a subnet pop-up to enter additional subnet information like the name and IP address range. Make sure you are entering the subnet name as per your organization’s naming standards. Click the Add button to add the subnet. See Figure 4-9.

Azure virtual network creation, adding a subnet detail
- 9.
Once you have entered all the IP address information, then click Next to go to the Security tab and verify whether you want to change anything as per your organization standards, or click Next to go to Tags. Make sure you are adding tags as per your organization’s standards and click Next. See Figure 4-10.

Azure virtual network creation, Tags tab
- 10.
Finally, click “Review + create” and then click Create once the validation is completed. See Figure 4-11.

Azure virtual network creation, creating and reviewing
- 11.
You will be able to see deployment progress on the same page, and you can go to the resource once the deployment is completed. See Figure 4-12.

Azure virtual network creation, deployment status
- 12.
You can verify the VNet details on the Overview page. See Figure 4-13.

Azure virtual network, AVD VNet details
- 13.
If you still want to add subnets, then you can go to the Subnet option in the left pane and click to add a subnet. See Figure 4-14.

AVD virtual network, adding a subnet
- 14.
Once the subnet and VNet are ready, then the next step is to create a network security group (NSG), peering to a hub virtual network, and DNS settings. Create the NSG and click the Create option to create a new network security group. See Figure 4-15.

AVD virtual network, creating a NSG
- 15.
Select the correct subscription and resource group for the network security group (the same as AVD VNet). Add the NSG name and select the correct region the same way as you did for the VNet and AVD desktops. See Figure 4-16.

AVD NSG creation
- 16.
You will see the deployment status on the same page. Wait for the deployment to complete and then click “Go to resource.” See Figure 4-17.

A AVD NSG creation, deployment status
- 17.
The NSG default rules will be visible on the Overview page. See Figure 4-18.

AVD NSG, Overview page
- 18.
Make sure to add the AVD-specific IP/port in the outbound rules. The following are the recommended/required IP addresses/ports for AVD. AVD does not require any inbound connection but definitely needs KMS, metadata, health monitoring IP addresses/ports, and a few Azure service tags in case you don’t want Internet access on the VM. Refer to Table 4-1 for all AVD-specific port and IP details. See Figure 4-19.
AVD NSG: Outbound Security Rules Requirement
Source | Destination | Port | Action | Direction | Remark |
|---|---|---|---|---|---|
* | * | * | Deny | Outbound | Deny all default NSG rules. |
Azure AVD VNet | AD DNS IP addresses? | DNS (port 53) | Allow | Outbound | If the DNS is on-premises, we need to open ports from the firewall. |
Azure AVD VNet | AD domain controllers IP addresses? | TCP 88 (Kerberos Key Distribution Center) | Allow | Outbound | If the target is on-premises, we need to open ports from the firewall. |
TCP 135 (Remote Procedure Call) | |||||
TCP 139 (NetBIOS Session Service) | |||||
TCP 389 (LDAP) | |||||
TCP 445 (SMB, Net Logon) | |||||
UDP 53 (DNS) | |||||
UDP 389, 636 (LDAP, LDAPS, DC Locator, Net Logon) | |||||
TCP 49152-65535 (Randomly allocated high TCP ports) | |||||
Azure AVD VNet | Monitoring and patching server IP address range? | ? | Allow | Outbound | If the target is on-prem, we need to open ports from the firewall. |
Azure AVD VNet | On-Prem application IP address range? | ? | Allow | Outbound | If the target is on-prem, we need to open ports from the firewall. |
AVD-specific port | |||||
Azure AVD VNet | 169.254.169.254 and 168.63.129.16 | 80 | Allow | Outbound | Azure internal: AVD metadata and health monitoring: https://docs.microsoft.com/en-us/azure/virtual-desktop/safe-url-list |
Azure AVD VNet | kms.core.windows.net | 1688 | Allow | Outbound | Internet: KMS port required for AVD: https://docs.microsoft.com/en-us/azure/virtual-desktop/safe-url-list, KMS (Key Management Service) is one of the methods to activate Microsoft Windows and Microsoft Office. Activation ensures that the software is obtained from and licensed by Microsoft. |
23.102.135.246 | KMS IP addresses | ||||
Azure AVD VNet | AzureCloud and WindowsVirtualDesktop OR Internet service tag | 443 | Allow | Outbound | 443 to Internet OR 443 to AzureCloud, WindowsVirtualDesktop: https://docs.microsoft.com/en-us/azure/virtual-desktop/safe-url-list |

AVD NSG, Outbound security rules
- 19.
Once an NSG is updated with the correct rules, then you have to attach it to subnets so that the rules will take effect. Go back to the AVD virtual network you created at the start and go to the subnet option from the left pane. Now click the subnet name and attach the NSG from the right-side pane. See Figure 4-20.

AVD NSG assignment
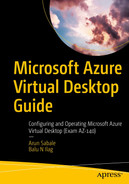
- 20.
Select the network security group from the drop-down in the subnet pop-up. See Figure 4-21.
AVD NSG assignment on subnet
- 21.
Select the correct NSG name and click the Save button. See Figure 4-22.

AVD NSG assignment page
- 22.
You can attach a route table to force-tunnel all traffic to the Azure firewall or third-party firewall in the cloud or on-premises firewall. Select the routing table from the drop-down to attach it to the subnet. See Figure 4-23.

AVD NSG assignment page- route table
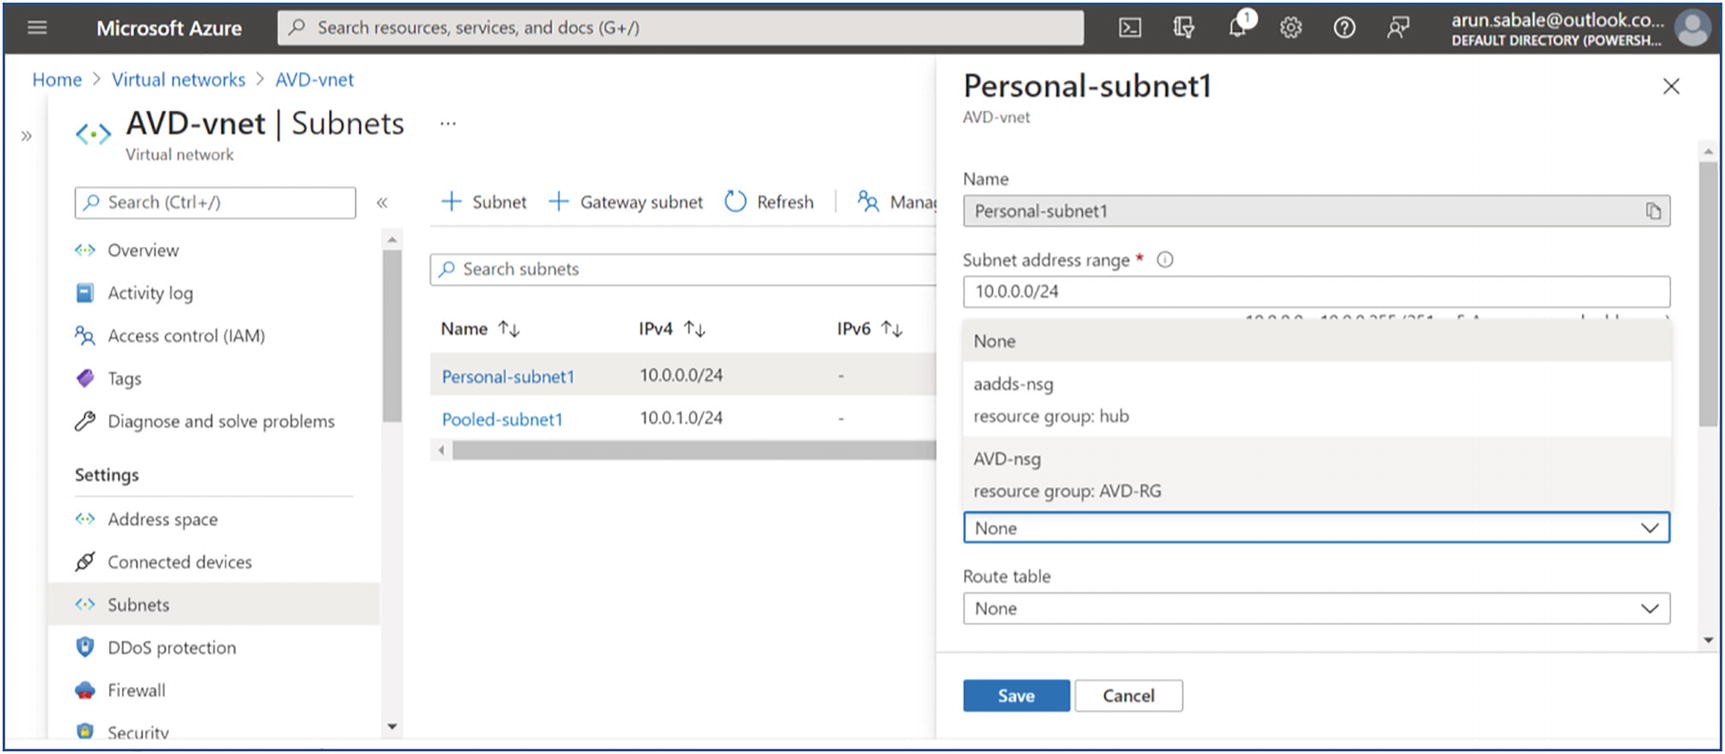
- 23.
Make sure you have the correct port/IP address open on the firewall/NVA when you are force-tunneling all AVD traffic. Additionally, the routing table must have the correct route. Refer to the route table in Figure 4-24.
AVD routing table to force-tunnel traffic to the firewall
- 24.
Once you have updated the NSG and route table, then create peering with the hub VNet so all traffic to on-premises/the other VNet can go through the hub VNet. Go to the hub VNet, click Peering in the left pane, and then click the Add option in the right pane. See Figure 4-25.

AVD virtual network peering to hub virtual network
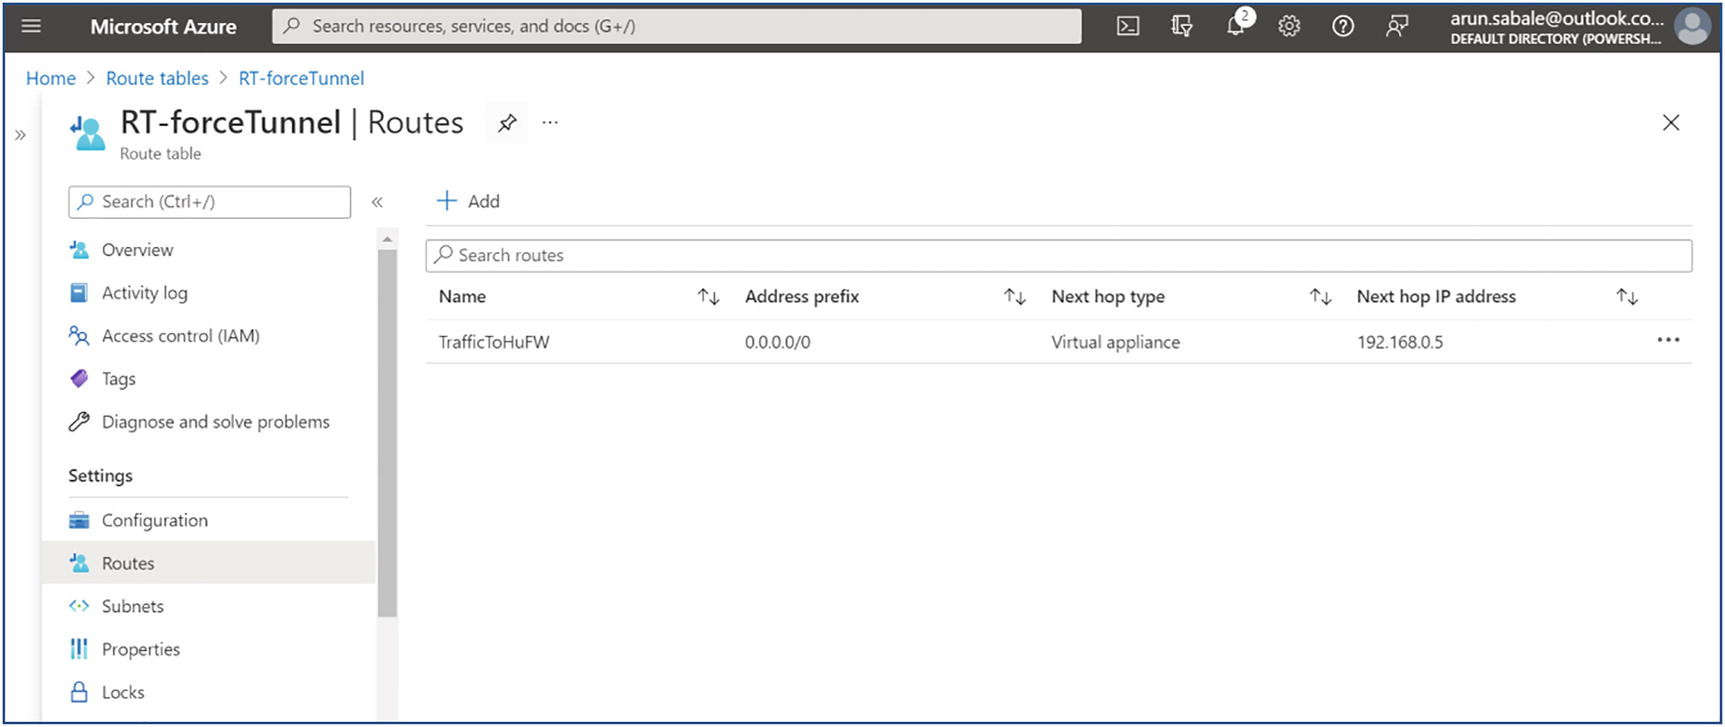
- 25.
Enter the names for peering from the hub to AVD and vice versa. Additionally, select the target virtual network in the drop-down to peer with. Most important, allow all traffic as well as gateway transit so that the gateway will be used for on-premises traffic. The “Gateway transit” option will be available when you have a gateway in the hub for a site-to-site VPN or ExpressRoute. Click the Add button once you select all the options on the peering page. See Figure 4-26.
AVD virtual network peering to hub vnet, adding peering
- 26.
The peering status will be visible on the same page. Wait until the peering status is connected. See Figure 4-27.

AVD virtual network peering to hub vnet, Overview page
- 27.
The next step is to update the DNS settings on AVD VNet. Go to AVD VNet and click the DNS Servers option in the left pane. See Figure 4-28.

AVD virtual network, DNS server setting
- 28.
Select the Custom option in the right pane and enter the DNS server’s IP address. Additionally, you must make sure the DNS port and IP address are open on all firewalls and NSGs so that the session host can reach the DNS server on port 53. Once the IP address is added, then click the Save button to save the configuration. See Figure 4-29.

AVD virtual network, custom DNS server setting
Manage Connectivity to the Internet and On-Premises Networks
Point-to-site virtual private network: A point-to-site VPN is established between a virtual network and a single computer in your network. Each computer that wants to establish connectivity with a virtual network must configure its connection. It is ideal for just getting started with Azure, or for developers, because it requires little or no changes to your existing network. Another important point is the communication between your computer and a virtual network is sent through an encrypted tunnel over the Internet, which makes your connectivity protected from unauthorized people.
Site-to-site VPN: A site-to-site VPN is another connectivity mechanism. It establishes a connection between your on-premises VPN device and an Azure VPN Gateway that is deployed in a virtual network. Site-to-site VPN enables any on-premises resource that you authorize to access a virtual network. The communication between your on-premises VPN device and an Azure VPN gateway is sent through an encrypted tunnel over the Internet.
Azure ExpressRoute: By using Azure ExpressRoute partners, you can establish communication between your network and Azure. This connection is completely private and not shared with other customers or the Internet. Also, the Azure traffic does not go over the Internet. See Figure 4-30.

Connectivity options for the Internet and on-premises
Understanding Azure Virtual Desktop Network Connectivity
- 1.
When authenticated in the Azure Active Directory, a token is returned to the Remote Desktop Services client.
- 2.
The gateway checks the token with the connection broker.
- 3.
The broker queries the Azure SQL database for resources assigned to the user.
- 4.
The gateway and the broker select the session host for the connected client.
- 5.
The session host creates a reverse connection to the client by using the Azure Virtual Desktop gateway. Figure 4-31 shows Azure Virtual Desktop connectivity.

Azure Virtual Desktop connectivity
When no inbound ports are opened, the gateway acts as an intelligent reverse proxy. The gateway manages all session connectivity, with nothing but pixels reaching the client. Azure Virtual Desktop hosts client sessions on the session hosts running on Azure. Microsoft manages portions of the services on the customer’s behalf and provides secure endpoints for connecting clients and session hosts.
Azure Virtual Desktop Network Connection
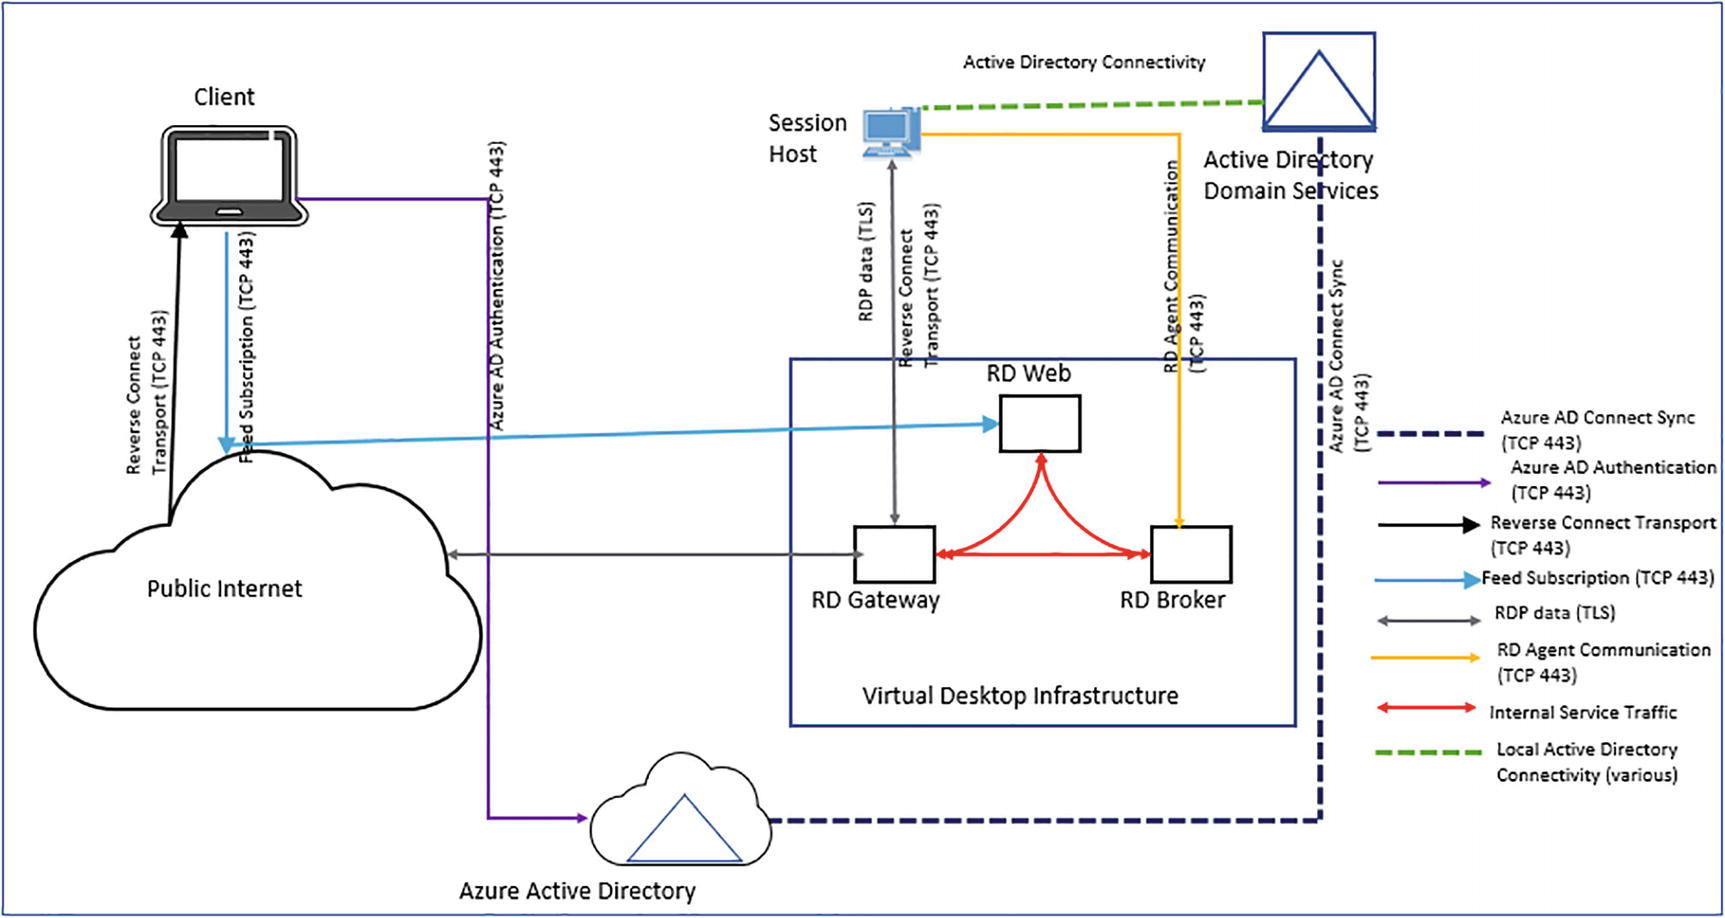
Azure Virtual Desktop Network connections
Session connectivity: Azure Virtual Desktop uses Remote Desktop Protocol to provide remote display and input capabilities over network connections.
Reverse connect transport: Azure Virtual Desktop is utilizing a reverse connect transport for establishing the remote session and for carrying RDP traffic. Unlike the on-premises Remote Desktop Services deployments, reverse connect transport doesn’t use a TCP listener to receive incoming RDP connections. Instead, it is using outbound connectivity to the Azure Virtual Desktop infrastructure over the HTTPS connection.
Session host communication channel: Upon startup of the Azure Virtual Desktop session host, the Remote Desktop Agent Loader service establishes the Azure Virtual Desktop broker’s persistent communication channel. This communication channel is layered on top of a secure Transport Layer Security (TLS) connection and serves as a bus for service message exchange between the session host and Azure Virtual Desktop infrastructure.
How Can You Filter the Network Traffic?
You can filter the network traffic between subnets using either or both of the options including Network Security Group (NSG), and application security groups. NSG’s can contain multiple inbound and outbound security rules that permit you to filter traffic to and from resources by source and destination IP address, port, and protocol. Another option is a network virtual appliance (NVA), which is a VM that performs a network function, such as a firewall, WAN optimization, or other network function.
How to Route Network Traffic in Azure?
Azure routes traffic between subnets, connected virtual networks, on-premises networks, and the Internet, by default. You can implement a route table or Border Gateway Protocol (BGP) route. Both options override the default routes that Azure creates.
By using route tables, you can create custom route tables with routes that control where traffic is routed to for each subnet. If you connect your virtual network to your on-premises network using an Azure VPN Gateway or ExpressRoute connection, you can propagate your on-premises BGP routes to your virtual networks.
Virtual Network Integration for Azure Services
If deploying dedicated instances of the service into a virtual network, the services can then be privately accessed within the virtual network and from on-premises networks.
Using a private link to access a specific instance of the service privately from your virtual network or from on-premises networks.
You can also access the service using public endpoints by extending a virtual network to the service, through service endpoints. Service endpoints allow service resources to be secured to the virtual network.
No inbound ports are opened. In this version, the gateway acts as an intelligent reverse proxy. The gateway manages all session connectivity, with nothing but pixels reaching the client.
Azure Virtual Desktop hosts client sessions on the session hosts running on Azure. Microsoft manages portions of the services on the customer’s behalf and provides secure endpoints for connecting clients and session hosts. The diagram above (Figure 4-32) gives a high-level overview of the network connections used by Azure Virtual Desktop.
How the AVD Client Connection Sequence Works
- 1.
As the first step, a user utilizing a supported Azure Virtual Desktop client subscribes to the Azure Virtual Desktop workspace.
- 2.
Then Azure Active Directory authenticates the user and returns the token used to enumerate resources available to the user.
- 3.
The client passes the token to the Azure Virtual Desktop feed subscription service.
- 4.
The Azure Virtual Desktop feed subscription service validates the token.
- 5.
The Azure Virtual Desktop feed subscription service passes the list of available desktops and RemoteApps back to the client in the form of a digitally signed connection configuration.
- 6.
The client stores the connection configuration for each available resource in a set of .rdp files.
- 7.
When a user chooses the resource to connect to, the client uses the associated .rdp file, establishes a secure TLS 1.2 connection to the closest Azure Virtual Desktop gateway instance, and passes the connection information.
- 8.
The Azure Virtual Desktop gateway validates the request and asks the Azure Virtual Desktop broker to orchestrate the connection.
- 9.
The Azure Virtual Desktop broker identifies the session host and uses the previously established persistent communication channel to initialize the connection.
- 10.
The Remote Desktop stack initiates the TLS 1.2 connection to the same Azure Virtual Desktop gateway instance as used by the client.
- 11.
After both the client and session hosts connect to the gateway, the gateway starts relaying the raw data between both endpoints; this establishes the base reverse connect transport for the RDP.
- 12.
After the base transport is set, the client starts the RDP handshake, and the user can access the Azure Virtual Desktop.
How Does AVD Secure the Connection?
Azure Virtual Desktop utilizes TLS 1.2 for all connections initiated from the clients and session hosts to the Azure Virtual Desktop infrastructure components. For reverse connect transport, both the client and session hosts connect to the Azure Virtual Desktop gateway. After establishing the TCP connection, the client or session host validates the Azure Virtual Desktop gateway’s certificate. After establishing the base transport, RDP establishes a nested TLS connection between the client and session host using the session host’s certificates. By default, the certificate used for RDP encryption is self-generated by the OS during the deployment.
Implement and Manage Network Security
Before understanding how to manage network security in a Azure Virtual desktop, you as an Azure Virtual Desktop admin must remember that when an end user connects to an Azure Virtual Desktop environment, their session is run by a host pool. A host pool is nothing but a collection of Azure virtual machines that register to Azure Virtual Desktop as session hosts.

Azure Virtual Desktop Security system
Additionally, Figure 4-33 provides additional protection for your Azure Virtual Desktop host pool using Azure Firewall.
Host Pool Outbound Access to Azure Virtual Desktop
- 1.
Deploy an Azure Firewall and configure your Azure Virtual Desktop host pool subnet user-defined route (UDR) to route all traffic via the Azure Firewall. Your default route now points to the firewall.
- 2.
Create an application rule collection and add a rule to enable the WindowsVirtualDesktop FQDN tag. The source IP address range is the host pool virtual network, the protocol is HTTPS, and the destination is WindowsVirtualDesktop.
- 3.The set of required storage and service bus that accounts for your Azure Virtual Desktop host pool is deployment specific, so it isn’t yet captured in the WindowsVirtualDesktop FQDN tag. You can address this in one of the following ways:
- a.
Allow HTTPS access from your host pool subnet to *xt.blob.core.windows.net, *eh. servicebus.windows.net, and *xt.table.core.windows.net. These wildcard FQDNs enable the required access but are less restrictive.
- b.
You can use the following log analytics query to list the exact required FQDNs and then allow them explicitly in your firewall application rules:
- c.
AzureDiagnostics | where Category == “AzureFirewallApplicationRule” | search “Deny”
| search “gsm*eh.servicebus.windows.net” or “gsm*xt.blob.core.windows.net” or “gsm*xt.table.core.windows.net” | parse msg_s with Protocol “request from “SourceIP “:” SourcePort:int “to “FQDN “:” * | project TimeGenerated,Protocol,FQDN
- d.
Create a network rule collection to add the following rules: for Allow DNS, allow traffic from your ADDS private IP address to * for TCP and UDP ports 53, and for Allow KMS, allow traffic from your Azure Virtual Desktop virtual machines to Windows Activation Service TCP port 1688.
Certain implementations may not require DNS rules; for instance, Azure Active Directory domain controllers forward DNS queries to Azure DNS at 168.63.129.16.
Important Consideration: Host Pool Outbound Access to the Internet
Based on your organization’s requirements, you may need to enable secure outbound Internet access for your end users. In instances where the list of allowed destinations is well-defined (for instance, Microsoft 365 access), you can use Azure Firewall applications and network rules to configure the required access. This routes end-user traffic directly to the Internet for the best performance.
If you want to filter outbound user Internet traffic using an existing on-premises secure web gateway, you can configure web browsers or other applications running on the Azure Virtual Desktop host pool with an explicit proxy configuration. These proxy settings only influence your end-user Internet access, permitting the Azure Virtual Desktop platform outbound traffic directly via Azure Firewall.
Manage Azure Virtual Desktop Session Hosts by Using Azure Bastion
In this section you’ll learn about Azure Bastion.
Configure AVD Session Hosts Using Azure Bastion
Azure Bastion offers secure connectivity to all VMs in a virtual network in which it is provisioned. Utilizing Azure Bastion protects your virtual machines from exposing RDP/SSH ports to the outside world, while still offering secure access utilizing RDP/SSH.
You need a VNet with the Bastion host already installed. Make sure that you have set up an Azure Bastion host for the virtual network in which the VM is located. Once the Bastion service is provisioned and deployed in your virtual network, you can make use of it to connect to any VM in the virtual network.
You need a Windows virtual machine in the virtual network.
The required roles are as follows: Reader role on the virtual machine, Reader role on the NIC with the private IP address of the virtual machine, and Reader role on the Azure Bastion resource.
To connect to the Windows VM, you must have the inbound port RDP (3389) open on your Windows VM.
How to Connect to Bastion?
- 1.
Log in to the Azure portal (https://portal.azure.com), navigate to the virtual machine that you want to connect to, and select Connect. Select Bastion from the drop-down list. Figure 4-34 shows the Bastion option.

Connecting to Bastion
- 2.
After you select Bastion from the drop-down, a sidebar appears that has three tabs: RDP, SSH, and Bastion. Because Bastion was provisioned for the virtual network, the Bastion tab is active by default. Select Use Bastion. For more information, refer to Figure 4-35.

Usong Bastion
- 3.
On the “Connect using the Azure Bastion” page, enter the username and password for your virtual machine, and then click Connect. See Figure 4-36.

Connecting using Azure Bastion
- 4.
The RDP connection to this virtual machine via Bastion will open directly in the Azure portal (over HTML5) using port 443 and the Bastion service.
Monitor and Troubleshoot Network Connectivity
After learning about virtual desktop network connectivity and management, you as an admin must learn about different troubleshooting scenarios for using virtual desktop connectivity. There are different tools that can you use to troubleshoot the connectivity issues and diagnosis the problems.
Azure Virtual Desktop Monitoring

Azure Virtual Desktop Connection Monitor 2.0
How Do I Monitor Communication Between a Virtual Desktop and an Endpoint?
You as an admin must know how to monitor the communication between an endpoint and the virtual desktops. Endpoints can be another virtual machine (VM), a fully qualified domain name (FQDN), a uniform resource identifier (URI), or an IPv4 address.
Another tool is the Connection Monitor 2.0, which monitors communication at a regular interval and informs you of reachability, latency, and network topology changes between the VM and the endpoint.
If an endpoint becomes unreachable, connection troubleshooting informs you of the reason. Potential reasons are a DNS name resolution problem; the CPU, memory, or firewall within the operating system of a VM; the hop type of a custom route; or a security rule for the VM or subnet of the outbound connection.
Additionally, the Connection Monitor provides the minimum, average, and maximum latency observed over time. After learning the latency for a connection, you may find that you’re able to decrease the latency by moving your Azure resources to different Azure regions.
How Do I View Resources in a Virtual Network and Their Relationships?

An Azure virtual network, topology diagram
How Do I Diagnose Network Traffic Filtering Problems to or from a VM?
After you implement a VM, Azure applies various default security rules to the VM that allow or deny traffic to or from the VM. You as an admin might override Azure’s default rules or create additional rules. If you see a VM that may become unable to communicate with other resources, because of a security rule, the IP flow verify capability enables you to specify a source and destination IPv4 address, port, protocol (TCP or UDP), and traffic direction (inbound or outbound). IP flow verifies the tests the communication and informs you if the connection succeeds or fails.
If the connection fails, IP flow checks and tells you which security rule allowed or denied the communication so that you can resolve the problem.
How Do I Diagnose Network Routing Problems from a VM?
While supporting the VM environment as an admin, you may encounter the network routing issue, and you must know how to diagnose the routing problem. Once you create a virtual network, Azure creates several default outbound routes for network traffic. The outbound traffic from all resources, like VMs, deployed in a virtual network, are routed based on Azure’s default routes. You might override Azure’s default routes or create additional routes. You may find that a VM can no longer communicate with other resources because of a specific route.
To troubleshoot the issue, you may check the next hop capability enables you to specify a source and destination IPv4 address. The next hop then tests the communication and informs you what type of next hop is used to route the traffic. You can then remove, change, or add a route to resolve a routing problem.
Azure Monitor Tool
In this section you’ll learn about the tool.
How Do I Monitor Azure Virtual Desktop Using Azure Monitor?
Azure Monitor is another tool that helps you in monitoring Azure Virtual Desktop. It is important to learn how to set up Azure Monitor for Azure Virtual Desktop to monitor your Azure Virtual Desktop environments. Prior to using Azure Monitor for Azure Virtual Desktop, you’ll need to set up the multiple things.
You must have at least one configured Log Analytics workspace. Make use of a designated Log Analytics workspace for your Azure Virtual Desktop session hosts to ensure that performance counters and events are collected only from session hosts in your Azure Virtual Desktop deployment.
- Allow data collection for the following things in your Log Analytics workspace:
- a.
Diagnostics from your Azure Virtual Desktop environment
- b.
Recommended performance counters from your Azure Virtual Desktop session hosts
- c.
Recommended Windows Event Logs from your Azure Virtual Desktop session hosts
The data setup process explained in this page is the only one you’ll need to monitor Azure Virtual Desktop. You can disable all other items sending data to your Log Analytics workspace to save costs.
- Anyone monitoring Azure Monitor for Azure Virtual Desktop for your environment will also need the read-access permissions that are mentioned here:
- a.
Read-access to the Azure subscriptions that hold your Azure Virtual Desktop resources
- b.
Read-access to the subscription’s resource groups that hold your Azure Virtual Desktop session hosts
- c.
Read-access to the Log Analytics workspace or workspaces
Read-access permissions only let admins view data. However, they will need different permissions to manage resources in the Azure Virtual Desktop portal.
Set Up Azure Monitor for Azure Virtual Desktop
- a.
First you need to log in to the Azure portal. After you are logged in to the Azure portal, search for and select Azure Monitor from the Azure portal.
- b.
Select Insights Hub under Insights, and then select Azure Virtual Desktop. See Figure 4-39.

Azure Monitor
- c.
Once you have the page open, enter the subscription, resource group, host pool, and time range of the environment you want to monitor.
- d.
As an additional step, you will need to set up the log analytics setting, because before you start using the Azure Monitor for Azure Virtual Desktop, you will need at least one Log Analytics workspace. Use a designated Log Analytics workspace for your Azure Virtual Desktop session hosts to ensure that performance counters and events are only collected from session hosts in your Azure Virtual Desktop deployment.
How Do I Set Up Resource Diagnostic Settings on a Virtual Desktop Workspace?
- 1.
Select the Diagnostic settings host pool.
- 2.
Under Monitoring, select “Diagnostic settings.”
Log Analytics Workspace for Azure Monitor
It is important to have an analytics workspace, because you will need at least one Log Analytics workspace to start using Azure Monitor for Azure Virtual Desktop. Utilize a designated Log Analytics workspace for your Azure Virtual Desktop session hosts to ensure that performance counters and events are collected only from session hosts in your Azure Virtual Desktop deployment.
- 1.
Log in and open Azure Monitor for Azure Virtual Desktop in the Azure portal at https://aka.ms/azmonwvdi, and then select configuration workbook.
- 2.
Select an environment to configure under Subscription, Resource Group, and Host Pool.
The configuration workbook sets up your monitoring environment and lets you check the configuration after you have finished the setup process. It’s important to check your configuration if items in the dashboard aren’t displaying correctly or when the product group publishes updates that require new settings. You need to enable the supported diagnostic tables such as Checkpoint, Error, Management, Connection, HostRegistration, and AgentHealthStatus.
Azure Advisor Tool to Monitor Azure Virtual Desktop
You can use Azure Advisor to monitor Azure Virtual Desktop. Azure Advisor is the go-to tool, and I frequently use it for monitoring issues. Whenever you come across an issue in Azure Virtual Desktop, always check Azure Advisor first. Azure Advisor will give you directions for how to solve the problem, or at least point you toward a resource that can help. This section will tell you how to set up Azure Advisor in your Azure Virtual Desktop deployment to help your users.
What Is Azure Advisor?
Azure Advisor analyzes your configurations and telemetry to offer personalized recommendations to solve common problems. With these recommendations, you can optimize your Azure resources for reliability, security, operational excellence, performance, and cost.
How Do I Start Using Azure Advisor?

Azure Advisor
When you open Azure Advisor, you will see five different categories: Cost, Security, Reliability, Operational Excellence, and Performance.
For Azure Advisor, make sure to check your recommendations regularly. Azure Advisor updates its active recommendations multiple times per day. Reviewing the latest recommendations can help you avoid larger issues by assisting you in spotting and solving smaller ones. Constantly attempt to solve the issues with the highest priority level in Azure Advisor. High-priority issues are marked with red. Leaving high-priority recommendations unresolved can lead to problems down the line.
Best practice: If a recommendation seems less important, you can dismiss it or postpone it. But do not dismiss recommendations until you know why they are appearing and are sure they won’t have a negative impact on you or your users.
How Do I Resolve Azure Advisor Recommendations?
This section describes how you can resolve recommendations that appear in Azure Advisor for Azure Virtual Desktop. Resolving recommendations involve “No validation environment enabled,” “Not enough production (non-validation) environments enabled,” and “Not enough links are unblocked to successfully implement your VM.” Here are the details for resolving each mentioned recommendation:
No Validation Environment Enabled
This recommendation is under Operational Excellence. The recommendation should also show you a warning message like this: You don’t have a validation environment enabled in this subscription. When you made your host pools, you selected No for “Validation environment” in the Properties tab. To ensure business continuity through Azure Virtual Desktop service deployments, make sure you have at least one host pool with a validation environment where you can test for potential issues.
- 1.
Log in to your Azure portal home page and choose the host pool you want to change.
- 2.
Choose the host pool you want to change from a production environment to a validation environment.
- 3.
In your host pool, select Properties on the left column. Next, scroll down until you see “Validation environment.” Select Yes, and then select Apply.
These changes won’t make the warning disappear immediately. Allow enough time for the recommendations to disappear on their own.
As a best practice, you can check the Azure Advisor updates twice a day.
Not Enough Production (Non-validation) Environments Enabled
- 1.
Log in to the Azure portal home page.
- 2.
Choose the host pools you want to change from validation to production.
- 3.
In your host pool, select the Properties tab in the column on the right side of the screen. Next, scroll down until you see “Validation environment.” Select No, and then select Apply. See Figure 4-41.

Nonproduction environment recommendation
Not Enough Links Are Unblocked to Successfully Implement Your VM
Another recommendation occurs under Operational Excellence. You need to unblock specific URLs to make sure that your virtual machine (VM) functions properly. You can find the list on the Safe URL list. If the URLs aren’t unblocked, then your VM won’t work properly. To resolve the recommendation, make sure you unblock all the URLs on the Safe URL list and use the Service Tag or FQDN tags to unblock URLs.
Azure Virtual Desktop Common Issues and Their Troubleshooting
Problem: Unable to open remote virtual desktop client or its stops responding for Windows 10.
Solution: You as an admin can reset the user data from the About page or use the msrdcw.exe /reset [/f] command. Use this command to remove your user data, restore default settings, and unsubscribe from all workspaces.
Problem: Unable to open web client.
- a.
As a first step, test your Internet connection by opening another website in your browser or using different browser.
- b.
Additionally, you can use nslookup to confirm DNS can resolve the FQDN or use a command prompt to run the command nslookup rdweb.AVD.microsoft.com .
- c.
You can try connecting with another client, for instance, Remote Desktop client for Windows 10 to see if you can open the web client.
Problem: The Virtual Desktop web client keeps prompting for credentials.
- 1.
Check and confirm the web client URL is correct. If there is any typo, then correct the URL and try accessing the correct URL.
- 2.
If the issue persists, then check and confirm that the credentials you are entering are for the Azure Virtual Desktop environment tied to the URL.
- 3.
If issue persists, then clear the browser cookies and browser cache.
- 4.
You can open your browser in private mode.
Troubleshoot application issues related to AVD using User Input Delay.
First check the counter measures how long any user input remains in the queue before it is picked up by a process.
The User Input Delay counter measures the max delta between the input being queued and when it’s picked up by the app in a message loop. Figure 4-42 shows input relay.

AVD using input relay
Troubleshoot Graphic Performance and Quality Issues
How Do I Find the Remote Session Name?
- 1.
First open the Windows command prompt from your remote session and then run the qwinsta command and find your session name.
If your session is hosted in a multisession virtual machine (VM), your instance of each counter is suffixed by the same number that suffixes your session name, such as rdp-tcp 37.
How Do I Access Performance Counters?
- 1.
First click Start ➤ Administrative Tools ➤ Performance Monitor.
- 2.
In the Performance Monitor dialog box, expand Monitoring Tools, select Performance Monitor, and then select Add.
- 3.
In the Add Counters dialog box, from the Available Counters list, expand the section RemoteFX Graphics. Then choose the counters to be monitored.
- 4.
In the “Instances of selected object” list, select the specific instances to be monitored for the selected counters and then select Add. To select all the available counter instances, select All instances, and then after adding the counters, select OK.
How Do I Diagnose the Graphics-Related Performance Issues?
Remember, the graphics-related performance problem normally fall into four types: low frame rate, random stalls, high input latency, and poor frame quality.
Frames Skipped/Second (Insufficient Server Resources)
Frames Skipped/Second (Insufficient Network Resources)
Frames Skipped/Second (Insufficient Client Resources)
A high value for any of the Frames Skipped/Second counters implies that the problem is related to the resource the counter tracks. If the Output Frames/Second counter matches the Input Frames/Second counter, you will still notice unusual lag or stalling, and Average Encoding Time may be the culprit. Encoding is a synchronous process that occurs on the server in the single-session (vGPU) scenario and on the VM in the multisession scenario. Average Encoding Time should be less than 33 ms.
How to Check the Poor Frame Quality?
Make use of the Frame Quality counter to diagnose frame quality issues. This counter expresses the quality of the output frame as a percentage of the quality of the source frame. The quality loss may be due to RemoteFX, or it may be inherent to the graphics source. If RemoteFX caused the quality loss, the issue may be a lack of network or server resources to send higher-fidelity content.
Best Practices
It is a best practice to post issues or bugs on a tech community so that other admins in the field and community contributor can help solve the problem.
Another best practice is to put forward new feature requirements or vote for existing new feature requests.
When you make a post asking for help or propose a new feature, make sure you describe your topic in as much detail as possible.
Summary
In this chapter, you learned about Azure Virtual Desktop network requirements, including implementing Azure virtual network connectivity, managing connectivity to the internet and on-premises networks from Azure Virtual Desktop, implementing and managing network security for AVD, and managing Azure Virtual Desktop session hosts by using Azure Bastion.
It is important to learn all about the network requirements for Azure Virtual Desktop so that you can keep the network ready before virtual desktop implementation.