In this chapter, you will learn about planning and implementing disaster recovery for Azure Virtual Desktop and about designing and configuring a backup strategy for personal desktops. You’ll also learn about FSLogix user profiles, MSIX packages, golden images, and restore options for all the backed-up components.
Backup and disaster recovery are different options; backup can be performed in the same region to recover/restore data from a specific point, and disaster recovery allows you to recover the infrastructure in another region in the case of a primary region outage.
Let’s get started with disaster recovery for pooled and personal desktops.
Plan and Implement a Disaster Recovery Plan for Azure Virtual Desktop
In this section, you’ll learn how to implement a disaster recovery plan.
What Is Disaster Recovery?
Disaster recovery is an organization’s method of regaining access and functionality to its IT infrastructure in a secondary location/region after events like a disaster in the primary region. A variety of disaster recovery (DR) methods can be part of a disaster recovery plan. DR is one aspect of business continuity. Applications/infrastructure must be replicated to a DR region so that they can be made available during a disaster.
To keep your organization’s data safe, you may need to adopt a business continuity and disaster recovery (BCDR) strategy. A sound BCDR strategy keeps your apps and workload up and running during planned and unplanned service or Azure outages.
Azure Virtual Desktop offers BCDR for the Azure Virtual Desktop service to preserve customer metadata during outages. When an outage occurs in a region, the service infrastructure components will fail over to the secondary location and continue functioning as normal. You can still access service-related metadata, and users can still connect to available hosts. End-user connections will stay online as long as the tenant environment or hosts remain accessible.
To make sure users can still connect during a regional outage, you need to replicate their virtual machines (VMs) in a different location. During outages, the primary site fails over to the replicated VMs in the secondary location. Users can continue to access apps from the secondary location without interruption. On top of VM replication, you’ll need to keep user identities accessible at the secondary location. If you’re using profile containers, you’ll also need to replicate them. Finally, make sure your business apps that rely on data in the primary location can fail over with the rest of the data.
- 1.
Replicate the VMs in a secondary location.
- 2.
If you’re using profile containers, set up data replication in the secondary location.
- 3.
Make sure the user identities you set up in the primary location are available in the secondary location.
- 4.
Make sure any line-of-business applications relying on data in your primary location are failed over to the secondary location. See Figure 10-1.
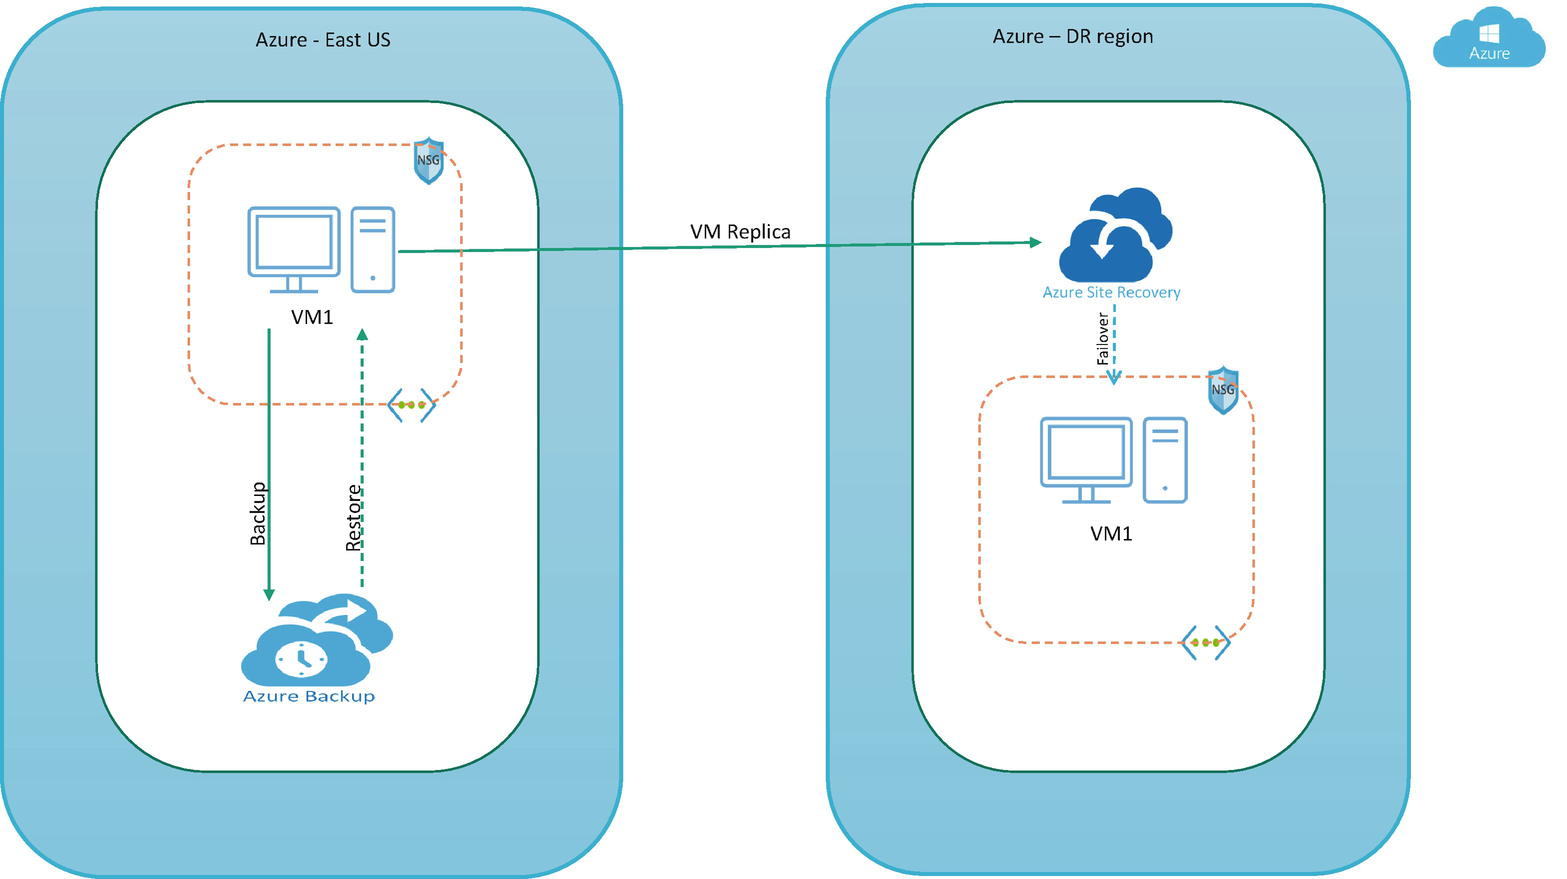
Disaster recovery
Disaster recovery relies upon the replication of data and the computers in a secondary location not being affected by the disaster. When servers go down because of a natural disaster, equipment failure, or cyberattack, a business needs to recover lost data from a second location where the data is backed up. Ideally, an organization can transfer its computer processing to that remote location as well to continue operations.
Most Azure resources come with the option to set the data replication to another region, so you must plan the disaster recovery during Azure Virtual Desktop implementation so that data replication can be enabled for all required resources during the implementation phase. Different resources are involved in pooled and personal desktops, and planning DR for each type of desktop is different.
Let’s see how we can plan and set up disaster recovery for each type of desktop.
Disaster Recovery for Pooled Desktops
Pool desktops are nonpersistent desktops, and that’s the reason we must use FSLogix to store the profile on a remote file share/storage. Since we already learned about all the pooled desktop concepts, you know that there are multiple resources we create as part of the pooled desktop creation, and you must plan disaster recovery for all the required resources.
Pooled user profile (DFS file share/Azure File Share Storage/Azure NetApp)
Pooled host pool session host
Pooled image
MSIX package storage account
On-premises connectivity and authentication

Disaster recovery for pooled desktop
- DFS/Windows file share: If you are using a DFS file share, then you must configure a file share replica on the file server in the DR region, and DFS will take care of the file replication to this DR region. Since you will be using a common workspace name, the DFS file share will be available with the same share name (workspace) from the DR region in the case of a disaster in the primary region. See Figure 10-3.
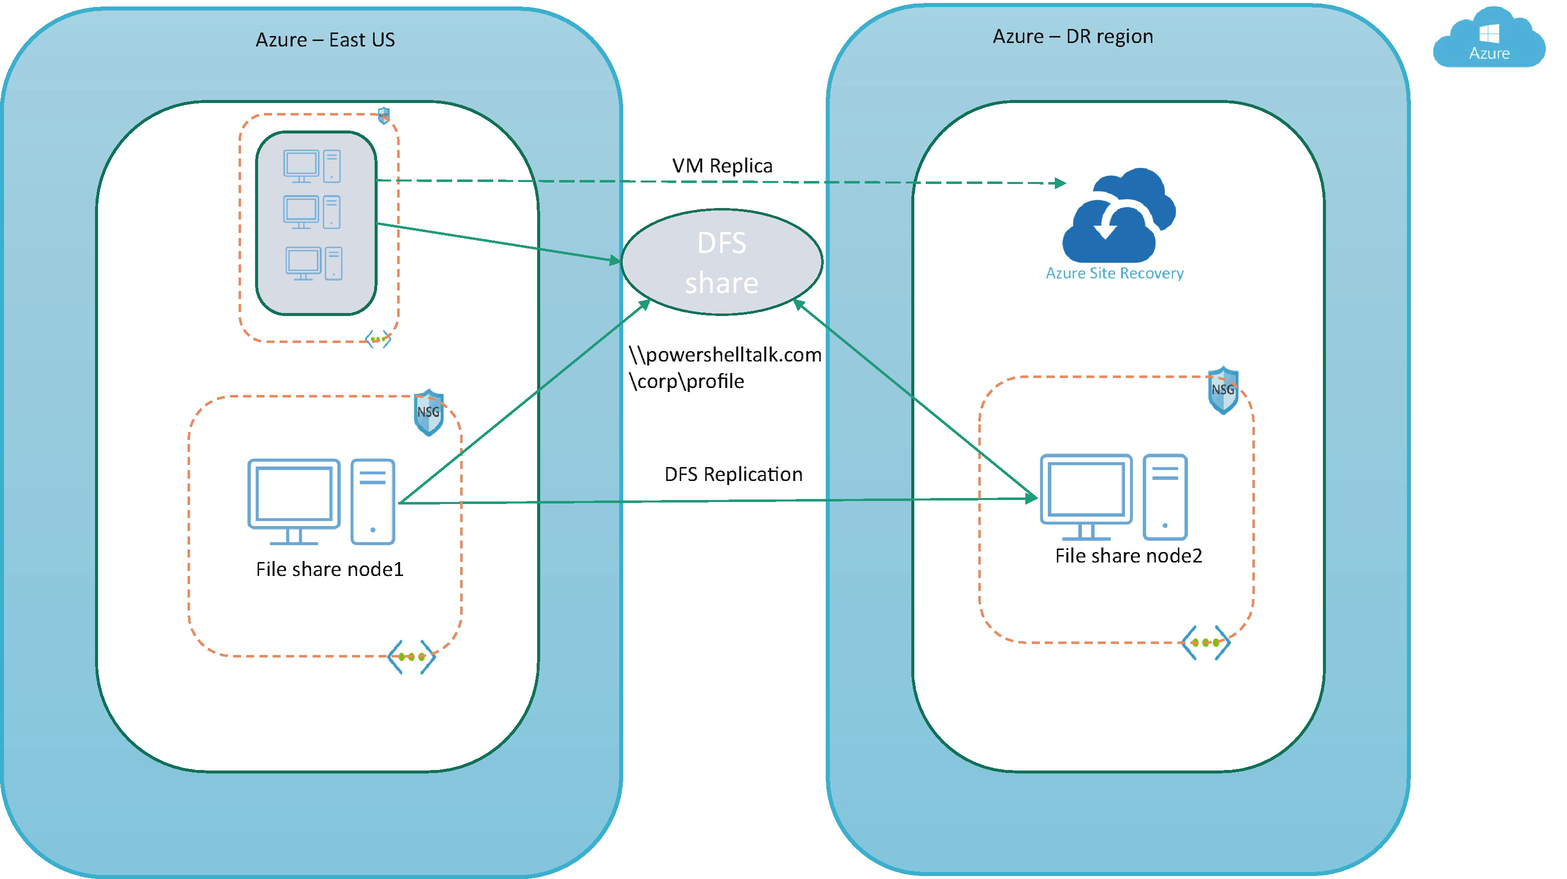 Figure 10-3
Disaster recovery for pooled desktop with DFS
Windows stand-alone file shares are a not recommended solution for a Azure Virtual Desktop user profile, and I don’t see any reason to use this option as we have much better options available for user profile storage. Anyway, if you are using a stand-alone file share, then you should know that it does not allow the replication feature, and you have to use robocopy/PowerShell to copy files to the file share in another region as well as manage the file share DNS names so that you don’t have to change the FSLogix user profile registry every time.
Azure File Share storage : File share storage is the most often used solution for the FSLogix user profile because it’s Azure native and easy to integrate with other services like Azure AD, ADDS, and a private endpoint with a virtual network. There are two options in Azure storage: premium and standard storage.
Standard storage: This comes with replication and a failover option to another region, but this is not recommended for a production workload because it can impact AVD performance due to limited IOPS on the standard storage. Premium storage provides more IOPS compared to standard storage, but if you are using a standard storage account, then you can go ahead and enable replication to another region. In the case of disaster, you can set the failover storage account to another region. Refer to Chapter 5 for more detailed steps about the FSLogix VHDLocation implementation. See Figure 10-4.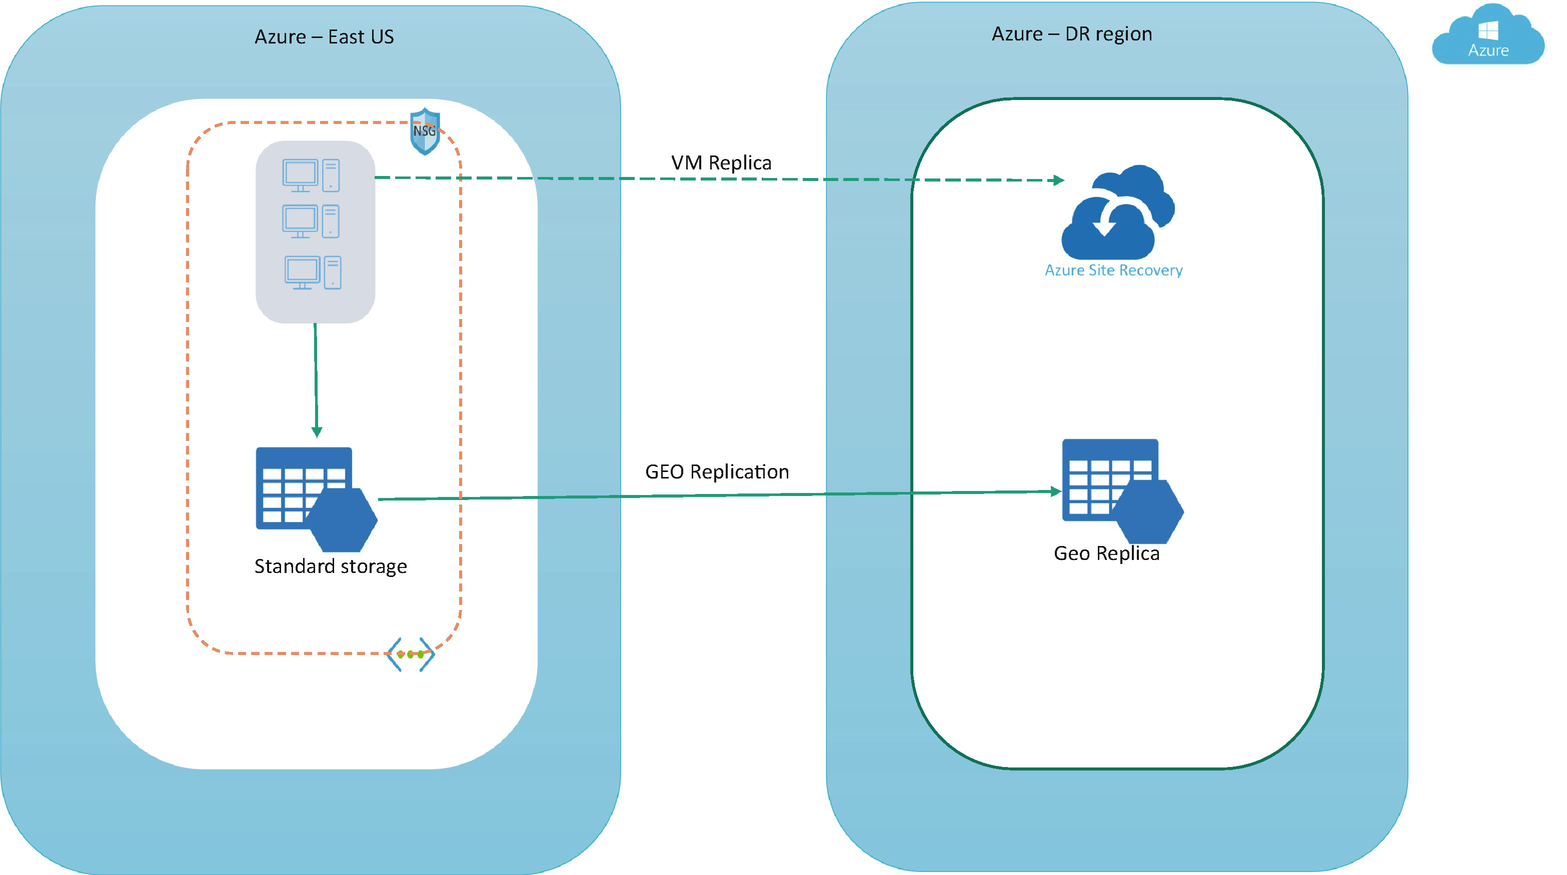 Figure 10-4
Disaster recovery for pooled user profile
Make sure you are setting the redundancy to GRS or ZGRS if you want to use standard storage so it will allow you to enable georeplication. See Figure 10-5.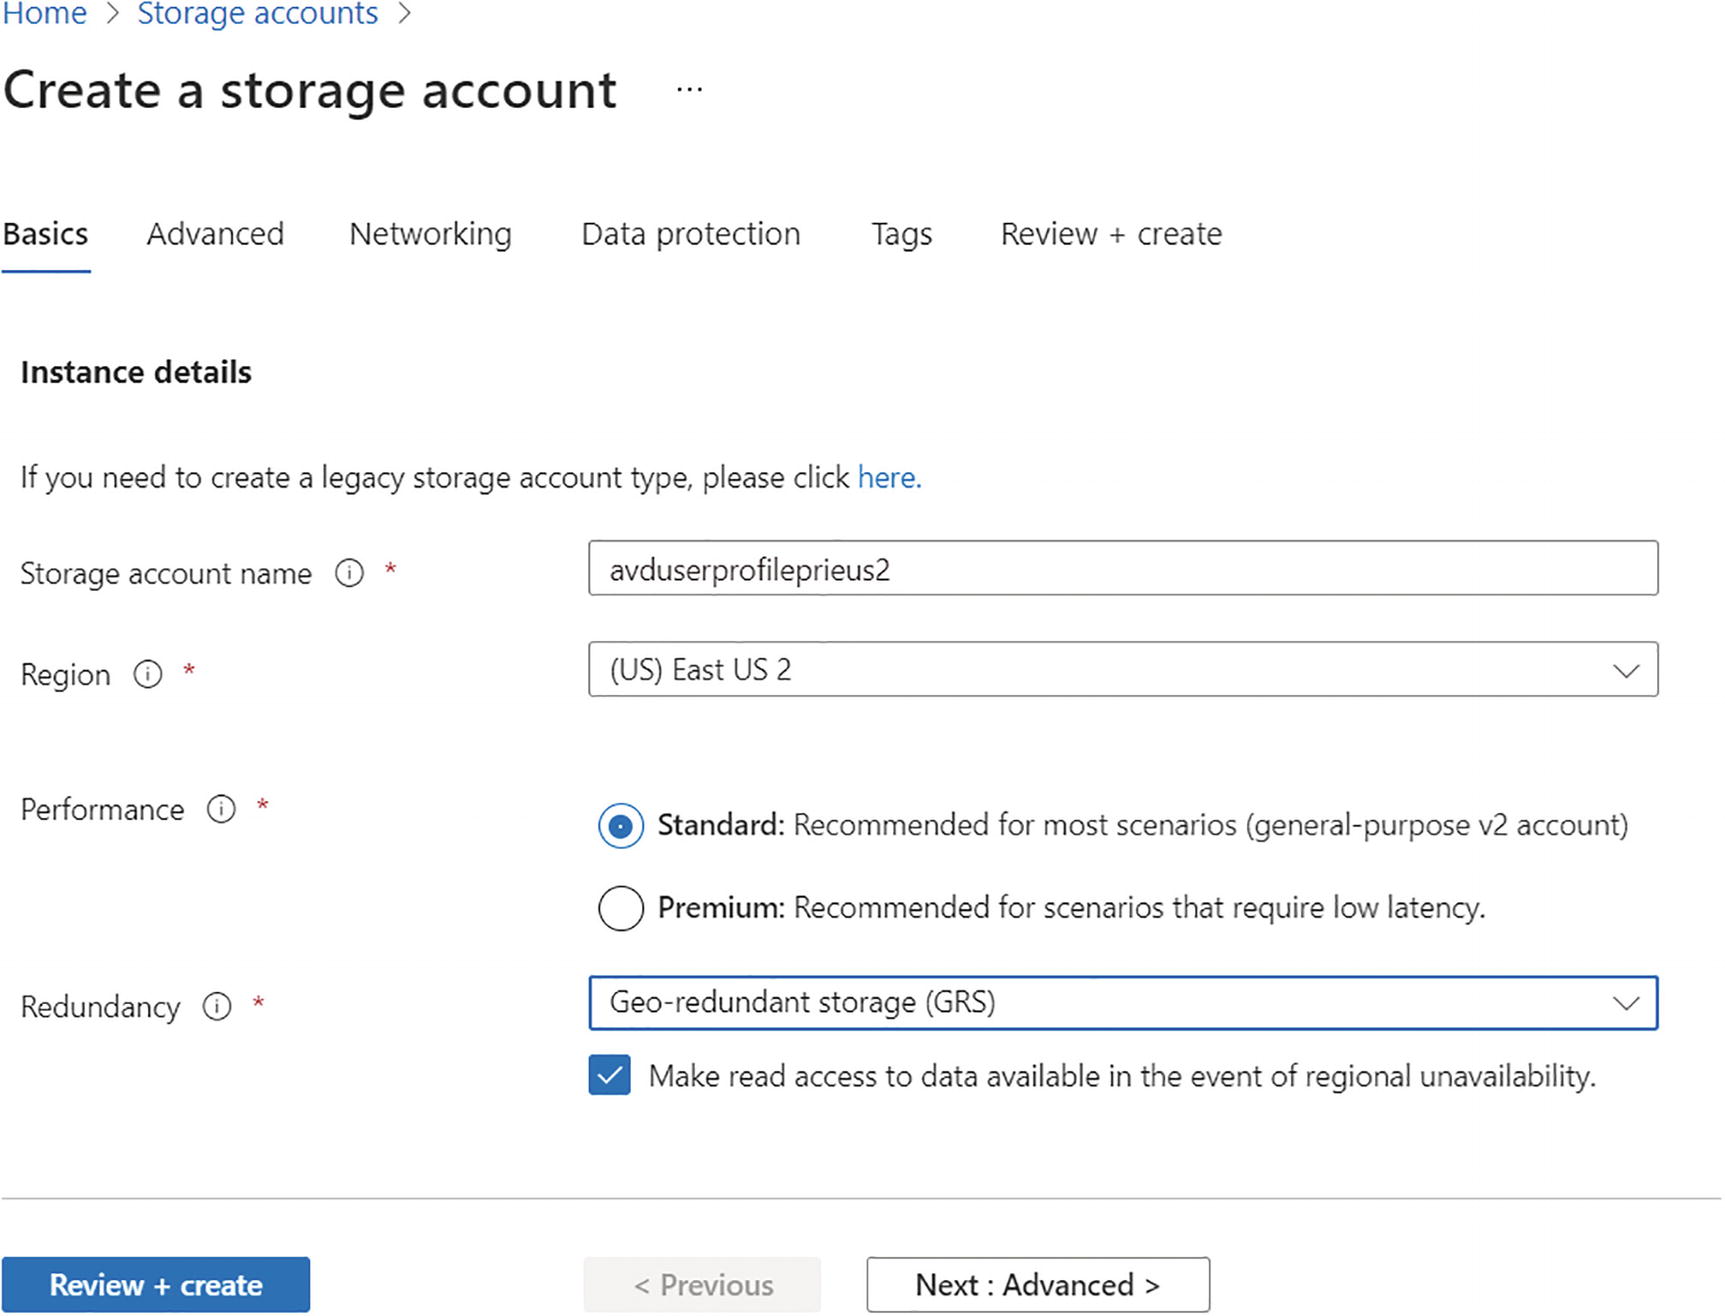 Figure 10-5
Pooled user profile storage account creation
Figure 10-6 shows the redundancy options available for a standard storage account.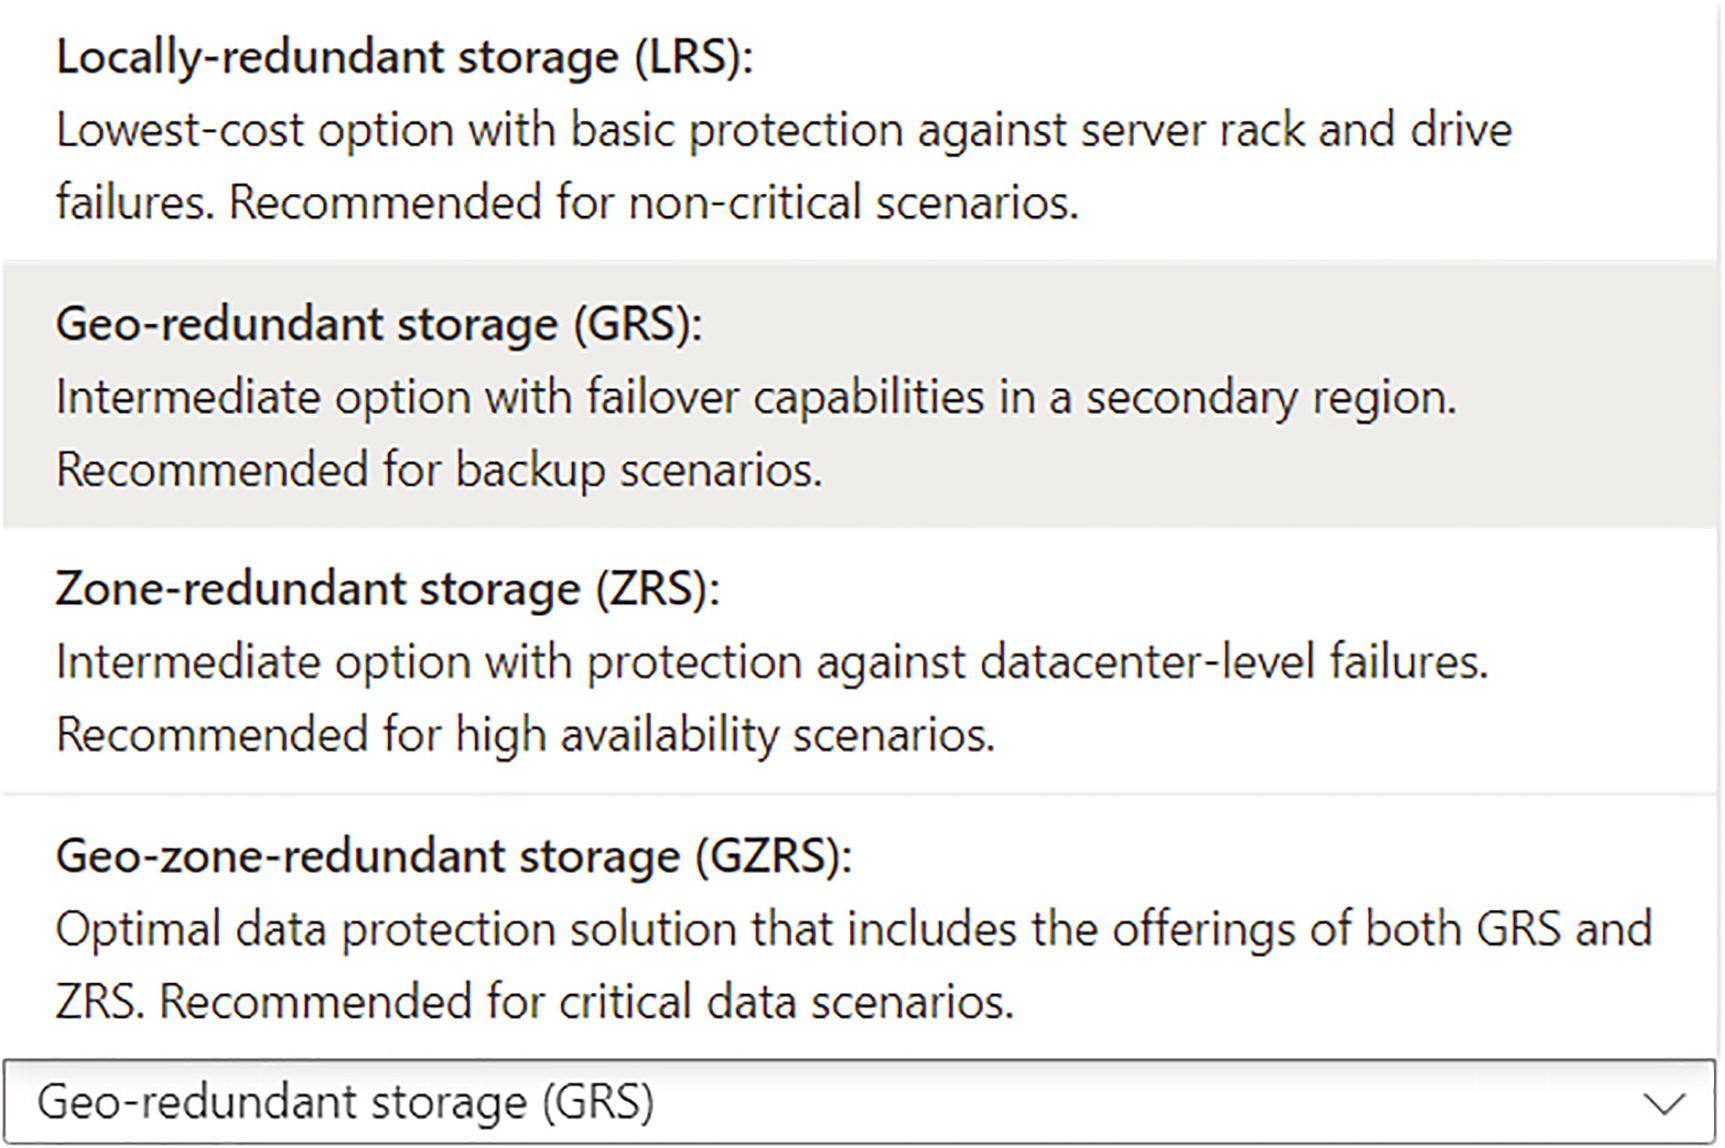 Figure 10-6
Storage redundancy
You can see the georeplication by going into the georeplication option in the user profile storage account. You will be able to see the replication status as the data center type (primary/secondary), and you can do failover in case of a disaster by clicking “Prepare for failover.” See Figure 10-7 and Figure 10-8. Figure 10-7
Storage georeplication
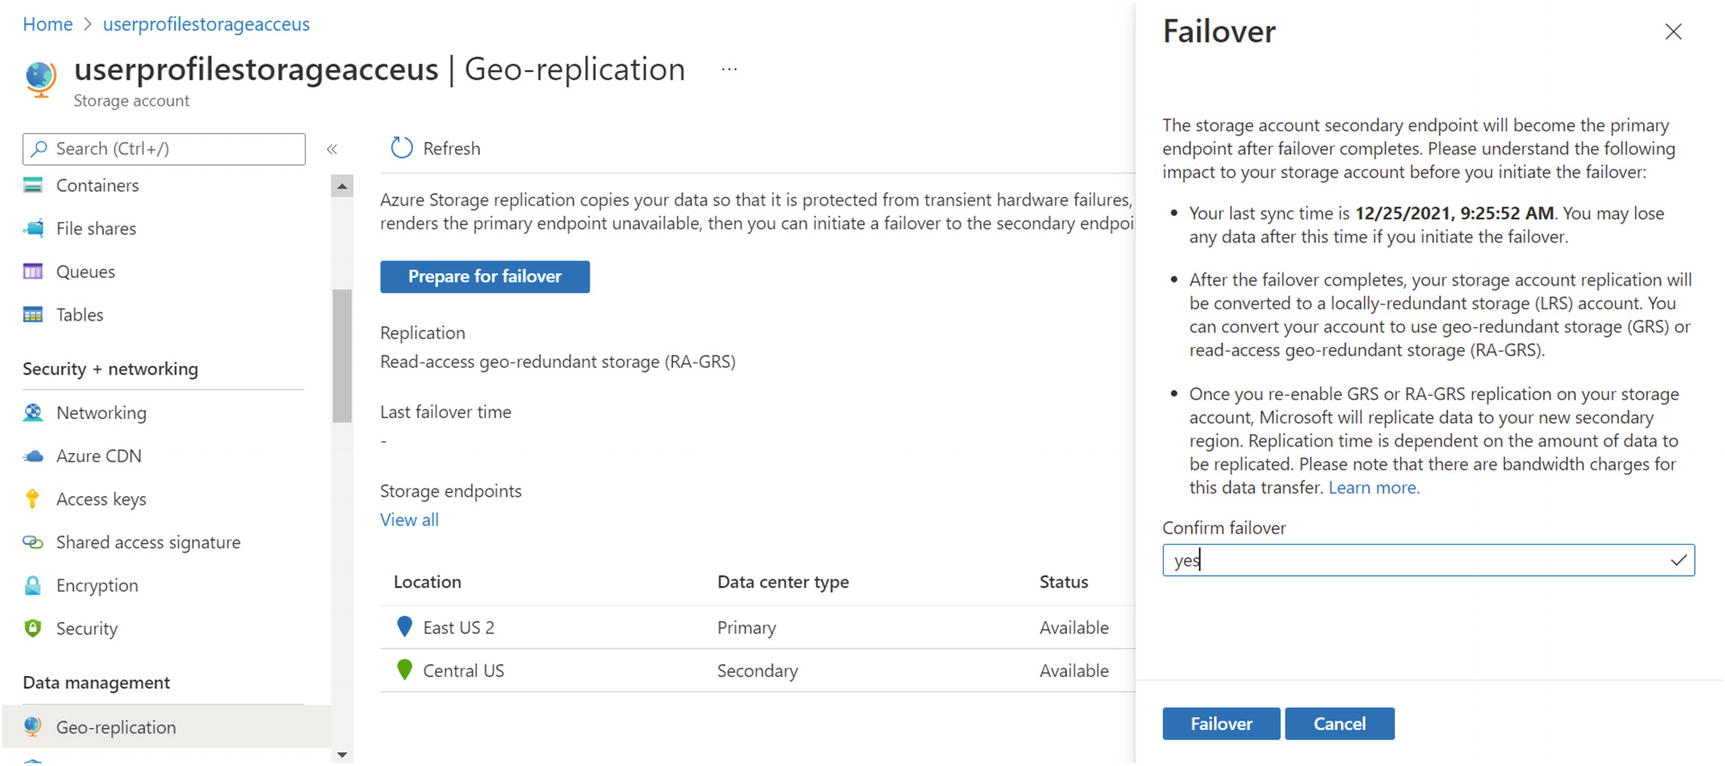 Figure 10-8
Storage georeplication and failover
Premium storage does not allow for replication, but since premium storage is recommended for production workloads, you can use the FSLogix cloud cache, which will allow you to replicate the user profile to multiple storage accounts in a different region. By doing this you will be able to use the secondary storage account automatically if the primary storage account is not accessible/available. Primary and secondary storage are both dependent on the sequencing in the CCDLocation registry key, and both the storage accounts will be in sync. A CCDLocation overrides a VHDLocation, if they are both set.
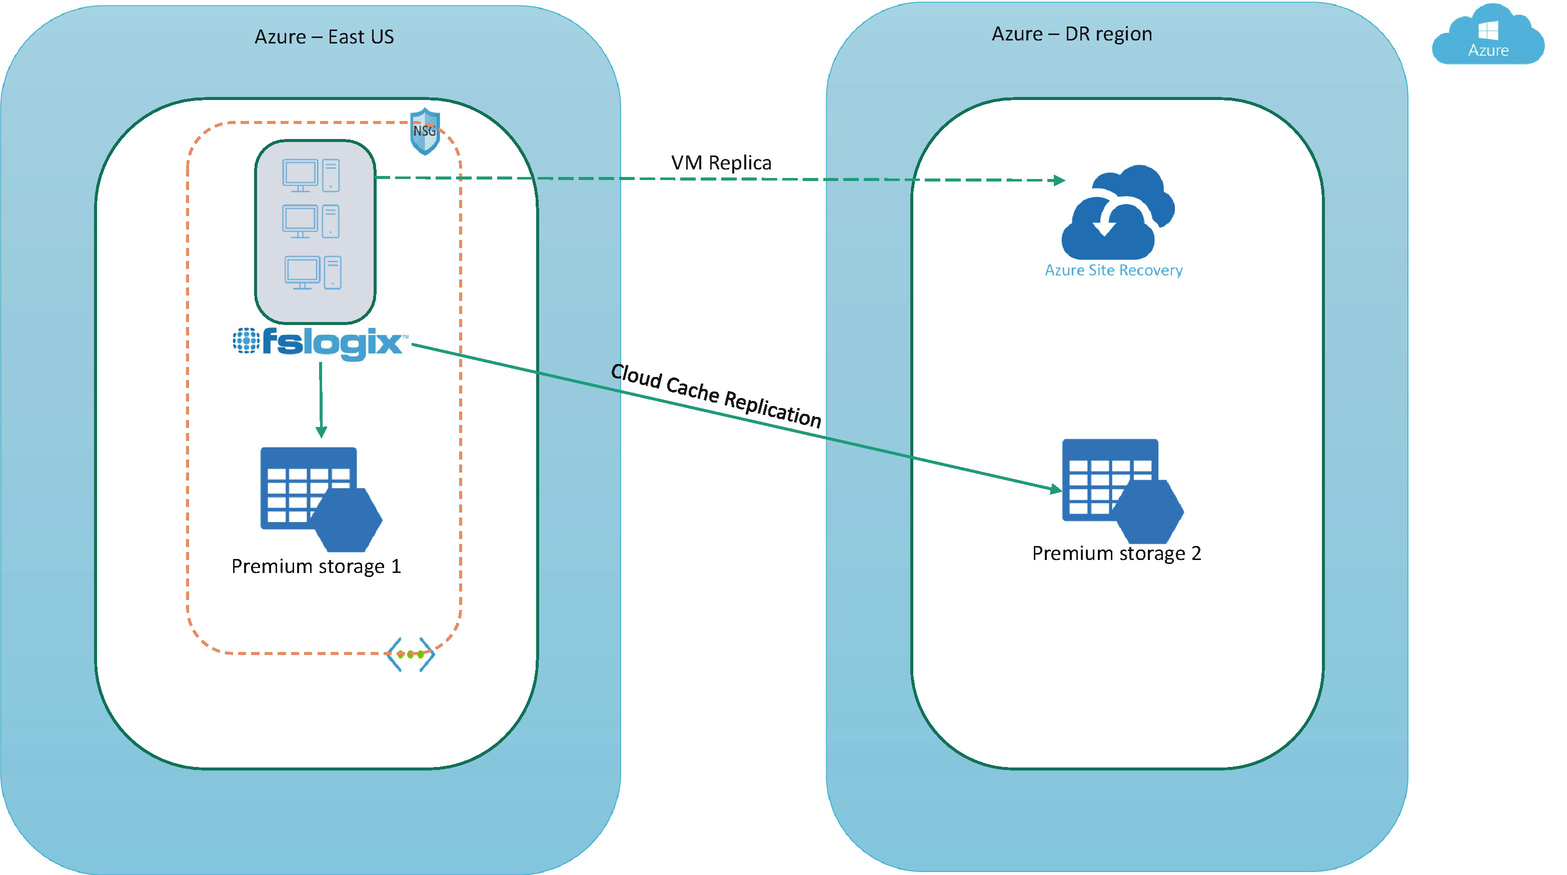
FSLogix cloud cache
In Figure 10-9 you can see that FSLogix is syncing the user profile data to both storage accounts using a cloud cache. Refer to Chapter 6 for more details about the cloud cache.
Azure NetApp also has a disaster recovery option, and you can easily configure replica in a supported cross region. The Azure NetApp Files replication functionality provides data protection through cross-region volume replication. You can asynchronously replicate data from an Azure NetApp Files volume (source) in one region to another Azure NetApp Files volume (destination) in another region. This capability enables you to fail over your critical application in the case of a region-wide outage or disaster. There are certain cross-region replication pairs to which you can replicate a NetApp file volume, so it’s recommended to check the Microsoft site for an updated list of supported cross-region replica pairs.
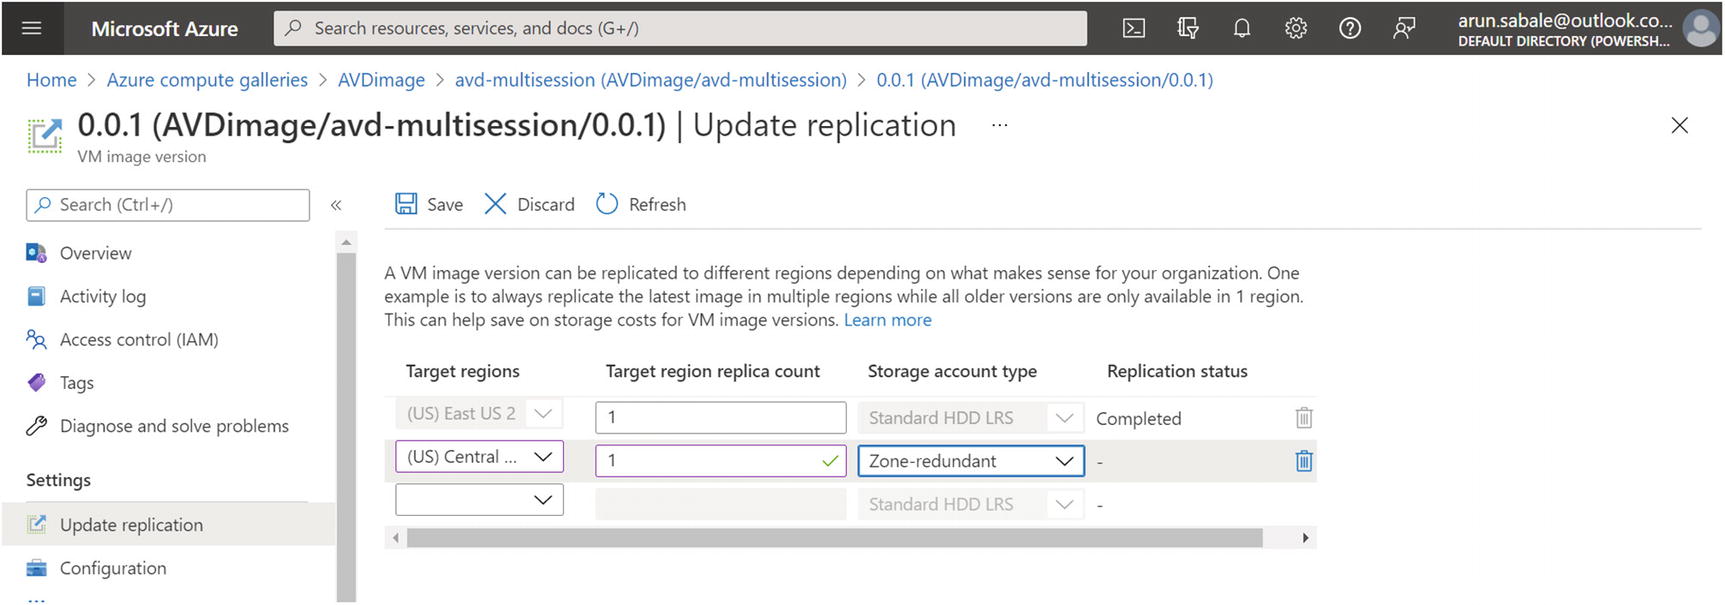
Image gallery replication
The limitation with image gallery replications is that you can create a limited number of VMs from a replicated image (20 VMs per replicated VM as of December 2021), and if you want to create hundreds of VMs in a replicated region, then you have to consider an alternative to storing an image in another region using the Azure image builder.
A pooled host pool is nonpersistent, and we can store all user profile data to the remote storage. Additionally, you can have pooled hostpool image with all application/configuration ready to deploy, so DR is not really required for a pooled host pool session host but definatly required for user profile storage and operating system image. You can simply create a new session host in the DR region using a pooled image, and it will come up with all the applications, FSLogix configuration inside new session host in DR region that will use the user profile from the fslogix cloud cache secondary location.
If you still want to protect your pooled session host from disaster, then you can use the Azure Recovery Services Vault (ASR) to protect the pooled session host, and you can fail over the session host during the disaster in a primary region. The following are the detailed steps to protect the session host as well as to fail over.
- 1.Log in to the Azure portal and select the correct subscription. Search for recovery service vault on the top search bar in the Azure portal and click “Recovery Services vaults.” See Figure 10-11.
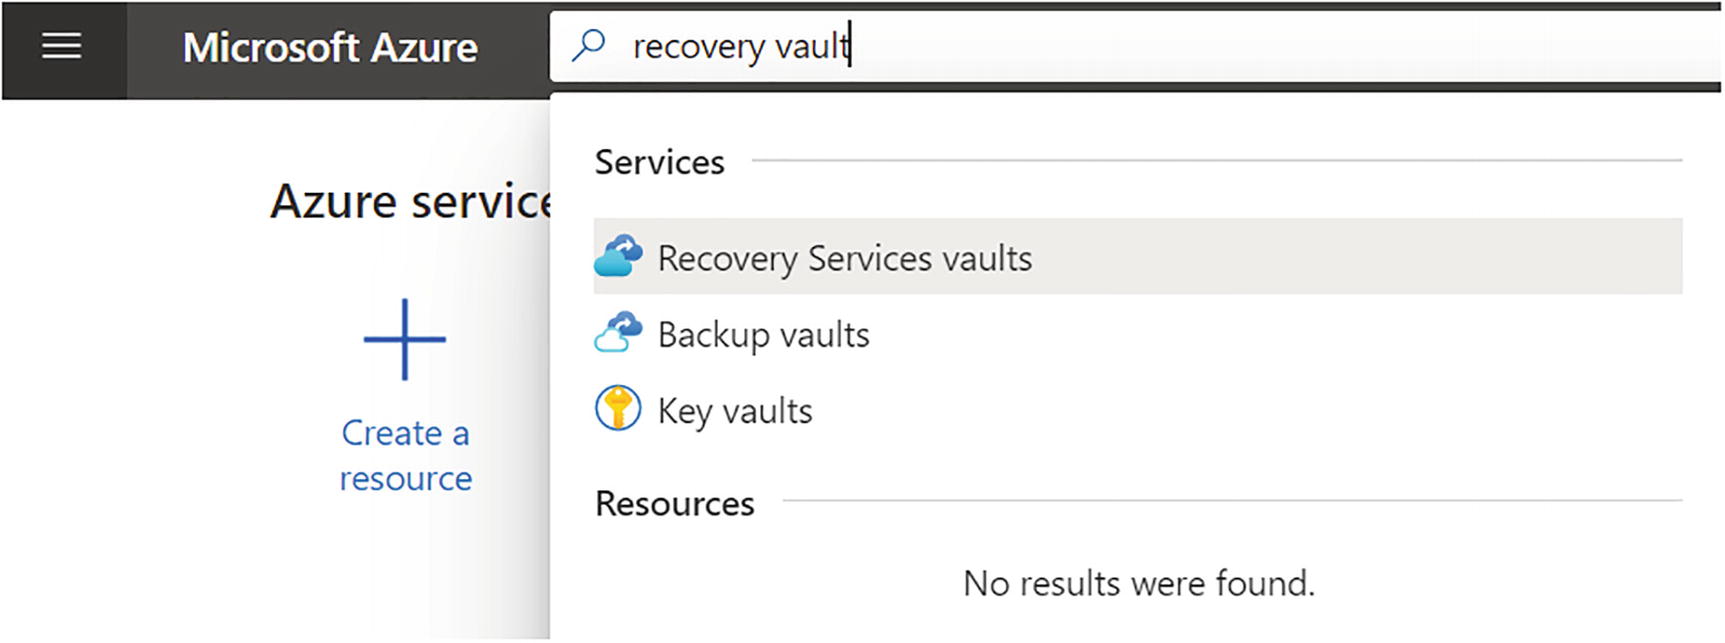 Figure 10-11
Recovery service vault search
- 2.Click the Create button under the recovery service vault. See Figure 10-12.
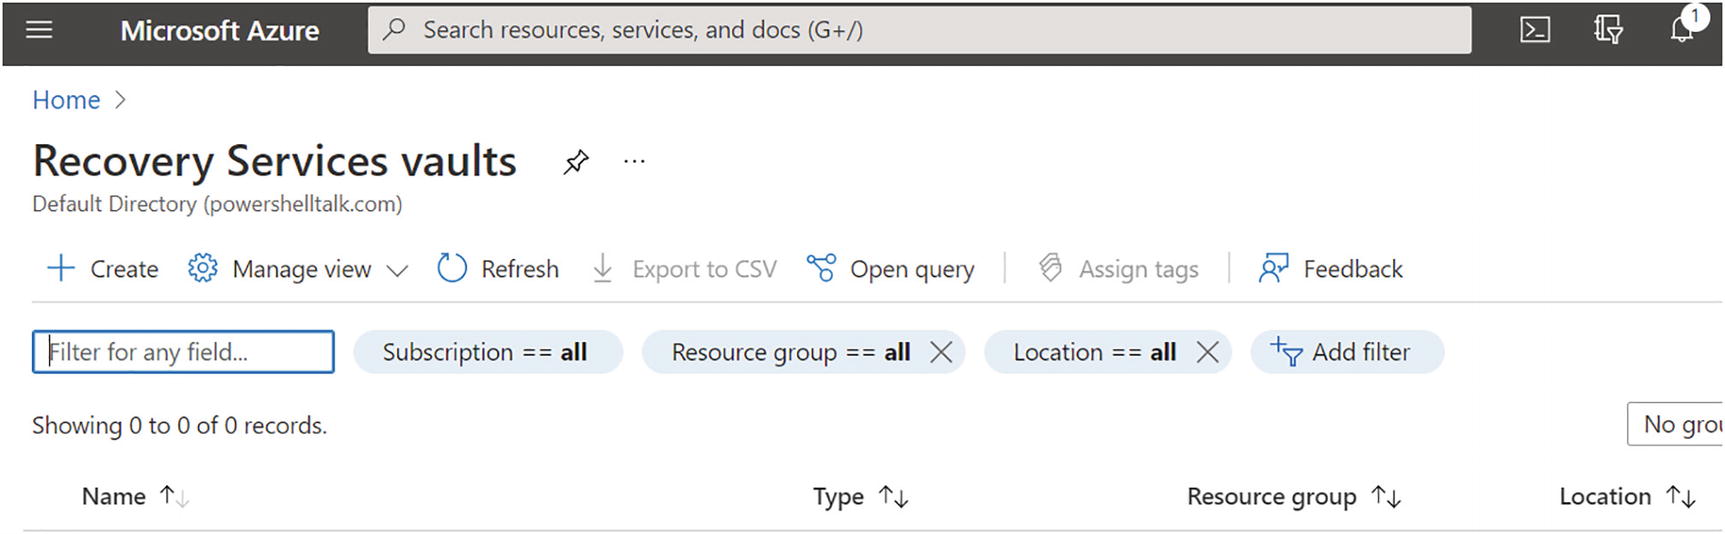 Figure 10-12
Creating the recovery service vault
- 3.On the create recovery service vault page, fill in the mandatory details such as the subscription, resource group name, vault name, and region for vault creation. Make sure you select the secondary region to create the vault so that you can protect the session host from the primary region and the vault will be available during disaster in the primary region. See Figure 10-13.
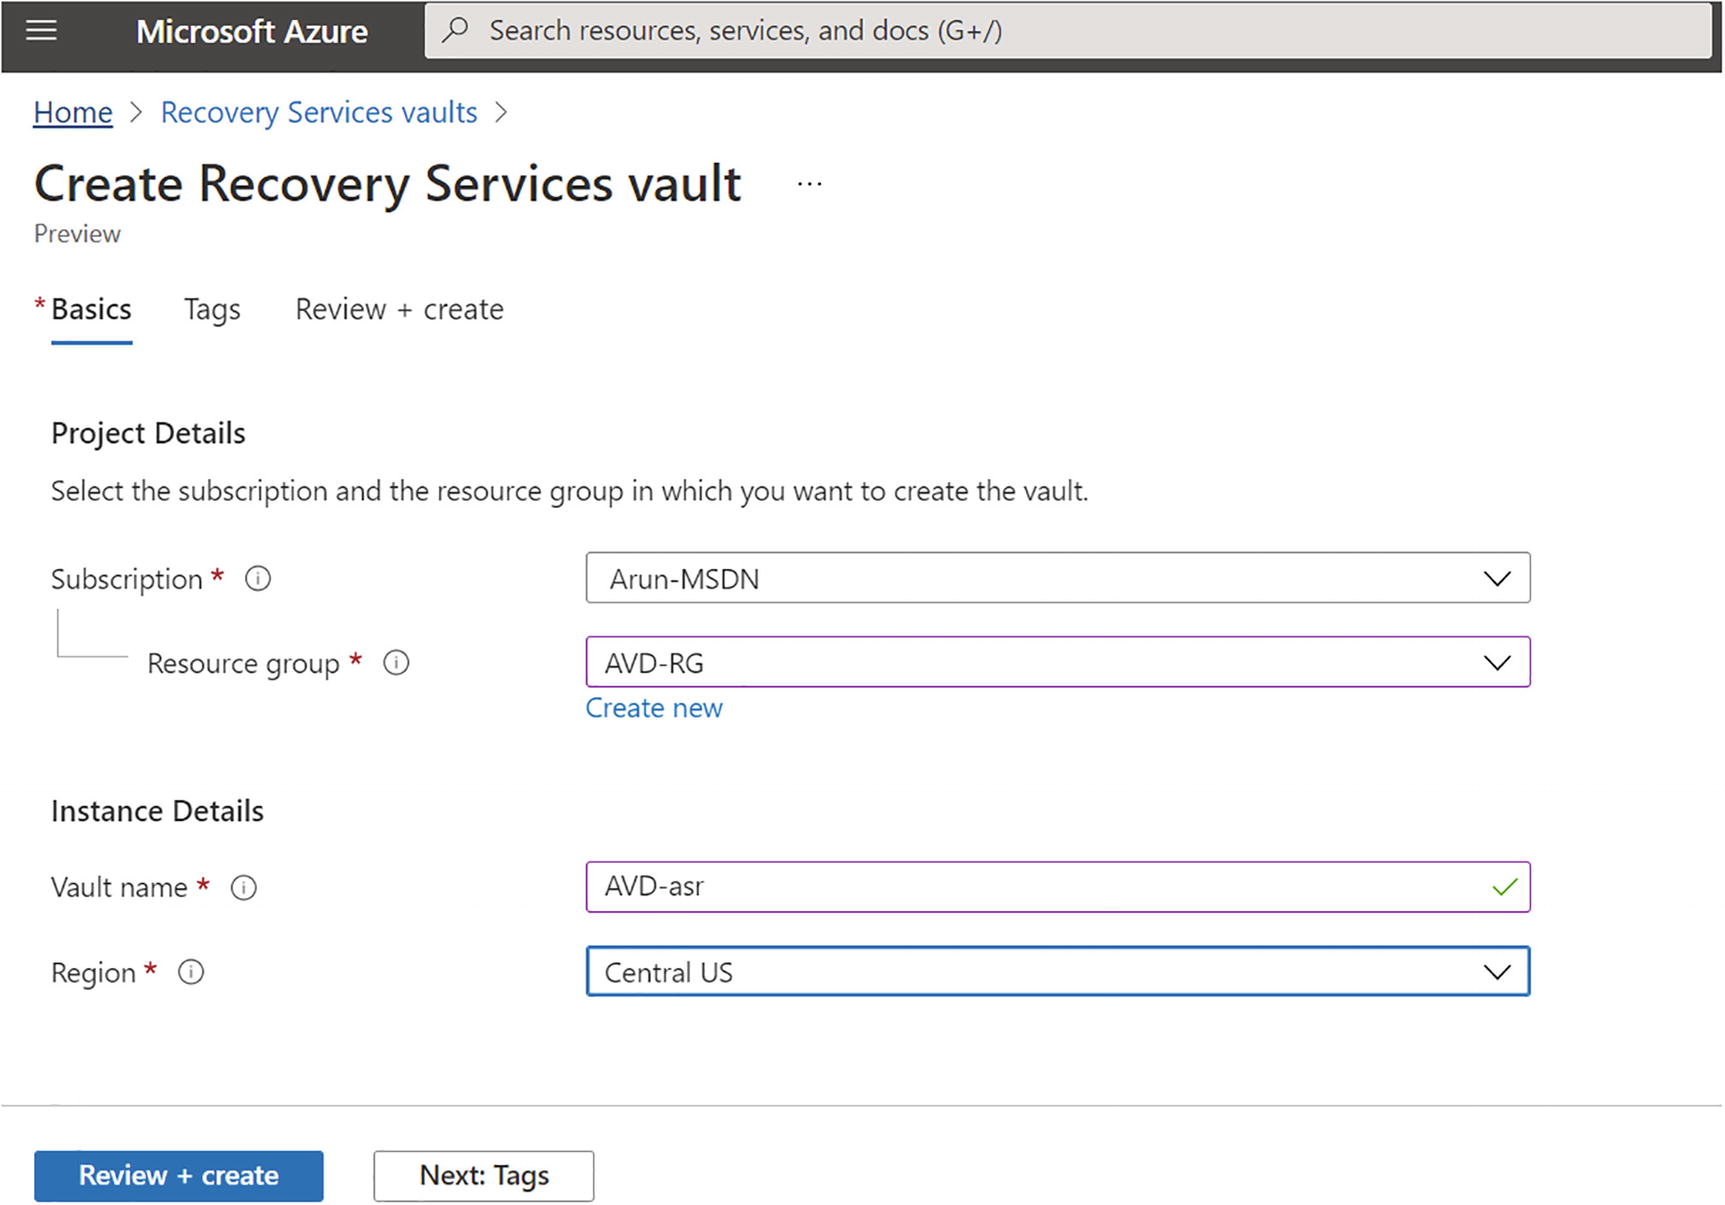 Figure 10-13
Creating a recovery service vault, Basics tab
- 4.
Verify all the vault properties once the recovery service vault is created successfully.
Enabling replication/protection for AVD virtual machines is again a one-time activity at the time of Azure Virtual Desktop creation, but you might want to repeat it if you add additional session hosts of the host pool in your environment. You can automate the additional session host protection by using the PowerShell Az.RecoveryServices module. Follow these steps to protect the AVD session host using ASR:
- 1.Open newly created recovery service vault, click + Enable Site Recovery, and fill in the source virtual machine details, source virtual machine location, and source VM resource group location. See Figure 10-14.
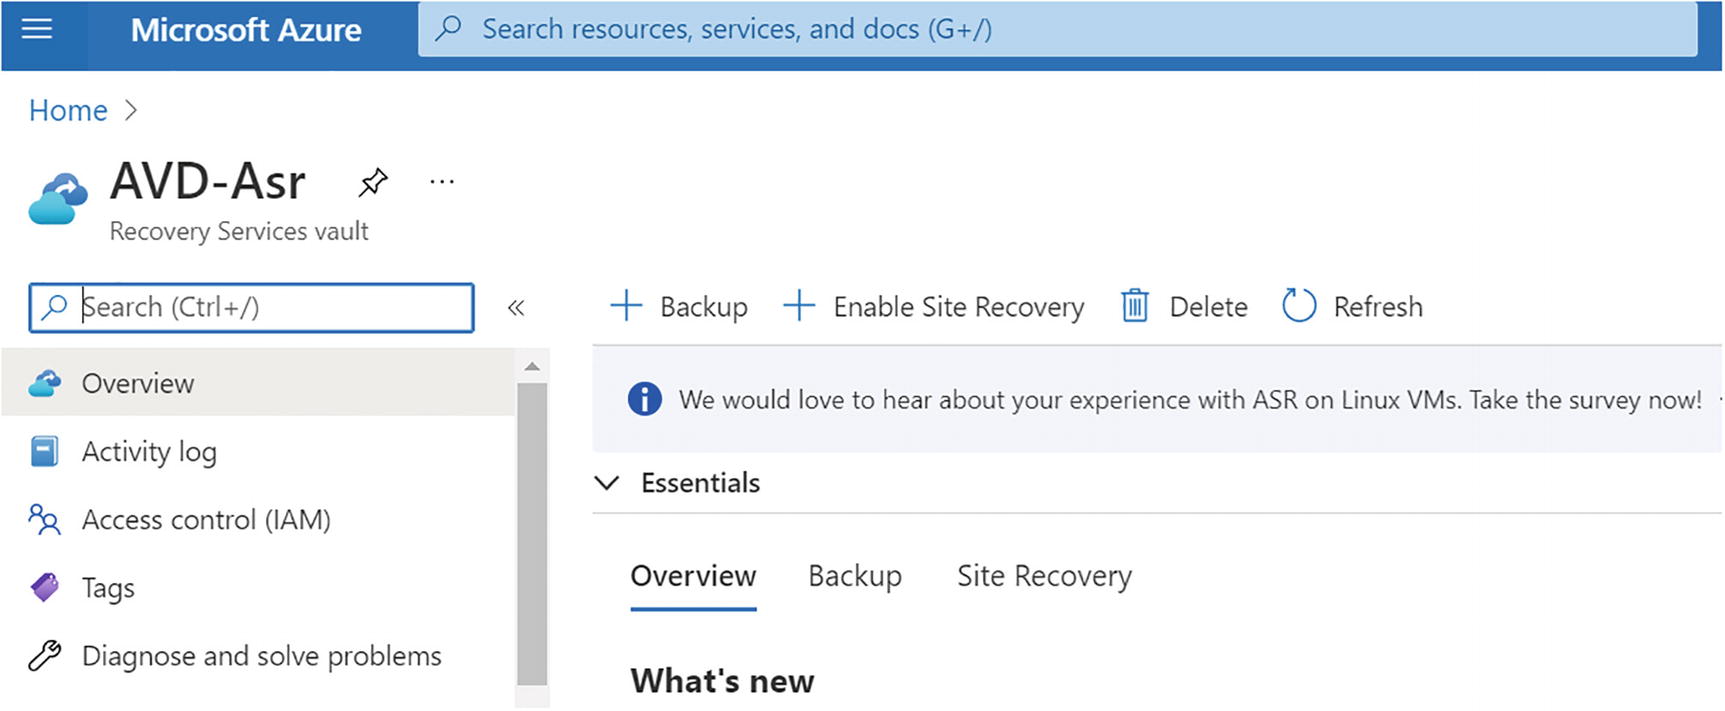 Figure 10-14
Recovery service vault, Overview tab
- 2.Note that the recovery vault and the recovery vault resource group should be in the secondary region and select the correct source primary region while protecting the Azure Virtual Desktop session host. See Figure 10-15.
 Figure 10-15
Recovery service vault, enabling replication
- 3.Select the virtual machines we want to replicate. See Figure 10-16.
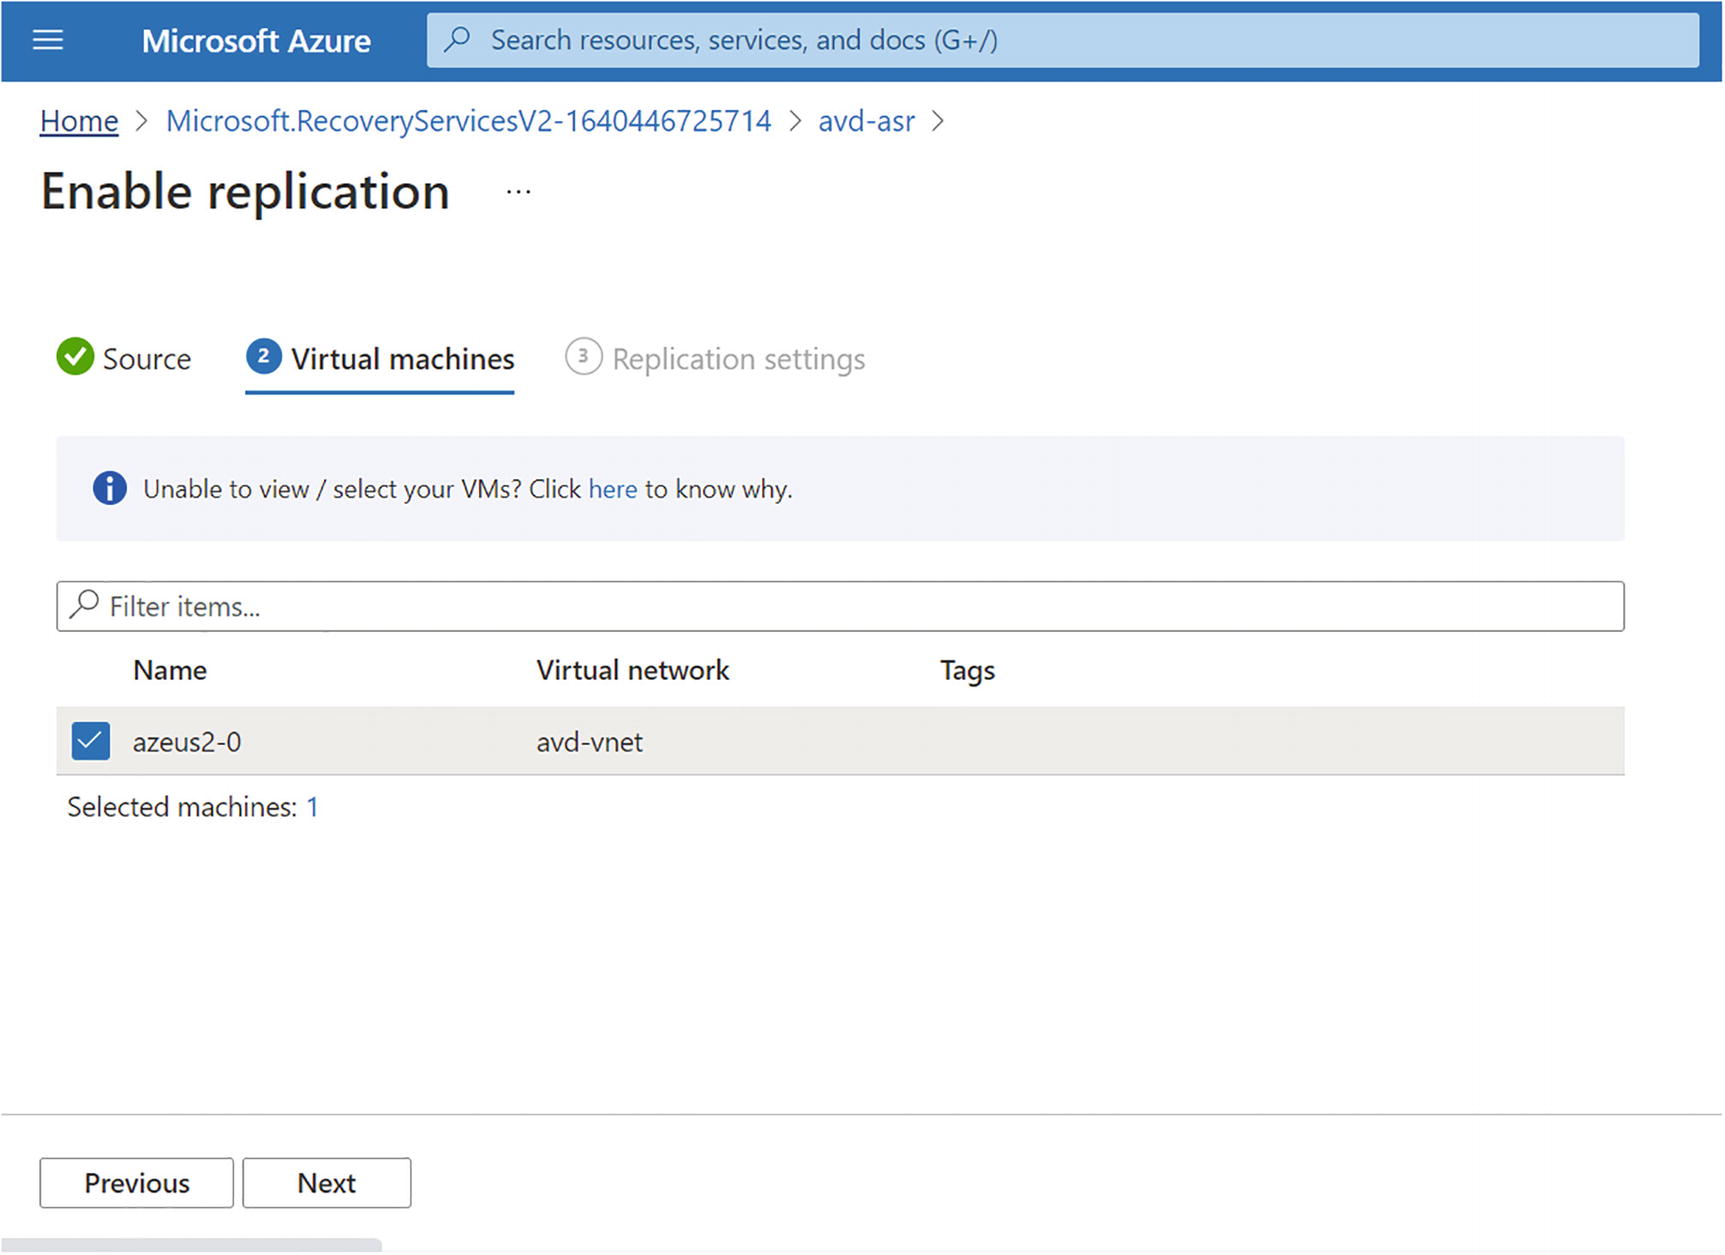 Figure 10-16
Recovery service vault, selecting the virtual machine
- 4.Make sure you select the correct target region and subscription for the DR on the “Enable replication” tab. Also verify the target resource group, network, storage, and availability setting and click Customize in case you want to modify the target naming (DR region) settings. See Figure 10-17.
 Figure 10-17
Recovery service vault, target resources
- 5.Verify and modify the replication policy as per your needs. By default, recovery point retention will be 24 hours, and snapshot frequency will be 4 hours. See Figure 10-18.
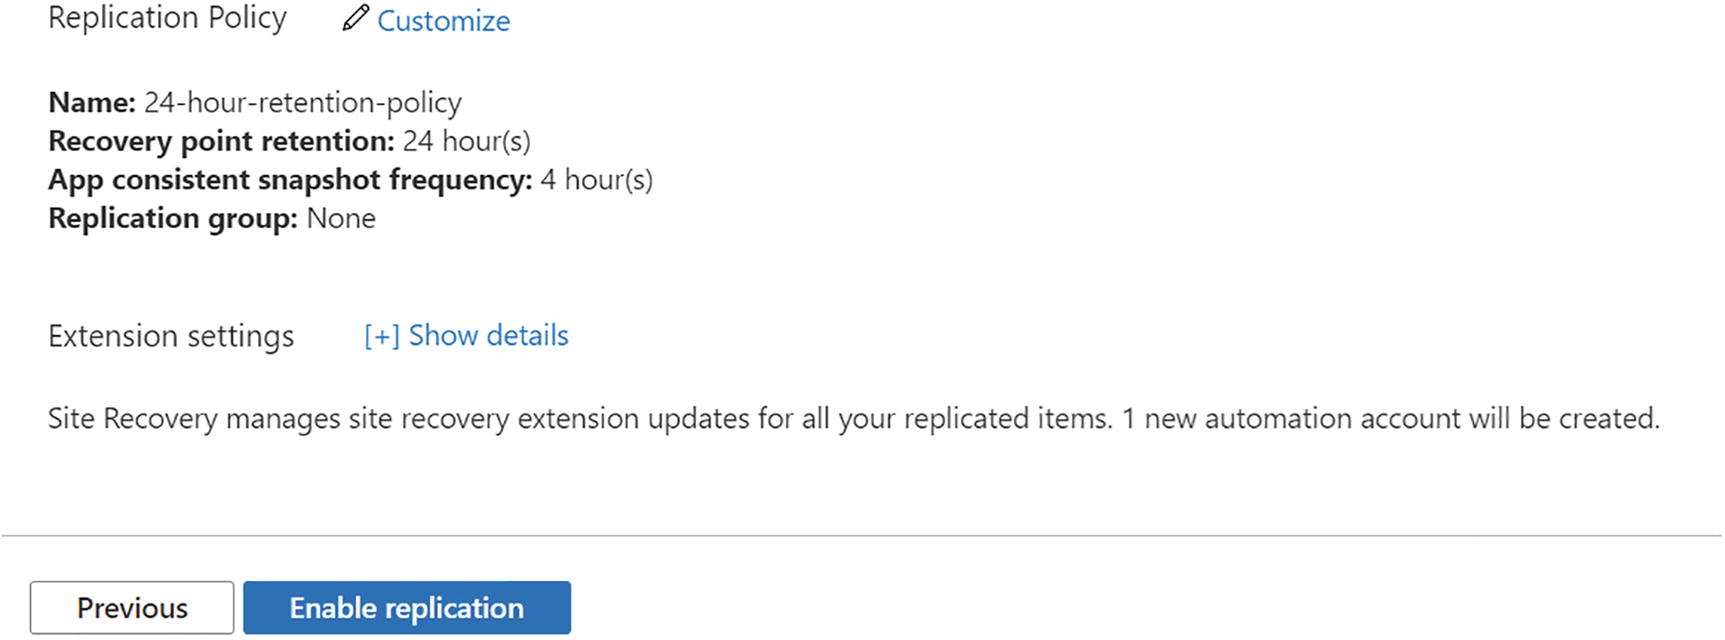 Figure 10-18
Recovery service vault, replication policy
- 6.Click “Enable replication” to start the replication of the selected virtual machines. Click the Notification icon (from the top bar) to monitor the enabling replication job status. See Figure 10-19.
 Figure 10-19
Recovery service vault, site recovery job
- 7.To check replication status of the virtual machines, go to the recovery service vault that was selected to enable replication and click the “Replicated items” tab. See Figure 10-20.
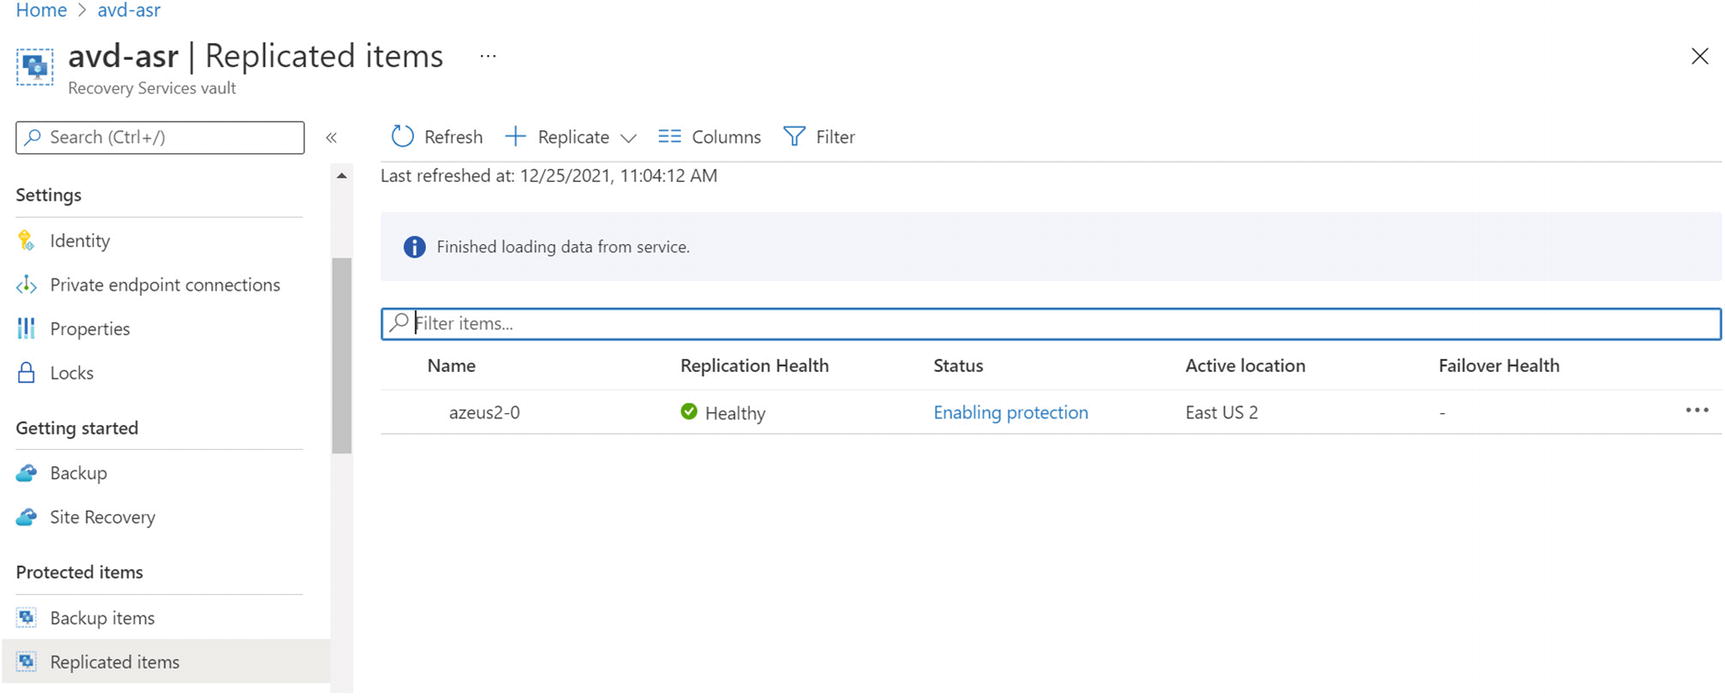 Figure 10-20
Recovery service vault, replicated items
- 8.We can monitor the replication status of each virtual machine in the same blade. See Figure 10-21.
 Figure 10-21
Recovery service vault, replicated items status
Adding virtual machines to the recovery service plan is a one-time activity to group multiple protected VMs/session hosts in the recovery plan so that you can fail over all the VMs together.
- 1.Go to the Azure portal and select the recovery service vault we created for the Azure Virtual Desktop session host. Click the Recovery Plans tab. See Figure 10-22.
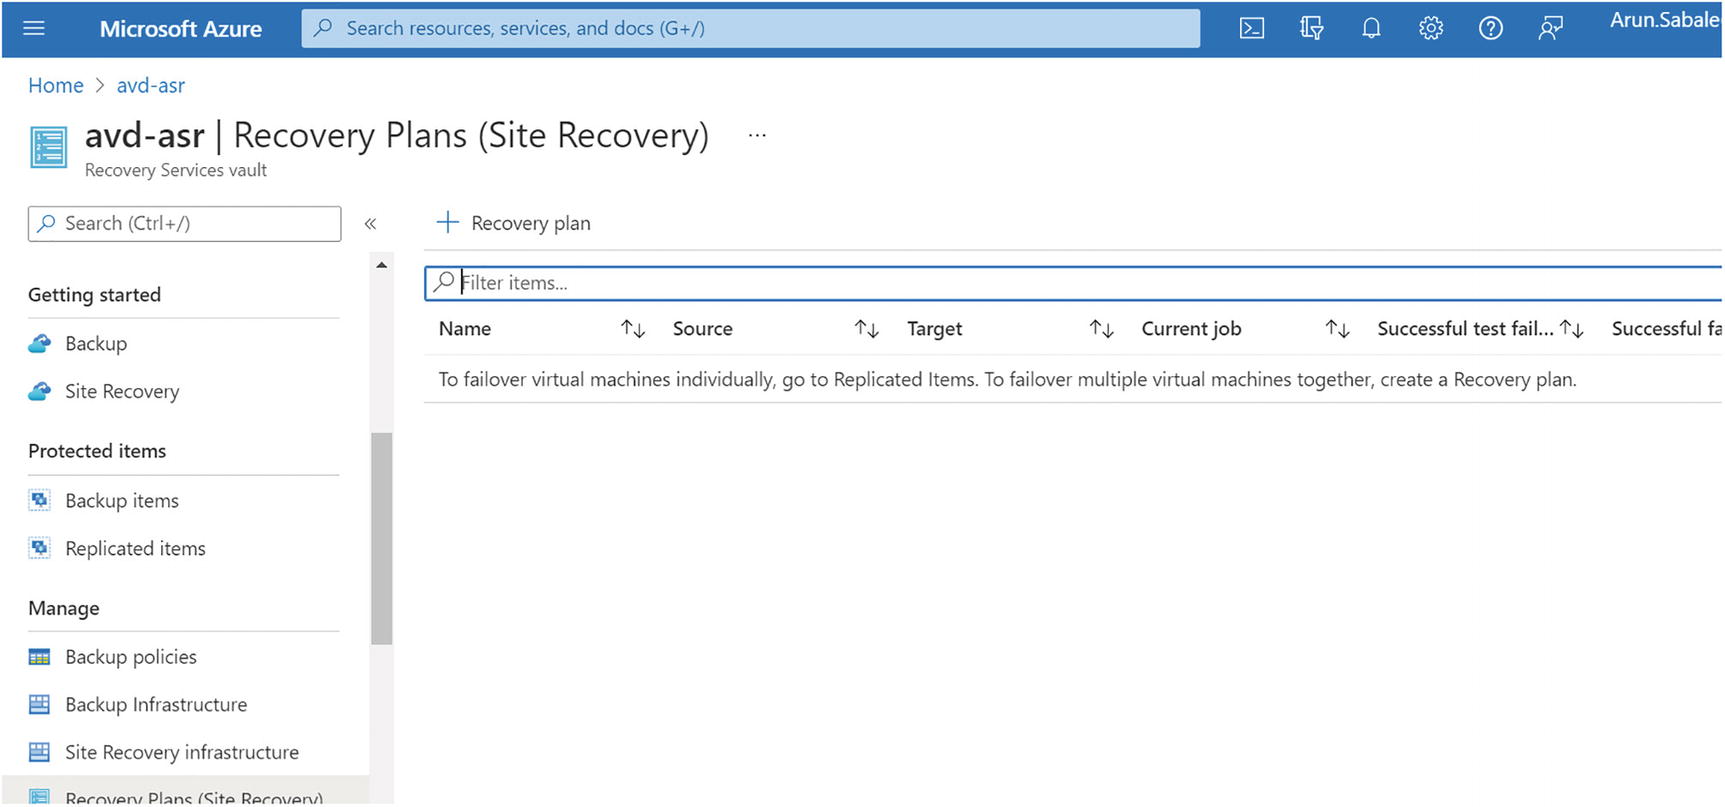 Figure 10-22
Recovery service vault, recovery plan
- 2.Click “+ Recovery plan” to add a new recovery plan. Make sure you are selecting the correct source and target for the Azure Virtual Desktop session host DR. Select the protected VM in the recovery plan. You can add 100 protected VMs in the recovery plan (as of December 2021), so prepare the recovery plan accordingly. See Figure 10-23.
 Figure 10-23
Recovery service vault, creating a recovery plan
- 3.Click the Create button to create the recovery plan. Once the recovery plan is ready, verify the source session host is showing in the recovery plan. See Figure 10-24.
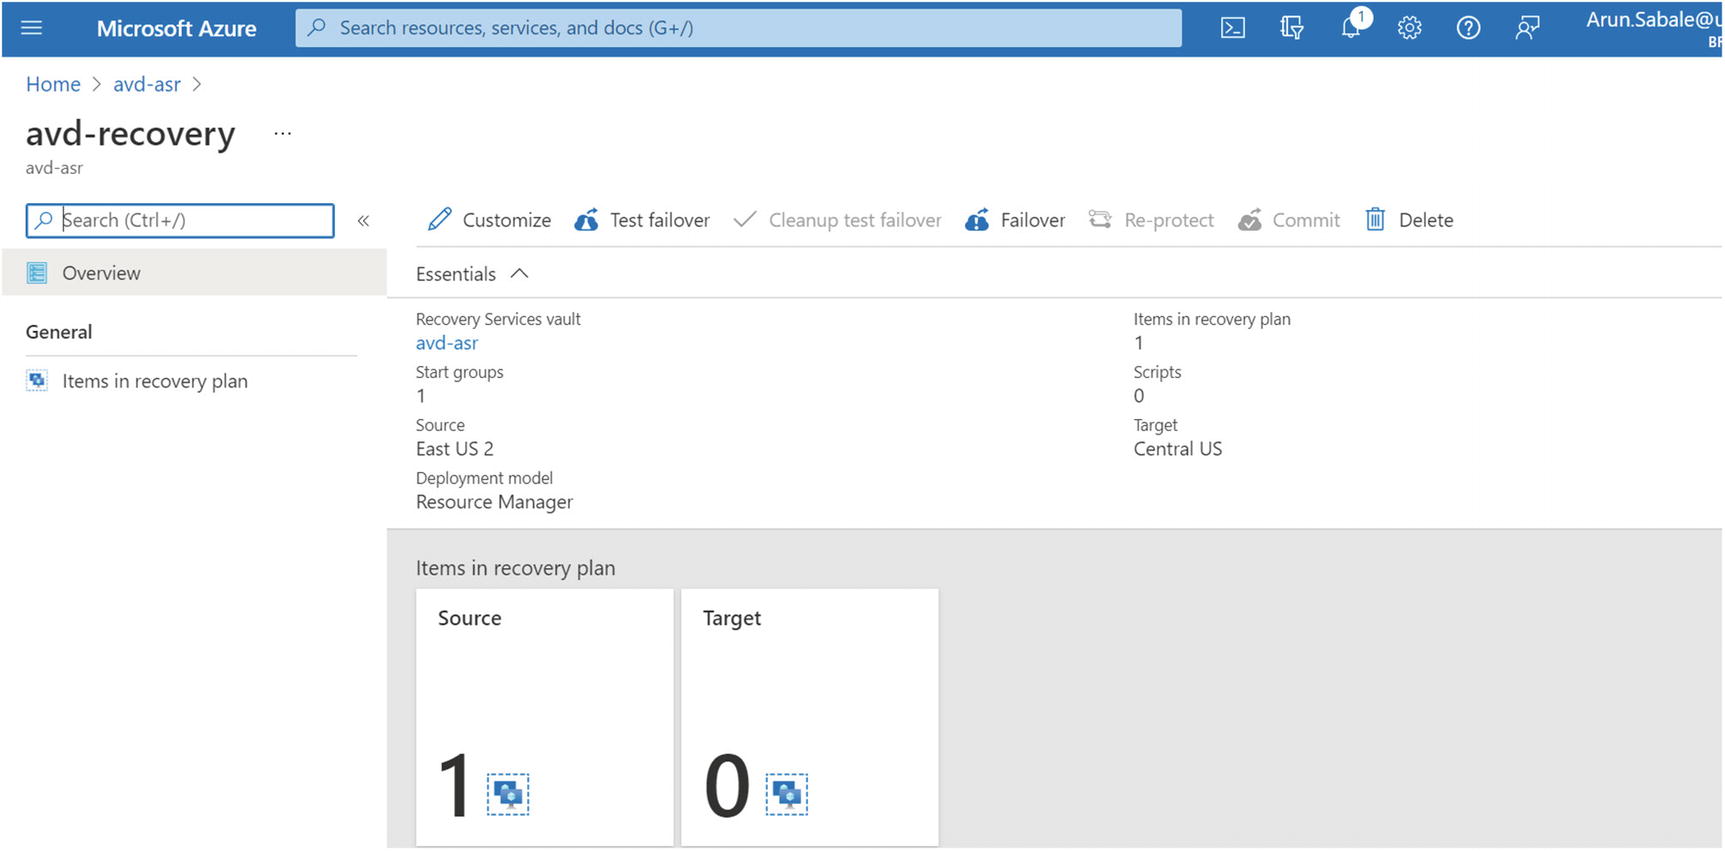 Figure 10-24
Recovery service vault, recovery plan overview
- 1.Log in to the Azure portal and go to recovery vault created in the secondary region. Click the recovery plan name on the recovery server vault and click “Cleanup test failover.” See Figure 10-25.
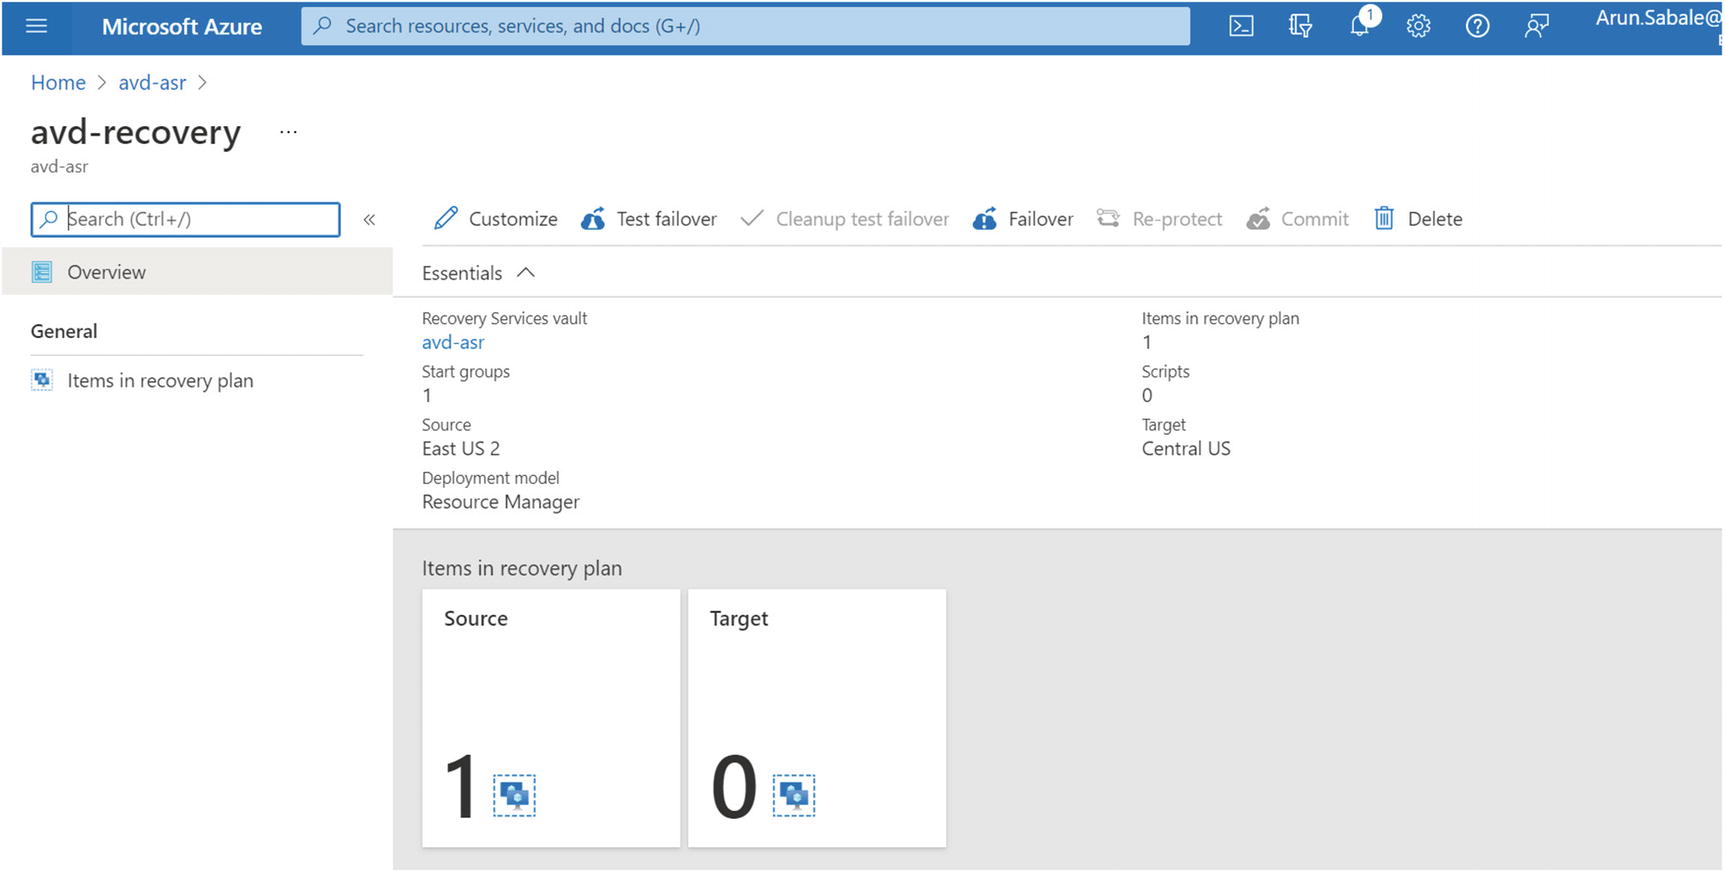 Figure 10-25
Recovery service vault, recovery plan overview
- 2.Select “Latest processed (low RTO)” under Recovery Point, select the target failover virtual network, and click OK. If you choose the Latest option, the failover will be triggered after processing all the data sent to the service. The time taken will depend on the number of unprocessed logs. Check the time of the latest crash-consistent recovery point to get an estimate of the unprocessed logs so you can select the latest processed. See Figure 10-26.
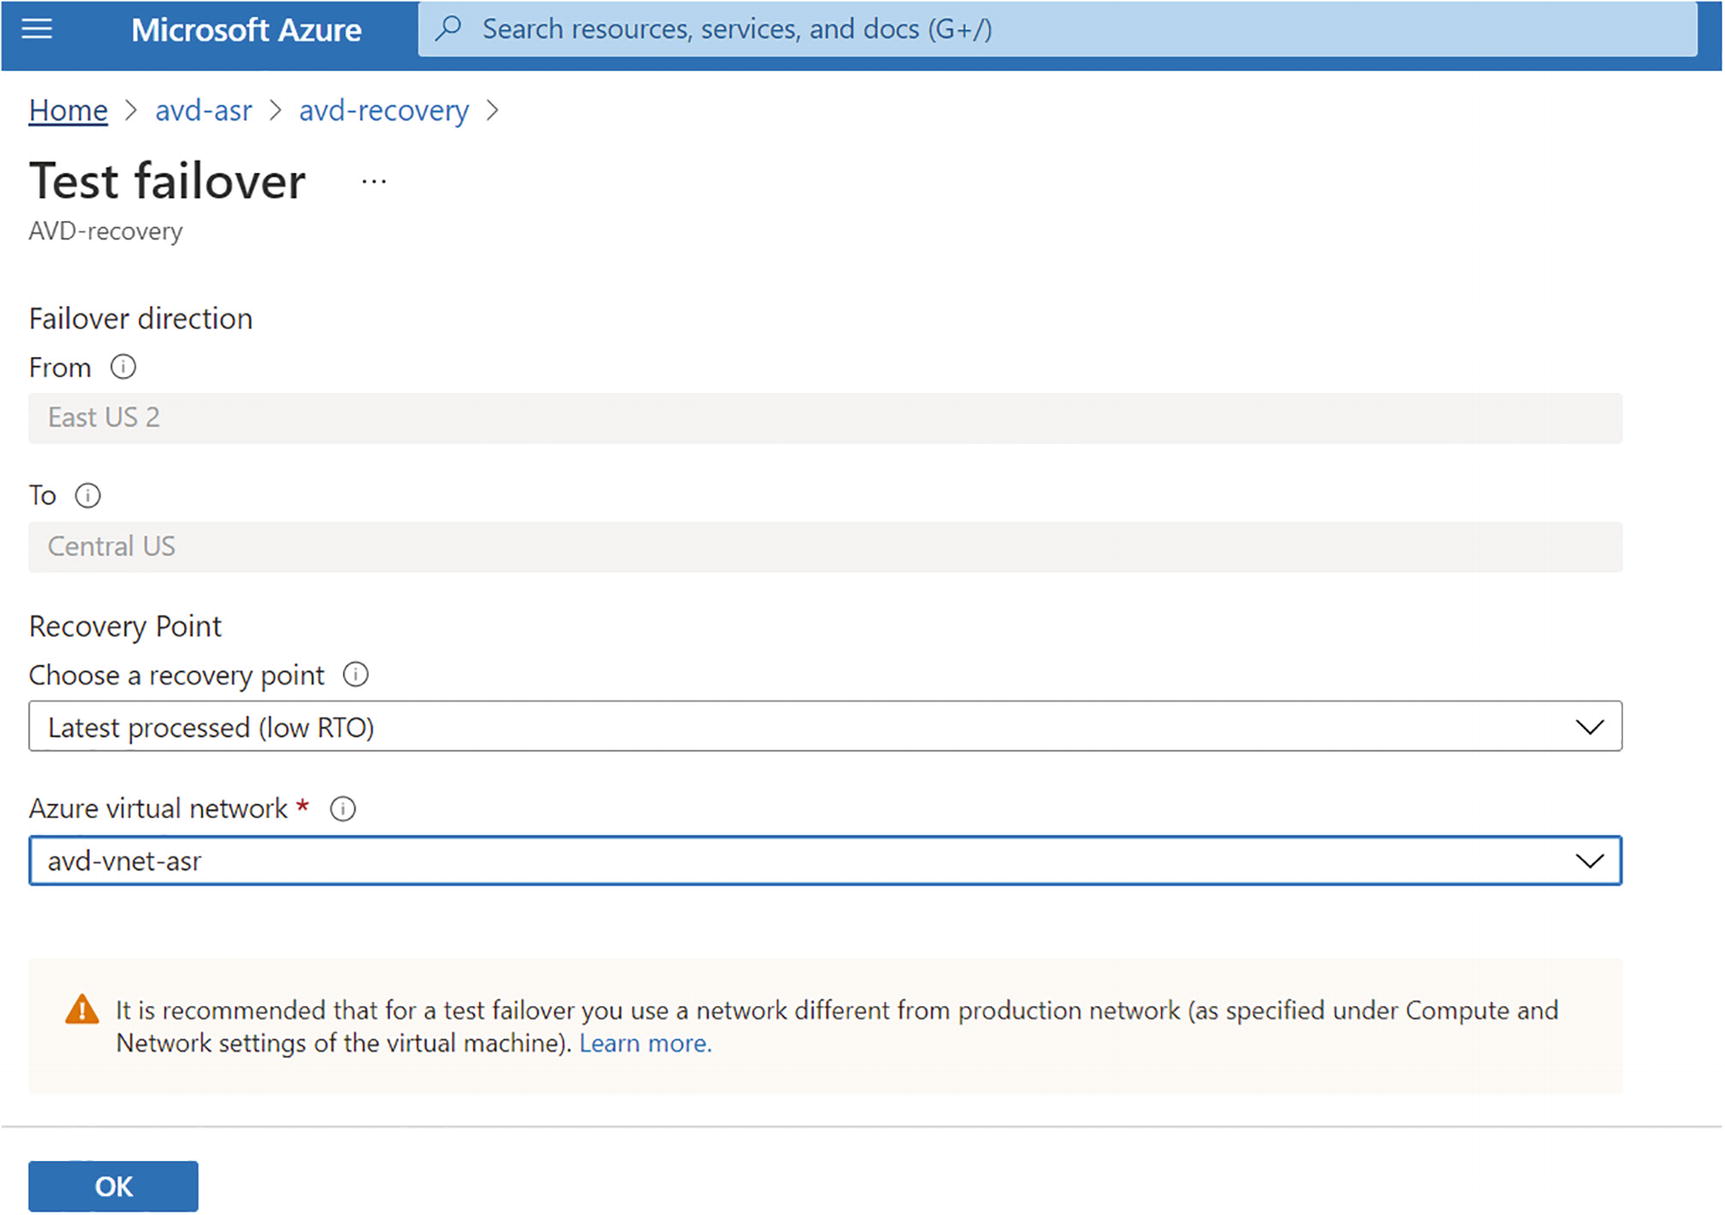 Figure 10-26
Recovery service vault, test failover
- 3.You can monitor the status by clicking the notification icon on the top bar. See Figure 10-27.
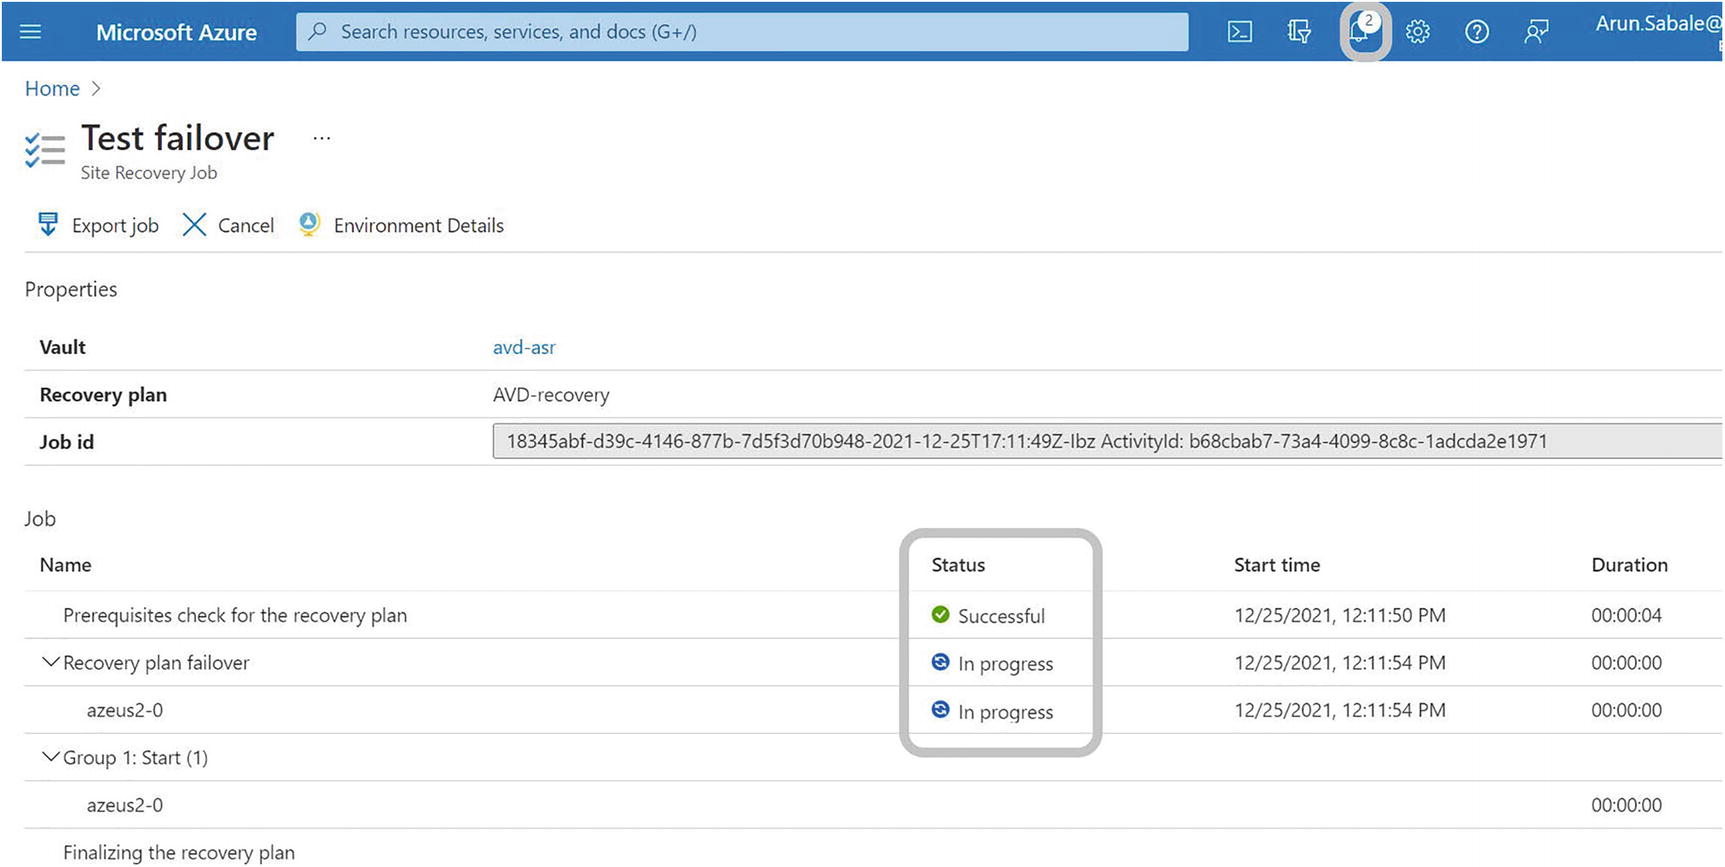 Figure 10-27
Recovery service vault, test failover job
- 4.Wait until Azure completes the failover tasks. Test failover is completed. See Figure 10-28.
 Figure 10-28
Recovery service vault, test failover job status
- 5.Shut down the primary region session hosts for testing and check if the host pool session host is available and allowing user sessions. If the host pool allows sessions on the DR region session host, it means the test failover is working fine, and you can start the primary region session host and then clean the test failover and revert the host pool/session host to the primary region. See Figure 10-29.
 Figure 10-29
Test failover validation
- 1.Log in to the Azure portal and go to the recovery vault where you performed the test failover. Select the recovery plan and click the “Cleanup test failover” option. See Figure 10-30.
 Figure 10-30
Test failover cleanup
- 2.

- 1.Log in to the Azure portal and go to the recovery vault. Click Recovery Plans (Site Recovery) under your recovery service vault. Next click the Failover menu item to fail over the session hosts from the recovery plan. See Figure 10-32.
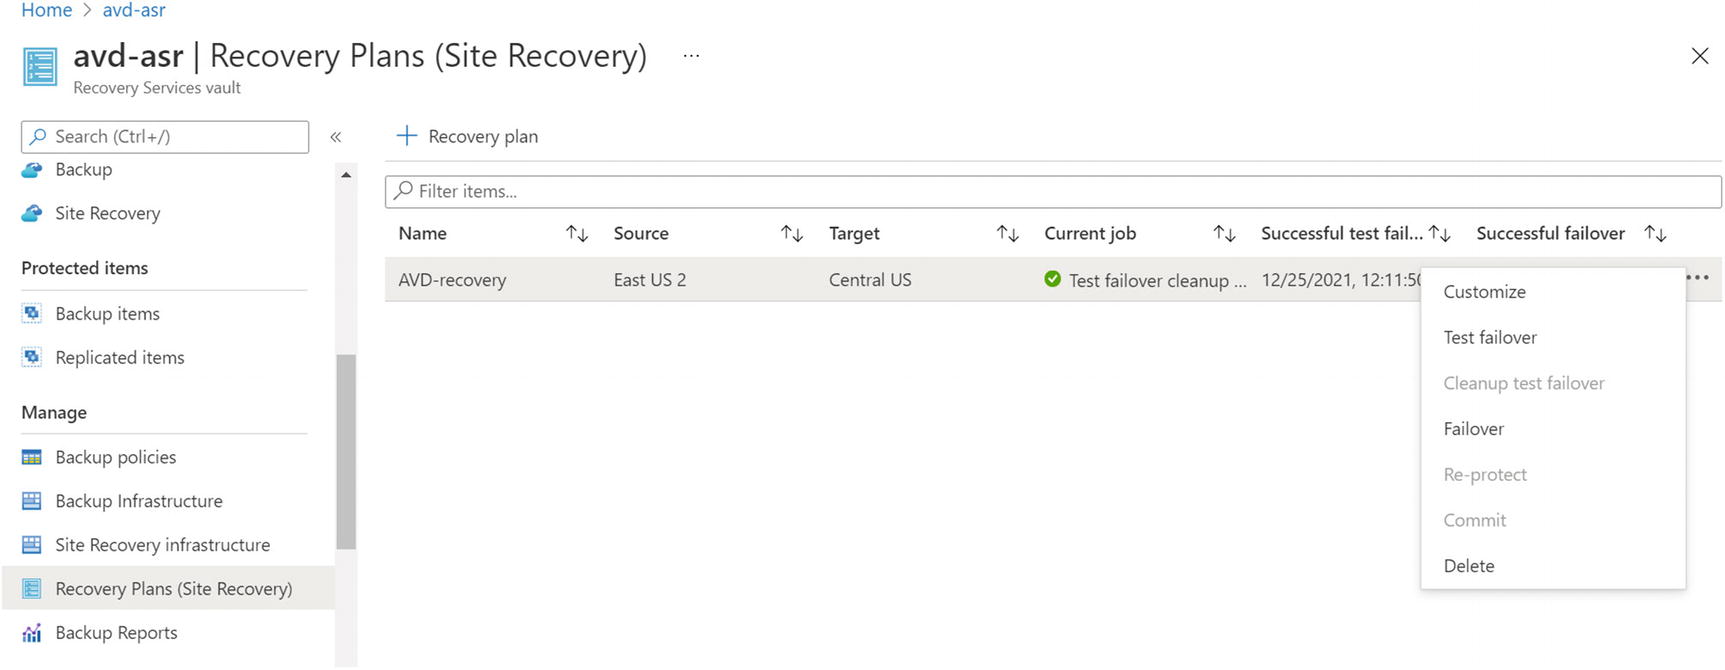 Figure 10-32
Failover, recovery plan
- 2.Select “Latest processed (low RTO)” under Recovery Point, select “Shutdown machines before beginning failover,” and click OK. You can also change directions in case you have an active/protected VM in the secondary region and you want it to fail back to the primary. See Figure 10-33.
 Figure 10-33
Failover, failover direction
- 3.Click the notification icon on the top bar to monitor the failover job status and wait until Azure completes the failover job. See Figure 10-34.
 Figure 10-34
Failover, failover job status
- 4.Now you can see new virtual machines running in the DR region and the primary region VMs deallocated. See Figure 10-35.
 Figure 10-35
Failover, VM status after failover
- 5.
The next step is to make sure the remaining Azure Virtual Desktop–dependent resources are also available in the DR region so that the user can start logging in using the secondary region. The Azure control plane (gate, broker) is available in multiple regions and managed by Microsoft, so you don’t have to worry about that. If you are using the FSLogix cloud cache (required only for pooled), then you don’t need additional action to failover user profile storage, and once you fail over the session hosts, the user can access Azure Virtual Desktop from the DR region.
After the DR, you can fail back the session host to the primary region and protect the VMs again using ASR. When you fail over Azure VMs from one region to another using Azure Site Recovery, the VMs boot up in the secondary region, in an unprotected state. If you want to fail back the VMs to the primary region, do the following tasks:
- 1.
Reprotect the VMs in the secondary region so that they start to replicate to the primary region.
- 2.
After reprotection completes and the VMs are replicating, you can fail over from the secondary to primary region.
- 1.If you need to be fail back to the original primary region (in my case East US2) after DR, then click the Site Recovery tab under the recovery service vault and select the “Re-protect” option. See Figure 10-36.
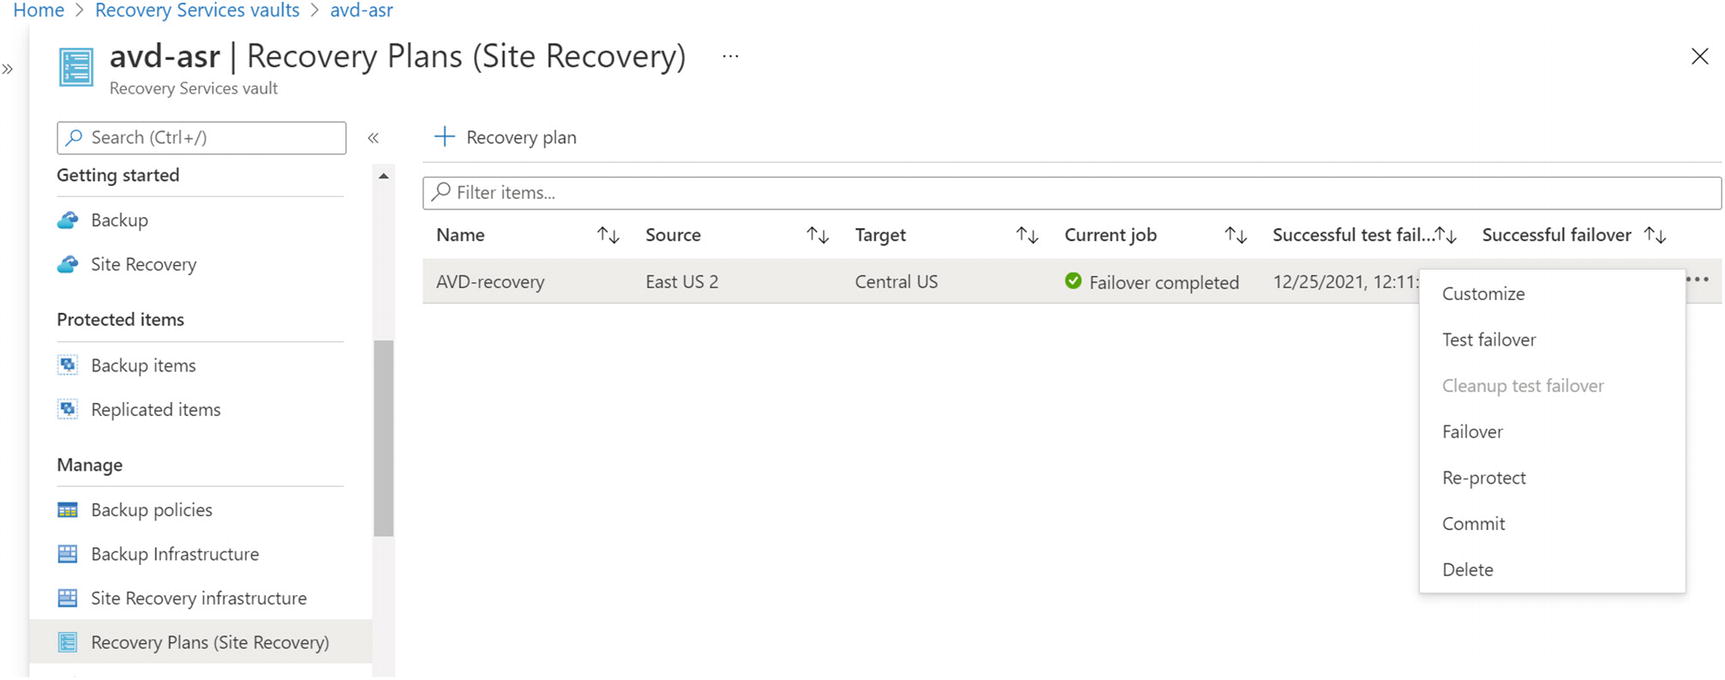 Figure 10-36
Failback to the original primary region
- 2.Select all the correct details for the target (East US2 in my failback case) and click OK to re-protect the session host from the DR region to the original primary region. See Figure 10-37.
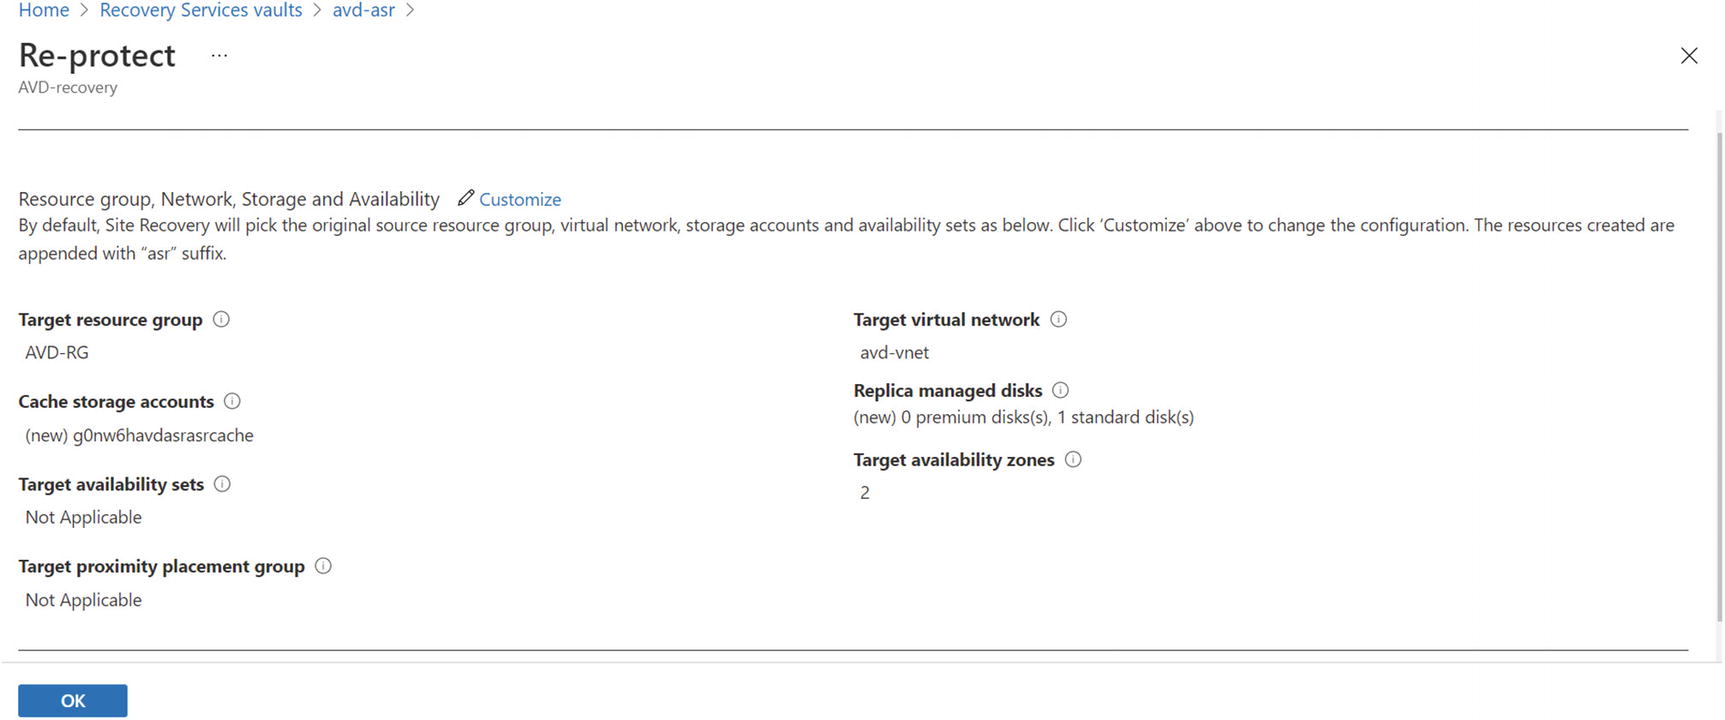 Figure 10-37
Failback, target resources
- 3.You can check the re-protect job status from a notification. See Figure 10-38.
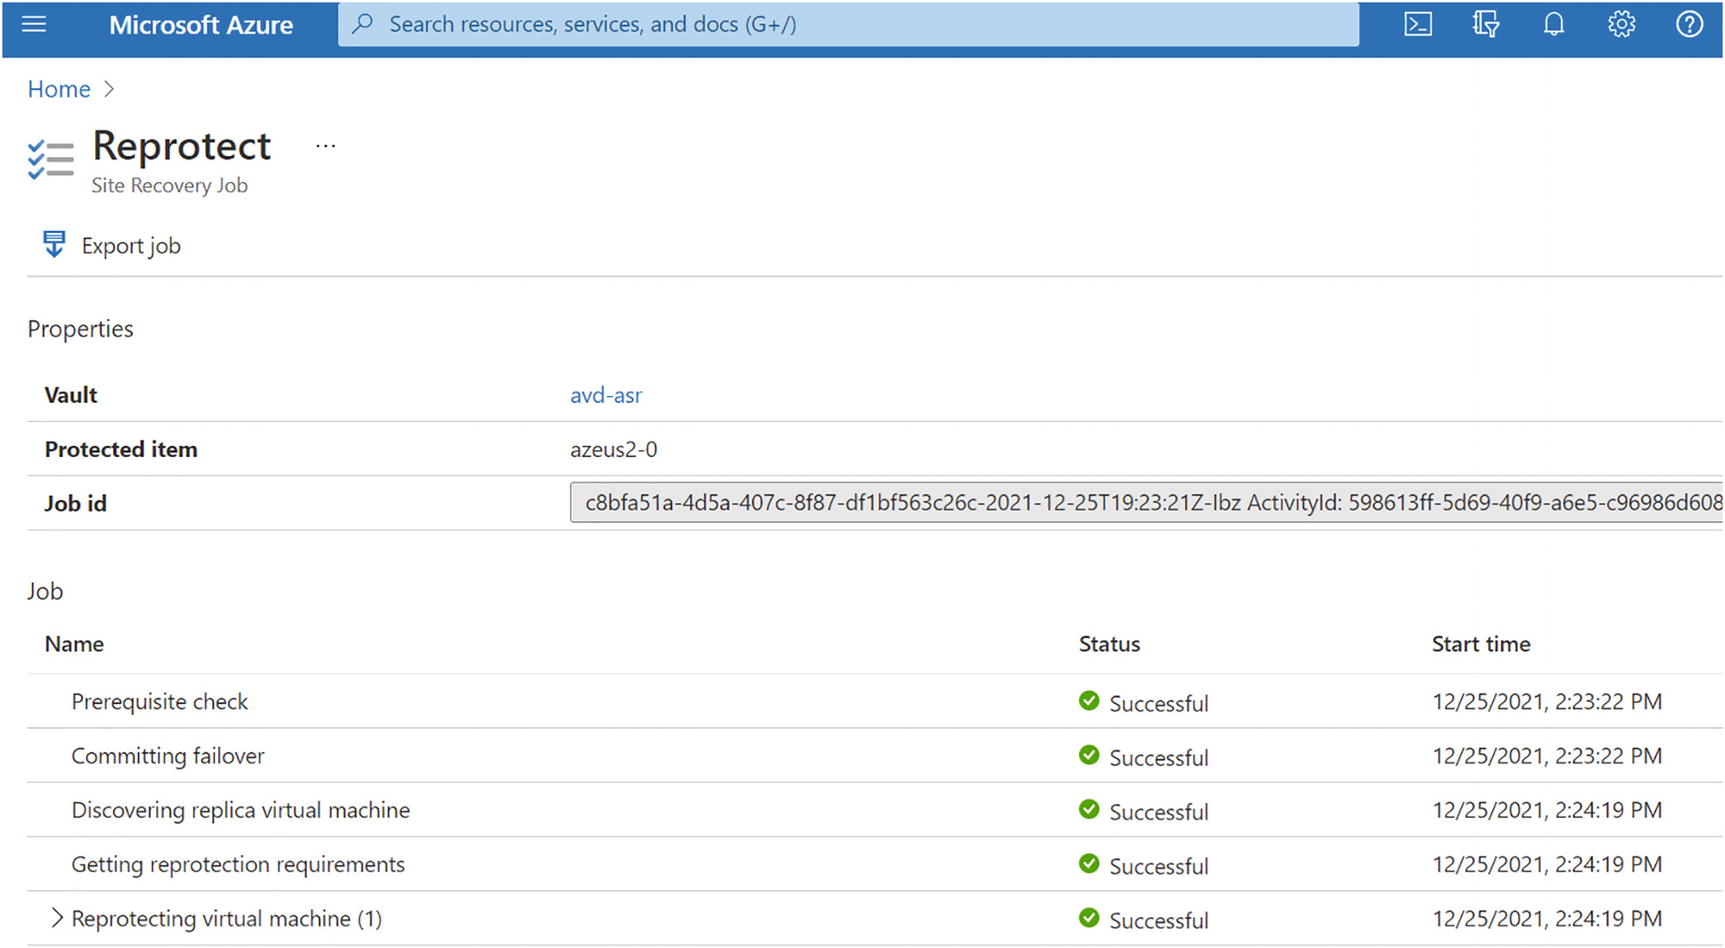 Figure 10-38
Failback, failback job status
- 4.Once reprotection is completed, you can change the network setting of the protected VM and initiate failover from the DR region to the original primary region. See Figure 10-39.
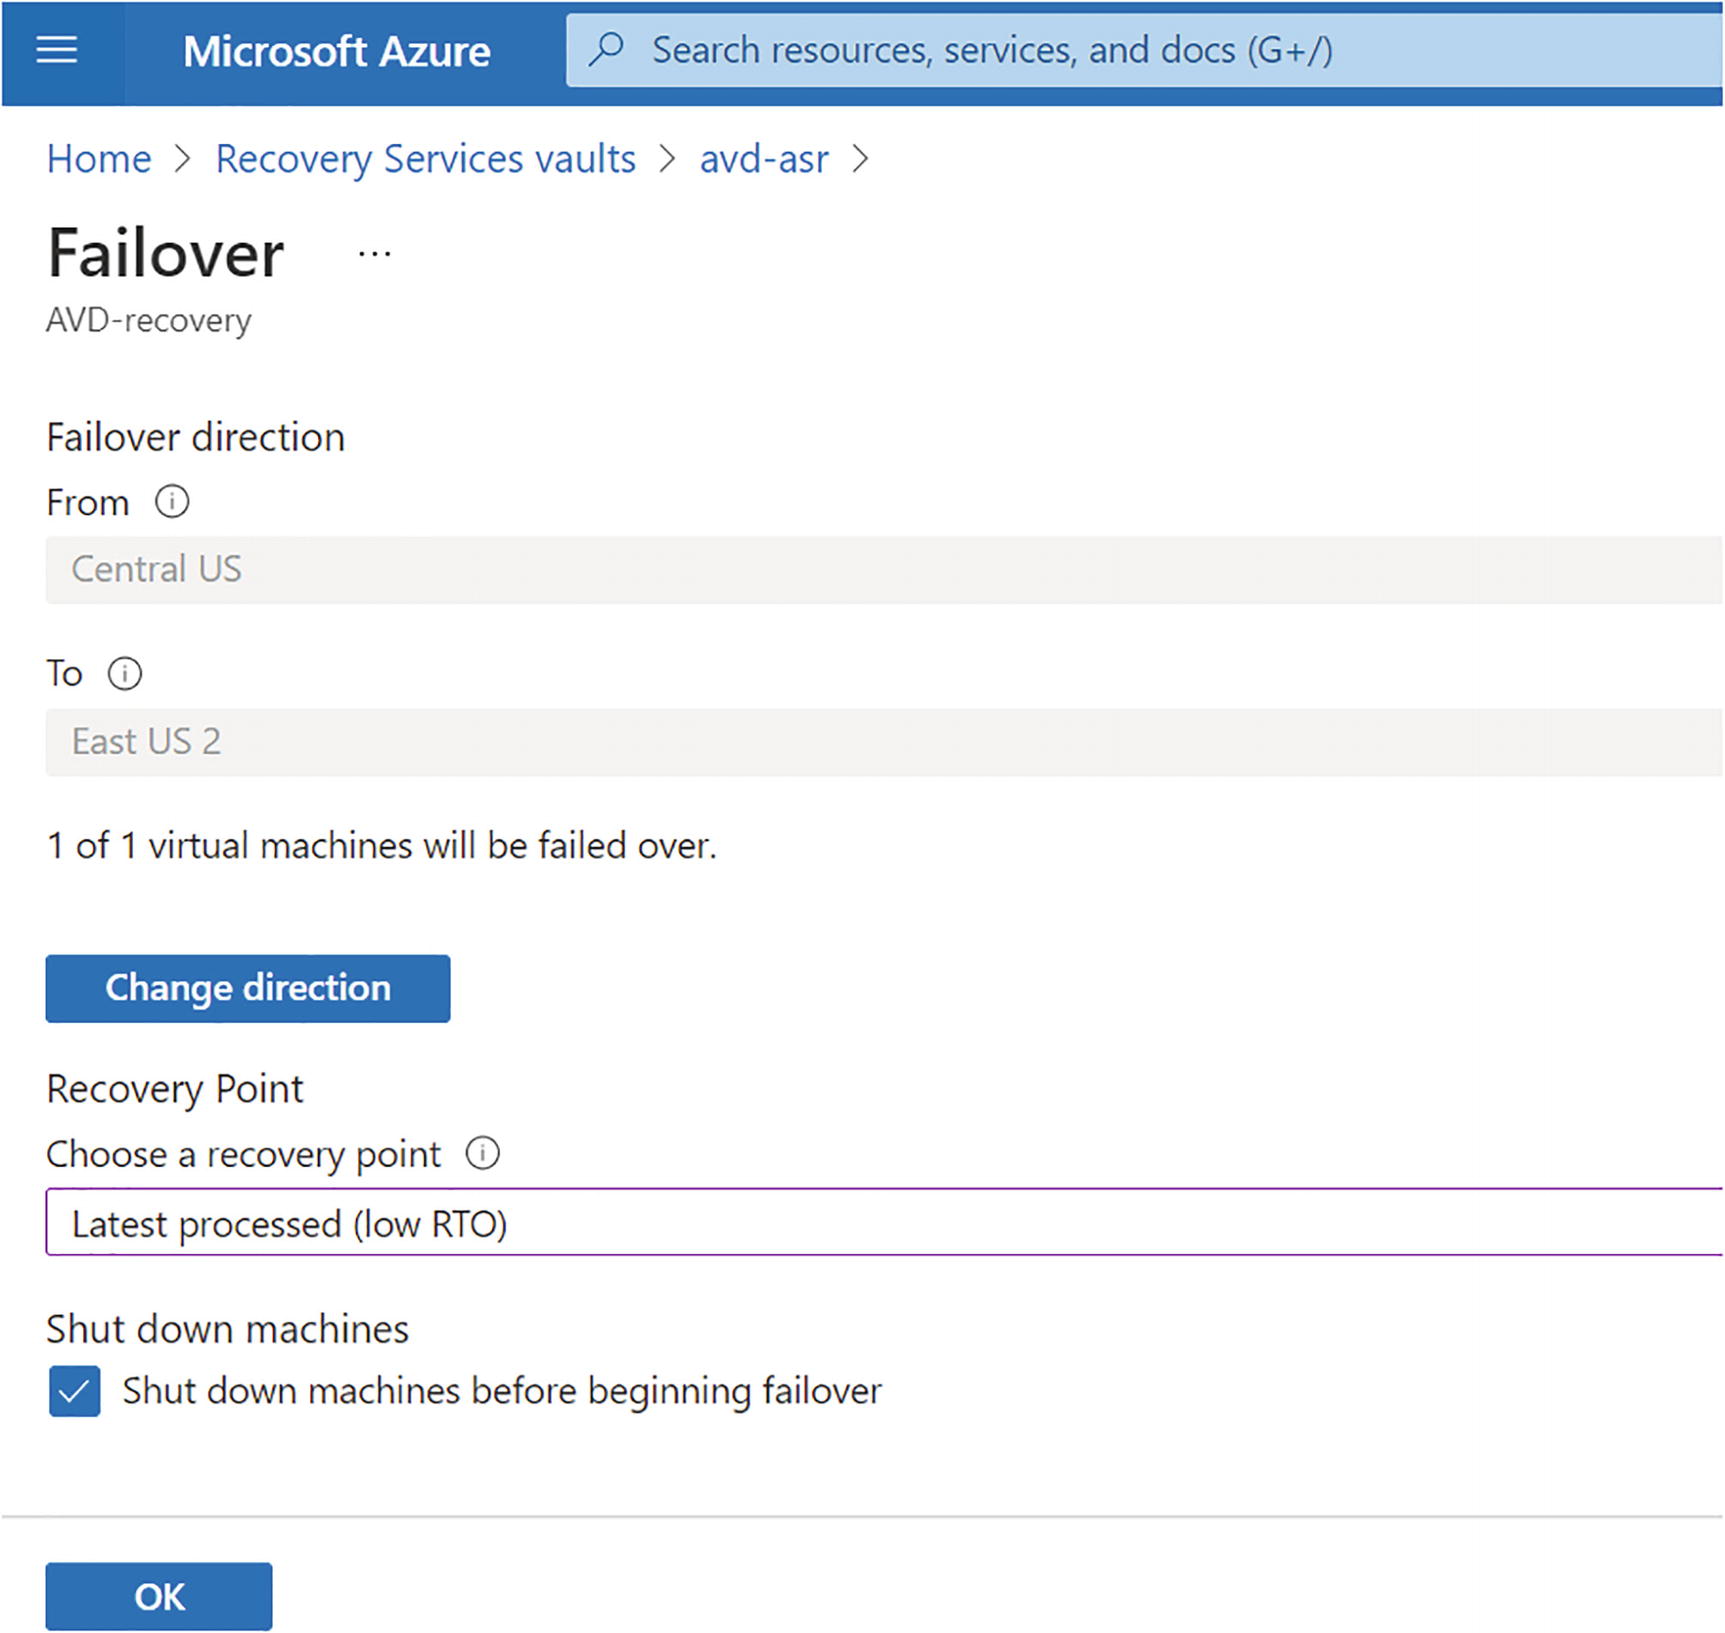 Figure 10-39
Failback, failback direction
- 5.Wait for the failover job to complete and check the running VM. See Figure 10-40.
 Figure 10-40
Failback, failback job status
- 6.You can see the changes in the running VM. Now the original primary VM is running, and the DR will be deallocated. See Figure 10-41.
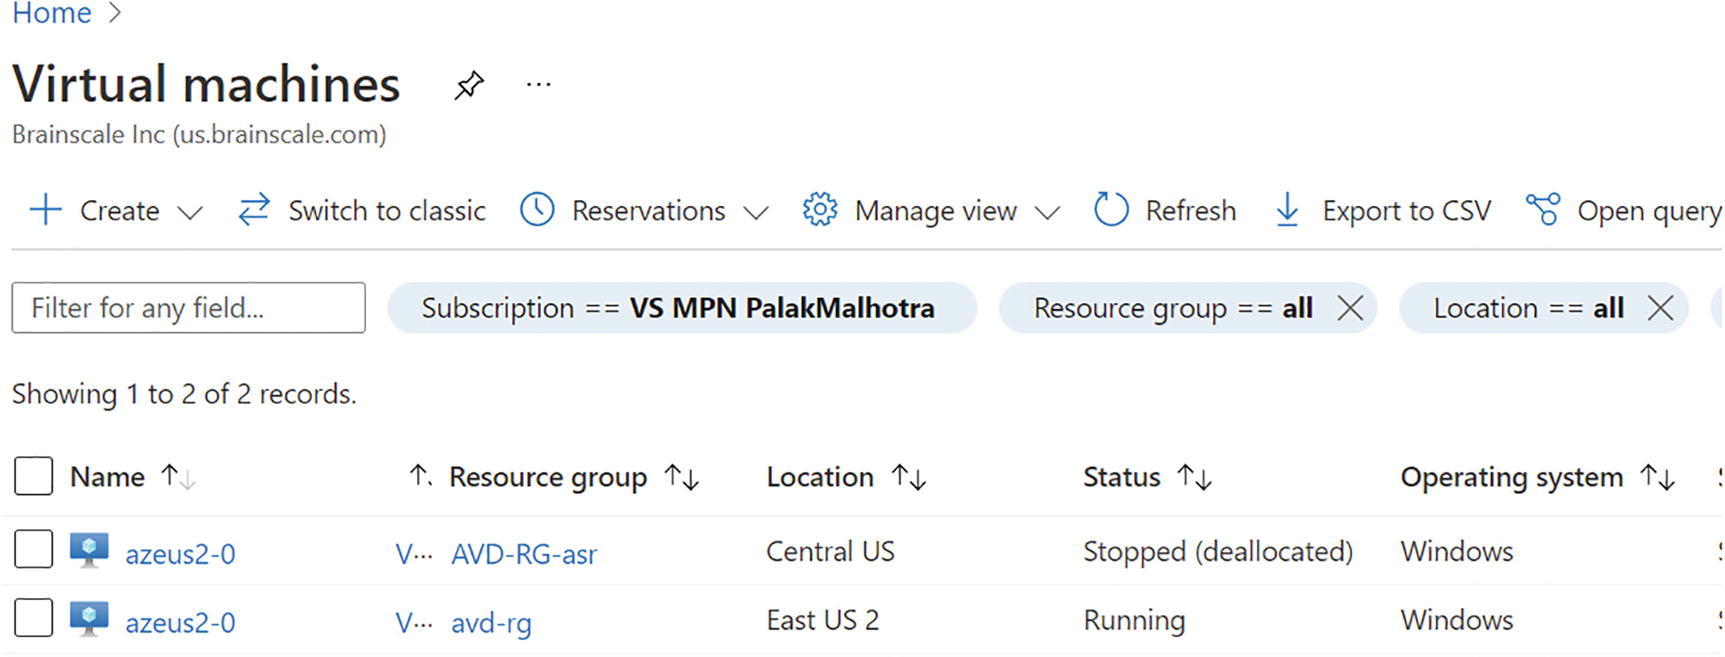 Figure 10-41
Failback, VM status after failback
- 7.The VMs will be unprotected now, so reprotect the VM from the original to the DR region again. See Figure 10-42.
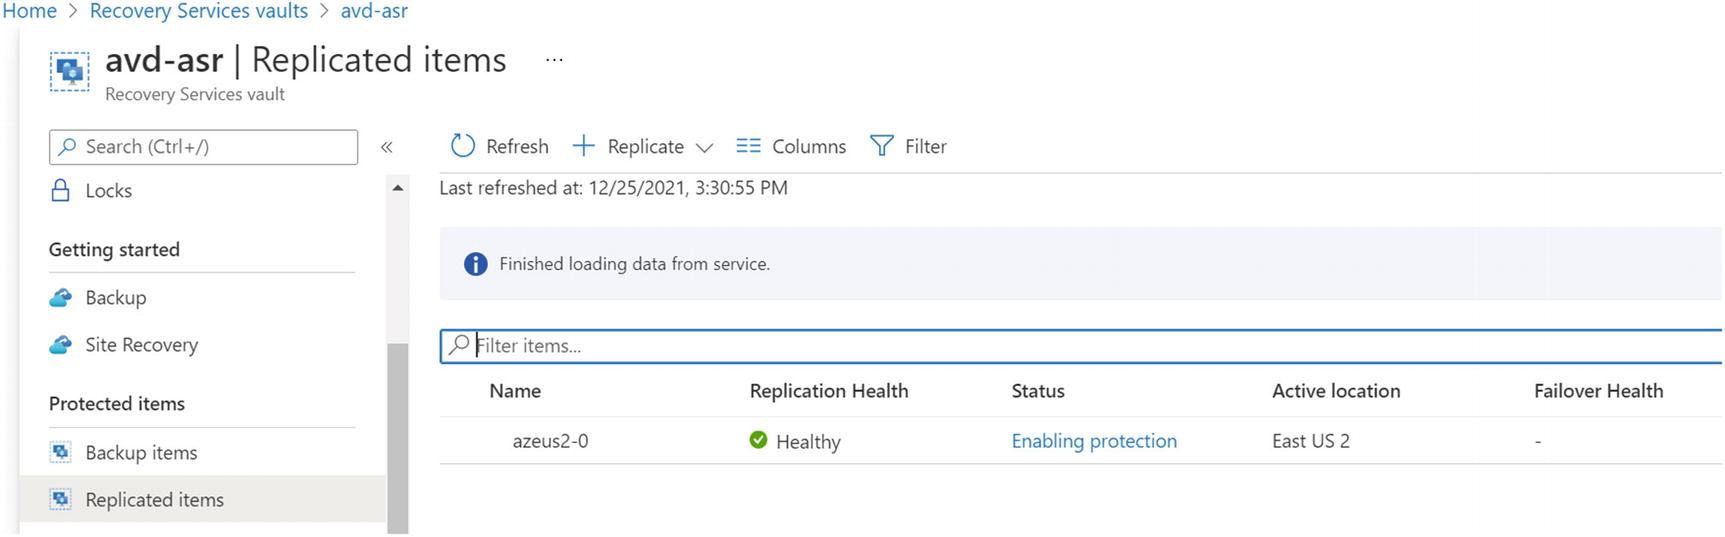 Figure 10-42
Failback, re-protect VM
- 1.
A cache storage account is created in the original primary region where the failed over VM is running. If the target storage account (the original storage account in the primary region) doesn’t exist, a new one is created. The assigned storage account name is the name of the storage account used by the secondary VM, suffixed with asr.
- 2.
If your VM uses managed disks, replica managed disks are created in the primary region to store the data replicated from the secondary VM’s disks.
- 3.
Temporary replicas of the source disks (disks attached to the VMs in the secondary region) are created with the name ms-asr-<GUID>, which are used to transfer/read data. The temp disks let us utilize the complete bandwidth of the disk instead of only 16 precent bandwidth of the original disks (that are connected to the VM). The temp disks are deleted once the reprotection completes.
- 4.
If the target availability set doesn’t exist, a new one is created as part of the reprotect job if necessary. If you’ve customized the reprotection settings, then the selected set is used.
- 5.
MSIX package storage account DR: If you are using MSIX packages and if they are stored in Azure storage (standard/premium) or any other file share, then please refer to the “Azure File Share storage” section in this chapter to plan and implement DR for MSIX packages.
- 6.
On-premises connectivity and authentication: Make sure the ADDS service is available and reachable from the DR region as well so that if the primary is down, the VM authentication and name resolution will work with ADDS and DNS. Additionally, if you have some application needs on-premises connectivity, then you have to make sure that the same connectivity is there in the DR location with all the firewall rules.
Disaster Recovery for Personal Desktops
Personal desktops are persistent desktops, which means the user data will be there on the same VM, and the user will be able to log in to the same VM every time. Since the user profile/data will be on the VM itself, you have to protect the VM using ASR. See Figure 10-43.
Personal host pool session host
Personal image
MSIX package storage account
- On-premises connectivity and authentication
 Figure 10-43
Disaster recovery for personal desktop
Personal host pool session host DR plan and implementation: Protecting a personal session host is the same as pooled VM protection using ASR. You can follow the same steps as the pooled host pool DR mentioned in the previous section.
Operating system image DR: Another important resource you should consider in a DR plan is your golden image stored in the image gallery. The Azure image gallery has a replication feature that allows you to replicate images to a specific region and use LRS/ZRS storage accounts to store the replicated image in the secondary region. Please refer to Chapter 7 for more details.

Azure image gallery, image replication
MSIX package storage account DR: If you are using MSIX packages and if they are stored on Azure storage (standard/premium) or any other file share, then please refer to the “Azure File Share storage” section in this chapter to plan and implement DR for MSIX packages.
On-premises connectivity and authentication: Make sure the ADDS service is available and reachable from the DR region as well so that if the primary is down, the VM authentication and name resolution work with ADDS and DNS. Additionally, if you have some application needs on-premises connectivity, then you must have to make sure that the same connectivity is there in DR location with all firewall rules.
Design a Backup Strategy for Azure Virtual Desktop
Azure Backup
A comprehensive backup strategy is an essential part of an organization’s cyber safety. It can be defined as an administrator’s plan to ensure critical organizational data is backed up and available for restore in the case of a data loss event. A backup strategy, along with a disaster recovery plan, is a better business continuity plan, which allows an organization to recover with zero-to-minimal damage to the business, data, and reputation.
- 1.
Determine what data has to be backed up: When it comes to data, “everything” will probably be your answer. However, the level of data protection will vary based on how critical it is to restore that data. Your organization’s recovery time objective (RTO), which is the maximum acceptable length of time required for an organization to recover lost data and get back up and running, is a reliable benchmark when forming your backup strategy. The recovery time objective (RTO) can be different for each data type, and accordingly you should form your strategy for each data set.
Assess and group your applications and data into the following so that you can decide your priority:Existentially-critical for the business
Mission-critical for the organization to operate
Optimal-for-performance for the organization to thrive
- 2.
Determine how often data has to be backed up: The frequency with which you back up your data should be aligned with your organization’s recovery point objective (RPO), which is defined as the maximum allowable period between the time of data loss and the last useful backup of a known good state. Thus, the more often your data is backed up, the more likely you are to comply with your stated RPO. As a good rule of thumb, backups should be performed at least once every 24 hours to meet acceptable standards of most organizations, but if the data is more/less important, then you should define your backup schedule strategy accordingly.
- 3.
Identify and implement a suitable backup and recovery solution: Based on your organization’s requirements, you need to identify a suitable backup solution as part of your backup strategy. Azure Backup is the most preferred and suitable solution when it comes to Azure Virtual Desktop or any other cloud service backup, but if you already have backup solution, then make sure it’s compatible and suitable for Azure Virtual Desktop.
- 4.
Test and monitor your backup system: Once your backup system is in place, check that the backup is successful, and the restore is smooth and accurate.
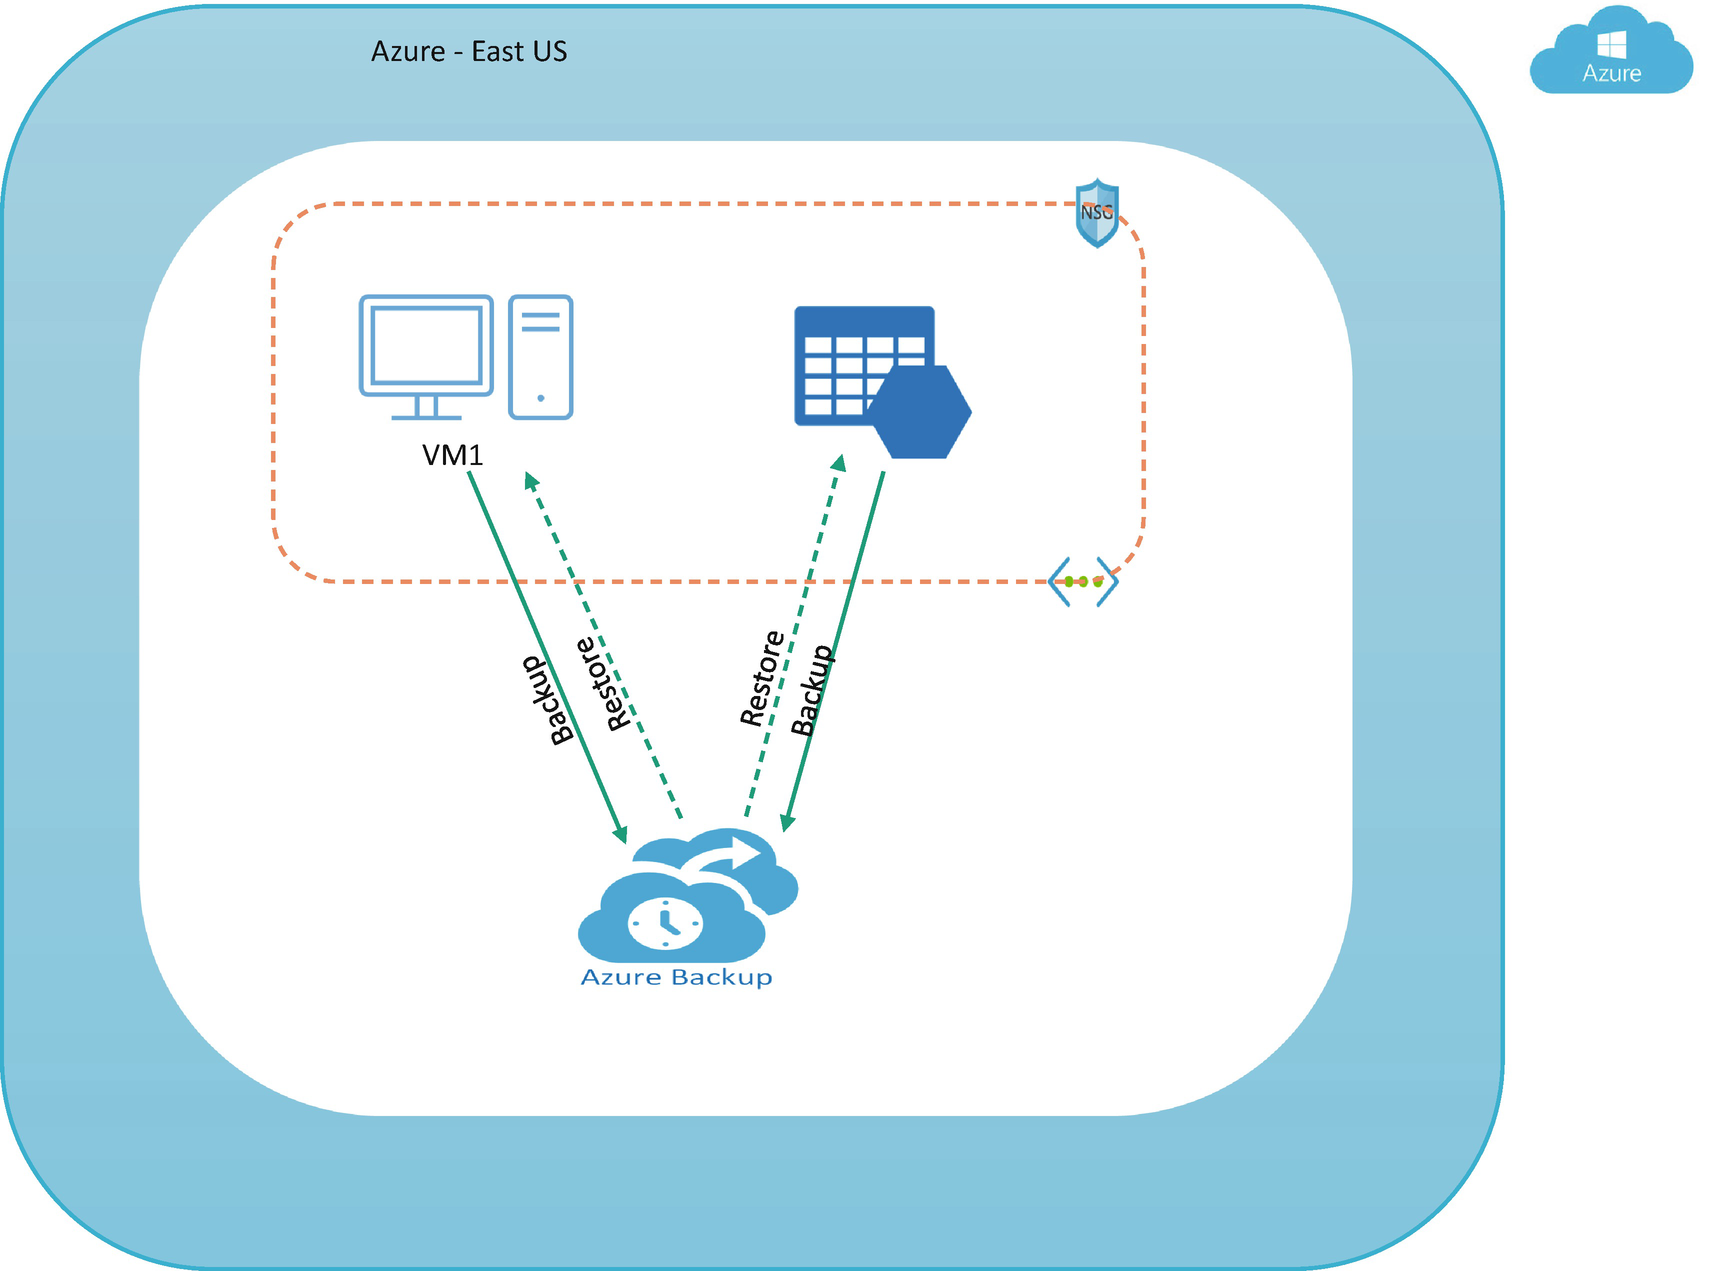
Personal desktop VM backup
Pooled FSLogix user profile storage
A personal desktop needs to be backed up as users can store data on personal desktop and it should be protected with any backup tool.
For pooled desktops, VMs are not required to be backed up, because user data will be there in the user profile storage, so you have to plan a backup option for the user profile data for pooled desktops.
Configure Backup and Restore for FSLogix User Profiles and Personal Virtual Desktop Infrastructures
You now know why backup is important for Azure Virtual Desktop, so let’s go ahead and see how to configure a backup for a personal desktop and FSLogix user profile (pooled desktop).
Azure backups can be created through the Azure portal. This method provides a browser-based user interface to create and configure Azure backups and all related resources. You can protect your data by taking backups at regular intervals. Azure Backup creates recovery points that can be stored in georedundant recovery vaults.
- 1.To set up a backup on a session host, log in to the Azure portal and go to the personal desktop session host. Click the Backup option under the session host. You can use an existing vault or create a new one on the Backup page. See Figure 10-46.
 Figure 10-46
Azure Backup for personal desktop
- 2.By default, backup frequency will be daily, and it will retain data for 30 days, but you can click the Edit button and change the backup frequency as per your organization’s need. Once you verify all details, then click “Enable backup.” See Figure 10-47.
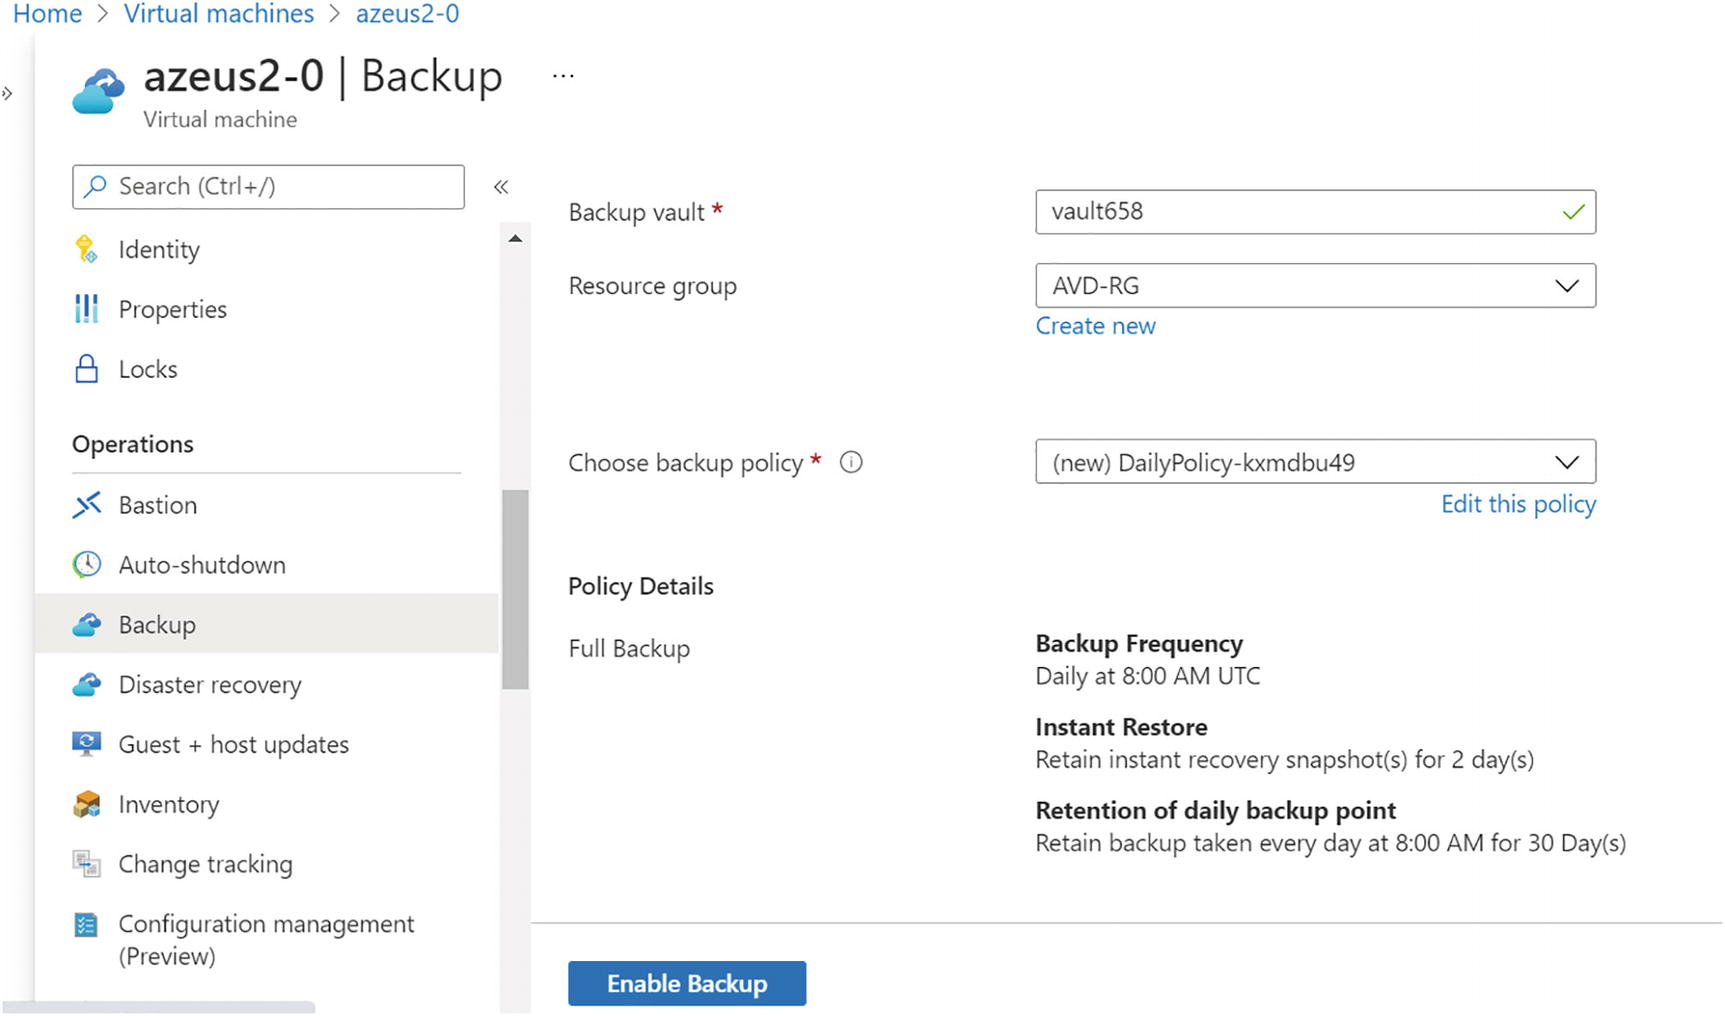 Figure 10-47
Azure Backup, VM backup setting
- 3.Once the backup is enabled, you will be able to see the VM backup in the vault under “Backup items.” See Figure 10-48.
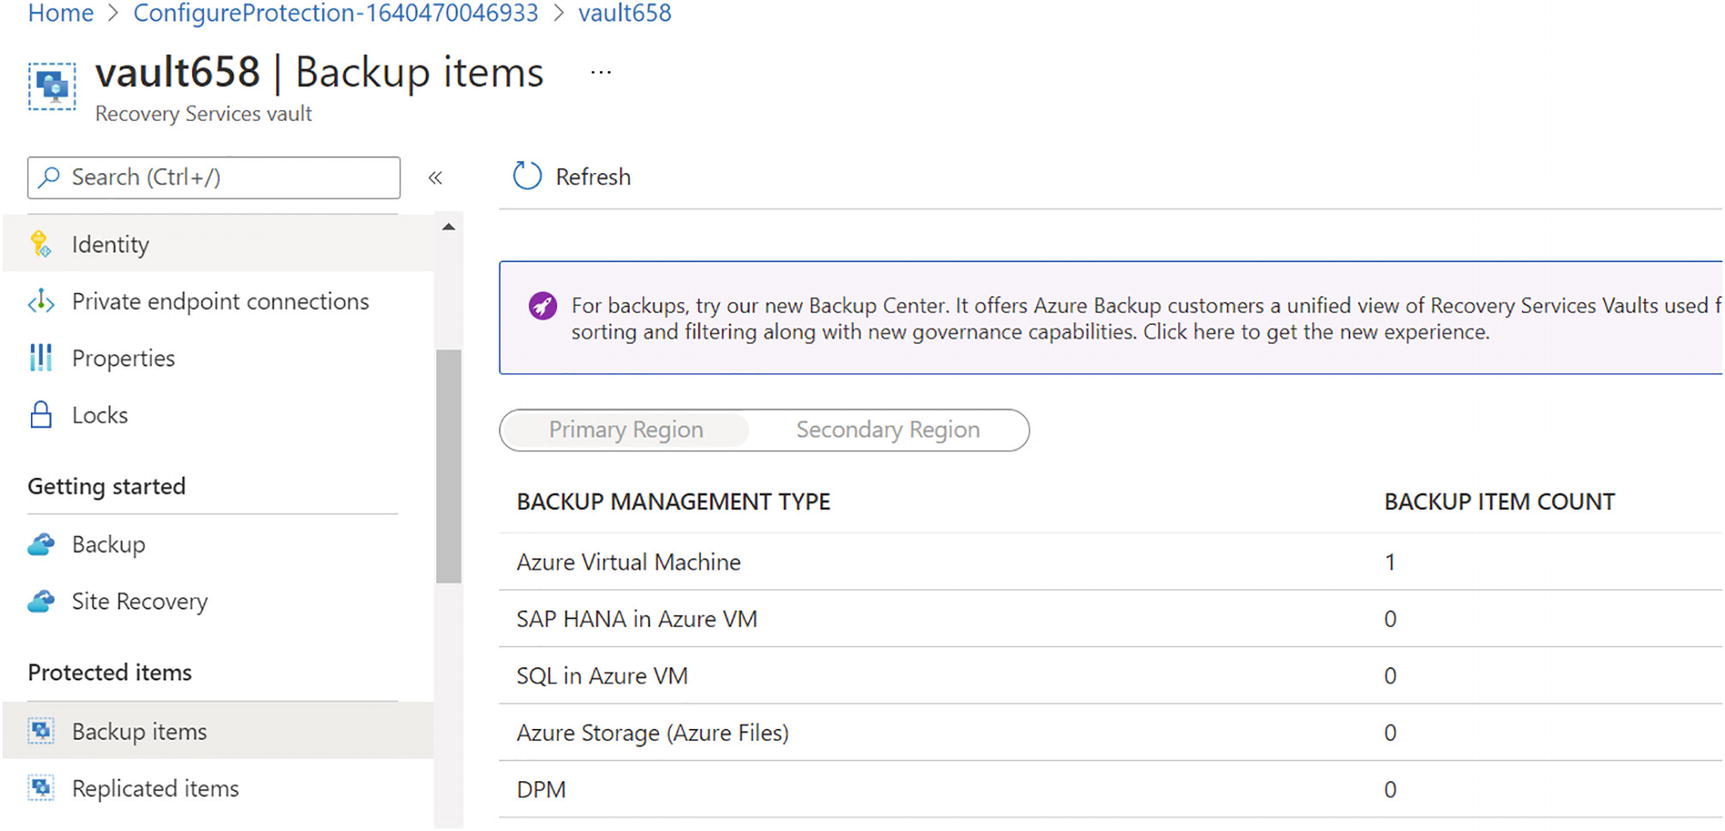 Figure 10-48
Azure Backup, backup items
- 4.
Repeat the same steps for all personal session hosts. Alternatively, you can create automation using PowerShell/CLI to enable backups on multiple personal desktop session hosts.
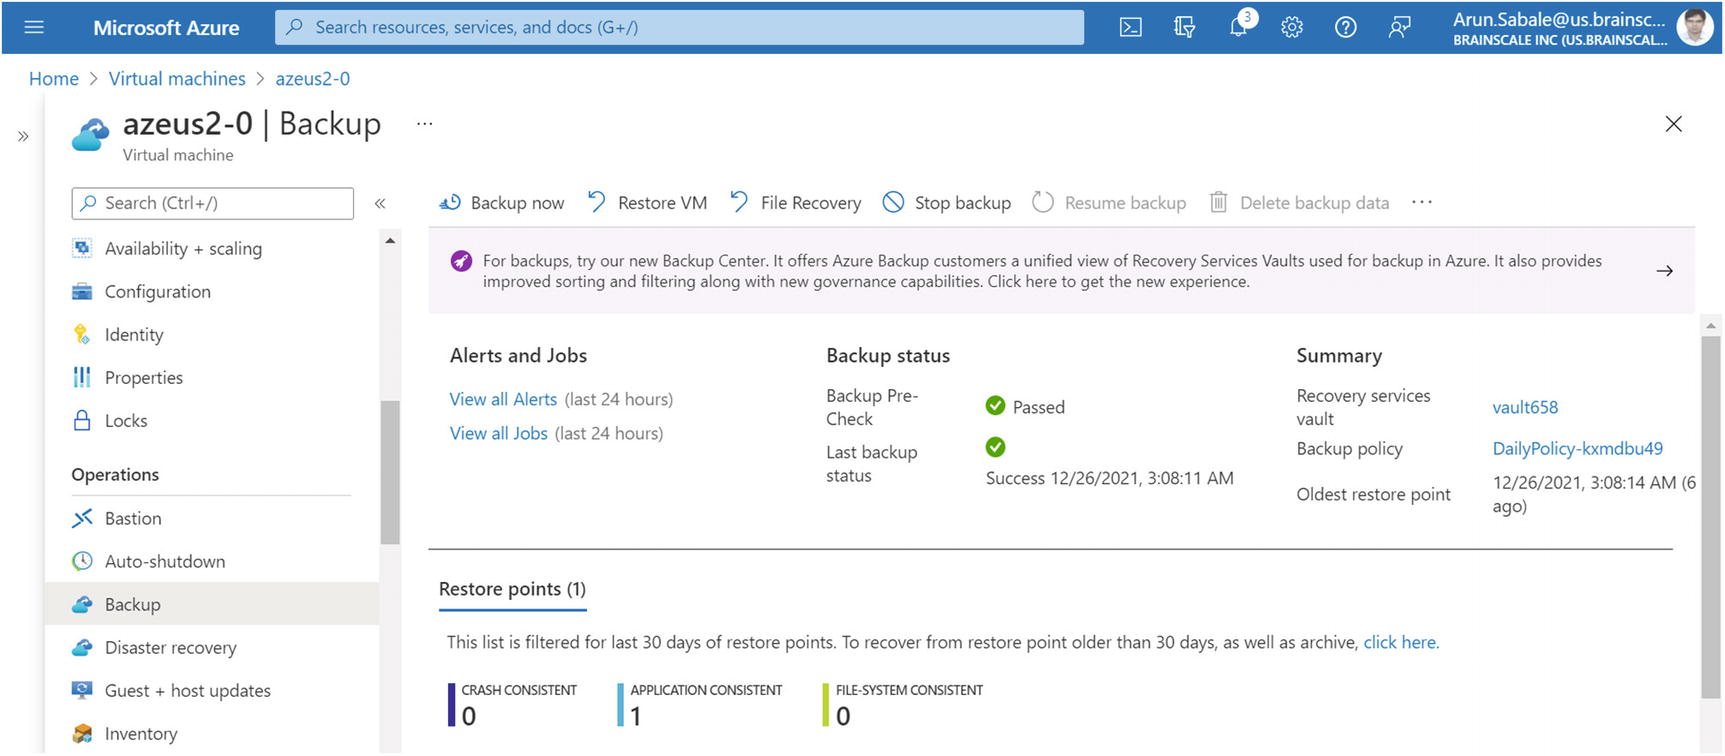
Azure Backup, backup status
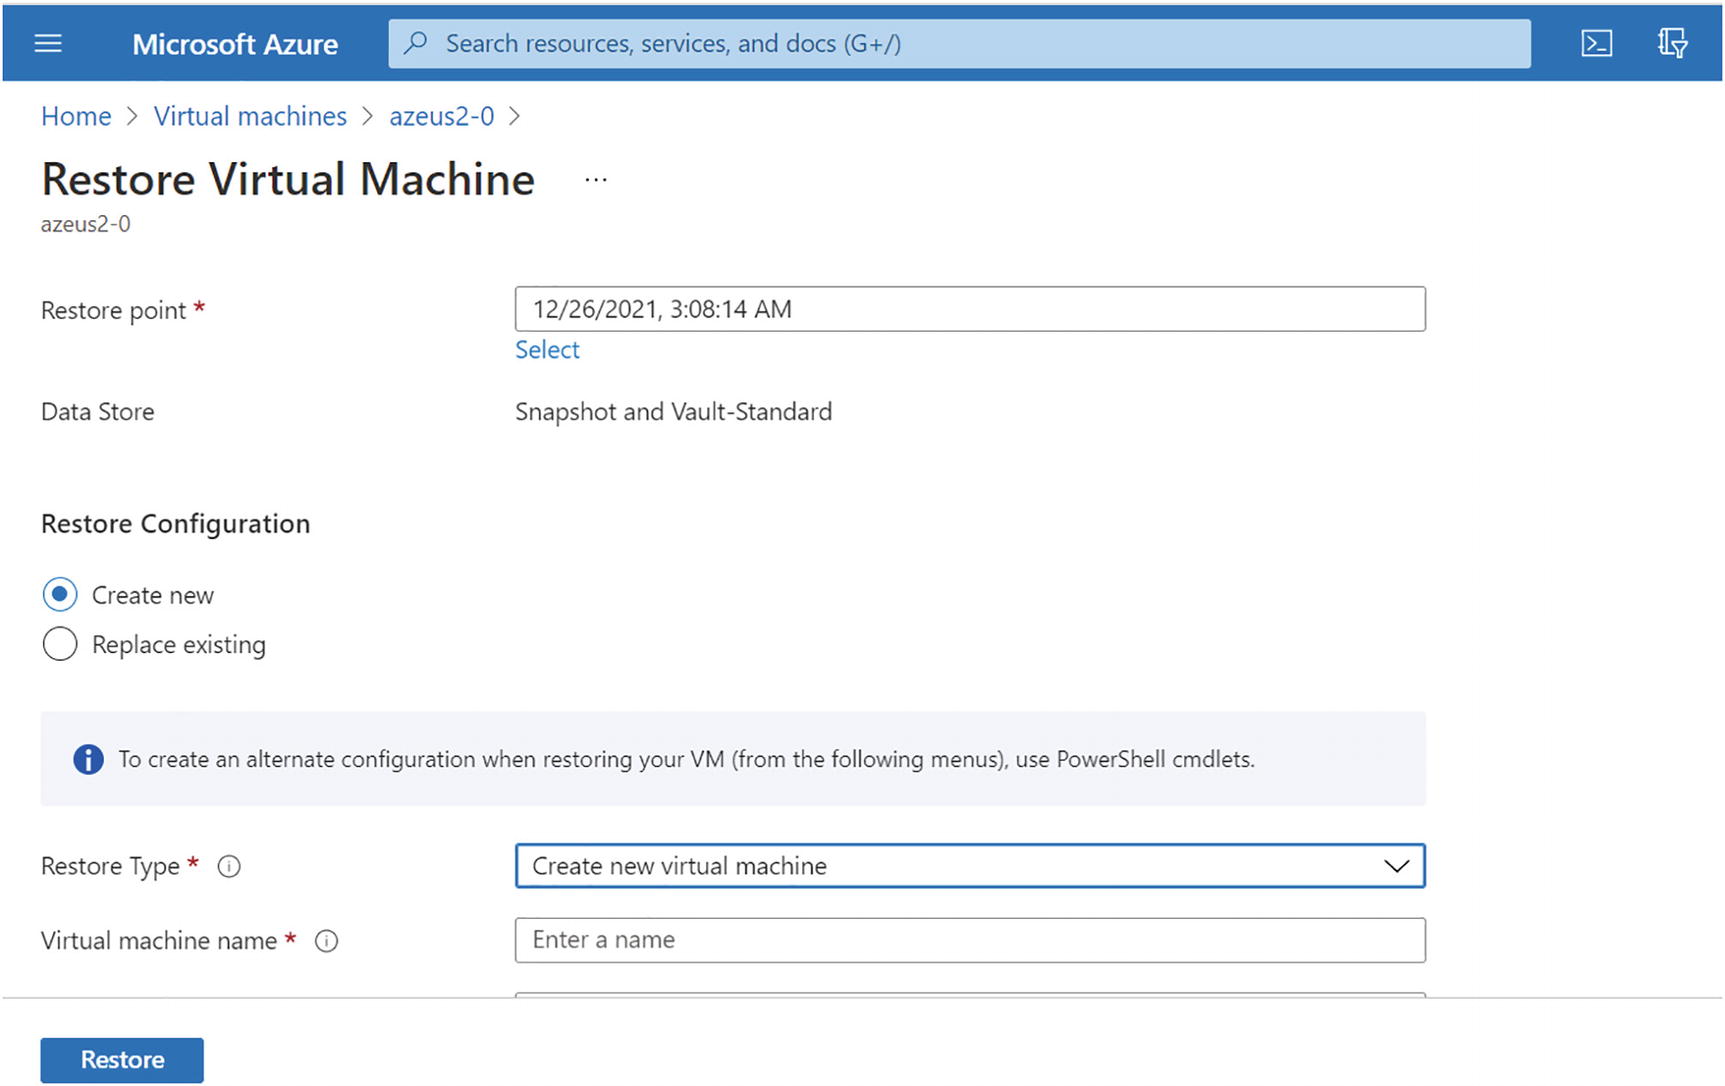
Azure Backup, restore a VM

Azure Backup, restoring specific files from backup
Pooled desktops use FSLogix to store user profile/data to a remote storage, so it is important to take backups of the user profile storage. You can protect the user profile data by taking backups at regular intervals. Azure Backup creates recovery points that can be stored in georedundant recovery vaults.
Azure file share backup is a native, cloud-based backup solution that protects your data in the cloud and eliminates additional maintenance overheads involved in on-premises backup solutions. The Azure Backup service smoothly integrates with Azure File Sync and allows you to centralize your file share data as well as your backups. This simple, reliable, and secure solution enables you to configure protection for your enterprise file shares in a few simple steps with an assurance that you can recover your data in any disaster scenario.
Key Benefits of Azure File Share Backup
Zero infrastructure: No deployment is needed to configure protection for your file shares.
Customized retention: You can configure backups with daily/weekly/monthly/yearly retention according to your requirements.
Built-in management capabilities: You can schedule backups and specify the desired retention period without the additional overhead of data pruning.
Instant restore: Azure file share backup uses file share snapshots, so you can select just the files you want to restore instantly.
Alerting and reporting: You can configure alerts for backup and restore failures and use the reporting solution provided by Azure Backup to get insights on backups across your file shares.
Protection against accidental deletion of file shares: Azure Backup enables the soft delete feature on a storage account level with a retention period of 14 days. Even if a malicious actor deletes the file share, the file share’s contents and recovery points (snapshots) are retained for a configurable retention period, allowing the successful and complete recovery of source contents and snapshots with no data loss.
Protection against accidental deletion of snapshots: Azure Backup acquires a lease on the snapshots taken by scheduled/on-demand backup jobs. The lease acts as a lock that adds a layer of protection and secures the snapshots against accidental deletion.
- 1.
Log in to the Azure portal and go to the user profile storage account and file share. Click the file share name under the file share option.
- 2.
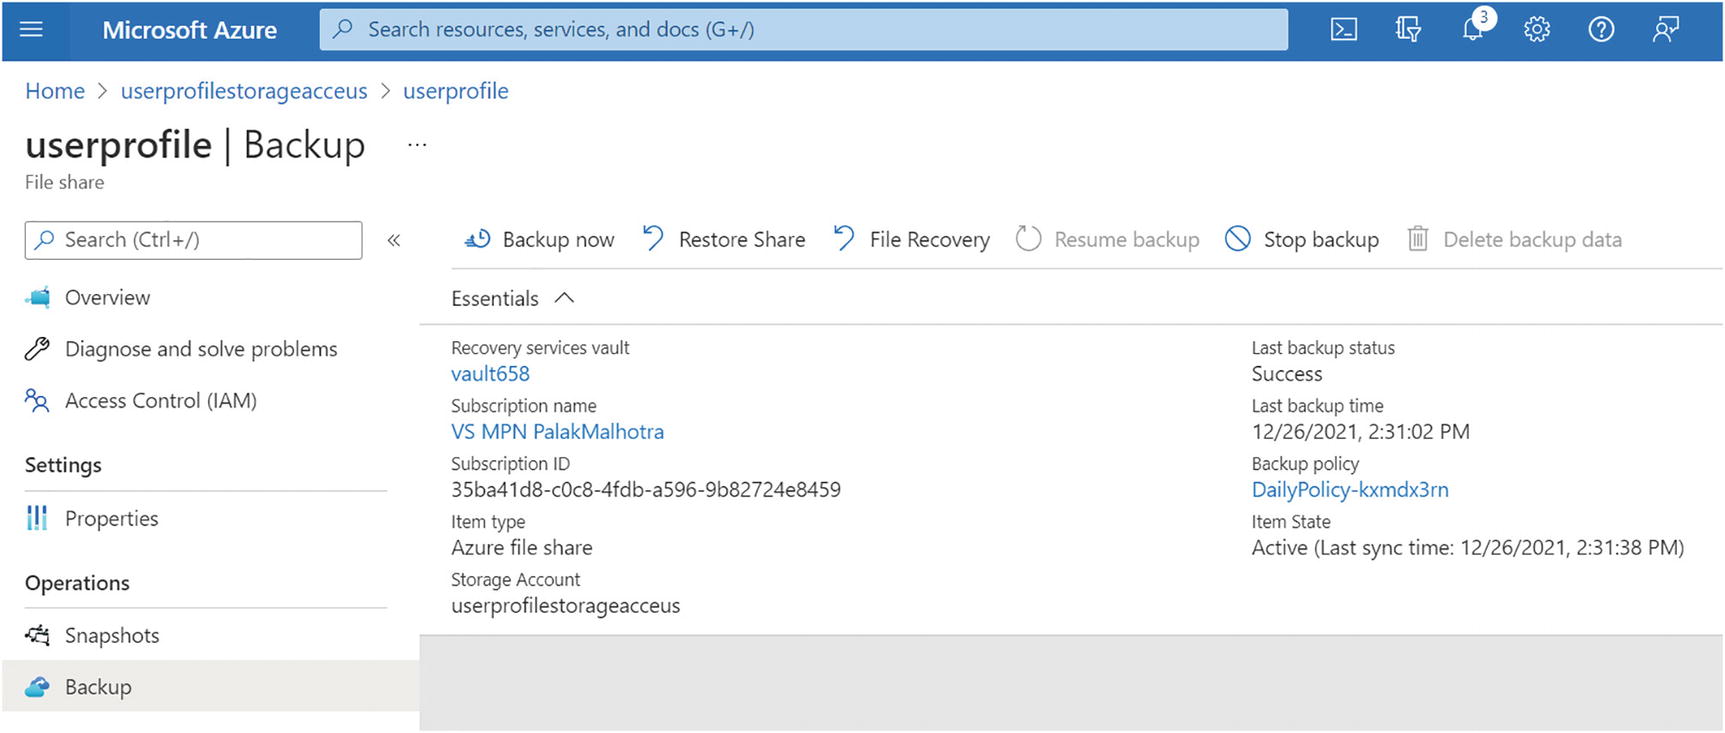
Go to the backup option on the file share and select an existing vault or create a new vault if you don’t have one. The vault must be in the same region. Also verify the backup policy and backup frequency to proceed. Once you verify everything, then click “Enable backup.” See Figure 10-52.

Azure Backup, backing up Azure storage file share
Azure Backup, Azure storage file share restore options
Summary
In this chapter, you learned about planning and implementing disaster recovery for Azure Virtual Desktop including pooled and personal desktops. You also learned about the difference between backup and disaster recovery. Backup is also important to protect the user data in same region, so you learned how to back up user profile data for pooled and personal session host VMs.