- Log in to Windows Server 2016. The IP address of Windows Server 2016 is 172.16.15.60 and the name of the server is WIN2016IIS.
- Press Windows + R on your keyboard. You will get the Run window. Open PowerShell ISE with administrative rights, type RunAs /user:Administrator PowerShell_ISE.exe in the Run window, and press OK.
- Now it will ask you the administrative password for you Windows Server 2016 instance (not Nano Server). Type the administrator password and press Enter. The PowerShell window will open.
- Now we have to remote-connect to Nano Server 2016 on the IP 172.16.15.63.
- We will use the following command from PowerShell:
Enter-PSSession –ComputerName "172.16.15.63" -Credential ~Administrator
You can use either the computer name or IP address for –ComputerName. We are using the IP address in this command.
- Now you will get a pop-up window for the Nano Server administrator username and password. We will enter the Nano server administrator password and press OK to log in. You have connected successfully. Run the Import-module iisAdministration command. Press Enter and you will get the PowerShell module imported.
- Let's create the website with an advanced script. We will use the following command:
$manager = Get-IISServerManager
$site = $manager.Sites.Add("v5mysite", "http", "*:8082:v5mysite.com", "C:v5mysite") $site.Id = 4                           $site.Bindings.Add("*:8083:", "http")$manager.CommitChanges()"
- Close PowerShell and press Enter. We can run the command from the PowerShell toolbar by clicking on the Play button at the top:

- You can see here that we created a website called v5mysite with protocol http, IP * (all available IPs), and header v5mysite.com. We also set the physical path of v5mysite as C:v5mysite and set the site ID as 4.
- Now let's check the created website, v5mysite. Run the command Get-IISSite in PowerShell:

- You'll see in the figure that it shows that you have a website called v5mysite, ID 4, status Started, and physical path C:v5mysite, and we have two pieces of binding information, one with the header and the other without.
- Let's create the application pool in IIS 10.0 on Nano Server. Run the following command in PowerShell:
$manager = Get-IISServerManager $pool = $manager.ApplicationPools.Add("NanoAPP") $pool.ManagedPipelineMode = "Integrated" $pool.ManagedRuntimeVersion = "v4.0" $pool.Enable32BitAppOnWin64 = $false $pool.AutoStart = $true $pool.StartMode = "OnDemand" $pool.ProcessModel.IdentityType = "ApplicationPoolIdentity" $manager.CommitChanges()
- Next, we create an application pool called NanoApp and set the property of the application pool, as shown here:

- Once you create the application pool, you can check its status with the command Get-IISAppPool, as shown here:

- You can see that we have created the application pool called NanoApp. Let's add NanoApp to v5msite.com. Use the following command:
$manager = Get-IISServerManager $website = $manager.Sites["v5mysite"] $website.Applications["/"].ApplicationPoolName = "NanoApp" $manager.CommitChanges()

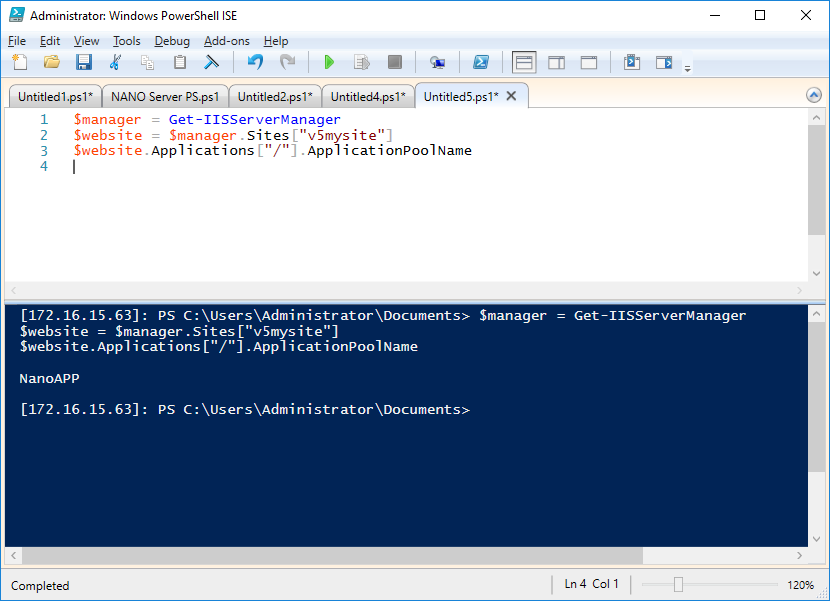
- We assigned the application pool NanoApp to website v5mysite. Now let's check the application pool name for v5mysite.com.
- Use the following command:
"$manager = Get-IISServerManager
$website = $manager.Sites["v5mysite"]
$website.Applications["/"].ApplicationPoolName"
- You will get the application pool name as NanoAPP, as shown here: