12
Add sound and movement to slides
In this chapter
A PowerPoint presentation might be designed to provide ancillary information for a live presentation or to stand alone as an information source. Regardless of the method of delivery, a presentation has no value if it doesn’t keep the attention of the audience. An element that can make the difference between an adequate presentation and a great presentation is the judicious use of animated content, sound, and videos. By incorporating these dynamic effects, you can grab and keep the attention of your audience. You can emphasize key points, control the focus of the discussion, and entertain in ways that will make your message memorable.
With PowerPoint 2019, you have so many opportunities to add pizzazz to your slides that it is easy to end up with a presentation that looks more like an amateur experiment than a professional slide show. When you first start adding animations, sound, and videos to your slides, it is best to err on the conservative side. As you gain more experience, you’ll learn how to mix and match effects to get the results you want for a particular audience.
This chapter guides you through procedures related to animating text and pictures on slides, customizing animation effects, adding audio content to slides, adding video content to slides, and optimizing and compressing media.
Animate text and pictures on slides
In the context of PowerPoint, animation refers to the movement of an element on a slide. When used appropriately, animated slide elements can both capture the audience’s attention and effectively convey information. You can animate individual objects on a slide, including text containers, pictures, and shapes. (You can’t animate objects that are part of the slide background or slide master, other than as part of the transition between slides.)
Thoughtfully designed animations can be very informative, particularly for audience members who are more receptive to visual input than to auditory input. Animations have the added benefit of providing a consistent message with or without a presenter to discuss or externally illustrate a process.
The elements of a multipart animation
You can configure four types of animations: the appearance, movement, emphasis, and disappearance of objects on the slide. There are multiple options within these four categories. The options are categorized as Basic, Subtle, Moderate, and Exciting (although you might have a different concept of “exciting” than the PowerPoint developer who categorized the effects). A few more animation effects are available for text than for other slide objects.
Here’s a breakdown of the animation effects available in PowerPoint 2019:
Entrance animations An object with an animated entrance is not visible when the slide first appears. (It is visible during the development process but not when you present the slide show.) It then appears on the slide in the manner specified by the entrance effect. Some entrance effects are available in the Animation gallery. They’re illustrated in green, and their icons provide some idea of the movement associated with the effect.

Have fun experimenting with the different effects
Selecting More Entrance Effects at the bottom of the Animation menu opens a dialog box that displays all the available entrance animations by category to help you choose an appropriate effect.

The entrance animation effects available for text
Emphasis animations These effects animate an object that is already visible on the slide to draw attention to it, without changing its location. The emphasis effects available in the Animation gallery are illustrated in yellow.

Effects range from subtle to bold
Selecting More Emphasis Effects at the bottom of the Animation menu opens a dialog box that displays all the available emphasis animations by category.

The emphasis animations available for text and images
Motion Path animations These effects move an object along a path that you specify, over a period of time that you specify. A few simple motion paths are available from the Animation gallery, but a surprisingly large variety is available from the dialog box that opens when you select More Motion Paths at the bottom of the Animation menu.

The motion path animations available for text
Exit animations These effects take an existing object through a process that results in the object no longer being visible on the slide. The exit effects available in the Animation gallery are illustrated in red.

Choose an effect that suits the style of your presentation
Additional exit effects are available from the Change Exit Effect dialog box.

The exit animations available for text
Animations can be very simple or very complex. Many animations have options that you can configure, such as the direction, speed, size, or color. For example, when you configure an entrance effect for a bulleted list, you can specify whether to have the entire list enter the slide at the same time, or to have only one bulleted item enter at a time. After you choose an effect, the applicable options are available on the Effect Options menu.

Different animations have different options
You can apply multiple animation effects (for example, an entrance effect and an emphasis effect) to a single object. As you assign animations to slide objects, numbers appear on the objects to specify the order of the animation effects. The numbers are visible only when the Animation tab is active.

Each number represents one animation event
As you build an animated slide, you can add and animate individual elements, or you can add all the elements to the slide first, and then animate them. Regardless of the process you choose, position the objects on the slide as follows:
Entrance effects Position the object where you want it to end up after it enters the slide.
Emphasis effects Position the object where it will be before and after the effect.
Exit effects Position the object where it will be before it leaves the slide.
After all the elements are in place, animate them in the order you want the animations to occur. (If you’re animating multiple objects, it might be helpful to write out a description of the process before starting.) If you animate something out of order, don’t worry—you can reorder the animations from within the Animation Pane.
To animate an object on a slide
Display the slide in the Slide pane, and select the object that you want to animate, or its container. (For example, if you want to animate the entrance of a bulleted list, select the text box that contains the bulleted list.)
On the Animations tab, in the Animation group, select the More button to display the Animation menu and gallery.
 Tip
TipIf the menu expands to cover the slide content, you can drag the handle in the lower-right corner of the menu to resize it.

The Animation gallery and menu
Do either of the following:
In the Animation gallery, select the icon that represents the animation you want to apply.
On the Animation menu, select the More command for the type of animation you want to apply, and then in the Change Type Effect dialog box, select the animation you want.
PowerPoint displays a live preview of the selected animation effect and adds an animation number adjacent to the object. A star appears next to the slide thumbnail to indicate that the slide contains either an animation or a transition.

In the Thumbnails pane, the star below the slide number indicates the presence of movement on the slide
TipWhen you apply an animation, PowerPoint automatically previews (plays) the animation. If this is distracting to you, you can turn off this feature by selecting the Preview arrow (in the Preview group on the Animations tab) and then selecting AutoPreview to remove the check mark that indicates the option is turned on.
To select an applied animation
On the slide or in the Animation Pane, select the animation number.
To display or hide the Animation Pane
On the Animations tab, in the Advanced Animation group, select Animation Pane.
TipYou can expand and collapse sets of animation effects in the Animation Pane to help you focus on those you want to work with.
To configure animation options
Apply the animation, or select a previously applied animation.
On the Animations tab, in the Animation group, select Effect Options. (If the button is unavailable, the animation has no configurable options.)
The Effect Options menu has one titled section for each option that you can configure.
On the Effect Options menu, select one option in each section.
To apply multiple animation effects to one object
Apply the first animation effect and configure any options.
Select the object (not the animation). The existing animation information is highlighted on the Animations tab and in the Animation Pane.
On the Animations tab, in the Advanced Animation group, select Add Animation. In the Add Animation gallery, select the additional animation you want to apply.
To copy a set of animation effects from one object to another object
Select the source object.
On the Animations tab, in the Advanced Animation group, select Animation Painter.
Point to the object you want to format. When a paintbrush appears to the right of the cursor, select the object to apply the formatting.
TipThe Animation Painter is similar to the Format Painter. If you select Animation Painter one time, you can copy the formatting to one other object. If you double-click the Animation Painter button, you can copy the formatting to many other objects, until you select the button again or press Esc to deactivate it.
To preview animations
To preview all animations on a slide in order, on the Animations tab, in the Preview group, select Preview.
To preview a specific animation and those that follow, in the Animation Pane, select the first animation, and then select Play From.
To preview one animation, select the animation on the slide and then, in the Animation Pane, select Play From.
To remove animation effects from slide objects
Do either of the following in the Animation Pane:
To remove one animation, right-click the animation, and then select Remove.
To remove all animations, select any animation, press Ctrl+A to select all the animations, and then press Delete.
Customize animation effects
Many presentations don’t require much in the way of animation, and you might find that transitions and ready-made animation effects will meet all your animation needs. However, for those occasions when you want a presentation with pizzazz, you can customize the animation effects.
![]() Tip
Tip
Animations can be useful for self-running presentations, where there is no presenter to lead the audience from one concept to another.
After you apply an animation effect, you can fine-tune its action in the following ways:
Specify the direction, shape, or sequence of the animation. (The options vary depending on the type of animation you apply.)
Specify what action will trigger the animation. For example, you can specify that selecting a different object on the slide will animate the selected object.
As an alternative to clicking the mouse button to build animated slides, have PowerPoint build the slide for you.
Control the implementation speed (duration) of each animation, or delay an animation effect.
Change the order of the animation effects.
Entrance and exit effects cause objects to appear and disappear when you’re previewing or presenting a slide. However, all the objects are visible while you’re working in the Slide pane. A very helpful tool when managing multiple animated objects on a slide is the Animation Pane. Each numbered animation on the slide has a corresponding entry in the Animation Pane that provides information and options for managing the animations.

Manage all aspects of animations from the Animation Pane
The color coding of the Entrance, Emphasis, and Exit effects is visible in the Animation Pane, and a timeline is available at the bottom of the pane. The visual indicators to the right of each object name represent the type, starting point, and duration of each animation event, as follows:
The indicator color represents the animation type (green for Entrance, yellow for Emphasis, blue for Motion Path, and red for Exit).
The left side of the indicator aligns with the animation starting point. If the left sides of two indicators align, those animations start at the same time. If the left side of an indicator aligns with the right side of the previous indicator, the animations run in order.
The width of the indicator is the animation duration as it relates to the timeline at the bottom of the Animation Pane.
The right side of the indicator is either triangular or square. A square indicates that the animation has a fixed duration; a triangular edge indicates that the duration is set to Auto.
Each animation is an individual event. By default, each animation starts immediately “on click,” meaning when you switch to the slide, click the mouse button, tap the screen, or press an arrow key—any action that would otherwise move to the next slide. You can change the animation “trigger” to run with or after another event, to run it after a certain length of time, or to run it when you select a specific screen element or reach a bookmark in an audio or video clip. You control these settings either from the Advanced Animation and Timing groups on the Animations tab, or from the Animation Pane.
Selecting an animation in the Animation Pane selects the animation and displays an arrow to the right of the animation timing indicators. Selecting the arrow displays a menu of actions. Some of these actions are available from the Animations tab, but the effect options available from this menu are more complex than those on the Effect Options menu in the Animation group.

You can configure these actions from the Animation Pane to customize an animation
Selecting Effect Options on the shortcut menu provides access to an effect-specific dialog box where you can refine that type of animation in the following ways:
Specify whether the animation should be accompanied by a sound effect.
Dim or hide the element after the animation, or have it change to a specific color.
If the animation is applied to text, animate all the text at once or animate it word by word or letter by letter.
Repeat an animation and specify what triggers its action.
If a slide has more than one level of bullet points, animate different levels separately.
If an object has text, animate the object and the text together (the default) or separately, or animate one but not the other.
The dialog box title is the animation type, and the options available in the dialog box are specific to that type of animation.

Some of the settings available through the Animation Pane Effect Options menu
To open the effect-specific dialog box for an animation
Do either of the following in the Animation Pane:
Point to the animation, select the arrow, and then select Effect Options.
Double-click the animation.
To change the order of animation effects on a slide
On the slide or in the Animation Pane, select the animation you want to reorder.
On the Animations tab, in the Timing group, select Move Earlier or Move Later.
Or
In the Animation Pane, select the animation or animations that you want to move.
Drag the selection to the new position in the Animation Pane. The animation numbers change to reflect the new positions.
TipAfter reordering animations, it’s a good idea to preview the animations to ensure that the actions happen in a logical order.
To set the trigger for a selected animation
![]() Tip
Tip
Many of the following settings can be configured on the Animations tab, in the Animation Pane, or in the effect-specific options dialog box. We’ve provided one path to the setting, but use the interface that you’re most comfortable with.
Do any of the following in the Timing group on the Animations tab:
To start the animation manually, select the Start list, and then select On Click.
To start the animation based on the previous animation, select the Start list, and then select With Previous or After Previous.
To start the animation a specific period of time after the trigger, specify the Delay in seconds.
Or
Do either of the following in the Advanced Animation group on the Animations tab:
To start the animation when you select an object on the slide, select the Trigger button, select On Click of, and then select a trigger object on the slide.
To start the animation at a specific point during the playback of an audio clip or video clip, in the Trigger list, select On Bookmark, and then select a bookmark that you’ve set in an audio or video clip.
 SEE ALSO
For information about setting bookmarks, see the sidebar “Bookmark points of interest in media clips” later in this chapter.
Or
In the Animation Pane, drag the colored indicator bar to the starting point you want.
To set the duration of a selected animation
On the Animations tab, in the Timing group, specify the Duration in seconds.
In the Animation Pane, drag the right side of the colored indicator bar to set the duration in accordance with the timeline at the bottom of the pane.
To add a sound effect to an animation
In the Animation Pane, double-click the animation to open the animation-specific effect options dialog box.
On the Effect tab, select the Sound list, and then select the sound effect you want to assign to the animation.
Select the speaker icon to the right of the Sound list to display the volume slider, and set the volume level of the sound effect.
Select OK to close the dialog box.
Bookmark points of interest in media clips
Bookmarks are a useful feature for PowerPoint users who incorporate audio, video, and animation into presentations. You can insert bookmarks into audio and video clips to identify locations either that you want to quickly get to or that you want to use as triggers for other events.
For example, you could create an animation that visually describes a process, and record a narration that verbally describes the process. Instead of setting up a series of timing points to synchronize the narration and animation, you could insert bookmarks at key points in the narrative audio clip that trigger specific segments of the animation to play.
As another example, you could embed a video on a slide, and record audio comments about certain parts of the video. Then you can insert bookmarks at those points of the video to trigger the playback of the relevant audio comments.
When you insert bookmarks in audio and video clips within PowerPoint, those bookmarks exist only in PowerPoint and don’t affect the original recording.
To insert a bookmark in an audio or video clip, follow these steps:
Display the slide in Normal view and select the audio or video clip to display the Audio Tools or Video Tools tab group.
Play the clip by selecting the Play/Pause button on the playback toolbar or in the Preview group on the Playback tool tab.
At the point that you want to insert a bookmark, select Add Bookmark in the Bookmarks group on the Playback tool tab.
To insert additional bookmarks, repeat steps 2 and 3.
Bookmarks in audio or video clips are indicated by circles on the playback tool-bar. Pointing to a bookmark on the toolbar displays a ScreenTip that includes the bookmark name. You can select a bookmark as the starting point for an animation, from the Trigger list on the Animations tab.

Adding a bookmark to a media clip makes it available as a trigger
If you create a bookmark but then don’t need it, you can remove it by selecting it and then selecting Remove Bookmark in the Bookmarks group on the Playback tool tab.
Add audio content to slides
You can enhance presentations by adding sound to slide transitions, to animated content, to an individual slide, or to the presentation as a whole. For example, you could run a presentation that provides basic information and icebreakers during the time leading up to your actual presentation. You can add a pleasant royalty-free soundtrack that loops while the presentation plays, to avoid the discomfort of a room full of people who don’t want to break the silence.
If you plan to distribute a presentation electronically for people to watch on their own, you might want to add audio narration to an animation or provide narration for the entire presentation.
![]() SEE ALSO
SEE ALSO
For information about adding sound effects to animations, see “Customize animation effects” earlier in this chapter.
You can add prerecorded audio content to a presentation or record your own content directly within PowerPoint. PowerPoint supports the most common audio formats— MP3, MP4, WAV, and WMA—and more specialized formats such as ADTS, AU, FLAC, MIDI, and MKA audio.
![]() Tip
Tip
The Insert Online Audio feature that was present in earlier versions of PowerPoint is no longer available. However, you can download royalty-free audio music and sound effects from many online sources. Some of these require that you credit the website as the source, so be sure to read the website fine print. When you locate an audio clip that you want to use, you can download it to your computer and follow the instructions in this topic to use it in a PowerPoint presentation.
When you add audio to a slide (rather than to an animation or transition), the audio icon (shaped like a speaker) appears on the slide, and the audio trigger event appears in the Animation Pane.
When the audio icon is selected, the Audio Tools tab group, which includes the Format and Playback tool tabs, appears on the ribbon, and audio playback controls appear on the slide.

The playback controls are simple but provide sufficient options
You can start audio content on a slide automatically or from the playback controls. The playback controls are visible only when the audio icon is active. The icon isn’t obtrusive, but you can disguise or hide it if you want to.

The audio controls are visible only when the icon is active
You can customize the audio content by using commands on the Playback tool tab, as follows:
Edit the audio content so that only part of it plays.
Make the sound gradually increase and decrease in volume.
Adjust the volume or mute the sound.
Specify whether the audio content plays:
Automatically when the slide appears.
Only if you select its icon.
Make the audio object invisible while the presentation is displayed in Reading view or Slide Show view.
Specify that the audio content should play continuously until you stop it.
Ensure that the audio content starts from the beginning each time it is played.
To insert an audio clip onto a slide
Save the audio clip on your computer or on a network-connected location.
On the Insert tab, in the Media group, selectAudio, and then select Audio on My PC to open the Insert Audio dialog box.
In the Insert Audio dialog box, browse to and select the audio file, and then select Insert.
Or
In File Explorer, open the folder that contains the audio file.
Arrange the File Explorer and PowerPoint windows on your screen so that both are visible.
Drag the audio file from File Explorer to the slide.
To record audio directly onto a slide
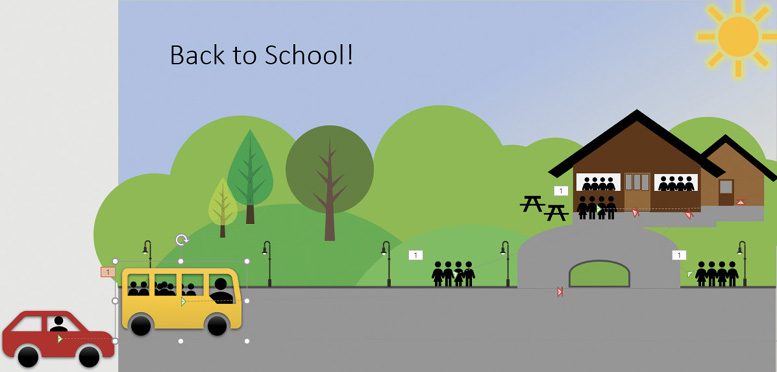
On the Insert tab, in the Media group, selectAudio, and then select Record Audio to open the Record Sound dialog box.
In the Name box, enter a name to uniquely identify the recording. Then select the Record button (labeled with a red circle).
The Record Sound dialog box
Speak or otherwise provide the audio that you want to record. When you finish, select the Stop button (labeled with a blue square). The audio icon and an accompanying trigger icon appear in the center of the slide, and the trigger event appears in the Animation Pane.
![]() Tip
Tip
If you record multiple clips, the audio icons stack up in the same location on the slide. It might be necessary to move one or more out of the way to get to an earlier clip.
To restrict the playback of an audio clip to a specific segment
Select the audio icon. On the Playback tool tab, in the Editing group, select Trim Audio to open the Trim Audio dialog box.

You can trim unwanted audio from the beginning and end of a clip
In the Trim Audio dialog box, do any of the following:
Select the Play button to play the clip, and then select the Pause button to pause when you locate a point that you want to mark.
Drag the green Start marker to specify a playback starting point other than the beginning of the clip. (If you drag the marker near the point at which you paused the playback, the marker snaps to that location.)
Drag the red End marker to specify a playback end point other than the end of the clip.
Select the Start or End marker, and then select the Previous Frame or Next Frame button to move the selected marker back or forward 0.1 seconds (one-tenth of a second).
When you finish, select OK to close the Trim Audio dialog box.
TipTrimming the audio affects only the playback of the audio on the slide, not the original audio clip. You can re-trim or restore the audio clip at any time. For information about discarding trimmed content, see “Compress media to decrease file size” later in this chapter.
To fade into or out of an audio clip
Select the audio icon. On the Playback tool tab, in the Editing group, do the following:
In the Fade In box, specify the length of time over which you want to increase the audio to full volume.
In the Fade Out box, specify the number of seconds at the end of the audio clip over which you want to decrease the audio volume.
TipThe Fade In and Fade Out times can be specified precisely down to a hundredth of a second.
To modify or hide the audio icon
Select the audio icon, and then do any of the following:
Drag the sizing handles to make the icon larger or smaller.
Drag the icon to a different location on the slide, or to a location slightly off the slide but still on the development canvas.
Use the commands on the Format tool tab to change the icon’s appearance.
Replace the default icon with a different image (such as a picture or logo).
To manually start audio playback
In Normal view, Reading view, or Slide Show view, point to the audio icon. When the playback controls appear, select the Play button.
In Normal view, select the audio icon, and then select the Play button on the playback toolbar or in the Preview group on the Playback tool tab.
In Slide Show view, after the audio icon has had focus, press Alt+P.
TipTo play sounds and other audio content, you must have a sound card and speakers installed.
To automatically start audio playback
On the Playback tool tab, in the Audio Options group, in the Start list, select Automatically. Then select the Loop until Stopped check box.
TipIf your presentation might be viewed by people using assistive technologies such as screen readers or text-to-speech tools, you should avoid starting audio clips or files automatically. Instead, allow the user to play the audio content after the tool has finished communicating the slide content.
To prevent an audio clip from stopping when the slide changes
On the Playback tool tab, do either of the following:
To play to the end of the audio and then stop, in the Audio Options group, select the Play Across Slides check box.
To loop the audio until the end of the slide show regardless of other audio tracks, in the Audio Styles group, select Play in Background.
To loop (repeat) an audio clip
On the Playback tool tab, in the Audio Options group, select the Loop until Stopped check box.
TipTo automatically start and continuously play an audio clip through an entire slide show, configure the settings as follows: On the Playback tool tab, in the Audio Options group, change the Start setting to Automatically. Then select the Play Across Slides, Loop Until Stopped, and Hide During Show check boxes.
Add video content to slides
Sometimes the best way to ensure that your audience understands your message is to show a video. For example, if your company has developed a short advertising video, it makes more sense to include the video in a presentation about marketing plans than to try to describe it by using bullet points or even pictures. To save you the trouble of switching between PowerPoint and a video player, you can embed a video recording directly onto a slide, and then play the video as part of presenting the slide show. This is a much smoother way of presenting information from multiple sources than switching between them.
You can insert a video onto a slide from your computer or a connected local storage device, from your Facebook account, from YouTube, or from a website that provides an “embed code” (basically, an address that you can link to).
![]() Tip
Tip
If a publicly posted video clip has an “embed code” available, you can link to the online video rather than embedding it in the slide show. PowerPoint uses the embed code to locate and play the video. As long as the video remains available in its original location (and you have an active internet connection), you will be able to access and play the video from the slide at any time.
After you insert the video, you can format its representation on the slide in all the ways that you can other imagery. You can move and resize it, display it in a frame of your choice, and even adjust the brightness or color contrast.

You can resize the video frame
![]() Tip
Tip
The changes that you make to an image on a slide also affect the video playback. So, for example, if you change the aspect ratio of the video representation on the slide, imagery in the video might appear to be skewed.
When working with local videos that you embed rather than online videos that you link to, you can fade into and out from the video playback, and manage the content of the video by trimming it to play only a specific portion. You can insert bookmarks to use as triggers for other events (for example, you might display a list of selling points as each is presented in the advertising video).

Set your start and end times to focus on the specific content you want to highlight
When you’re previewing or presenting a slide show, you can play (and pause) embedded audio or video, move around within the recording, and control the volume by using the controls that appear when the audio icon or video placeholder image is active. When playing back a video, you can display it at the embedded size or full screen.
Many of the processes for managing video clips are the same as those for managing audio clips:
Restricting the playback of a video clip to a specific segment
Fading into or out of a video clip
Manually or automatically starting video playback
Preventing a video clip from stopping when the slide changes
Looping a video clip
SEE ALSOFor additional information related to the preceding processes, see “Add audio content to slides” earlier in this chapter.
To insert a video clip onto a slide
On a slide that includes a content placeholder, select the Insert Video button in the content placeholder to display the Insert Video window that contains links to all the video sources you’ve configured Office to connect to.

You can insert video clips from your computer or link to video clips hosted online
In the Insert Video window, select the source of the video that you want to insert, and then follow the process to insert a video from the selected source.
Or
On any slide, on the Insert tab, in the Media group, selectInsert Video, and then do either of the following:
Select Online Video to open the Insert Video window. In the Insert Video window, select the source of the video that you want to insert, and then follow the process to insert a video from the selected source.
Select Video on My PC to open the Insert Video dialog box. In the Insert Video dialog box, browse to and select the video file, and then select Insert.
To select an embedded video
Select the video image one time. Selection handles appear around the video image, the playback toolbar appears below it, and the Video Tools tab group appears on the ribbon.
To move the video image on the slide
Select the video, and then do either of the following:
Drag the video to the new location. Smart guides might appear on the slide to help you align the video with other objects.
Press the arrow keys to move the video by small amounts.
To resize the video image on the slide and retain its aspect ratio
Drag any corner handle. Smart guides appear on the slide to help you align the video with other objects.
On the Format tool tab, in the Size group, set a specific Video Height or Video Width, and then press Enter to change both settings.
To format the video image on the slide
Select the video, and then apply formatting from the Format tool tab just as you would for a picture.
SEE ALSOFor information about formatting pictures, see “Edit and format pictures” in Chapter 11, “Insert and manage simple graphics.”
To configure an embedded video to play back at full screen size
Select the video.
On the Playback tool tab, in the Video Options group, select the Play Full Screen check box.
To set the relative volume of a video soundtrack
Select the video.
On the Playback tool tab, in the Video Options group, select Volume.
In the Volume list, select Low, Medium, High, or Mute.
Compress media to decrease file size
Trimming an audio or video clip affects only the playback of the media on the slide, not the original media clip. The original media clip is stored in its entirety as part of the presentation, and you can re-trim or restore the media clip at any time.
You can decrease the size of a PowerPoint file that contains trimmed media clips by discarding the unused portions of the clips. PowerPoint 2019 offers three compression configurations designed to balance size and quality.

Choose the size and quality that best fits your needs
When you save and close the file after compressing the media, the trimmed portions of the videos are discarded and no longer available. You can reverse the compression operation until you save and close the file.
To compress media files
Save the PowerPoint presentation, and then display the Info page of the Backstage view.

The Info page displays file properties and information
Note the total size of the presentation, the size of the media files in the presentation, and the number of files that have been trimmed.
On the Info page, select Compress Media, and then select the level of compression you want. In the Compress Media window, PowerPoint itemizes the media elements and their compression levels, and reports the total space savings.

Compressing media files can make a big difference in file size
In the Compress Media window, select the Close button. In the Media Size And Performance area of the Info page, the Compress Media button is active to indicate that media has been compressed, and specifics about the compression are available.

You can undo the compression if you don’t like the results
Play the presentation to assess the quality, and then save the file if the quality is acceptable.
To reverse the compression of media files
On the Info page, select Compress Media, and then select Undo. PowerPoint immediately reverts to the uncompressed files.
Hyperlink to additional resources
Presentations often include URLs of websites that provide additional information related to the presentation topic. When a presentation will be viewed electronically, the URLs can be formatted as hyperlinks so that the websites can be accessed directly from the presentation. Hyperlinks can also provide access to information that might be on a hidden slide in the presentation, or in a separate file.
TIP If you use Microsoft Outlook, you can also use a hyperlink to open an email message window so that people viewing the presentation can easily contact you.
Hyperlinks are most frequently in text format, but you can attach a hyperlink to any object—for example, an image such as a shape, logo, or picture. Selecting the hyperlinked object then takes you directly to the linked location. Editing the object does not disrupt the hyperlink; however, deleting the object also deletes the hyperlink.
The simplest method of creating a hyperlink is to enter a URL in a text box and then press the Enter key. PowerPoint automatically inserts the hyperlink and formats the URL so that people recognize it as a hyperlink.
If you want the same hyperlink to appear on every slide in a presentation, attach the hyperlink to text or an object on the presentation’s primary slide master.
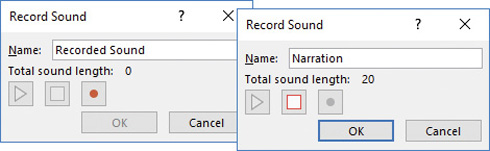
To attach a hyperlink to an object, follow these steps:
Select the object that you want to hyperlink from.
Open the Insert Hyperlink box by doing either of the following:
On the Insert tab, in the Links group, select Hyperlink.
Press Ctrl+K.
In the Link to list, select the type of target you’re linking to. Often this is a webpage or another place in the file.
You can link to internal, local, and online locations
If you’re linking to a webpage, enter the URL in the Address box. If you’re linking to a slide or heading in the current file, select it in the Select a place in this document pane. Then select OK.
Key points
Used judiciously, animated text and graphics add interest to your slides. You decide how and when the animation occurs, and you can even customize animation effects with sounds.
You can configure audio clips to play as an accompaniment to your slide content. This is a great feature to use when playing an unnarrated slide show or displaying a welcome slide at the beginning of a class or meeting.
You can embed video clips directly on a slide and configure their playback. This is a great way to seamlessly incorporate video into a presentation and avoid switching to the display of another program.
Before distributing presentations, you can compress audio and video content to significantly decrease the size of the file.
 Practice tasks
Before you can complete these tasks, you need to copy the book’s practice files to your computer. The practice files for these tasks are in located the Office2019SBSCh12 folder. You can save the results of the tasks in the same folder.
The introduction includes a complete list of practice files and download instructions.
Animate text and pictures on slides
Open the AnimateSlides presentation, and then perform the following tasks:
On slide 1, apply the Shape entrance animation to the slide title and then to the subtitle. Notice that the animation numbers 1 and 2 appear to the left of the animated objects.
Display slide 2, and apply the Shape entrance animation to the left content placeholder. Notice that boxes containing the numbers 1 through 3 appear to the left of the bullet points to indicate the order of their animations.
Repeat task 2 for the placeholder on the right.
Preview all the animations on slide 2.
Display slide 3. Apply the Shape entrance animation to the frog photo, and then add the Pulse emphasis animation.
Copy the animations from the frog photo to the crow photo and to the cat photo.
Preview the animations on the slide, and then preview the entire presentation.
Return to Normal view.
Save and close the presentation.
Customize animation effects
Open the CustomizeAnimation presentation, and then perform the following tasks:
On slide1, apply the Diamond entrance effect to the slide title. Set the direction to Out.
Copy the animation from the slide title to the subtitle. Then change the timing of the subtitle animation to After Previous.
Switch to Reading view, and preview the animation effects on slide 1.
Switch back to Normal view, display slide 2, and then select anywhere in the bulleted list on the left.
Display the Animation Pane. Right-click animation 1, and then select Effect Options to open the Circle dialog box.
In the Circle dialog box, do the following:
Apply the Chime sound.
Dim the text color to Red after the animation.
Animate the text by letter.
Set the duration to 3 seconds (Slow).
Watch the effects of your changes to the animation effects. The Shape animation doesn’t work very well with the selected effect options, so let’s adjust them.
On the slide, select the left content placeholder. Notice that in the Animation Pane, all the animations for the bullet points in the placeholder are selected.
Apply the Float Up entrance animation to the entire placeholder, and then display the effect options.
In the Float Up dialog box, do the following:
Apply the Chime sound.
Dim the text color to Red after the animation.
Animate text by letter.
Set the duration to 1 seconds (Fast).
Preview the animations, and make any additional adjustments you want to your custom animation effects.
Copy the animation effects of the bullet points on the left to those on the right.
Switch to Reading view, and then select Next to display the animated bullet points on slide 2.
When all the bullet points are visible and dimmed to red, press the Esc key to return to Normal view.
Save and close the presentation.
Add audio content to slides
Open the AddAudio presentation, display slide 1, and then perform the following tasks:
On the Insert tab, in the Media group, selectAudio, and then select Audio on My PC to open the Insert Audio dialog box.
In the Insert Audio dialog box, browse to the practice file folder, and double-click the SoundTrack file to insert the audio clip on the slide.
On the Playback tool tab, in the Audio Options group, change the Start setting to Automatically. Then select the Play Across Slides, Loop until Stopped, and Hide During Show check boxes.
Switch to Reading view, and listen to the audio file as the presentation moves from slide to slide.
Press Esc to stop the presentation and return to Normal view.
Save and close the presentation.
Add video content to slides
Open the AddVideo presentation, and then perform the following tasks:
In the left content placeholder, insert the Butterfly video from the practice file folder.
On the playback toolbar, select the Play/Pause button, and then watch the video.
Insert the Wildlife video from the practice file folder into the content placeholder on the right, and then play the video.
With the Wildlife video selected, open the Trim Video dialog box, and drag the green start marker until it sits at about the 00:17.020 mark. Then, frame by frame, adjust the starting point until the first marmot frame comes into view at about the 00:17.292 mark.
Drag the red stop marker until it sits at about the 00:20.900 mark. Then, frame by frame, adjust the ending point until the last marmot frame comes into view at about the 00:20.790 mark.
Play the trimmed video, and then select OK to close the Trim Video dialog box.
Change the height of the Butterfly video representation to 3”.
Change the height of the Wildlife video representation to 3”, and then crop it to a width of 4”.
Drag the video representations until they are evenly spaced on the slide and center-aligned with each other.
Apply the Reflected Bevel, Black (in the Intense area of the Video Styles gallery) video style to both video objects.
Set up the Butterfly video to play back on mute, to start automatically, and to loop until stopped.
Set up the Wildlife video to play back on mute, to start on click, and to loop until stopped.
Preview and pause the Butterfly video. Then preview and pause the Wildlife video.
Return to Normal view.
Save and close the presentation.
Compress media to decrease file size
There are no practice tasks for this topic.