
Chapter 5
Understanding the VMM Library
The VMM library is a catalog that provides access to all the resources you need to support a cloud, whether they are stored on library shares or in the VMM database. The library can also store virtual machines when they are not in use; therefore it is effectively a resource for everything deployed to the private cloud.
This chapter covers all aspects of setting up, configuring, and maintaining the VMM library, including the following:
- Understanding the requirements for building a library
- Deploying library servers and shares
- Associating library servers with particular host groups
- Keeping resources such as VHDs, ISOs, and templates in the library and using them to create and deploy virtual machines
- Installing and configuring fabric patching within the environment
- Scanning for compliance and remediating the server fabric
Introducing the Library Role in VMM
The VMM library acts as a central resource for all that is deployed to the private cloud. Leveraging the library will help you promote a consistent set of standards as you build out your private cloud; it will also encourage the reuse of IT-approved configurations and images.
A default library share is created as part of the VMM installation process. During the installation, the default is to create a library share on the VMM management server. This is located on the system drive in
%systemroot%ProgramDataVirtual Machine Manager Library Files
and the default share name is MSVMMLibary. Additional library servers and library shares can be added post-installation, via the VMM Administration console.
Certain considerations need to be made as to the design of your library-server architecture. During a proof of concept or for a small production implementation, leveraging the default library share might be appropriate; however, as you move to a mid-to-large-scale production environment, concerns over scalability and high availability will drive the design of your library-server architecture, as shown in Figure 5.1.
Figure 5.1 Sample library- server architecture

As a best practice, Microsoft recommends that you make the library server highly available by using a file share managed by a Windows failover cluster. This library share might reside on an existing Windows failover cluster that might host other services and applications, or it might reside on a dedicated Windows failover cluster as either a guest cluster running within the private cloud-management fabric or as a dedicated, physical Windows failover cluster outside of the management fabric.
VMM supports adding a file share on a Windows failover cluster using the following operating-system versions and editions:
- Windows Server 2008 SP2, Enterprise Edition, x86 or x64
- Windows Server 2008 SP2, Datacenter Edition, x86 or x64
- Windows Server 2008 R2 SP1, Enterprise Edition
- Windows Server 2008 R2 SP1, Datacenter Edition
Library-Server Hardware Requirements
A number of factors influence the hardware requirements for your library servers. However, the library server is a repository; its main tasks are to store and retrieve content. Therefore, storage capacity and Input/Outputs per Second strongly influence your library design, the level of change within the environment, the number of library servers, and their geographical placement all are factors.
There are no hard and fast answers here. Chapter 4, “Setting Up and Deploying VMM 2012,” lays out the requirements for a library server.
Adding Library Servers
VMM is not limited to a single library server. In designing the logical architecture for your VMM implementation, you might decide to add additional library servers because your implementation spans more than one data center or because you need to support one or more remote sites. Having all the required files available locally enhances the performance of your virtual environment and reduces network traffic.
Use the following procedure to add a library server to VMM:
Figure 5.2 Library servers and shares

Adding a Library Share
Your VMM library server is composed of one or more file shares, which are either local to the management server or are located over the network, on file shares managed by VMM.
Before a library share can be added to the library server, you must manually create the shared folder on the intended server, in advance of adding the library share to VMM.
Use the following procedure to add an additional library share to VMM:
The Jobs window opens, enabling you to follow the progress and ensure that the share is added successfully. You should see it in the Library Servers node of the VMM console.
Associating Library Servers to a Host Group
Library servers can be added to host groups to further organize them. This is accomplished by modifying the properties of a library server in the VMM console. During placement, VMM uses this association as an input to help determine where to obtain library resources.
Use the following procedure to associate a library server with a host group:
Adding Resources to the Library
Before the library can function and serve a purpose, you must add content to it. Content resides either in files or in the VMM database. This section shows you how to add content of each type.
Adding File-Based Resources
Adding file-based resources like VHDs, ISOs, and deployment scripts must be done manually, outside of VMM. When you add files to a library share, the files do not appear in the library until after the next library refresh. The default and minimum library refresh interval value is 1 hour.
To make files available immediately, you must manually refresh the library server or share. If you move files within or between library shares, you must manually refresh the destination shares. During a library refresh, VMM indexes the files stored on the library share and then updates the Library workspace with the resource listings.
To add file-based resources to the library, do one of the following:
- Without using the VMM console, browse to the library share and then manually copy the files you need.
- In the VMM console, in the Library workspace, expand Library Servers, right-click a library share, and click Explore. Again manually copy the files you need.
- In the VMM console, on the Home tab, use the Import Physical Resource and Export Physical resource options to move file-based resources between library shares.
Use the following procedure to refresh the library server:
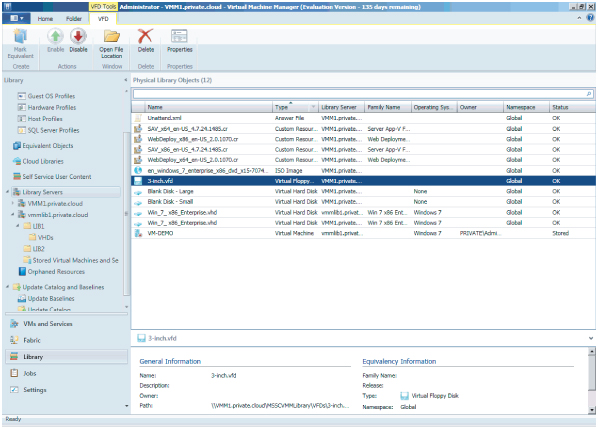
During a library refresh, VMM indexes the files stored on the library share and then updates the Library workspace and resource listings. Not all files are indexed, and not all indexed files are displayed in the Library workspace. The following file types are the ones added as library resources during library refreshes:
- Virtual hard disks— .VHD files (Hyper-V and Citrix XenServer) and .VMDK files (VMware)
- ISO image files— .ISO files
- PowerShell scripts— .ps1 files
- SQL Server scripts— .sql files
- Web Deploy (MSDeploy) packages— .ZIP files
- SQL Server data-tier applications (DACs)— .dacpac files
- Server App-V packages— .osd files
- Driver files— .inf files
- Answer files— .inf and .xml
- Custom resources folders—those with a .cr file extension
- Virtual floppy disks— .vfd (Hyper-V) and .flp (VMware)
The following configuration-file types are indexed but are not added to the Library workspace as library resources:
- Virtual machine export files— .EXP (Hyper-V) .VMX (VMware)
- Virtual machine saved-state files— .VSV (Hyper-V)
- Virtual machine memory files— .BIN (Hyper-V)
- Virtual machine configuration files— .VMTX (VMware)
- VHDs, ISOs, and VFDs that are attached to a virtual machine
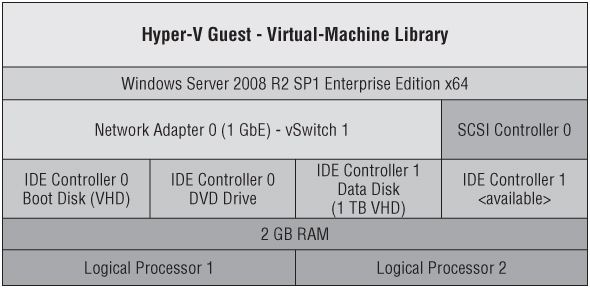
Adding Templates and Profiles
A template is a library resource that consists of a number of other configuration components. Typically, these components are stored in the VMM database (with the exception of the virtual hard disk) and are not represented as physical files in the Library workspace. They include the following:
- Hardware profile
- Guest operating-system profile
- Capability profile
- Application profile (which is part of a service template)
- SQL server profile (which is part of a service template)
- Virtual hard disk
Templates provide a standardized group of hardware, software, and application settings you can consistently reuse to create multiple new virtual machines configured with those settings applied. VMM supports two types of templates:
- virtual-machine template
- Service template (which is covered in Chapter 8, “Understanding Service Modeling”)
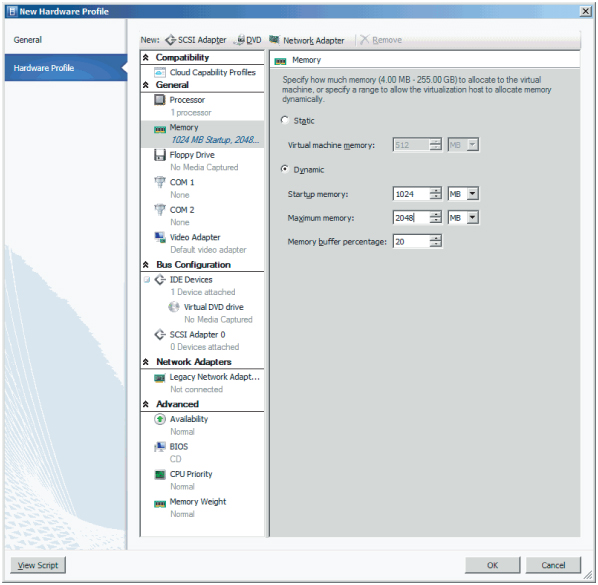
Creating a Hardware Profile
A hardware profile is a library resource that contains the hardware specifications that will be applied to a new virtual machine or to a virtual-machine template. A hardware profile contains specifications for things like the CPU, memory, floppy drive, COM ports, video adapter, DVD drive, and network adapters; it also contains the priority given to the virtual machine when resources are allocated on a virtual-machine host and specifies which capability profile to leverage when validating your hardware profile.
After specifying a hardware profile for a specific virtual machine, you can go back and change the settings that were imported. These changes do not affect the hardware profile, nor is any association maintained with the hardware profile after the virtual machine is created.
Use the following procedure to create a new hardware profile:
Figure 5.3 Hardware profile properties
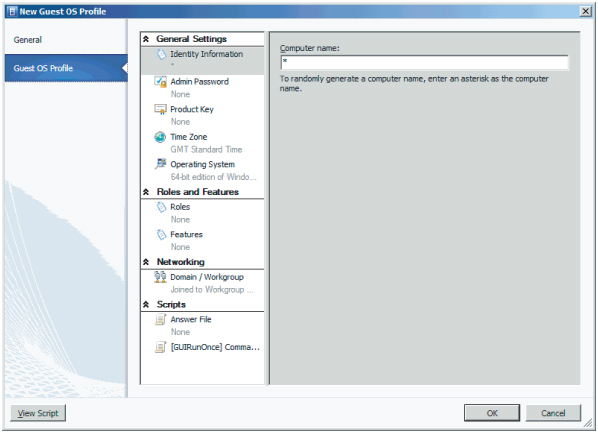
Creating a Guest Operating-System Profile
A guest operating-system profile is a collection of operating-system settings and values that can be imported into a virtual-machine template to provide a consistent operating-system configuration for virtual machines that are deployed from that template.
A guest operating-system profile contains specifications for things like computer name, administrative password, time zone, which roles and features to install (in the case of deploying Windows Server 2008 or above), and which workgroup or domain to join. You can attach a dedicated answer file to apply additional settings outside of the guest operating-system profile.
Guest operating-system profiles are database objects that do not have physical files associated with them within the library. The profiles are configured in the Library workspace, where they are displayed under the Profiles node.
Use the following procedure to create a new guest operating-system profile:
Figure 5.4 Guest OS profile properties
Creating a Virtual Machine Template
Virtual-machine templates are used to create new virtual machines, providing a repeatable way of deploying standardized hardware and software settings. A virtual-machine template is a library resource that consists of the following components:
- Virtual hard disk
- Hardware profile
- Guest operating-system profile
Use the following procedure to create a new virtual-machine template:
Figure 5.5 Configuring hardware

Figure 5.6 Configuring an operating system

Creating a Virtual Machine from a Template
Creating a virtual machine is one of the main tasks that a VMM administrator will perform, and configuring the multitude of hardware and software settings available can be a fairly repetitive task. The virtual-machine template provides a repeatable way to deploy standardized hardware and software settings.
Use the following procedure to create a virtual machine from a template:
Figure 5.7 Creating a VM

Storing Virtual Machines in the Library
At some point, you may want to store a previously running virtual machine in the library. By doing so, you can preserve the state of the virtual machine for later use. There are many reasons to preserve a VM. For example, you can use your stored VM to make multiple copies to run several other virtual desktops.
Use the following procedure to store a running virtual machine in the library:
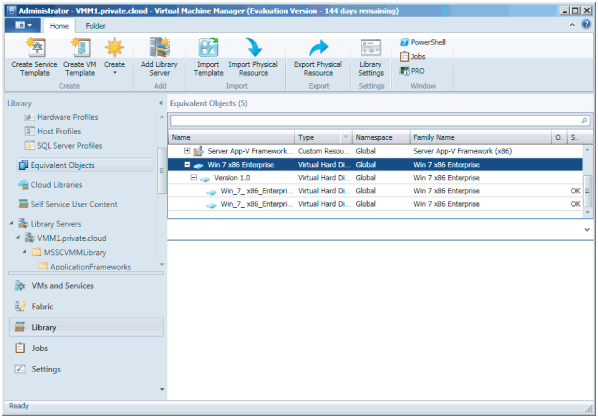
Equivalent Objects
If your VMM library has multiple locations, you'll want users to be able to use resources without regard to location, but you'll want VMM to supply those resources from a local library share if possible. To support this ability, you can define sets of library objects as equivalent. If users request one resource in a set of equivalent objects, VMM can substitute any other resource in that set to satisfy the request.
In previous versions of VMM, the only way to do that was to create different VM templates referring to different library shares. With equivalent objects, you can use a single template and let VMM access the resources from the most convenient location. That is, VMM is location-aware so that you don't have to be.
The resources that you call equivalent must be of the same file type, either virtual hard disk (VHD) or image file (ISO).
Use the following procedure to mark file-based resources in the library as equivalent:
Figure 5.8 Equivalent objects
Use the following procedure to modify equivalent file-based resources in the library:
Removing Resources from the Library
Library resources can be removed from the Library workspace, and specific library object files that are stored on a library share can be disabled.
When you no longer need a file in the VMM library, Microsoft recommends that you remove the file through the VMM console. If you remove the file from a library share outside the console, any library resources that use that file must be repaired and references to the deleted file must be removed. If you use the Remove option (Library Server tab → Remove Group) to remove the object, VMM lists any dependencies that reference the file; and if you proceed, VMM removes the reference to the deleted file from the library resource that used it.
Disabling Library Resources
Only file-based resources can be disabled in VMM. Use the following procedure to disable a resource in the library:
Figure 5.9 Disabling file-based resources
Deleting Files from the Library
File-based resources can be deleted from the library server. Use the following procedure to delete a resource from the library:
Removing a Library Share or Server
Use the following procedure to remove a library server or share from management:
Use the following procedure to remove an entire library server from management:
Updating the Catalog and Baselines
With VMM, Microsoft provides the ability not only to build and cluster the virtualization fabric but also to maintain and optimize that fabric, all from a single pane of glass.
VMM requires the x64 version of Windows Server Update Service (WSUS) 3.0 SP2. The WSUS server role can be installed on the VMM management server or on a remote server. Because VMM places an agent on the WSUS server, the supported operating-system version is limited by the VMM Agent prerequisites. The remote server must be running Windows 2008 or higher. No support for Windows 2003 is provided. Chapter 4 describes the requirements for an update server.
Benefits of Managing Fabric Updates with VMM
Managing the server fabric, which includes Hyper-V hosts, Hyper-V clusters, and VMM server roles (i.e., the management server, library servers, Preboot Execution Environment (PXE) servers, and WSUS servers) can be a challenge in terms of compliance and remediation.
VMM supports on-demand compliance scanning and server-fabric remediation. VMM administrators can monitor the update status of the server fabric, scan for compliance, and remediate updates for a selected group of servers. They can also exempt specific servers within the fabric from installing specific updates.
VMM supports orchestrated updates of Hyper-V host clusters. When a VMM administrator performs update-remediation tasks on a host cluster, VMM places one Cluster node at a time into maintenance mode and then installs the selected updates.
If the cluster supports live migration, intelligent placement is used to live-migrate the virtual machines off the Cluster node. If the cluster does not support live migration, as is the case for Windows 2008, then VMM will put the virtual machine into a saved state.
Managing the WSUS Server
After you add a WSUS server under the control of VMM, you should not continue to manage the WSUS server with the WSUS console; this may be one of the reasons you decide to implement a dedicated WSUS server to patch your server fabric.
In VMM, an administrator updates the properties of the update server to configure a proxy server for synchronization and to change the update categories, products, and any supported languages that are to be synchronized by the WSUS server. If you add the update server to VMM in Single Sockets Layer (SSL) mode, you can update the proxy-server credentials for synchronization in the update server's properties. If the update server is not added to VMM in SSL mode, the proxy-server credentials are managed in the WSUS Administration console.
In VMM, administrators and delegated administrators can manage fabric updates. Only administrators can manage the update server and synchronize updates. Delegated administrators can scan and remediate updates on machines that are within the scope of their defined user role. Delegated administrators can use baselines created by administrators and other delegated administrators. However, delegated administrators cannot modify or delete baselines created by others.
Deploying a WSUS Server
To manage updates in VMM, you must either install a dedicated WSUS server or use an existing WSUS server. VMM uses the WSUS Windows Update/Microsoft Update catalog, Windows Update Agent (WUA) integration in Windows Server, and a WSUS server for binary distribution to managed computers.
You can install the WSUS server on the VMM management server. However, Microsoft recommends using a remote WSUS server, especially if the VMM management server is managing a large number of computers. If you install WSUS on a remote server, you must install a WSUS console on the VMM management server and then restart the VMM service.
If you plan to use a highly available VMM management server, Microsoft recommends that you use a remote WSUS server. With a highly available VMM management server, you must install a WSUS console on each node of the cluster to enable the VMM service to continue to support fabric updates.
WSUS Server Prerequisites
Before you install the WSUS server, ensure that the intended server meets all WSUS prerequisites. You must install the Web Server (IIS) role in Windows Server. In addition to the roles or services that are added by default, WSUS requires the following role services:
- ASP.NET
- Windows authentication
- Dynamic content compression
- IIS 6 management compatibility
Installing a WSUS Server
Use the following procedure to install a dedicated WSUS server to your environment running on Windows 2008 R2 SP1:
- On the Web Server (IIS) page, click Next.
- On the Select Role Services page, click Next.
- On the Windows Server Update Services page, click Next.
- On the Welcome To Windows Server Update Services Wizard page, click Next.
- On the License Agreement page, click Agree.
- On the Required Components To Use the Administration UI page, click Next.
- On the Select Update Source page, accept the default storage location.
- On the Database Options page, accept the default.
- On the Website Selection page, accept the default.
- On the Ready To Install Windows Server Update Services page, click Next.
- On the Completing The Windows Server Update Services Setup page, click Next.
- On the Windows Services Update Configuration Wizard page, click Next.
- On the Join The Microsoft Update Improvement Program page, click Next.
Figure 5.10 Choosing an upstream server
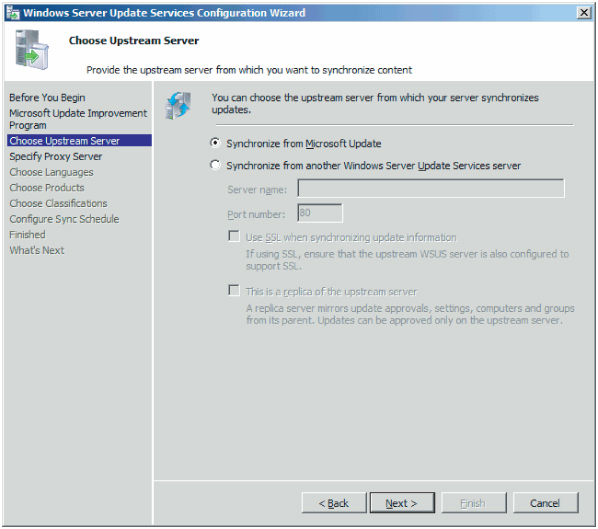
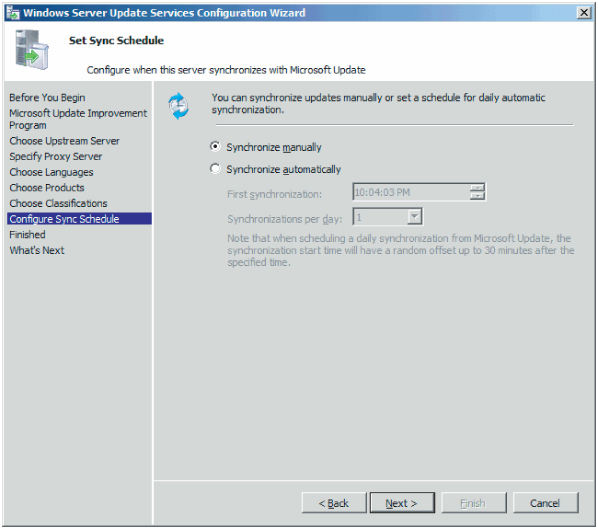
Figure 5.11 Setting the sync schedule
- On the Finished Configuration screen, click Next.
- On the What's Next screen, click Finish.
- On the Installation Results screen, click Close.
Figure 5.12 Windows Server Update Services

Installing the WSUS Console
Use the following procedure to install the WSUS console on your VMM management server. This step is required when the WSUS server is installed on a remote server:
- On the Welcome screen, click Next.
- On the Installation Mode Selection screen, select only the Admin console.
- On the License Agreement screen, click Accept.
- On the Required Components screen, click Next.
- On the Completing screen, click Finish.
Adding the WSUS Server to VMM
Use the following procedure to add a remote WSUS server to the server fabric and enable update management:
Figure 5.13 Updating the server

Use the following procedure to verify that the remote WSUS server has been added to the server fabric successfully:
Configuring Update Baselines
After you add your WSUS server to VMM, you can prepare to manage updates for the server fabric by configuring update baselines. An update baseline contains a set of required updates that is then scoped to an assignment. This assignment can be a host group, a standalone host, a cluster, or a VMM management-server role.
During a compliance scan, servers that are assigned to a baseline are graded for compliance with their assigned baselines. After a server is found to be noncompliant, an administrator can bring the server into compliance through update remediation.
Update baselines that are assigned to a host group are applied to all standalone hosts and clusters in that host group, as well as the standalone hosts and clusters in child host groups.
If a host is moved from one host group to another, the baselines for the new host group are applied to that host and the previous baseline will no longer apply, unless that baseline is assigned to both host groups. Explicit baseline assignments to a host stay with that host when it is moved from one host group to another. It is only when the baseline is assigned to a host group that baseline assignments are revoked during the move. You can use either of the following methods to prepare update baselines for remediation:
- Use one of the built-in update baselines that VMM provides.
- Create your own custom update baseline.
VMM provides two built-in sample update baselines you can use to apply security updates and critical updates to the computers in your VMM environment:
- Sample Baseline For Security Updates
- Sample Baseline For Critical Updates
Before you can use a baseline, you must assign it to host groups, clusters, or standalone hosts. Use the following procedure to assign servers to the sample security baseline.
Use the following procedure to create a new custom update baseline that you can then assign:
Scanning for Update Compliance
Now that you have assigned servers to an update baseline in VMM, you can scan those servers to determine their compliance status against that baseline.
When it scans a server for compliance, WSUS checks the assigned update baselines to determine whether applicable updates are installed. After a compliance scan, each update has a compliance status of Compliant, Non Compliant, Error, or Unknown.
The compliance scan focuses on the updates included in the baseline because you deemed them important for your environment.
The following changes can cause a server's update status to change to Unknown. When one of them occurs, you should perform a scan operation to assess the server's compliance status.
- A host is moved from one host group to another host group.
- An update is added to or removed from a baseline that is assigned to a server.
- A server is added to the scope of a baseline.
Use the following procedure to verify the update-compliance status of your server fabric:
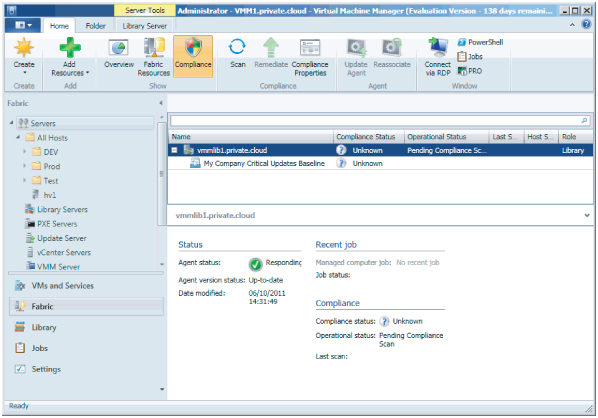
Figure 5.14 Viewing the compliance status
Use the following procedure to scan the server fabric and determine the compliance status against your assigned baseline:
Performing Update Remediation
The task of bringing a server into compliance is known as update remediation. In VMM you can choose to remediate all update baselines that are assigned to a server, all noncompliant updates in a single update baseline, or a single update.
Use the following procedure to remediate updates for a nonclustered Hyper-V host that is managed by VMM:
Figure 5.15 Remediating the update baselines

There are times when you might not want to apply a specific update even though that update is part of your baseline. When an administrator creates an update exemption for a managed server, that server still remains accountable to an assigned baseline while it is exempted from a particular update in the baseline.
The most common reason for creating an update exemption is that a specific update has placed a managed server in an unhealthy state. The administrator uninstalls the update, which returns the server to a healthy state, and then wants to prevent that update from being reinstalled until the issues around that update have been identified and resolved.
Because the update was uninstalled out of band, the server's update status in VMM remains Compliant until the server is scanned again. The next scan will change the server's status to Non Compliant. To prevent an accidental reinstallation of this update before the issues are resolved, and to provide a valid business justification, the administrator can add an update exemption to the baseline. After the issues are resolved on the server, the administrator can remove the exemption so that the update will be reinstalled during the next update remediation.
Use the following procedure to create an update exemption for a specific server within the server fabric that is managed by VMM:
Use the following procedure to remove an update exemption for a specific server within the server fabric that is managed by VMM:
Performing On-Demand Update Synchronizations
To get updates, the WSUS server contacts Microsoft Update. WSUS determines whether new updates have been made available by Microsoft since the last synchronization. WSUS downloads the new metadata, and VMM imports the changes into the VMM update catalog.
When the update server is added to VMM, an initial synchronization is performed. VMM does not perform automatic synchronizations after that point. You should perform on-demand synchronizations on a schedule that meets your company's requirements. As a best practice, synchronization should occur at least every 15 to 30 days in accordance with Microsoft security and update release cycles.
Use the following procedure to synchronize updates in VMM with your Microsoft Update:
Use the following procedure to manage configuration changes with the WSUS server:
Summary
This chapter covered all aspects of setting up and configuring the VMM library, installing and configuring fabric patching, scanning for compliance, and remediating your server fabric. Now that you understand the factors behind the installation options VMM provides, you should be prepared to make optimal decisions for your own unique situation. In the next chapter you will learn about additional aspects of your private cloud environment: networking and storage.